If your place is looking a little cluttered and you don’t want to spend money on expensive storage shelving, consider these 20 innovative ideas for hidden storage. These solutions will not only make your life easier by filling in little nooks and crannies with extra storage but they will also boost your home’s curb appeal and up its aesthetic value!
Best of all, most of these ideas are easy to do yourself. Plus, they fit right into any room in your home without taking up too much space. The best part is that you can save money on storage units with these DIY ideas by storing all the stuff you don’t need daily in these clever places hidden around the house.
Who knew it was so easy? 🙂

Relevant FAQs and Answers:
How do I declutter my living room?
When organizing your living room, it’s best to focus on one area of the living room at a time. We recommend starting by picking a spot in the room and decluttering from there. Start from the ceiling fan to the floor because this is an uncommon order for most people who clean their rooms.
This idea will help you to see the big picture and remember what has been done. We recommend that you start with the ceiling fan because it is easy to move out of the way. Any items that you should store underneath, you can quickly move them also.
Then start with a furniture item usually in this area. Such as a bookshelf or coffee table and move these items out from there. This move will help you see your living room as one big area instead of several smaller areas that are hard to see the whole of at once.
We also recommend you photo all the stuff currently in your room so that you can see at a glance what is there. If you want to get rid of something, now is the time to do so.
Advice for picking furniture decorations: We recommend that you remove any unnecessary items first and then select the best pieces to store away. It’s always better to use your storage space wisely. We suggest that you use both wall and floor space as well as shelving, so if you have a lean toward one or the other, then make sure to make use of it.
How do I attach storage to a bookshelf?
The best way to attach shelving to a bookshelf is with brackets. To install the brackets, measure the width of the shelves or length depending on what you want, and then install two brackets–one for each side. There should be enough space between them to fit your bookshelves inside, and if they are too close, it will make it difficult to pick up any of your objects.
Be sure that your left and right brackets are both installed at the same height. To fasten the bookshelf in place, install screws into the brackets that are attached to the walls. Be sure to drill a pilot hole before screwing in your screws. After everything is secured, you can finally start using your new shelves!
How do I best organize my tools?
To arrange tools in a way that is easy to find and use, you will want to put them all in one toolbox. If there is much room left over, then you may want to divide them into small boxes or bags if possible so it will be easier to find some of them than others.
If your tools are not going to fit in one toolbox, then you may want to stack them on top of each other. This decision will show you what types of tools you have and how much space they take up.
There are also made-to-order boxes that you can make that will help to store small parts. If you have many small pieces, then these boxes can be used in an organized way by color or size, and this can make it easier for you to find the part that you need. When creating a system for storing all of the different types of tools, it is always best to use containers or boxes for smaller things since they take up less space.
What is the easiest way to declutter clothes?
There are many ways that you can store your clothes. For instance, you can use drawers, shelves, and hangers to keep them quickly and efficiently so that they are close at hand when you need them. If you want your clothes easier to organize, then use containers or boxes instead of placing all of the same size items side-by-side. Also, you can use bins to store all of your items.
If you have many small items, you should think about buying containers that are the right size for them. When purchasing storage containers, it’s best to check to see if they have lids or not and, if so, what type of lid is on them. If they don’t have caps on them, then you can buy partitioning containers instead.
If the things you want to keep organized are small enough to fit in a box, that is always better than putting everything in one big package.
How do I organize books?
The best way to store books is by creating a separate bookcase. Then, you can keep every book where it belongs to make them easier to find when you need them.
This organization will also free up much-needed space in the room since you will not be wasting space by keeping all of your books in one place. If you do not have enough space to create a separate bookcase, then we recommend that you place all of the books in boxes so that they are easy to find and there are no more piles on the floor or tables.
Are there any apps that help you declutter your computer/laptop/Mac and iPhone?
There are many apps that you can download on your iPhone to help you declutter your phone. One, for example, is the Pomodoro app. It helps produce a system of working in 25-minute sessions with short breaks at regular intervals, which helps people maintain their focus and work more effectively. It’s an excellent app for both individuals and teams.
Another app worth mentioning is “Freedom” software which blocks access to certain websites so that you can declutter your computer in less time. You can either use its default settings or customize it based on what websites you want blocking (for example, social media).
Can books be stored vertically in a bookcase?
The best way to store books is by creating a separate bookcase. Then, you can keep every book where it belongs to make them easier to find when you need them.
This organization will also free up much-needed space in the room since you will not be wasting space by keeping all of your books in one place. If you do not have enough space to create a separate bookcase, then we recommend that you place all of the books in boxes so that they are easy to find and there are no more piles on the floor or tables.
Also,
The books can be stored vertically in a bookcase but should not be double-level deep. They are best organized by depth and length, with the tallest standing up against the wall so that they do not fall over.
Which side of the bed should shoes go on when it’s in storage under the bed?
We think it would be better to place shoes on the left side of the bed to be more challenging to see. This way, you will not be tempted to wear them right away, and you won’t have any clutter near your bed.
What is the best way to organize shoes?
Number 1. Chronologically by purchase date, with the most recent purchase first. Chronological organization is crucial because it will make it easier to find a specific pair of shoes. For example, if you are looking for all the red shoes you recently purchased, the chronological organization would group them. You would not have to go through all of your shoes to find them.
At the same time, a chronological organization might make it more difficult to find an old shoe that you plan on wearing today. If this is your goal and time permits, then we recommend organizing by category: boots and flats should be in one section; sandals should be too;
Number 2. By color – shoes can be categorized by color. It is easiest to use the same color for all of your shoes to create a similar style.
Number 3. By size – this way, you will also have an easier time finding the right shoe for the right foot, and you will not have to search through a lot of too small or too big shoes.
Number 4. If possible, function by creating separate sections for short-term (for example, weekend) and long-term (for example, hiking) uses so that you do not have to waste time looking through all of your pairs to find a good one.
Number 5. By season – if it works better for you, try to group them by season: winter (for example, boots that are more likely to be worn in the snow and not on sand and beaches), spring (for example, sandals), summer (for example, flip flops and dress shoes or tennis shoes).
Number 6. By style – if it works better for you, try grouping them by type: casual shoes; formal shoes; work shoes; sportswear; etc.
How do I organize my closet?
Number 1. You can start by organizing your clothes by color. This understanding means that all the clothes that are the same color should be grouped. This decision will make it easier to match outfits together since they will always have the same colors and will not clash. For example, all of your red shirts can be organized in one section and then placed on a purchase date next to them. If you think this organization might take too long, consider grouping them by season: summer, winter, spring, etc.
Number 2. You can also organize your clothes by style or fabric type: formal – work – sportswear – casual – shoes; etc..
Number 3. You can also organize your clothes by type of outfit: dress – shorts – skirts – pants; etc.
Number 4. You can also organize your clothes by occasion or season: formal occasion, informal occasion, work occasion, etc..
Number 5. You can also organize your clothes by other related attributes such as brand, size, etc..
Number 6. You can also use a calendar attached to your door to always see the upcoming events that you have planned (for example, holidays and birthdays) with the most important dates to remember on it.
What are some of the best ways to organize a closet for kids?
You should start by organizing your clothes by color: all the same, clothes should be grouped in one section. This idea will make it easier to match outfits together since they will always have the same colors and will not clash. For example, all your red shirts can be organized in one section and then put in order of age next to them. If you think this organization might take too long, consider other related attributes such as brand, size, etc.
Next, you can repeat the same steps available on the answers to previous question
How to put together a bar cart?
- Step number 1: You can start by painting the top and bottom pieces based on your preferences.
- Step number 2: After that, you will need to add the shelves that hold your drinks. We recommend adding a one-foot divider between each shelf so that you can create space for other objects such as books and candles.
- Step number 3: Next, you will need to attach a wine rack to the left side of the cart so that it is easier for you to store your wine bottles. We recommend placing narrow glasses on top of this rack for them to be accessible without taking up too much space.
- Step number 4: Finally, you can add casters to the bottom of the cart so that it is easier for you to move it around.
How do I organize my bar cart?
- Number 1: You can organize your bar cart by theme (wine, beer, cocktail) or by drink type (tea, water, juice). The theme will depend on your preferences and what you will be using your cart for. Suppose you are going to use it at home instead of in a restaurant or bar. In that case, we recommend organizing your drinks by theme since it will be easier for you to remember. For example, all your wine bottles (0% alcohol) can be classed together in one section and then grouped by color in another area.
- Number 2: You can also organize by bottle size: short – tall – non-alcohol.
- Number 3: You can also organize by season, if possible. For example, you can manage your drinks in a cart by season: summertime, springtime, wintertime, etc.
How do I keep my bar cart clean?
We recommend that you cover your cart with a tablecloth so that it is easier for you to clean all of the drink stains off of it.
How do I use my bar cart?
We recommend that you keep drinks on and around your bar cart to help separate them into different categories/types.
Where should I put jewelry?
You can store jewelry in an accessory chest. This type of storage system is a container that has different compartments or drawers for storing jewelry.
How do I get rid of toys and bookshelves when not enough space for them?
Or how do I organize my toys and bookshelf when it seems not enough space for them anymore?
- Number 1: You can start by grouping your items by type (books – cars; dolls – trucks).
- Number 2: You can also organize them according to what they are used for. This step means that all of the items that are used for reading should be grouped. All of the items that are intended for playing should be grouped together. All of the items that are intended as decorations should be grouped together.
- Number 3: You can also organize your collection based on their age if it is appropriate to do so. Start it with the newest toy or book and working your way back in time to the oldest one.
How to declutter a regular kitchen (even the small kitchen)?
What are my options for decluttering a regular kitchen?
- Number 1: You can start by organizing your kitchen cabinets. This point includes organizing them according to what type of food they contain, such as pasta, oils, spices.
- Number 2: You can also organize your kitchen drawers. This point includes managing them according to what type of utensils they contain, such as forks – knives.
- Number 3: You can also declutter the kitchen counters by removing any items that are not currently used for cooking purposes, such as pots and pans or books.
How do I declutter my regular kitchen?
1). Organize your cabinets based on what food it contains
2). Organize your drawer based on what utensil it contains, including pot and pan storage
3). Remove all old food, containers, and outdated items from your kitchen
4). Throw away or recycle the garbage/recyclables
5). Put back any remaining items that you don’t want to live without
6). Review and repeat
How do I declutter my small kitchen?
The key is to be ruthless. You need to identify everything that is ‘unnecessary’ and get rid of it.
The following way is to collect everything together in one place and then prepare a box for each type of item. Label them (kitchen stuff, cleaning supplies, other), take a few minutes on each type of item, and then put the ones you don’t need into the labeled boxes.
-Toss out items that are broken or squashed flat;
-Donate anything you’ve used up;
-Take any leftover food into your freezer so you can eat it later without needing to shop again or cook it;
-Wipe down the surfaces with antibacterial spray, so they stay cleaner longer.
Next, you can optimize your kitchen storage system by only keeping the bare necessities. For example, you can store all of your cooking accessories in one place.
How do I keep my small kitchen clean?
Since most of the items are already stored in a closet and/or cabinet, you just need to wipe down the counters and other surfaces with antibacterial spray so that they stay cleaner for longer.
How do I organize my small kitchen? (cooking utensils)
- No 1: You can use drawer dividers to keep things organized. For example, you can label each compartment based on what type of utensils it contains (utensil 1 – cooking utensil 2, etc.).
- No 2: You can also use drawer organizers to keep things organized. For example, you can manage your utensils based on what type of food they are intended to be used for, such as cooking utensils or eating utensils.
- No 3: You can use pull-out drawers to keep things organized. This idea will help you to see everything you have at once and will make your kitchen look neat.
- No 4: You can also use a specially designed drawer or cupboard to store space for your utensils. This drawer is best for storing small utensils, like chopsticks, toothpicks, forks, spoons, etc.
- No 5: You can always use baskets to keep everything neatly organized. For example, you can manage your pots and pans in rustic wooden baskets with simple tins of food inside them. In order so that the food does not get dirty while being transported around in the basket.
How do I organize my kitchen cabinets? (food)
- No 1: You can start by organizing your kitchen cabinets by type of food, such as pasta – rice; vegetables – fruits
- No 2: You can also organize your kitchen cabinets according to what meal it consists of (breakfast – lunch – dinner).
- No 3: You can also organize your kitchen cabinets according to the frequency of use (vegetables – fruits – meats).
- No 4: You can also organize your kitchen cabinets according to what meal it consists of (breakfast – lunch – dinner).
- No 5: You can keep your utensils, plates, and mugs on the lower shelf of your kitchen cabinets.
- No 6: You can store away spices in a spice rack or small jars.
- No 7: You can store away all the snacks in a glass jar or small boxes.
- No 8: You can store away the juice, drinks, water in a glass jar or small boxes.
- No 9: You can have your cooking utensils on the top shelf of your kitchen cabinets.
- No 10: You can store away all the plates, bowls, and mugs in a set of narrow plastic containers.
- No 11: You can store away all the kitchen tools, including knives, in a set of narrow plastic containers.
- No 12: You can store away all your clothes, including towels and sheets, in a set of narrow plastic containers.
- No 13: You can keep plates, bowls, and mugs on the bottom shelf of your kitchen cabinets.
- No 14: Keep your cutlery on the middle shelf of your kitchen cabinets.
How do you organize your cupboard?
- Number 1: You can organize your cupboards based on what is contained in them, such as canned goods, flour, sugar. Suppose you have a lot of canned goods or other foods that are stored in the same container. In that case, we recommend putting them in a single place so that it is easier to remove and access them when needed.
- Number 2: You can also organize your cupboards by type, such as utensils – plates – Tupperware. This trick will make it easier to find specific types of items without searching through the small containers and cups that fill most shelves.
- Number 3: You can also organize your kitchen drawer by type, such as plates – cutlery – Tupperware.
- Number 4: You can start by separating your plates, bowls, and cups into three different sections. This little job can include separating them by color for them to match. It can also involve separating them according to how you would like to use them in the future. For example, group dinner plates separately from the dessert plates and portioning each of the groups accordingly.
- Number 5: You can also separate your pots, pans, and utensils into three different sections. And then put them back in order of usage (most used on the top shelf).
What are the best ways to organize a refrigerator?
- Number 1: You can start by organizing your refrigerator according to what it contains. For example, suppose your refrigerator has soft drinks, wine bottles, and beer cans. In that case, you can organize them accordingly into different sections (soft drinks – wine bottles – beer cans).
- Number 2: You can also organize your refrigerator in order of how often you use it. For example, all your snacks should be put into one section and then grouped by how frequently you will be eating them. (every day – almost every day – rarely – never) depending on how often you prepare them.
- Number 3: You can group the items you use most often together so that they are easier to find. For example, You can put all your daily snacks into one section insight of everything else. You can put all your supplements and vitamins in another section, all your condiments in another department, and all your meats and food items in other different sections.
- Number 4: Never ever place expensive food items on the bottom shelf of the refrigerator. Instead, place them on top so that they are easily visible & accessible. Some people may say, “Why put expensive things up high?” but instead of storing them on the bottom where no one will see them, keep them on top where they will be easy for you to find.
How do I organize and store my cookware when decluttering?
If you are using one pot for cooking and another for storage, consider putting them on one side of the cabinet. This decision will increase its efficiency and therefore saves space.
What are some of the best ways to reuse items in my kitchen when decluttering?
One example is to reuse any leftover containers when cooking. For example, if you cook some rice in a small pot and there are leftovers, put the pieces in that pot and take it back into your kitchen. The next time you want to cook up rice, use the same container! You can also use any leftover containers for packing lunches or storing leftovers.
What is the best way to clean up my kitchen if I am finished with decluttering it?
The best way would be to clean the kitchen and put everything back in its proper place. Another thing that you should do is leave notes about where things go. For example, my notes say, “Put away utensils when done cooking” and “It’s important not to leave dirty dishes in front of the sink that will start to stink.”
What are my best options to photographically set goals for myself to complete my decluttering?
One good option is to take pictures of your home before and after you clean and sort out clutter. This act will provide something that you can reflect on your progress. It also lets you track any areas that have trouble spots, such as a pile of clothing that’s collected in a corner. The other thing that you can do is create a list of resolutions. These are promises that you make to yourself when trying to keep your home tidy. They may include, “I promise not to purchase any new clothing until I’ve worn out the clothes I already have.”
How to declutter a kitchen when you just moved in?
- Go through all the boxes and put things away in their rightful places.
- Throw away any trash that you have accumulated.
- Put aside anything that you know you will need soon or any items that might be sensitive and fragile.
- Find a home for dishes, food, pots & pans, dish towels, cookbooks, etc.
- Try not to buy new kitchen items until your current stock is finished running out or starts running rampant!
How to declutter and organize your kitchen pantry?
- Start by sorting all of your pantry items into 3 different bins: trash can, donation bin, and to keep.
- Throw away any expired food or ones you don’t want to keep in the trash.
- Separate what you want to donate from the things you want to keep. Items like canned goods or boxed cereal are easy to get rid of since there’s usually somebody who needs them. The same goes for extra cooking oil, sugar, honey, frozen veggies, etc.
- Separate what you want to giveaway by category. It is such as spices (pumpkin pie spice in one container and oregano in another), pastas (fusili and angel hair), oils (olive oil and vegetable oil in a different container), etc.
- When organizing your pantry, it helps to label each container with what’s inside: toiletries, condiments, oils/vinegar/baking supplies, etc.
- Add a lox or other canning supplies if you have them.
- Keep empty containers or jars for flour (the exact measurements are essential when you get back to baking).
- Keep empty containers for spices (Chinese 5 spice powder and curry powder in one jar, paprika, and cayenne in another). Put the bottles inside the spice container, so they don’t scatter throughout your pantry.
- Keep empty containers for nuts (almonds, walnuts, and pecans in one container and peanuts in another).
- Keep dry ingredients (flour, sugar) in a bin on the counter and keep the rest of the pantry on the floor to make it easier to look through.
- Do this with as many other things as possible.
- Organize your pantry by dividing it into clear boundaries so if there are things leftover from one side, you don’t accidentally put something from the other side back in it.
- Become more efficient so you can spend less time finding things.
- Find the key to making your pantry more efficient here:12 Kitchen Pantry Organization Systems
- When organizing your medicine cabinet, start by getting rid of everything you no longer use.
Then, sort what remains into three bins with the following categories:
1). Trash bin for things that are expired or so old they aren’t safe anymore.
2). Donation bin for things you don’t need but someone else may (like prescription bottles).
3). To keep bin for prescription medications and over-the-counter vitamins (tape expiration dates and names of contents on bottles).
4). Mark each bin clearly with a marker so you don’t risk mixing anything up.
The key to organization is knowing what you need and keeping only that in your medicine cabinet.
1). Ask yourself: Do I use this regularly? Then keep it.
2). Ask yourself: Do I want to use this but don’t know when? Then get rid of it.
3). Ask yourself: Am I keeping this for sentimental reasons, or do I actually need it? Discard unwanted items and keep the few that are important to you.
4). Keep a list of prescription meds in your purse so if you need them while away from home, you have them with you.
How do I keep my kitchen organized throughout the year while staying flexible for different occasions?
If you want to keep your kitchen pretty organized throughout the year. You have to set a routine that includes placing all of my pots and pans in the bottom cabinet, taking out things such as trash bags and cleaning supplies to make room for the next month’s food. The best part about this system is that it allows you to be flexible with different occasions throughout the year. For example, during the winter months, You’ll use fewer out-of-season fruits on your countertop.
Where should I keep my knives to keep my small kitchen organized and neat?
An aspect of the kitchen that you need to improve is organization. Currently, you have knives slung across my counter in an unorganized manner, making the space look messy and cluttered. You have tried different solutions, such as using a knife rack or putting them in a drawer, but neither of those was a perfect option for you. What would work best for you are storing your knives on the wall to make more available storage space while keeping them organized and not taking up as much room on the countertop.
To start, remove all your knives from your current locations. This step will give you more space on your countertop to work with, and it will create an organized new system for you!
- Step number 1: Use paint to cover up the countertop surface of where you would like to put your knives. For this step, use bright yellow paint since it is a brighter color to pop against all the darker gray countertops in my kitchen.
- Step number 2: For this step, simply used strong glue and clamped them into place. This move will allow you to use the same space for multiple tools, and it also gave me a much neater look.
- Step number 3: Use wood or plastic hardware to secure your knives into place.
- Step number 4: For the finishing touch, use a clear varnish to bring out the vibrant yellow color. This color will help the lighter wood or plastic hardware stand out.
The finished look is stunning, and you will please with how your knives looking fresher and more organized on my countertop without taking up any more space!
Can I keep my food scraps in a drawer?
You want to keep the scraps of my food out of sight because you don’t want things falling on them, but at the same time, you tend not to have enough storage space for trash and food because you have limited cabinet space. What would be a good way of storing your scraps so that they are not visible but somewhat hidden from view and accessible whenever needed in case of an emergency?
How can I organize all those plants and herbs inside my small kitchen area?
- Step no1: First of all, find out the labels of your hanging baskets or pots and mark them on the inside with a sharpie marker. Now, remove your pots and plants from their baskets and arrange them in the order you hung them. This way, you can quickly locate your neighbor’s plant that keeps sneaking into your pot.
- Step No 2: Next, decide where you will hang these plants again after storing them for future use. You can have a plan to turn these plants above your kitchen sink to let them give you company while you are busy washing up.
- Step no 3: Hang them!
And there you have it, not only are they organized but now they are pretty too.
How do I organize my kitchen items by type?
A kitchen typically consists of:
– Crockery, cups, and glasses
– Cutlery
– Utensils (spoons, forks, whisks)
– Kitchen appliance (oven, stovetop)
– Coffee maker
– Microwave oven
Then:
Step 1: Arrange your products by category
Step 2: Label the shelves
Step 3: Group together items that have similar function and appearance to form “mini-zones”
How do I organize my desk?
Start with all your papers. First, sort your papers into categories:
– Journal entries
– Financial documents
– News clippings
– Credit card statements
– Preprinted forms
Then:
- Step 1: Create 5 categories for your desk. Make a temporary label for each one. Each category should have only one and only one item. For example, suppose you started with five categories. In that case, you could have three journals, one news clipping, and one credit card statement on each shelf. You must decide ahead of time what the categories will be and what their names will be so that you can easily group the items when you are ready to organize.
- Step 2: Once all items have been sorted, you can label permanent labels for the five categories.
- Step 3: Place each item in its appropriate place
How do I organize my bathroom items?
Start by putting all your items into two categories:
- Personal hygiene
- Hygiene products (shampoo, conditioner, soap, etc.)
Then:
Step 1: Group together items that go to similar places or are used for similar purposes. For example, the toothbrush could be placed on a shelf together with floss and mouthwash. The same goes for the rest of the hygiene products.
Step 2: Label the shelves
Step 3: Group together items that have similar functionality and appearance to form “mini-zones”
How do I organize my closet?
Start by taking everything out of your closet and putting the items into 5 or 6 categories:
- Tops
- Bottoms
- Dresses/skirts/shorts
- Coats (winter, fall, spring)
- Handbags/Shoes/flats/sandals (not including regular shoes)
Then:
Step 1: Group together items that go to similar places or are used for similar purposes. For example, your tops can all be placed on one shelf.
Step 2: Label the shelves
Step 3: Group items that have similar functions and appearance to form simple to recognize units.
Where should I store my kitchen utensils and dishware?
For starters, you can put them under the table or in the kitchen drawer.
If you have many utensils and can’t put them all in a tiny space, it is better to buy a storage rack for utensils.
This type of storage option will save up some space and still keep your utensils well organized.
The great thing about racks is that they are adjustable. Those with smaller cabinets will still fit their appliances in the same position as their larger countertop friends.
How to build your own kitchen island?
A kitchen island is a free-standing cabinet that has a countertop with stools. This solution can be used for food prep, dishwashing, and serving for larger parties. To build your own kitchen island, you need the following materials:
Tools: power saw and drill
Materials: plywood boards, wood boards or hardboard panels (3), wood boards (2), screws (2 packs), granite slabs or butcher block tops (2), and kitchen cabinets (2)
- Step 1: Measure and cut the plywood boards, wood boards, and hardboard panels so they have the same dimensions as your kitchen cabinets. Make sure you have cut those into five pieces of each material. The two pieces will be used for the base, while the other three will be for the sides.
- Step 2: Drill holes on the side panels where they will meet with each kitchen cabinet door. This trick is so that you can easily screw them together with screws and make them immovable. Once both sides are completed, you can then install each panel on top of one cabinet door by using screws to secure it in place.
- Step 3: Remove the doors of your cabinets and mount your kitchen island on top of one end with help from a drill. Make sure that you have aligned the holes with the ones already drilled in your plywood boards.
- Step 4: Mount the other 3 boards or panels facing outward to form a sturdy and stable base for your kitchen island. Use as many screws as needed because grating is a hazardous material that might cause it to tip over during installation. Set a granite slab or butcher block on top of this base and let it sit overnight to expand to fit perfectly.
- Step 5: Install the remaining 2 boards to form a structure for hanging utensils, serving dishware, etc.
How to build a storage shelf in a small closet?
Closet storage is one of the most challenging things to accomplish as part of self-storage solutions. If you have a tiny closet and want to maximize its use, you can build a wall shelf. This step doesn’t require many tools or even materials to complete, but it will still help you make better use of that wasted space.
This explanation is the-step-by-step how you build one:
- You need 3 short wood boards,
- 6.5 inches each;
- 2 large wood boards,
- 12 inches each; and 2 hinges.
Instructions: Cut one large board into three pieces using your power saw: two pieces at 10 inches and another piece 20-inches long. Sand all of the boards and screws. Then, screw a hinge to the two long pieces and a hinge to the short 10-inch piece. To hold it together, screw one on each side of the shelf.
To make shelves to store clothes, you can screw additional hinges to your wood board. And attach it to your existing closet door frame using brackets screwed into the door head. This way, you can hang your clothes from shelves like this: You will need to cut hooks and cups that suit your needs at a hardware store or home improvement store. Using these hooks or cups, hang your clothes for them not to get wrinkled or pilled. It is a great way to eliminate the clothes that you haven’t worn in years and are just taking up space.
You can also use this same idea with kitchen appliances like pots and pans to hang them from their hooks. Then, keep small hand tools like screwdrivers, knives, etc., on the other side for quick access. If you have several people living in your home, then you can arrange shelves on both sides of the closet so that each person can keep his or her things straight. This way, you don’t have to worry about who has what and when because You will nicely place everything within easy reach for everyone.
How do I declutter my kitchen drawers?
While decluttering the contents of your kitchen drawers, keep in mind that some items are worth holding on to. If you can hold on to them and put them away in a designated spot, then it’s fine. But if you’re not sure what needs to stay and goes, simply select a space for everything from leftovers to craft supplies.
1. Multi-purpose cabinet
Use a cabinet with multiple drawers to store items from all over the house. You can dedicate each drawer to a different household category: kitchen, cleaning tools, appliances, etc. You can even add a cupboard above the drawers for additional storage space.
2. The minimalist’s pantry solution
Shelves placed at different levels make the most of your vertically oriented space and are visually pleasing to boot. You could put spices, baking ingredients, and cans on the top shelf while spices, cooking sauces, and dried goods go in the lower levels.
3. Drawers to the ceiling
If you have plenty of drawers, why not put them all in one unit and make it the centerpiece of your kitchen? Take your pick: have them all open at once or alternate their use. Choose a large and an evenly-distributed space so that you can easily reach everything.
4. Use cupboards as storage baskets
Placing baskets for condiments and spices inside cupboard doors is a great way to keep things from falling out when opened. It’s also a good idea to keep flour, sugar, and other bulky items from knocking into each other when stacked.
5. Stackable storage units
Dividing your kitchen drawers into sections is the best way to organize them. You can do it yourself by purchasing plastic baskets or storage containers and sticking labels for quick and easy reference. Or have a carpenter add pre-cut drawer dividers.
6. Pull-out plank ladder
If your kitchen lacks drawers, you can use these ingenious pull-out plank ladders as clever and straightforward solutions. Just slide the unit open, close up the ladders when done, and place a towel underneath to prevent scratches. Voila!
7. Wall mounted spice rack
If you want to save space but still keep your kitchen organized, you can add a wall-mounted spice rack that utilizes vertical space. Just paint the wall with a matte finish first and place the spice racks. Place a magnetic strip at the top of each rack for easy labeling.
8. The adaptable tool cabinet
One of the best kinds of storage is called adaptable storage. This idea means that each item has its drawer and can be accessed at any time using a pull-out drawer rail that’s already installed in the cabinet.
9. Floating shelves
If you have lots of unused wall space in your kitchen, all you need are a few floating shelves and a couple of hooks to hang ladles and other utensils. They’re also suitable for displaying your favorite photos.
10. Pull-out spice drawer contraption
This trick is a perfect way to store spices. Ensure the shelf is sturdy and fits nicely inside the cabinet to prevent it from tipping over when opened.
11. Shelf above the fridge
If your fridge has no cabinet under it, you can use the space to store extra items. Another option is getting a rolling storage unit that fits perfectly underneath.
12. Floating drawer
Another kitchen organization hack to look into is an adjustable floating drawer. The one shown here is excellent for storing chopping boards and other cutting equipment. Still, you can keep anything in there that needs to be accessed often.
13. Open the insides of your drawers for storage
The best way to organize your kitchen drawers is by opening them up and putting items inside them. If you don’t have kitchen cabinets with dividers, open up the drawers and slide sections of shelf dividers into them.
14. Color-coded utensil holder
If you like to organize your spices using colors, adding color-coded utensil holders to the drawers will make it easier for you.
15. Put your junk in plastic bags
Rather than throwing away items that aren’t being used anymore, simply put them into a plastic bag and keep them in the refrigerator or freezer. This simple thing to do is a great way to organize different ingredients and keep everything fresh.
How do I declutter a food pantry?
Decluttering a food pantry is quite simple. All you need to do is take out all of the things that will not be used and put them in a box or something else for storage. The key is to declutter the food supply. Start from the bottom and work your way up.
How do I declutter a garage?
With only minor effort, you can declutter a garage and get it into shape. If you want to free up some space, start by removing anything that is not needed right now. For example, if you are refurbishing your car, remove parts from the garage or workbench. You could also take out items that are needed for a particular project, like tools that you will use during the repair of your vehicle.
Recommended list:
25 Tricks How to Get Organized Garage you Desire
10 DIY Garage Organization and Storage ideas
What are some of the best ways to organize a food pantry when decluttering?
There are a few great ways to declutter a food pantry.
One way is to start with the food in the back of the pantry and work your way forward.
Another option is to remove all items that you have less than three of.
When there are three or more, label them with dates so you know when you buy them, and if it has been over six months since you purchased them, discard them as they will expire soon.
Finally, explore different organizational systems by taking an inventory of what types of foods are in the pantry: dairy products like milk and cheese; flour and sugar; frozen goods like ice cream; canned goods and cereals; spices such as basil leaves or rosemary leaves or peppermint leaves; canned goods; condiments.
What are some of the best ways to organize a linen closet when decluttering?
When organizing your linen closet, you must keep things organized by type of item. For example, if you have towels, place those towels in a basket and label that basket “towels.” If you find mix-ups or items getting misplaced in your linen closet, label the storage baskets with the word “towels,” then see if the mix-up stops in the future.
More idea related to linen organization idea you can read this:
10 Bedroom Linen and Sheet Organization Ideas
5 Steps How to get Perfect Linen Closets
What are some of the best ways to organize pots and pans in a regular kitchen space?.
When you are cooking in a kitchen, it is vital to have the pots and pans organized.
Some of the best ways to organize pots and pans in a regular kitchen space include storing them on shelves,
using bags for each pot and pan,
or using magnetic strips on all your pots and pans.
You can also place them inside cabinets where they will be easy to reach if needed.
Also, consider the following suggestions:
- Suggestion no 1:
You can place a pot rack to store all of your pots and pans. You can find this in the kitchen department of your local home improvement store. Look for one that is decorative and has a lot of room for all of your cooking items. - Suggestion no 2:
You can use ceramic tile to create a mat or runner for the bottom of the cabinets that hold your pots and pans. You do not want them sliding around when you try to get something out, so this is an excellent way to keep them in place. - Suggestion no 3:
You can use the magnetic strips attached to your cabinets’ underside. You can put all of the pots and pans with these strips, and they will remain secure, but you will have an effortless time getting them out when you need them or need to get something else out first. - Suggestion no 4:
You can also use the labels that come with your pots and pans so you can organize them by type. This method is suitable if you will use more than one cooking item, as it is easier to get to each one if they are labeled. - Suggestion no 5:
You can use drawer organizers to organize your pots and pans. This idea is a great way to keep everything in order and available when you need it and help you find things when you are in a hurry and need some of them quickly. - Suggestion no 6:
You can also buy special ceramic racks designed for pots and pans that do not slide. These will allow you to keep all of your pots organized. However, they will still allow you to store other items on top to have a lot of space and not be cluttered with other things that are not cooking items.
What should be done with cookware before being thrown away?
- Make sure it isn’t in contact with the food, and then place it in a sealable bag or container.
- Scrape off all the food onto the ground.
- Place some sand inside a metal garbage can, and then set your cookware on top of that.
- Pile some sand on top of the cookware so that it’s completely covered.
- Throw away the bag or container after you’re finished.
If you wish to keep the cookware, consult a professional for cleaning.
How to declutter a small and limited living room?
Step number 1: If your living room is limited by size, you should choose a half-moon sofa. Select one which has an open end. You can use this place for hidden storage. The other side of the sofa remains open, so it gives you enough space to store your clothes and additional accessories inside the couch.
The storage space of these sofas is huge and spacious. So, to declutter your limited living room is very convenient by using the half-moon sofas with hidden pockets for additional storage options.
Step number 2: Storage under Dining Table: If your living room is limited in size, you can also use this option to declutter your small living room. In this option also, you can hide your stuff like blankets, pillows inside the dining table. Now that you have hidden your things inside the dining table, then it will be difficult for anyone to find that storage space under the table. If you have a huge dining table and you are not able to store
Step number 3: Storage behind curtains: This is also an easy way to declutter your limited living room. You can use curtains or any kind of large spreader cloth as a divider in your living room. With the help of these dividers, you can divide your limited space into two areas.
Step number 4: Use the curtain rod: You can also use curtain rods to divide your space. The curtain rods are very long and have a very long reach. You don’t need to do much to place a curtain rod at the edge of your wall. So, you can easily set the curtain rod at your side and then hang the curtains to hide all your extra stuff behind the curtains.
Step number 5: Use old wine barrels as storage space: If you cannot find any other good options for storage under or behind your dining table, you can always use old wine barrels as storage. Old wine barrels are made up of wood, but they look like metal because they have iron covers that look like metal covers.
Step number 6: Use an old trunk as storage space: Another option to declutter your small space is by using old wooden trunks. They look lovely when you place them. You can also purchase wooden trunks from the market and replace the old ones with new ones.
Step number 7: Use an inbuilt storage compartment: Sometimes, you will also get small extra storage built inside the wall of your house. Usually, these small compartments are made under the floor or inside the wall of your house. If you can get this storage space in your home, it will be better to place all useful stuff inside that small storage compartment and then close it from outside.
Step number 8: Hide your stuff under tables: You can also use tables as a trick to hide your extra stuff. There are many types of tables available today in the market which have hidden cabinets below them. Make sure that you choose a perfect table that fits right into the corner of your living room and has enough space beneath it.
Step number 9: Build a shelf in your wall: If you can get access to the inside of your wall, you can always build a shelf in your living room. This decision will allow you to store all of your stuff like books and other accessories.
Step number 10: Use an old filing cabinet: If you don’t want to build a new shelf in your house’s wall, you can always use an old filing cabinet that has multiple drawers inside it. You can use those drawers as storage space for all of your stuff.
How to declutter a bedroom?
We have talk about these issue view times:
10 Ideas How to Declutter a Bedroom (Small, Regular, or Large)
10 Declutter Messy Closet ideas
10 Closet Alternative Ideas for Anyone with Tight Space
10 Bedroom Wardrobe Renovation ideas
10 Wardrobe Layout Storage Ideas
10 Wardrobe Behind Bed Ideas
10 Small Walk-in Wardrobe Layouts
12 Bedroom Organization With No Closet Ideas
12 Bedroom Closet Organizations
12 Unique Ideas to Handle Closet Chaos
How to declutter a small and limited bedroom?
12 Storage Cabinet Ideas for a Small Bedroom and Living Room
12 Cost-Cutting Tips to Optimize A Small Bedroom
12 Unique Organization For Small Bedroom Ideas
100+ ideas How to Transform your Small bedroom into a Calming Sanctuary
What are my options for decluttering a body drawer?
- Number 1: You can start by organizing all of the items into categories. For example, you can collect your items according to what type of clothing they contain, such as shirts, pants, or skirts.
- Number 2: You can also organize them based on what they are used for. All of the items that are meant for sleeping should be grouped together and then managed by color. All of the clothes that are meant for playing should be grouped together and then organized by color. All of the clothes that need cleaning should be grouped together and then looked through until they have been cleaned or purchased new ones.
- Number 3: You can also organize them based on their age. If it is appropriate to do so, starting with the newest item and working your way back in time to the oldest one.
How to declutter a bathroom:
What are my options for decluttering a bathroom?
There are three options available: The first will be to repaint the walls so that it is easier for you to remove any stickers or hooks attached to them. The second option will be to replace the shower curtain with easy-to-remove curtain rings on it (the ones where you can slide your hand and hang it up without burning yourself).
How to declutter a bathroom apartment?
Decluttering a bathroom can be tricky if you don’t know what you should declutter. Here are some things that you should remove depending on the state of your home:
- Mildew or mold: Remove these growths with bleach and scrubbing. If the mildew is behind a shower, simply scrub and replace the grouting every year. Tile showers are more likely to develop mildew because there’s not much light in them, and they’re humid all year round, so it’s good to check for new spots and keep them clean regularly. This issue is the reason why we recommend using vinegar in your tub instead of bleach- it won’t react with metal fixtures like bleach will, and it won’t leave a chemical smell.
- Cleaners: Get rid of all those bottles of cleaners and replace them with simple white vinegar or baking soda in a spray bottle. Vinegar is excellent for cleaning stone surfaces and interior glass, and baking soda work well on metal fixtures. These are safer alternatives to bleach that will not react with the other things you may have around your bathroom, like your clothing basket.
- Bath toys: If you’re lucky enough to have a rubber ducky sitting in your tub, consider removing it. If your child plays with this constantly, you may not realize how much of a germs magnet it is. Just placing the ducky in a sealed ziploc bag helps reduce the potential for germs to multiply and spread around your bathroom.
- Shower stains: If you’re worried about mildew, you should also check these areas: Shower walls and shower curtains. Shower walls are especially susceptible to mold growth because there’s not much natural light in them, and they’re humid all year round. If mildew has formed on your shower wall, just make sure to scrub it clean with bleach and wash all the grouting every year.
How to declutter a small bathroom for cheap?
When it comes to decluttering, the most important thing is not what you should keep or get rid of; it’s what you should know about. Here are some things to remember when decluttering your bathroom:
- Individual items: It’s ok to keep things that don’t take up too much space or money- like makeup brushes in a drawer. You can also keep old toothbrushes and fans that save your energy and encourage airflow in the room. It’s better for the environment (and cheaper) if you sort your waste bins into different colors rather than eliminate everything with one garbage bag.
- Mold cleaning: Mold is not a design element- it’s a source of mildew and mold. Cleaning this thing requires that you remove the source of moisture and keep an eye on your tiles. The easiest way to keep a moist bathroom from turning into a moldy one is to use vinegar in place of bleach to clean your tile surfaces. You can also check your grout every year for signs of mildew. If you have installed a tile shower, do not use bleach on the grout because it will damage the tiles.
- Clutter: Another way to declutter your bathroom is to make sure that your items are organized.
List Entries:
20. Drawers in the steps
 Got stairs at home? Turn them into nifty storage spaces for all the extra essentials that are struggling for room. It’s easy as well. Measure the dimensions, from top to bottom of each stair tread and between the stringers. Grab a 5/8” MDF board. Cut the panels and hot glue them. Add drawer slides and you are all set.
Even better, make a false bottom in the drawer. You can use any item that you’d normally store in the drawer as a handle and use it to lift the bottom up. Great place to sneak in some cash (or your pistol).
19. Storage Chaise Lounge
 A chaise lounge chair is the perfect way to turn any unused corner of your room into your personal kickback-and-relax space. Even better if it can store some clutter. All that you need is some hardwood for the frames, a few schmancy saws and some elbow grease on a weekend.
Net damage? $150 at best. Certainly beats those $1000 chaise lounge chairs on sale in big box ticket stores.
Tip: Work on the headrest first and go creative with the upholstery. If nobody else does, your dog will thank you the most.
18. Piano Shelf Sculptural Wooden Wall
 You have to hand it over to Sebastian Errazuriz, the Chilean designer who came up with this amazing multifunctional and aesthetic furniture piece.
At first glance, it’s a row of wooden frames attached to the wall that resemble piano keys. But each key contains a neatly concealed screw that when tuned (rotated) allows it to be lowered to a preset level, instantly converting it into a wall shelf. It can be used to store just about anything, from books to art pieces. Focal point? You’ve got it. Storage? It has you covered.
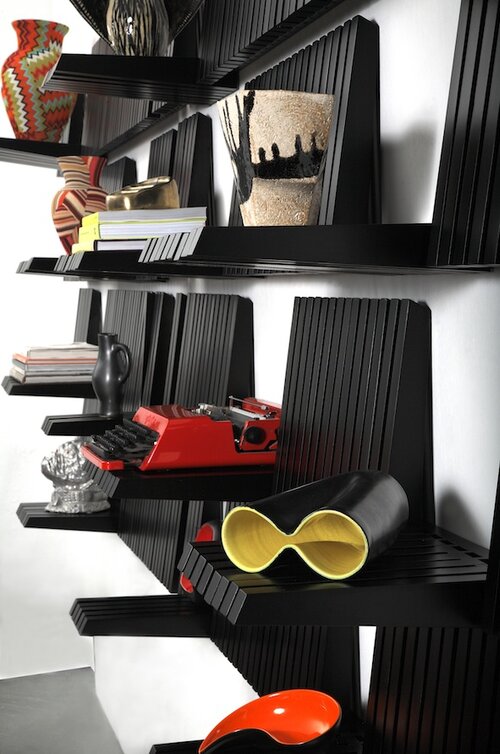
17. Apothecary Media Console with Storage Doors
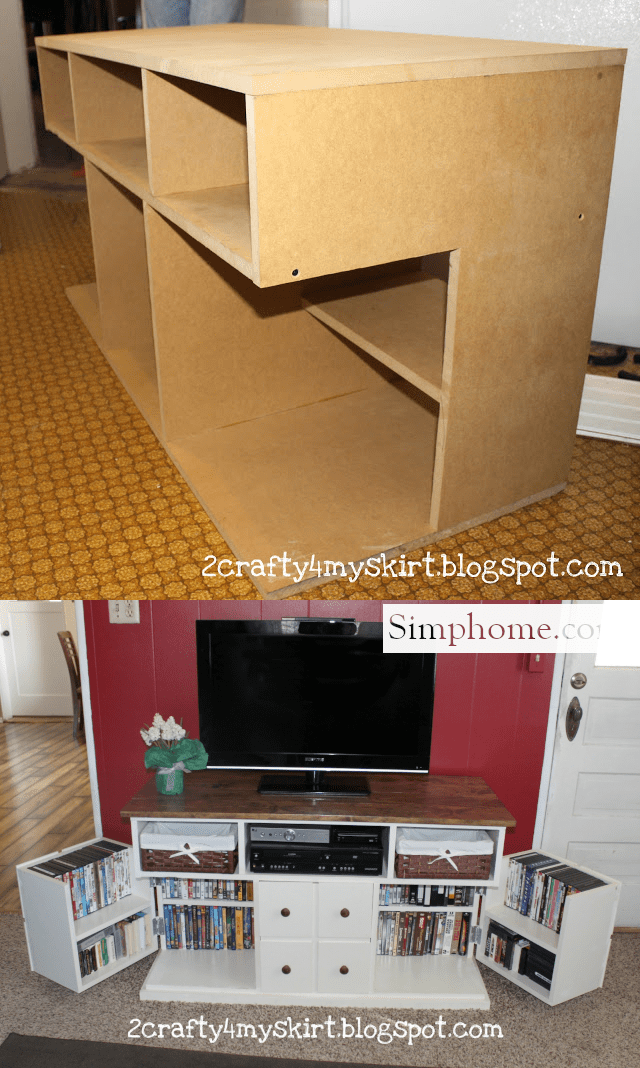 A media console can be a dumpster for your videos, games, remotes, cables, joysticks and whatnot. Or else, it can be sleek, stylish and complement the rest of the furniture pieces neatly concealing everything inside.
Enter the Apothecary media console with storage. The Apothecary design draws eyeballs and ensures that there’s no dearth of drawers for organizing your stuff.
But despite the sophisticated appearance, this DIY design is immensely easy to make. A few hours on a weekend and you can completely transform your living room.
Tip: Use Annie Sloan’s chalk paint to create a distressed, vintage looking apothecary that would make an old world pharmacist proud.
16. Makers Light, Shelf & Power Box
 Have a workbench that’s in desperate need of a makeover? Here’s a stylish and practical solution. This is the ultimate Maker’s box.
It’s got an integrated power box, an integrated LED with a glare guard that bounces the light off the back wall and a ledge that serves as a parking space for your wireless speakers, headsets or collectibles.
Despite sounding like it’d take a lot of work, all it takes is a few hours to get this protean furniture piece ready.
And it’s cheap. What’s stopping you from getting one for your workspace?
15. Floating Corner Shelf with Drawers
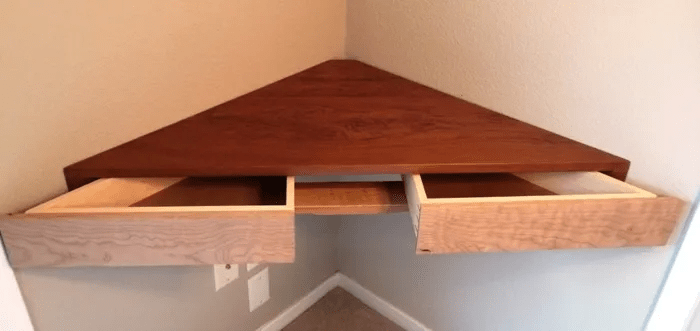 Corners are the most underused spaces in homes. With some creativity, you can add some attractive shelves with drawers thrown in for good measure.
Here’s an idea right here.
What makes these amazing corner shelves standout from more common designs is that the brackets are hidden making them appear like they are floating.
Two rails for each drawer ups the maximum weight limit. The shelf on top is wide enough to store books, vases, frames. Name it.
And it can be made in less than hundred bucks. Looks great, works equally well. Go and get to work folks.
14. Drop-Front Desk
We love this modernist take on the old secretary’s desk.
This is a wall hanging drop-front desk that saves space that would otherwise be gobbled up by a conventional desk with a hutch.
This smart, functional desk has a hinged drop front surface that can be used for writing or as a desktop.
When not in use, it folds up and conceals the shelves and cubbies inside which can be used for storage.
The top surface of the shelf can be used to store your décor accessories.
It’s easy to adjust the height of the surface depending on whether you work sitting or standing.
13. Flip Down Wall Shelf
 This flip down wall shelf draws inspiration from the piano key shelf that we mentioned earlier.
A very similar design, this one features individual wooden pieces that can be flipped downwards and used as storage shelves.
When not in use, fold them upwards and they are a contemporary, aesthetic addition to your room.
The best part is that making them is as easy as crafting a few identical pieces of wood. And you can customize the arrangement of the shelves every day.
12. Boxing ring inspired Side board
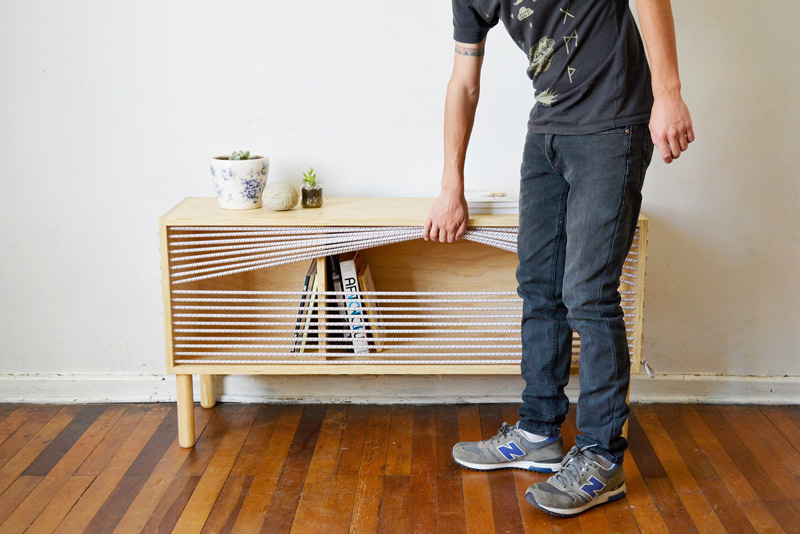 This boxing ring inspired side board is minimalistic, stylish and creative. At first glance, it’s just another side board shelf made of plywood and turned legs.
But when the elastic cords are added, it creates a very unique looking storage space that’s reminiscent of the old world Murphy Radios with the horizontal lines.
Apart from the aesthetics, it allows you quick access to the stuff stored inside.
Just pull the cords apart and grab your books.
11. Key Storage hack
 Keys, those pesky little things that have an uncanny knack to go missing when you most need them.
Not anymore. This floating wall mounted key console with a nested drawer is a great place to store your keys and other quick-access things.
It is ridiculously easy to make and can blend in with most décor themes.
There’s a hundred different ways to customize it as well.
Swap those frumpy key holders for this swanky storage hack.
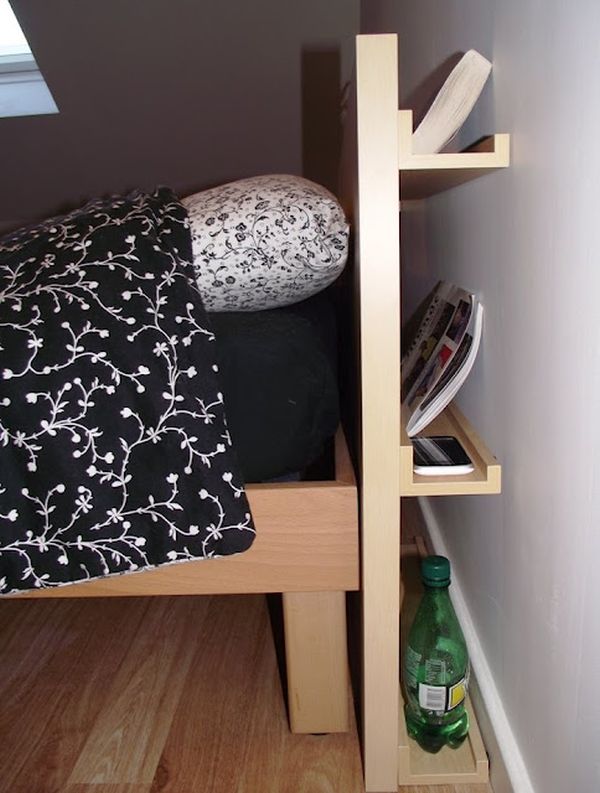 If you live in a micro apartment, then finding room for add-on furniture pieces like side tables is a challenge. And where on earth will you park your stuff if not on the side table?
This storage hack allows you to tuck all those things behind the headboard of the bed.
And there’s enough room for your cell phone, books, water bottles, iPad and more.
It’s extremely easy to make as well.
Grab a wooden table top (if the bed doesn’t have a heard board), some plywood pieces that can be used as shelves, some screws and you are all set. You can add as many shelves as you want to.
They are easily accessible and stay hidden from public view.
With some basic prep work, you can be done with this DIY hack in minutes.
9. The Wooden Cloth Table
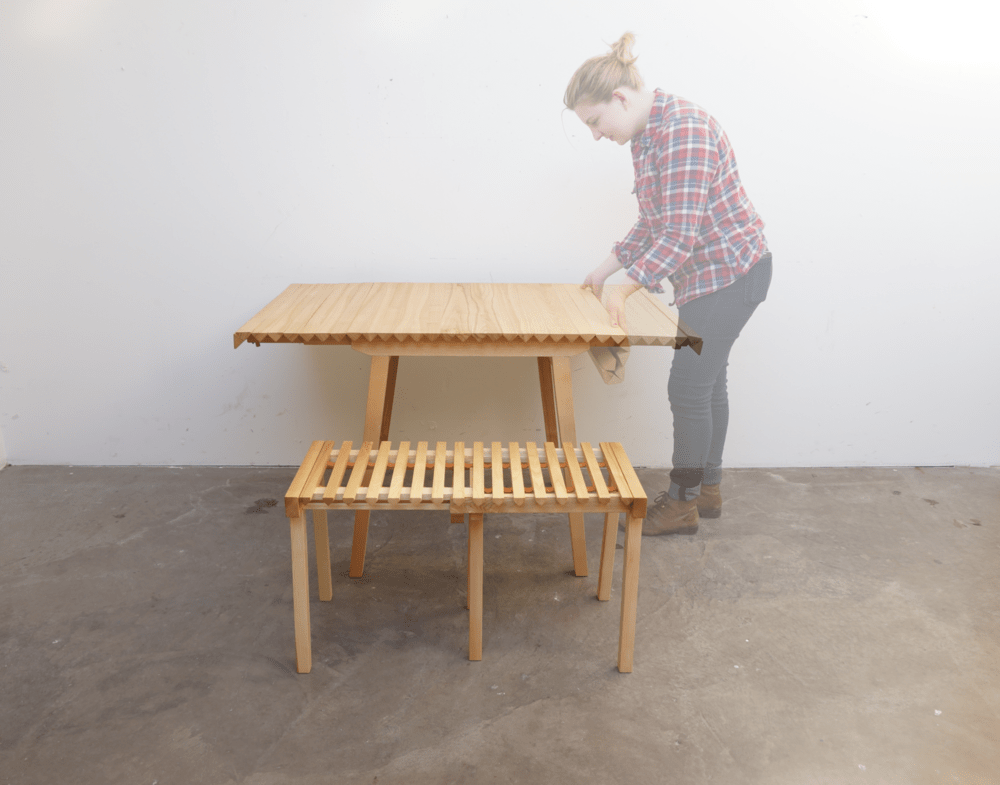 Designers like Nathalie Dackelid are stretching the boundaries of conventional woodworking by applying some smart thinking and making the most of technology.
One of her most popular creations is this folding table called ‘The Wooden Cloth’.
Strange name? Blame it on the incredibly creative design that literally rolls to expand and fold.
It’s not a conventional drop-leaf design mind you. There are a series of prism-shaped wooden pieces that are connected together with rubber cords.
When you need some extra space for storage, just grab the handle and pull it to expand the table. The prism-shaped wooden pieces roll out neatly and seamlessly integrate to create a stable, wobble free surface.
8. The Fold Up Wall desk Idea
 This Fold UP wall Desk is an amplified version of the Drop front desk shared earlier in this list. It is spacious and can easily accommodate a full-sized desktop computer with ample room left for extras.
You can throw in your wireless speakers, add some extra shelves for books, DVDs, gaming consoles and the likes.
Everything stays concealed eliminating clutter.
And it can be built on a shoe string budget with some plywood.
7. Contemporary Mid-Century Book Case
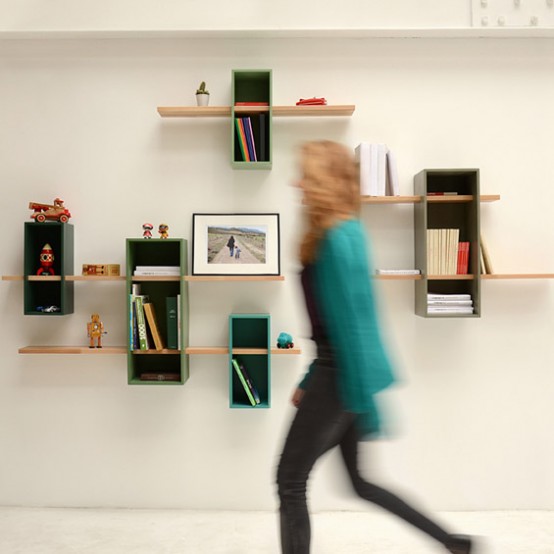 Architect Olivier Chabaud takes an old midcentury bookcase and does away with the panels on all four sides.
The result is this contemporary take on the classic design.
A series of interconnected MDF boxes and beech shelves make for an eye-pleasing storage space that will fit right into your living room or bedroom.
There’s ample room for books and décor pieces and you are free to experiment with colors and finishes.
The simplistic design means that it’s a DIYers dream.
6. The Ultimate Craftsmen’s working space
 This workbench created by Laura Mrkša’s is perfect for most weekend warriors dabbling in arts and crafts, jewelry making or other hobbies.
Made of hardwood, it features a fixed center as the work space with modular drawers for storage inserted into rasters on either side of it. Allows the hobbyist to get quick access to their tools and materials. And the modularity due to the rasters allow the storage boxes to be custom arranged in just about any way.
Translucent covers complete with is a functional, durable and space-saving design.
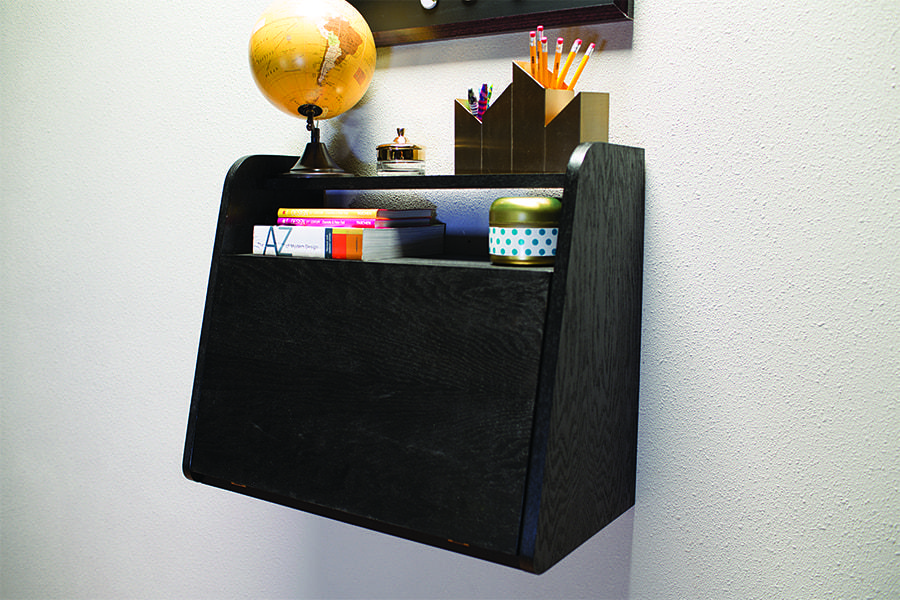
5. Floating storage shelf that transforms into a work desk
![]() We can’t have enough of work desks. Can we?
We can’t have enough of work desks. Can we?
Especially when they are multifunctional pieces, like this floating storage shelf from Michael Hilgers.
Made from solid oak (you can use MDF or plywood too), this serves as a compact floating bookshelf until the hinged top section drops down to create a work desk surface.
We haven’t seen a more practical design that looks neat and serves the purpose.
Height can be adjusted according to your preferences.
4. Recycled furniture
 Have an old, outdated suitcase at home? Here’s an easy DIY hack to convert it into a comfortable chair.
Can save you some dough and it looks straight out of an antique store.
Save those popsicle sticks and stack them up to create a dainty, octagonal wall shelf. Create four of these and you have an easy storage solution that looks stunning.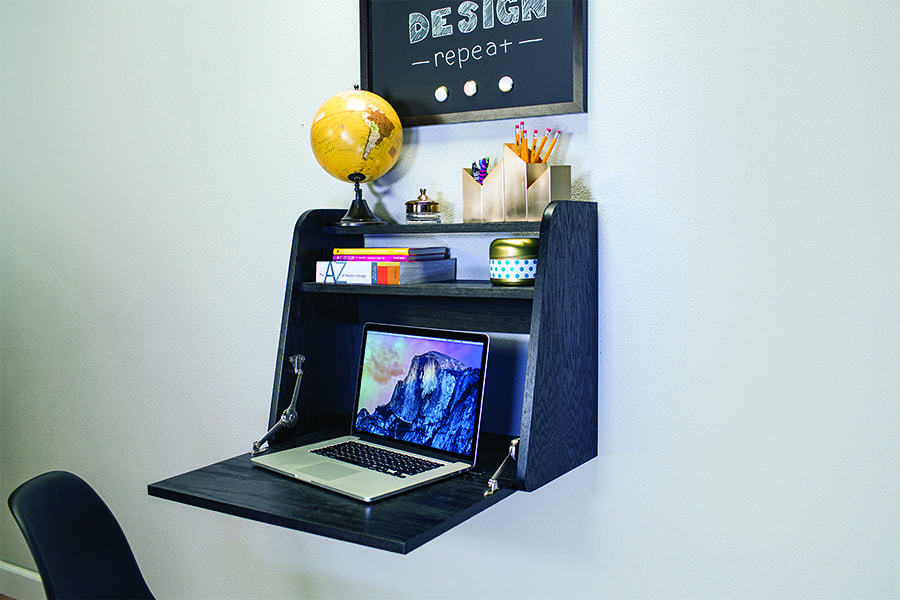 This DIY video gives you some great furniture ideas that can be made at a fraction of the cost of what it’d cost you if you were to buy it off the shelf.
3. DIY Cloud Bookshelf Ledges
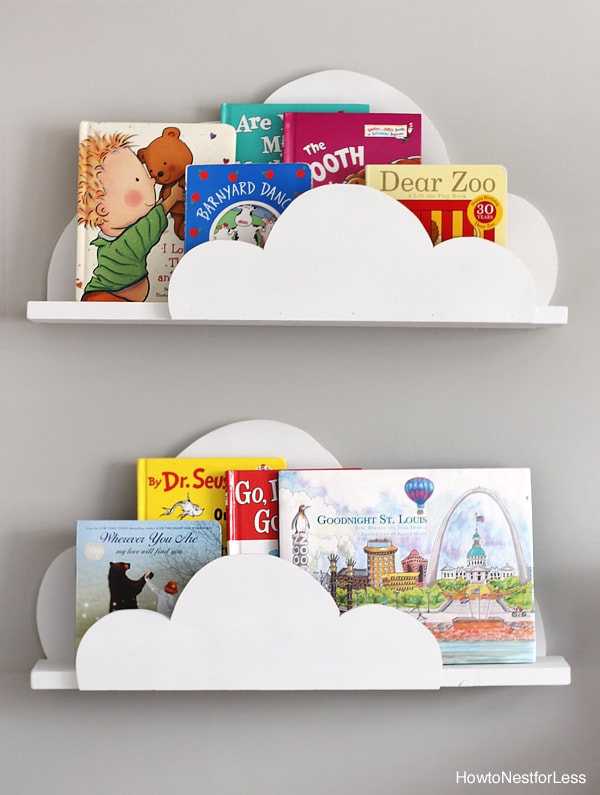 These Cloud Bookshelf ledges look so beautiful that most people would mistake to it be an expensive IKEA furniture piece.
In reality though, this is something that most people can rig in less than an hour and in less than $40.
A wooden board, some pieces of MDF, some screws and some milk paint. You are all set to float your favorite books in the clouds.
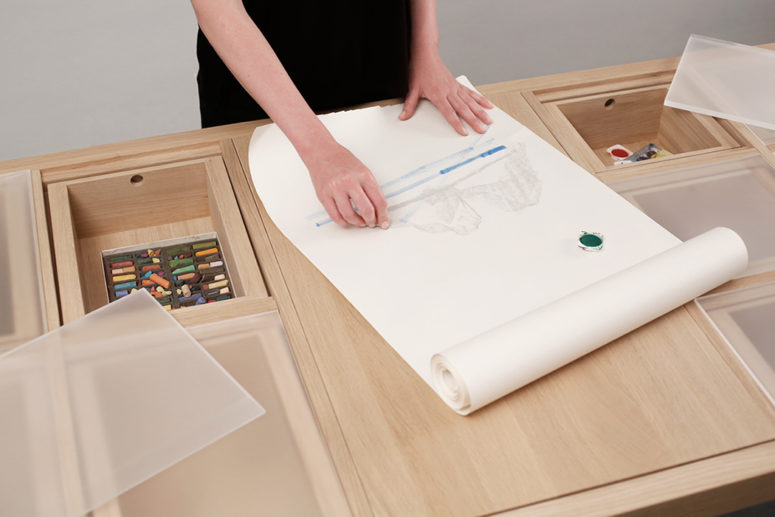
2. DIY Pop up pen Organizer
This pop up pen organizer is perfect for arts and crafts students who have to deal with a hundred different pencils and crayons.
It is roomy and features a bunch of compartments that allow you to organize your stuff.
Need those charcoal pencils the most? Store them in a compartment that’s closest to you. Segregate and store those graphite pencils according to their grade.
This pop up organizer ensures that you don’t misplace your pens and pencils and you can also add a small box lock to safely tuck away your stuff after use.
Can be built in a couple of hours on a weekend.
(Play the video for more detail)
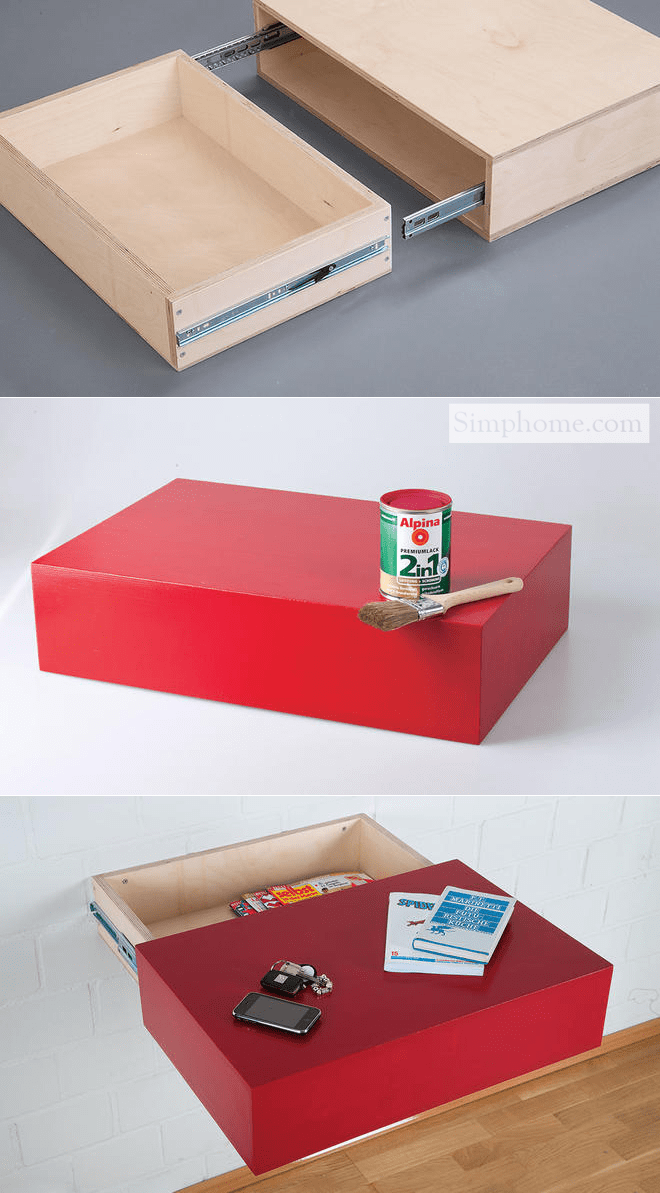
1. Easy False-Bottom drawer
Fancy a false bottom drawer that can safeguard your personal effects from prying eyes? Here’s one that doesn’t require you to grease your elbows too much.
A wood sheet that matches the exact dimension of your drawer’s bottom panel, some wine corks, a tube of industrial glue and some creativity will transform into your personal hidden storage space.
You can swap the wine corks for something else if you want the hidden compartment to have more depth.
Either ways, it’s the easiest hack to a false-bottom drawer that we’ve ever come across.
Tip: Be really creative with the handle.
Conclusion
That’s it fellow DIYers. We hope that you enjoyed browsing through this list. Do liven up the comment boxes with pictures of your DIY hidden storage ideas. Until next time, adios!
References:
20. Drawers In The Steps
Saving4six.com
Similary: Try this False-Bottom Drawer
Familyhandyman.com
19. Storage Chaise Lounge
Tonyandkristine.blogspot.com
18. Piano Shelf Sculptural Wooden Wall
Vurni.com
Meetsebastian.com
17. Apothecary Media Console with Storage Doors
2crafty4myskirt.blogspot.com
16. Makers Light, Shelf & Power Box
Instructables.com
15. Floating Corner Shelf with Drawers
Finewoodworking.com
14. DIY Recycled Furniture Projects
Buzzfeednifty
13. Flip Down Wall Shelf
Contemporist.com
12. Boxing Ring Inspired Side Board
Contemporist.com
11. Key Storage Hack
Selbst.de
10. Wooden Crate Headboard With Extra Hidden Space
Homedit.com
9. The Wooden Cloth Table
Dackelid-form.com |
Geyserofawesome.com |
Contemporist.com |
8. Fold Up Wall Desk
7. Contemporary Mid-Century Book Case
Digsdigs.com
6. The Ultimate Craftsmen’s Working Space
Digsdigs.com
5. Floating Storage Shelf That Transforms Into A Work Desk
Contemporist.com
4. Drop-Front Desk
Buildsomething.com
3. DIY Cloud Bookshelf Ledges
Howtonestforless.com
2. DIY Pop up Pen Organizer
Video by Buzzfeed nifty
1. Easy False-Bottom Drawer
Buzzfeed Nifty