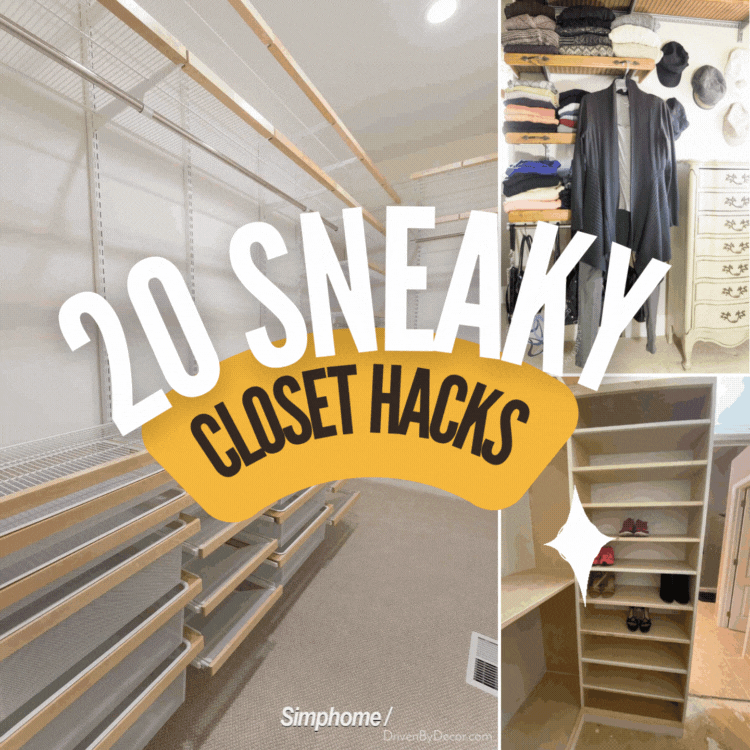
Welcome to “20 Dull Closet Makeovers” — a treasure trove of ingenious solutions to maximize your space and organize your belongings seamlessly. Have you ever imagined tapping into the potential of your overlooked closets or transforming them into sophisticated storage sanctuaries without burning a hole in your pocket?
Drawing from the expertise of industry leaders and inspired DIYers, this list guide presents affordable IKEA-based hacks and will dive deep into the nitty-gritty of crafting lavish Dreambox-style closets on a dime. Buckle up, dear reader, as we unravel secrets that promise to elevate your storage game and leave you awe-inspired!
20. Katrin’s DIY Expedit/Kallax Makeover: Your Step-By-Step Guide!

Note: Remember, Expedit’s now called Kallax.
Materials You’ll Need: Three Expedits (2×2, 2×4, 4×4), wood drill (with stopper), 6mm-dowels, Japanese saw, wood glue, metal brackets, perforated metal plates, and clamps.
Ready to Roll? Here’s Your Blueprint:
- Gather Your Shelves: Get a 2×4, 4×4, and a 2×2 Expedit. The 2×2? That’s for extra boards. Grab two as they are, and create two more by slicing that middle board with your Japanese saw and clamps. A nifty trick? Use an existing board as a guide for flawless cuts.
- Tweak That 2×4: Set it up as per the norm but with flair! Slide in an extra horizontal board. You’ll need to drill a couple more holes and pop in some snipped dowels.
- Redefine the 4×4: Go unconventional by adding extra horizontal boards and moving around some vertical ones for a fresher look. Forget about that bottom panel and go for a centralized solid board. If you’re feeling the vibe, pop in some brackets for added sturdiness, but that’s your jam.
- Drill Like a Pro: That wood drill with a nifty stopper will be your BFF. It ensures you won’t go drilling all over town. When tackling the thick yet hollow outer parts, proceed with caution. They’re solid only where the original screws fit.
- Bring ’em Together: Repurpose those dowels from the 2×2 to anchor the 4×4 to the 2×4. Given the outer boards are about 1cm solid and then turn hollow, you’ll want to glue those dowels in snugly.
- Solo Assembly Hack: Lay the shelves flat, inching them closer using clamps. Once they’re cozied up, lock them down with metal plates. Safety always!
- Lift-off and Final Touches: Here’s the workout part! Muscle up and get that entire 2.20m, 100kg structure upright. Bonus points if you have a pal to help! To wrap it up, slide in those chic Expedit doors.
Heads Up: Expedits are a bit delicate and prone to scratches. Got a plushy carpet? You’re golden. If not, cozy it up with a blanket during assembly.
19. Unleash Your Inner DIY Maven: Target’s Closet Hack by @Laelani Lash!
Hey, savvy DIY enthusiast!
Have you ever dreamt of that perfect, Instagram-worthy closet? Grab your tape measure because precision is key! Your shopping list:
– Five 5X shelf bookcases from Target.
– Four three-drawer modular chests.
– Four 3-cube organizer shelves.
Swing by Lowe’s and scoop up eight stylish closet tension rods with holders. Now, a quick tip: the rods come with holders, but upgrading to the chic ones, Laelani showed amps up the aesthetic.
Ready? Dive in! Assembling might bring some “oops” moments (yep, our author had hers), but trust me, it’s all part of the DIY charm. Pro-tip: If you’ve got a handy partner or friend, recruit them. Two heads (and sets of hands) are better than one!
Ensure those measurements are on point for that sleek finish when it comes to the nitty-gritty of rod holders – a heads up! Ditch the default chunky screws for slimmer ones. This ensures your holder sits perfectly flush. Tighten up, but fair warning, this bit’s a challenge.
18. For Just $36, You Can Craft an IKEA Dream Closet in Your Hallway!
Have you ever fantasized about New York City living but stumbled upon the oh-so-common closet-less apartments? Picture this: Your sunlit space is drenched in warm rays, ceilings as tall as the city skyscrapers, and there’s even that unexpected window in your shower. But… where’s the space for your beloved wardrobe?
Here’s the dilemma you and your fashion-forward roomies could face in your chosen Williamsburg nook. Now, there’s enough style between the lot of you to start a mini fashion boutique. On a classic twenty-somethings budget, creativity is your best friend.
Enter the genius hallway makeover! You’ve toyed with the idea of IKEA’s Pax wardrobes, maybe even dreamt of them after a tip from the stylish Jordan Ferney. But your jackpot? IKEA’s Mulig clothes bars. At a mere $5.99 each and only needing six, your bank doesn’t even blink.
These Mulig bars are the MVPs, stretching from 23 inches to a whole 35 inches. That’s enough space for your flowing dresses, cozy winter coats, and yes, even that sparkly special occasion outfit. Secure them with trusty toggle anchors, creating your very own closet corner.
And why stop there? Level up by adding wooden shelves above those racks, a twin to your bookshelves, making room for those extra heels. Voilà! Your hallway’s now a runway, ready for spontaneous fashion shows amidst your neatly arranged collection. So, who says NYC living can’t be stylish and budget-friendly?
17. Jazz Up Your Hallway: IKEA Cabinets Turned Shoe Closet!
Ready to step up your shoe storage game? Dive into this swanky IKEA transformation from @athomewithdea, and give your hallway a fresh breath of life. Here’s how you do it:
- Select Your Cabinets: Grab 2 Ställ shoe cabinets from IKEA. They’re sleek, with a base coat of acrylic paint, and are made from sturdy particleboard (bonus: the edging is plastic).
- Wall Mounting Magic: Wondering how it’s attached? It’s mounted just above your wall’s trim, roughly 8-10 cm off the ground. No more tripping over shoes!
- That Chic Wooden Top: While the cabinets come in white, that stylish wooden finish on top isn’t original. You can purchase a separate birch piece from Bauhaus and stain it to achieve that warm wood effect.
Or are you on a budget but still want the wood vibe? Slap on some wood foil right on top. It’s easier on the pocket and still gives you the desired look. - Sizing it Right: The wooden piece on top? It extends about 6-7 cm beyond the cabinets’ length. And those border pieces you spotted at 0:06? They measure around 6 cm.
16. An Affordable IKEA Shoe Closet Makeover Guide! @Jpbyjp
Ready to elevate your closet game? Dive into this stylish shoe storage hack using a sprinkle of IKEA genius just for you.
- The Main Attraction: Grab the Burhult shelf. For only $2.49 each, it’s a steal! Take a look: [Burhult Shelf]
- The Perfect Pair: Add those essential Sibbhult brackets. Tiny but mighty and a bargain at $0.75 apiece! See them here: [Sibbhult Bracket]
- Let’s Get Building: Have a DIY-savvy friend? Maybe rope them in! Fit those shelves in your closet, perfectly spaced for your sneaker pride.
- Showtime: Now, picture your sleek white shelves tucked into that closet corner, each one waiting for your favorite sneakers. Arrange, and voilà!
A little heads up – if your sneaker collection rivals a celeb’s, not all might find a home. But don’t fret; this is just step one of your closet glam-up journey. Keep exploring and transforming. Your footwear and closet will love you for it!