Are you still struggling to control your clutter while dreaming of indulging your guilty pleasure in IKEA marketing plans, discounts, quirky innovation, and those greasy meatballs? Gear up for ’20 IKEA’s Dream Closet Ideas,’ where we present a variety of challenges to fuel your adrenaline.

Start with the grand and scale down as your budget allows, transforming your space into an organized masterpiece.
20. Ikea Hack: Ivar Wardrobe Transformation
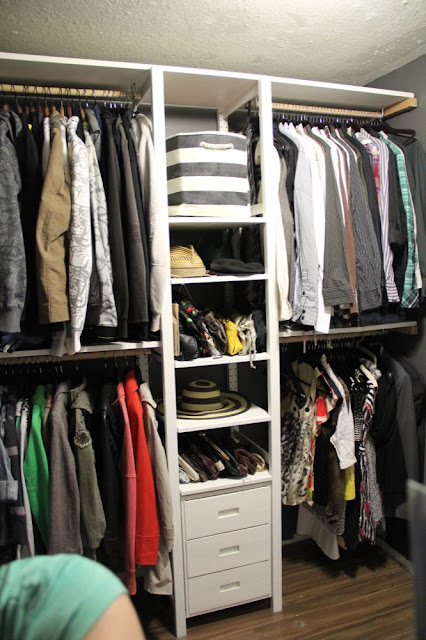
You’re about to turn a mundane space into a stunning walk-in wardrobe. It’s a project that’s still evolving, but trust me, it’s shaping up to be absolutely fabulous.
Before the Magic:
Let’s rewind a bit. Your starting point is a typical closet space – nothing to write home about. Oh, and that random pink skeleton perched atop the dryer? Not part of the original design plan, but it adds a quirky touch, doesn’t it? Consider it a bonus Halloween décor!
Color Coordination:
First things first, the color scheme. Your bedroom walls are a soothing pale blue, but the wardrobe? Stark white. Why the previous owner opted for this mismatch is anyone’s guess. To create a seamless flow, you decide to paint both the bedroom and the wardrobe in a chic Benjamin Moore Kendall Charcoal.
A Misplaced Dresser:
In a stroke of initial optimism, you place an IKEA Malm dresser right in the middle of the wardrobe wall. Spoiler alert: it’s not the right fit. Luckily, it finds a cozy nook beside the stacked washer and dryer, a perfect temporary solution until you figure out the corner’s destiny.
Craving for Closet Space:
You’re in dire need of hanging space. Enter the hero of our story: IKEA Ivar parts, snagged from Craigslist for just $55 (delivered, no less!). Sure, they’re a little rough around the edges – think blue paint and doodles – but they’re ripe for transformation.
The Makeover Begins:
Choosing the best Ivar parts, you grab some Behr paint from Home Depot in a crisp white, mirroring the Malm dresser. After a thorough sanding, priming, and painting session, you’re ready to assemble your wardrobe tower, right in the middle of that long wall.
Assembly Adventures:
It’s not all smooth sailing. The drawers seem to have lived a previous life outdoors, swollen and stubborn. But after some determined sanding, they finally slide into place. The hardware for the drawer unit? Missing. A quick trip to IKEA doesn’t yield much without a receipt. No problem – you improvise with metal L-plates, securing the unit with eight brackets for each corner.
Custom Shelving:
You’re not just settling for Ivar shelves; you’re going custom too. Pine planks are cut to size, with two pieces joined for a longer top shelf, all painted in the same white as the Ivar unit.
Installing the Rods:
Here comes the fun part – installing rods for your clothes hangers. You attach metal L-plates to the wall studs, place a 1.5″ by 1.5″ wooden piece on top, and secure it. A shelf is added to this wood and the Ivar tower, with U-hooks and a wood dowel creating the perfect hanging space.
Final Touches:
Matching the shelf heights to the Ivar frame rungs, you ensure stability, using L-plates for extra strength. The result? A closet space that’s not just functional but also aesthetically pleasing.
Personal Touches:
Your favorite part? Displaying your bags, no longer hidden in moving boxes. The adjustable shelves accommodate everything from summer hats to winter gear, effortlessly adapting to your needs.
Reaching New Heights:
The towering unit almost kisses the ceiling, adding grandeur to your space. And that IKEA Farum rug, snagged for just $29.99, brings everything together, making the room feel complete.
Cost-Effective Creativity:
In total, this project sets you back a little over $150. Here’s the breakdown: $55 for the Ivar parts, around $60 for the pine planks, about $30 for the paint, and $20 for the wood dowels, supporting pieces, and hardware. Considering the size and quality of your new closet, that’s a steal!
Before and After:
Pat yourself on the back, because the transformation is stunning. From a forgettable space to a chic, organized wardrobe, you’ve done it. But wait, there’s more to come!
Future Plans:
You’re not done yet. Plans for overhead lighting to brighten those lower shelves, drapes to separate the bedroom from the wardrobe, and perhaps a strategically placed mirror are already brewing in your mind. That misplaced Malm dresser? Its destiny is yet to be determined.
So, there you have it – a step-by-step guide to creating your dream IKEA Ivar wardrobe. It’s a tale of creativity, perseverance, and a little bit of elbow grease. Now, go forth and transform your space. You’ve got this!
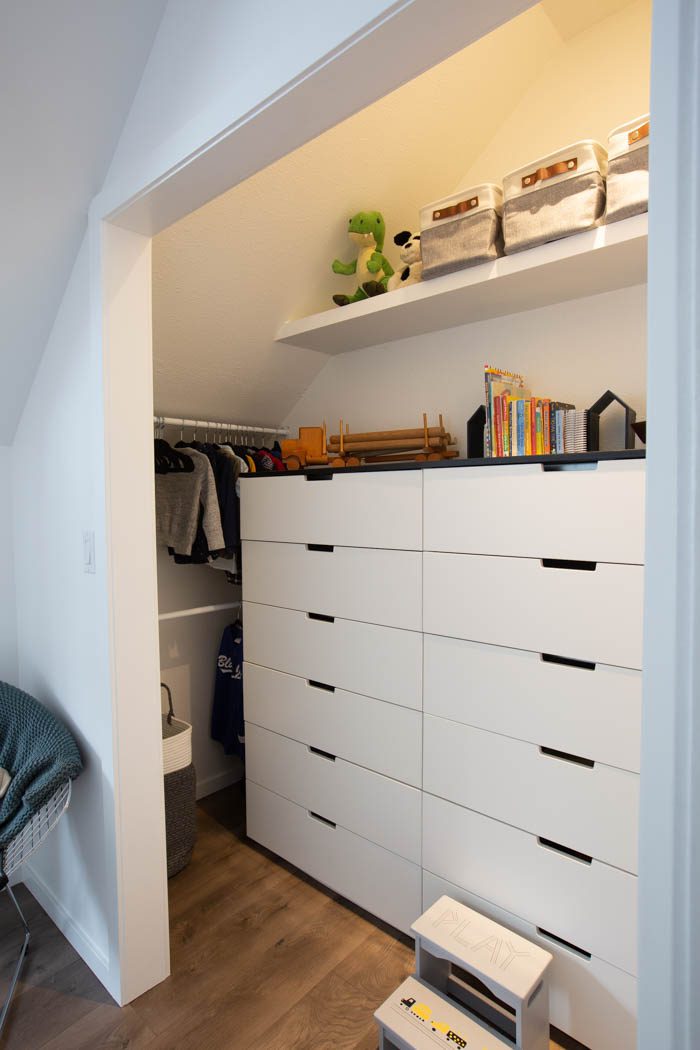
19. IKEA Nordli Hack: Small Closet Makeover Magic
Ready to tackle a fun and functional makeover for a small closet?
Let’s transform it into a snazzy, organized space that’s perfect for your kiddo.
We’re talking about an IKEA Nordli hack that’s going to rock your world!
- Finding the Treasure:
You’ve been hoarding Nordli cabinets from IKEA’s AS-IS section for $20 each. A total steal! Six of these beauties have been chilling in your garage, and now it’s their time to shine. - The Closet Before:
Picture this: a small, unassuming closet in a room that’s been a playroom for years. It’s pretty basic – white walls, no storage. But hey, it’s a blank canvas! - Prep Work:
Roll up your sleeves and start by emptying the closet. You’ve got some patchwork to do – filling holes and removing old trim. You’re going for a fresh vibe that matches the rest of the house, so out with the old and in with the new! - Sprucing Up the Walls:
Grab some spackling for those pesky holes. Larger ones? Use wall spray texture for a seamless look. Then, give those patched areas a quick primer coat. - Flooring and Trim Time:
Revamp the room with Silverleaf laminate flooring from Golden Select. It’s the final room in your home to get this upgrade, so it’s a big deal! Match all the trim with the rest of your house for a cohesive look. - Painting Party:
Now, let’s paint! Using Wagner’s EZ Roller, you’re going to make this job a breeze. Fill it with paint, prime the roller, and get rolling. The perks? No constant tray-dipping, minimal drips, and an ergonomic handle that makes reaching high spots easy. Plus, it’s a snap to clean. - IKEA Nordli Hack Time:
You’ll need tools like a table saw, pocket hole jig, clamps, nail gun, mitre saw, drill, and a laser level. For supplies, gather construction adhesive, spackling, caulk, plywood for the countertop, 2x2s for bracing, flat stock moulding, and MDF for shelving. - Building the Base:
Craft a custom base using scrap wood – dimensions are 15 1/2″ deep x 62 1/2″ long x 1 1/2″ tall (or 15″ x 62″ sans trim). This allows a neat overhang for the Nordli units. Trim details? Go for flat stock, cut to 1 1/2″ tall, painted white. - Creating the Top:
For the countertop, use plywood and lumber scraps. Your dimensions: 17″ deep x 63 1/4″ long x 3/4″ thick. Add wood strips to the exposed edges, then prime and paint it black for a sleek look. - Assembly and Installation:
Assemble the Nordli units, three high, using the included connectors. Secure the base to the floor, aligning with any wall studs. Attach the countertop with pocket holes drilled into the top of the Nordli units. Level, clamp, and secure the drawers together, then anchor everything to the wall studs. - Adding a Floating Shelf:
To maximize storage, add a floating shelf above the drawers. Use 1″ thick strips as a brace, screwing them into wall studs. Wrap the brace with 1/2″ MDF for a seamless look. Install it 19″ above the drawer top, making it 12 3/4″ deep – perfect for baskets. Attach the MDF to the bracing with adhesive and brad nails, then fill, caulk, sand, prime, and paint. - The Final Touches:
Organize the closet with items like white bins, a hanger rod, walnut hooks, hangers, a laundry hamper, a walnut bowl, and collapsible fabric storage baskets. These functional additions make the closet not only organized but also stylish. - Budget Breakdown:
This entire Nordli hack project adds incredible value to your home without breaking the bank.
It’s a huge upgrade from standard builder-grade closets, giving your son’s room a high-end feel on a budget.
So, what do you think? Excited to hit IKEA’s as-is section for your next renovation adventure? This IKEA Nordli hack proves that with a little creativity, some DIY skills, and a sprinkle of patience, you can transform a simple space into something spectacular!
18. Double Dream Closet to Inspire you
IKEA Closet Hack 1 from @Bebradas
Revolutionize your space with the IKEA Pax planner! Head to IKEA’s website and delve into the “Pax planner” and “Design from scratch” options. Create a customized wardrobe sans doors for around €450, but with doors, it elevates to approximately €700. Despite the fantastic customization, you’re confined to choosing from three frame widths: 50cm, 75cm, or 100cm. The limitations in size options make it a bit restricted, but the customization potential is vast within these parameters.
IKEA Closet Hack 2 from @Onemoreproject
Embark on a transformative closet journey using the Target bookshelf hack and two IKEA dressers. Begin by removing the old shelf, painting it white, and assembling the $40 Target bookshelves. These versatile bookshelves can work wonders, and with just two, you can revamp your closet or even an entire walk-in space economically, creating an aesthetically pleasing look. Enhance the visual appeal by adding headboard wallpaper to the back, available on Amazon.
A trip to Lowe’s brings closet rods and shelves into the picture. Cut them to size, and stain with Varathane’s subtle wood stain for a cohesive look. While initially concerned about the grayish hue, wiping off the excess reveals a pleasant match with the dressers. Install curtain rod holders on the bookshelf sides, ensuring a secure fit. A laser level and stud finder aid in marking out precise spots for shelf bracket installation. Secure the shelf in place, and voilà—the closet upgrade is complete!
In both hacks, the cost-effectiveness shines through. The Pax planner offers a personalized wardrobe experience, albeit with predefined frame widths. On the other hand, the Target bookshelf hack demonstrates the power of creativity, utilizing affordable components to revitalize your closet space. Whether you prefer customization or creative repurposing, these IKEA hacks bring a fresh and budget-friendly perspective to closet makeovers.
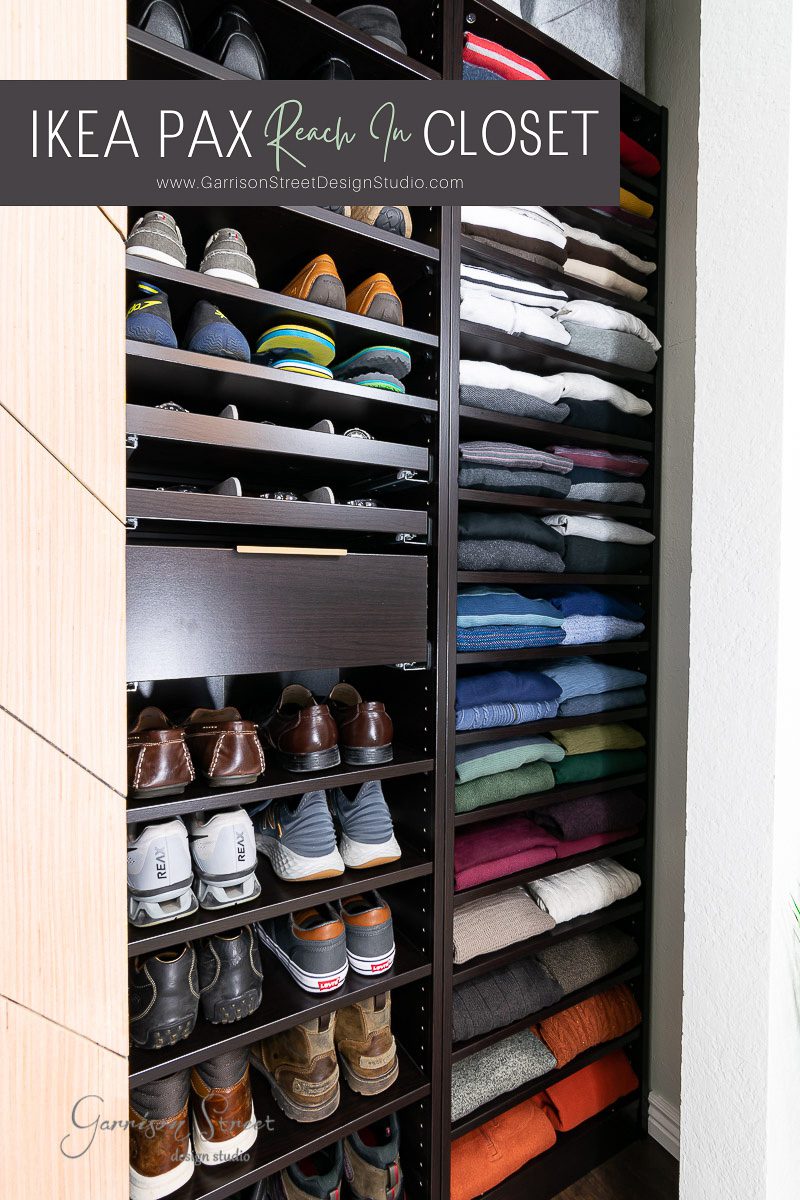
17. IKEA Pax Reach In Closet: A DIY Makeover Guide
Ready to dive into an exciting closet makeover adventure? Barry’s IKEA Pax reach-in closet transformation is here to inspire you, and trust me, it’s a game changer. If you’ve ever dreamt of turning a cluttered closet into a sleek, organized haven, this is your moment.
Understanding Your Space:
Your average reach-in closet might look something like this: 80.5 inches wide, 24 inches deep, and 92.5 inches tall, with a door opening of 58×80 inches. The real challenge? Utilizing every inch smartly. You know, the gap between hanging clothes and the floor? That’s prime real estate going to waste.
IKEA Pax to the Rescue:
IKEA’s Pax system is the star of this show. For Barry’s closet, we’re talking about:
- 2 IKEA PAX Small Frames (19 5/8×13 3/4×79 1/8)
- 23 Komplement Shelves (19 5/8×13 3/4)
- 1 Komplement Drawer (19 5/8×13 3/4)
- 2 Komplement Pull Out Trays (19 5/8×13 3/4)
- 2 Komplement Dividers (19 5/8×13 3/4)
- Plus, drawer liners, valet hanger, Pudda baskets, wooden hangers, labels, finger pull, closet rod, and the needed tools.
- Planning is Key:
Hop onto IKEA’s website and use their Pax Planner. It’s a nifty tool for visualizing your dream closet with your specific dimensions. Plus, it’s a shopping list wizard. - Layout Logic:
Our closet’s unique “wings” and 24-inch depth mean we’re working with shallow Pax frames. We positioned both frames on one side to maximize space, adding pull-out trays and a drawer in the clearer area for accessories. - DIY Side:
The other side of the closet needed a custom touch. We reused the existing shelf and supports, painting them to match the IKEA frames. Attach these supports into the wall studs, and use 1-inch nails to connect them to the IKEA frames carefully. - Closet Rod Considerations:
A metal closet rod, around 40 inches long, was chosen for its durability. If needed, trim it with a miter saw. Attach the rod securely to the wood supports with sturdy brackets. - Finishing Touches:
Our ceiling height restricted us to shorter Pax frames, so we topped the closet with IKEA Pudda baskets for less-used items. Label them for easy access. A gold finger pull adds a chic touch to the drawer, and wooden hangers from IKEA ensure your closet isn’t overstuffed. - Door Makeover:
Don’t forget the doors! A fresh look for them can elevate the entire room’s aesthetic.
The Big Reveal: And there you have it! A beautifully organized closet that makes life easier and more stylish. Whether you’re tackling this as your first DIY project or you’re a seasoned IKEA hacker, this makeover is sure to add a spark of joy to your daily routine.
Now, who’s ready for their next IKEA adventure?
16. Anna Laura’s Kallax Closet Hack: A Stylish Storage Solution
Imagine moving into your new apartment, with every “thing” finding its perfect place.
After assembling your second IKEA PAX cabinet, you’ve finally got a drawer or box for everything.
But let’s focus on something more exciting: your wardrobe transformation, not just where the vacuum cleaner hides.
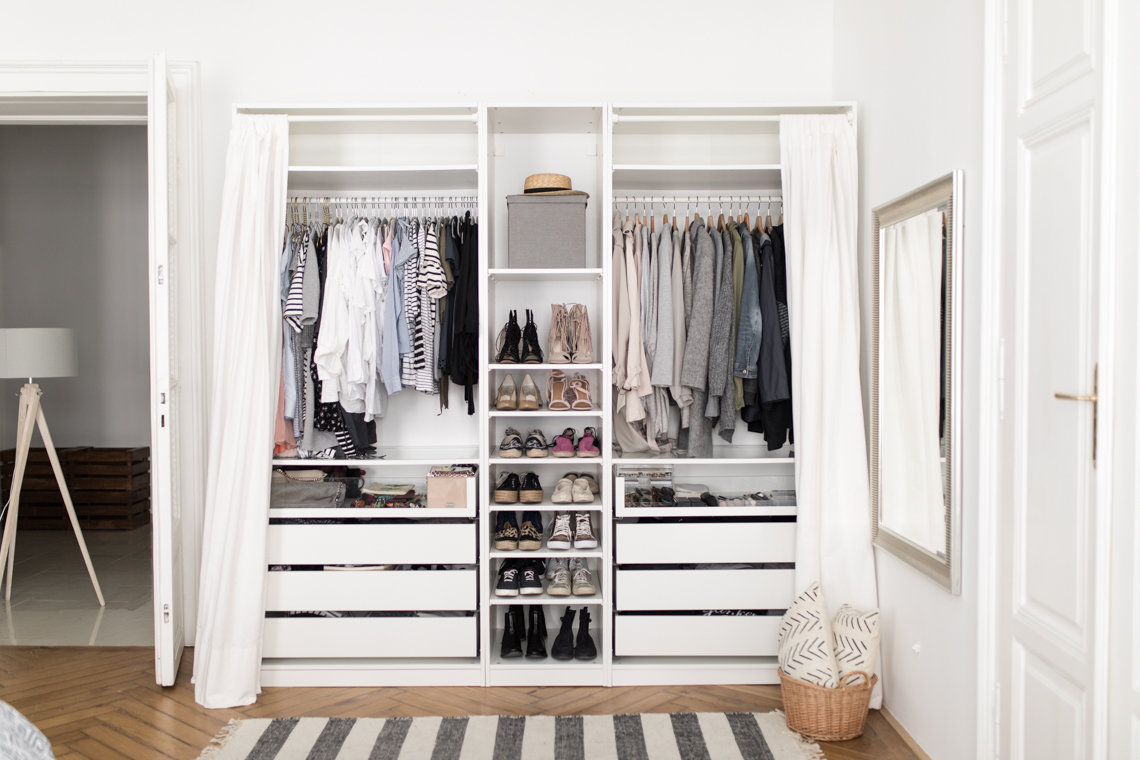
Your IKEA PAX Wardrobe Setup:
Opt for a spacious IKEA PAX wardrobe, measuring 250cm wide, 236cm high, and 58cm deep.
It features a 50cm wide middle section sandwiched between two 1m wide side sections.
Initially, you might’ve used the narrow section for books, but now it’s a stylish shoe showcase.
Symmetry and Style:
You chose symmetry over practicality, sacrificing long-hanging space for a pleasing, balanced look.
It’s all about what works for your style and organizational needs.
Innovative Door Solution:
Remember the hassle of sliding doors? You’ve wisely decided against them.
Choosing between box doors and an open wardrobe, you’ve gone for the open look.
It’s all about ease and visibility, seeing your outfits at a glance without the fuss of opening doors.
Outsmarting Dust:
The downside of an open wardrobe? Dust. But don’t fret. Embrace your inner Taurus and get creative. You’ve ingeniously added extra clothing stands at the top of the wardrobe, cleverly solving the dust issue while keeping the open feel.
Visualize Your Transformed Space:
Picture this: a neatly organized wardrobe where every pair of shoes, every piece of clothing, has its own place. The convenience of this open and accessible setup makes your daily routine smoother and more enjoyable. It’s not just a storage space; it’s a reflection of your personal style, a testament to smart design and functionality.
Now, you’ve got a wardrobe that’s more than just storage; it’s a statement of elegance and practicality, all thanks to a bit of IKEA ingenuity and your creative touch. Welcome to your newly transformed, stylishly organized life!