We’re all about breathing new life into those ubiquitous cubby shelves that have become a staple in homes across the globe. If you’ve been around the block of home organization and décor, you’re familiar with these versatile storage options. However, today we’re not just talking about using them as they are – we’re diving into the world of customization, where creativity meets functionality.
Imagine walking into a room and being greeted by a storage unit that’s not only practical but also a stunning piece of art. That’s what we’re aiming for in this post. We’re transforming the mundane into the magnificent, taking a simple cubby shelf and turning it into a statement piece that echoes your personal style and meets your unique storage needs.
The beauty of these hacks lies in their simplicity and accessibility. You don’t need to be a seasoned DIYer with a garage full of tools. With some basic equipment, a sprinkle of creativity, and a dash of patience, you can embark on this journey of transformation. We’re talking about changes that range from the subtle addition of color and texture to complete overhauls that redefine the very purpose of these shelves.
Let’s start with the basics – a fresh coat of paint. It’s amazing how a new color can completely alter the look and feel of a piece of furniture. But why stop there? Consider adding wallpaper to the back of each cubby for an unexpected pop of pattern. Or, for those who are a bit more adventurous, why not turn a cubby shelf on its side and add legs to create a chic console table?
The possibilities are endless. Think of adding fabric bins for a softer look, or wooden crates for a more rustic feel. You can even add doors to some of the cubbies, turning them into mini cabinets that hide away clutter. And for the craft enthusiasts, how about a cubby shelf turned into a crafting station, where each compartment holds different supplies?
These transformations aren’t just about aesthetics; they’re about functionality. A well-organized space can bring a sense of calm and order to your home. It’s about creating a space where everything has its place, whether it’s books, toys, craft supplies, or even your treasured collection of knick-knacks.
So, join us as we delve into the exciting world of cubby shelf customization. We promise that by the end of this journey, you’ll look at these humble storage solutions in a whole new light. Let’s get those creative juices flowing and turn the ordinary into the extraordinary. Your home is a canvas, and these cubby shelves are your tools to create a masterpiece.
20. DIY Cube Storage Makeover (& Tutorial)

Hey there, DIY enthusiast! Ever feel like your rented space needs a bit of “you” in it, but can’t exactly knock down walls or repaint? Well, have I got a project for you! Let me take you on a journey of transforming a bland cube storage unit into a show-stopping piece. Trust me, it’s a game-changer, and I’m here to guide you through every step.
First, Picture This:
You’re in your cozy (but not quite ‘you’) home, staring at a cube storage unit that screams “meh.” It’s time to bring in some personal flair! Imagine a cozy boho farmhouse vibe. That’s the target. But here’s the kicker: the unit you have sticks out like a sore thumb. You could sell it, but let’s be real – that’s not happening. So, what do you do? You grab your DIY hat, and you get to work!
Embracing the Process:
Remember, great design isn’t an instant coffee affair. It’s more like a slow-brewed, aromatic experience. You might toss and turn over multiple ideas, but that’s part of the fun. After some head-scratching and Pinterest-scrolling, I had my lightbulb moment.
Here’s the Master Plan:
We’re going to wrap each bin with stained wood for a natural, rustic charm, blending farmhouse warmth with sleek modern lines. Picture that transformation!
Shopping List:
This is for 6 – 11” cube storage bins (adjust as needed):
- 6 – 1⅜” x 8’ pine lattice boards (cut them into 11” pieces)
- Your favorite wood stain (I’m a Walnut gal)
- Super glue (the mightier, the better)
- Stylish Handles or Knobs
Let’s Get Crafty:
1. Slice and Dice: Cut those boards into 11” strips. Quick tip: Use a stopper for uniform cuts – less measuring, more efficiency.
2. Stain Baby, Stain: Coat every inch of the wood, even the back (trust me, you don’t want any pale surprises later). Give it a day to dry and say adieu to that stain smell.
3. Stick ‘Em Up: Glue the stained wood to the BACK of the bins (front holes can be a nuisance). And remember, no glue on the top and bottom edges – we’re going for seamless here.
The Grand Finale:
4. Handle It: Choose handles that have a good base for super glue. Glue them where screws usually go and press hard for a solid minute. Give it another day to bond.
5. Staple for Assurance (Optional): For extra hold, especially for heavy bins, staple each side of the handle on the wood. It’s like a little security blanket for your masterpiece.
Voilà!
Now, not only does your cube storage look like a million bucks, but it’s also sturdy enough to handle those heavy books or secret chocolate stashes. This project might set you back about $50 (depending on what you already have), but the end result? Priceless.
19. IKEA TROFAST CLOSET HACK – Your Step-by-Step Guide to Organizational Bliss
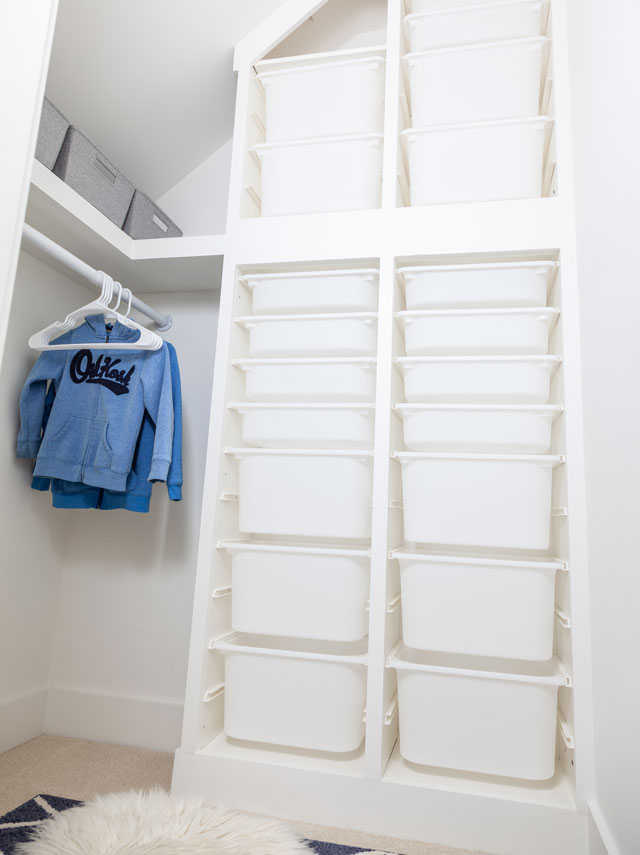
The ‘Oh No’ Before:
Picture this: a closet so cluttered it’s almost a no-go zone. You’ve been there, right? Well, it’s time to wave goodbye to the chaos. The plan? Four IKEA Trofast storage units, a genius blend of tall and short, are about to turn this mess into a marvel, fitting perfectly under that 8’ ceiling.
IKEA Shopping Spree:
Grab these essentials:
- 2 Tall IKEA Trofast Storage Units
- 2 Short IKEA Trofast Storage Units
- A mix of IKEA Trofast Storage boxes: small, medium, and large
Building the Base (Literally):
First things first, let’s build a base. This isn’t just any base; it’s a stage for your storage units to shine and mesh seamlessly with chic baseboard trim. Start by clearing away old baseboards, aiming for that flush wall fit. Your base should hoist the units just 1.5” off the ground, primed for a dashing 1×6 baseboard trim.
Spacer Magic:
Think of spacers as the unsung heroes of DIY. These wooden wonders create the perfect gap for face trim and ensure everything lines up just right. Your Trofast units will hug the back wall, but let’s create a little breathing room on the left with spacers. We’re talking wood strips, screwed into wall studs, setting the stage for that perfect 1×2 wood trim finish.
Unit Assembly Unleashed:
It’s time to bring in the Trofast units. Start on the left, stack the short unit atop the tall one, and secure them to your handy spacers. IKEA’s brackets will anchor them to the back wall. For the right side, introduce slightly thinner spacers (around ¼”) for that 1×2 trim alignment.
Face Framing: The Game Changer:
This is where the magic happens. The face frame trim is the final touch that elevates your storage from functional to fabulous. We added a bit of paneling on the exposed right side for that seamless look. Nail in your trim pieces using a finish nailer and construction adhesive, tailoring them to your space’s dimensions.
Finishing Touches:
The final lap! Fill those nail holes, caulk up the seams, and get painting. For larger gaps, a backer rod is your friend. Painting-wise, focus on the trim. I found Sherwin Williams’ Alabaster paint a neat match with the Trofast units.
The Big Reveal:
Step into your kids’ closets now and bask in the glory of walk-in (and step-free) bliss! These Trofast units are kid-friendly wonders, with bins they can shuffle around with ease. Top bins? Perfect hideouts for linens and out-of-season gear. This hack has turned a cluttered nightmare into a neatly organized dream.
18. Ikea Hack – Billy Bookcases Transformed Into Chic Custom Cabinetry
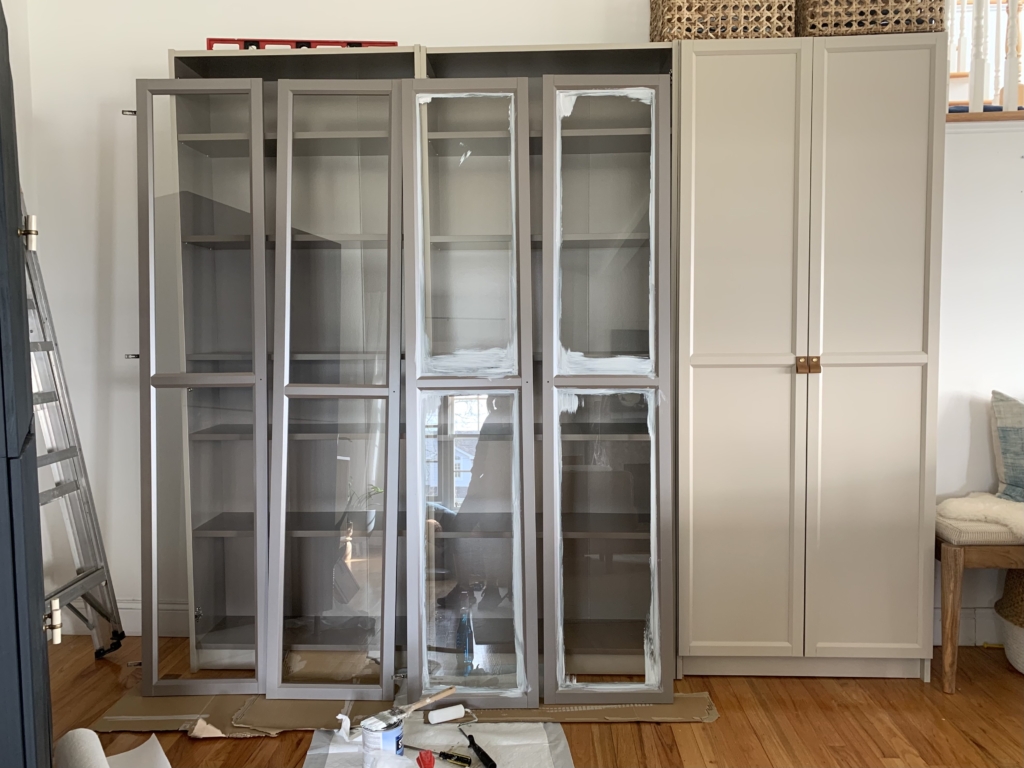
Get ready for a thrilling DIY adventure where you’ll transform simple Ikea Billy bookcases into stunning, custom-looking cabinetry for your living room! Imagine needing extra storage without the clutter of open shelving. While the Pax wardrobe system might have been too deep for your space, Billy bookcases are just right.
First, you’ll pick Billy bookcases that are light enough in color to paint over easily. Unfortunately, in the U.S., they don’t come with solid doors, so you’ll need to get creative.
Assembling these bookcases is straightforward.
- Line them up to ensure they fit perfectly into your space. To cover the glass, apply a layer of Stix primer – this stuff is solid and durable.
- Next, use Valspar Cabinet Paint in Realistic Beige to give those doors a chic, bespoke look.
- Once the paint dries, it’s time to attach the doors. This part requires some finesse with the screws to get them perfectly even. Here’s a fun part: you’ll make your own leather pulls (check out the tutorial on Instagram). It’s surprisingly easy and adds a personal touch.
- The trickiest part? Getting the bookcases level and securely attached to the wall. But don’t worry, Ikea provides all the necessary hardware for this. It’s a bit of a challenge but crucial for safety and stability.
For a stylish finish, top the bookcases with chic baskets – you can find great options at Target, especially from Studio McGee, if Ikea’s out of stock. These baskets add functional style and are perfect for hiding away those miscellaneous items.
To complete the look, place a bench next to the cabinets to create a pleasing contrast in heights. The space might be unique, but the outcome is stunning. Add some cozy pillows from your collection to the bench for an extra cozy vibe.
And of course, let’s not forget the pet approval – it seems Denny, your furry friend, has already taken a liking to the new setup, even if he does love messing up the sofa!
17. IKEA HACK: Transform a Simple Cube Storage Unit into a Mid-Century Modern Marvel
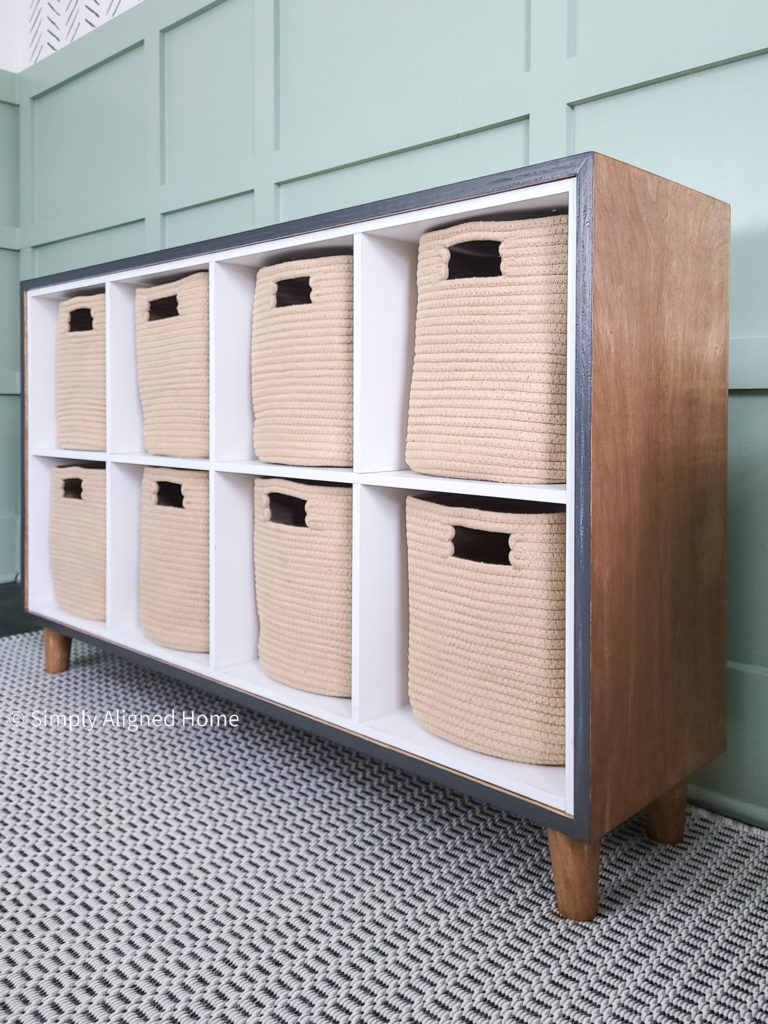
Ever looked at that plain cube storage unit tucked away and thought, “Meh”? Well, get ready to turn it into a piece of furniture you’ll actually want to show off!
Step 1: Back Panel Upgrade
Tired of toys tumbling out? Swap those flimsy back panels with two sturdy pieces of 1/4″ plywood for a solid backing. For safety, especially with kids around, notch out spaces to secure the unit to the wall.
Step 2: Wrapping in Warmth
Bring in some coziness by wrapping the unit in 3/4″ birch plywood, extending 3/4″ beyond the edges for that extra oomph. Miter the corners for a seamless look, securing with construction screws, brad nails, and wood glue. Keep it clamped until the glue sets.
Step 3: Pre-Stain Prep
Fill any gaps and sand down the wood, especially the wood filler spots, with 220 grit sandpaper. Don’t skip the pre-stain wood conditioner for an even finish.
Step 4: Feet First
Raise your unit off the ground with some chic feet. If they’re sealed, give them a good sanding to prep for staining.
Step 5: Stain Away
Embrace the beauty of water-based stains for a quick, low-odor transformation. Apply your favorite shade (Early American, anyone?) with a cloth, adding layers until you reach the desired richness.
Step 6: Face Frame Facelift
Add character by painting the face frame. Sherwin-Williams’ Iron Ore is a great pick. A couple of coats with a craft brush should do the trick.
Step 7: Seal
Protect your hard work with two coats of water-based polyurethane, lightly sanding between coats.
Step 8: Attaching the Feet
Mount those stylish feet with metal plates, easily screwing them to the bottom of your newly wrapped unit.
Step 9: Bin Makeover
For a nursery-safe option, choose fabric storage bins. Iron out any creases for a crisp, clean look.
And there you have it! Your once boring cube storage is now a stunning, functional statement piece, perfectly suited for any room, even a nursery. It’s amazing how a little wood, paint, and creativity can completely transform a piece of furniture. Time to bask in the glory of your DIY prowess!
16. Transforming Ikea Cubes into a Chic Welcome Desk @Timberntwine
Ready to turn those ordinary Ikea cubes into a stunning welcome desk? Here’s how you can make it happen – and trust me, it’s going to be a fun ride!
- Foundation First: Start by bonding your four Ikea cubes using liquid nails and screws. This is your desk’s core, so make sure it’s sturdy!
- Building the Base: For the base, grab some 2x4s and create a frame using pocket holes. This will give your desk the right height and stability.
- Add Mobility: Fancy a desk you can move around? Attach four-inch caster wheels for that high-end mobility vibe. Wheel it in, wheel it out – you’ve got options!
- Panel Magic: Head to Lowe’s (or your favorite hardware store) and pick up quarter-inch white paneling. Get it cut to size for an easy fit and transport. This will give your desk a sleek, finished look.
- Zigzag Dowels for Fun: Since this is for a kids’ space, let’s add some pizzazz. Grab 60 square dowels and create a zigzag pattern. Attach them with – you guessed it – liquid nails and a brad nailer. Trim any excess for a neat finish.
- Paint Party: Painting can be a bit of a task, but it’s totally worth it. Bring in colors from a previous project (like a six-foot sign) to maintain thematic consistency and add a youthful touch.
- Countertop Craftsmanship: Use 16-inch edge-glued pine panels for the countertop. Opt for a waterfall edge on the sides – it hides the dowel ends and looks super sleek. Sand, stain, and voila!
- Assembly Time: Bring all the pieces into your space and assemble them using, yes again, liquid nails and screws.
- Budget-Friendly Customization: This entire transformation might set you back about $260 in supplies (excluding the cost of the Ikea Ecke cubes). But the result? A custom, vibrant welcome desk that’s a joy to walk into.
Now, step back and admire your work! Doesn’t it just tie in perfectly with that tree-themed sign on the wall? It’s a playful, welcoming piece that’s sure to make a statement. What do you think? A fun project, right?
15. Turn Basic Storage Cube Units into an Upscale Wall Unit
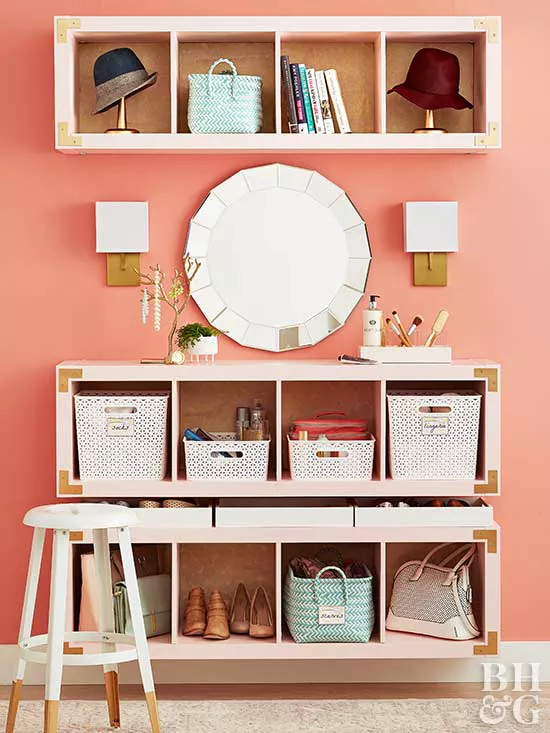
Ever thought those basic storage cube units could be your ticket to an upscale, double-duty bedroom setup? Here’s how to make it happen and transform your space!
Step 1: Paint Your Way to Elegance
First up, assemble three four-cube shelving units following their instructions. Then, it’s time to get artsy. Prep, prime, and paint these units in your chosen hue. Let this new color settle and cure for a solid two days, ensuring a smooth, lasting finish.
Step 2: Floating Magic on Your Wall
Now, let’s mount these beauties. Hide braces at the top and bottom of each unit to secure them to the wall, creating a floating illusion. Position the top shelf with its bottom 72 inches off the floor, the middle at 27 inches, and the bottom shelf just 6 inches from the floor. For a bonus touch, place beveled glass atop the middle shelf for a chic, easy-to-clean vanity top.
Step 3: Gold Accents for a Luxe Look
Here’s where the glam comes in. Trim 8-inch flat corner braces down to 3 inches. Give them a luxurious gold spray-paint makeover and attach them with ½-inch screws for that extra flair.
Step 4: Trays for Tidy Shoe Storage
Prevent your delicate footwear from getting lost or misshapen by stowing them in wood trays. Customize trays with spray paint and line them with fine paper, sealed with decoupage medium for durability and style. Slide these trays between the bottom and middle units, maximizing your storage space.
Step 5: Basket Bliss
For bulkier items, opt for breathable baskets with labels. They’re perfect for keeping things organized and easy to find. Choose baskets that fit snugly into the cube spaces to keep the top of the unit clutter-free.
Step 6: Personalize with Pops of Color
Finally, add a personal touch. Cut backings for two cubbies from 20×29-inch sheets of fine paper and glue them in for a playful color pop. If you’re looking for an easier switch-up, adhesive contact paper is a quick, no-glue alternative.
And there you have it! You’ve just elevated those simple cube units into a stunning, personalized wall unit that’s both functional and fashionable. Store your shoes, hats, and makeup stylishly while adding a personal touch to your bedroom. Enjoy your new space – it’s a work of art!
14. Cubby Storage Hack: Create a Chic Barn Door Nightstand
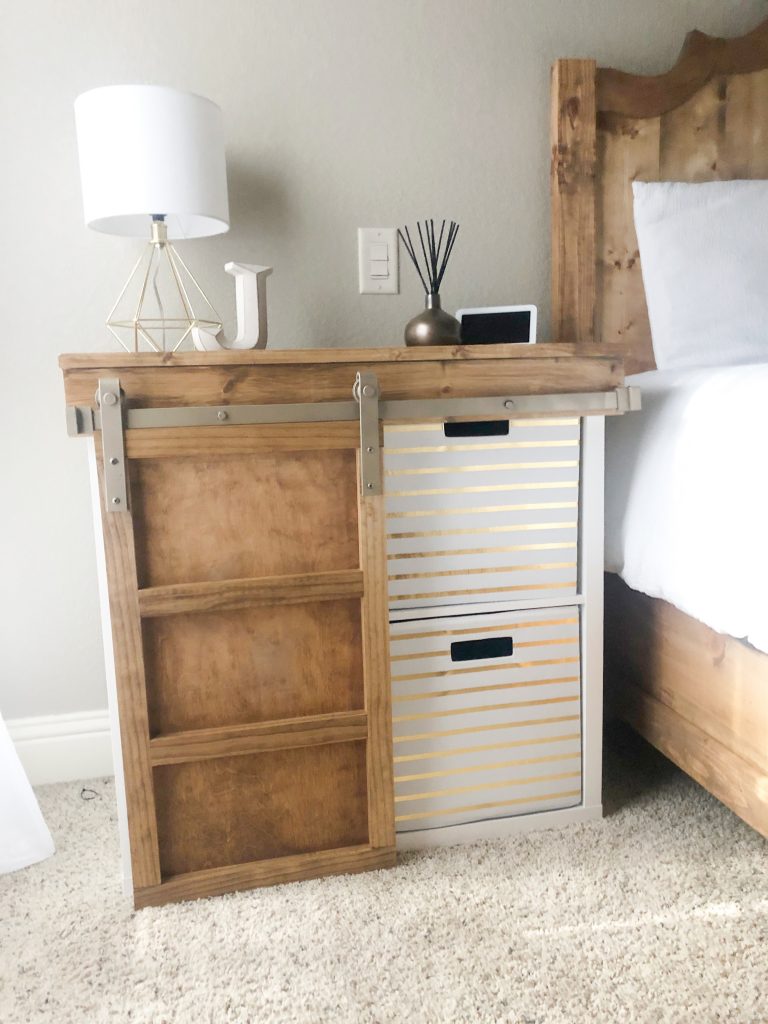
Looking for a fun and easy DIY project? Transform a basic Target Cubby Storage Shelf into a gorgeous Barn Door Nightstand – perfect for adding a custom touch to any room!
Step 1: Gather Your Supplies
You’ll need:
- 1x4x8, 1x2x8 Pine or Common Boards
- 1/2″x3/4″x48″ Trim
- 1/2″x24″x48″ and 3/4″x24″x48″ Hardwood Plywood
- Pocket Hole Screws (1 1/4″), Brad Nails (5/8″ and 1 1/4″)
- Wood Glue
- Barn Door Hardware
- Target Cubby
- Krylon Fusion All-In-One Metallic Gold Spray Paint
- Tools: Miter Saw, Drill, Kreg Jig, 18 Gauge Nailer
Step 2: Build the Top
Cut your top panel board to size, ensuring a 1/4″ overhang on the sides and front. Attach it to the top of the cabinet using 1 1/4″ brad nails and wood glue, leaving a 1/4″ gap at the back.
Step 3: Trim It Up
Attach side and front/back trim pieces to the top panel, using 1 1/4″ brad nails and wood glue for a neat finish.
Step 4: Side Trims
Cut and attach the side and front trim pieces to the cabinet sides and front, again using 1 1/4″ brad nails and wood glue.
Step 5: Assemble the Barn Door
For the barn door, cut frame pieces and drill 3/4″ pocket holes. Attach the pieces with 1 1/4″ pocket hole screws and wood glue. Then, cut the back panel to size and attach it to the frame with 5/8″ brad nails and wood glue.
Step 6: Adding the Golden Touch
Buy barn door hardware and spray it with two coats of Krylon Fusion All-In-One Metallic Gold, which bonds perfectly to metal without needing primer or sanding.
Step 7: Stain and Assemble
While waiting for the paint to dry, stain the top panel and door. Once dry, attach the hardware, and voila! Your custom nightstand is ready.
This project is ideal for beginners and only requires three tools. The metallic spray paint adds a unique, custom feature, making this nightstand a standout piece.
13. Sleek Shelving DIY: Transforming Plywood into a Stylish Organizational Space
Imagine transforming your space with a functional yet stylish built-in shelving unit, perfect for organizing all those props (or anything else!) you’ve accumulated. Let’s dive into creating this modern plywood shelving unit, ensuring everything has its place, without the stress of it needing to look picture-perfect all the time.
What You’ll Need:
– Plywood: 2 sheets of 4×8
– Interior finish or brad nails (2 1/2 inch)
– Finish nailer / nail gun
– Table saw
– Sanding block or sander
– Natural wood filler
– Tape measure
– Small framing square
– Drill with countersink bit
– Coarse thread drywall screws (1 5/8 inch)
– Soft clamps
– Optional: saw horses
– Level (2 ft or torpedo level)
– Eye and ear protection
Step 1: Measuring Up
Start by measuring the height, width, and depth of your intended built-in space. Remember, accuracy is key here!
Step 2: Bracing and Layout
Consider the widths of vertical bracing in your design. These plywood pieces will run up and down, and if not accounted for, could throw off the symmetry of your cubbies.
Step 3: Building the Frame
Subtract the width of these supports from your total width, then divide by the number of desired boxes for equal-sized sections. Construct the box frame first, add shelving and supports, and then secure the back piece.
Step 4: Accommodating Depths
If you’re dealing with corner built-ins like I did, remember the first column may need to be shallower to align with adjacent sections.
Step 5: Filling It Up
Once installed, you’ll be amazed by how much each cubby can hold! This setup isn’t just a storage solution; it’s a game-changer, especially in loft spaces with limited closets.
Step 6: Enjoying the Space
With everything organized, you’ll find extra space you never knew you had. It’s an incredible feeling to finally unpack those lingering boxes!
This DIY project isn’t just about organization; it’s about creating a space that works for you, without the added pressure of constant styling. So, roll up those sleeves and get ready to transform your space with this chic, modern plywood shelving unit. And remember, sometimes it’s okay to embrace the organized chaos – it’s your space, after all!
12. DIY Industrial Storage Cubbies: Your Clutter’s Chic New Home
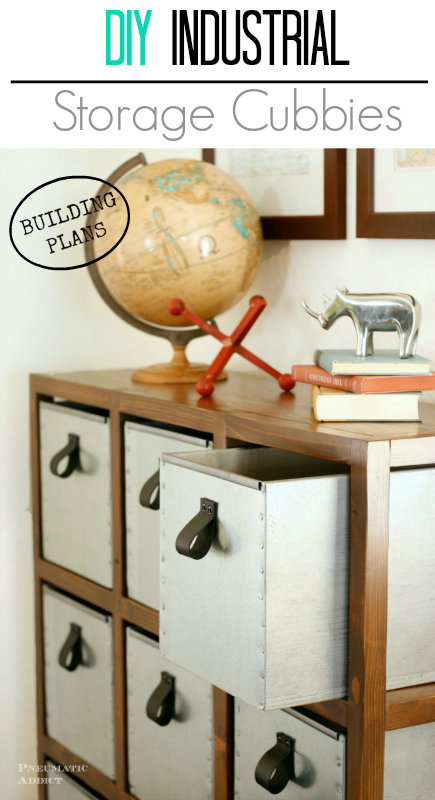
Ready to banish clutter in style? Let’s dive into building an industrial-inspired cubby storage system that’s as practical as it is eye-catching. Ideal for everyone from organizing mavens to DIY newbies, these cubbies are a stylish solution to store all that stuff lying around your house.
What You’ll Need:
– Plywood: (1) half sheet of 3/4″ (48″ x 48″)
– Wood Boards: (2) 1 x 12 x 96″, (1) 1 x 12 x 72″, (1) 1 x 2 x 96″
– Sheet Metal Panels: (18) 12 x 12″ (I recommend 28-gauge galvanized steel)
– Leather Straps: (9) 6″ sections (1-1/2″ wide)
– Hardware: 3/4″ wood screws, #8 washers, 2″ finish nails, galvanized roofing nails
– Tools: Circular saw/Miter saw, Power drill, Brad nailer, Measuring tape, Speed square
– Extras: Spray paint, E6000 adhesive, Report cover spines, Metallic spray paint
Building Your Cubbies:
- Cutting to Size: Start by cutting your plywood and 1 x 12 boards. Most home improvement stores can do this for you if you don’t have a saw.
- Assembly: Align the 1 x 12 pieces vertically on the plywood. Attach using wood glue and 2″ finish nails.
- Adding Cross Pieces: Measure and mark 1-1/2″ from the top edge of the side pieces. Secure a 1 x 2 cross piece at this mark with glue and nails.
- Paint for Texture: Apply two coats of hammered texture spray paint to the wood frames and let them dry.
- Metal Panels: Pre-drill holes in the metal panels and attach them to the wood frame with E6000 glue and roofing nails.
- Custom Pulls: Create pulls using black leather straps, screws, and washers. Pre-drill and attach these to the cubbies for a functional yet chic touch.
- Safety First: Smooth the metal panel edges with an angle grinder, then cover them with report cover spines painted in metallic spray paint for safety and style.
These versatile cubbies, inspired by vintage metal locker systems, can be used anywhere from your living room to a mudroom, offering ample space even for standard paper sizes. They not only help organize your space but also add an industrial charm to it. And the best part? You can customize the size, paint, and finishes to match your home’s decor perfectly.
11. DIY IKEA Hack – Effortlessly Craft Your Own Dream Bed
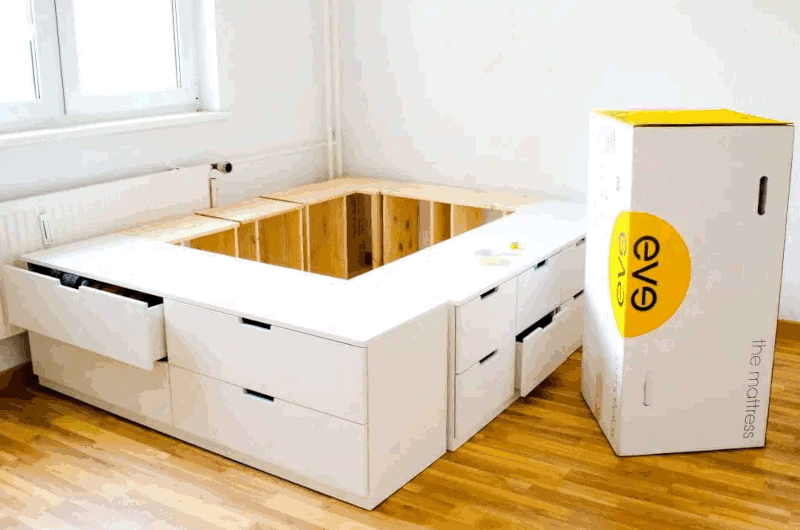
Hey there, DIY enthusiast! Ready to create a bed that’s not just a sleep sanctuary but a storage wonder too? Let’s dive into building a functional yet fashionable bed using IKEA’s Nordli and Rast ranges. It’s a project that’s perfect for organizing enthusiasts or anyone looking to make the most out of their bedroom space.
Gathering Your Supplies:
– Nordli Chests: Get both 4-drawer and 8-drawer options for variety and storage.
– Rast Side Tables: Affordable, solid wood, and just the right height.
– Angle Brackets and Screws: For securely connecting your pieces.
– Slatted Frame: A standard 140cm will do nicely.
– Velcro Tape: For easy slatted frame attachment and removal.
– Mattress: Choose a thick, comfortable one for a restful sleep.
– Tools: Drilling machine, cordless screwdriver, cutter, pencil – the basics for any DIY project.
Building Steps:
- Assemble the Furniture: IKEA assembly can be a time-consuming task, but it’s the first step to your dream bed.
- Positioning for Stability: Arrange the Nordli and Rast pieces to form a robust frame measuring 160cm x 200cm.
- Connecting the Pieces: Use angle brackets to securely attach the chests and tables. For the Rast tables, you might need to modify the angles slightly for a perfect fit.
- Velcro Magic: Attach one side of the Velcro to the bed frame and the other to the slatted frame. This makes it easy to remove when you need to access the storage space beneath.
The Finishing Touches:
- The Mattress: A good mattress is key. Opt for a model that offers both comfort and support. It’s the crown jewel of your new bed.
- Storage Utilization: Use the middle area of the bed for storing rarely used items like Christmas decorations, suitcases, or sleeping bags. It’s out-of-sight storage at its best!
Final Thoughts:
This bed isn’t just about getting a good night’s sleep; it’s about creating a space that works for you. With ample storage, it’s ideal for small bedrooms or for those who love to keep things neat and organized. And the best part? You’ve created it yourself!
So, why wait? Head over to IKEA, grab your supplies, and start building. Your perfect bed, customized to your needs and style, is just a few steps away. And don’t forget to share your creation with us using #DIYBedHack #Simphome– we’d love to see how it turns out!
10. Slide Out Entry Pantry Cabinet for Tiny House: A DIY Guide

Imagine transforming a cramped tiny house entryway into a functional, stylish pantry space. With a clever slide-out cabinet, you can maximize storage while keeping your kitchen essentials within easy reach. Here’s how to create this ingenious solution:
1. Design the Cabinet: First, decide on the cabinet’s size.
- Aim for just over 24″ in length to accommodate 24″ full extension drawer slides from Liberty.
- Build the cabinet carcass using 1×8 boards, assembling with a Kreg Jig set to 3/4″, and 1-1/4″ pocket hole screws.
2. Back and Front Panel Construction:
- For the back, nail 1x boards (1×10 at the bottom and 1×3 at the top) to secure the contents and provide a mounting area for the slides.
- On the front, focus on aesthetics. Start with a face frame, adding 1x2s on the sides and 1x3s on top and bottom for a decorative touch. Fill the center with 1x boards, leaving gaps for visual interest, sized accurately on a table saw.
3. Creating the Door Look: It still needs something extra. Rip some 1/4″ plywood into 2-1/2″ wide strips and nail them to the front, crafting a more authentic door appearance.
4. Finishing Touches: For an easy, drip-free finish, apply Danish Oil by Watco over the entire project. It stains and seals in one step, leaving no blotchiness.
5. Installing Drawer Slides: Use 24″ full extension drawer slides. Attach the drawer part of the slide to the cabinet, ensuring they’re perfectly parallel to avoid any binding. Then, attach the cabinet part of the slide to the wall. Pro tip: fix 1×4 boards to the wall studs first, then attach the slides to these boards for a hassle-free installation.
This slide-out cabinet isn’t just a space-saver; it’s a game-changer in tiny house living, offering easy access and improved functionality. It’s perfect for keeping your pantry organized and hidden, yet easily accessible. Can’t wait to see how you adapt this idea in your own home – do share your builds with us!
9. Maximize Your Kitchen Space with DIY Cabinet Cubbies
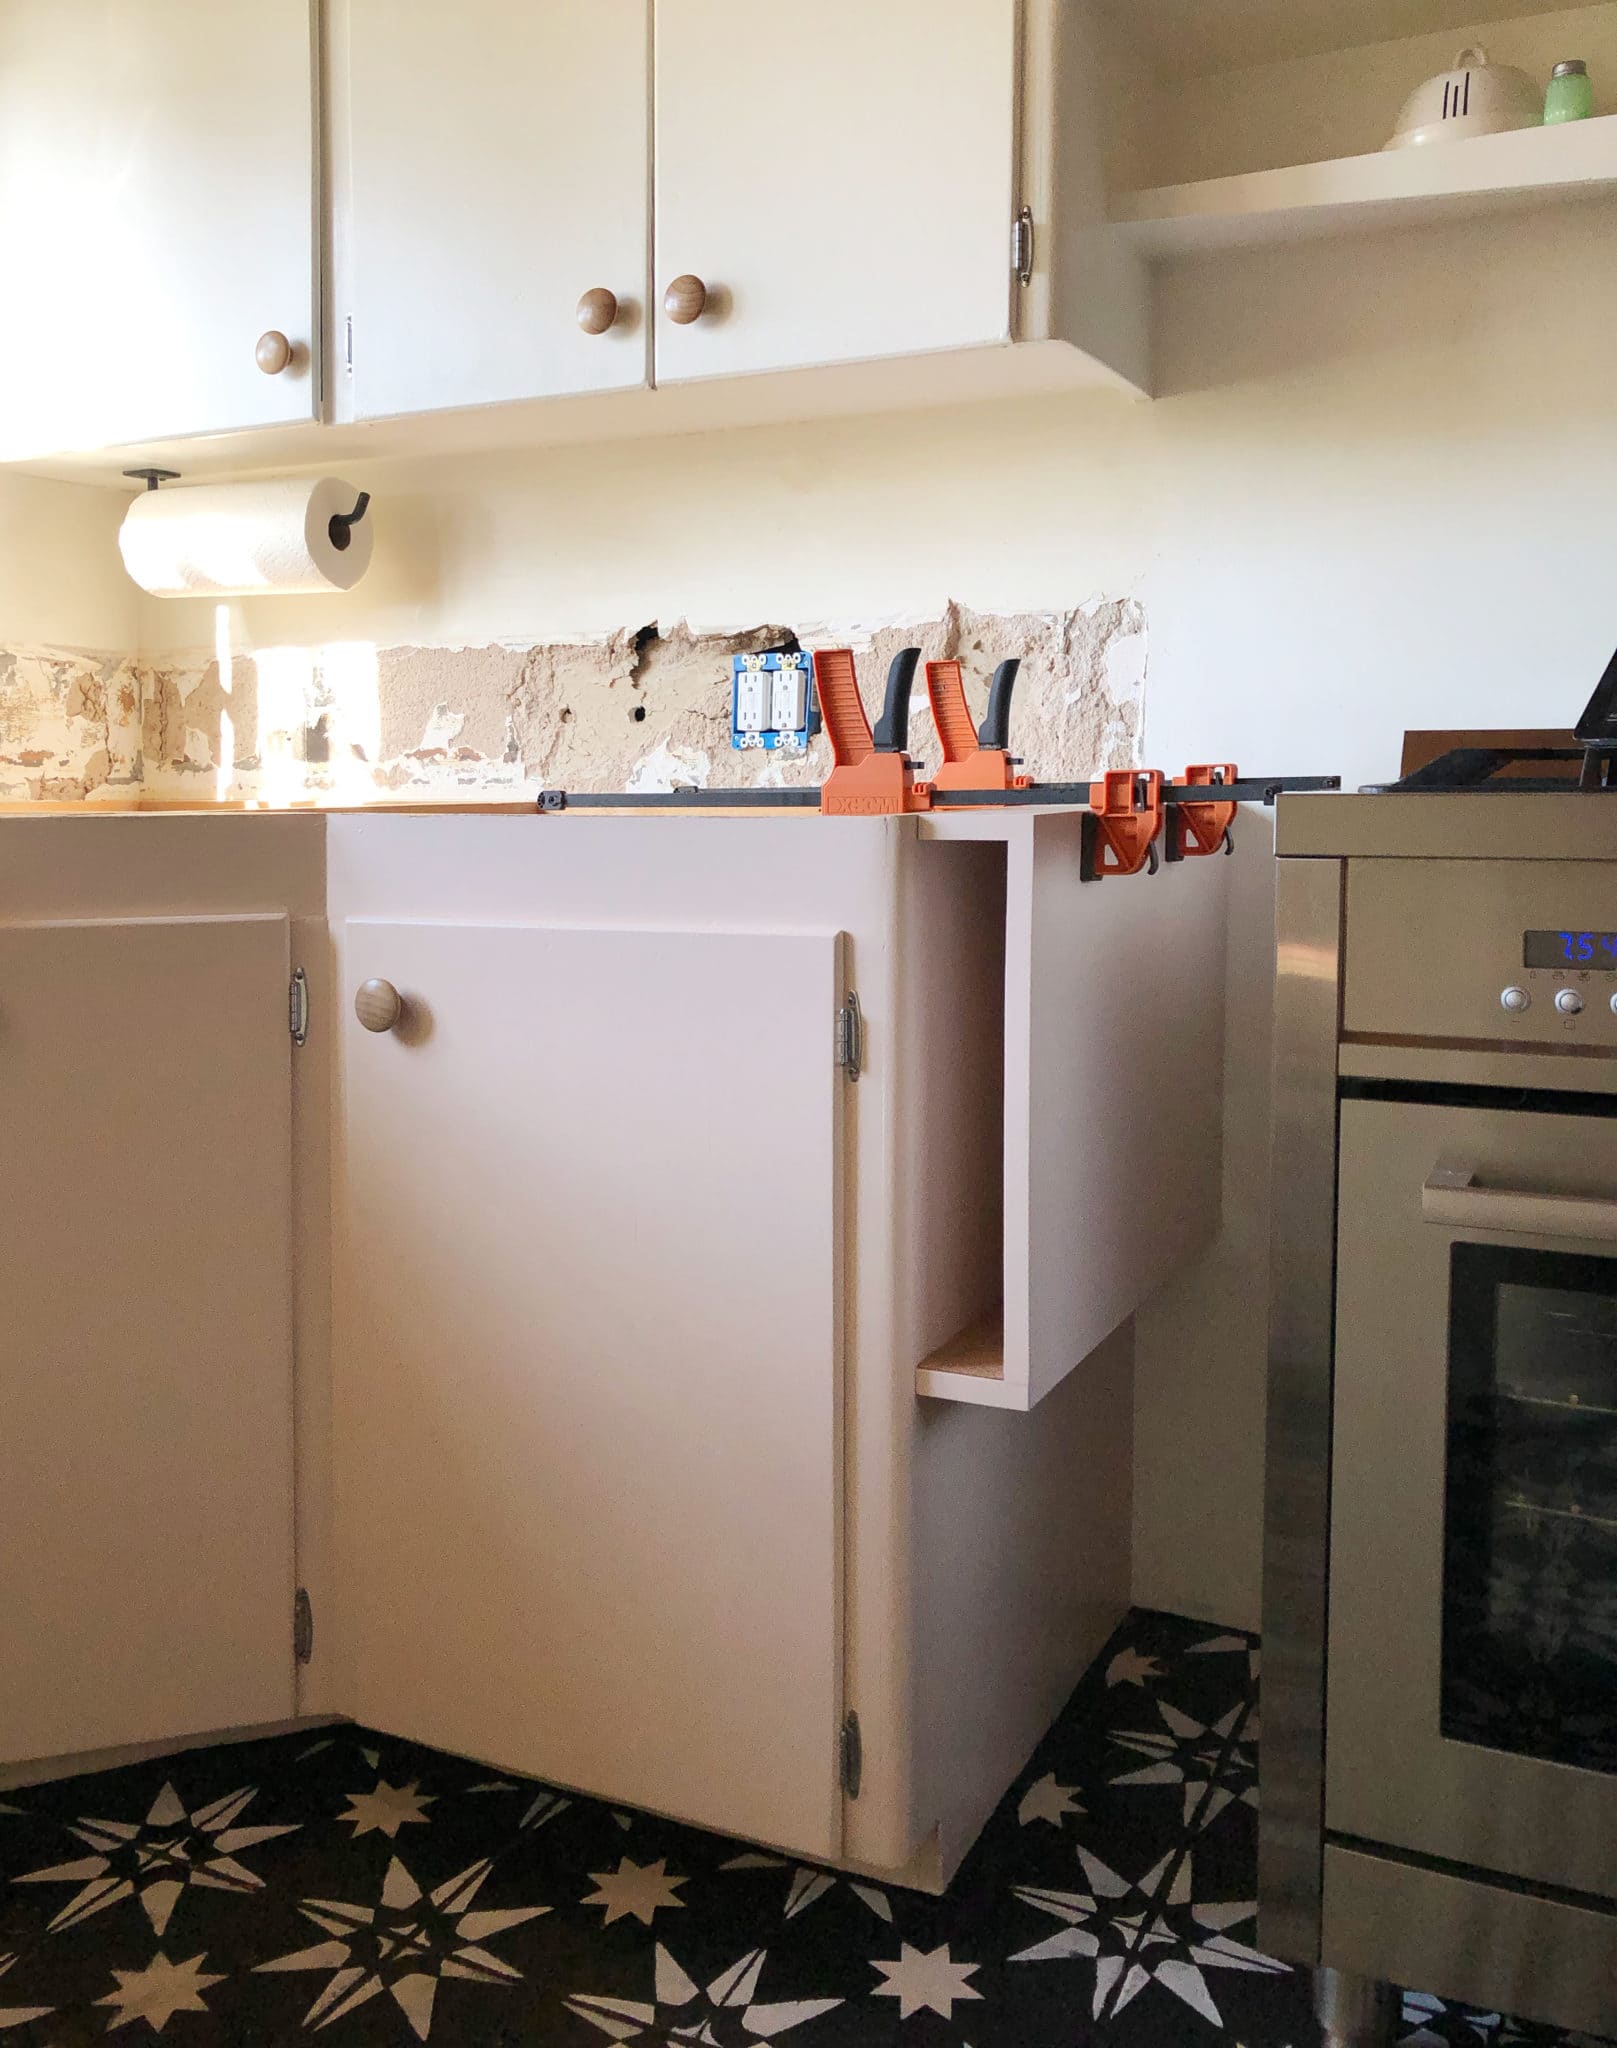
Are you ready to tackle those awkward gaps in your kitchen with a creative, practical solution? Let’s dive into building custom cubbies that are not just adorable but incredibly functional. Perfect for those odd spaces beside the range, these cubbies are tailor-made for your baking needs.
Understanding the Space:
You’ve got a 43″ gap to fill, thanks to your 36″ range that leaves a 7″ void. But don’t worry, that 3 ¼″ space on each side is a hidden storage goldmine.
The Design Plan:
Aim for cubbies that complement your kitchen’s aesthetics while being highly practical. You don’t want them to stand out awkwardly or disrupt the balance. Their height should be just enough to store a standard 13×18″ cookie sheet, and they should be set back slightly from the cabinet fronts to maintain the curved corner look.
Building the Cubbies:
- Materials: Use pine project panels for the sides and 1×4″ pine boards for the tops, bottoms, and back. Keep everything in line with your cabinet’s thickness.
- Assembly: Hold everything together with screws. Keep it simple yet sturdy.
- A Little Ingenuity: Drill a hole in one cubby to align with the cabinet’s hole for the range cord. A small but crucial detail!
- Securing in Place: Use a Kreg pocket hole jig to attach the cubbies to the cabinets. Ensure they’re firmly in place.
- Adding a Personal Touch: Inspired by New Mexico’s stepped motif, craft decorative elements from scrap 1x4s. A jigsaw, a ruler, and a little creativity will add charming details to your storage solution.
- Finishing Touches: Line the cubby bottoms with self-adhesive cork to prevent scratches, combining functionality with aesthetics.
Imagine the satisfaction of sliding your baking sheets into these custom cubbies, not only freeing up space but adding a unique charm to your kitchen. Say goodbye to the clunky drawer under the oven and hello to sleek, accessible storage.
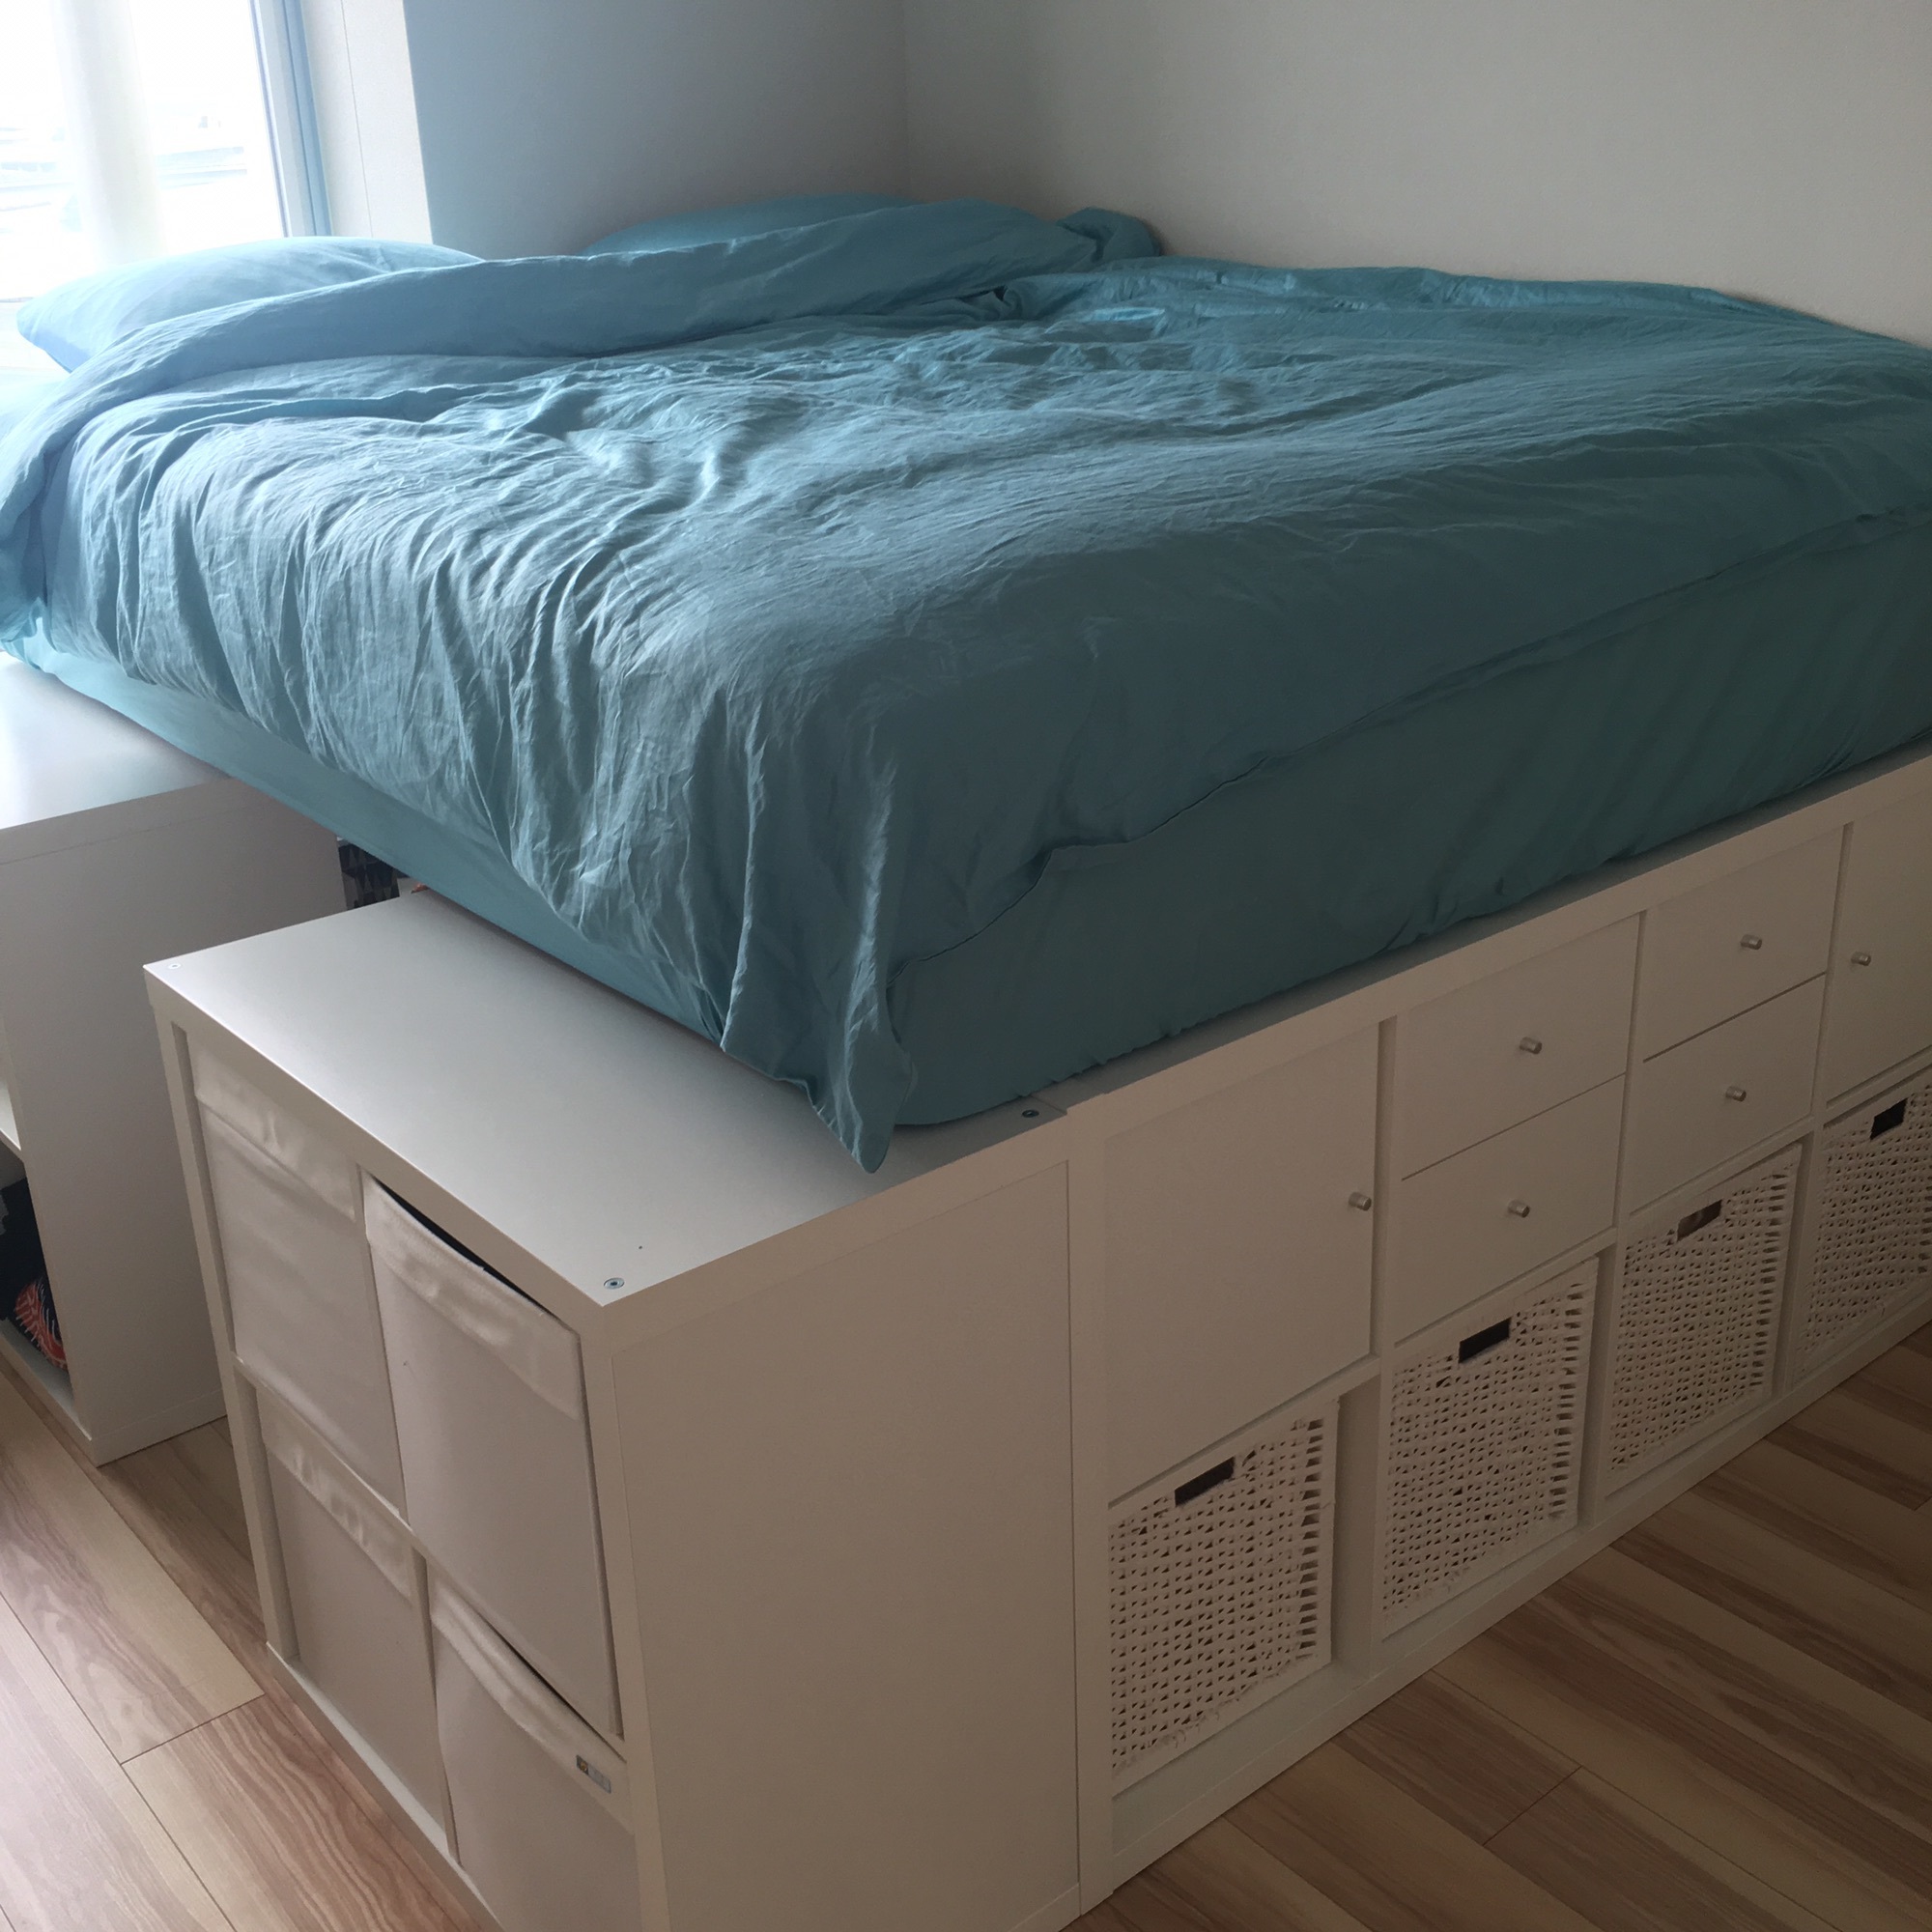
8. Crafting a Unique IKEA Bed: Malm Meets Kallax
Ready to embark on a fun, space-saving DIY project that combines style and practicality? Let’s dive into creating a bed using IKEA’s Malm and Kallax units. This isn’t just any bed; it’s a storage wizard’s dream come true.
The Foundation:
You’re curious about what’s supporting those slats, right? Well, they rest on top of the frame. Imagine the structure – the slats are screwed securely into beams, creating a sturdy base for your mattress. This is where the magic of stability meets comfort.
Balancing the Heights:
Now, how about the slight height difference between the Malm and Kallax units? No sweat! Elevate the Kallax slightly off the ground. Picture this: a few well-placed pegs or spacers can raise it just enough to align perfectly with the Malm. It’s all about creating that seamless look.
Storage Galore:
The real beauty of this IKEA hack? The ample storage space beneath the slats. Here’s your chance to stash away those rarely used items. Think Christmas decorations, suitcases, or bulky winter gear. It’s the perfect hideaway for things you need, but not all the time.
Dealing with Creaks:
Got a creaky Malm? It happens. But before you fret, double-check the assembly. Sometimes, a little adjustment and re-hammering can silence those pesky sounds. Remember, a quiet bed is a happy bed.
Design Tweaks:
Some of you might find the tall shelving a bit limiting. Here’s a tip: customize the height or placement of the shelves to suit your needs. It’s all about making the bed work for you and your space.
Maximize Every Inch:
This bed isn’t just a sleeping spot; it’s a storage powerhouse. The trick is to utilize every nook and cranny effectively. How about sliding in some baskets or bins under the slats for organized, out-of-sight storage?
Final Touches:
Now, stand back and admire your handiwork. You’ve successfully merged two classic IKEA pieces into a functional, stylish bed that meets all your storage needs. Plus, you’ve added a personal touch to your bedroom. This isn’t just a bed; it’s a testament to your creativity and practicality.
So, are you ready to give your bedroom a storage-friendly makeover? Grab your IKEA Malm and Kallax units, and let’s get building! Don’t forget to share your finished product – we’re all excited to see how you’ve redefined bedroom storage.
7. DIY Mini Mudroom Magic: Transforming Garage Space
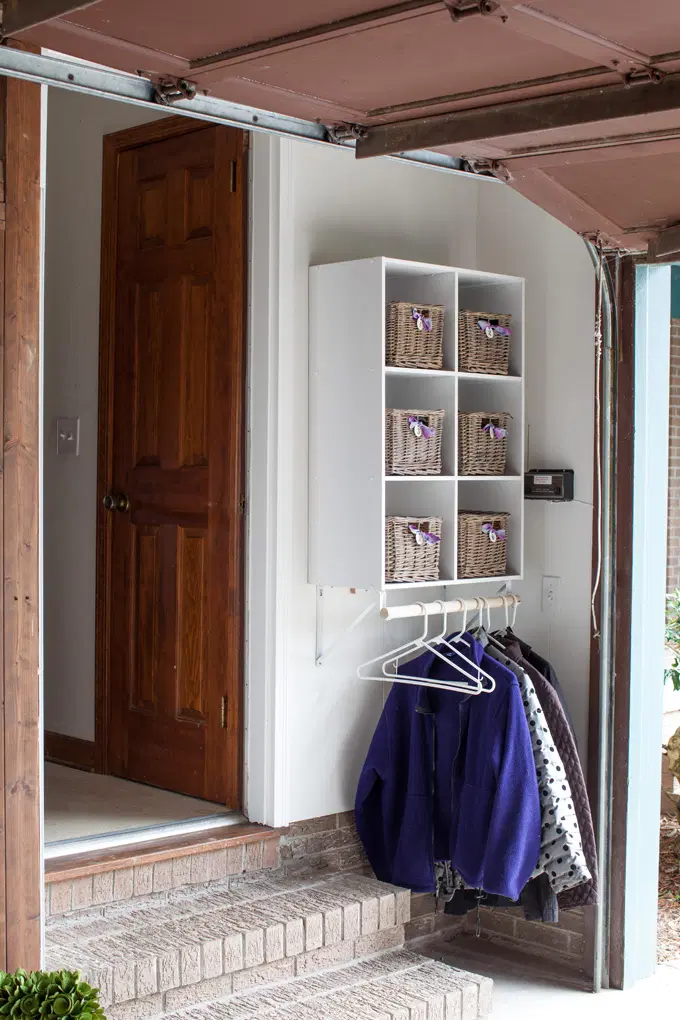
Ready to wave goodbye to clutter and hello to organization? Let’s create a mini mudroom in your garage, turning an unused corner into a haven of orderliness. Perfect for homes missing that essential mudroom, this DIY project is both practical and stylish.
Gearing Up:
- Grab a ClosetMaid 6-Cube Cubeical Storage Organizer. It’s the perfect size for tight spaces.
- Gather a Phillips-head screwdriver, a mallet, angle irons, wood screws, closet rod and shelf brackets, a wood dowel, white spray paint, a drill, a level, a pencil, and a 12″ 1 x 2 piece of wood. Optional: E-Z Wall Anchors for non-stud walls.
Assembling the Cubeical:
Follow the clear, illustrated instructions in the box. In about 30 minutes, you’ll have your storage unit ready.
Mounting the Cubeical:
- Find the Studs: Use a stud finder for secure mounting. If studs aren’t where you need them, E-Z Wall Anchors will be your best friends.
- Prep the Dowel: Cut it to 23″, then give it a coat of white spray paint for a sleek look.
- Mark and Level: Decide where your Cubeical will go. Mark the wall, ensuring the placement is level.
- Attach the 1×2 Support: Secure the 1×2 along the level line with wood screws.
- Set the Brackets: Place the shelf and rod brackets 22-1/2″ apart, aligning them with the top of the 1×2.
- Install Angle Irons: Position the Cubeical, mark for angle irons, remove it, then fix the irons to the wall.
- Secure the Cubeical: Lift the Cubeical back into place and attach it to the angle irons.
- Add the Dowel: Place the dowel in the rod holder and secure it with screws.
Finishing Touches:
Add hangers on the rod and baskets in the cubes. At first, leave the dowel unpainted for a rustic look, or paint it white for a coordinated finish.
The Result:
Enjoy a clutter-free kitchen as your jackets, bags, umbrellas, and mail find a new, organized home in your garage. This mini mudroom is not just about storage; it’s about reclaiming your space with a touch of creative flair. Say farewell to kitchen counter chaos and hello to a neatly organized entryway. Now, every time you enter or leave your house, you’ll appreciate the tidy and inviting space you’ve crafted.
6. DIY Floating Shelves: A Beginner’s Guide to Elegant Storage
Hey there! Ready to add a touch of elegance and functionality to your space? Let’s dive into creating stunning DIY floating shelves, perfect for displaying your favorite knick-knacks or organizing clutter. This project is beginner-friendly and can be crafted with basic tools and materials.
Step-by-Step Guide:
- Choosing Your Wood: You can use fancy hardwoods or opt for a simple 2×8 from your local home center. If using rough lumber, start by squaring it up with a jointer, planer, and table saw.
- Cutting to Size: For each shelf, you’ll need two pieces – top and bottom (18″ long x 6″ wide), and two sides (5 1/2″ long x 6″ wide). If you’re new to this, remember to square up one end before cutting the other end to length.
- Drilling Dowel Holes: Use a 1/2 inch dowel drilling jig for the joinery. Mark the dowel placement on your wood, ensuring they are evenly spaced.
- Assembling the Shelves: Glue and insert the dowels, then clamp the pieces together. A tip – don’t overdo the glue to avoid pressure build-up.
- Adding Character: Once assembled, consider routing the edges for a refined look. Square up the inside corners with a chisel for a clean finish.
- Sanding and Finishing: Sand your shelves up to 180 grit, apply a coat of water-resistant Waterlox finish, and let it dry. This step ensures durability and a sleek look.
- Mounting on the Wall: Use blind shelf supports for a floating effect. Locate your wall studs, and mark the placement for the shelves. Drill holes in the shelf for the supports, ensuring they are square for a level mount.
- Final Touches: Once mounted, step back and admire your handiwork. These floating shelves not only add storage but also bring a modern, minimalistic charm to your room.
Why This Project Rocks:
– Beginner-Friendly: Easy to follow, this project is perfect for new woodworkers.
– Versatile: Stain or paint the shelves to match your room’s decor.
– Functional Elegance: Floating shelves offer storage while keeping floor space open.
5. Wall-Mounted KALLAX Revolution: Cubbies to transform Your Laundry Space
Imagine transforming your laundry area into an organized, stylish space. Let’s turn that vision into reality by wall-mounting an IKEA KALLAX unit. This project is not just about adding shelves; it’s about crafting a functional area that complements your home.
Finding the Bargain:
Start by hunting down a bargain, like an IVAR side unit in the As-Is section for $15. It’s a steal compared to standard lumber prices.
Preparing the IVAR:
- Dismantle the IVAR into individual parts using a flush-cut saw.
- Cut the pieces to match the length of your KALLAX unit.
- Carve recesses with chisels to fit the KALLAX sides perfectly.
Painting Time:
- Create simple painting horses from scrap wood and pallet nails.
- Use the same paint as your home’s walls for a cohesive look.
- Apply paint with a mini roller for a smooth finish.
Getting KALLAX Ready:
- While the paint dries, prep your KALLAX for wall mounting.
- Drill mounting holes with a counter-sink bit.
- If plastic parts melt, trim them off with a knife.
- Use hot glue for loose screw sleeves, ensuring a tight fit.
- Attach the top mounting rail to the KALLAX shelves.
Mounting on the Wall:
- Use a stud finder to locate the ideal screw placement.
- Drill pilot holes and mount the bottom rail (using 100mm x 8-10G screws).
- Attach the top rail to the KALLAX, not the wall.
Assembling Everything:
- Support the KALLAX with temporary wood spacers.
- Secure KALLAX to the wall using 8 x 100mm screws and connect it to the IVAR pieces with 8 x 75mm screws.
- Fill the shelves with items that cluttered around your sink.
- Tidy up, and voilà – your upgraded laundry area is ready!
Final Touch:
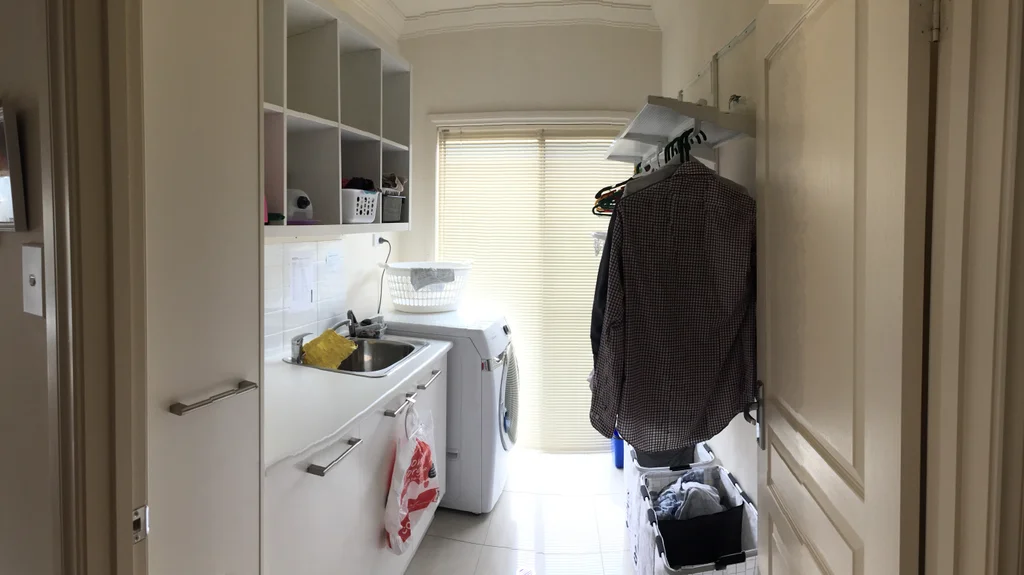
Your KALLAX might be a tad higher than existing cupboards, but it’s an affordable, efficient storage solution. Enjoy the new look and functionality of your laundry space, now with a wall-mounted KALLAX unit that not only saves space but also adds a modern touch to your home.
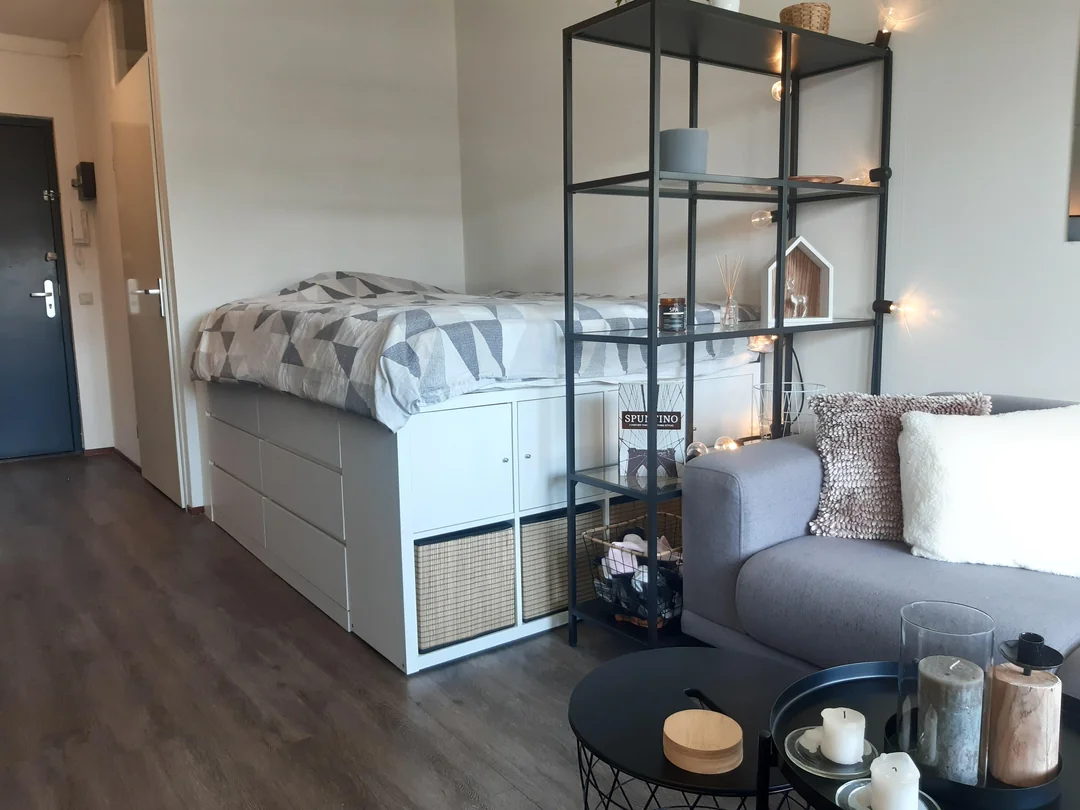
4.1 IKEA Kallax Loft Bed DIY: A Chic and Practical Solution for Compact Living
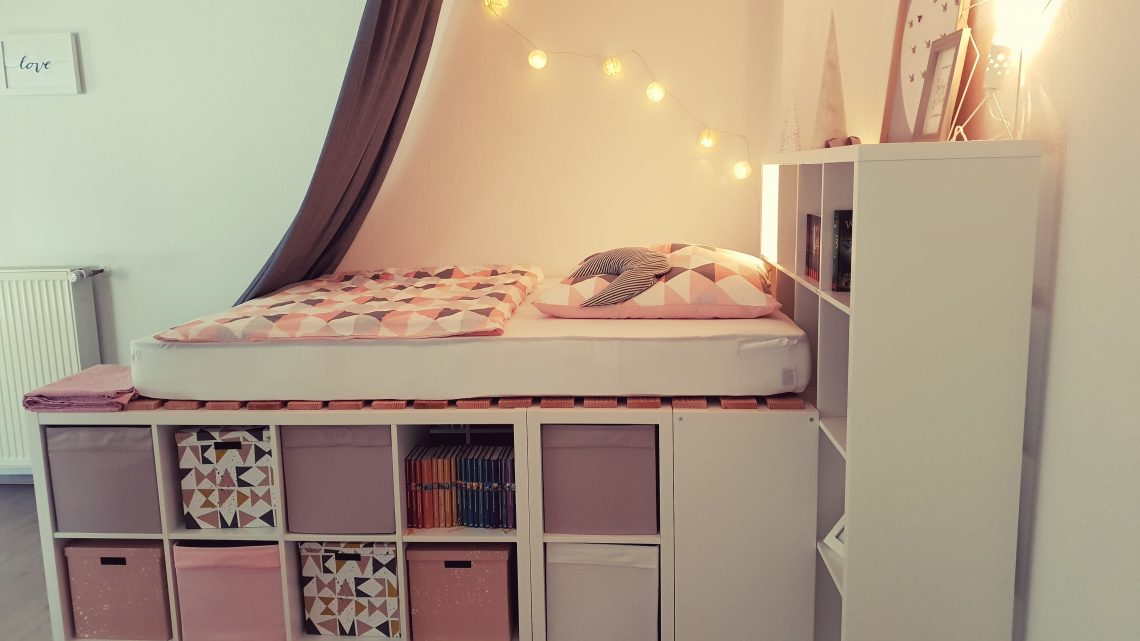
Embrace urban living with a stylish, space-saving loft bed crafted from IKEA Kallax shelves. This DIY project is perfect for adults seeking a functional, minimalist living space without compromising on design. Let’s create a chic loft bed that’s not just a sleeping area but a statement piece in your apartment.
Gather Your Materials:
- 3 IKEA Kallax shelves (77x149cm) for a sturdy base.
- 2 smaller IKEA Kallax shelves (77x42cm) for additional storage.
- 1 IKEA Kallax cube (42x42cm) as a creative step-up.
- 16 robust Bankirai decking boards, each 140cm long.
- Essential tools: screws, cordless drill, and sander.
- Estimated cost: Around €280.
Constructing Your Adult Loft Bed:
- Assemble the Core Structure: Build an 8-cube Kallax shelf as the central piece. Flank it with the 2-tier shelves on both sides, creating a harmonious look.
- Craft a Smart Staircase: Use the cube as a functional and stylish step to the bed, securing it firmly for safety.
- Slats for Stability: Smooth out the decking boards with 240-grit sandpaper. Secure them with wood screws, two on each end, to form a durable slatted base.
- Final Assembly: Ensure the structure is stable and aligns well in your chosen space. Add a mattress measuring 1.40m x 2.00m to complete your new sleeping haven.
Adapting to a Narrower Space:
For a 1.20m wide bed:
- Opt for 2 large and 3 small Kallax shelves.
- Customize one shelf by removing a partition for better access and storage versatility.
- Adjust the decking boards to 1.15m in length.
- Assemble with precision, using Spax wood screws for a secure fit.
Maximizing Under-Bed Space:
The reduced width version offers an ‘under-bed cave,’ perfect for storing seldom-used items, making it ideal for small living spaces where every inch counts.
Your Chic Loft Bed Awaits:
This IKEA Kallax loft bed isn’t just a sleeping area; it’s a smart space-saving solution that brings a touch of modern elegance to your apartment. With its functional storage and sleek design, it’s a perfect fit for the contemporary adult looking for efficiency and style in their living space. Ready to transform your room? Dive into this project and relish the satisfaction of creating a personalized, chic loft bed.
4.2 DIY IKEA Platform Bed Tutorial: Elevate Your Bedroom Storage
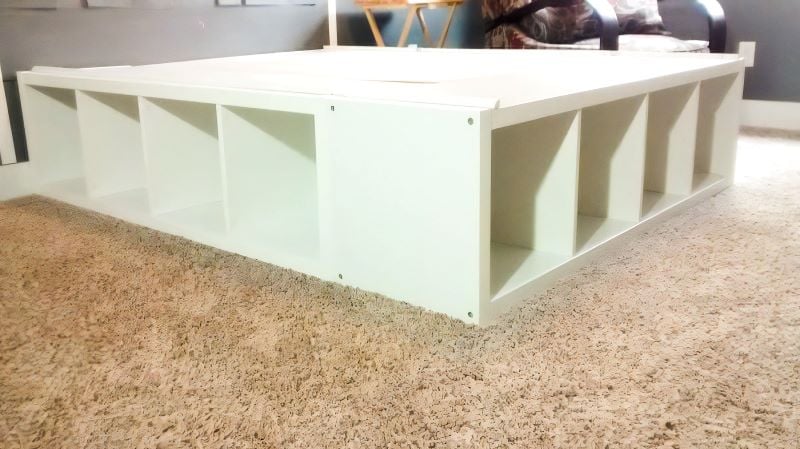
Ready to craft a stunning yet practical full-size platform bed using IKEA’s Kallax shelves? Let’s get started on this space-saving project that’s perfect for small bedrooms with limited closet or wall space. It’s an IKEA hack that’s both easy and fun, offering loads of storage in a stylish package.
Materials You’ll Need:
- 3 IKEA Kallax 4-shelf units
- Lumber: 3 2″x4″x8″ boards, 1 sheet 1/2″ plywood (or 3 1×4 bed slats), 1 4×8 sheet 1/8″ white tile board (optional)
- 2 1/2″ screws, 1/2″ screws
- White spray paint
Basic tools: drill, miter saw, table saw or circular saw (optional)
Creating Your Bed Frame:
1. Assemble Kallax Units with Glue: Strengthen the joints with wood glue for extra stability. Let it dry completely.
2. Cut the Backerboards: If using IKEA units, you might not need backerboards. Otherwise, measure and cut white tile board to fit behind the Kallax for a seamless look.
3. Cut the 2×4 Bed Frame: Adjust measurements for a full-sized bed. The critical parts to cut are:
- 2x4s: two at 54 3/4″, two at 26 1/4″, two at 23 5/8″
- Plywood: one at 54 3/4″ x 26 1/4″ (or cut bed slats to size)
- Tileboard: two at 57 1/2″, one at 26 1/4″
Mounting and Assembly:
- Attach the 2×4 Frame: Create a U-shape frame and attach it to the Kallax, keeping screws near the edges for strength.
- Install Center Supports or Bed Slats: If using plywood, add two 23 5/8″ 2x4s as center supports. For slats, cut nine to the width of the bed.
- Install Plywood or Bed Slats: Place your plywood or slats inside the frame. Optionally, attach the plywood with screws or create a slat roll with webbing for easy placement.
Adding the Finishing Touches:
- Trim the Edges: Prevent mattress sliding by adding quarter round or 1×2 trim along the edges. Route out a small section to fit over the Kallax edges.
- Paint and Install the Trim: Use white spray paint for a cohesive look and install the trim with screws and a jig for consistent placement.
Voila! Your Custom Bed is Ready:
Now, stand back and admire your handiwork. This IKEA hack platform bed is not just a place to sleep; it’s a clever storage solution that’s ideal for small spaces. The bed frame comfortably fits a full-size mattress, and with the Kallax shelves, you have ample space to store your essentials.
3. DIY Modern Farmhouse Custom Built-in Bookshelves for Compact Spaces
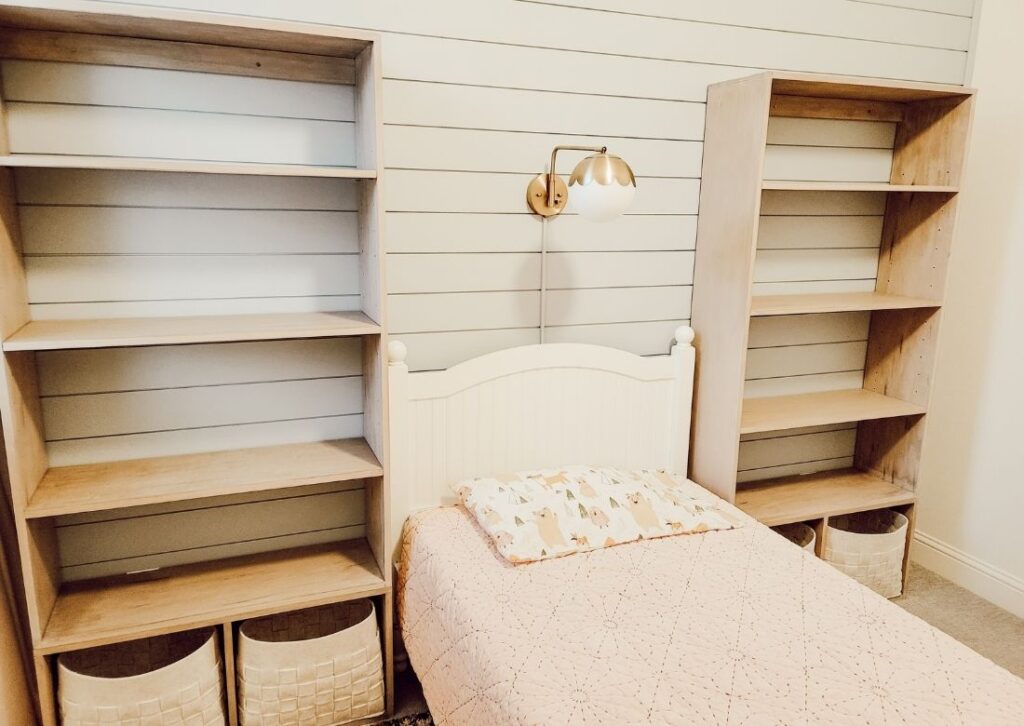
Hey there! Ready to transform a small bedroom into a stylish and functional space? Let’s create some DIY Modern Farmhouse custom built-in bookshelves perfect for a cozy yet chic room makeover!
Getting Started:
- Measure and Plan: Start by measuring your wall and any furniture that’ll pair with the built-ins, ensuring a snug fit.
- Design Your Bookshelves: Use Shelf Help Now’s configurator for a visual and precise design. You can even order wood directly from them or create your cut list based on your design.
Materials and Tools You’ll Need:
- IKEA Kallax shelves: 3 large (77x149cm), 2 small (77x42cm), 1 cube (42x42cm).
- 16 Bankirai decking boards, cut to 140cm length for robust slats.
- Screws, cordless drill, and sander.
Building the Bed:
- Assemble the Kallax: Begin with an 8-cube Kallax shelf as the central piece. Add the two-tier shelves on each side for a harmonious look.
- Staircase Cube: Utilize the cube as a stylish and functional step, securing it firmly for safety.
- Decking Boards as Slats: Smooth these out and secure with wood screws, two on each end.
For a Narrower Bed:
- Opt for 2 large and 3 small Kallax shelves.
- Adjust the decking boards to 1.15m.
- Assemble with Spax wood screws for a secure fit.
Under-Bed ‘Cave’: The narrow version creates an ‘under-bed cave,’ great for extra storage.
Steps to Build the Shelves:
- Wall Prep: Install shiplap or any wall treatment, locating wall studs for attaching shelves later.
- Shelf Design: Ensure the shelves fit well with the room’s layout, considering the bed and desk placement.(This free tool from Shelfhelpnow, can be helpful to you)
- Attention to Details: Account for outlets, light switch locations, and ensure the door can fully open.
- Cubby Construction: Include two cubby spaces at the bottom, sized for felt bins. This creates easy storage for toys and crafts.
Installation:
- Attach to Wall Studs: Position the shelves and predrill holes, securing them with three-inch screws into the studs.
- Adjustable Shelves: Add flexibility with adjustable shelves, great for evolving storage needs.
Finishing Touches:
- Wall Sconce: Install a plug-in wall sconce with a paintable cord cover for a neat look.
- Styling: While the primary function is storage, organize items in a visually pleasing way.
Final Thoughts:
With these DIY modern farmhouse bookshelves, you’ll have a functional, elegant space that grows with your child’s needs. Whether it’s for a good night’s sleep or creative playtime, this setup is versatile and charming. Get ready to dive into this project and give your child a room they’ll adore!
2. Amebaownd’s Cubbies to Master Bed
Create a queen-sized bed with ample storage using IKEA Kallax shelves in an innovative DIY project.
- Begin with two Kallax shelf units (77×147 cm) and three units (77×77 cm), arranging them to form the base of your bed.
- To ensure stability, especially at the center where the mattress will rest, reinforce with an L-shaped steel frame (150 cm), available at any hardware store.
For the bed board,
- Purchase two pine wood boards (90cm x 182cm x 1.8cm) from a home center.
- Cut these into two pieces each measuring 50cm x 182cm, and one piece at 40cm x 182cm.
- Assemble these boards on the Kallax shelf, allowing a small gap between them for better ventilation.
- Secure the boards with screws to prevent shifting.
The mattress length is 200cm, so the 182cm boards will be hidden once the mattress is in place.
For a queen-sized bed,
- Use two semi-single pocket spring mattresses (80×200 cm each). This setup minimizes disturbance from movement during sleep.
- For added comfort and to bridge any gap between the mattresses, include a mattress pad (160×200 cm).
Cover your new bed with a sheet, and you have a stylish and functional queen-sized bed with storage. The Kallax shelves offer versatility, allowing you to customize with drawers, baskets, and doors for easy access and organization. The elevated structure creates a playful area underneath, perfect for kids to use as a secret base, or for adults to store seasonal items and keepsakes.
This DIY project, including the mattress, totals around 130,000 to 140,000 yen. If you already own a suitable mattress, the cost for this spacious storage bed drops to about 60,000 to 70,000 yen. Not only does this bed offer generous storage, but its height also provides a unique vantage point, making it a cozy and practical addition to any bedroom.
1. 8 Practical Cubbies from Hometalk
Transform your living space with these eight creative DIY projects for Target storage cubes, perfect for DIY enthusiasts with just basic tools. Start by rejuvenating your cube with a fresh coat of primer for a complete makeover, or add a layer of wood for a distinct look, using simple tools like a drill, gorilla glue, and screws.
This collection includes a variety of projects:
– Stylish Coffee Table
– Versatile Modular Bookshelf
– Practical Window Bench
– Multifunctional Modular Table
– Convenient Bed Cubbies
– Cozy Bed Bench
– Space-Saving End Table
Ideal for those with a tight budget but rich in creativity, each project helps you reimagine and personalize various areas of your home, from the bedroom to the living room. Dive into these hacks to turn basic Target storage cubes into eye-catching, practical pieces that showcase your unique style and organizational needs. Embrace these ideas and craft a living environment that’s entirely your own.