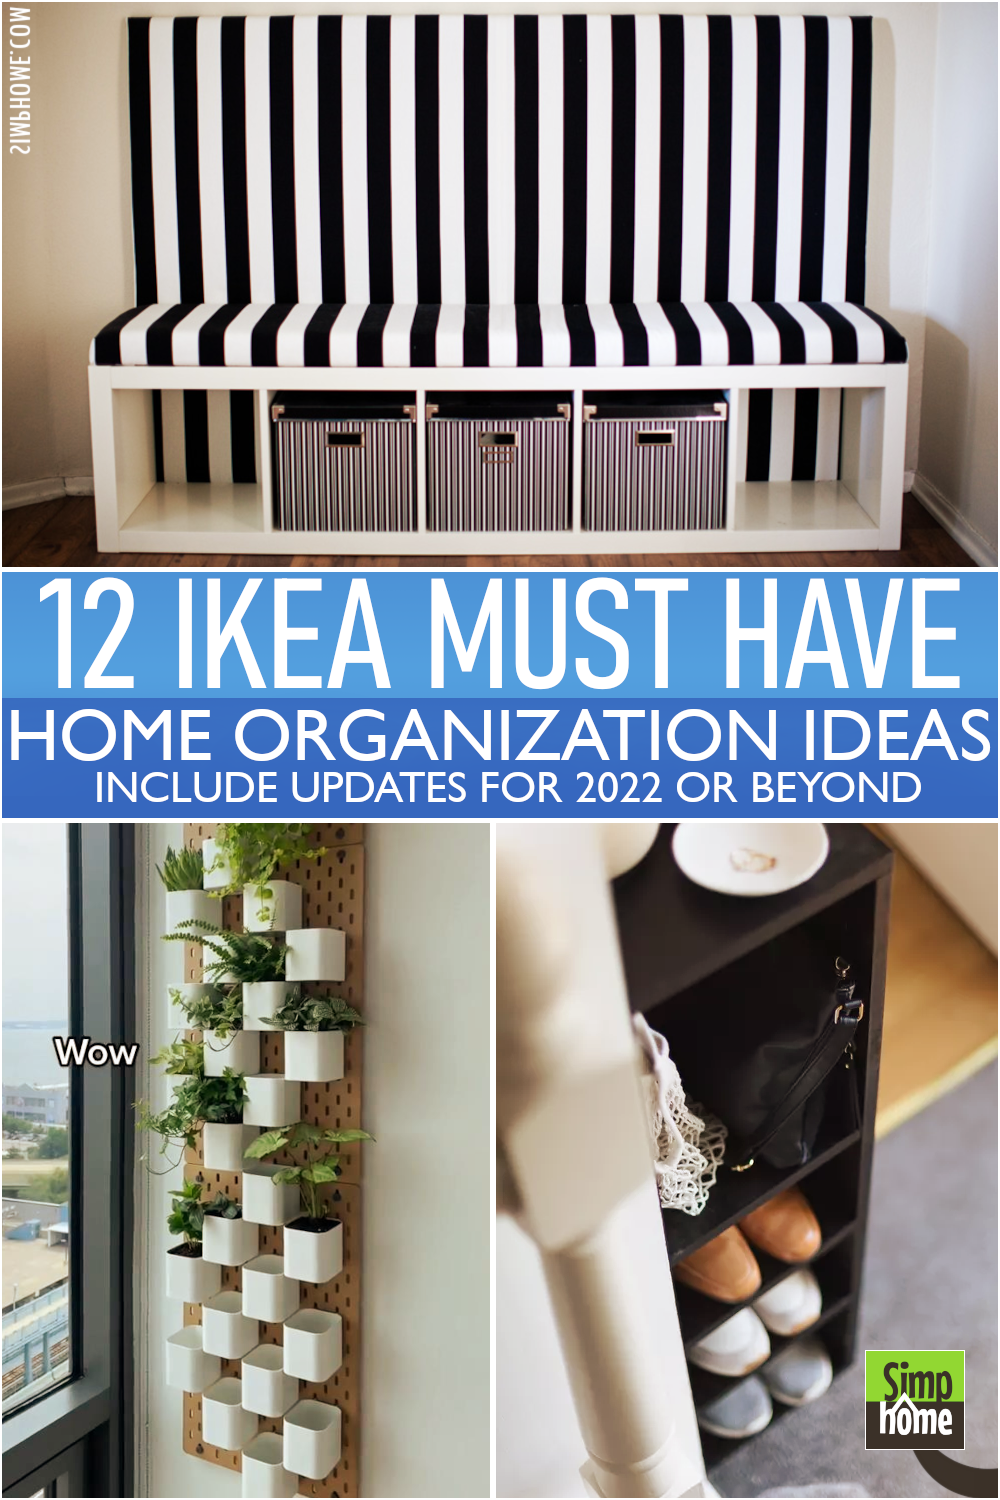
IKEA is always renowned for the high-quality furniture for your home. It offers a vast array of shelves, wardrobes, cubbies, and many other pieces that will not only hold clutter at bay but also spruce up every room.
Despite the exceptional quality of IKEA products, some people like to challenge themselves to tweak the furniture to improve their functions or looks. If you are one of them, you had better check these 12 IKEA must-have home organization ideas. For more detail and uncut version clips featured in the list, follow the Simphome link inside the description right after the video end or half time of the video. Let’s start the countdown.
🔊12 IKEA must have Home Organization Video:
List Entries:
12. The IKEA Hemnes Hack – Curvy Shoe Cabinet
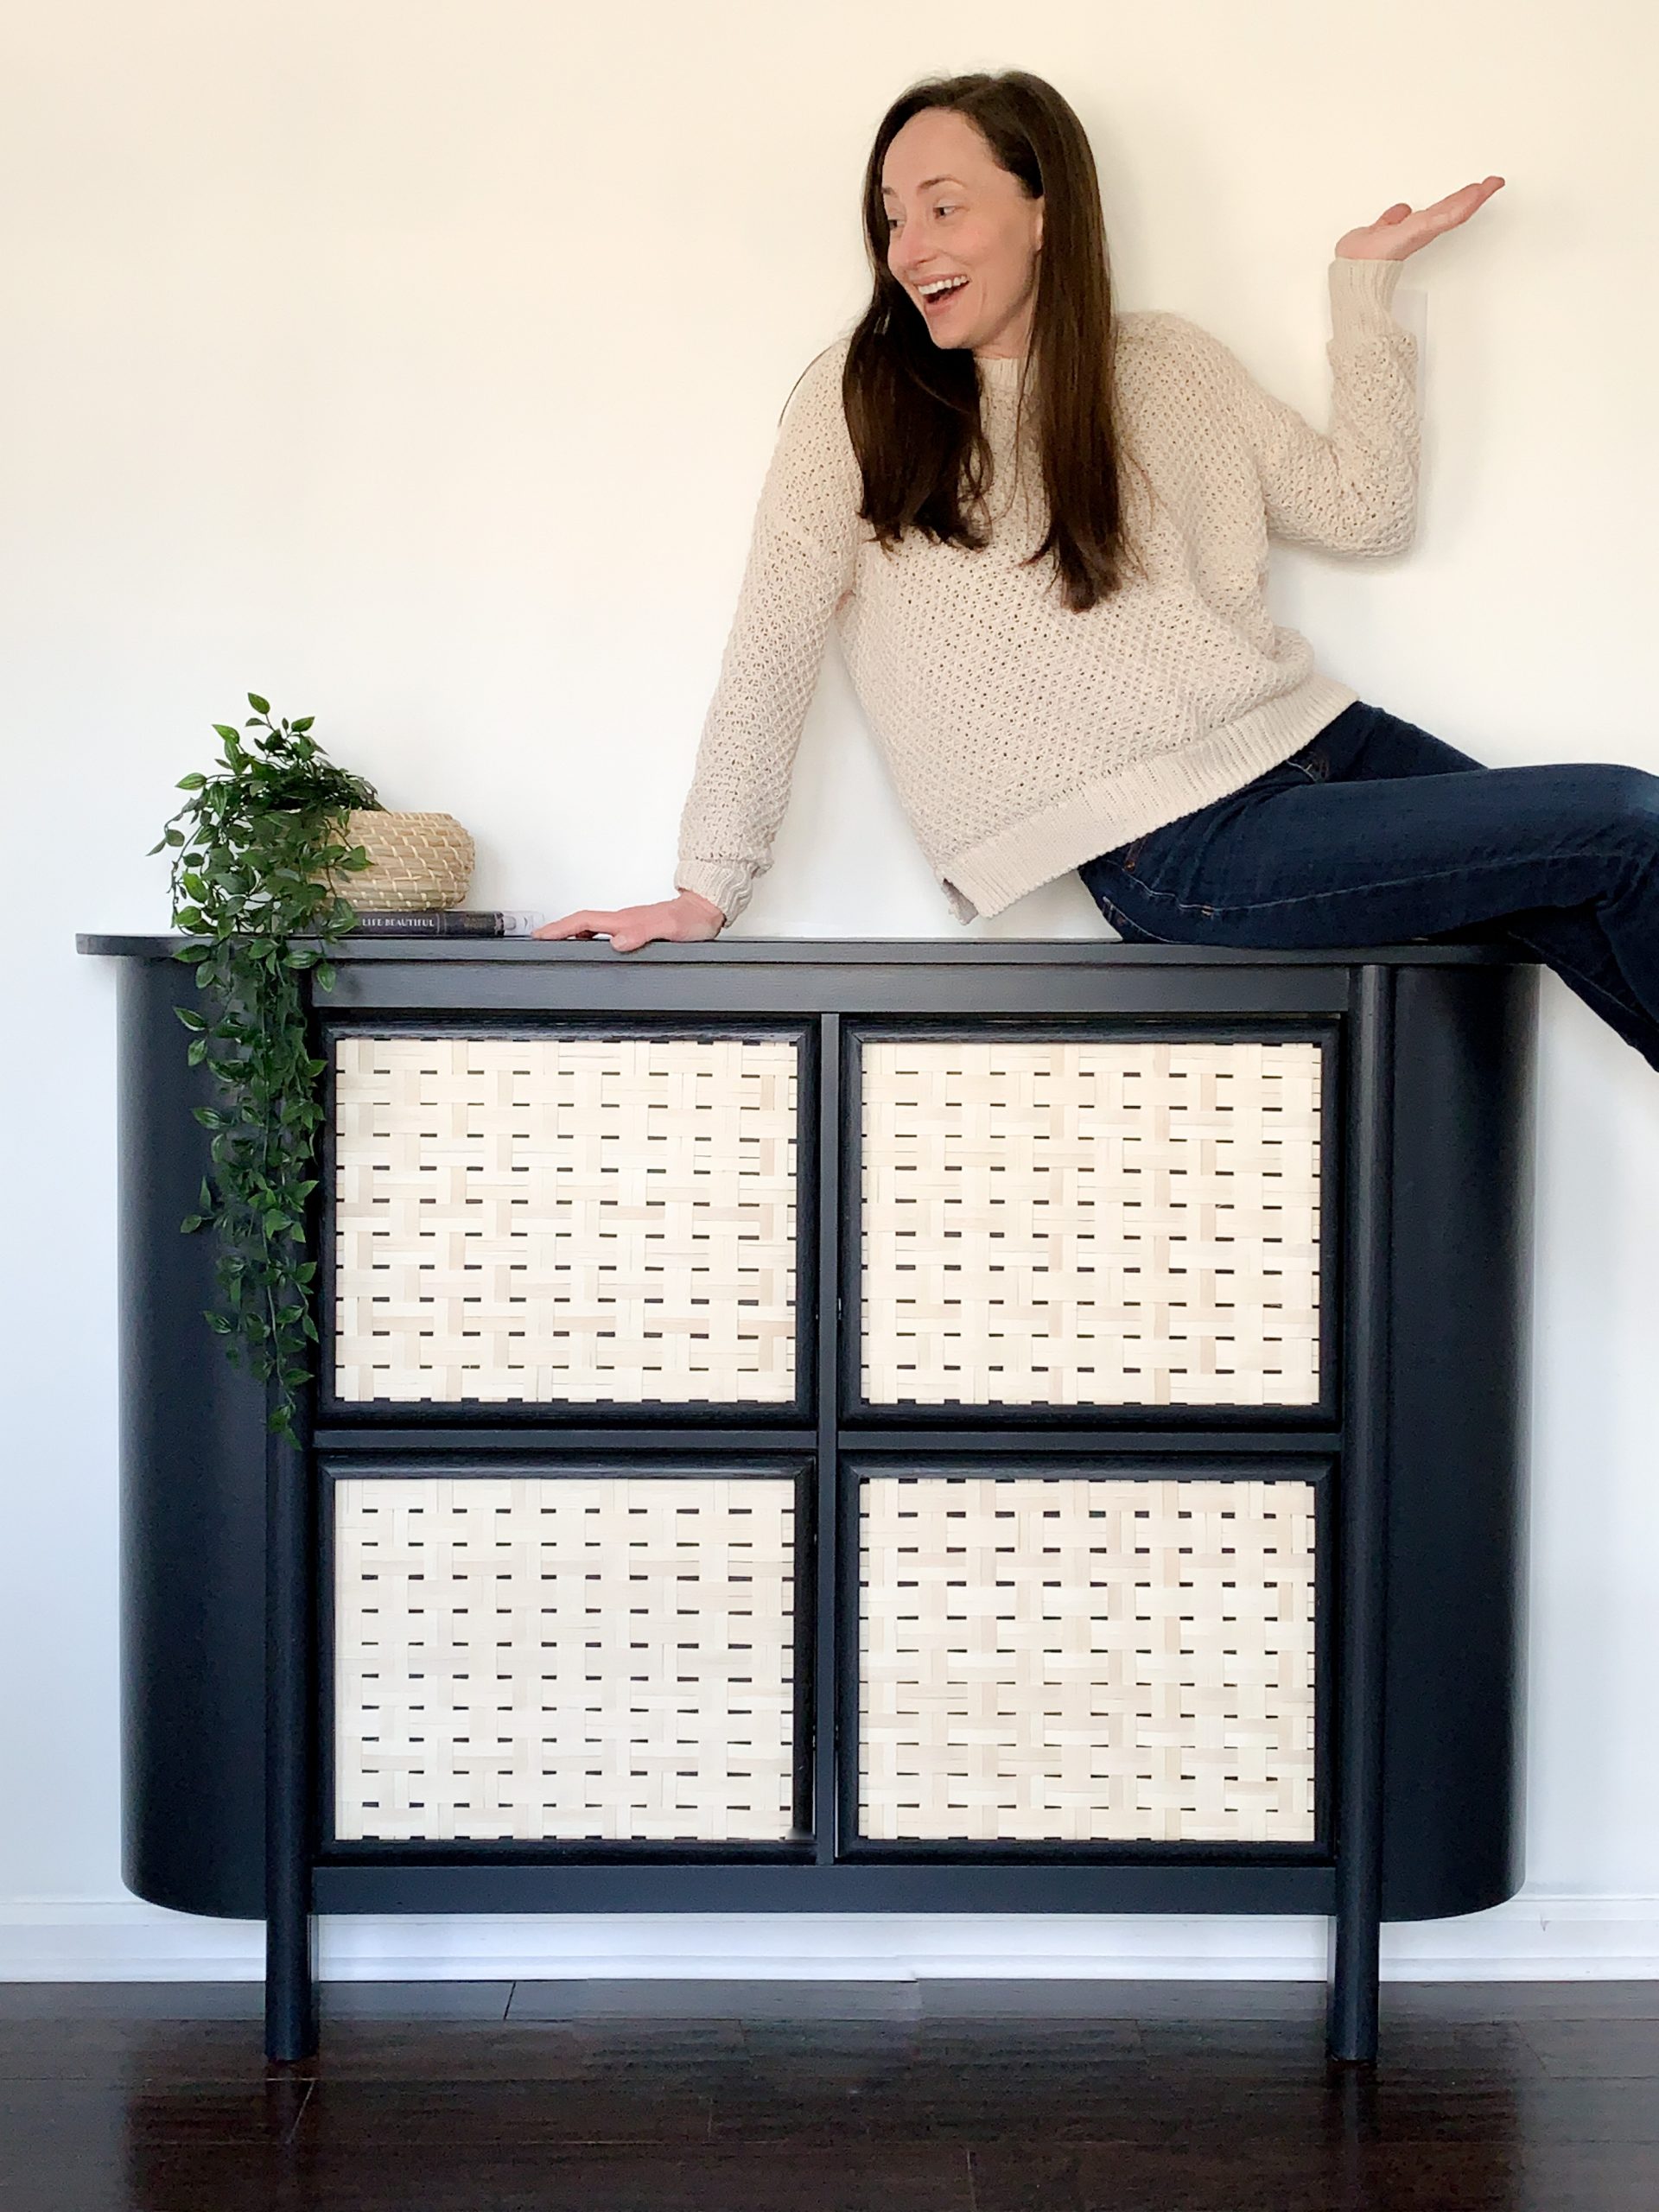
Are you struggling with messy, scattered footwear? Grab an IKEA Hermes to overcome your problem. It usually comes in crisp white, perfect for your ultra-modern home. Still, if you are not into the hygienic look, you can tweak it a bit, just like these curvy shoe cabinets.
- To make these curvy shoe cabinets, you need to get an IKEA Hermes.
- Then, line four wooden dowels onto the carcass.
- After that, install bendable plywood on both sides to create a curvy design.
- Next, grab a wood board and cut it to size. You will put it on top, so make sure both sides overlap the carcass a bit.
- Then, cut the edges to get a curvy top.
- After that, paint the shoe cabinets black.
- Now, attach woven rattan panels on each door to add exciting patterns and textural elements to the cabinets.
11. NO-SEW trick to elevate your curtains in 3 easy steps! From @melb_lifeandhome
Are you bored with your curtains? Do you want to replace them, but you have not found the best ones yet? Well, you had better make them yourself.
If you are not good at sewing, no worries! You can try this no-sew curtain idea.
First, get the fabric you like. For your information, IKEA offers a wide range of fabrics with various patterns. You should give them a try.
- Next, cut the fabric to length.
- Make sure to add an extra 3″ or 4″ for hemming.
- Then, define the edges by folding and ironing the sides and top.
- After that, insert iron-on double-sided adhesive into folds.
- Then, secure it by ironing the folds to create a hem without sewing the fabric.
- Do not forget to place a damp cloth over it when ironing. Consider ironing the entire fabric to remove wrinkles.
- Then, hang the curtains with SYRLIG curtain rings.
Bonus Idea @Kelseyvenkov to save your IKEA spending by up to 50%
If the budget is your primary obstacle, you can try visiting IKEA as-is department because it hides some IKEA gems you’ve probably always wanted to acquire. It is a section where you can find floor samples, customer returns, and discontinued pieces. Thus, the furniture comes at way lower prices.
Some products are even still in the boxes. Yet, they are 50% off. This way, you can get the one you like while salting away some money.
10. The STAND UP: A DIY STANDING DESK (IVAR IKEA HACK)
 Working on your monthly report from home can be somewhat challenging because you do not have a comfortable desk.
This one can be what you have been looking for. You do not need to make this workstation from scratch, though. Grab two IVAR IKEA cabinets. Then place them in the spot you want. After that, top them with a pine board to create the desktop. Finally, screw the standing desk to the wall.
9. A Modern and Exotic Wall Plant Idea by Rachel Shea
Did you know that the combination of IKEA Skadis containers and a pegboard can make epic planters? Even better, it can be the best solution for anyone who has a green thumb yet is not blessed with a spacious garden.
- First, get as many IKEA Skadis Containers as possible.
- Then, drill a hole underneath for the drainage.
- After that, grow your favorite plants in each container.
- Finally, use your creativity to display them on the pegboard.
With this new indoor planter idea, you can decorate your kitchen, hallway, or even dull bathroom. You can also get creative with the design of your wall planter. All you have to do is paint the pegboard and leave it as-is. Then, use a chalk marker to draw a planter on the wall.
Set up your garden anywhere you want by placing the containers on the pegboard until they get filled with plants.
8. The DIY: Banquette Seat EXPEDIT/KALLAX IKEA Hack
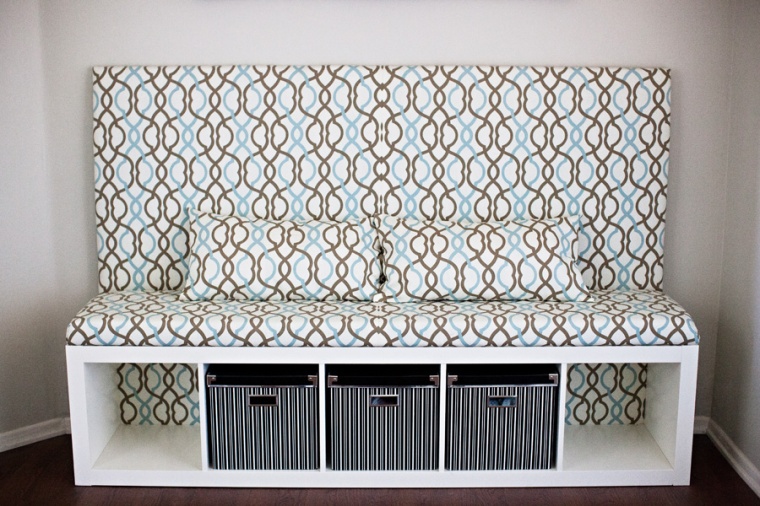 This banquette seat is perfect for your dining area or mudroom. More importantly, you can make it yourself.
You do not have to make it from scratch, though.
- You just need to put one of the long sides of IKEA Kallax on the floor to get a bench.
- Then, you need to make the backdrop. It has to be comfortable enough for you to lean your back against it and large enough to make a statement. Thus, get a 4’x6′ piece of plywood. Pad it with 1″ thick foam.
- After that, cover it with batting. You can choose any canvas fabric you like to upholster the backdrop. Then, secure it to the plywood by using staples.
- You can also install flush-mount brackets to hold it on the wall for peace of mind.
Next, you need to add comfort to the top bench. You can do this by cutting a piece of MDF to length and covering it with 2-inch thick foam. - After that, cover them with batting. Use staples to secure the fabric in place.
7. Downsizing an $1800 cabinet to a DIYed one for $225 by Greybirchdesigns
Displaying your family treasure in a glass-door cabinet can be mesmerizing. Unfortunately, it can be pricey if you buy a ready-made one. Therefore, you need to make it yourself.
Begin with purchasing two IKEA Kallax units. Then, paint the outer sides black for a more elegant look. Next, assemble glass doors and install them in the cabinet using euro hinges for a sleeker look.
Installation instructions:
- When you have the items ready, you can get started with this project by attaching the hinges to one of the KALLAX shelf’s sides.
- Attach one hinge on each side of the back panel and secure them using the screws included in the package.
- Then, attach both panels using the hinges and connect them using screws.
- Next, place the glass doors that you have purchased on top of your new cabinet and use some glue to attach them in place permanently.
6. A Slim Space-Saving Shoe Storage That Float
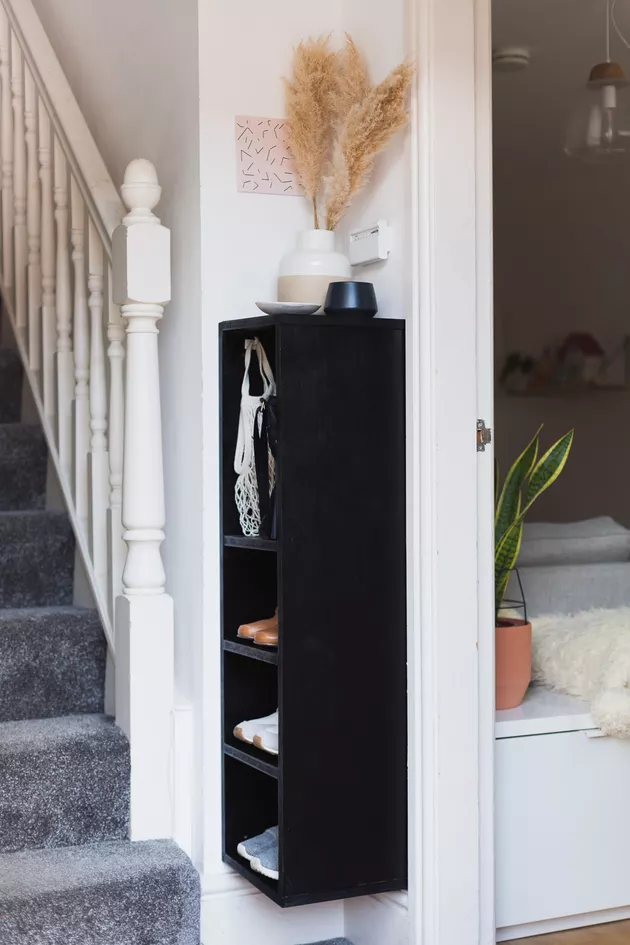 IKEA Kallax is exceptionally versatile. You can use it as a multipurpose shoe rack in your bedroom or even mudroom.
You just need to get an IKEA Kallax. Then, adjust it to your need by removing or adding some shelves. You can try mounting it from the wall so that you can free up more floor space. Consider installing L-brackets for extra support.
You may need to complement your spacious living room with a large TV console for your big, flat TV. The fantastic news is you can build one without breaking a sweat.
- First, you need to purchase IKEA Besta TV unit 70″, Besta TV unit 47″, Lappviken doors, brackets, and euro hinges.
- Mount both Besta units to the wall. Consider installing a bracket in each cubby to the wall studs.
- Then, screw the units together for a seamless look.
- Finally, install the doors using euro hinges.
Hint: The dirty little secret of the project only comes from 5 pieces of steel bracket that cost only $3 a pop.
4. Replicate the Ikea builtins project from Mygrandparentschair
These built-in shelves look attractive, don’t they? Can you believe that they are coming from several IKEA Billy?
To make this look, you need two or three IKEA Billy units depending on the length of your wall. Do not forget to make some space between them and the adjacent wall. You can do this by adding plywood.
After that, conceal the gaps using the MDF board. Consider making an arch for each top. Finally, add trim and paint the board the same color as the walls to create a seamless look.
SECOND IDEA
Complete the previous idea with the next IKEA Besta Hack with Sexy Curves From Our_Bears_Home
Do you want to add more elegance? Try this IKEA Besta hack too.
You just need to create a wavy top by cutting a plywood board. It will be a bit challenging, but you can do it after several practices. We have faith in you.
Then, sand and paint it the same color as your IKEA Besta.
You need to glue down some wooden dowels onto the front for the doors, then paint them the same color as Besta.
Follow the simphome link to access the uncut version and all clips featured in the list.
Next:
FROM NO 3 TO 1, YOU’LL FIND OUT 3 DIFFERENT WAYS HOW TO TRANSFORM YOUR BED IKEA FAN’S WAYS
3. The IKEA bed hack by Jettsetfarmhouse
The first idea requires three IKEA Kallax units. Then, lay them on their sides to create a U shape. Next, top them with a plywood board and secure them in place using some screws. Finally, add a mattress, and that’s it!
You can get a comfortable place to sleep while enjoying ample storage space for your books and knick-knacks underneath.
2. The DIY IKEA BED by Lara.sophie2806
Why do you have to splurge out on a fancy and comfortable bed if you can make it yourself? First, shove two Kallax (1×3) against a wall. Then, place two Kallax (1×4) in front of the second shelf of each Kallax (1×3). Close the opening with another Kallax (1×4).
Install metal plates to secure them together and add some boards to make slats. Finally, top the frame with a mattress.
Lastly, Number 1. The DIY HANDMADE IKEA bed transformation by Celiasaco
Who would have guessed that making an ottoman bed can be so easy with Kallax?
This IKEA bed hack features Kallax arranged in a U shape with one shelf in front of each Kallax unit.
First, once again, you need three Kallax units to create a U shape. Assemble the Kallax units using the clips and dowels to create a solid and sturdy look. Then, top it with a plywood board. Secure the left side with hinges to improve the stability, and you are good to go.
The hinges allow you to open the plywood board so that you can have easy access to the hidden storage space under the bed.
Alternative Improvement: The clear acrylic top is perfect for decor and also provides a visible open space below the bed to store books, charges, cables, notebooks, or other items that you need at the same time.
Bonus:
You can create the storage space under your IKEA bed by adding a wooden shelf.
- Just measure the area’s height and cut at an angle on both sides of your bed’s frame.
- If you want to install it under the bed instead, you need to purchase Kallax instead of using Kallax shelves as shelves will be slightly smaller for a Kallax bed frame.
- Another important tip is that you should use plywood for the top layer and not MDF board as screws used to secure it may damage MDF due to its soft texture.
- The wood grains that come from MDF will also show in the paint-work, but with plywood, they are invisible.
Conclusion:
You do not have to make a wardrobe or bookshelves from scratch, especially if you are not into woodworking. You can purchase some ready-made furniture and use these 12 IKEA must-have home organization ideas to add a twist to them. This way, you can get the pieces that suit your need immensely without breaking a sweat.
References:
12. Champagnechaos.com, Pinterest.co.uk
11. Tiktok.com/@melb_lifeandhome
10. Papernstitchblog.com
9. Tiktok.com/@rachelshea
8. Melo-drama.com
7. Tiktok.com/@greybirchdesigns
6. Hunker.com
5. Tiktok.com/@rhausliving
4. Tiktok.com/@mygrandparentschair, Tiktok.com/@our_bears_home
3. Tiktok.com/@jettsetfarmhouse
2. Tiktok.com/@lara.sophie2806
1. Tiktok.com/@celiasaco