In the labyrinth of life’s knick-knacks, there are hideaways and then there are Houdinis. Curious? Ditch the clutter kerfuffle with 18 masterful magic nooks that’ll make your mess vanish – poof! Get set to be the David Copperfield of tidying; your clutter won’t know what vanished it. Let’s tidy in style.

18. A DIY Rotating Lazy Susan with Secret Slide-Out Drawers
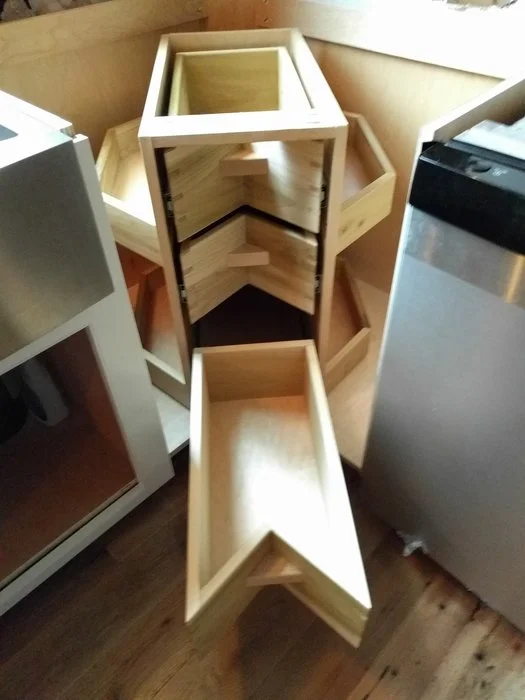
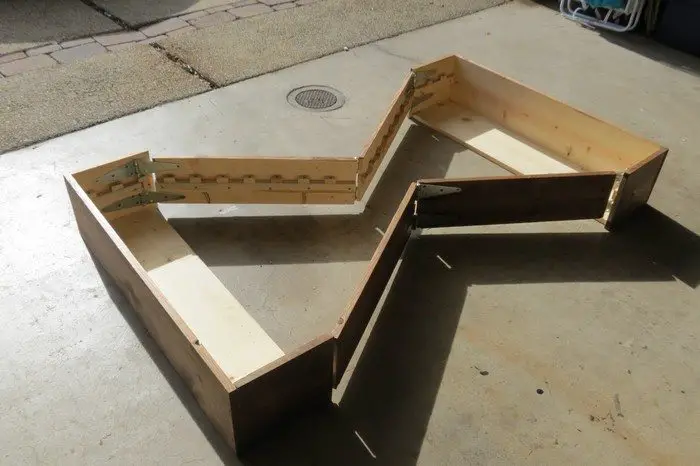
Your mission, should you choose to accept it, involves constructing a rotating Lazy Susan complete with stealthy slide-out drawers—perfect for stashing spices, snacks, and kitchen gadgets galore. Let’s turn that corner base cabinet into the heart of your culinary command center!
First, scrap those angled dovetails you’ve been wrestling with for two days straight—total headache, right? And those angled box joints? Big ol’ nope. But don’t toss in the towel yet; failure is just the compost that helps our DIY skills grow.
We’re going for precision, so craft a 45-degree sled attachment like an origami master folding their most intricate swan. Take your time to calibrate it with metallic flashing strips till you’ve hit that sweet, sweet 45-degree angle. Trust me, the angle’s key—like fitting together pieces of the world’s smallest puzzle.
Ready to play a joinery version of Goldilocks? It might take a few tries to get those drawer front pieces just right. If you find yourself shouting “This one’s too long!” like three times over, remember, dear friend, the power of math is on your side. Calculate the perfect cut based on the hypotenuse—yes, flashback to those high school math classes—so you’re not re-routing those bad boys more times than necessary.
Glue-up turning into a sticky nightmare? Breathe. The key is clamping one end to keep everything square, then, with surgeon-like steadiness, clamp the rest without warping your woodwork.
Now let’s talk aesthetics. You’ve selected poplar wood—an excellent choice, may I add—for its workability and are sealing it up with Arm R Seal for durability and a hint of sheen. Round off those edges for a streamlined look that’s sure to dazzle from up close or at a breadcrumb’s toss away.
For a firm grip, you’ve fashioned chunky maple handles, each hugged snugly by its own drawer front and complemented with a routed finger groove for that intuitive pull-action.
As you sit back, admiring your creation that smoothly spins atop its circular bearing—you envision a folding cabinet door to complete your masterpiece. Let’s hope the kitchen gods spare you from another round, but if they do call upon you, you’re armored and ready for Lazy Susan Round Two.
Now go forth and twirl your way to clutter-free bliss!
17. Eco-Chic OSB Drawer Unit: Crafty, Sturdy, and Kind to the Planet
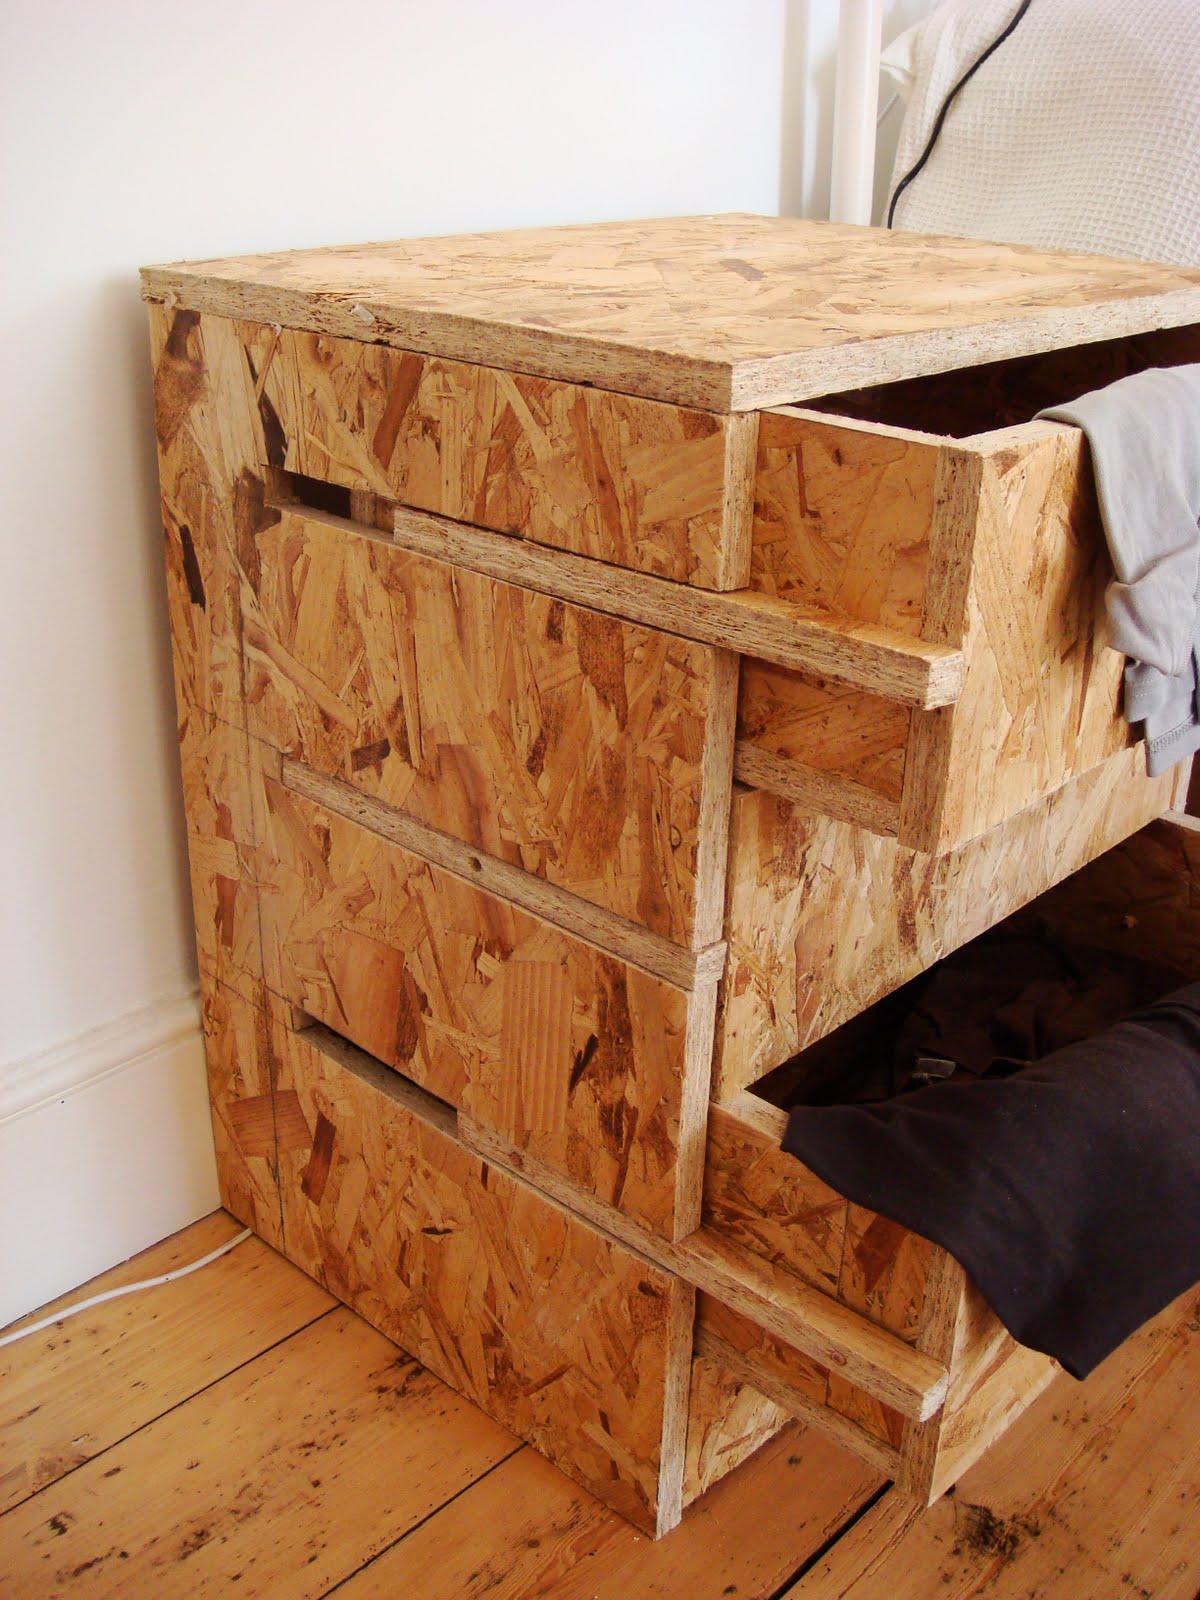
Get ready to channel your inner furniture wizard with a creation that’s as kind to Mother Earth as it is to your organizational needs. We’re talking about a low-impact drawer unit, cobbled together from a single OSB board. It’s the furniture equivalent of a one-pot meal—less mess, more genius!
Picture this: you whip out your trusty saw and, with a few calculated moves, you slice up that OSB into a drawer frame and runners, minimizing waste like a pro. Now, the offcuts from the main frame aren’t just leftovers; they’re the heroes of this tale, transforming into slick drawer runners. And those drawers? They’ll glide smoothly in and out of your minimalist frame with a satisfying ‘whoosh’.
Farewell to fussy handles; with this design, you’re rocking cut-out holes for a sleek, no-fuss pull. Give the OSB a coat of varnish to seal the deal, making it gleam and protecting it against the rigors of daily life.
The heart of this project beats with sustainable passion, utilizing FSC certified wood and soya-based glue. Not only are you making a stylish statement, but you’re also tipping your hat to this precious planet. Cost-effective, minimal waste, and dripping with design savvy—that’s the name of the game.
Constructing this standout piece might feel like a puzzle where you’re learning on the go, but remember to keep those drawer trials and errors in check; stability is key, and no one’s chasing their socks under a toppled drawer!
This dazzling drawer unit isn’t just a solitary marvel; it’s the trailblazer for a whole lineup of sustainable, wallet-friendly furnishings that are brewing on your design horizon. So, gear up for an assembly that proves you can create extraordinary without the excess and do our environment a solid while you’re at it. Your future sideboards and wardrobes will thank you, and so will your clutter-free oasis.
16. “Der Vorstand”: Your Sleek, Hideaway Home Office

Imagine a chameleon of a cabinet, “Der Vorstand”, that morphs at your touch from a svelte wall piece into a fully functional command center. Picture yourself in your cozy nook and with a single pull, this slender cabinet by Nils Holger Moormann rolls out on wheels, expanding into a 170.0 cm wide, 95.0 cm deep, and 230.0 cm tall workspace, complete with an integrated desk of 59.1 x 70.9 cm, beckoning bookshelves, and an overhead top light to illuminate your brilliant bursts of productivity.
Crafted to make the most of minimal spaces, this ingenious cabinet unfurls a fold-out canopy, raising the atmospheric stakes to a roomy ceiling height of 205.5 cm. It’s not just a cabinet, it’s a closet-sized think tank where every pencil, every book, even your charging gadgets have their meticulously designated spot — all while hidden cables maintain a clean visual flow.
Follow Moormann’s genius “ordering principle” and you’ll find a place for every office essential. And for those moments of ultra-focus or Zoom-worthy backdrop needs, slide in a curtain to the side for added privacy.
This magnetic marvel, initially dreamed up for a design contest, soared beyond expectations to become a standalone space-saving superhero in any room. With its ash wood bones and calming, light beige linoleum for work-worn hands, paired with non-distracting black surfaces, it’s a study in sophisticated simplicity.
Lock in or unfold Der Vorstand with a precise, easy mechanism that exudes executive confidence. When you switch from business to personal, simply tuck your pop-up office back into its compact core of 37.5 x 95.0 x 230.0 cm. Moormann’s team delivers minimalist design with maximum utility, and always with a playful wink. Der Vorstand stands by to organize your life discreetly or reveal a personalized workspace at a moment’s notice — mastering the art of blending into your abode.
15. A Hideaway Wall Table Idea with Artistic Touch!
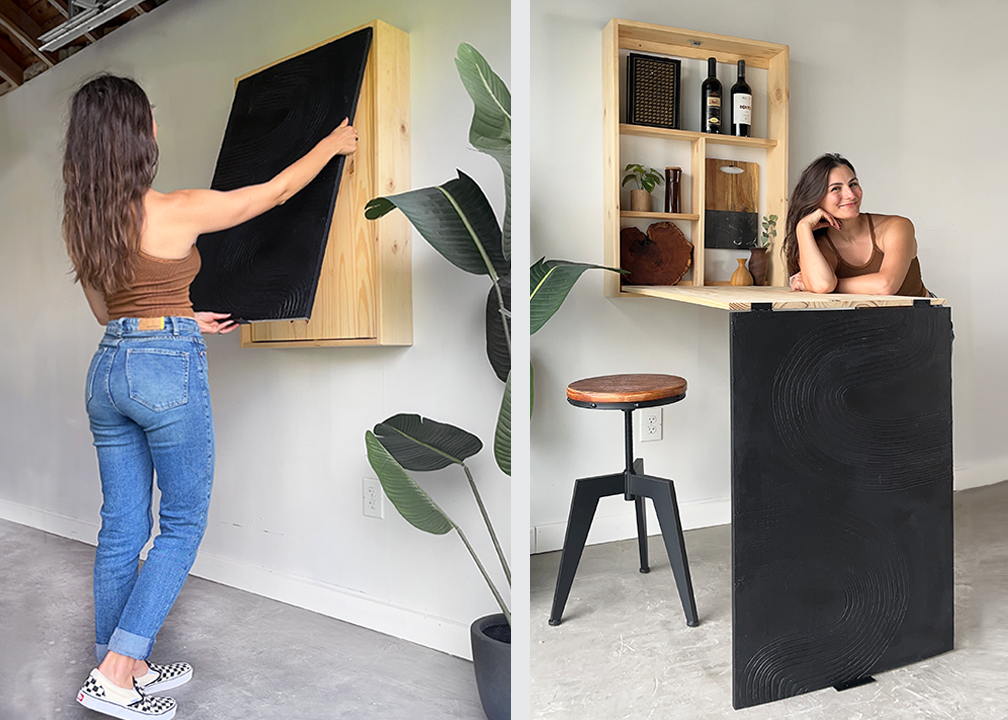
Alright, DIY dynamos, let’s conjure up a wall table that’s as stealthy as a secret compartment in a spy novel.
Step 1: Build Your Secret Shell
Kick things off by crafting a frame with 1×6 boards. This baby isn’t just any frame; it’s the future disguise of your fold-down masterpiece. Get those boards buddy-buddy with pocket holes and wood glue, and top and bottom pieces join the party too. And hey, don’t let those pocket holes cramp your style — pop in some pocket hole plugs and give it a smooth sanding to keep things slick.
Step 2: Slot in Shelves and Bolster with Braces
Now, shimmy in your shelves cut from 1×4 boards at heights tailored to your treasure trove of trinkets. Pocket hole screws and wood glue will be your allies here. And because we’re all about sturdy chic, fortify your masterpiece with 1 x 2 beams at the top and bottom for a suspension that would make a trapeze artist jealous. This is also the perfect moment to splash on that sultry wood finish or bold paint color you’ve been eyeing.
Step 3: Unleash Your Inner Picasso
Here’s where you let your creativity flag fly. Jazz up that front panel with some artistry! Maybe it’s the joint compound and paint route for you — smear on that compound, style it with a comb for ripple effects, and when it’s dry, bring on the paint parade.
Step 4: Lift-Off and Lock In
Everything’s dry? Awesome! Time to mount your chameleon cabinet. Drill through those top and bottom 1 x 2 braces straight into the wall studs (pro-tip: this is a cinch without the front panel).
Step 5: Flip Out Your Table
The endgame’s in sight! Attach that tabletop to the cabinet frame so that your hinges at the bottom front panel wink back at the bottom shelf. Finally, hinge up the front panel to the tabletop. It’ll flip down more smoothly than a vaudeville stage curtain.
And just like that, you’ve turned a humble panel into a hidden table haven. Slide those chairs in, and it’s showtime – dinner, crafts, or the next chapter of your novel, all with a flick of the wrist. Ta-da!
14. Craft Your Cozy Hideaway: The Bed-in-a-Box!
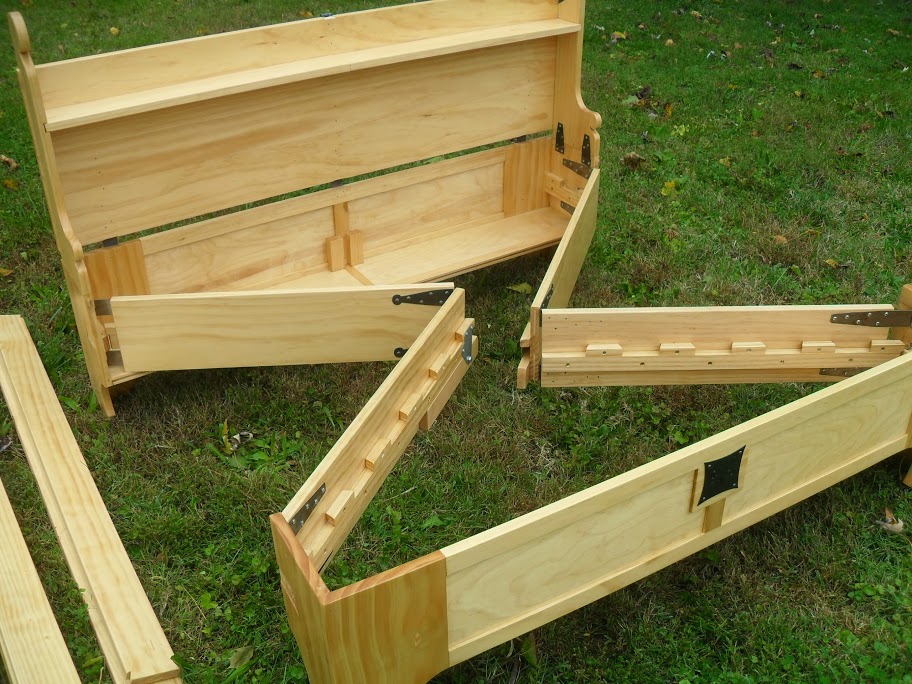
Listen up, space-saving sorcerers and DIY devotees! Picture this: a nifty bed that moonlights as an elegant chest or bench, a secret slumber spot you can whip out faster than you can say “unexpected houseguests.” Welcome to your next weekend project – the bed-in-a-box. Keep your cool when the holiday horde descends for Thanksgiving or Christmas, or when summer brings in waves of fun-loving friends.
Here’s the skinny: dash to the store and scoop up some pine lumber, birch plywood, a classy tin of semi-gloss polyurethane, plus the usual suspects – locks, hinges, and wood screws. Roll out your arsenal of tools: tape measure, table saw, sander, cordless drill, paintbrush, and clamps – because precision and finesse are your new besties.
Throw on your stylish yet practical work gloves (safety first!), and get to measuring and cutting. Those pine planks and birch sheets aren’t going to size themselves. After the sawdust settles, it’s time to play puzzle master and piece together your creation with hinges and screws, making every connection tight – because a loose screw is like a plot twist in a thriller: only fun in stories.
The grand finale? Brush on that semi-gloss polyurethane to make your bed-in-a-box as shiny as your feeling of accomplishment. Now, you’ve got a bonus bed for the nights filled with more laughter than elbow room, and a piece of decor that tucks away as easily as your guests’ luggage when the party’s over.
Concocting your very own bed-in-a-box is no small feat, but imagine the high-fives and the envy! So gear up, get crafting, and transform your space with a DIY bed that’s as functional as it is fantastical. Your future houseguests will thank you.
13. No fuss Slider Box for your Closet/Drawer
You’ve eyed those cluttered shelves long enough, and now’s your moment to conquer the chaos with a no-fuss drawer box for that closet of yours. Who says you need math to pull off a carpentry feat? Not you! Ready to slip into your DIY shoes and wave your magic saw? Let’s slice right through the complexity.
First things first, slide those drawer slides into place. Their length? That’s your golden number for cutting those side pieces. Affix them to the slides, and you’re already halfway to victory. Measure the distance between your newly installed side pieces—front, middle, and back. The smallest number? That’s your width genie, ensuring your front and back pieces fit like a dream. Nail and glue ’em together, and you’ve got the skeleton of success.
For the grand finale, cut a sturdy bottom that nestles into your creation, secure with the trusted duo of glue and nails, and stand back. There you are, the artisan of a spanking new drawer box, no calculator needed!
This is your entry ticket to the world of woodworking—simple, satisfying, and superb for beginners. Grab those stock boards and let your circular or miter saw do the dance. And when the wood chips settle, and your drawer slides open like the curtains on a Broadway debut, take a bow, DIY superstar. You’ve nailed it, math-free and marvelous! Source