12. A DIY Oversized Pegboard Shelving System
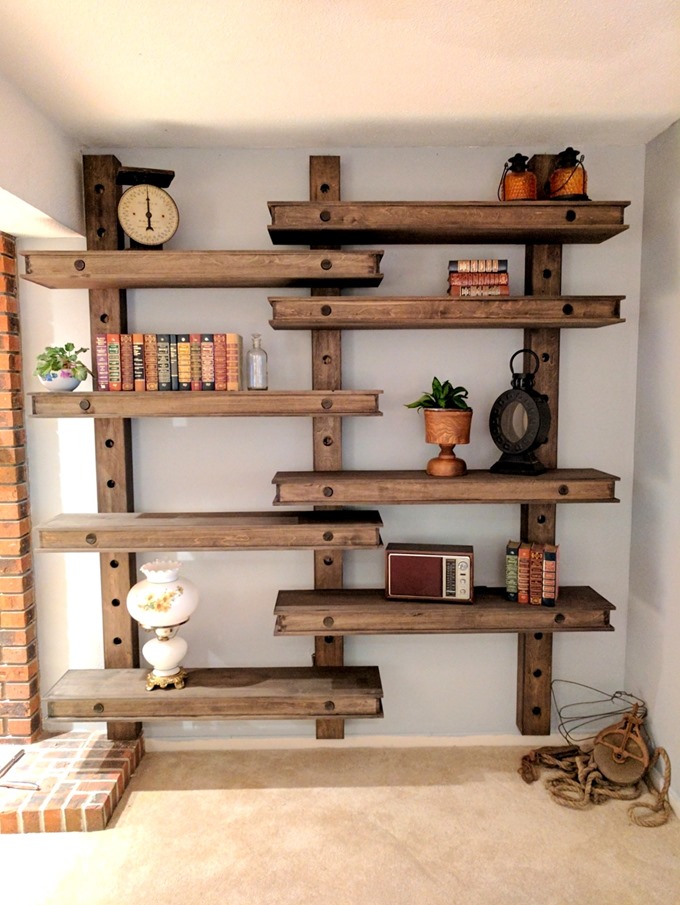
Hey there, DIY titans! Ready to tackle an advanced level project that transforms your wall into a customizable storage masterpiece? Meet the oversized pegboard shelving system! This isn’t your average Sunday crafting; it’s the woodworking equivalent of running a marathon – but oh, so rewarding.
You’ll need to hit up Home Depot for their exclusive Purebond Plywood. We’re talking about 5 sheets of 1/2-inch thickness for quality that echoes through your space with minimal voids, easy workability, and it’s North American-sourced. You’re also going to grab dowels, lag screws with washers, stain (we’re swooning over General Finishes’ Walnut), and edge banding – or hey, cut costs by making your own!
As the Master Carpenter of your domain, you’ll rip the plywood down to whittle out your shelves, ensuring the size matches up with your vision. Dive into some precision hole-drilling for that oversized pegboard effect with a 1 3/8″ forstner bit and wow the crowd (or just the family). When it comes to edge banding, trim those shelves slightly shorter for a seamless fit – 3/16″ shorter, to be exact, on all sides. Glue, pin, trim, and soon you’ll have shelves that are just the right kind of edgy.
For a grand shelf display, construct those French cleats with finesse. Glue and planer those plywood strips to a perfect 3″, angling the cuts at 30 degrees for that clean, chic joinery. Drill away with the big cleats, setting your drilling depth to 2″. Hello smooth, symmetrical bliss!
Now, time to stain and assemble this beauty. You didn’t sweat this hard not to go all-in with finishing touches that matter. Once it all comes together, lock and load those shelves onto the beams and give your space that storage glow-up.
So there you have it, a pegboard shelving system that’s not only sturdy but oozes that organizational charm. Revel in knowing this isn’t just a structure; it’s a functional work of art you created. A backdrop for books, board games, memories-in-the-making. As the ruler of your wood-crafted domain, take a well-deserved toast to a job exceptionally done. Cheers to the walls that can handle your version of 328,000 pounds of genius – or at least enough to make your space both organized and stunningly beautiful.
11.The Impossible Bookshelf: A Gravity-Defying DIY
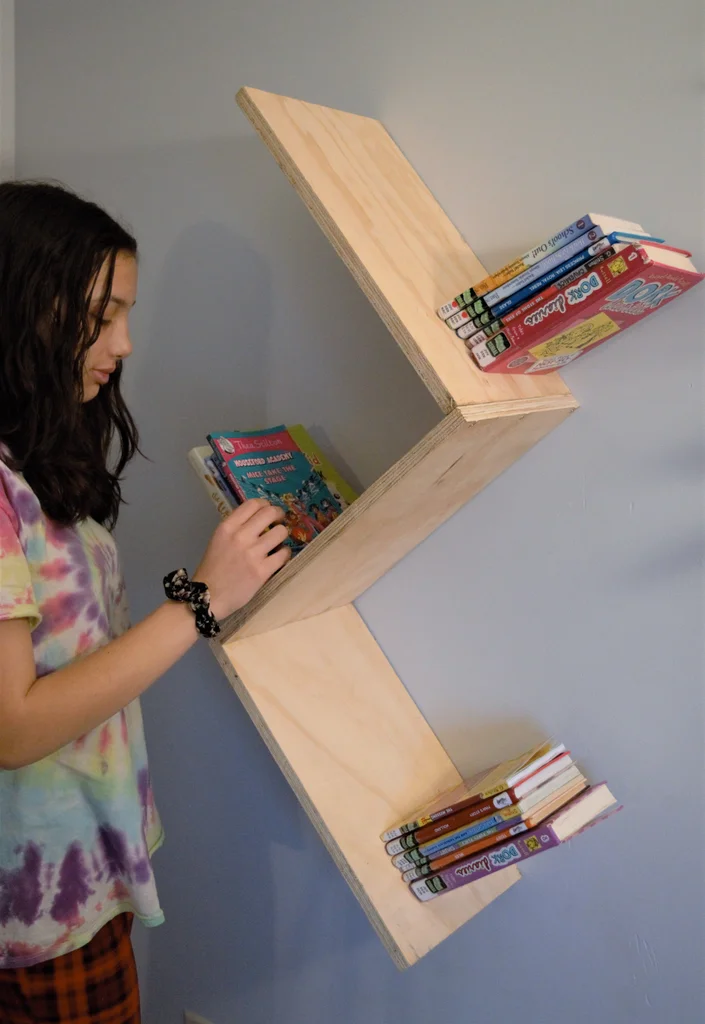
Time to craft an optical illusion with lumber and a bit of ingenuity – your very own Impossible Bookshelf. This whimsical piece will twist and turn like a mind-bending staircase of literary wonder, perfect for injecting charisma into any room.
Step 1: Blueprint Those Planks
You’re aiming for shelves that zigzag in alternating 90-degree angles. Imagine a stairway of books spiraling skywards. For the version you’re about to build, you’ll need three shelves, each 17 inches long, 10 inches deep, and 3/4 inch thick, proudly supported by three 4.5-inch long metal brackets – just shorter in width than your chunkiest hardbacks.
Step 2: Woodwork Wizardry
Measure once, measure again, then cut. You’ve sourced wood 17 inches wide, planning for 10-inch wide sections alongside a central break – creating three equal shelves. Secure your wood to your workbench with clamps to keep it steady, then draw your cut lines.
Step 3: The Straight Edge Tango
With your measuring tape’s saw guideline at 1-17/32 inches, align a straight edge with your cut marks. Clamp it down and let the saw glide along, bestowing you with your first perfectly straight shelf. Repeat until you have a trio of timber.
Step 4: The Glue-and-Tape Jig
Prepare to assemble. Apply a liberal amount of wood glue along the edge, squaring up the ends to exactly 90 degrees. Use tape to hold the bond and a damp cloth to clean up the excess glue. Opt for screws or nails if you fancy doubling down on durability.
Step 5: Metal Maestro Moves
Notching metal flats? Craft them now if you don’t have them prefabricated. Split a sturdy napkin holder or similar metal item in half, then into thirds – safety gear on! They won’t see the limelight, so precision isn’t paramount. Sand down harsh edges for a smooth finish.
Step 6: Anchor & Adhesive
Trace the metal bases on your shelves and glue them into place with rugged E6000. For extra grip, weigh in with screws. Transfer the project indoors if it’s chilly – a blow dryer can speed up glue setting times.
Step 7: The Suspenseful Reveal
After giving the glue a full 72-hour settle-in, test your shelf’s mettle with a book or two. Success will hinge on arranging the hardcovers to obscure the supports, creating that floating shelf magic. And just like that, you’ve defied gravity and expectations with a bookshelf that’ll have everyone doing a double-take. Welcome to your very own corner of impossible cool.
10. How to Build a Murphy Bed that Doubles as a Desk
Space-savvy DIYers, roll up those sleeves! You’re about to create a Murphy Bed that magically morphs into a desk. Ideal for those living in a snug space or craving a multi-functional room, this transformative piece keeps your workspace intact when you switch from office duties to dreamland.
Tools & Materials:
Snatch up a circular saw, cutting guide, drill, and a set of Forstner bits. Add in a miter saw, tape measure, nailer, and you’re set for construction. Maple lumber and plywood will form the bones, enhanced with a polyurethane finish for that sleek look.
Step by Step:
- Measure Twice, Cut Once: Carve out your plywood into rectangles with a circular saw, guided cuts for inside corners, and a handsaw finish.
- Edgy Edging: Cut edging strips wider than the plywood’s thickness, glue them on, then nail them down for that polished edge.
- Smooth Operator: Sand the edging until it’s flush, using a pencil line as your sanding sentinel.
- Hole-in-One: Drill precise recesses with metric measurements for the folding mechanism – it’s the heart of the magic.
- Skeleton Assemble: Create the carcass (the bed’s body) by propping up sides, attaching the top with glue and trim-head screws, and adding the back shelves.
- Face Time: Affix wider front edging to camouflage hardware, sand it smooth, and fill any blemish with wood putty.
- Desk Duty: Flip the game by converting to a desk, adding backends and stiffeners for unwavering steadiness – attach with screws.
- Anchor the Bed: The bed platform gets rounded edges, rails, and cleats for a sturdy rest.
- Hardware Harmony: Fasten tribearers and pivot links – this is the hinge of your bed-to-desk dance.
- Central Spin: Slide in pivot pins and bushings, targeting torque with bolts and cap nuts for a secure spin.
- Unite the Two: Marry the bed and desk, ensuring pivot rods and locking pins are snugly in place.
- Mattress Mates: Strap down that mattress to prevent any tip-overs with elastic straps, ensuring serene sleeps.
- Light it Up: As an optional flourish, stick an LED strip light underneath for soothing illumination.
Now stand back and marvel at your handiwork – a cozy cot by night that flips into your daytime workstation in a flash. With this creation, you’ve just elevated your living space’s versatility and got a cool story to boot! @Familyhandyman
9. DIY Slat Wall with Hidden Doors
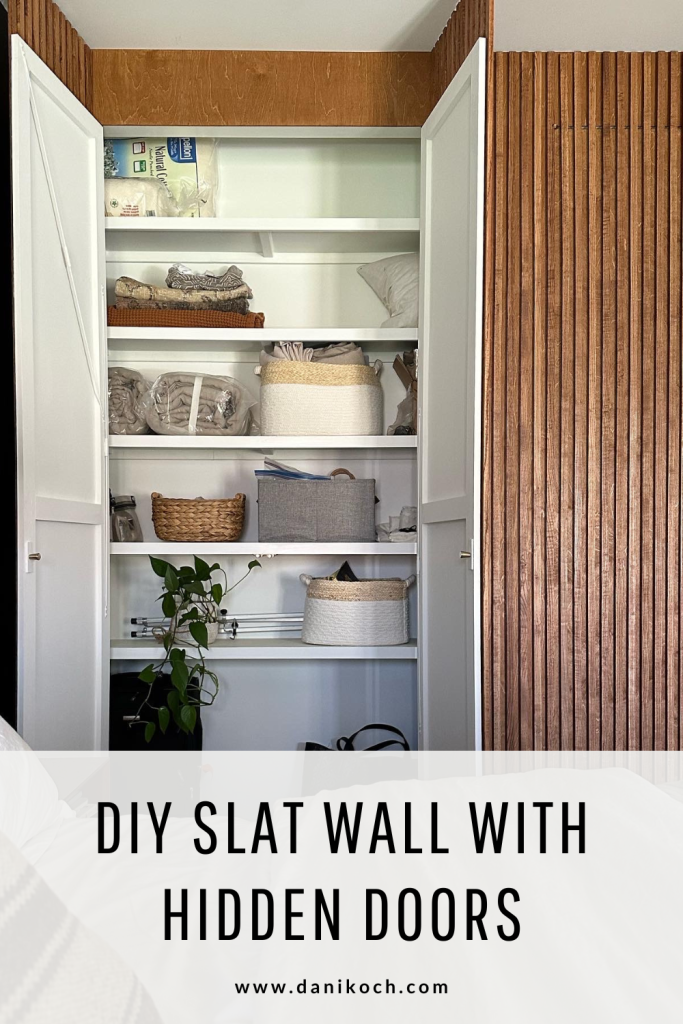
Welcome to the ultimate DIY challenge: constructing a sleek slat wall with seamless hidden doors. Let’s roll up our sleeves and get down to crafting something that not only looks sharp but also packs a functional punch with concealed storage and customizable shelving. Brace yourself—it’s going to be epic!
Gear Up:
You’re going to need tools like a jigsaw, miter and table saws, an orbital sander, and a drill complete with Forstner bits to create those clean-cut edges. Nab a brad nail gun, Dremel tool for detailed work, and a trusty tape measure.
Materials:
- Scoot over to your local lumber hotspot for ¼ inch maple plywood and get a bunch of ash wood slats cut to a custom size of 1/2 inch x 7/8 inch x 10ft.
- Stock up on essentials like hinges, wood glue, bountiful brad nails, and screws appropriate for the thickness of your slats.
- Get a wood stain that speaks to you—our source went with a layered combo of Early American and English Chestnut, topped with go-to wipe-on polyurethane for a flawless finish.
The Build:
- Doors to Adore: Craft your hidden doors to fit your nook’s opening, adjusting for any wonky angles. For my French doors, I calculated a width of 21.75 inches per door and a height of 8 feet 2.5 inches, leaving a little wiggle room for seamless operation. Pocket holes unite the framework, reinforced with centre braces.
- Swingin’ Secrets: Hinges can make or break your doors. Our source settled on some heavy-duty champs, installed with a self-centering drill bit for pinpoint accuracy.
- Ply Perfection: Measure and cut 1/4 inch plywood panels for each opening, hiding seams under where slats will lay. Sand, stain, and seal these panels before nailing them to your doors.
- Stylish Slats: Measure slats from the floor to just shy of the ceiling, ensuring they swing cleanly. Sand meticulously through 80/120/220 grit, then stain and seal each slat for that touchable texture.
- The Grand Assembly: Affix the slats with nailers, starting from the top. Spacer blocks are your best friends for consistent gaps. Conceal those door lines by aligning slats over the joins, making small notches for hinge clearance if needed.
With each slat secured, step back and marvel at your craftsmanship—a wood-cloaked wonder wall, with doors that play now-you-see-me, now-you-don’t. Your guests will be none the wiser as they admire your architectural artistry, oblivious to the storage magic hiding in plain sight.
8. A DIY Expandable idea for a small space even for a “mobile” home
Prepare to amp up your tiny home or RV with a wizardry work of wood – a DIY expandable table that’s oh-so-classy and disappears faster than you can say “abracadabra.” Channel the magic of clever design to morph a simple console into a dining haven.
- Scouting the Guts:
Your mission: nab telegraphing drawer slides. These nifty contraptions will shrink to 14 inches and stretch out to a majestic 64 inches, making them perfect for this vanishing act! - Stand and Deliver:
Legs are the next riddle. If those chic U-shaped telescoping legs are elusive or budget-busters, fret not. Sometimes a hardware store jaunt grants you just the fix – like the two 28-inch timber towers we scored. - Top it Off:
Be the maestro of your tabletop; handpick panels to size and sheen. Our source went with spruce boards, each flawlessly cut to 34.5 inches. A brush of Dark Tung Oil later, and we’re dining in style. - Seamless Assembly:
While dowel daydreams danced in our heads, the pragmatism of sash locks won the day. Straightforward to lock and strong enough for those pesky pet pounces. - The Reveal:
Now for the enchanting part – materializing your table from the aether. It’s child’s play: slide out the drawer, mount the legs, and secure the leaves. There it is—a dining surface summoned from thin air!
Roll back the curtain on your newfound space, a chameleon table that caters to your every need, be it work, feast, or familial gathering. With this savvy setup, tell crammed corners to take a hike – your RV just got a dose of grandeur, all packed into one crafty table.
7. An Ingenious DIY Hideaway Bed for Tiny Home Living
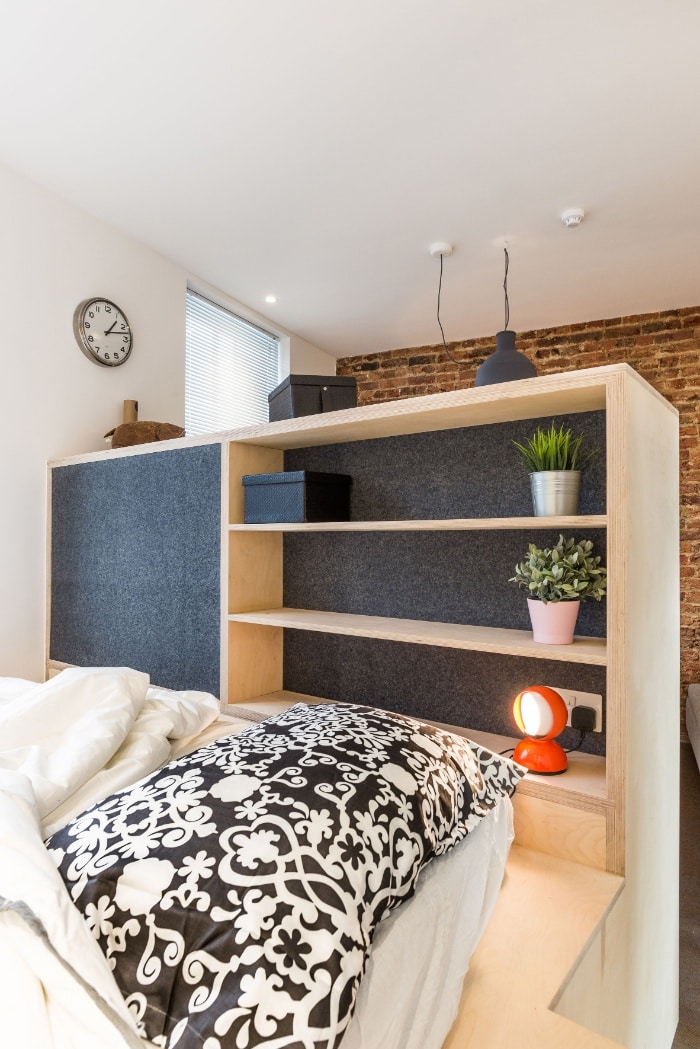
Got more shoes than square footage in your teeny London flat? Fear not, fellow space-savers! Let’s take a page from the playbook of a clever buyer who transformed their 35-square-meter Islington studio into a wonder of modern efficiency with the help of the innovative folks at CIAO.
This isn’t just about cutting clutter; it’s about magic-making with multipurpose furniture. With an open-plan design and not a corridor in sight, every inch is optimized. Imagine your bedroom lofted on a stylish platform, separated from the living area by a shelving unit that doubles as a divider – clever, right?
Now, add to that the hidden treasures: a guest bed nestled slyly beneath your elevated sleep sanctuary. Accessed by a staircase that’s more than just steps – yep, there are drawers built right in. Talk about stepping up your storage game!
Peek under the platform to discover the work nook, stylishly subdued and business-ready. But wait, there’s more. With a tug on two discreet handles, the true genius emerges. A guest bed glides out, transforming from a secret shelf-dweller into the star of your living space, offering comfort without crowding.
And because privacy is precious, both you and your overnight pals get your sleep zones cordoned off. See? Everyone’s happy.
But the marvels don’t stop there. Lounge in a living area that punches way above its weight class in spaciousness, flaunting an industrial vibe, complete with cool lighting and an exposed brick wall. It’s an ambiance that says, “I’ve got this tiny living down.”
Now, sashay into the kitchen. It’s breathtaking with rust-style benches and cabinets that keep on giving. And let’s not overlook aesthetics – a dash of Corten steel here, a splash of rusted metal there, and you’re cooking in the most enviable of tiny kitchens.
So there it is—your blueprint for living large in a pint-sized space. With innovative design and a little DIY spirit, your compact corner of the world can feel like a grand estate. And yeah, you might just have room for those extra shoes after all.