Are you bored with your bedroom decor and looking for some affordable ways to spice things up? You’re in the right place! We’re going to dive into an exciting world of do-it-yourself furniture upgrades to add new life to your space. One standout example is a custom-built floating headboard that requires no prior woodworking knowledge. This project is just one of the many versatile, budget-friendly options we will explore.
From smart storage solutions to game-changing aesthetics, each DIY will give your room a unique, personal touch. Most of these projects offer maximum impact with minimum investment.
So, whether you’re an experienced DIY-er or a beginner looking to dip your toes into home improvement, a thrifty DIY project is waiting for you. Get ready to unleash your creativity and say goodbye to bedroom boredom once and for all.
20. Leaning crate ladder bookshelf and desk: A frugal storage solution and decor for the bedroom!
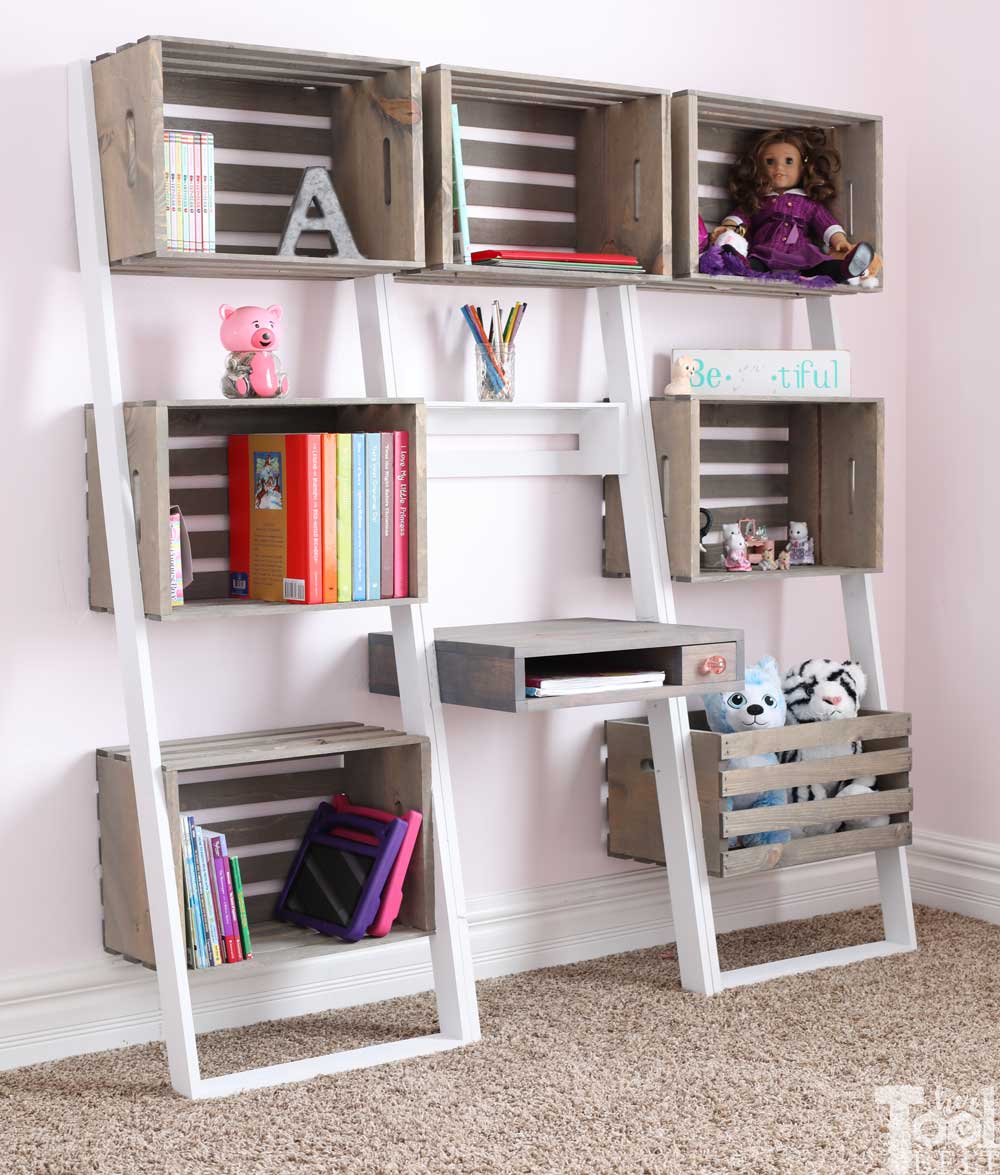
Introducing the Leaning Crate Ladder Bookshelf and Desk: the ultimate storage solution for kids! Get ready to create this trendy and functional system using weathered gray crates from Homedepot. No need to worry about staining them; they’re ready to use right out of the box!
Here’s how to make it in a nutshell:
1. Cut List and Diagram:
- Legs: Cut six legs and two leg bottoms measuring 3/4″ x 2 1/2″ x 18″.
- Desk: Cut various pieces according to the dimensions provided.
- Drawer: Assemble the sides, bottom, back, and front.
2. Assemble the desk portion:
- Glue the desk top/bottom pieces (6 pieces measuring 3/4″ x 5 1/2″ x 18″) together.
- Attach the desk sides (3 pieces measuring 3/4″ x 2 1/2″ x 16 1/2″) and back using wood glue and nails/screws.
- Secure the desk top to the sides and back.
3. Assemble the drawer (optional):
- Trim down the sides, back, and front to fit the desk opening.
- Attach the drawer bottom (1 piece measuring 3/4″ x 2 1/2″ x 14 1/4″) to the sides and back.
- Attach the drawer front (1 piece measuring 3/4″ x 2 3/8″ x 4″) to complete the assembly.
4. Mark the legs and crates for assembly:
- Starting from the bottom of the legs, mark the inside of 2 legs with the following dimensions: 25 3/8″, 40 3/8″, and 48 3/8″. Measure and mark from each side of the leg bottom, then connect the marks to make a 10-degree line.
5. Assemble the leaning desk:
- Line up the crates and desk with the markings.
- Attach the crates and desk to the legs using wood glue and 1 1/4″ brad nails or screws.
6. Leaning Crate Ladder Bookshelf with Bin:
- Follow the same process as the leaning desk but with different crate configurations.
7. Leaning Crate Ladder Bookshelf:
- Again, follow the same process but with another set of crate measurements.
8. Finish:
- Sand all components and apply desired paint or stain.
- Consider adding a charming glass knob to the drawer.
Detail: Hertoolbelt.com
19. A DIY Wall Shelf + Reverse IKEA Ekby Lerberg Bracket Hack
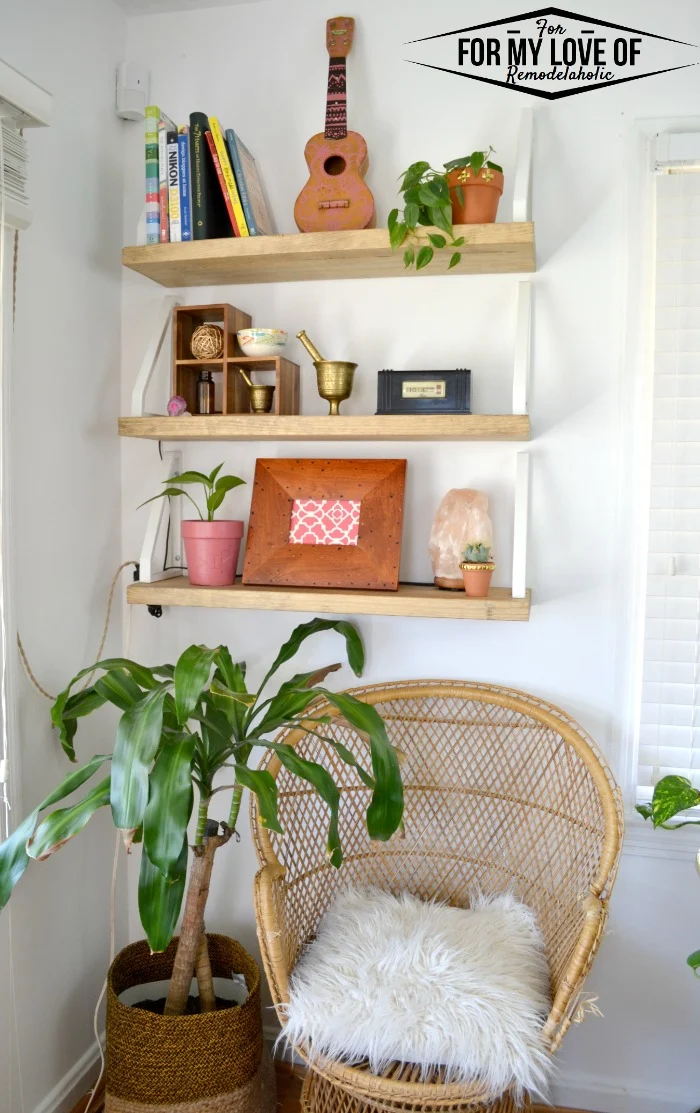 Introducing a brilliant solution for displaying your books, plants, and decor items while keeping them safely out of reach of little ones. Plus, it adds a stylish touch to any unused corner in your living room or small bedroom. Ready to get started?
Here’s a step-by-step guide in a nutshell:
1. Cut and Stain the Lumber:
- Have your lumber cut into thirds at the home improvement store, or cut it yourself.
- Dust off the wood and apply a light layer of your chosen wood stain.
2. Mark Holes on the Wall:
- Use painter’s tape to mark where the brackets’ holes should be made.
- Ensure you mark the large hole for screw placement.
3. Predrill Holes and Insert Wall Anchors:
- Predrill the holes into the wall, using wall anchors if not drilling into studs.
4. Mark and Drill Holes in the Lumber:
- Place the brackets onto the lumber and mark where the screws should be drilled.
- Drill wood screws partially into the marked holes, leaving space for the bracket’s thickness.
5. Secure Brackets and Attach Lumber:
- Use a small socket wrench to fully tighten the screws through the bracket and into the wall.
- Line up the screws on the lumber with the holes and slide the pieces into place.
- Hold the lumber firmly while tightening the screws to secure it in position.
Detail: Remodelaholic.com
18. A freestanding window bench using IKEA SEKTION cabinets!
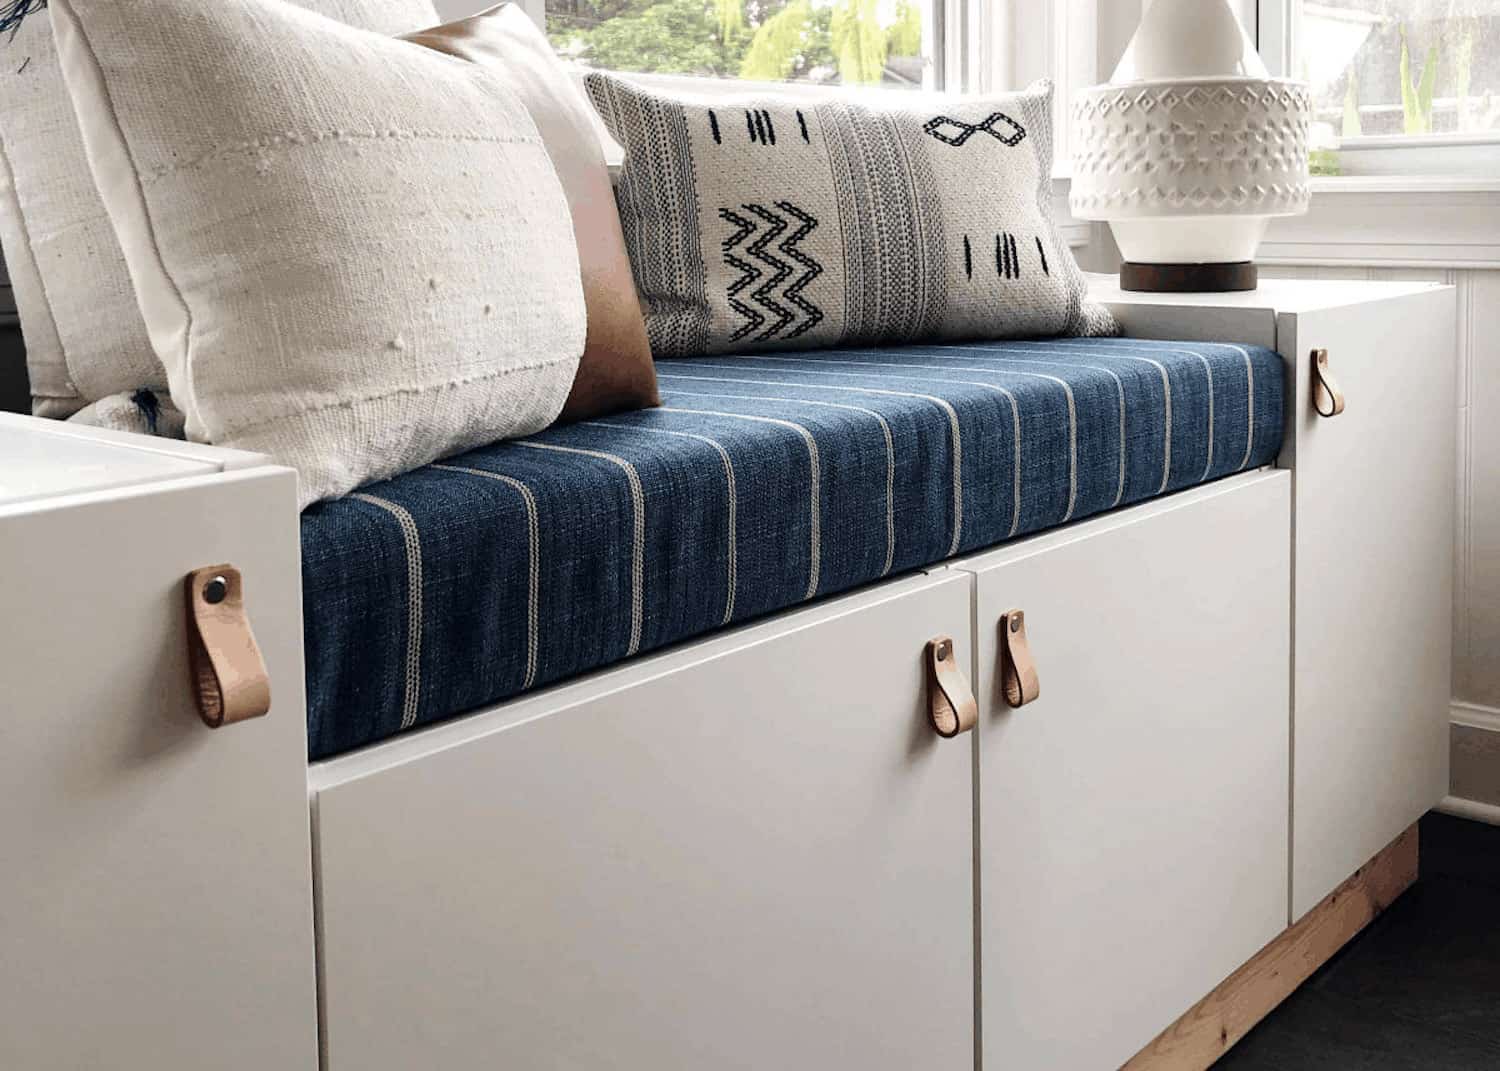 This project offers both storage and seating, making it perfect for any home.
Here’s what you’ll need:
Supplies:
- (2) 15x15x20″ IKEA SEKTION wall cabinets with HÄGGEBY doors, hinges, and dampers
- (2) 18x15x15″ IKEA SEKTION wall cabinets with HÄGGEBY doors, hinges, and dampers
- Three packs of IKEA UTRUSTA shelves
- Screw covers
- (2) 2x4x8″ whitewood lumber
- Miter saw
- Drill and long wood screws
- Dowels and wood glue
Cushion:
- MDF cut to size
- 3-inch foam cut to size
- Upholstery batting
- Upholstery fabric
- Staple gun and scissors
Step 1: IKEA SEKTION Cabinets
Start by building the IKEA SEKTION cabinets according to the instructions. These affordable and customizable cabinets will provide ample storage space for your project.
Step 2: Building the Base Frame
Construct a frame using 2×4 whitewood lumber. To achieve a polished look, miter the corners using a miter saw. Join the front piece to the support pieces using dowels and wood glue for a seamless finish. Secure the sides and back with wood screws.
Step 3: Attaching the Cabinets
Attach the IKEA SEKTION cabinets to the frame by screwing them into place. Ensure proper alignment before securing each corner.
Step 4: A Slight Change of Plan
Realizing the limited space inside the drawers, opt for cabinet doors instead. This change saves money and provides more practical storage options. Return the drawers to IKEA and exchange them for cabinet doors, hinges, dampers, and shelves.
Step 5: Making the Bench Cushion
Get a piece of MDF cut to size for the bench cushion. Order a custom 3-inch foam piece for a perfect fit. Attach inexpensive polyester batting to the MDF and foam using a staple gun. Upholster the cushion with fabric, securing it with the staple gun. Trim excess fabric and wrap the ends like a gift.
Step 6: Final Touches
To prevent shifting, add screws from the underside of the cabinets into the base of the cushion. However, this step may not be necessary if the cushion fits snugly. Enhance the look by adding leather pulls to the cabinets.
Detail: Thathomebirdlife.com
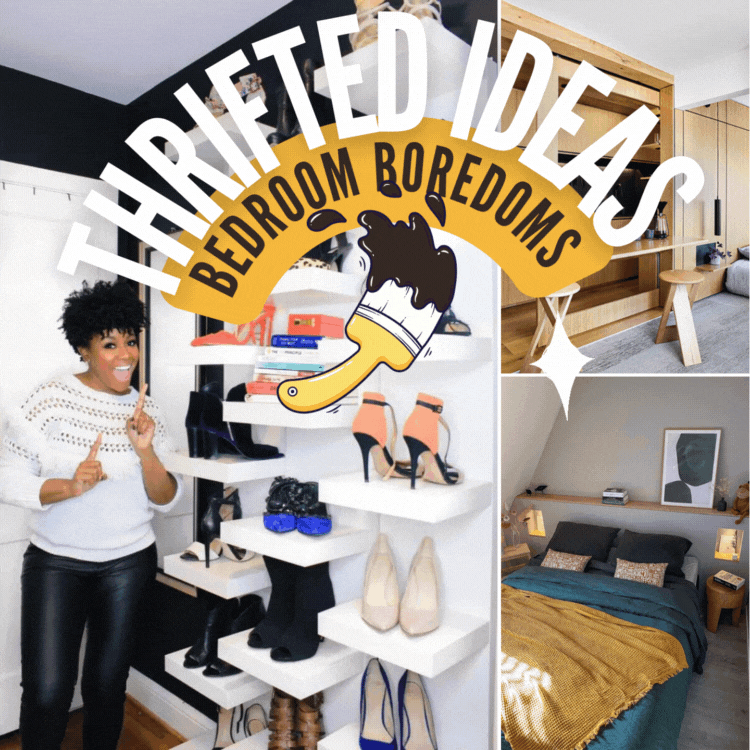
17. Get ready for the ultimate shoe organization solution for small spaces!
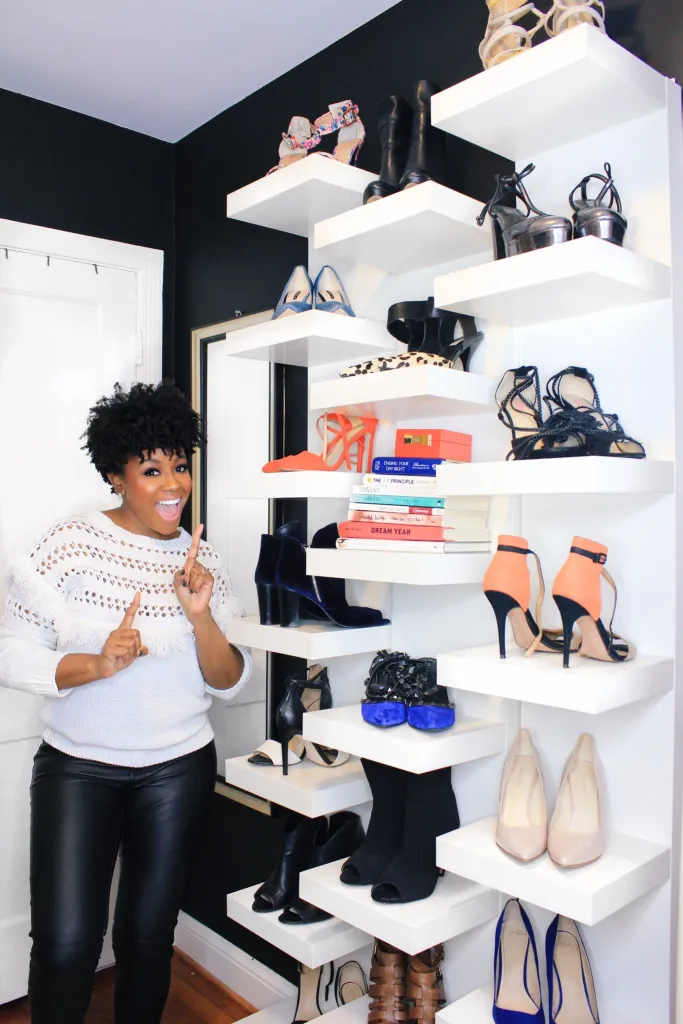 This creative and budget-friendly idea is perfect if you’re struggling with limited closet space. Here’s how to create a stunning shoe display using the IKEA LACK Wall Shelf:
1. Search for a bargain: Check out Craigslist for potential deals before heading to IKEA. Use your intuition to spot trustworthy sellers and find great prices. Rashida, our author, found three LACK shelves in excellent condition for only $25 each!
2. Hanging the shelves: You’ll need a partner, a screwdriver, a drill (for plaster walls), measuring tape, a pencil, and something sturdy to stand on. Follow these steps:
- Measure the width of the space where all three shelves will go (around 35 ¾ inches for three shelves side by side).
- Decide the height placement of each shelf. For staggered shelves, set the end shelves 6 inches above the ground (above the baseboard) and the middle shelf 3 inches above.
- Have your partner hold up the first shelf while you mark the hole positions with a pencil.
- Set the shelf down and pre-drill holes on the marks to guide the screws into the wall.
- If working with plaster walls, pre-drilling is essential. For drywall, consider using anchor screws for added stability.
- Align the shelf with the pre-drilled holes and screw it into the wall using a screwdriver.
- Repeat the process for the second shelf, aligning it next to the first one.
- Finally, mount the third shelf at the same height as the first one.
3. Time for the fun part! Add your shoes and other stylish items to your newly organized display. Now you can do your happy dance!
Pro Tips:
- Setting the shelves 6 inches above the ground aligns them with the baseboard, making measurements easier.
- Adjust the shelf placement accordingly if you prefer to use your baseboard as a guide.
Detail @Rashidabanks.com