7. A DIY Industrial Bench idea to give your bed more valuable space
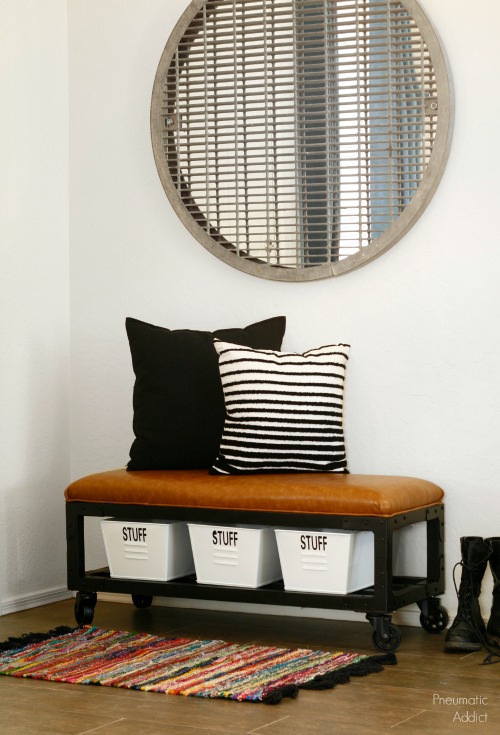
With this easy DIY build, convert underutilized space into a practical, stylish area. Whether for extra seating or hiding clutter, this bench offers a smart solution to bedroom organization. Add a fresh twist to your room today! Detail: Pneumaticaddict.com
6. DIY Floyd IKEA DIY Platform Bed Hack
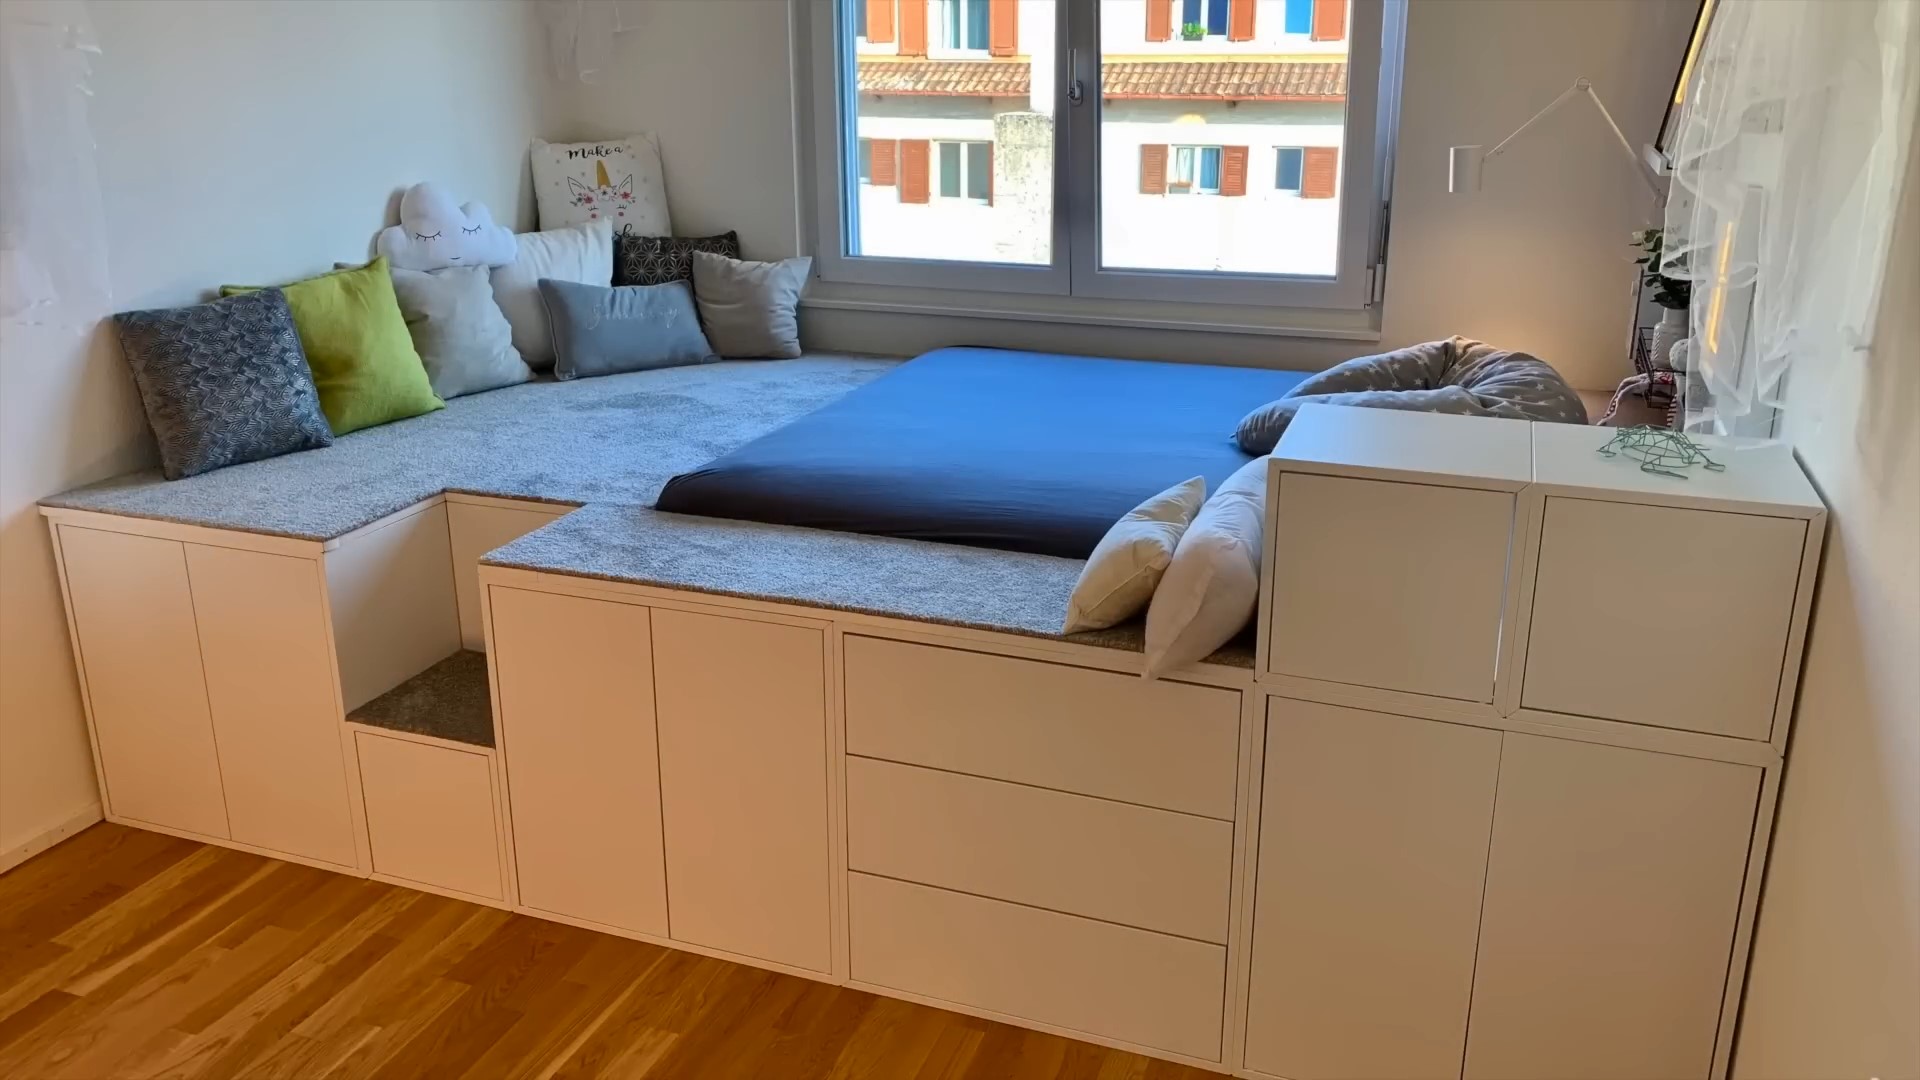 Meet Emma, the fourteen-year-old girl with a vision for her dream teenage room. She’s always wanted a cool platform bed where she can hang out with her friends, relax on cozy pillows, and have a great time. Emma’s room measures 3.2 by 4 meters (125 by 160 inches), and she’s about to turn it into the perfect hangout spot!
Step 1: Building the Bed Frame
To create this fantastic teenage bed, Emma’s assistant, Floyd, took a shortcut by using easy-to-build IKEA furniture. The IKEA Eket product line was a perfect fit for her project. These versatile modular storage cabinets come in various colors and dimensions, offering endless possibilities for customization.
Her parents purchased 12 individual elements from IKEA for less than $800. They used a new queen-size mattress measuring 1.6 by 2 meters (60 by 80 inches) for the bed’s core. Now, it was time to get creative and start assembling the cabinets.
Step 2: Assembling the Eket Cabinets
Floyd assembled the first five Eket cabinets according to her floor plan. The cabinets numbered 6 to 10 were strategically placed to support the platform or hold the bed in place. The beauty of the Eket series is that IKEA offers an online planning tool that makes combining different elements a breeze.
Step 3: Adding Support and Stability
Floyd cut some two-by-fours into lengths to ensure maximum capacity and stability and drilled holes into each. These two-by-fours would be vertically attached to the wall later to support the queen-size bed’s diagonal frame. By adding cabinets underneath the slanted frame and securely screwing the two-by-fours to them, Floyd created a sturdy base for her platform bed.
Step 4: Creating the Platform Bed
With the cabinets and two-by-fours in place, it was time to add the coated plywood boards. These boards were cut to the appropriate length and shaped to form the step leading up to the platform. Emma screwed the panels to the cabinets and added double-sided carpet tape to make it cozy.
Step 5: Adding the Cozy Touches
To enhance the comfort and ambiance, Our author chose a soft wool carpet that gave the room a pleasant dash of vibrancy. They inserted the queen-size mattress and added a wall panel with a bedside lamp, picture frames, a Bluetooth speaker, and decorations.
Step 6: Making It Feel Like a Teenage Heaven
Floyd suspended a bed canopy from the ceiling and adorned the space with LED string lights to give the bed an enchanting touch. The final touch was a variety of pillows and blankets to create a cozy and inviting atmosphere.
The Result: A New Teenage Heaven Transformation
The whole project took only a weekend’s work, and the results were impressive! Emma and her friends have enjoyed this fantastic teenage hangout spot since its completion. Project by DIY Floyd
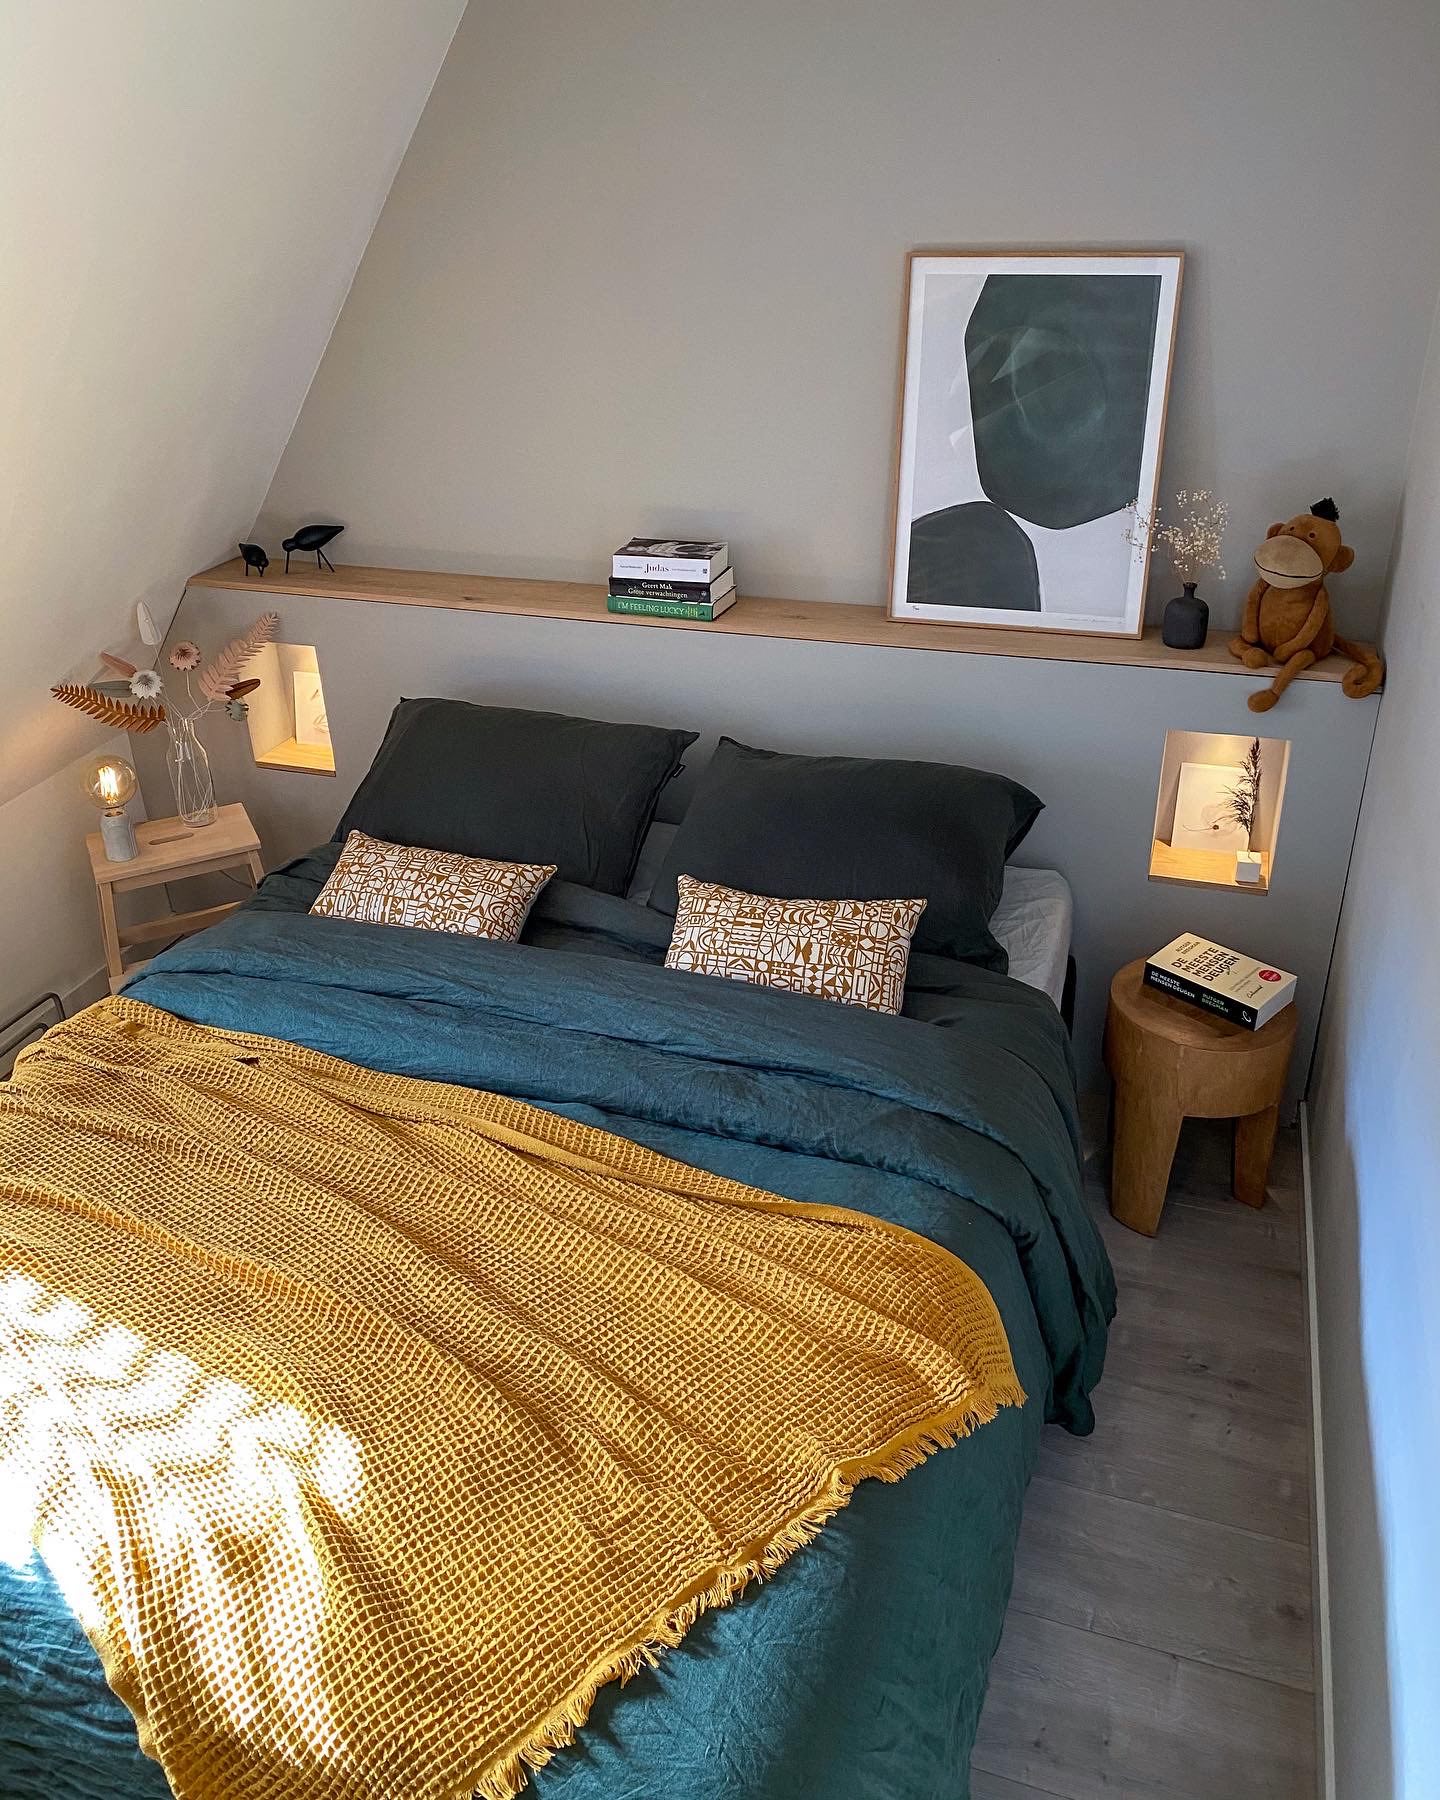
5. A DIY Headboard with Niches: Your New Bedroom Eye-Catcher
 Are you tired of searching for the perfect headboard for your bedroom?
It’s time to take matters into your own hands! Say hello to a custom-made headboard that fits your space and style like a glove. Not only will it be a cozy place to lean against, but it will also offer extra space for your styling needs. Get ready to create an eye-catching masterpiece that will transform your bedroom into a dreamy haven.
Step 1: The Design
First things first, you need to sketch out your dream headboard. Take some measurements and consider what you want to display on it. Do you want it to span the entire width of your bedroom? Are you thinking of adding stylish niches for showcasing your favorite items? How about dimmable spotlights to set the mood? Take time with this step; the rest will be a breeze.
Step 2: Materials and Measurements
Now that you have your design, it’s time to gather the materials.
Here’s a list of what you’ll need:
- Spruce beams for the frame
- MDF plates for the front and niches
- Oak planks for that touch of elegance
- Primer for a smooth finish
- Spots and lights for a warm glow
- Double sockets for practicality
- Paint and supplies for the perfect look
- Long screws for stability
- Electricity supplies for lighting setup
- Sander, drilling machine, and other tools
Step 3: Building the Frame
Start by securing the outer beams of the frame and adding a horizontal beam for the niches to lean on. Double-check the measurements to ensure everything aligns perfectly with your bed. Once the frame is secure, moving on to the exciting part is time.
Step 4: Crafting the Niches
Measure out the niches and carefully saw out the space for the spots. Assemble the niches with corner profiles for extra sturdiness, then attach them to the frame.
Step 5: Cutouts for Electrics
Here’s where the practicality comes into play. Add the double sockets under the bed on both sides, discreetly hidden from view but easily accessible for charging your devices. Mark the spots and drill holes to connect the electrics.
Step 6: The Finishing Touch
Attach the MDF plates to the front and top of the headboard. If you’re not creating a full-width headboard, this is also the time to add the sides. Fill any gaps with wood filler for a seamless look.
Step 7: Sand and Prime
Sand down all surfaces until they’re perfectly smooth. Wipe away the dust and apply a coat of primer to prepare for the final paint.
Step 8: Time for Color
Choose your desired color and paint the headboard and niches. We opted for a chic, light gray hue that beautifully highlights the wall and the headboard.
Step 9: Add the Oak Finish
Top off your creation with an oak plank for that extra touch of luxury. Place the oak plank on the headboard and mark out a cutout for the storage compartment, perfect for hiding extension cords.
Step 10: The Exciting Styling Part
Now comes the fun part – styling your masterpiece!
Add wooden stools to the niches, stack up some books on top of the headboard, and personalize it with your favorite items. The possibilities are endless.
Detail: @Onshaarlemsehuisje.nl
4. Hidden Design Elements: A Small Apartment in Melbourne with Big Ideas
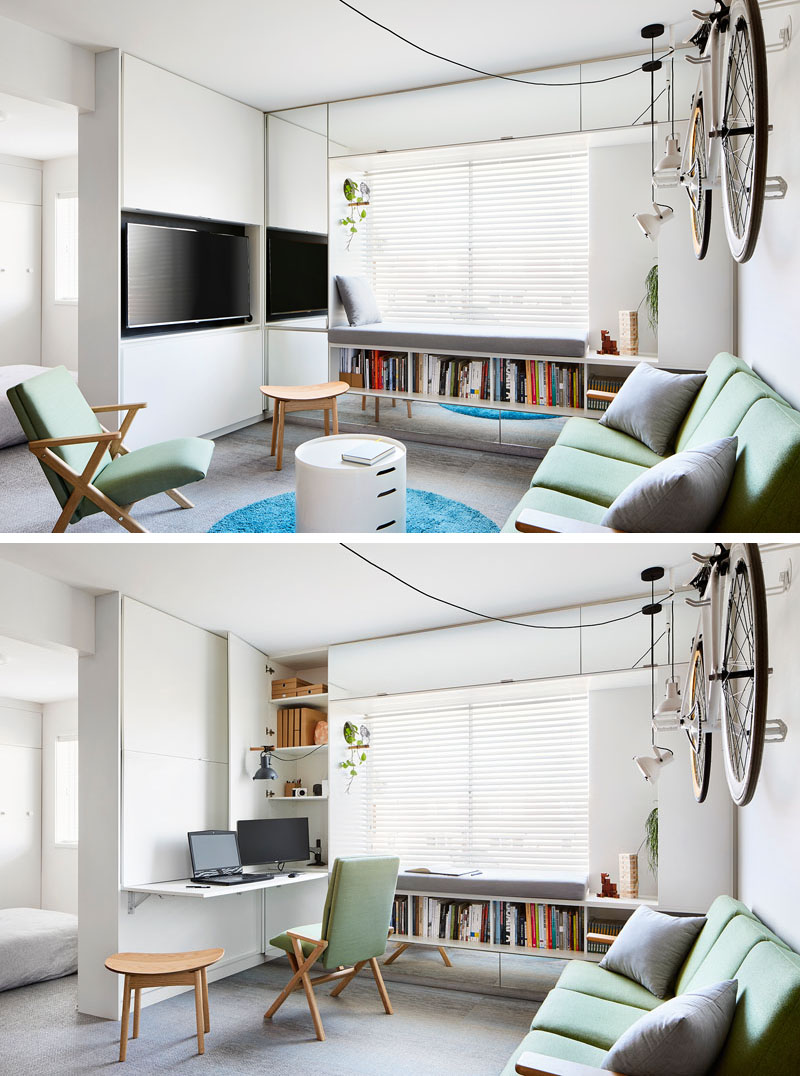 Welcome to this Melbourne apartment that defies its size with cleverly hidden design elements, transforming it into a livable and functional space. Let’s take a tour of the smart solutions that will inspire you to rethink your own small spaces.
1. Stylish Entryway with a Twist
Upon entering, you’re greeted by a custom-designed wall unit featuring a flexible pegboard wall for hanging jackets, storing shoes, and even showcasing wine bottles. The pegboard’s other half has fixed dowels for wine storage. It’s a sleek and organized entryway with a touch of sophistication.
2. The Multidimensional Living Room
The living room is a multi-functional space with a window seat surrounded by shelving and cabinetry. The TV is cleverly concealed behind cabinet doors when not in use, and the living room doubles as a home office/study with a hidden desk, computers, and lighting.
3. The Secret Bedroom Door
A sliding door, equipped with a whiteboard on one side, can be closed to hide the bedroom from view. Constructed from translucent polycarbonate panels, it allows light to pass through, maintaining a bright and airy feel.
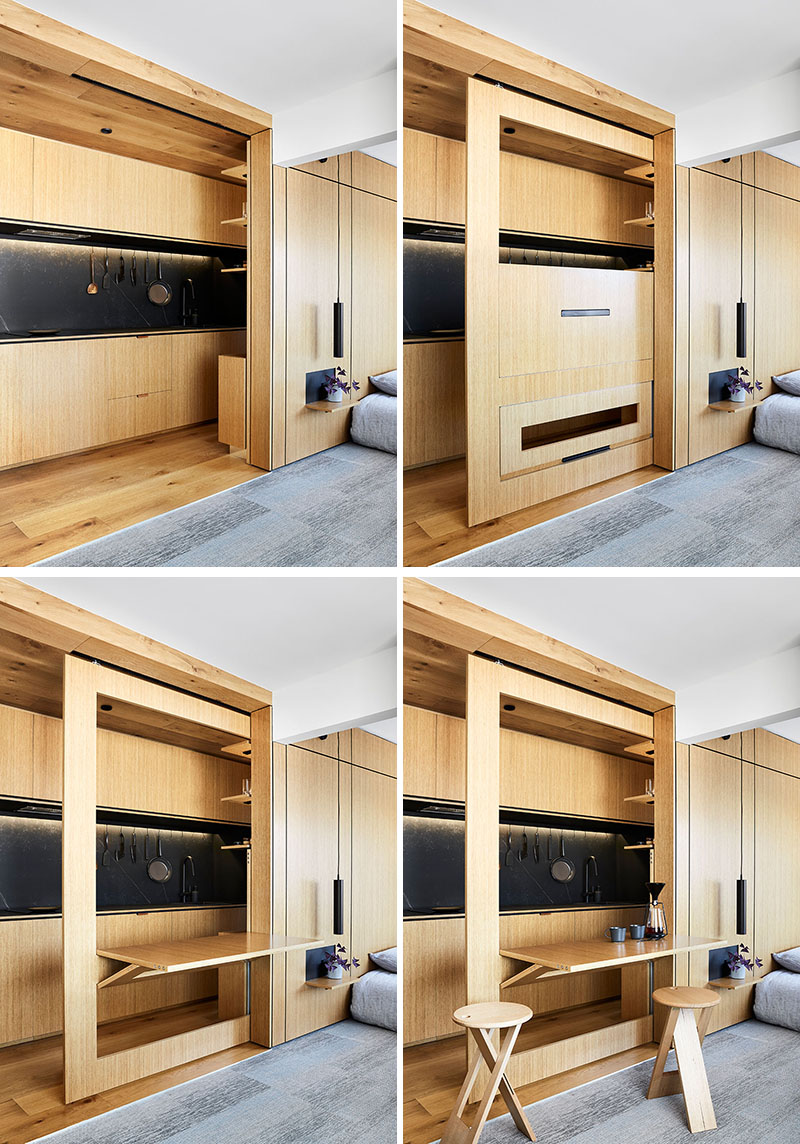
4. Slide-Out Dining Table Feature
Ingeniously tucked away between kitchen shelves and the wall is the dining table. Slide it out via a sliding door mechanism, and it folds down, creating a light floating effect. The dining chairs are also foldable, saving space in style.
5. A Stunning Wood-Clad Kitchen Feature
The kitchen is a beauty in wood, with a 13-foot length. The fridge and washing machine are neatly concealed within the kitchen cupboards. A bold contrast comes from the matte black countertop, sink, taps, and utensils. Opposite the main cabinetry, additional cabinets and open shelves provide storage for electrical appliances, glassware, and a dedicated whiskey bottle collection space.
6. Switchable Privacy Window
A north-facing window in the bathroom is maximized by installing a switchable film on an internal window between the bathroom and kitchen. With a press of a button, the glass can become frosted, ensuring privacy when needed.
 The minimalist bedroom features a wood accent wall, acting as a headboard. A small cut-out reveals a wall panel that folds down to form the bedside table. Beyond the wall panel is a concealed door leading to the bathroom, hinted only by a leather door pull.
8. Timber Look Feature in the Bathroom
Continuing the timber theme, the bathroom boasts timber texture porcelain tiles on the floor and walls. A green wall adds an outdoor feel, and a fold-out clothes drying line is cleverly hidden within the wooden wall.
9. Glass Shower and Frosted Window
A glass shower wall defines the shower area in the bathroom, while the frosted window between the bathroom and the kitchen adds a touch of privacy.
10. Unveiling the Floor Plan
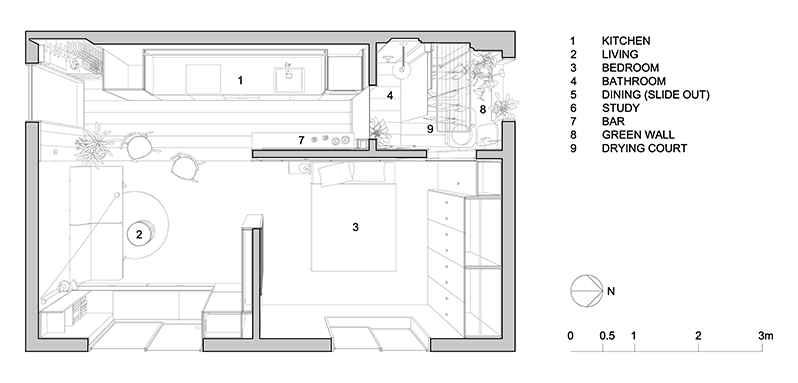
Check out the floor plan to see how all these hidden design elements seamlessly come together in this small yet functional apartment. It’s a brilliant example of how creativity and smart solutions can make any space feel like a dream home. Detail: @Contemporist.com