16. A stunning renovation of a 27m2 bohemian living room in Paris to inspire you!
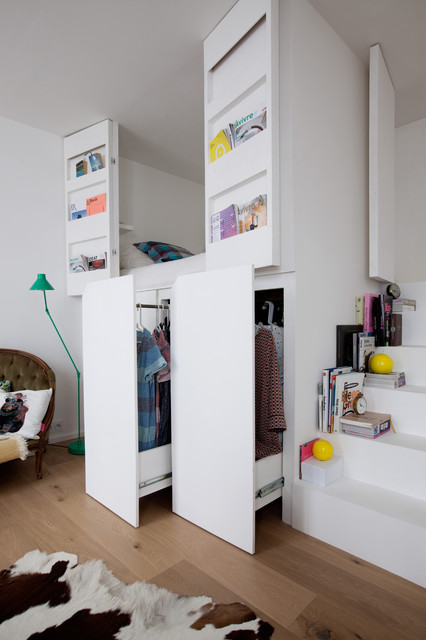
1. Pull-Out Wardrobes: These versatile wardrobes are not just for clothes. They can also be customized for toy storage or bedding, making them a practical and stylish addition to any small space.
2. Shutter-Like Doors with Bookshelves: Add a touch of charm to your living room or bedroom with shutter-like doors featuring built-in, front-facing bookshelves. This combination is both functional and visually appealing.
3. Mini Staircase with Privacy Door: The concept allows you to manage a private and cozy area with a mini staircase leading to a door at the top. Perfect for a daybed, reading nook, spare bedroom, or a separate play area when things get lively below.
4. Box-Style Storage: Transform your living room or compact sleeping space into a versatile space with a box-style design. This can be a daybed, reading nook, or a raised play area. Simply close the door at the end of the day to keep things tidy.
The “bedroom” area has a height of 1.2m, providing enough space to sit up comfortably. This height allows for the inclusion of pull-out wardrobes underneath, maximizing storage. With a total of five cupboards, three of which are dedicated to clothes, these wardrobes feature telescopic rails designed to handle heavy weights, making them ideal for storing a variety of items.
Additionally, there’s a hidden space behind the sliding cabinets, accessible through a door, which the homeowners consider a kind of “cellar” and even use to store a bike. via Houzz.co.uk
15. Instructions on how to build your own hidden bed with a built-in desk!
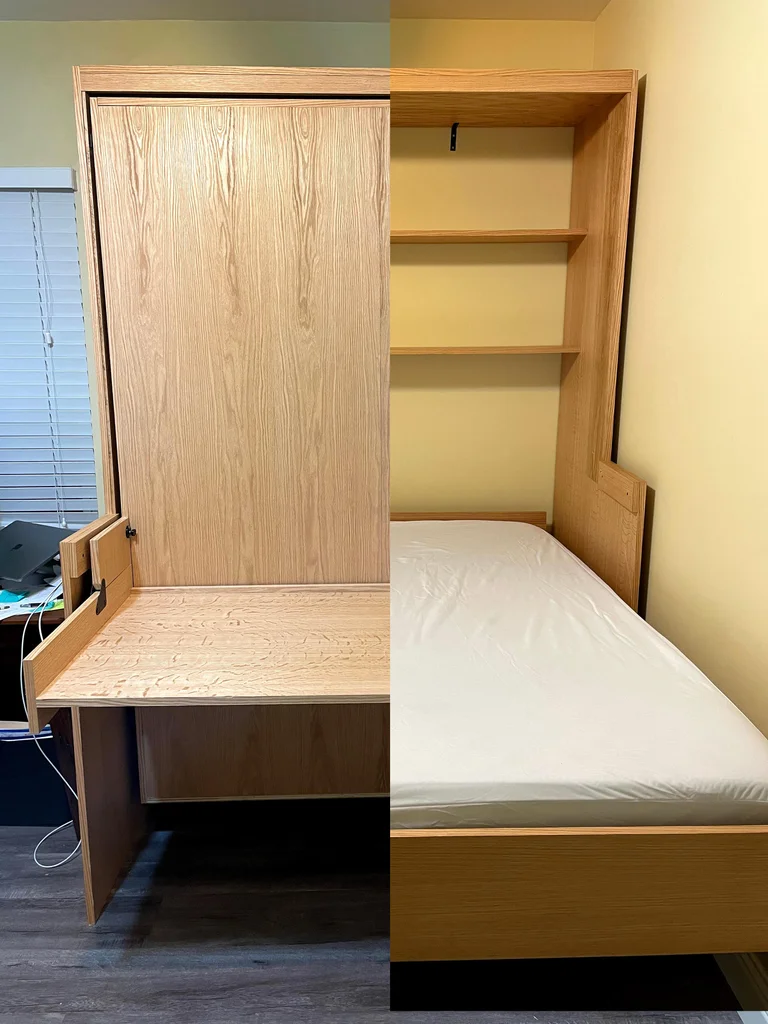 This DIY Murphy bed + desk combo is perfect for maximizing space and functionality.
Follow these steps to create your own hidden bed:
Step 1: Supplies
Gather the basic supplies, including plywood, furring strips, boards for bed slats, a table saw, a jig saw, a drill, and more. Depending on your budget and time-saving preferences, you can customize the list of supplies.
Step 2: Design
While the original plans may be complex, create your own hand-drawn version based on the hardware kit’s measurements. Simplify the design while maintaining the essential features.
Step 3: Cut the Materials
Cut the plywood according to the hardware kit’s dimensions. Consider outsourcing the cutting to a local cabinet maker to save time, or do it yourself using a table saw and jig saw.
Step 4: Apply edge banding and sanding
Give the exposed edges of the plywood a seamless look by applying pre-glued edge banding. Use an iron to attach the banding and trim the excess. Sand the pieces with 220-grit sandpaper for a smooth finish.
Step 5: HVLP Finishing
To save time, consider investing in a high-volume, low-pressure (HVLP) paint spray set. Mix lacquer with thinner and strain it into the spray gun tank. Apply multiple coats to the pieces for a professional finish.
Step 6: Drill Holes for Hardware
Drill the necessary holes for attaching the hardware. Pay attention to precise measurements and use a pilot hole technique to reduce blowout. Attach the hardware according to your plans.
Step 7: Drill Cabinet Pocket Holes
Drill pocket holes in the cabinet pieces for easy and sturdy assembly. Adjust the number of pocket holes as needed and follow the hand-drawn plans for guidance.
Step 8: Assemble Frame
With the help of another person, assemble the frame by aligning and screwing the panels together. Start with the top panel, then the shelves, and secure the bottom stretcher.
Step 9: Assemble Bed Frame
Attach 1×2 furring boards to the sides of the frame, 3/4″ down, to serve as hidden supports for the bed frame. Screw a 2×4 into the furring strips to create a stretcher/support bar.
Step 10: Bed Slats
Decide on the spacing and install bed slats for mattress support. Place the slats every 3-4″ along the frame, ensuring proper mattress support. Use a spare piece of plywood as a spacing guide.
Step 11: Assemble Desk
Assemble the desk, simplifying the original plans by eliminating unnecessary pieces. Use pocket holes for secure attachment. Ensure the desk is sturdy and level.
Step 12: Attach Desk to Bed Frame
Place the bed frame on the desk and align the hardware holes. Tighten the pivot triangles together with an Allen wrench.
Step 13: Attaching bed frame + desk to cabinet
Push the bed frame and desk back into the cabinet, aligning the hardware holes. Attach the trunnion bolt through the bed frame into the arm mounting plate.
Step 14: Attach Arms
Lift the frame, lock it into place, and pull back the arms on each side. Lock the arms into the metal pins attached to the desk.
Step 15: Mount to the Wall
Using a stud finder, locate the studs in the wall and mount the cabinet using L brackets or specialized wall mounts.
Step 16: Optional Customizations
Consider making any additional customizations, such as adjusting the depth of the bed frame to accommodate a specific mattress size.
Step 17: Final Mistake Alert
Ensure that the thickness of the concealers for the bed frame is appropriate to provide a secure fit for the locking pins and prevent frame legs from banging against them.
Full tutorial by Instructables.com
14. Turn those IVAR cabinets into a loft bed!
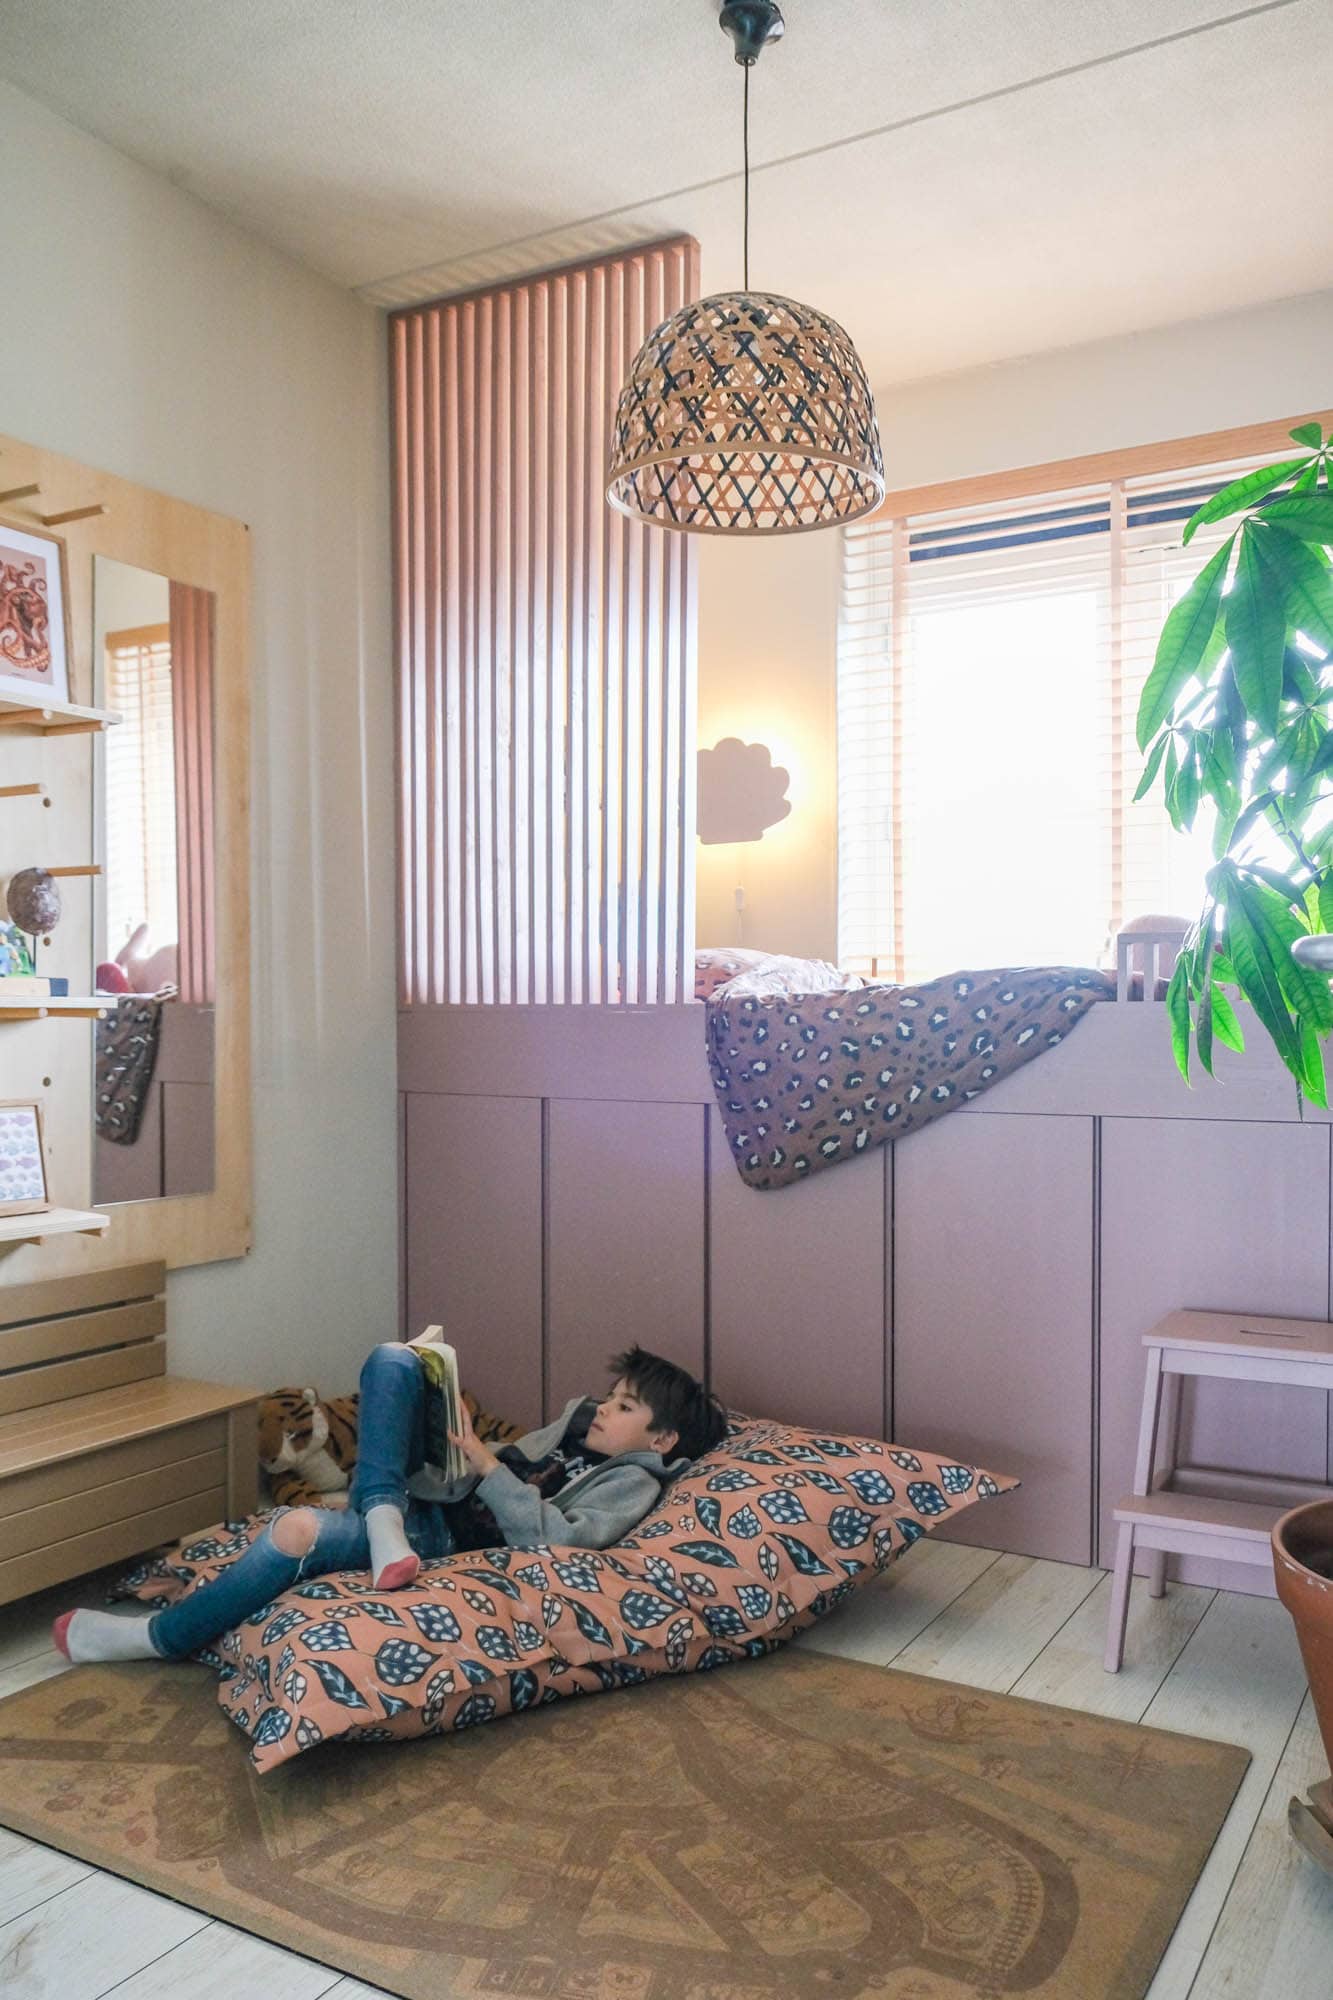 You’ll love this raised bed, also known as a podium bed, because it offers extra space underneath without the hassle of a high loft bed. Plus, it’s a sustainable and budget-friendly DIY project.
To start, look for second-hand IVAR cabinets. They’re in high demand, so keep an eye out for a good deal. You can even check online marketplaces like Marktplaats. We were lucky to find a complete IVAR shelving unit with three cabinets, two deep and a shallow one.
Now, it’s time to gather your supplies. Here’s what you’ll need: the IVAR cabinets, a mattress base, dowels, corner brackets, screws, wood glue, and boards in various sizes. The slats will be custom-made to fit your bedroom dimensions, so measure carefully.
Determining the height of your bed is easy. Use the window frame as a reference point. This way, you’ll have enough space for cuddly toys or decorations on the windowsill. As for mounting the bed, you can follow a similar method to a sofa bed from Malm cabinets. The main challenge is fitting the top section properly at an angle. While you might consider hiring a carpenter, it can be quite costly. So why not give it a shot yourself?
Now, get some spruce wood—it’s an affordable option. To personalize the bed, choose a paint color that matches your style. Our author used Flexa’s Mild Plum, which perfectly complemented our room’s theme. With the bed complete, you’ll have plenty of storage space underneath. Store books, toys, or boxes of LEGO in the IVAR cabinets.
As with any project, there are a few things to watch out for. Remember that the cabinets may need to be raised slightly to allow the doors to open properly if you have a rug in front. Additionally, consider adding a bed rail near the window frame to prevent accidents. You might need to get creative due to limited space to secure the vertical partition wall.
In the end, your DIY loft bed from IVAR cabinets will be a fantastic addition to your room. You can even add side rails for extra safety and a hidden flap for secret storage.
Detail @Eengoedverhaal.nu/blog/
13. A stylish and functional floating wall shelf with a lamp and plant!
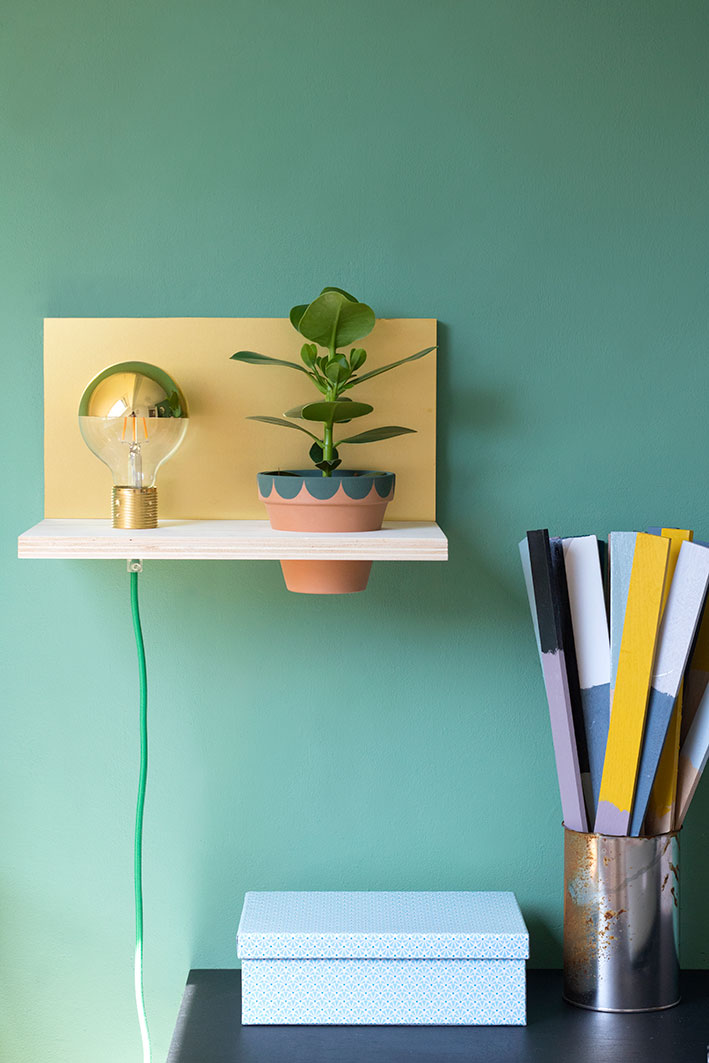 This DIY project is exciting and easy to follow with the help of Bosch tools. In this step-by-step guide, we’ll show you how to make this fantastic shelf, and you can even add your own twist to it.
- Start by marking the dimensions (L35 x W20 cm) on the wood and cut two boards of this size using the Bosch Universal Circ12. Use a long lath or a board to guide a straight cut. Safety is important, so don’t forget to wear gloves when sawing.
- Next, mark the hanging system on the wood, keeping a distance of 6 cm from the side and 3 cm from the top. Use a rack eye or closet hanger as the hanging system to secure the shelf tightly against the wall.
- Create the countersink for the suspension system using a 15 mm Forstner drill. Make several shallow holes to accommodate the suspension system. Ensure the recess is deep enough for a snug fit.
- Attach the suspension system using the PushDrive and 12 mm deep screws.
- Now, determine the placement for the lamp fitting and flower pot on the other shelf. Drill a hole for the fitting with a 37 mm hole saw progressor and another hole for the flower pot with a 92 mm hole saw progressor. Be sure to clamp the shelf securely to prevent movement during drilling.
- Smooth the boards using the EasySander 12, and don’t forget to wear safety goggles. Once sanded, clean the planks from any dust.
- Glue the two planks together with wood glue and use clamps to allow for proper adhesion and drying.
- Secure the planks together with self-tapping screws using the PushDrive. No need to pre-drill with a wood drill, as these screws pull themselves into the wood. Use a box or another object to support the shelf while drilling.
- Place a brass plate under the shelf, mark the plank on the brass, and cut it to size using the Bosch UniversalMulti 12 with a suitable saw blade. Stick the brass plate onto the top shelf using strong all-purpose glue.
- Determine the desired height and location for hanging the floating wall shelf. Use the EasyImpact 12 to drill holes in the wall and secure the shelf using plugs and screws. Ensure the shelf connects nicely to the wall, and remove the protective layer from the brass plate.
- To complete the shelf, attach the plug to the cord and the cord to the fitting. Screw the lamp into the socket and hang it on the shelf. Place a beautiful plant of your choice in the flower pot. You can also add an accent color with paint if desired.
This versatile floating wall shelf can be used in various locations around the house. Whether as a night lamp next to your bed or an additional hook for keys in the hallway, it offers an extra light source and practicality. In this case, it was hung above a desk in a workplace, providing a stylish and functional addition.
Detail: Entermyattic.com | Why Bromelia, You may Ask?