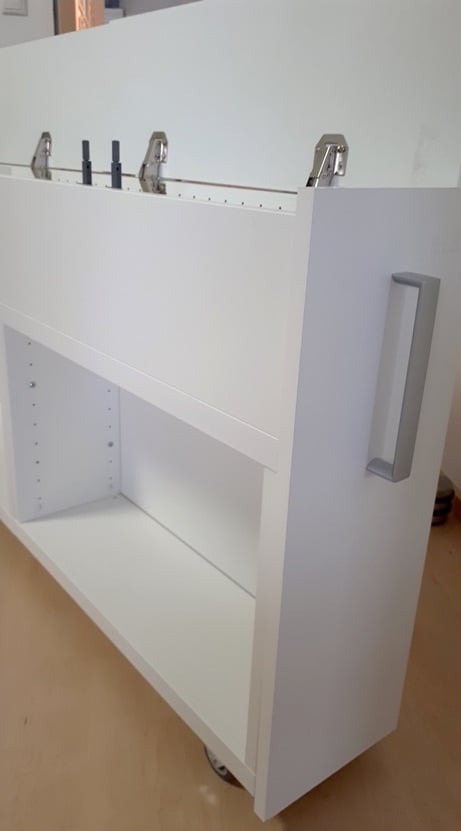
3. DIY Behind the Couch Storage & Charge Station: Turn Leftover IKEA Parts into a Functional Marvel!
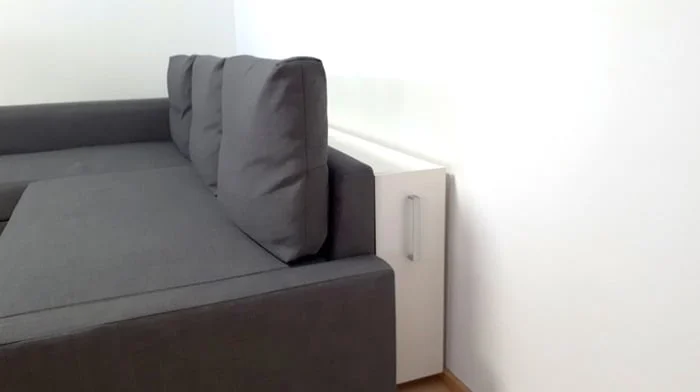 If you have some spare IKEA components lying around after moving, don’t let them go to waste! We have a brilliant idea to transform them into a behind-the-couch storage and charge station. Let’s get started on this nifty project:
You’ll Need:
IKEA Items:
- GNEDBY
- BESTÅ
- UTRUSTA
- TYDA
Other Materials and Tools:
- Wheels
- Wooden boards for covers
- Socket strip
- Cable passage
How to Make It:
- Cut three equally long cover boards and one for the front panel.
- Use a jigsaw to create a slot for the cable passage, ensuring a neat setup.
- Attach the wheels to the bottom side of the BESTÅs for mobility and convenience.
- Bolt all the components together to form the core structure.
- Assemble the three top covers with IKEA door hinges and push openers for easy access.
- Add a stylish handle to the front panel for a polished look.
- Plug in the socket strip to power up your devices.
- Voilà! Your DIY behind-the-couch storage and charge station is ready to use.
 This fantastic creation will keep your living room tidy and serve as a convenient charging hub for all your gadgets. Embrace the art of upcycling and turn your leftover IKEA pieces into something both functional and fabulous. Happy crafting from IKEAHackers!
2. A DIY Cinewall: Elevate Your Bedroom with a Sleek TV Showcase and Room Divider!
 Ever dreamed of having a chic cinewall in your bedroom? Now’s the perfect time to make it a reality! A cinewall is a built-in wall for your television, and we’ll guide you through creating a stunning one with or without a fireplace.
Let’s get started!
Types of Cinewalls:
1. Cinema Wall with Fireplace:
Add a touch of warmth and ambiance by combining your cinewall with an electric fireplace. Perfect for cozy movie nights or to simply elevate your space.
2. Cinewall without Fireplace:
For a sleek and modern look, go for a cinewall without a fireplace. You can adjust the dimensions to your liking and hang the TV at your preferred height.
Supplies You’ll Need:
Cinewall:
- 10 spruce beams (44x 96 x 2700 mm)
- 2 MDF plates (18 mm)
- Screws, adhesive sealant, quick-drying all-purpose filler
- 2 component wood filler
- TV of your choice
- Fireplace of your choice (optional)
- Paint or wallpaper of your choice
Room Divider (Optional):
- 4 beams (285 x 38 x 5400 mm)
- Rubio monocoat precolor easy 1 liter (cashmere brown)
- Rubio monocoat oil component A Chocolate 300ml
- Screws
- Tacker
Instructions on how to build the Cinewall:
- Make a Cinewall Construction Drawing: Measure your space, TV, and fireplace (if you choose one). Create a scale drawing to plan the layout, ensuring the TV and fireplace are proportionate.
- Frame the Cinewall: Construct a sturdy frame using spruce beams, leaving space for MDF plates. Place the TV and fireplace within the frame.
- Optional Room Divider: If you want a partially open wall, build a room divider using beams. Apply Rubio Monocoat oil for a seamless finish.
- Wallpaper or Paint: For the conversion, use MDF plates and fill holes with all-purpose filler. Prime the MDF before wallpapering or painting the cinewall to perfection.
Cost and Tips:
The cost of a cinewall varies based on dimensions and your TV and fireplace choices. For a budget-friendly option, skip the fireplace and watch a stylish TV showcase. Opt for wallpapers or paint to transform your cinewall whenever you crave a change. In our author’s case is € 1,600.
With your cinewall in place, enjoy the ultimate bedroom transformation! Movie nights will be cozier than ever, and your room will exude elegance and style. Get ready to turn your bedroom into a cinema-worthy sanctuary! Detail: @Thehomestyleclub.com/blog
1. A DIY Modern Floating Headboard Project: Elevate Your Bedroom Without Drilling for $200!
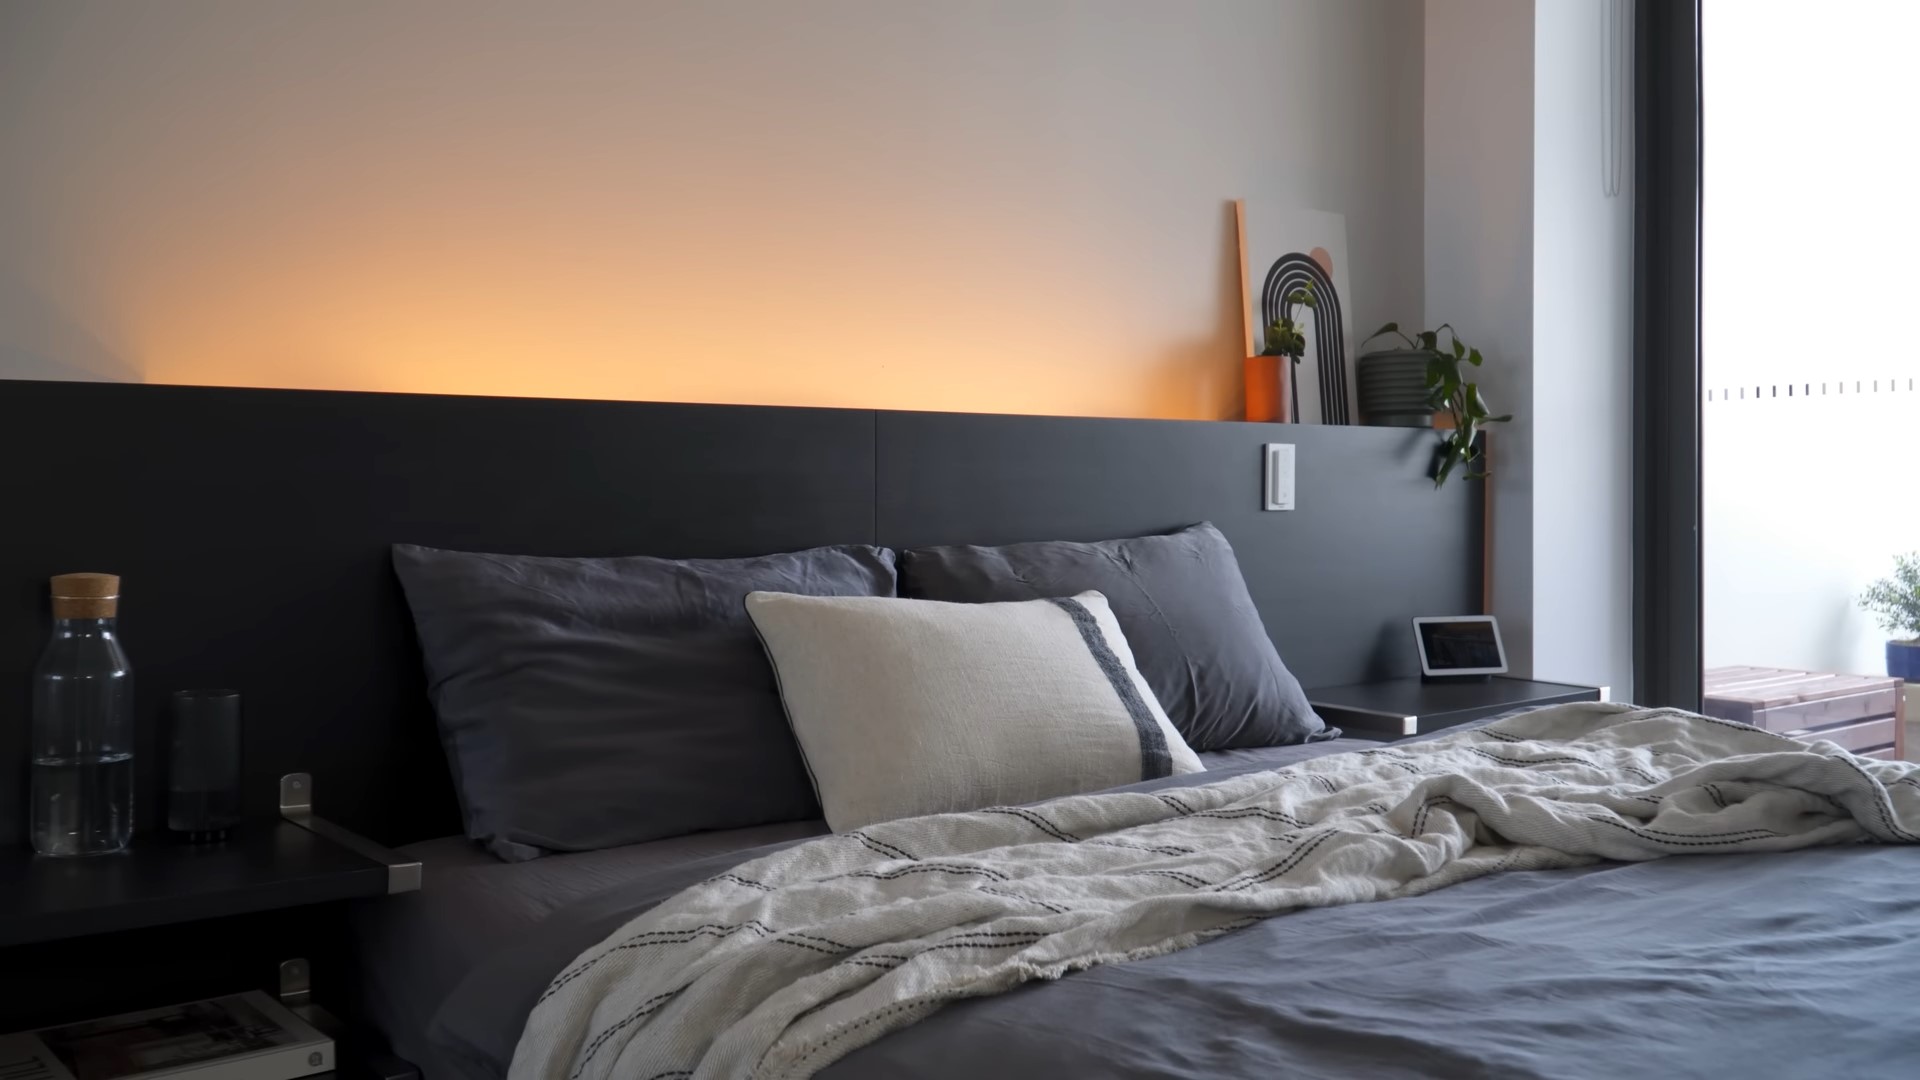 Your bed and headboard are the focal points of your bedroom, setting the tone for the entire space. But ready-made headboards can be pricey, and finding matching bedside tables adds to the cost. Not to worry! In this step-by-step guide, I’ll show you how to create a custom floating headboard without drilling any holes or needing woodworking skills.
Materials You’ll Need:
- 2x 1.5-meter IKEA LINNMON table tops (or any timber/MDF sheets)
- 2x IKEA BOAXEL wall shelves (or your choice)
- 4x IKEA GRANHULT brackets for shelf attachment
- 4x 1.2-meter pine wood pieces (or standard 2x4s)
- Timber screws
- Hardware glue
- 1x LED strip light
- Optional: 2x IKEA MOSSLANDA picture ledges or wood for decor display
Step-by-Step Guide:
1. Get the Right Materials: You’ll need table tops, wall shelves, pine wood, screws, glue, and an LED strip. Feel free to choose different brands or materials based on your preferences.
2. Frame the Headboard: Attach three pine wood pieces to the back of your bed frame, leaving a gap for the LED strip. Use pilot holes and screws for a secure fit.
3. Prepare for Nightstands: Measure the middle of the bed and mark where the nightstands will be. Glue four pine wood pieces to the headboard back, creating sturdy spots to attach the nightstands later.
4. Add Hidden Shelves: Flip the IKEA MOSSLANDA picture ledge and attach it to the back corners of the headboard, keeping it slightly below the top edge for a seamless look.
5. Mount the Headboard: Apply glue to the wooden planks and attach the headboard. Use screws at the top and bottom for extra support. Pre-drill the holes to avoid damaging the wood.
6. Install the Nightstands: Drill holes need to be marked before attaching the wooden planks for the nightstands. Make sure to use longer screws to secure them firmly.
7. Illuminate with LED Strip: Add ambient lighting by placing the LED strip on top of the wooden planks. Run it around for maximum coverage and connect it to a power board hidden behind the bed frame.
8. Storage Solutions: Utilize the space under the nightstands with a textured basket for extra pillows or blankets. Add a bamboo organizer for tidy storage of small items like lip balm and supplements.
9. Decor and Finishing Touch: The MOSSLANDA picture ledge is perfect for displaying plants, artwork, or decor items, adding color and visual interest to your bedroom.
10. Wireless Control: Install a wireless remote to easily control the LED lights to adjust the ambiance without leaving your bed.
Cost Estimate:$200
Check the description area to uncover full instructions and other essential details.