5. A DIY Plywood Closet Organizer: A Guide to Glamming up Your Closet on a Budget!
Ah, the closet! That treasure trove of memories, fashion statements, and sometimes…chaos. Now imagine morphing this space into an uber-cool, organized haven without emptying your wallet. Mission Impossible? Nope. Your mission, should you choose to accept it, is to transform a standard closet into the perfect wardrobe nook. Guess what? With a little DIY magic, you can do it for under $100!
1. Your Closet’s Cinderella Story
Have you ever looked at fancy closets in home magazines and let out a wistful sigh? “One day, when I win the lottery…” Stop right there! A sprinkle of DIY dust, and you can own a custom closet that even Cinderella would envy. Ditch the old wire shelves; go sleek with plywood.
Make it unique, adjust to your fashion stash, and voila! Your dressing space becomes a walk-in wonderland. Picture yourself waltzing in each morning to find that perfectly color-coordinated outfit. Dreamy, right?
2. Challenge Yourself: Room Makeover for $100
So you’re wondering, “Can I really redo my entire closet for just 100 bucks?” Oh, honey, yes, you can! This DIY journey began with a challenge: redo a room for $100 a month. Seemingly impossible, but your tenacity mixed with frugality makes magic happen. Previous missions? An office-craft room and a farmhouse laundry room. The goal now? Plywood closet galore!
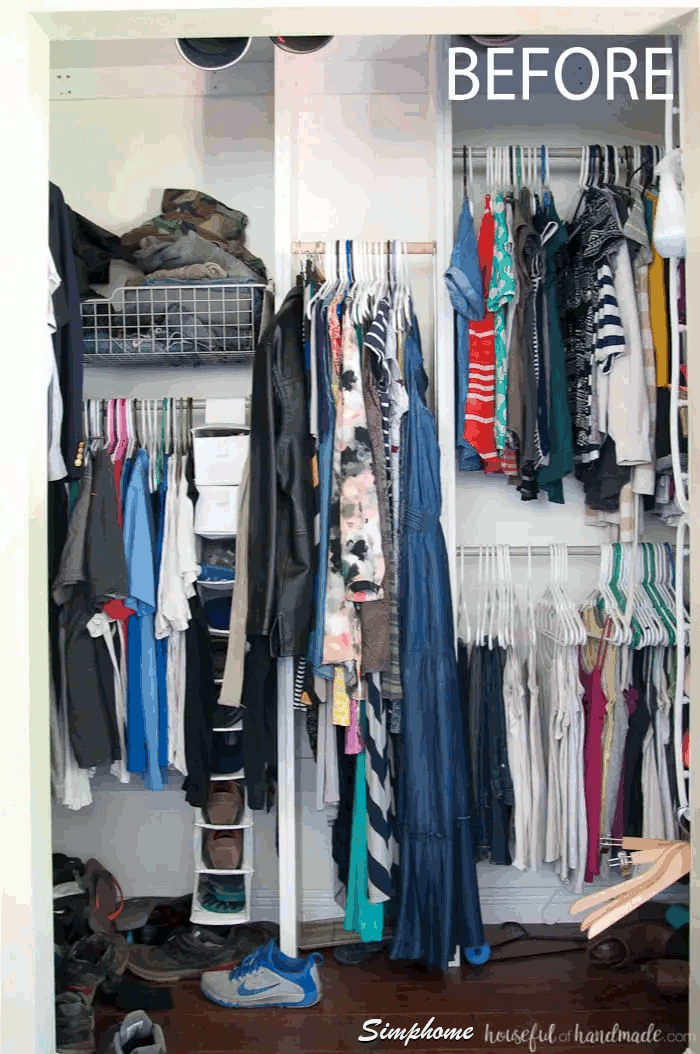
3. No More Closet Horrors
Gone are the days of knits hanging limply and shoes scattered everywhere. Fun fact: Knits aren’t meant to be hung! When working from home or just chilling, who doesn’t love a comfy knit? But hanging these can lead to saggy situations. Instead, picture shelves flaunting baskets and drawers with special spots for knits, shoes, pants, and more!
4. Super Secrets to Affordable Closet Organization:
- Plywood is your BFF: create shelves and cubbies.
- Upcycle boxes into pretty storage boxes.
- Reuse storage baskets from around your home.
- Maximize wall space for shoe storage.
- Matching hangers = an instant sophisticated look.
- Less is more! Trim down to your beloved clothing items.
5. The Plywood Power Play
Cabinet-grade plywood offers that premium wood look, perfect for staining. Painting? MDF is a strong, smooth alternative. For load-bearing, opt for a minimum of 1/2″ thick plywood. Yet, 3/4″ ensures sturdier shelves. On a shoestring budget? Pine plywood is a savior. For around $35, you get a 4’x8′ sheet from Home Depot.
6. Customizing and Organizing:
- Get jiggy with design and measurements. Adapt the system to your closet size.
- Opt for tools like a circular saw and router. Your toolkit is your weapon.
- Plywood dimensions to remember: 3/4″ thickness, 15″ width, and 38 1/2″ closet area.
- Cut, assemble, router grooves, sand, and stain. Your plywood’s transformation journey!
- For a plush finish, add Ikea baskets on custom drawer slides.
7. Getting It All Together
Slide in your plywood masterpiece. If it doesn’t fit, chisel away and adjust. Remember to seal everything with a protective finish, and then… drumroll… start loading up!
4. IKEA BOAXEL CLOSET SYSTEM Makeover: Your Step-By-Step Guide!
Hold Tight, Aspiring Designer! Have you ever found yourself wandering the winding paths of IKEA, searching for that *perfect* closet solution? Congrats! You’ve discovered the BOAXEL system, and you’re in for a treat.
Your First Dive into IKEA:
Navigating IKEA is a ride – the maze-like layout, sleek designs, and yes, those meatballs! But there’s a treasure waiting: the BOAXEL closet system.
Your Closet’s Transformation:
Imagine a closet (let’s call it Myles’ for now). Amidst renovations, it becomes a temporary junkyard. But remember, every mess has the potential to be a masterpiece. After a clean sweep and a fresh coat of the cozy SW Alabaster paint, you stand before a blank canvas. Dreaming of an accent wall? Been there! But sometimes, simplicity lets the BOAXEL truly shine.
Preparation Time:
Picture this: It’s 2 p.m., and you’re in full DIY mode. But just as you’re about to get started, you spot a curveball in the BOAXEL’s manual: missing screws. Every DIYer’s tiny nightmare, right? But a quick trip to your local Home Depot and you’re equipped with 12 #7 screws and 32 #8 screws. Back on track!
The BOAXEL Installation:
Here’s a golden tip: recruit a helper. The suspension rails can be a challenge if you’re solo. Once past this hurdle, it feels just like piecing together a fun jigsaw puzzle.
Your Trusty Toolbox:
- Prepare yourself:
- A magnetic level. It’s your best ally!
- Pencil for precision marks.
- Tape measurer for accurate spacing.
- A fanny pack or tool belt (Keep those screws handy!).
- A reliable screwdriver.
- Your #7 and #8 screws with anchors.
- And, of course, your shiny BOAXEL pieces.
Accuracy is key. Aim for about 2 1/2 inches of space on each side of the system, and place your suspension rail about eight inches from the ceiling.
Designing Tips Tailored for You:
- Think of the look. Centered or off to one side? You decide!
- Identify your space. Is it a kid’s closet, pantry, or the master suite?
- Plan your storage. Visualize the boxes, shelves, and maybe even baskets!
- Here are two goals for you: maximize floor space and keep clutter at bay.
Breaking Down Costs:
For $213, plus an additional $20 for screws, you get to transform your space for a mere $235. Compare that to a high-end dresser, and you see the value, right?
Your Verdict:
Prepare to fall in love with the BOAXEL system! Its adaptability will surprise you. Whether you’re repositioning drawers or adjusting hanging sections, playing around is a joy. And the cherry on top? Top-notch quality and additional fancy add-ons are available.
Q&A Corner!
- Worried about wall drilling? Just make sure you’re using those anchors with every screw. Stability, check!
- Pondering over suspension rail sizes? Opt for three 23 3/4” shelves with a 71 3/4 suspension rail.
3. Transforming an Odd Space with the IKEA Boaxel System: Your Step-by-Step Guide
Ever stumbled upon an awkwardly shaped master closet and felt defeated? If your space resembles a sideways ‘A’ with an ever-open doorway, here’s a simple guide to conquer that challenge using the
IKEA Boaxel System:
- Evaluate & Measure: Begin by sizing up your quirky space. Note the irregularities. For instance, that open doorway? It’s going to play a pivotal role in our makeover.
- Storage Inventory: Living in space-tight zones like Florida means you need to be savvy. List down all items intended for the closet. This will help prioritize.
- Design & Plan: Engage a planning software or that buddy with a knack for design. Important: Ensure your drawers won’t clash when opening and gauge how much room hanging clothes need.
- Choose the Right System: IKEA’s Boaxel is a pocket-friendly, customizable gem perfect for irregular spaces. But here’s a pro tip: Don’t swap out cheap for cheaper-looking. Elevate aesthetics with some peel-and-stick wallpaper. Lowes has some chic options that stick perfectly, even on textured walls.
- Begin Installation: Attach the Boaxel’s vertical rods to your wall. This system’s charm? It’s modular. Feel free to snap in those shelves and baskets wherever you fancy.
- Budgeting & Purchasing: Though you might think you need $700 of shelving, as you set up, you may realize a $100 saving by optimizing space. Don’t forget wall organizers, storage boxes, and yes, that classy wallpaper.
- Accessorize the Corners: Got a tricky nook? Pegboards and spice racks are your MVPs. They turn an awkward corner into a nifty accessory hub. Add an IKEA utility cart for those extras.
- Streamlining: Incorporate drawers in the Boaxel system to free up floor space. Remember, it’s about making the most of your area. For instance, adding pant hangers might reduce the need for additional hanging space.
- Final Touches: Position everything in a way that best serves your daily routine. The Boaxel system lets you play around until it feels just right.
- Time Management: You might wonder how long this magic takes. With dedication, tackle it in one productive Saturday. Or, if you prefer, spread it across a few nights.
Remember, the right tools and a clear plan can turn even the quirkiest space into an organized oasis. So, roll up those sleeves and let the transformation begin!
2. The IKEA Pax Closet Hack from Yellowbrickhome
Hey there, DIY enthusiast! Have you ever fancied a massive wardrobe makeover but just couldn’t find the right fit for your unique space? Well, buckle up because you’re about to embark on the wardrobe transformation journey of a lifetime!
First Impressions First: So, you’ve probably caught wind of our spring makeover updates on Instagram and Facebook. Cheers to all the thumbs-ups and heart-eyed emojis sent our way!
A Closet’s Foundation – The Planning Phase: Diving into the IKEA PAX closet system was a big move for us. Sure, there were challenges (hello, quirky house quirks like slightly sloping floors!), but the real magic was in the assembly. With your trusty power drill, screwdrivers, hammer, and the iconic IKEA instruction manual, you’ll be gearing up for success. Pro tip: Sort through those packages! Knowing which part is in which box is a huge time saver.
Measure Twice, Build Once: This can’t be stressed enough! Take a page out of our book – while your enthusiasm might prompt you to get the biggest closet, keep in mind the quirks of your space. Too snug a fit? Consider adding a 2″ x 4″ spacer to adjust the depth of your closet.
The Building Adventure Begins: Once you’ve got everything set, it’s assembly time! Partner up – it makes things ten times more fun and efficient. And, if things seem tricky? Innovate! Sometimes, a good old Dremel or some improvised rails can be your best buddy.
Stylish Storage? Yes, Please!
Who said storage can’t be chic? Upgrade the look of your PAX by using vibrant wallpapers. Our source went with a neutral linen from NuWallpaper.
Get Shopping (But Wisely): As you head to IKEA, your budget might tremble at the thought of spending. But guess what? Our source spent around $700 on shelving but ended up saving $100! How? Efficient planning and maximizing space utility. In total, our source makeover amounted to just under $1400 – including those dreamy wallpapers, some wall organizers, and storage boxes.
The Finer Details: The IKEA Boaxel system, a life-saver for tricky spaces, is modular magic! Imagine having the freedom to change your storage style on the go. Want drawers one day and shelves the next? No problem! Plus, think about clever space-saving solutions. For example, pegboards for accessories or using pant hangers to maximize clothing storage.
Final Flourishes: As you near the end of your closet-building marathon, it’s time for the fun bits! Think LED lights, stylish brassy pulls, and maybe a dash of decorative flair.
Key Takeaways:
- Measurements are crucial: If one thing saves you from a DIY disaster, it’s precise measurements.
- Work smarter, not harder: Strategic planning can save you dollars and effort.
- Customization is king: The PAX system lets you build a unique closet.
- Style it up: From wallpapers to lighting, don’t skimp on adding some flair to your storage space.
So, there you have it! Turn that dream of a chic, organized closet into reality. Who knows? By next weekend, you might just be snapping photos of your new IKEA PAX masterpiece for your Instagram followers to admire.
Lastly, No 1. A DIY Dreambox Closet Hack: Save Over $2000!
Dreaming of the luxurious Dreambox closet priced at a hefty $2500? Create a strikingly similar version for only $380-400! Here’s how:
Materials:
- 2x Ikea Gersby
- 2x Ikea Platsa
- 2x Ikea Fonnes
- Plywood (for the fold-out table)
- Two 2m pine wood (table legs)
- Acrylic white paint
- Door hinges (for the fold-out table)
- A deadbolt (to keep it securely closed)
Steps:
- Assemble the Ikea items as the main structure.
- Fix the plywood atop, supported by the pine wood legs, to form a fold-out table.
- Secure the table with hinges and add a deadbolt for stability.
- Finish with a coat of acrylic paint for a sleek look.
Can’t find some items in your region? No worries. Four BILLY bookcases can be a great substitute.
For a comprehensive guide, check out Helen Kukovski’s video tutorial and give her channel some love. You’re on your way to enjoying a posh closet without the hefty price tag!