It is easy for anyone to go crazy when deciding how to organize their closet. What should I do with this sweater? What about that jacket? These are common questions that many people ask themselves when they stand in front of a crowded space. Fortunately, there are 10 ways you can maximize your wardrobe without having everything taking up the floor, so let’s get started!
Following previous wardrobe ideas published in the channel, Simphome presents you with the list.
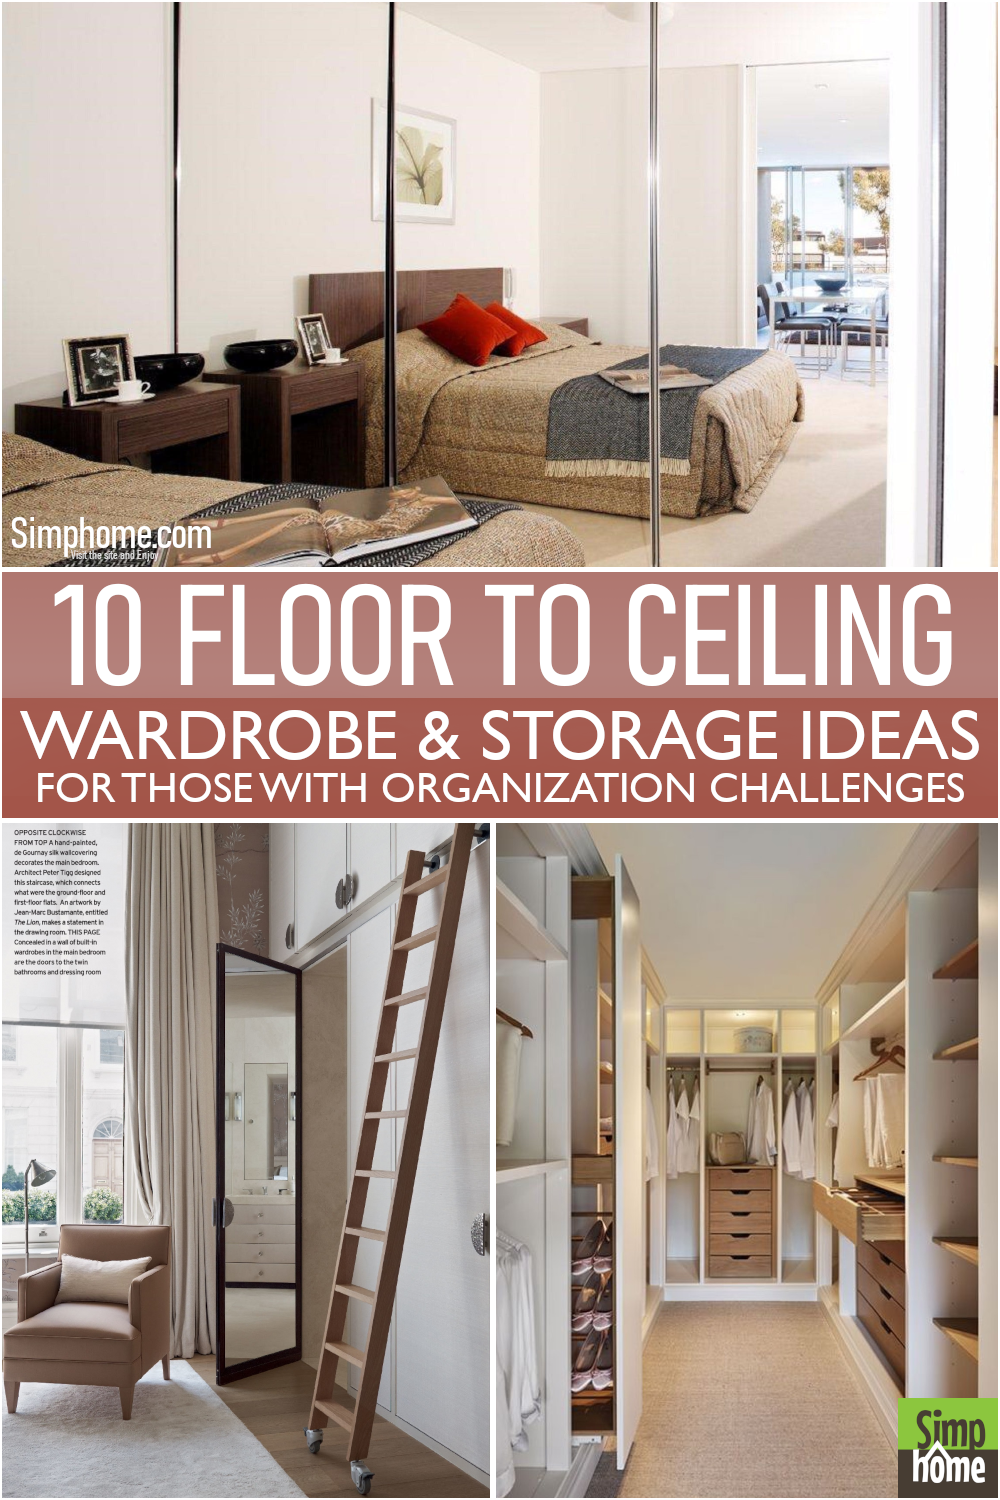
10 Floor to Ceiling Wardrobe Video:
The basic tip is to think outside the box when using your closet walls. All too often, there is wasted space at eye level. But by placing your dresser on high shelves or on the top of your closet, you can make a big difference.
The next tip is to avoid placing your clothes at the back of your closet, leaving wasted space behind them. Moving these items to the door can prevent essential things from being hidden. And create a more open space for better organization. Finally, it is often a good idea to fold your clothes; this will help keep wrinkles at bay and give you more space between stacks.
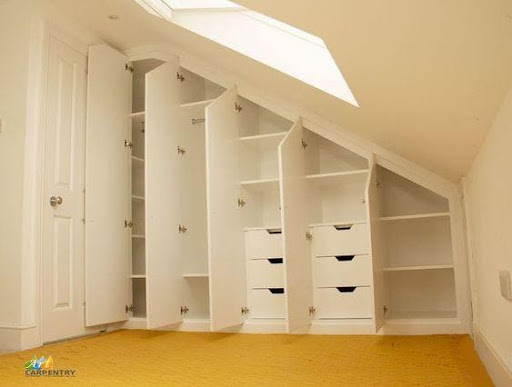
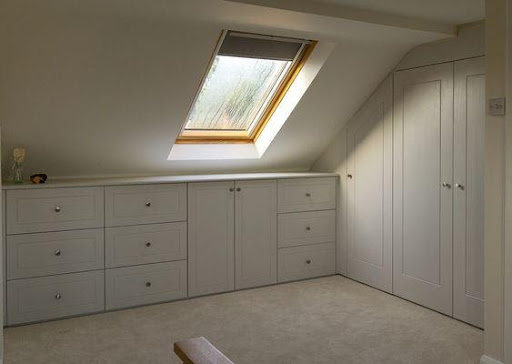
10. The Sloped Ceiling Wardrobe Idea
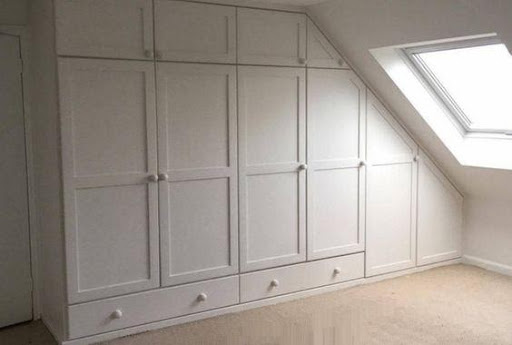 Some wardrobe space is more challenging than others. The area under the stair is one of the favorite spaces to incorporate into a new room in homes that don’t have existing storage.
The problem with this area is that it often has slanted ceilings or walls that make them difficult to tie in.
Decorate your sloping ceiling with a plain wardrobe that stretches from wall to wall and floor to ceiling. By turning an eave storage space into a slanted wardrobe, you can get all the benefits of a standard-shaped room with a handy built-in storage solution.
To build your fist-sloped ceiling wardrobe, your basic instructions are:
1. Make sure there is enough room for a fully enclosed space.
2. You must install adjustable or free-standing shelving units in the wardrobe to ensure stability.
Once you have these features, add your bottom shelf to your space and hang shelves along the wall and ceiling to complete your project.
These are only a few tips on getting more out of your ceiling spaces for storage, whether in the form of hanging curtains or built-in wardrobes.
3. A Floating Floor-to-ceiling Wardrobe
Floating wardrobes have been trendy in recent years. The usefulness of this wardrobe is that they often help determine the general style of your home better than any other type of wardrobe.
This wardrobe is designed with no visible connection to the floor, walls, or ceiling. It is usually built on metal legs or casters and can be moved around the house as needed, as long as the floor they roll on is smooth enough.
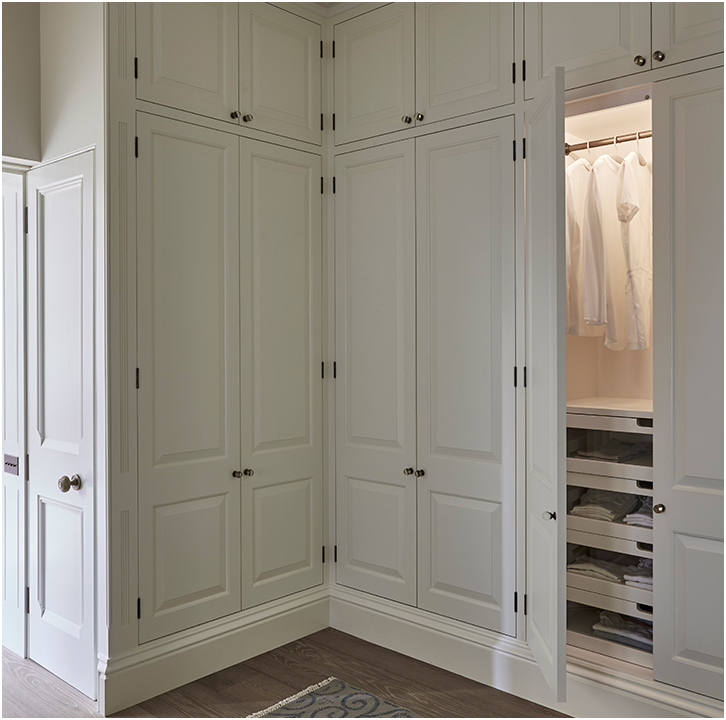
9. The Fitted Wardrobe
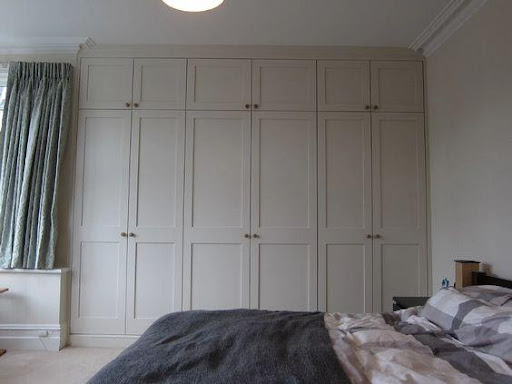 In a small bedroom, every inch counts. That’s why a fitted wardrobe is perfect for getting that extra storage in your bedroom. This picture shows the idea of maximizing all the potential space in a small bedroom.
The beauty of the wardrobe is that you can adapt it to your needs and maximize the floor-to-ceiling space. The design of this fitted wardrobe has doors from top to bottom as well. As seen here looks great and would work well in period properties as it has more visual character.
To build the fitted wardrobe, your basic instructions are:
No 1. First, decide on where to place the wardrobe.
No 2. Choose a material that is easy to paint and then build it with a wooden frame.
No 3. Next, add a bottom shelf and then fabricate the wardrobe around it.
No 4. Once you finish, paint and decorate it to your desire.
Other Wardrobe Models:
The C-shaped Floor-to-ceiling Wardrobe:
This idea is called “C” because of the shape of the wardrobe, which looks like an upside-down “C” or a “Y”. To build it, you need:
No 1. Find a place to put the wardrobe where it doesn’t touch the floor or ceiling.
No 2. Measure and draw a “Y” shape on the wall where you want to put the wardrobe. You should mark the top up about 12 inches from the ceiling.
You can also use an angle grinder with a metal-cutting disc to make this cut.
No 3. Now you can attach a bottom shelf to the bottom of the “Y.”
No 4. Measure and mark where you will place the sides of the wardrobe on the wall.
No 5. Cut along your lines to build your wardrobe from plywood or MDF.
The “Multi-Level” Wardrobe:
To build it, you have to:
No 1. Determine the placement of the wardrobe.
No 2. Cut out a base from plywood or MDF to get your desired size.
No 3. Decorate with fabric and then fix directly to the wall or ceiling.
No 4. Attach shelves underneath to create a functional storage space beneath your wardrobe
The “A” shape Floor-to-ceiling Wardrobe:
It is another option for those who want more narrow storage space in their bedroom.
To start and build the project, your instructions are:
No 1. Find a wall, and then measure out the length and height of your wardrobe.
No 2. Decide how big you want to make your walk-in wardrobe or choose a standard size.
No 3. Mark out an “A” shape on the wall where you plan to place the wardrobes
No 4. Cut along your lines with an angle grinder, and then attach them with a few screws.
No 5. Decorate your wardrobe with fabric or paint and start using it.
The “U” shape or “T” shape Floor-to-ceiling Wardrobe:
It is one of the most popular choices in contemporary spaces. To build it, you have to:
No 1. Determine the placement of the wardrobe and measure out its dimensions.
No 2. Determine where your support legs will go as part of the “U” shape or “T” design.
No 3. Decorate your wardrobe with fabric or paint and start using it.
No 4. Fix your bottom shelf to the ceiling.
No 5. Add a few more shelves inside to complete your storage space
The “Curtain” Wardrobe:
This option is an easy way to get more storage in the attic. To build it:
No 1. Measure and mark where you want to place the wardrobe on your wall.
No 2. Cut along your lines with an angle grinder, and then attach them with a few screws.
No 3. Decorate your drawers with fabric or paint and start using them.
No 4. Fix the bottom shelf underneath the dresser to create an extra storage space beneath your wardrobe.
The “Deflector” Floor-to-ceiling Wardrobe:
This choice is one of the newer ideas for floor-to-ceiling wardrobes. To build it:
No 1. Find a place to put the wardrobe where it doesn’t touch the floor or ceiling.
No 2. Measure and draw an “X” shape on the wall where you want to place the wardrobe. You should mark the top up about 12 inches from the ceiling.
No 3. Now you can attach a bottom shelf to the bottom of the “X” shape.
No 4. Measure and mark out where you will place your supportive legs
No 5. Last, add your curtains and decorate the interior with fabric.
The “Hanging” Wardrobe:
This option for storage is advantageous in attics where there is limited floor space but there is a high ceiling height. To build it:
No 1. Decide where you want to place the wardrobe and measure its dimensions.
No 2. Use an angle grinder to cut along your lines to build your wardrobe from plywood or MDF.
No 3. Attach your support legs along the edges of the “X” shape and secure them to your ceiling.
No 4. Decorate your wardrobe with fabric or paint and start using it.
No 5. Add a few more shelves inside to complete your storage space
The “Dual” Floor-to-ceiling Wardrobe:
This option is trendy because of its double function. To build it, you have to:
No 1. Decide on where you want to put your wardrobe.
No 2. Measure and draw a “double” shape on the wall where you want to place it
No 3. Decorate with fabric or paint, and then attach the construction.
No 4. Decorate your wardrobe with fabric or paint, and then start using it.
No 5. Add a few more shelves inside to complete your storage space
Also read:12 DIY Projects for Better Wardrobe Organizations
12 Built-in Wardrobe Ideas
10 Minimalist Wardrobe Ideas
10 Small Walk-in Wardrobe Layouts
10 Wardrobe Behind Bed Ideas
10 Wardrobe Layout Storage Ideas
10 Built-in Bedroom Wardrobe Ideas
10 Bedroom Wardrobe Renovation ideas
10 Modern Wardrobe Design and Makeover Ideas
10 Bedroom Wardrobe & Cabinet Upcycled ideas
8. The Attic Wardrobe Idea with Plain Doors
 If you’re thinking about a white wardrobe for your bottom stairs area, a wardrobe with plain doors can be your consideration. White is a versatile neutral choice, which goes well with all other colors and materials such as wood.
You can use white to match any design style. You just have to think carefully about how to use it. The glossy white color combined with a light wooden floor, white shelves, and drawers blend with the wardrobe color to create a sleek, modern-looking room.
7. The Loft Fitted Wardrobe Idea with Drawers
 Drawers usually add more cost to your built-in wardrobe because of the additional materials and installation required for drawer fronts, runners, and handles.
Drawers will increase the cost of your built-in wardrobe and limit the storage space in your closet. However, drawers are helpful on the lower levels, as you can pull them out and look down instead of bending over and peeking deep into open shelves. Also, if you have tall kids, they will find drawers easier to reach inside.
If you are looking for a transparent drawer, you will need a mirror for its backside, so the whole wardrobe looks like it has two doors. These wardrobes are suitable if your closet design is not large enough or you want more storage space.
You can use this idea for a media center, laundry room, bedroom, or office storage space.
6. The L-Shaped Ceiling Wardrobe Idea
Since it has much storage, you can organize your clothes to look neater on different shelves. You can also hang dresses, jackets, or coats using hangers. While in the drawers, you can place socks, ties, clothes, and handkerchiefs. To make the wardrobe look uncluttered, you can install doors for each shelf that match your home’s theme.
To own it yourself, you are only required to:
- Fix the bottom shelf on your wall.
- Use an angle grinder to cut along your lines and attach the remaining parts with a few screws
- Decorate your wardrobe with fabric or paint, and then start using it
- Add a few more shelves inside to complete your storage space
- To finish it up, install the door to your wardrobe
5. A Built-in Wardrobe Idea with Vanity
 Wardrobes and vanity are essential aspects of any bedroom, so why not try to combine them and design a bespoke wardrobe with a dressing table as a unit?
Wardrobe vanities give many advantages that the average homeowner craves. They can help turn your floor-to-ceiling wardrobe space into a personal sanctuary.
Equipped with mirrors and lighting, they give a deluxe space for applying makeup, styling hair, and using other toiletries. In a pinch, your quiet wardrobe with vanity can double as a private home office.
To build it, your basic instructions are as follows:
- Prepare the space where you want to place the vanity
- Mark out the exact depth of your vanity from the wall’s surface
- Measure and mark out one “L” shape on the wall, that is, opposite to the width direction of your measurements
- Make a hole for the backplane in your “L” shape as indicated in your plan
- Draw out one drawer and install it on its side with a few screws
- Install a shelf above it as an extra space.
- Drip the vanity and trim it with molding
- Now you can install drawers on the side of the backplane
- Install your mirror as a doorway between the vanity and wardrobe
- Decorate your wardrobe with fabric or paint to match your room
4. A Fitted Sliding Wardrobe Idea
 As the name suggests, it has sliding doors instead of hinged ones that open. Transform your room with wall-to-wall, floor-to-ceiling sliding wardrobe doors. Combine wardrobe door designs to create an appealing-looking wall space from different door colors.
There are various choices for sliding wardrobes, including the number and width of doors. They come in different designs and finishes, from mirror glass to classic wood. The good thing about sliding wardrobe doors is that they take up less space. They are a good choice if there is a snug fit between the bed and the wardrobe.
To replicate the idea, you need to:
- Measure the width between the wall and your bed
- Apply this measurement on paper.
- You must draw a line twice as long as the measurement you have taken from the wall to your bed.
- Make a mark at the halfway point of this line.
- Make another mark at one-third of the distance from one end than from the halfway point
- Draw two more lines connecting these marks, forming a rectangle shape with an L shape on one end
- Use the measurements and drawing to make two sliders.
- Install each slider on the bed’s side corresponding to its separate marks
- Install a shelf at one end of the wardrobe, where you can place hangers and accessories such as scarves, ties, or caps
- To complete your storage space, install a mirror on top of your wardrobe
3. A Fitted Mirrored Wardrobe Idea
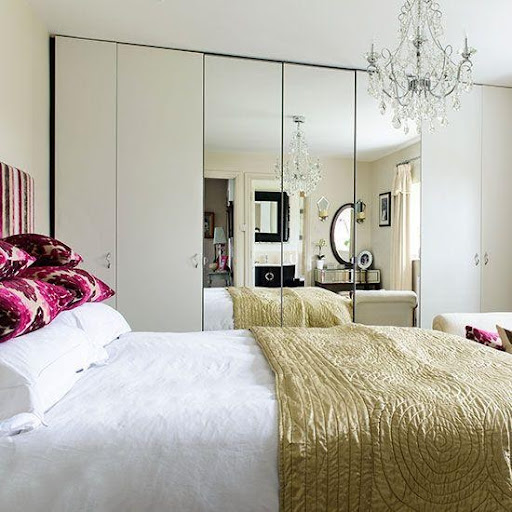 Both hinged and sliding wardrobes offer mirror options. Doors can be mirrored in whole or in part, and you can have all of them done the same way or just some doors.
Full-size mirrors can be great for bringing light into a room, but keep in mind that they are difficult to clean. Dust and fingerprints are more likely to show up than on a regular door.
One option is to hang a mirror inside your wardrobe door. You can install it on the back of a door, integrate it as a pull-out panel or tuck the back. If you use the mirror to check your clothes in the morning, make sure they get lots of light.
2. A Walk-in Wardrobe Idea
 If you’re pretty fortunate to have a walk-in wardrobe, it can be hard to determine how to best design it and make the most of the space.
We give expert advice in layout planning to create an astonishing walk-in wardrobe design with an open front unit that exposes the stylish wardrobe interior. Consider the choice between open clothes storage and wardrobes with doors, as each has advantages and disadvantages.
Displaying your seasonal clothing and accessories on open rails and shelves in separate dressing rooms can create an upscale clothing boutique effect, especially if the lighting is beautiful and color-coordinated.
Stuff is easier to find than having it all behind closed doors and can save more space because you don’t have to worry about space for the door to swing.
General instructions to replicate the ideas are:
- Measure the location of your wardrobe, and mark it out on the wall
- Measure and mark out one door for your walk-in wardrobe
- Check if your measurements are correct, and then do a few dry runs to ensure that you have the perfect fit for your door
- Now, you’re ready to go ahead with installing the door; use a few screws to join them together, and you’re done!
- Install a mirror above the door to give it a more appealing look
- To finish it up, install some shelves on both sides of the door
- Now, you can use your walk-in wardrobe as an extra storage space and even a dressing room, depending on the layout you choose to create in your bedroom.
Lastly, number 1. The Ceiling Wardrobe Idea with Ladder
 Designing for storage that is very high could be a challenge. Thus, several types of wardrobe ladders are recommended. Either a rolling ladder that mounts permanently to a shelf or a lightweight stair stool that you can store in a closet will offer your best options for easy access.
Rolling ladders are always out, and some people find this an annoyance. On the contrary, certain step stools are designed to attach to cabinet panels when folded with special hooks for off-the-track storage.
Ladder benches are easy and inexpensive for high-ceiling wardrobe storage ideas. But make sure you opt for a high-quality model with a non-slip base and tread.
To build a new wardrobe with a ladder, your basic instructions are:
- Measure the height of your ceiling and check that there is enough space to install a ladder on it
- Add 5 inches to your measurement for the height of the step stool
- Take your measurement and draw a rectangle on your wall
- Use a chalk line on the straight edges of the rectangle
- Go over the chalk line with a drywall saw while holding it vertically
- Cut through the ceiling at this point and install a mounting bracket to attach the ladder
- You need to measure the distance from the edge of your floor to the middle of your ceiling and draw a rectangle on your wall.
- Draw a diagonal line from one corner of this rectangle to another corner right above it
- Cut through the ceiling in this area and your floor using a drywall saw.
- Make sure you drill through all three points while holding them horizontally.
- Install the mounting bracket at this point and attach your step stool
- Measure, draw, and make marks for the ladder to hang from the wall
- Once you’re done, mark it out on your wall using a chalk line
- Cut the plasterboard with a plasterer’s knife
- Drill holes in each corner of your step stool, move it to its position and tighten the screws.
Conclusion:
Generally, we have limited storage in our rooms, especially with small wardrobes. We then have a cramped and messy room with clothes and shoes everywhere. How can you reduce this storage inconvenience? Of course, a floor-to-ceiling wardrobe is the best solution.
Ceiling wardrobes offer a lot of space for all your items. But, designing them along the ceiling can present a challenge. It is especially true if the builder has cast the rods and racks in a less than optimal location.
However, you can convert most ceiling wardrobes into efficient storage space with a bit of a re-forming. In the end, we hope after you know the type of ceiling wardrobe you’re looking for, the ten floor-to-ceiling wardrobe ideas would be new things that offer you new organizational experiences too
References:
10. Fittedwardrobecornwall.co.uk
9. Pinterest.com
8. Pinterest.fr
7. Spbcarpentryandjoinery.co.uk
6. Pinterest.com
5. Recommend.my
4. Pinterest.com
3. Pinterest.com
2. Pinterest.com
1. Pinterest.co.uk