Growing various kinds of herbs, vegetables, and beautiful flowers in the backyard is pleasing. You can enjoy the backyard landscaping while relaxing in your patio. Unfortunately, you are an apartment dweller so you don’t have any backyard. What a bummer!
But, don’t worry! You can still grow some plants indoor with these 10 Clever and cheap indoor garden ideas included with bonuses. Not only do they add visual appeal to your home but also better the airflow. Let’s start the countdown and if you need more I present you next 20 Creative and Clever Indoor Garden Ideas that you can read later
🔊20 Creative and Clever Indoor Garden Video:
This idea would give you new indoor garden ideas from perspective of different author. Enjoy the video or follow this hyperlink to detail ideas featured in the video
How to Bring Your Garden Indoor to a New Level
In this day and age gardening is not only restricted to those who have huge yards and enough space to plant trees and flowering shrubs. For people who live in apartments or high-rise condominiums, they can get a little bit of the outdoors thanks to indoor gardening. Whether you grew up in a home that has a big backyard, in the countryside, or you live in the middle of the most urban area, you can start a garden. That’s right. You can develop a garden hobby even if four concrete walls surround you. This way, you can continue with your desire to grow plants and flowers as long as you have space and the necessary light.
1st. Indoor Gardening is not What You Think it is
A lot of people have ideas regarding indoor gardening that require a lot of space. The truth is, you don’t need much room if you have the right indoor gardening plants. Not only do you satisfy your passion for growing anything green but bringing your garden indoors can add much-needed life to all your indoor spaces. Consider it a great way of decorating the inside of your house using living plants. If anything, it brings a different kind of aesthetic to your environment.
2nd. Different Ways to Bring Your Garden Indoors
There are so many ways you can bring plants in while using planters that will fit right with your furniture and fixtures. One way is to go vertical. Simply put, you will use tray pots for succulents or set up a herb garden on your wall. The key here is to place a wood trellis or layered containers. You can also use wall pocket planters. These are made from rubber or plastic, and they come in various patterns. There are also planter boxes that are specially designed to be mounted on any kind of wall.
Finally, if you would like to work with clay pots, there are magnets that you can stick to your wall to hold them up. These are very durable and can handle a bit of weight. The important thing is to look at your wall not only as an architectural structure that provides indoor space definition and protection but also as a potential holding area for growing plants.
3rd. Think about Hanging Gardens
Hanging gardens can take many forms. You need to have a shelving system that you can suspend from the ceiling. Maybe you can hang it from a staircase or turn an old clothing rack into a hanging garden. You can also set these up to create tiered planters made of ceramic. Whatever the case may be, you are merely suspending them to avoid getting them in the way of people and furniture and at the same time giving a beautiful home for your plants. They may not look much when you’re starting because they are just made out of wires or frames. As the plants fill out, grow, and crawl up the wiring, they can add greenery to your indoor areas.
4th. Make Use of Your Windowsills
You can start with garden kits on your windowsills. Right now, you may think that these ledges are just empty spaces, but you can make it come to life by getting garden kits that you can purchase from nurseries and hardware stores. These have a plant pod that you can attach to your windowpane. You can even buy designs that hang from your window units. There are other planters that you can use that would fit this area. They come in different sizes and design configurations.
5th. Plant on Your Countertops
Another commonly overlooked space in most homes is the countertop. You don’t necessarily have to keep kitchen related items there in addition to kitchenware, herbs, and other supplies. You can also put hydroponic herb planters on your countertop. Think about it. If you are cooking Italian food and you need fresh basil, thyme, or oregano, you don’t have to use dried packages. Instead, you can simply snip a few leaves from your herb planters right front and center of your kitchen counter.
This strategy is fantastic because even people who are very bad with plants can still manage to grow all the kitchen herbs that they need for daily cooking. How? By purchasing hydroponic planters. These are enclosed units that are self-watering to make sure that your herbs will continue to bear leaves and produce the greenery you need for your dishes. There are many kinds of herb hydroponic kits. Some are bigger than others and offer different types of herbs. Regardless of the meals that you usually cook, there is sure to be a hydroponic planter for you.
6th. Use Old Bookshelves
If you have a bookshelf that looks all worn out and behind the times, spruce it up by putting small plants. Take out your books and place living things on it and see it come back to life. Similarly, if you have a bar cart that has seen better days, rather than throwing it out, turn it into a rolling home for your indoor succulents. The only limit is your imagination and creativity. You can set any indoor space into a living area thanks to indoor gardening.
10 Clever and Cheap Indoor Garden Video
One thing before you start reading first idea of our list, I am presenting a super relevant video that you can enjoy or watch together with anyone you constantly reach out in your social media buddy list.
10 Clever and Cheap Indoor Garden List Entries:
10. Bottle Gardens
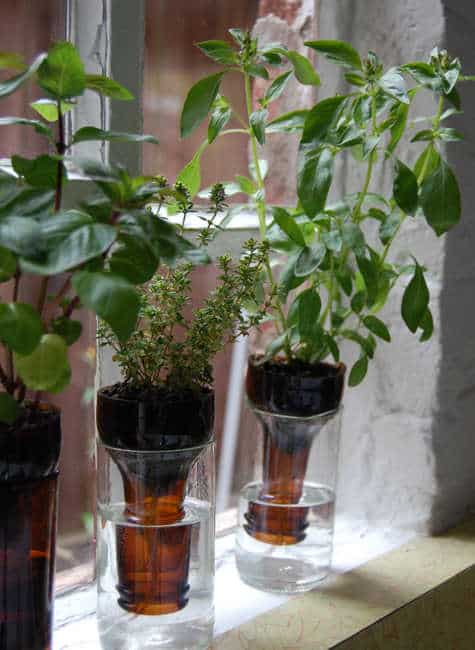 Don’t have much time to water your plants? These bottle gardens will be a perfect solution for your problem. You can still enjoy the herbs that you plant indoor without worrying about watering them.
The first thing you need to do is cutting a glass bottle. It may be a bit tricky so you can just have it cut. Or, you can use plastic bottles, instead. Then, sand the cut so it won’t be hazardous when touched.
After that, get a 2”x2” screen and cut a small hole in the center. Pass a string through the hole and tie a knot. Place the screen and string in the bottle. Make sure the rest of the string is longer than the bottle neck. Place the bottle that has been filled with dirt and herb in a glass filled with water. The string will transfer the water from the glass to the herbs.
9. Skinny Planter Stand
.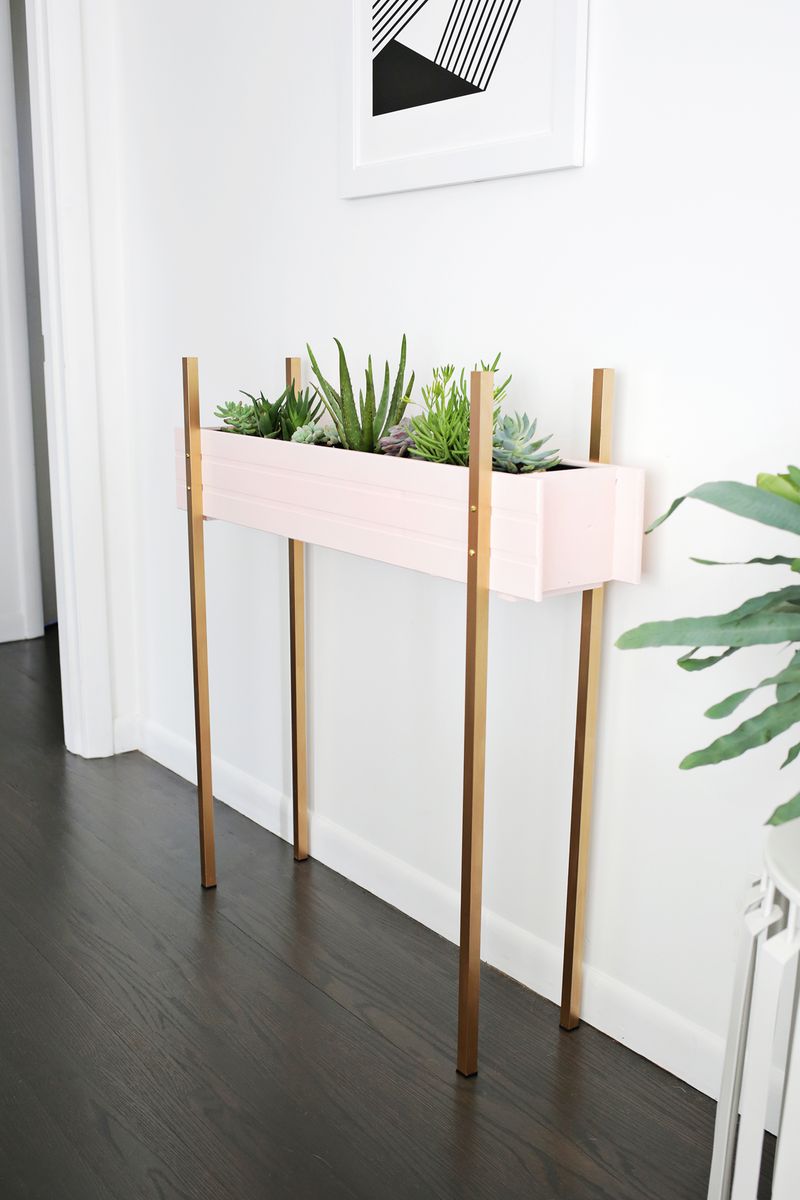 One of the most common ways of indoor gardening is growing plants in a window box and place them by the window. But you can opt for a more stylish idea just like this skinny planter stand.
It is actually a window box that is supported with four square-aluminium tubes screwed on it. The succulent in the window box provides a timeless charm with the minimum of fuss. And the gold finish of the tubes will complement your mid-century modern home well.
8. Baking Tin Planter
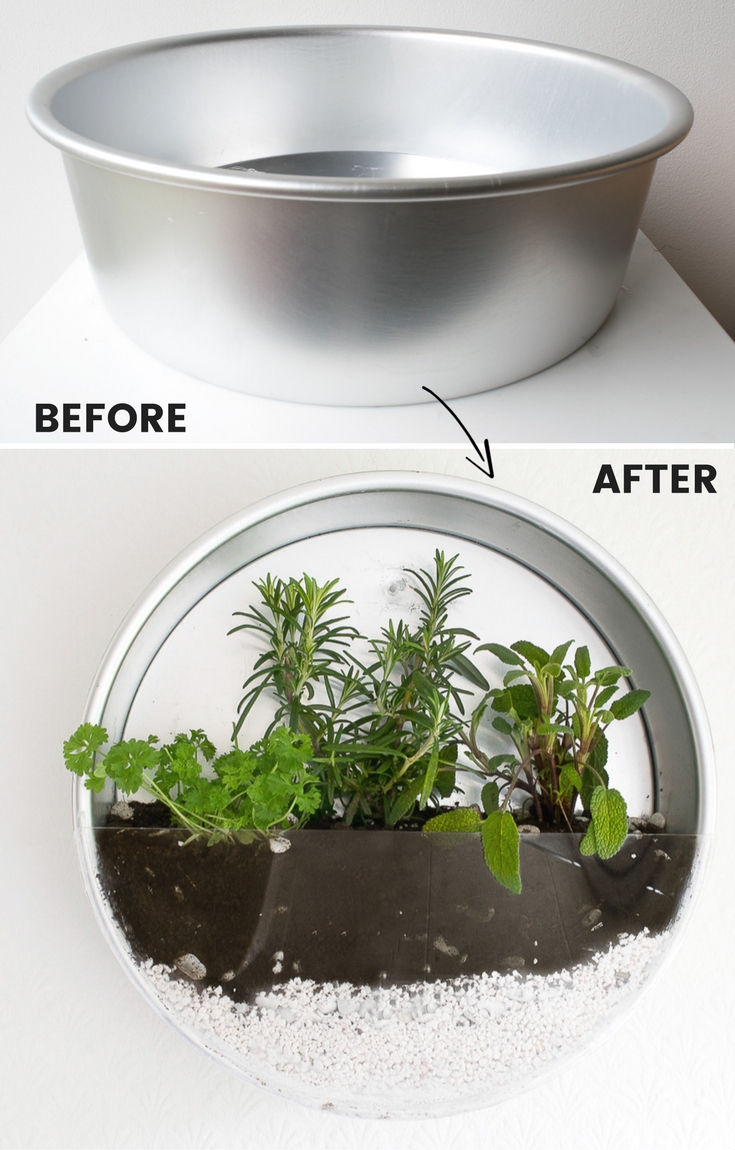 Who would have guessed a baking tin can make a superb planter? And the best thing of it is that it is affordable and can be made within 10 minutes. But the look will always sweeten your home décor.
You only need to get a round baking tin, flip it on a polymer plastic sheet, and draw an outline until you get a semi-circle shape. Then, cut the shape out. Apply gorilla glue around the edges of the baking tin, and attach the plastic. Press down the plastic hard and make sure it is attached to the baking tin perfectly, otherwise the water will leak out.
Then, you can begin to insert the drainage by adding stones and gravel to the tin, and a layer of potting soil on top of it. Finally, plant any herb you like.
7. Mason Jar Hanging Planter
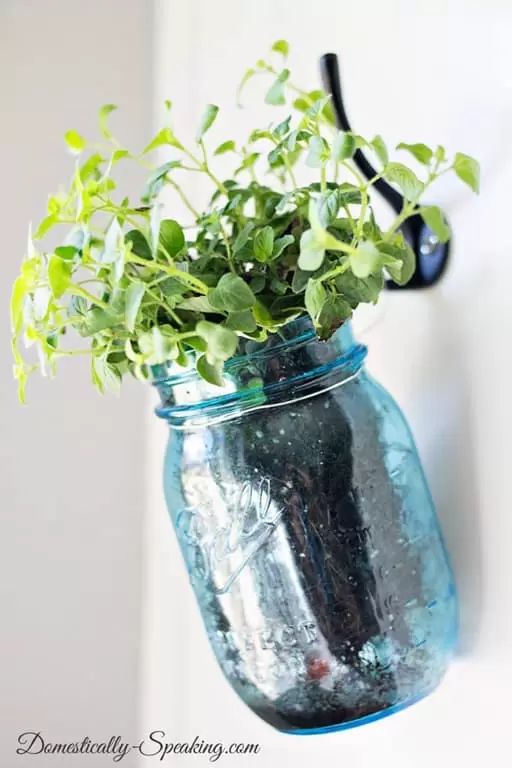 Harness the versatility of some mason jars to grow some herbs in your kitchen. It is an easy project for any novice. You only need to get some mason jars and fill them with pebbles or seashells as the drainage. Then, add a layer of potting soil and the herbs.
Wrap around the jar neck with a wire and hang the jar anywhere you like using a hook. But hanging the jars near the window in your kitchen would be the best as they can get sufficient light. Besides, you can grab them in a jiffy if you need them when cooking.
6. Tray Pot for Succulent
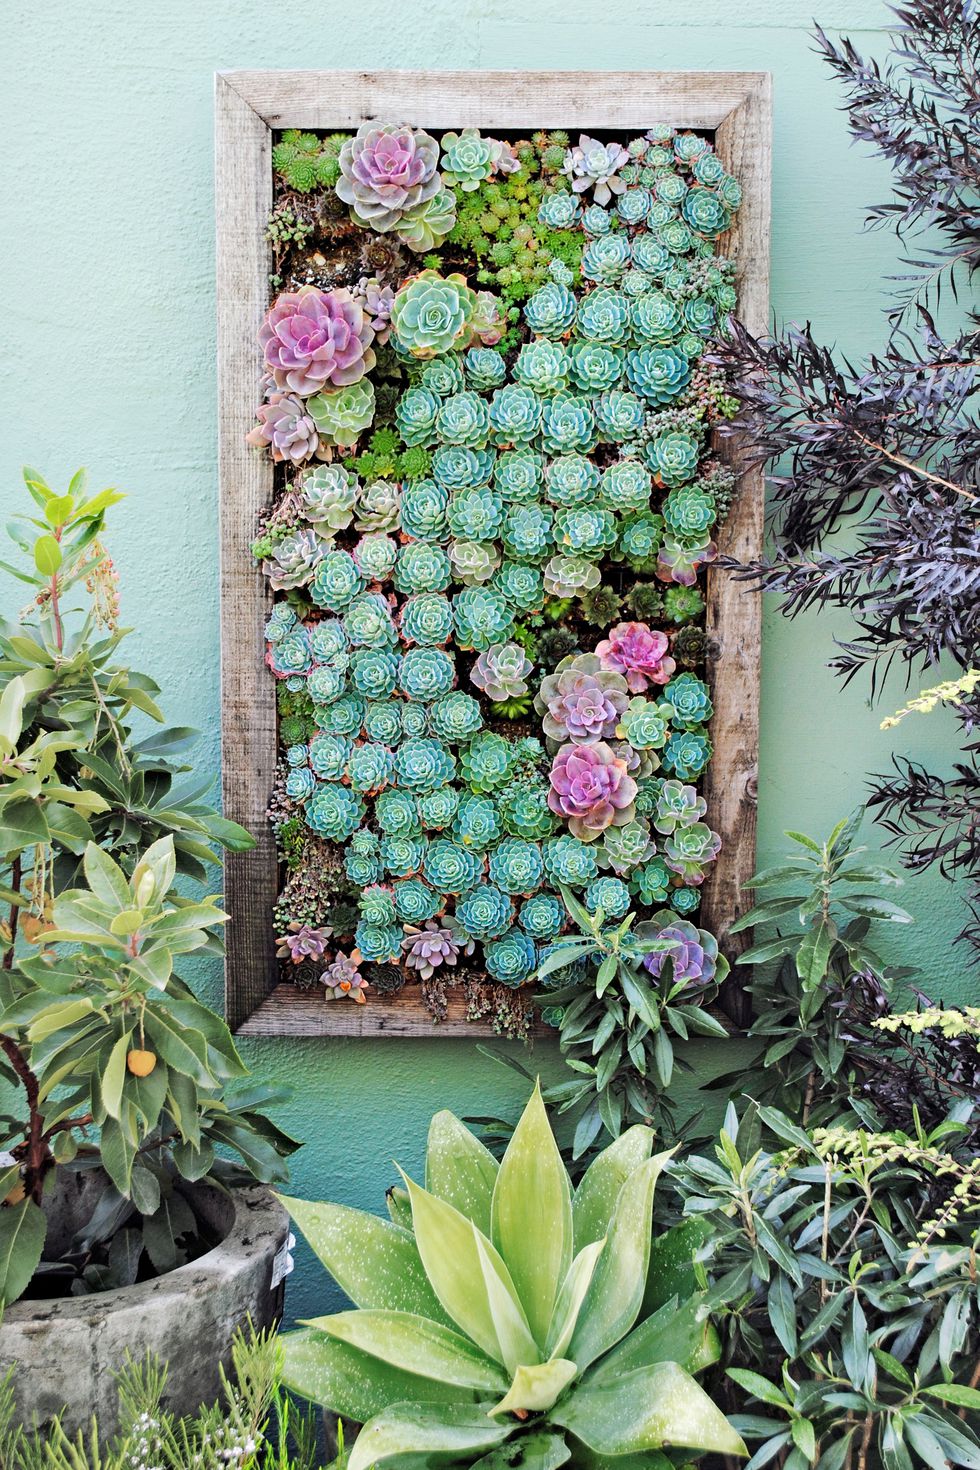
The tray features 72 cells that you can use to grow plants with shallow root systems like succulent. Each cell has drainage hole that prevents your plants from over-watering.
To make the tray look more epic, frame it with boards and hang it on the wall.
5. DIY Vertical Clay pots
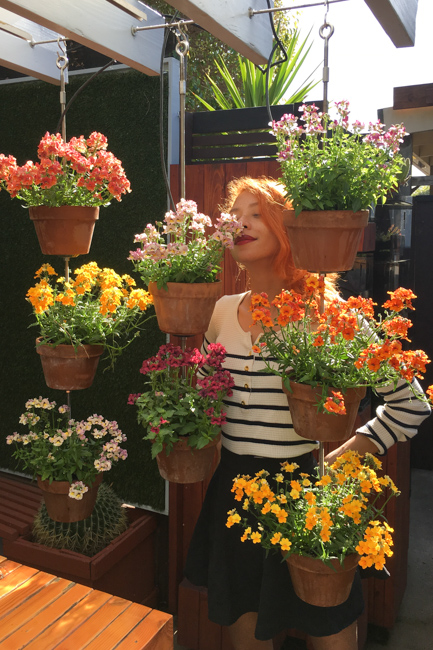 An apartment dweller has to put up with limited space. If you don’t have enough space to grow your favorite flowers, why don’t you just hang them and go vertical?
Vertical gardening is the best solution for limited space. And these vertical clay pots will allow you to grow some plants while saving more space because you will have to thread 2 to 3 clay pots using rods and washers and hang them on the ceiling using concrete anchor and threaded eye-bolt.
4. Glass Hanging Herb Garden
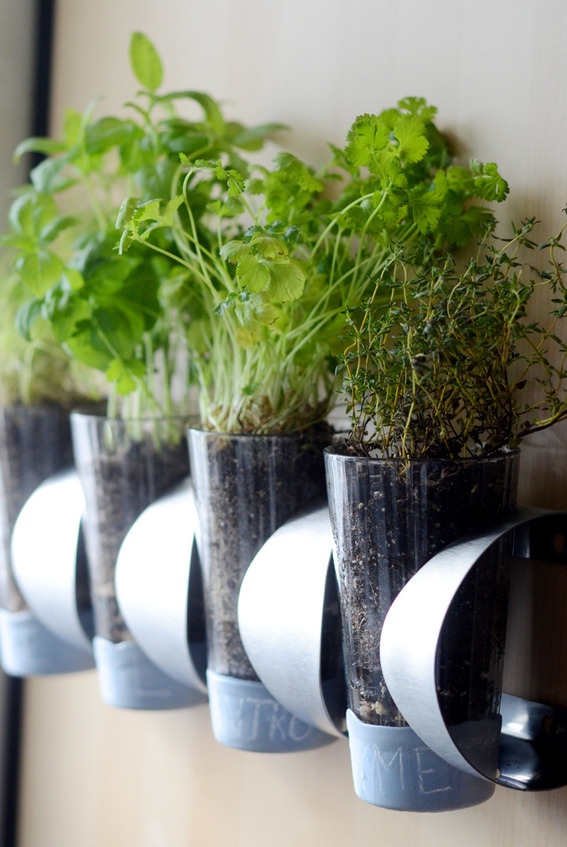 Indoor gardening is not just about growing either decorative or edible plants. It is also about improving the appearance of your house, just like these simple yet beautiful glasses.
To make this hanging herb garden, you’re gonna need to get IKEA Vurm, 4 herb plants, and 4 pint glasses. You can opt for dipping the bottom of each glass into latex paint so you can label them using white chalk.
Hanging the glasses is very simple. You just need to mount IKEA Vurm on the wall. Fill each glass with pebbles as the drainage, and transfer your herbs to the glass. Finally, put each glass into the open space in the Vurm. You’d better label each glass so you won’t mistake a certain herb for another.
3. Wood Trellis Plant Wall
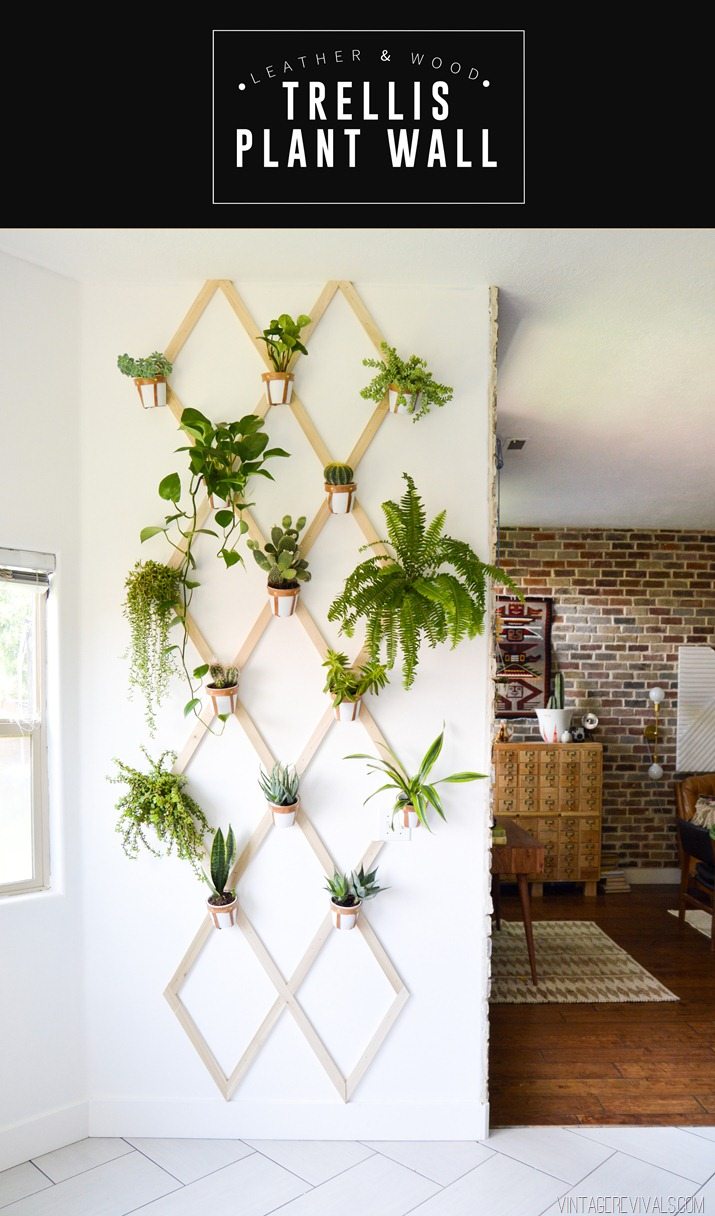 Incorporating living things as your home décor is such a great idea. And this wood trellis plant wall will make a pretty good focal point for your vintage or contemporary living room. You only need to attach some boards on the wall, and arrange them to form several diamond shapes.
Then, make some holders from leather or any leftover you have at home to save more bucks. Make sure they are sturdy enough to hold your planters. Place the pockets and planters on every center of diamond points, and you’re good to go.
2. Strawberry Jar Lamp
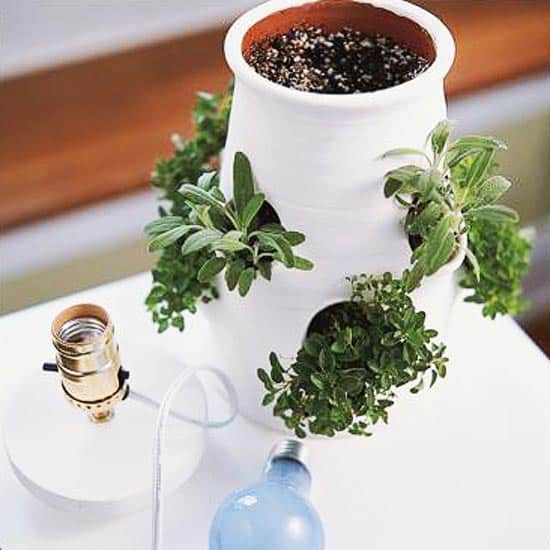 This is not an ordinary table lamp. This table lamp will definitely draw the eyes and steal everyone’s focus. You don’t need to worry about the trouble caused by the electricity and water as long as you separate the lamp’s works from jar base. Since plants love sun a lot, place this lamp near the window so the plants can grow better.
1. Clothespin Herb Planter
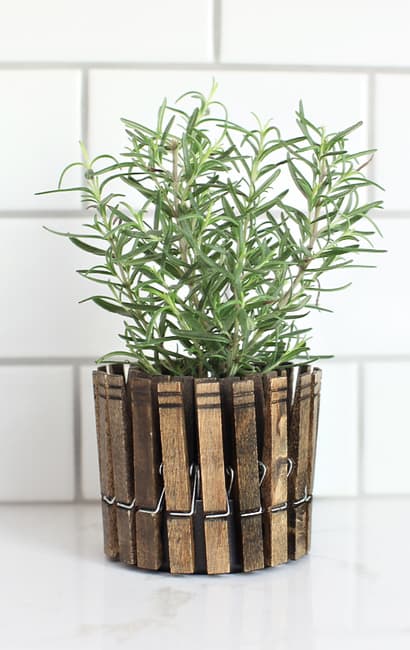 These clothespin herb planters will add the touch of rustic look to the room where they stay. It is such and easy and cheap project. You will only need to get a lot of clothespins, take each of them apart, stain them thoroughly, and put them all back together. Then, get some tuna cans, clean them fastidiously, and paint them black. After that, just clip the clothespins around the cans. And, finally, transfer the herbs into the cans.
So, don’t let the absence of backyard hinder you from growing some plants. In fact, this can be a blessing in disguise because you can have a more creative, cleverer, and cheaper indoor garden. BFL ( Before you leave) here I have few recommended ideas for you if you few minutes to spare.
EXTRA BONUS IDEAS:
5 Easy and Cheap Vertical Organizer Ideas for Indoor Garden:
More than dozens homeowners love indoor gardens because they can add so much beauty to a plain house interior.
However, they sometimes suffer from small space dilemma. If you are one of these lovely folks, lucky for you because I am about to give you 5 easy and cheap vertical organizer ideas that you can set inside your indoor.
Special for last idea on this list, I know that’s not 100% relevant.
But, if you take a look closer, you can use this idea for empty corner of your kitchen floor.
Instead of flower, use them as green area for you herbs. Not everyone has access to you kitchen.
So yea, I think. if you think this idea you’ll only hear criticisms from people who already knew you since you were very young. It should be harmless.
Anyway, this short list comes with relevant gardening ideas that will expand your vision and creativities.
1. Wooden Pot Holder
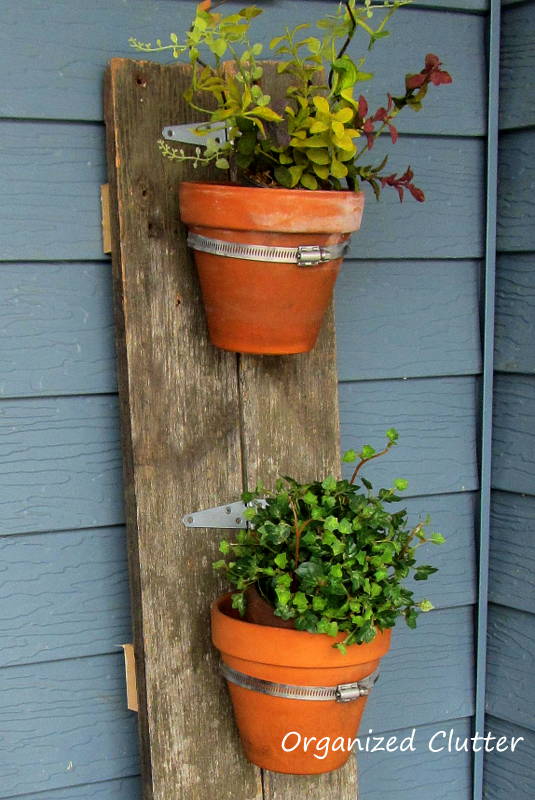 With a little bit of sweat and imagination, you can turn weathered wood boards into a pot holder. Join two boards by adding three small scraps of wood. Position hose clamps and strap hinges on the boards.
Attach the hose clamps with screws about 16 ½” apart and place the strap hinges near the top and bottom of the boards and above 3 inches above the pots. Drill a hole through the hose clamp and fasten with a screw. Lean your new pot holder against the window for direct sunlight. This easy and cheap vertical organizer ideas for indoor garden won’t take all day to make! Source
2. Rustic Planter Box
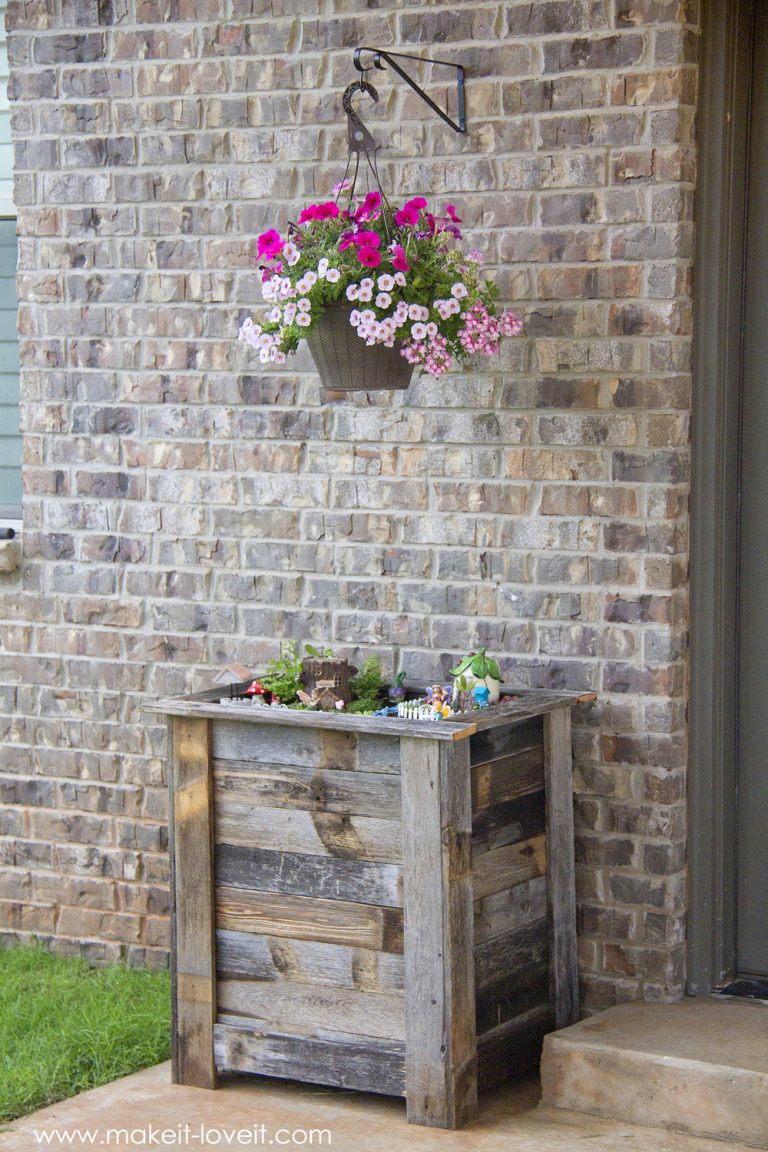 Repurpose scraps of wood you have at home as a planter box to create an upright fairy indoor garden. Collect your old wood fences and nail them together to make a square shape.
Don’t make the box too big and too small, better go with 30 x 23 x 30 inches wide. Add a top edge to the planter and nail it in place and you will have a matching squared corners. Fill your new planter with large plants or house trees or you can opt for succulents and moss. Fill the planter with old Styrofoam so it won’t be so heavy and about 5 inches of soil on top. Build little legs to allow drainage through the slats in the wood. Source
3. Hang Your Plants!
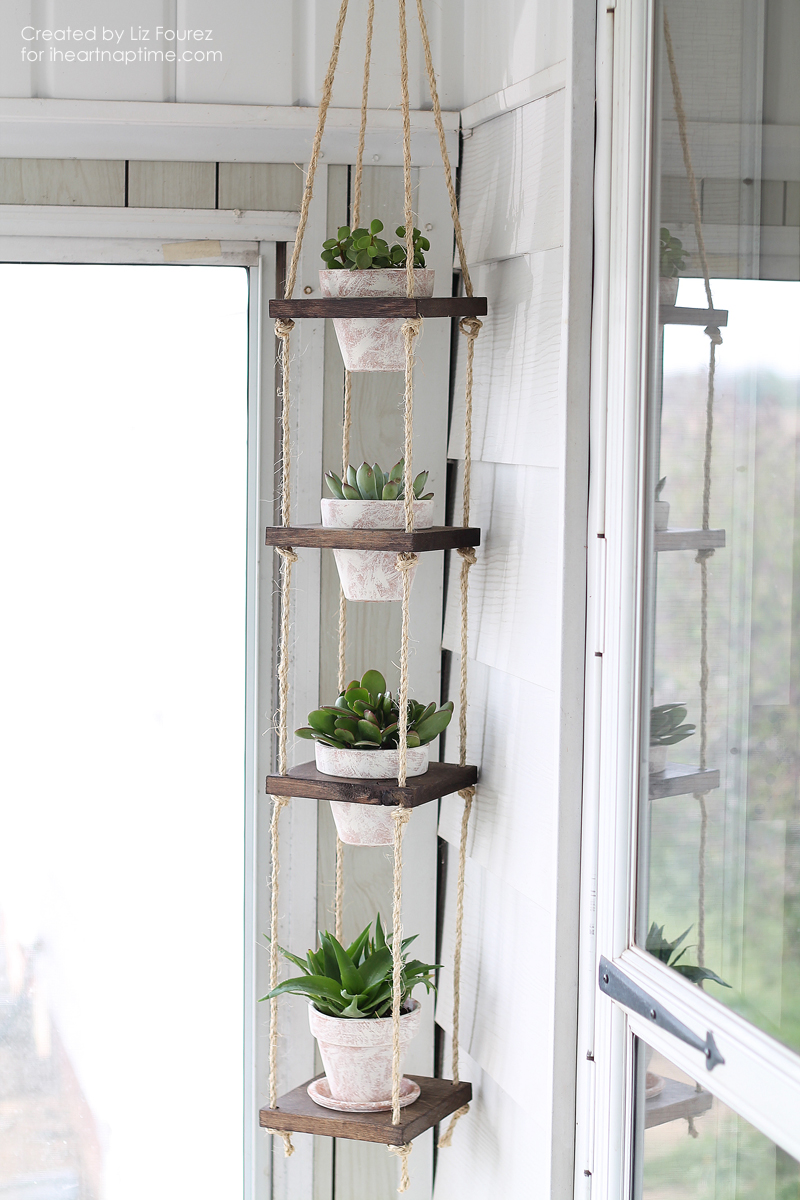 Make sure you have a scrap wood and pots (duh! Obviously) ready with you. Start by placing a pot upside down on the wood. Mark a square around the pot leaving a 1” bolder on the sides and cut with a chop saw. Make two circles where one is ¼” smaller and drill bit the smaller one to create a hole. Use a jigsaw to cut around the other circle to fit the pot.
Drill a hole in each corner of the wood for the rope to thread through. Paint the wood then cut four 6 foot pieces of rope and thread them through the holes and tie a knot in each rope underneath for your bottom piece. Tie another knot above the last knot and add the next wood square and slide it down to rest on the knots you just created.
Repeat this process depending on how many pots you want to hang. Source
4. Mason Jars for Herb Planters
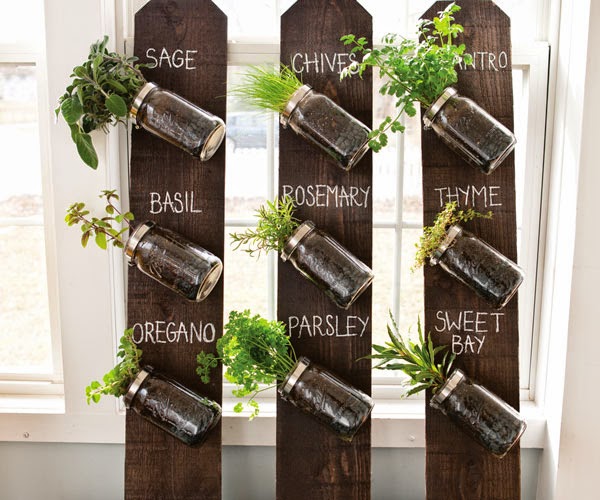 Make a vertical herb planter with scraps of wood fence and mason jars. Attach hose clamps to the board with screws and leave 10 inches between each clamp.
Fill the jars with one cup of gravel for drainage purpose.
Add the herbs to each jar and position the jars in each hose clamp and tighten them with a screwdriver.
Place the vertical planter near a sunny window. Source
5. Cheap Tiered Flower Planter
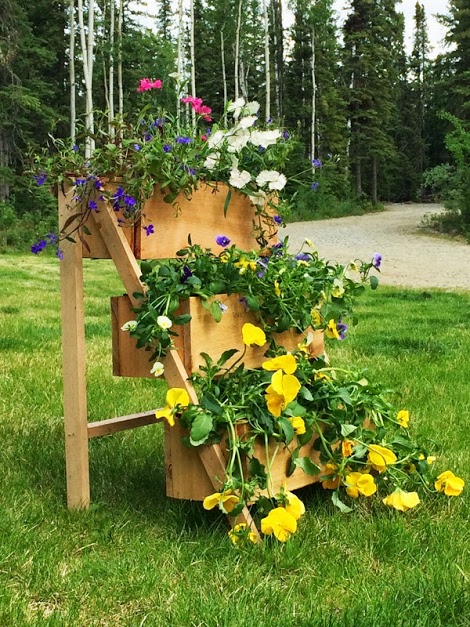 A tiered planter can’t be missed when considering vertical planters. Make 3 boxes by attaching wood boards together using nails. Use spacers to keep the boxes evenly spaced and secure them with a staple gun. Make sure to drill holes in the bottom for drainage. Source
5 Clever DIY Organizing Ideas for an Eye-Catching Rooftop Garden:
Rooftop gardens often become the way out for gardening enthusiasts and those who don’t have space in their front and back yard to plant their succulents, fruits or vegetables. And, sometimes people opt for this type of garden because they want to beautify their buildings.
Well, whatever your reason is today we have come up for you with a list of 5 clever DIY organizing ideas for rooftop garden that you should totally take into consideration. Pay special focus to the end of this list to find relevant ideas that will probably make your day. Let’s begin from number 6.
6. Pallet Orangery
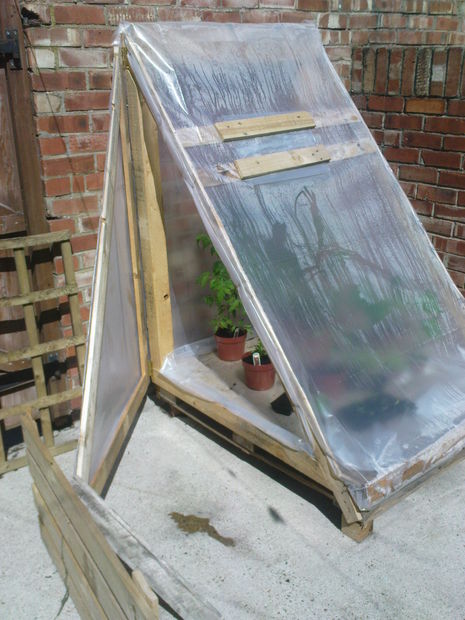 Everyone probably has one or two unused pallets just sitting in the back of the shed waiting to be put for organizational use. Make a triangle shaped door with two hinges.
Cut sheet that will fit each sides of the orangery then staple it to the wooden frame. Place your terracotta pots filled with tomatoes and other vegetables or flowers inside your newly built greenhouse. This clever DIY organizing idea for rooftop garden will surely bring a unique look to your roof. Source.
7. Square Planter for Edible Green Roof
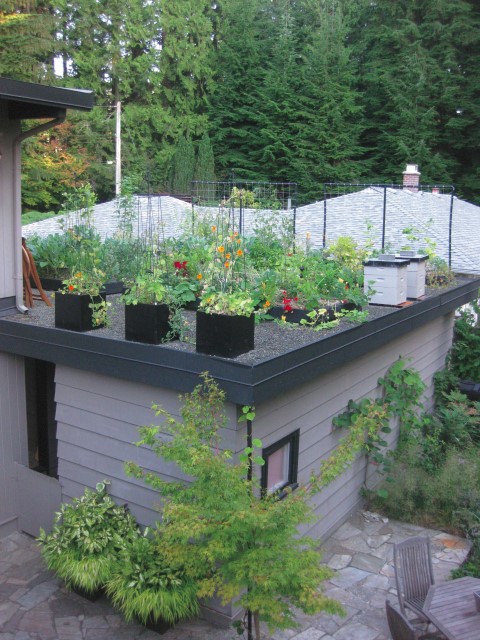 You can grow your vegetables on top of your shed or apartment building. First off, make sure that your rooftop can support walking and planters.
Then, use 2×4 fir on sleepers and make sure you allow 25cm of soil.
- Craft gravel to allow drainage.
- Fill with soil using weed block, note that you might want to use lightweight soil designed specifically for rooftop garden.
- Place soil in raised planters.
- And after all those steps done you can use them to plan watermelon, strawberry, and your favorite vegetables! Source.
8. Stunning CD Case Greenhouse
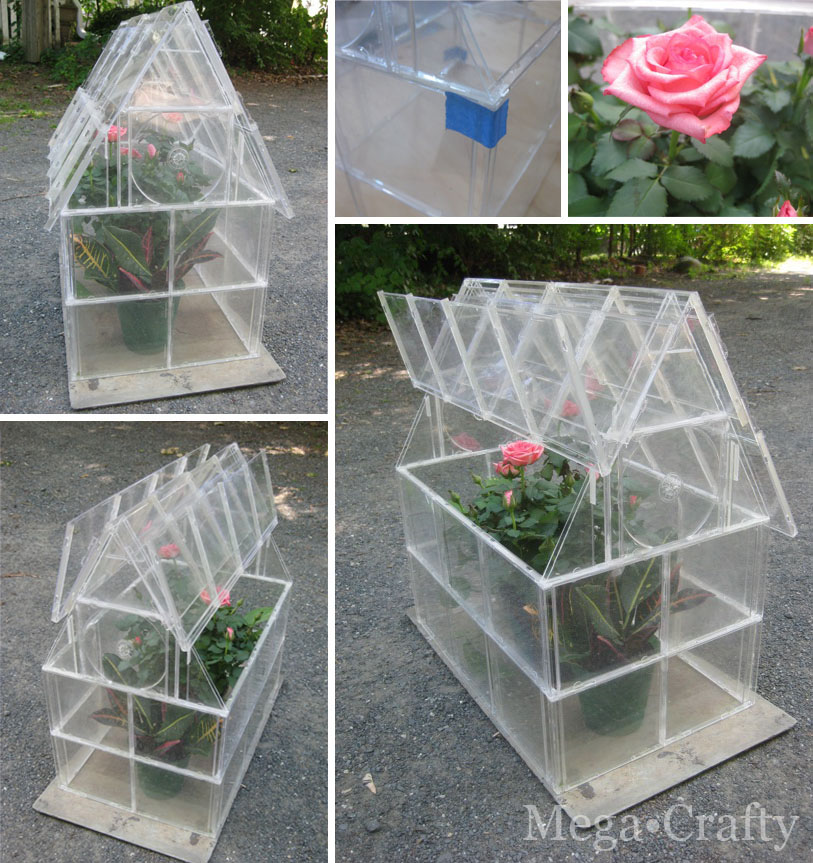 Make your rooftop garden ten times more spectacular by having a small greenhouse made out of a CD case. You will need about 40 cases for 11” x 18” x 20” in size.
- Make four walls with six cases for the side and four cases for end walls.
- Glue them all on the edges.
- Attach another CD in the middle of the wall and glue it.
- Next, you’ll need to cut cases to be placed on the wall peak.
- Bend four CDs in half and line them up to make the roof.
- Glue on the hinges of two cases and balance one on the top of the end of each wall.
- Finish the roof by placing panels for ventilation and watering purposes. Source.
9. Planter Ladder
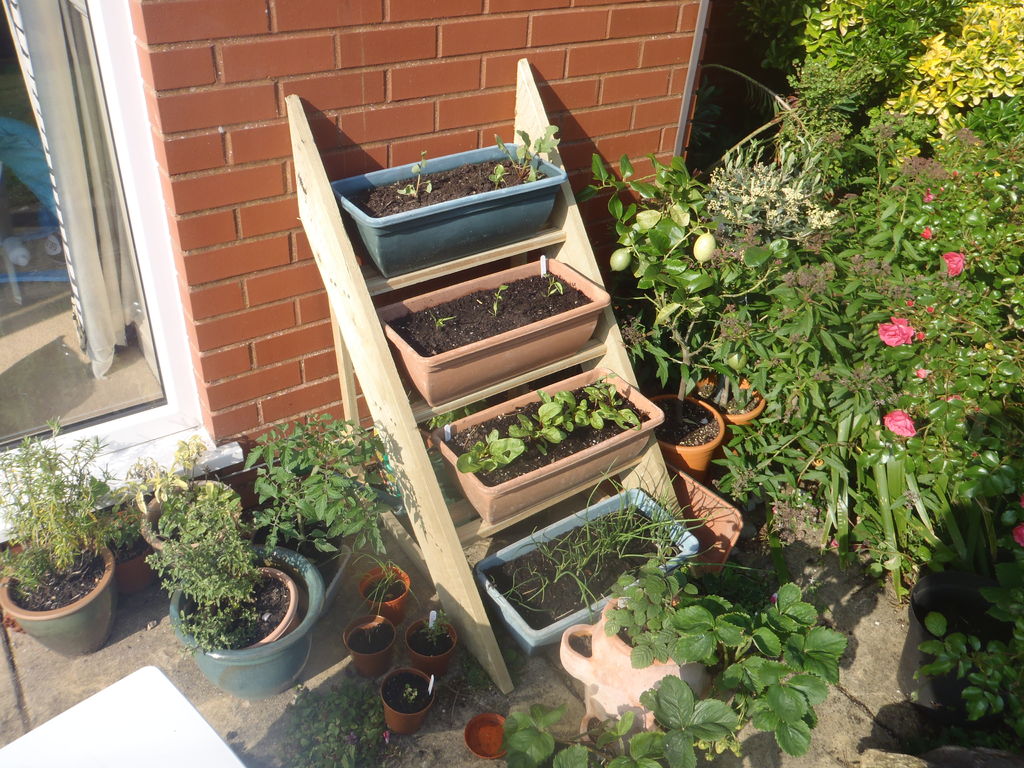 To the point, first, mark places of on scraps of planks where you will make shelves out of them about 200 mm between the shelves (about 25mm between each mark along the edge).
Hold the edges with screws and saw the top planks.
Lay another plank on top of the first one and lined up the bottom.
Use a larger drill bit to make shelf holes.
Create pilot holes and make support from the scraps of wood both on the front and behind the planter if there is no place to lean it on. Source.
10. Floating Succulent Terracotta Pots
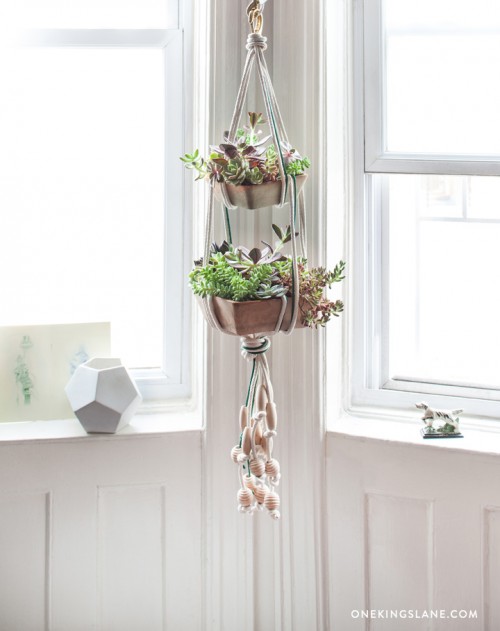 If your rooftop has a chimney, you can use the wall to hang your terracotta pots.
- Cut three 16 ft lengths of clothesline cord and just one green cord of the same size.
- Fold all of them in half and thread the midpoint through the snap hook and tighten it.
- Place one pot upside down and thread four cords through one of holes that allows drainage.
- Repeat this action to the other hole.
- Flip your pot and place the cord and move to position your other pot with the same method.
- Knot the remaining rope at the bottom and trim the hanging rope. Source.
These clever DIY organizing ideas for rooftop garden will totally transform your mundane plain roof.
Happy gardening!