Not enough space. The reality is you don’t have to be a hoarder to use up a lot of space in a tiny apartment or room. You move in. Set up a few things. And voila, you can’t seem to turn around without hitting something. It can be challenging to adjust to living in a small space.
But there’s no reason why you have to develop claustrophobia because circumstances dictate you have to do it small… for a while. Especially when there is no shortage of hacks to make organization in a small size bedroom a lot less nerve-racking and even a tad stylish.
FYI, This list or topic contains 2 different parts and a video. This first part will discuss point 15-11 and the second part from 10-01 is here, For your learning experience pleasure, I present you a video that I already referred to.

🔊15 DIY Organization Project for Small Bedroom Video:
That’s it. if you still want to go further down each idea I already previewed in the video, click the hyperlink inside the subheading.
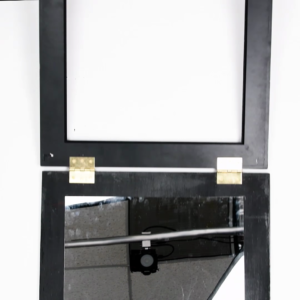
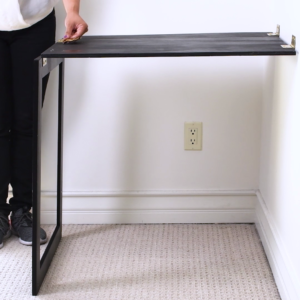
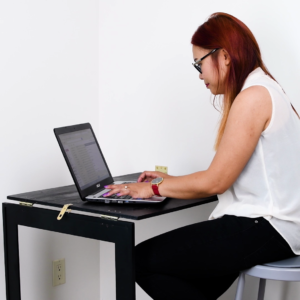
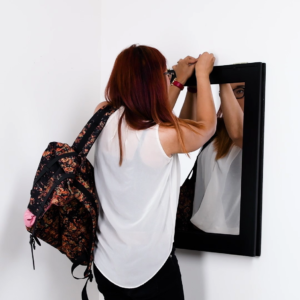
15. Mirror Folding Table
Overview :
The mirror/table combo fits the ‘multi-purpose furniture’ tag. Most times, it is (and serves) as a wall-mounted mirror. However, you could unfold it to be a table when the need arises.
The appeal of the mirror folding table stems from its simplicity, dual functionality, and the ease with which you could easily put it out of the way. It also adds to the aesthetics of the room.
On a basic level, it comprises two slabs of wood. One slab has the mirror; another slab has a cutout to show the mirror when folded. And both slabs are connected together and to the wall with hinges.
Things you need
| Materials | Tools |
|---|---|
| TWO wooden boards OR a board and a picture frame | Power, wood, and masonry drills |
| Mirror and mirror adhesive tape OR Reflective acrylic sheet and industrial glue | Pencil, ruler, and protractor |
| Metal hinges | Jigsaw |
| Acrylic paint | Paint brush |
| Masking tape | Sander or sandpaper |
| Screws | |
| L-Hooks OR Hasp and hook |
Alternatively, you could list them.
The DIY Process
Method 1
First phase
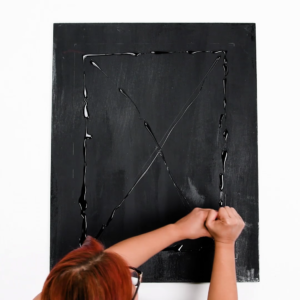
Start on the first wooden board. It’d serve as the table leg and frame for the mirror. You’d have to make a rectangular opening (cutout) in the wood.
- Step 1: Mark out accurate guide lines by drawing a rectangle (using your pencil, ruler, and protractor) matching the size of the mirror.

- Step 2: Drill holes in each of the rectangles four edges.

- Step 3: Use your jigsaw to saw out the rectangle starting at the edge holes.

- Step 4: Grind the insides of the cutout with sandpaper or a sander.

Second phase:
Paint both wooden boards and hinges with acrylic paint. Wait for the paint to dry, and then proceed to the third phase.
Third phase:
Connect the frame to the second board—that would serve as the tabletop. Afterwards, attach a mirror to the underside of the second board.
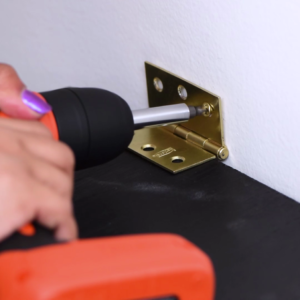
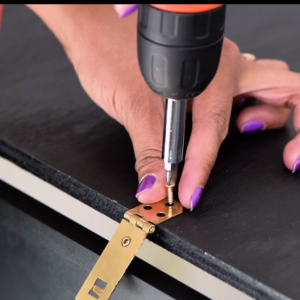
- Step 1: Use two metal hinges to connect the frame (or table leg) to the second wooden plate. Before you screw, confirm that they are in a right position.

- Step 2: Place the mirror in the middle of the [second] panel’s underside. Use a masking tape to mark its position.

- Step 3: Stick mirror adhesive or mounting tape to the mirror’s back.

- Step 4: Place the mirror on the marked position. Press firmly for a snug fit. Then, remove the masking tape.

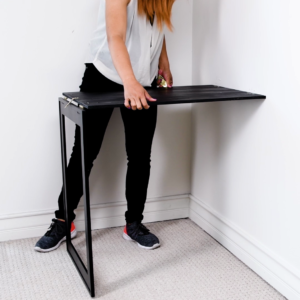
Fourth phase:
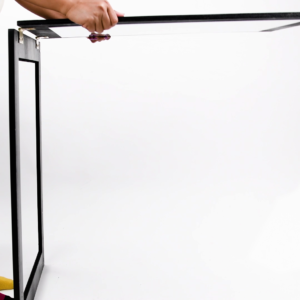
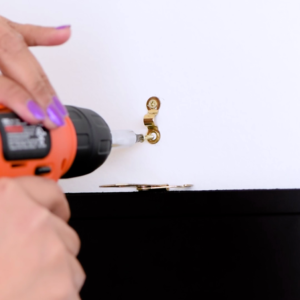
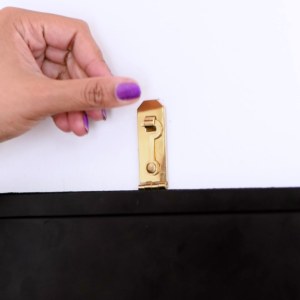
Use metal hinges to attach the tabletop (with an underside mirror) to the wall. The hinges enable you to fold the table when not in use. Subsequently, you attach two L-hooks at opposite sides (left and right) of the folded boards. They’d secure the boards, and in so doing, make the mirror visible.
- Step 1: Using the trio of masonry drill bits, suitable wall plugs, and screws—in that order—attach the tabletop to the wall with hinges.

- Step 2: After folding the table, attach two L-hook on its left and right to lock the table on the wall.

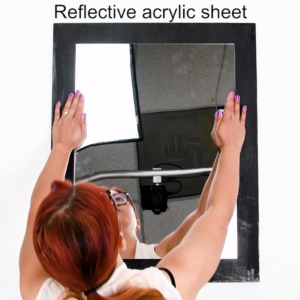
Method 2
This method is a lot similar to the first. Except you’d use slightly different components. They include:
- A wooden board and a picture frame, rather than two wooden panels;
- A reflective acrylic sheet (and industrial glue), rather than a mirror (and mounting tape); and
- A hasp and hook; rather than two L-hooks
Step 1: Paint the wooden panel and picture frame. Confirm that they are of the same size before you proceed.
Step 2: Apply industrial glue to the area where you’d attach the acrylic sheet. Afterwards, attach the sheet.
Step 3: Connect the wooden plate to the picture frame with heavy-duty hinges.
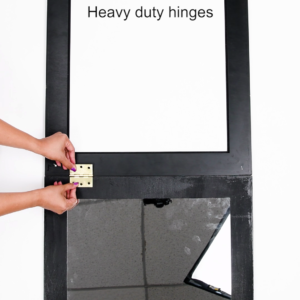
Step 4: Set the frame as the table leg and the panel as the tabletop, such that they are at a 90-degree angle. Move the setup to the wall, and connect the tabletop (panel) to the wall using heavy-duty hinges.
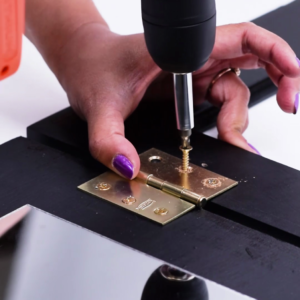
Step 5: Screw the hasp at the end of the tabletop where it makes a 90-degree angle to the frame. Try to position it at the center of the end’s length.
Step 6: Fold the frame up and mark the top center where the hasp and hook will fit.


Step 7: Screw the hook. Then ensure the hasp and hook fit securely.
Detach the hasp and hook to use as a Murphy table. And when you’re done, fold it up to serve as a mirror.
Additional tips
- Reduce cost by using salvaged wood or old HT stamped pallets.
- You could use a picture instead of a mirror or acrylic sheet.
Also read:
10 Outstanding Loft Bedroom Ideas and Improvements
10 Small Bedroom Ideas for Women (Renovation and Improvement)
10 Bedroom without Bed Ideas
10 Tiny Bedroom’s Bed Ideas
10 Tricks to Deal with a Very Tiny Bedroom
10 Furniture Layout for a Small Bedroom
14. Minimalist Oak Desk
Overview :
If you’re thinking of a cool, impressive, crafty weekend project to get busy with, this is it. It is a stylish, standard desk, but with an opening for storage. It isn’t complicated or anything. You only need four wood pieces (actually two boards that you’d later cut in four). And a bunch of supporting materials—screws and brackets mainly.
Things you need
| Materials | Tools |
|---|---|
| TWO 6 ft. oak boards | Power drill with drill and screwdriver bits |
| THREE 4” metal L brackets | Stud finder |
| TWELVE 2” wood screws | |
| Tung oil (optional) |
The DIY Process
- Step 1: Cut each oak board into a 5 ft. section and a 5” section. The longer sections are for the tabletop and bottom panel. While the shorter sections are for the sides.
- Step 2: Place a side section perpendicular to the bottom board at one end. Use the electric drill to bore three pilot holes (for the screws) that cuts through both the bottom board and the side section. Repeat on the other end with the second side section.

Step 3: Using three L brackets screwed into studs, mount the top board (tabletop) to the wall.
- Step 4: Connect the bottom board to the side sections with screws. Afterwards, connect the side sections to the top with screws.
- Step 5: To give your new oak desk better protection, apply tung oil. It’ll darken the wood slightly but wouldn’t erode its matte finish.
13. Inverted Bookshelf
Overview :
That looks a bit weird, right? And it’s not so much about its cool factor. It’s also about the effective use of all available space. You can organize your books on both surfaces of the bookshelf.
It looks futuristic. But it’s actually fairly easy to put together.Besides the obvious basic materials for the bookshelf, all you really need is a staple gun and elastic webbing.That said, inverting a book doesn’t negatively affect its lifespan, in case you’re worried about that.
Things you need
| Materials | Tools |
|---|---|
| A wooden board | Measuring tape |
| TWO brackets and screws | Staple gun |
| Elastic webbing | Power drill |
The DIY Process
First phase
Ascertain the ideal length of elastic that’d be good enough to support all your books without crushing any of them. You’d have to measure out your books to figure this out. For the books in the illustration images, the ideal elastic length was 14”.
Second phase
Staple two equal lengths of elastic on the board.
- Step 1: For each length, start with the excess facing in (not out).

- Step 2: As in the image above, staple the excess in place and fold the elastic backwards (back over) to start running it down the board.
- Step 3: After stapling the excess, measure out 14”, and then staple it one inch further.
Alternatively, after stapling the excess, measure out 14”, fold the next one or two inches to have two layers, then staple it to make it extra secure. The short clip below previews this method. Check full version here
- Step 4: Repeat step 3 until you get to the other end. Then fold the excess back in again before stapling.


Third phase:
Slide your books in the straps to test for secure fit. In general, the double strap configuration would be perfect for large books. Medium sized books may need one strap with the other squished behind it. Much smaller books may require only one strap to avoid compression.
Fourth phase:
If your test ran smoothly, remove the books temporarily, then add brackets to the other side of the board, and screw it to the wall. You may also want to hide a few L brackets underneath as well for extra stability.

12. Floating Bookshelf
Overview :
If you’ve got a small library of books that are eating space on a desk, table surface, or can’t seem to fit anywhere without cluttering; you may want to consider this floating shelves concept. It is stylish, but doesn’t require a ton of effort (or materials). It is basically a tall spine (board) supporting a few shelf boards. Doesn’t get any simpler than that. And stacking books vertically is more of a visual treat that deviates from the traditional upright organization of books.

To get the job done…
Things you need
| Materials | Tools |
|---|---|
| A 5.5 ft. tall wooden board | Drill with rabbet bit and countersunk bit |
| SIX 11.5” square boards | *Paint brush (optional) |
| Countersunk screws | |
| Paint (optional) |
The DIY Process
First phase
Measure and cut out the proper board size for the spine (that’d serve as the back support) and shelves (that’d hold the books).
- Step 1: Cut a 1” x 3” board that is 5.5 ft. long.
- Step 2: Cut six square shelves measuring 11.5” x 11.5”.
- Step 3: Use a rabbet bit to make six rabbet cuts on the back support for the shelves.
Make the first rabbet joint 7.5” from the top. The next four joints should be 10.5” from the preceding joint. And the last joint should be approximately 4.5” from the bottom.
 Second phase
Confirm that the shelves fit the rabbet joints you made. Third phase
Use countersunk screws to attach each shelf to the support board securely. Afterwards, consider adding a little extra support to the underside of the lower shelves where you’re likely to store heavier books.
 Fourth phase
You may want to apply paint at this point. After which you mount the setup into a stud in the wall, using countersunk screws.
Also read:
12 Space Saving Furniture For Bedroom Ideas
12 Beds and Bedframe Ideas for A Perfect Bedroom
12 Improvement Ideas for a Neutral Bedroom
12 DIY Storage Boxes for the Bedroom, Kitchen, and Living Room
12 Modern Minimalist Bedroom Design and Makeover Ideas
11. Floating Shelf with Built-In Light
Overview:
As you’d notice, a recurrent theme among most ideas on this list is adding extra storage. It seems like you can’t have enough storage in a small apartment or room.This DIY—a floating shelf with built-in light—is simple, creative, and offers extra lighting in addition to storage. It is the ideal thing to place in one of those nooks where a traditional furniture really wouldn’t fit (or look right in).
Full disclosure: you’d have to do a bit of wiring (there’s a bulb). But no, it isn’t as hard as it sounds. It’s really easy, and if you’re a rookie at wiring, now’s the time to pick up a valuable skill that’d come in handy.
Things you need
| Materials | Tools |
|---|---|
| TWO 14” long wooden boards | Drill with hole saw, drill bit, and screwdriver atts. |
| Edison bulb | Wire strippers |
| TWO D-ring hangers and THREE screws | Small screwdriver |
| Plug and socket with 2 shade rings & a switch | Needle nose pliers |
| Cord and strain relief |

The DIY Process
First phase
Wire the socket for the bulb.
- Step 1: Use wire strippers to strip about half an inch of wire on one end of the cord. If the wire you got is cotton-covered, use sharp scissor to cut the cotton away first.
- Step 2: Disassemble the socket and push down the strain relief, socket cap, & threaded washer over the wire for unfettered access.
- Step 3: Wrap the copper end of the wires around the appropriate screw. The white wire connects to the silver screw, while the black wire connects to the gold screw.
- Step 4: Tighten the copper of each wire around the screws using the needle nose pliers. Afterwards, use the small screwdriver to tighten the screws.
- Step 5: Reassemble the socket, attach the strain relief, and tighten down all screws.
Second phase
Wire the plug.
- Step 1: Use wire strippers to strip about half an inch of wire on the opposite end of the cord.
- Step 2: Disassemble the plug and push down the cover over the wire for unfettered access.
- Step 3: Follow steps 3 and 4 of the first phase—securely connect and tighten the wires to the appropriate screws.
- Step 4: Reassemble the plug and tighten down all screws.
Third phase
Set up the shelf.
- Step 1: Place the horizontal board below the vertical board. Then use a drill to bore three roughly equidistant holes that cuts through both the bottom (horizontal) board and the vertical board. You may use small clamps to hold both boards together while drilling.
- Step 2: Use the screws to connect both boards to assemble the shelf.
Fourth phase
Make a hole for the light.
- Step 1: Affix the hole saw attachment to the drill. Ensure that the hole saw diameter is wider than the socket, but smaller than the outside diameter of the shade rings.
- Step 2: Use it to drill a hole through the horizontal board of the shelf. To make a clean cut, drill about two-third of the wood from the top. Stop. Then flip it over and drill the rest of it from the bottom.
 Fifth phase
Attach the shelf to the wall and insert the light in the shelf.
- Step 1: Attach two hangers on either side of the back of the [vertical piece of the] shelf. Then decide on a location where the shelf light would be out of reach of kids, animals, and clumsy adults. Afterwards, mount the shelf.
- Step 2: Slide the socket into the hole you made (in the previous phase). Thread a shade ring on either side of the shelf to hold the socket in place.
- Step 3: Screw the bulb into the socket. And plug the light in.