In this post, you will learn some of the cleverest furniture makeover ideas you can use for your own benefit. It covers some of what we think are the best ways to make a living room set from drab and bland to amazing! This includes not-so-easy things like making the most of your space or choosing the most ideal furniture makeover that won’t leave a hole in your budget.
However, Don’t worry if you’re on a tight budget or if you want something simple but stunning for your home; there are plenty of low-cost, high-impact design ideas we’ve come up with in this blog post, too, or this website in general.
As always, Simphome presents you with the list.
5 Inspiring Furniture Makeover video ideas:
Part 3: 3 Creative Bed Designs for Small Bedroom and 3 DIY Creative Shelving ideas:
1. Ceiling Storage For Bed
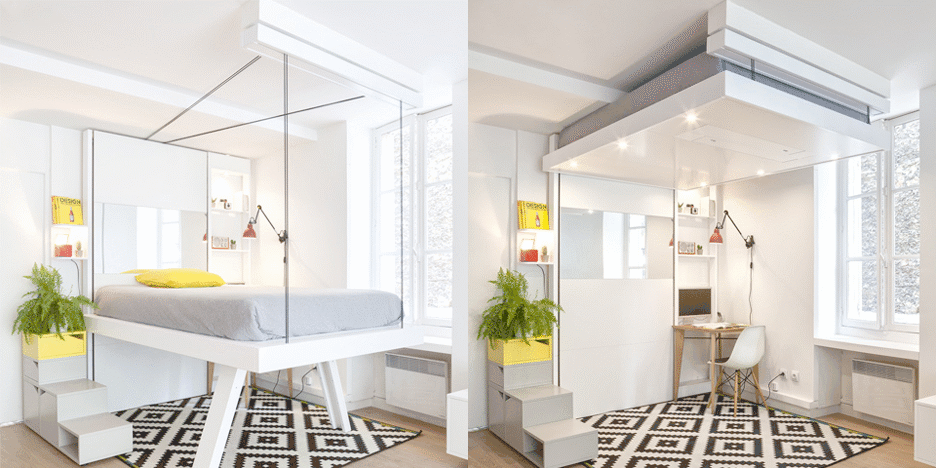 Most are familiar with the Murphy bed, which allows users to fold it against the wall when it is not in use. While this most definitely saves space, having your bed on the ceiling will give you the maximum amount of square footage of your room.
Though its origins are from a French manufacturer, the idea in place is essentially a pulley system for the mattress and frame. Do not be intimidated by the notion, as the installation isn’t nearly as complicated as it sounds, with Ikea now dipping its toes into this forum.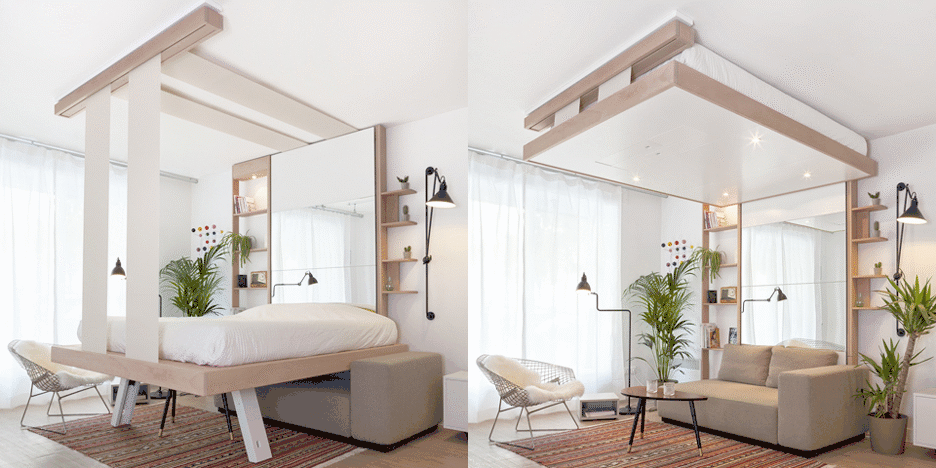
Tip: If you decide this route is for you, use a preexisting frame by BedUp (or a similar competitor) that raises and lowers the mattress but still gives you the freedom to determine the sleeping space height.
2. Compact Living Style Storage Bed by Yesul Jang
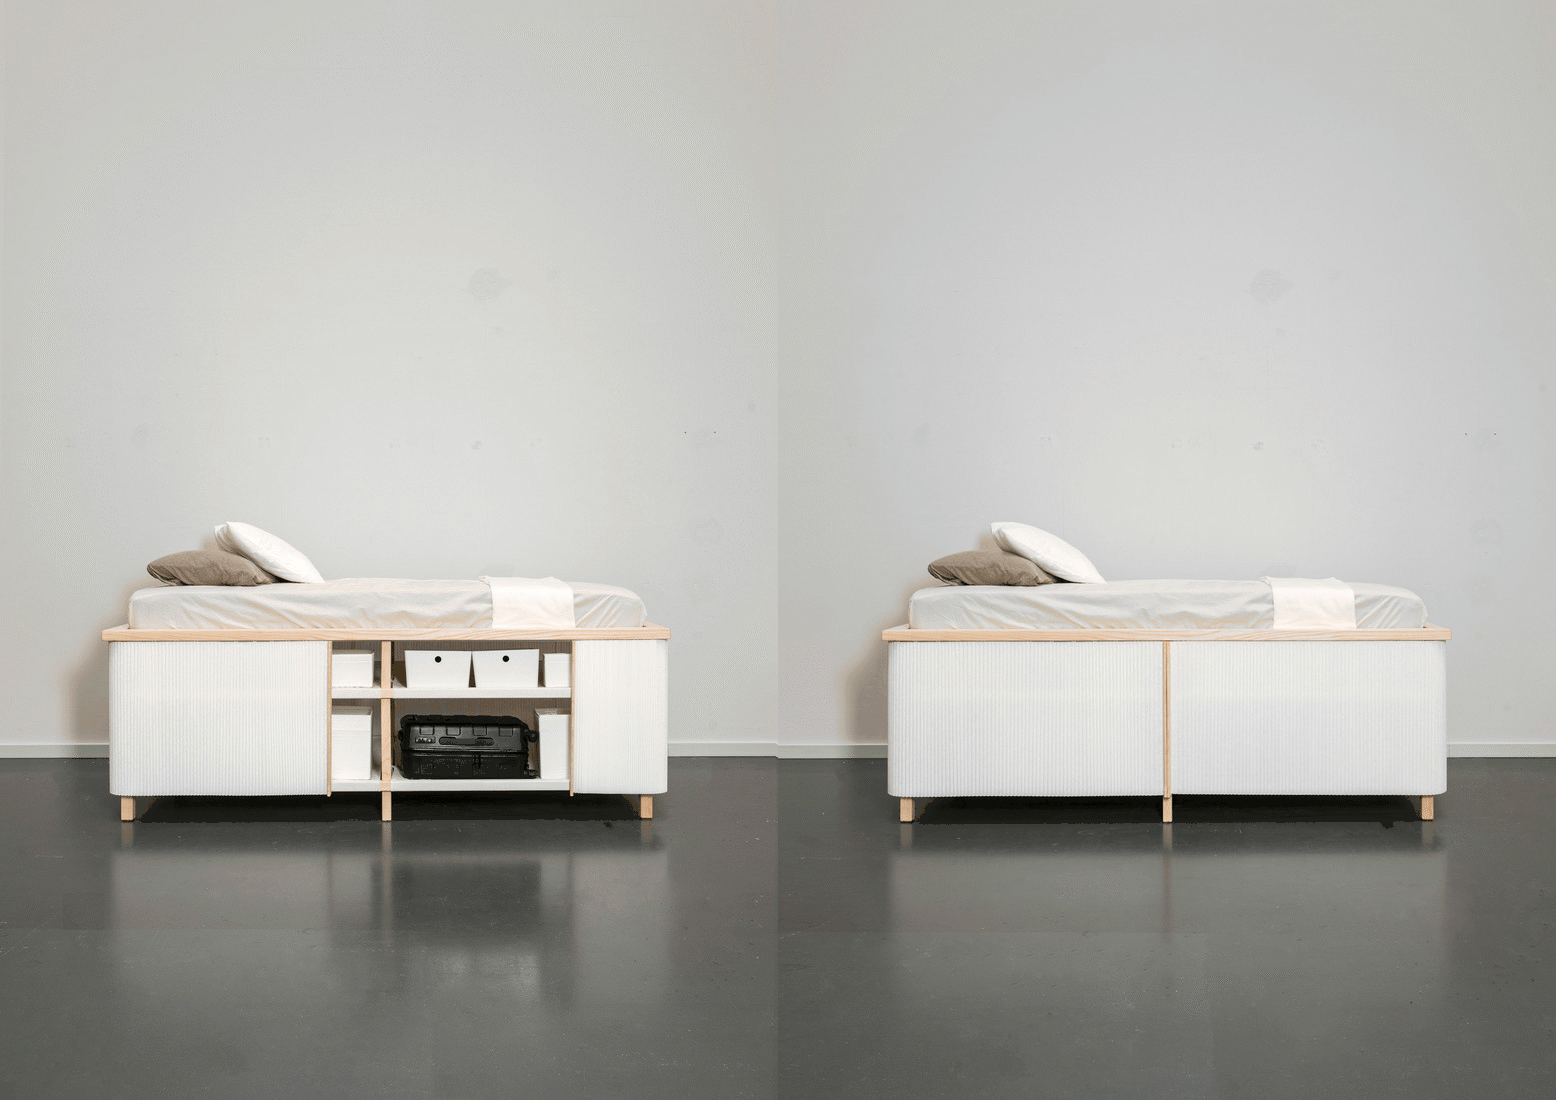 Graduate Yesul Jang was the original mind behind the millennial bed that is raised to waist level so items like dorm room accessories can all fit underneath, as sort of a makeshift bunk bed of practicality.
Additionally, a fabric curtain can cover your belongings so that they are not in view at all times. In using such a curtain, they are cheap and quick to replace if they incur damage. Because statistically sleeping space and storage take up the most real estate in a dwelling, it is a natural blend to pair them in the same square footage.
Rearranging furniture is enough to give anyone a headache, and never is this more true than shifting beds. Their cumbersome size and stature will make you tear your hair out, but fresh ideas have come to fruition on how to make hiding them more practical.
One such solution is an accordion-style panel of wooden strips that are each connected by hinges on both ends. In essence, the platform folds into a drawer, with one piece of wood folding on top of another as if you are stacking them. When the drawer is pulled out, the wooden frame of the bed pulls flat, with the hinges flush making a level surface for the mattress. That’s it. | Source 1, 2.
Next, you’re going to learn the 3 Creative Shelving Videos, but before that, I am giving you a video gallery related to our topic. This is 100+ ideas on how to convert your limited bedroom into a calming sanctuary
If your goal is to bring more neutral colors into the flow of your room, you may want to try a Scandinavian-style nightstand. Using 10 pieces of unfinished, non-stained wood, a beautiful and simple creation can be brought to life. The wood components include a top sized appropriately at 14″ by 18,” along with a bottom of 13.25″ by 18.”
Video related to this entry
With a front and back measuring 6.75″ X 16.5″ the dimensions will create a desk-looking nightstand that has the ideal width for one drawer. The length houses a lamp and clock without looking cluttered or distracting.
2. Moebe Large Shelving System
If you do not have the skills and patience with a set of tools and would prefer to keep your large living areas organized, the Moebe large shelving format is prudent. Capable of taking up an entire wall, the system utilizes wooden wedges to keep shelves from moving. Rounded steel uprights connect to the shelves in seconds by being placed through the pre-drilled holes.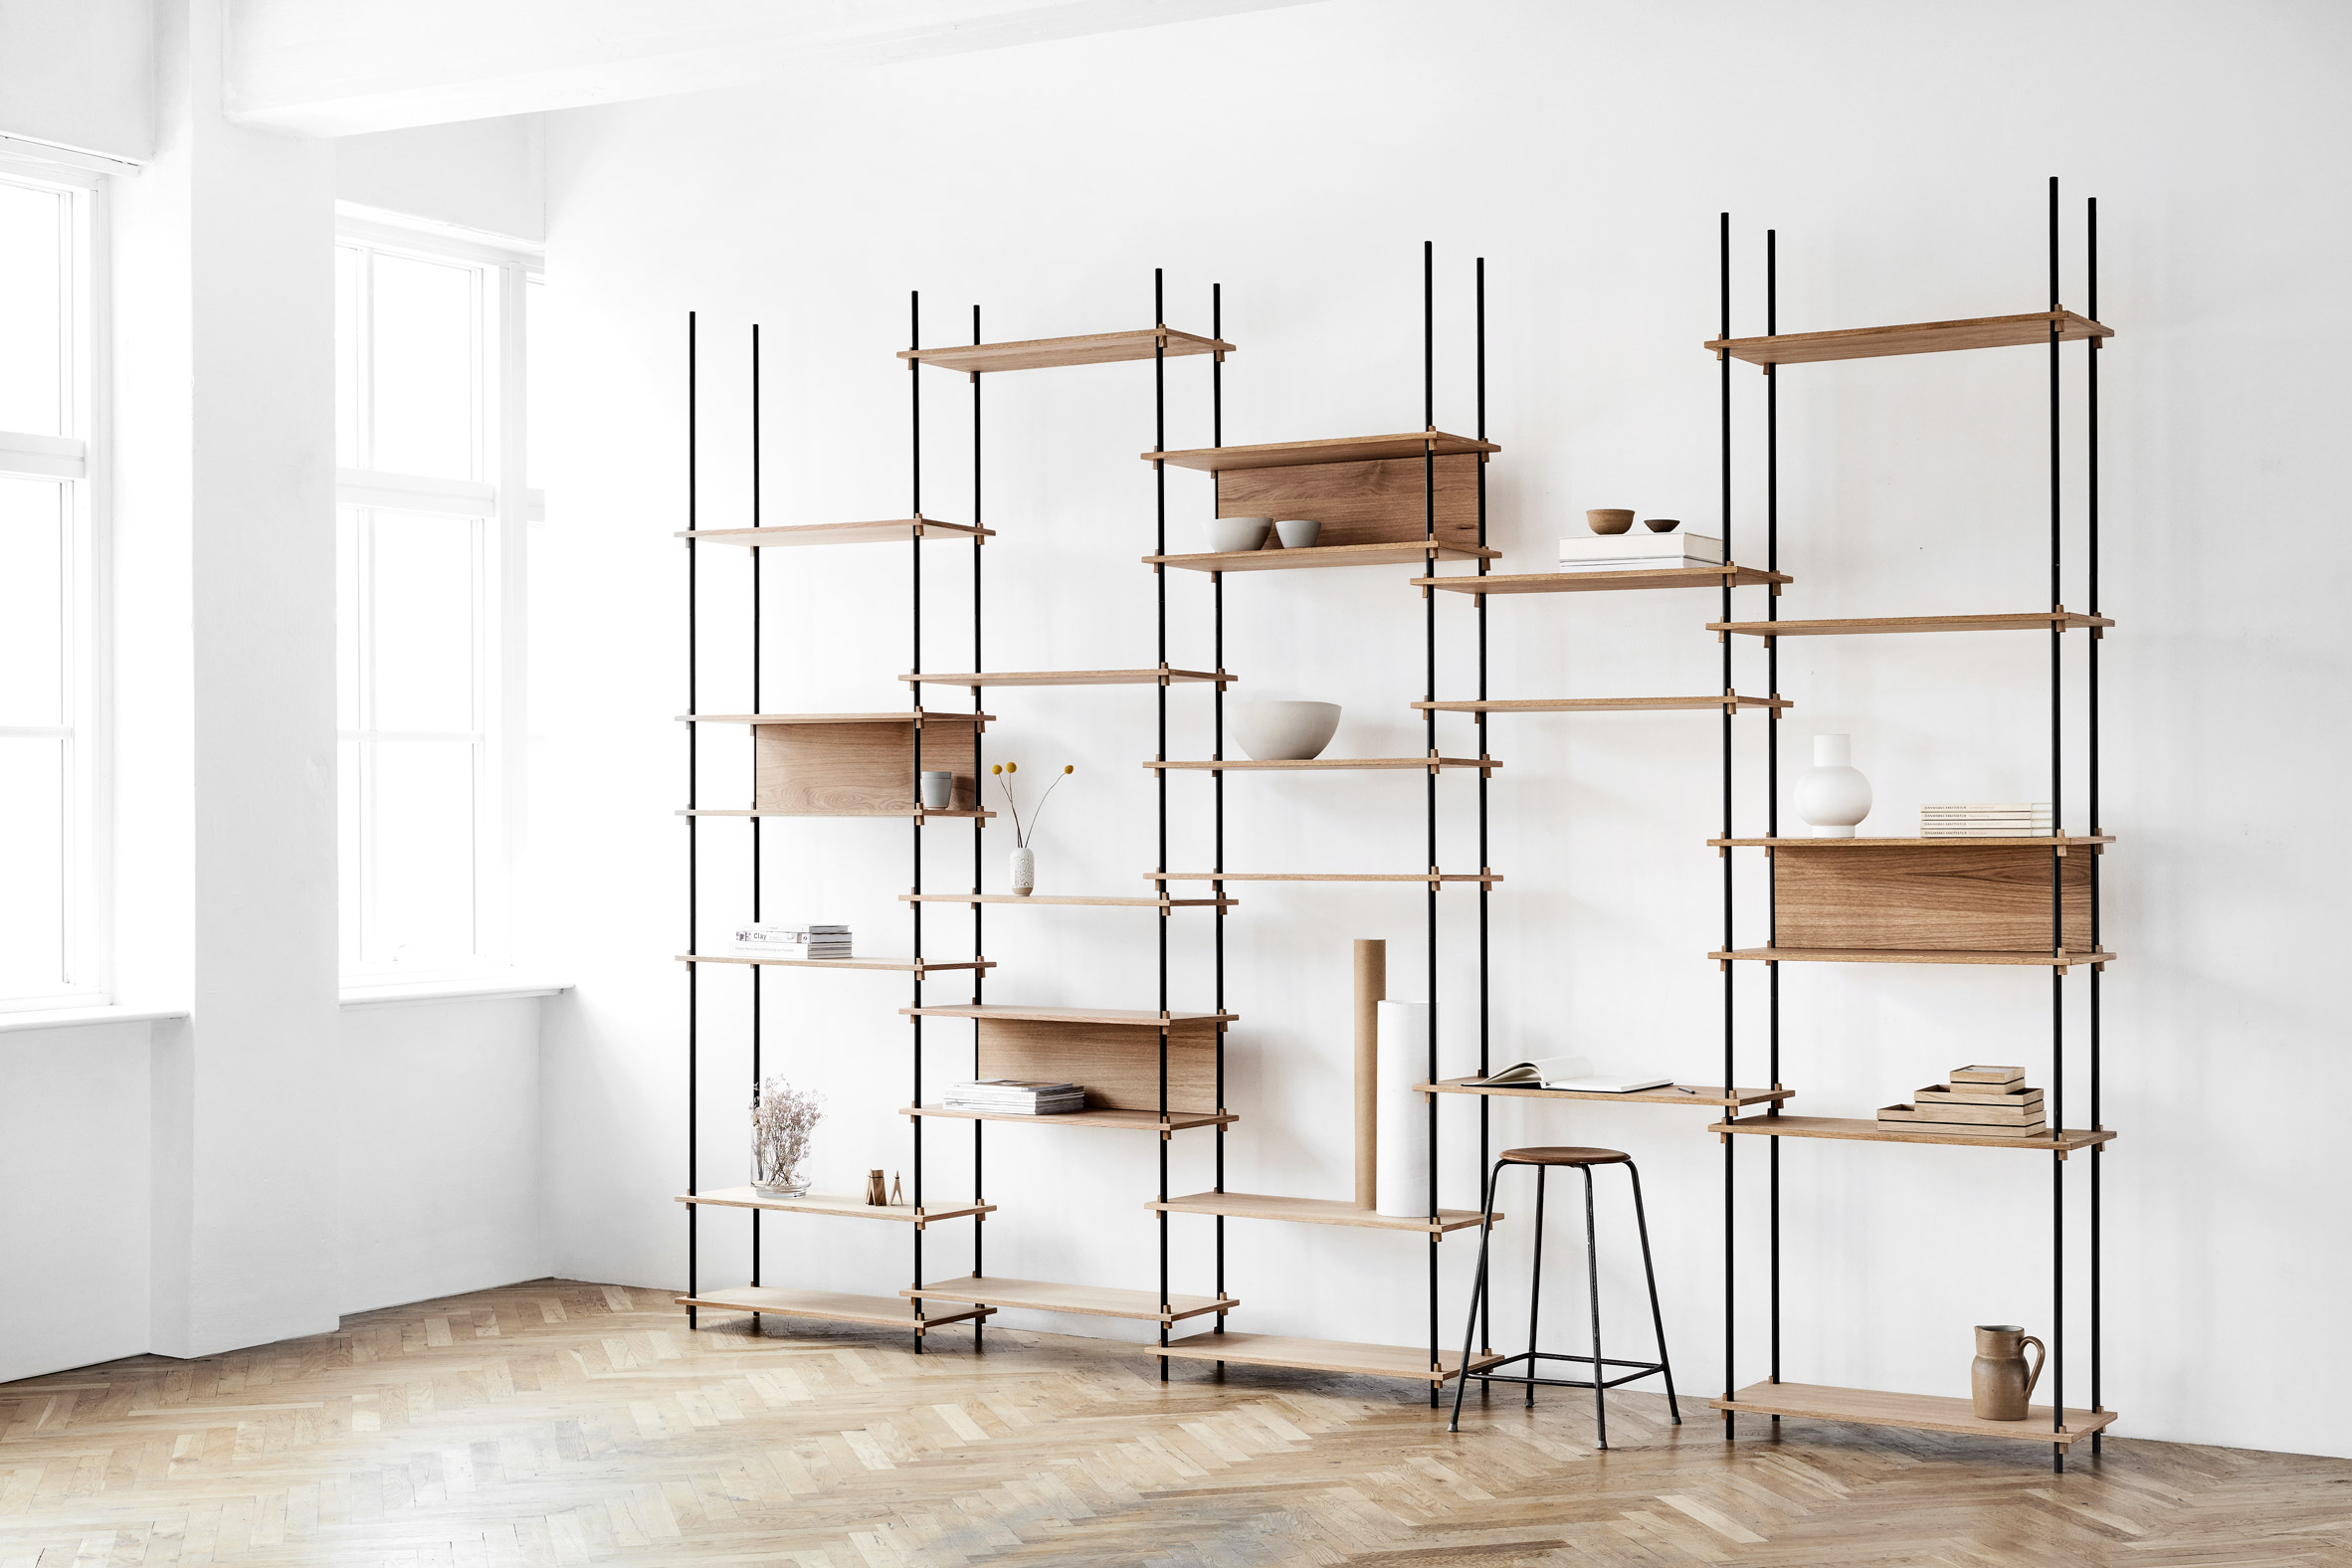
Black stained ash wood and oiled oak offer two diverse palettes to blend into any setting. The Moebe approach is the most painless experience possible from start to finish to consolidate messy rooms fluidly without brackets, glues, and other frustrating elements that slow you down.
3. Flexible Shelving System from Benjamin Hubert
Differing from the Moebe shelving system is the Benjamin Hubert-inspired flexible alternative known as ‘Shift.’ The idea behind its foundation is derived from retail outlets, which are in frequent need of swapping out their displays. The genius of the setup is that magnetic panels are mounted to the wall, with shelves having the capability to be moved at the drop of a hat.
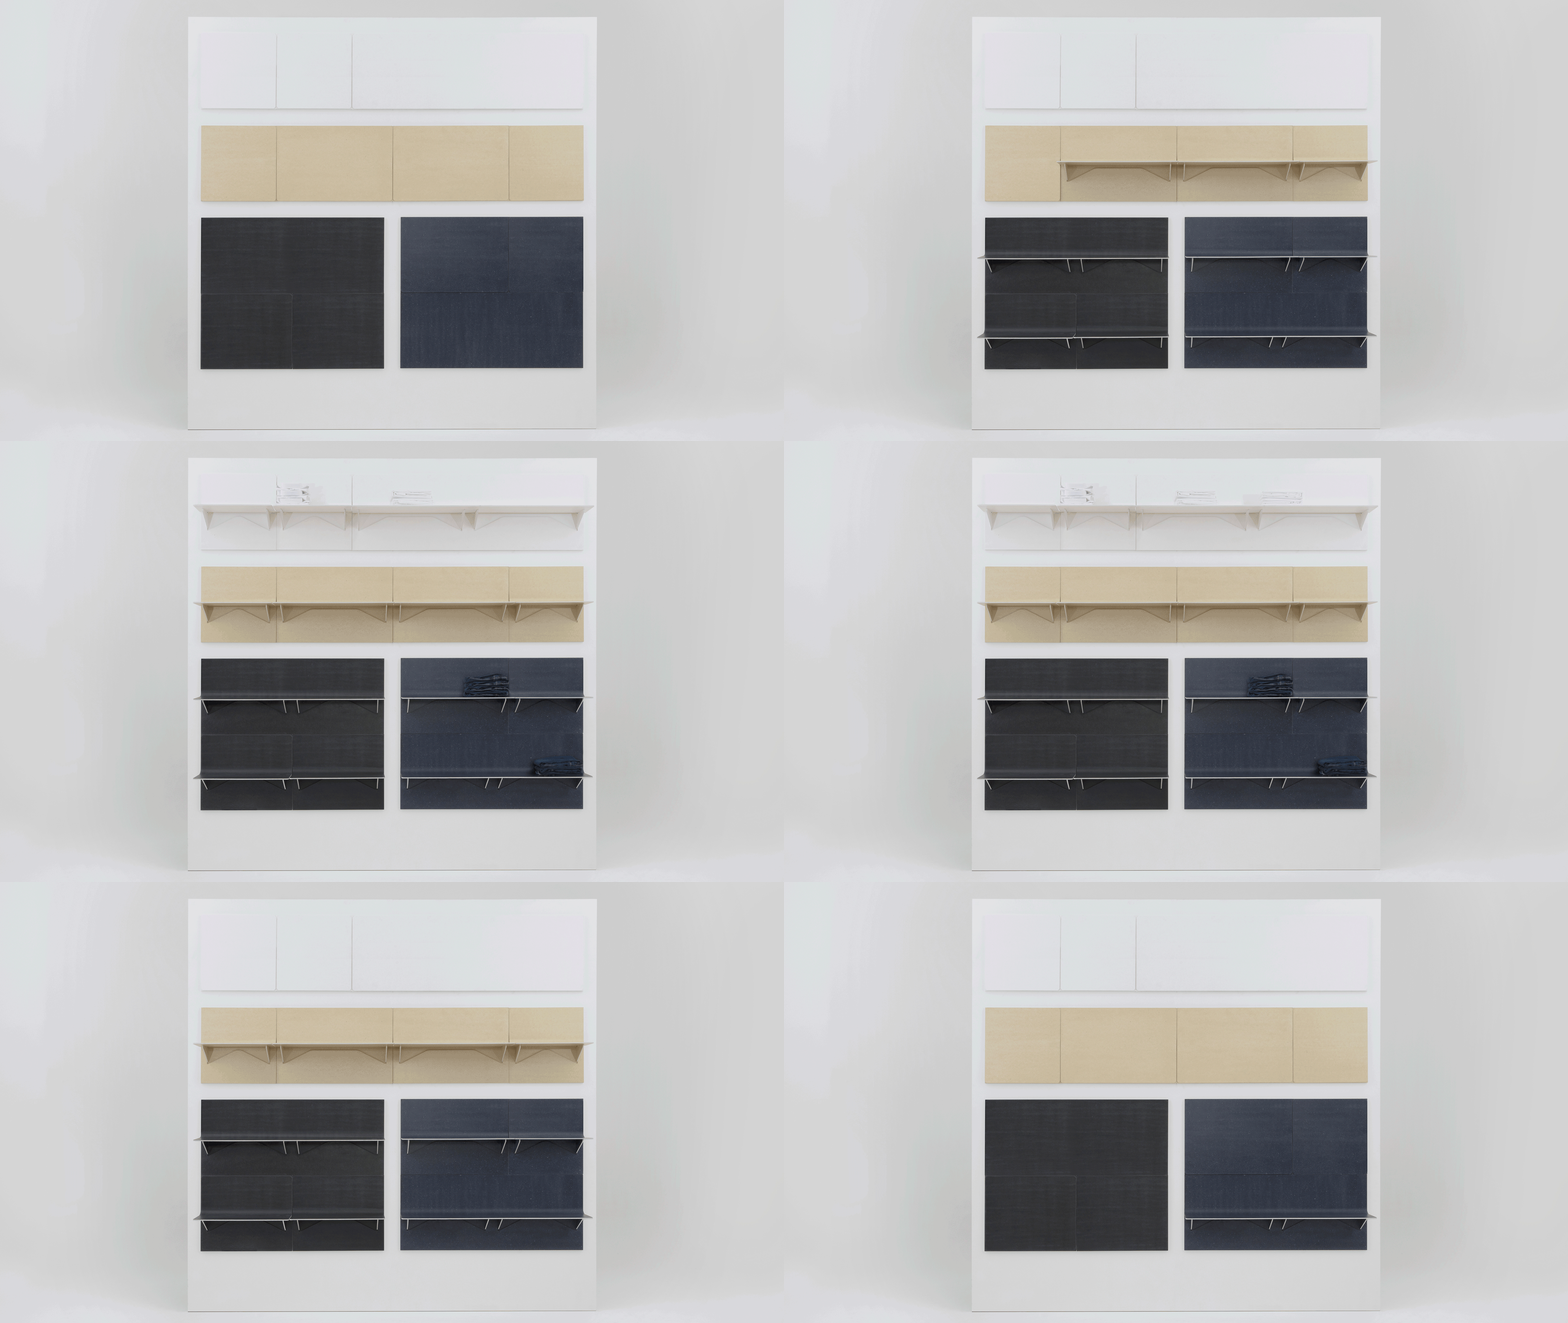
This process can be done at home, by lining each shelf with a magnet on the bracket that will hold it in place on the panels. With both the base and shelf boards connecting by these magnets, changing the style and appearance of the furniture can be accomplished in seconds.
Part 2: 3 Creative ways how to makeover a room:
1. Multi-functional Pallet Coffee Table with Storage
By installing two heavy-duty castors and hoisting mechanisms, following the design of a roll-out bed, you have the ability to have two pallets stacked on each other, with the top extending outward on a track.
The best way to envision the design is to imagine how a multi-layered toolbox is pulled out. Underneath the pallet is a plethora of storage space that is covered when not extended. Detail
2. Folding Vintage Dinner Table
.
Taking a standard folding table and turning it into a vintage spot for eating is just a matter of a few steps. As they are, the metal on these tables is boring and unappealing. The initial step is to spray paint the legs with a color tone that is bright and shiny. Then, using liquid nails, coat the entire surface, whereupon you will place 3 slabs of wood that act as the surface.
Leave an overhang on both sides so you can use leftover wood to screw in borders to hide the plastic elements. After sanding the wood, a simple cherry stain will have your new table complete and ready to serve!
Tip: Gold paint on the legs of the folding table works exceptionally well in adding to the value and overall appearance of the piece.
3. Fire Bowl for Your Tabletop
We are familiar with fire bowls to enhance our backyards, but what about placing one on your tabletop? Mix a generous amount of concrete and fill a large, sturdy bowl with it less than half of its depth.
Then place a smaller bowl inside the larger one and let set. After the concrete has fully dried, flip the bowl and tap gently, which will release the bowls you used as molds. Then place a fuel can in the center, covered by chicken wire and surrounded by decorative rocks. Done.
Part 1: 3 Creative ways how to makeover a room
1. Headboard Made Out of Pegboard
Pegboard is a wonder to use because it is extremely useful and cost-efficient at the same time. In mounting a series of pegboard panels above your bed, you have the ability to create real estate the size of your wall as far as storage and practical application. All that is required are drywall screws and a bit of ingenuity.
Pegboard is also the perfect backdrop for mounting picture frames and baskets that can hold alarm clocks, journals, and anything else you do not want cluttering your nightstand. The best aspect of utilizing pegboard is that it is easy to swap out the pegs and change up the design aesthetic in a matter of minutes.
2. Piping Table You Can Assemble Yourself
Exactly as it sounds, putting together a table made out of pipe maximizes space and brings a rustic flavor into your home. A thin pipe that is aged or weathered makes for the best material, and measuring equal parts for each leg is the extent of how difficult this DIY project is.
Because pipe has unfinished ends, it is simple to mount rollers on the bottom, and a bracket to attach the surface on top. Connectors for a piping table can be acquired at any hardware store, as long as you know the dimensions you are seeking.
3. Sliding Barn Door Cover for Your TV
By mounting pipe above your TV set, hooks can be screwed into two aged pieces of wood that serve as your doors. They connect to the pipe as a shower curtain would to a rod, giving you the flexibility to close and open them at will.
When the two barn doors meet in the middle, your TV is hidden and it looks like a decoration. Spread apart, and you can access your media in seconds.
That’s it for now.
Next, I’ll give you
5 Furniture makeover ideas: IKEA Ekby Floating makeover, A Standing desk, A side pool table, etc (Details)
When you look around your home you may see a flurry of cluttered areas and problematic décor choices. However, with some imagination, effort, and creativity, your furniture can have a sparkling and innovative look that is both cheap and efficient in its use. So, what are some ideas that may be worth your time? Here are 5 ideas for you to try.![]()
1. Ikea Ekby Floating Vanity idea
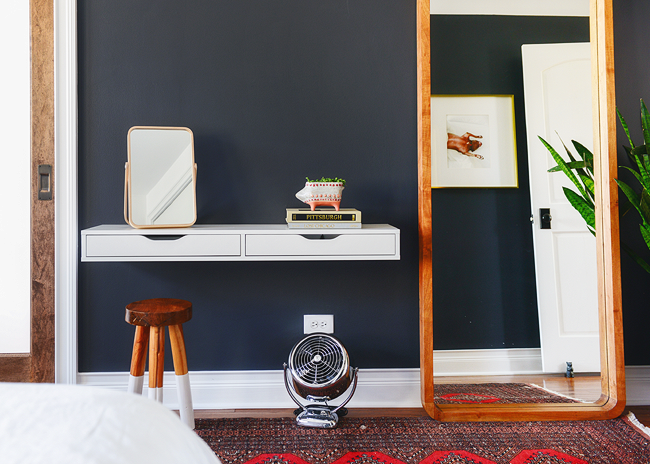
Inexpensive yet durable, the Ikea Ekby can be transformed into a vanity that floats to minimize heavy furniture against the wall while at the same time giving an ample flat surface to display items you choose to not place in the drawers.
In removing the back of the unit, heavy-duty 3″ corner braces work flawlessly to mount the vanity securely while keeping the toggle bolts hidden from view. The 12″ depth offers generous space without coming out too far into the room, and if mounted at waist level, can be equipped with a chair or used as a storage area underneath.
2. A Standing Desk makeover idea
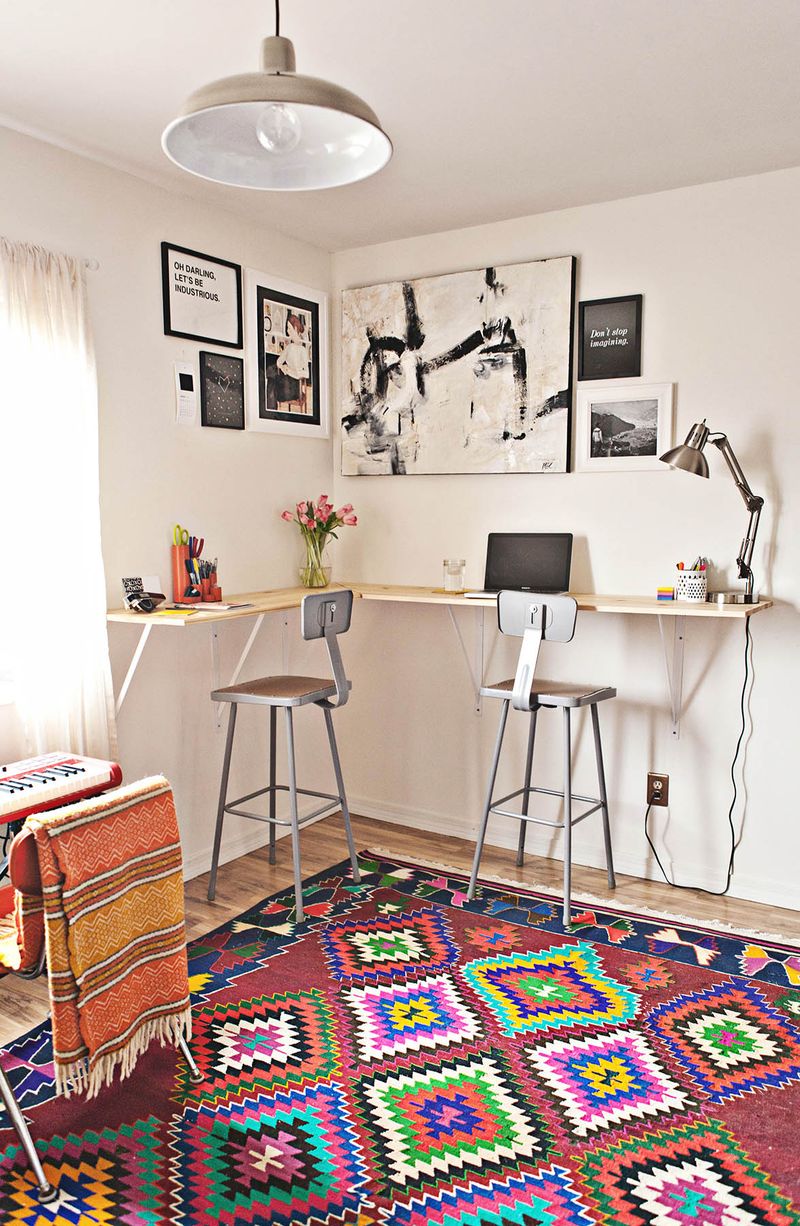
Creating a wraparound standing desk is advantageous for a myriad of reasons, starting with the fact that there is a wide workspace that remains uncluttered at all times. Attaching shelf brackets to the wall first before implementing the desk surface will allow you to make sure it will be perfectly balanced when the wood is placed on top.
By using two separate walls to brace the desk, you are guaranteeing it will remain sturdy, even if you have trouble locating the studs. Once complete, high bar stools on one end and a free-standing area on the other will give you full autonomy as to how to use your new workstation.
Tip: Use pine board to make customization to your room dimensions a breeze to cut and install.
3. Tricked Out TV Tray Table idea
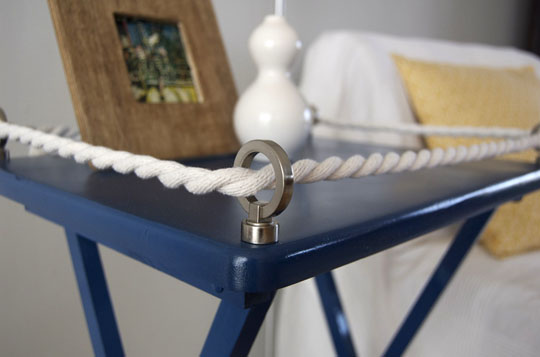
The eyesore when dining in front of media is no more when you deck out (pun intended) a TV tray in a nautical style. With the ability to be completed on a budget for under $12, a small can of blue or gray paint, 4 hooks, and some rope can go a long way.
By giving it a fresh coat to match an ocean motif, it is ready to have hooks screwed on each of the corners of the tray. Feed the inexpensive white rope through the hooks to give it a dock feel, while wrapping each leg with the same. The result is a corner piece that can hold picture frames and accessories without being visually distracting.
4. A-Side Spool Table transformation idea
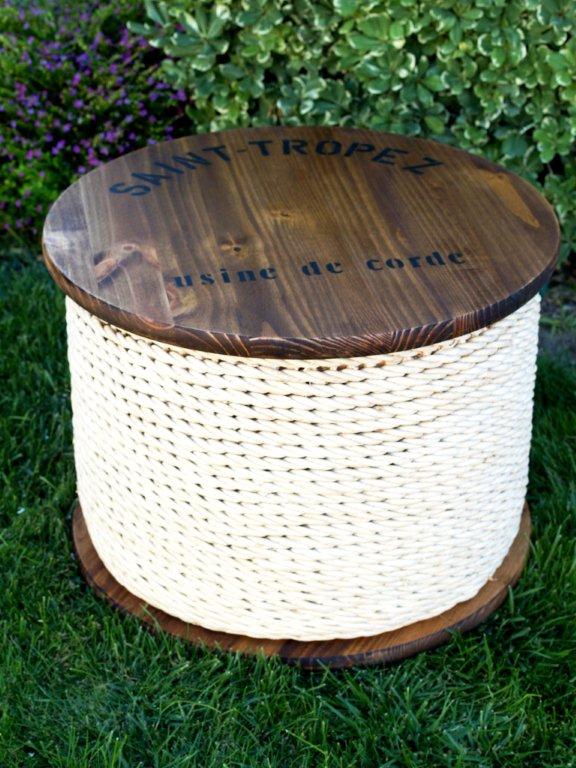
Exactly as it sounds, a table that can be situated anywhere in a room has the appearance of a spool, albeit with a professional aesthetic. With the use of a basket, wrap the rope around the entire circumference, while placing it on two wooden circles that are equal in size.
The wooden top and bottom can be mounted on the basket in minutes with the use of a few glued dowels that are solid and will remain hidden from view. Staining the wood will give the platform some age, and stencils can be used to get creative as to what the origins of the table are.
5. A Hollow Storage Desk transformation idea
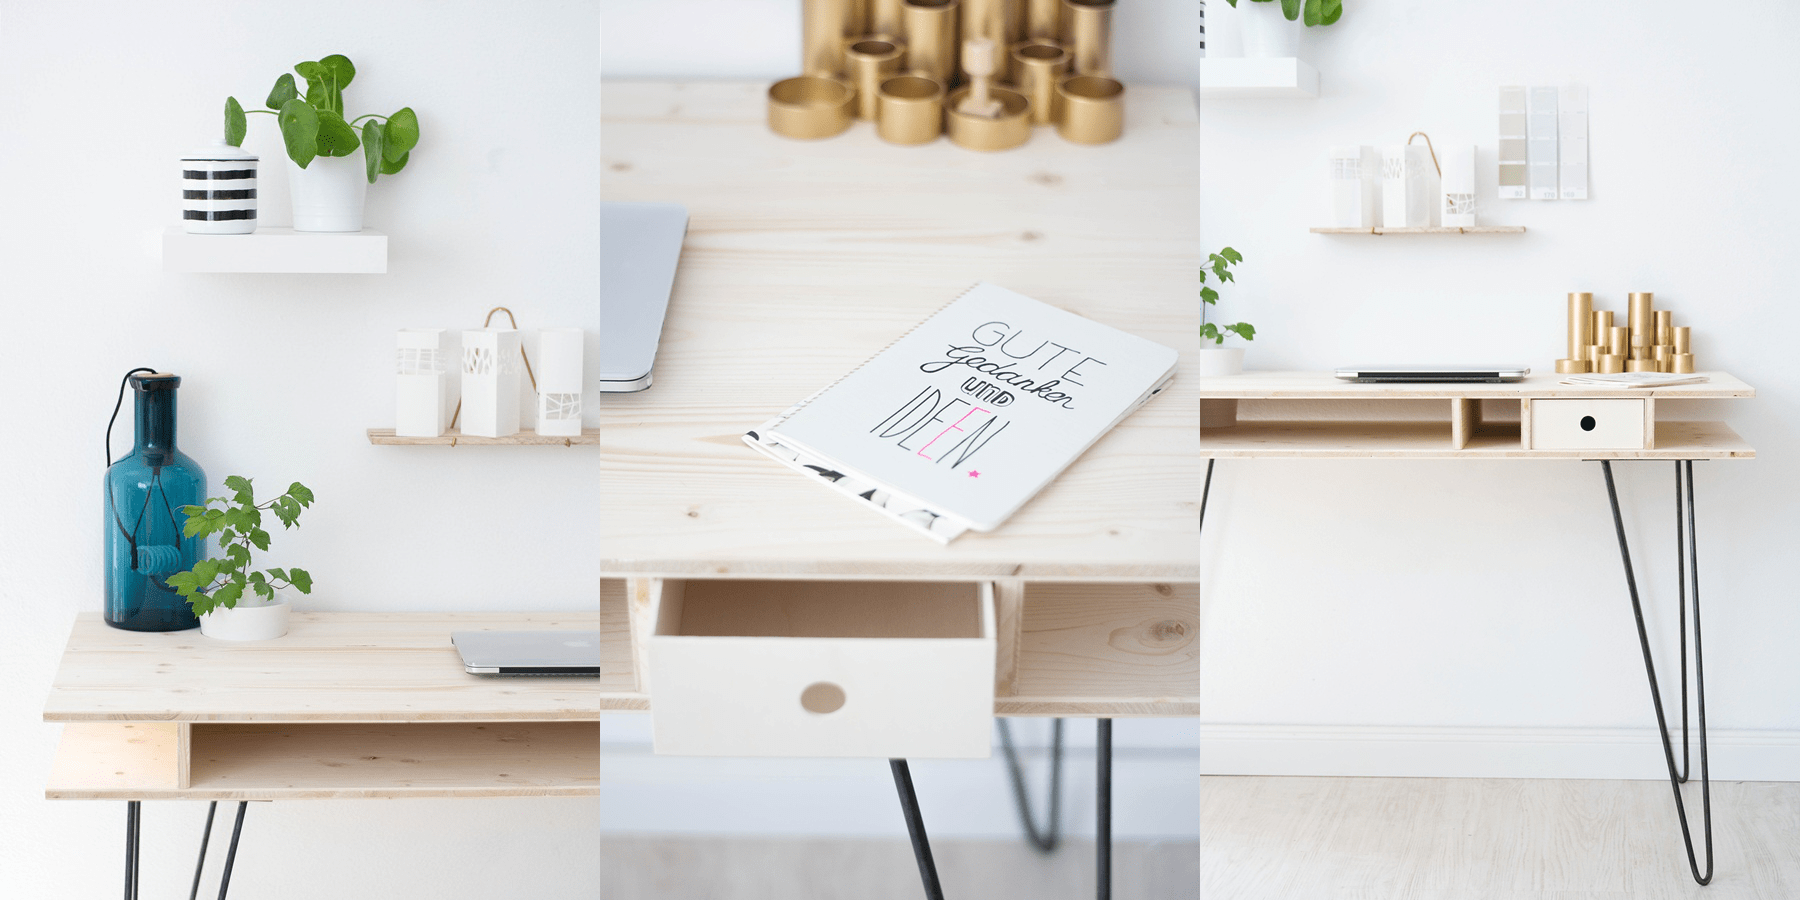
Requiring only 4 pieces of wood at minimum, a hollow storage desk can be assembled with two long sheets and a couple of 2 X 4s separating each surface. Using a bubble level, check the pieces are horizontal and drill them into place.
The open space in the middle of the desk can be best served for hiding a computer keyboard, and metal hairpin legs can be mounted on the bottom of the workstation with only a few screws to take up the least amount of real estate possible in your room.
How to build a Convertible Shelf to Kitchen Island
Kitchen islands are a luxury most on a budget cannot afford, but a long bookshelf with no backing is begging for a transformation to be placed where you cook.
Using simple color schemes like all black or white, screw-in leg mounting plates on the bottom, and twist-in wooden supports to rest on the floor.
Then paint a piece of wood to match the tone of the shelf and drill it onto the surface.
Coating it with sealant will give the shine to traditional kitchen islands.
With no backing on either side of the shelf, the island itself can now be used to place pots and pans for storage.
Video inspiration here
How to build a reliable Upside Down Mounted Lazy Susan
The idea of a rotating platform has been used for years in corner storage units, by why not incorporate it elsewhere?
To clear up counter space, and add a new wrinkle to your kitchen, drill holes on a circular wooden lazy Susan equidistant from one another as if it is like a clock.
By mounting a simple bracket underneath a cabinet, slide on the lazy Susan and place either coffee mugs, pots, or utensils on the hooks, allowing you to rotate them seamlessly.
Tip: Place a freestanding lazy Susan sphere on an entertainment center to make your TV capable of swiveling 360 degrees. The weight of the television set will ensure the platform will not slip.
Video inspiration.
Done,
Next time, we are going to discuss how to up-cycle Bookshelf Kitchen Island.
A Simple Dining and Desk Table makeover for your Small Living Space
This is one of the most effective tables you can create yourself with a tiny shopping list, a dining and desk nook. With little focus, you probably can put this project together in less than 30 minutes. By acquiring two desks of identical size, the only service required is mounting a set of wheels on the bottom of each of the 8 legs.
Next, Place the desks flush up against each other so that you can mount a hinge on one side of the two legs touching each other, and a latch on the other.
Doing so will allow you to undo the latch when you want to make it a desk, while conversely closing it will procure a full dining table.
Done.
Tip: Re-purpose plastic wheels you could find on an unused computer chair because as long as they could swivel smoothly they are perfectly suitable to screw into each leg of your new desk.
Inspiration!
How to build DIY Ladder Shelf
Take a V-shaped ladder and open it as you would before climbing its steps. On each rung add a pair of corner braces. These are critical to the shelf pieces you slide into every step being secured for the long haul. All of the space provided with very little coverage makes it the perfect area for plants, towels, or display pieces. Hooks can also be screwed into the ladder’s side panels for hats, purses, and decorations.
Tip: Use a wooden ladder for a brisk paint job to match your decor after a light sanding of the surfaces you plan to coat.
Related furniture makeover Ideas:
30 IKEA Table Makeover ideas
28 IKEA Chair Hack
FYI, Here’s the inspiration video for our whiteboard video.