When a room is so spacious that it could hold many people at once, a divider might be something you need.
The lack of space can also be why many homeowners forego building permanent walls and investing in a room partition.
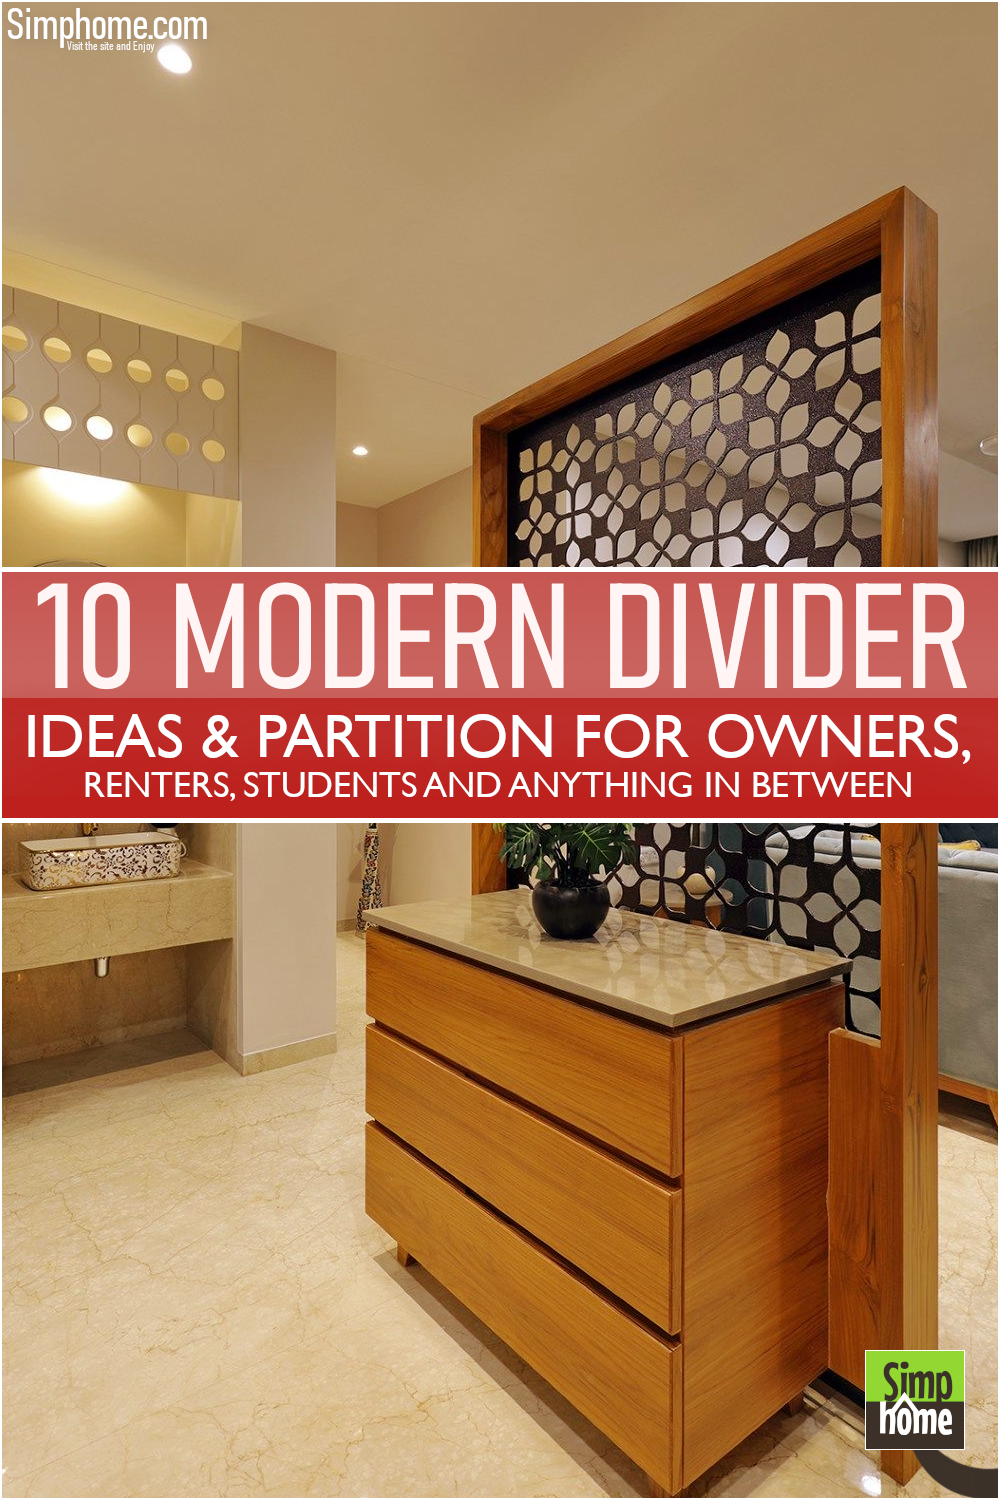
Whether you want to break down the room or create more privacy, these 10 modern room divider and partition ideas will help you out with that. They will give you a solution on separating and creating another room that appears much better than it was. For more details, follow the Simphome link inside the descriptions.
🔊10 Modern Room Divider and Partition Video:
List Entries:
10 Bedroom Partition Ideas
10 Partition Storage Room Dividers
10 Inspirations to Give Your Bedroom Instant Upgrades
10 Small Living Room and Rental Transformations
10 Small Comfortable House Ideas
10. A Simple Room Divider Hack
 A partition can have a basic form with just a square and straight shape from the floor to the ceiling. But some people would give it all to achieve their goals and make it more than just a mere room divider.
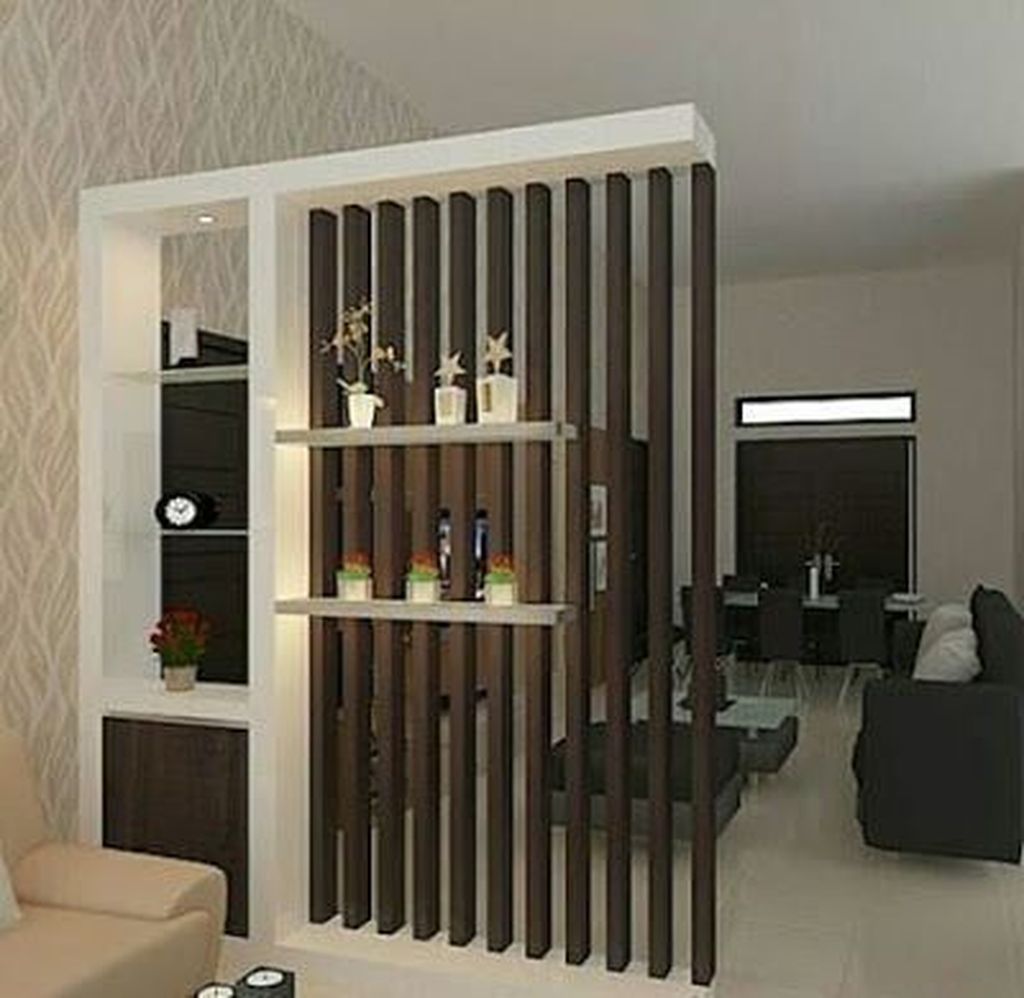
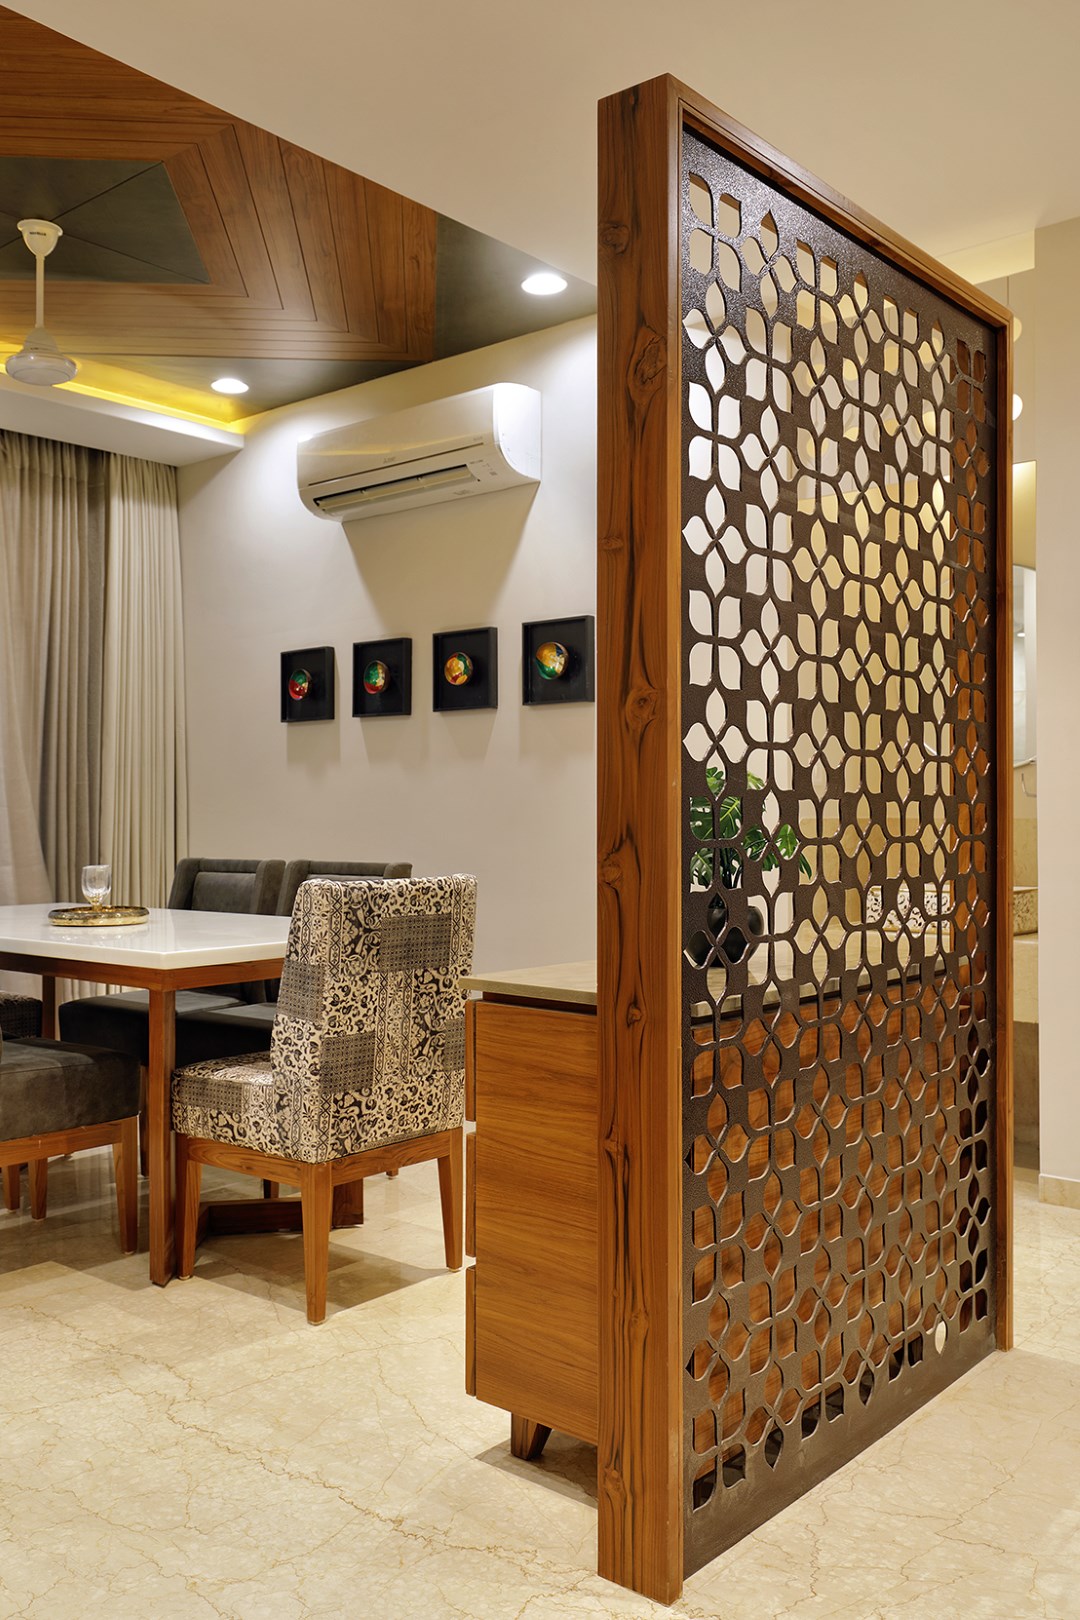
This wooden divider has a fancy look, and it comes as an exclusive design that also decorates the ceiling. Moreover, it also features racks that work for displaying some small plants.
It’s a functional modern room divider because it defines a room beautifully and offers ample storage space. Besides, the meticulous design that incorporates natural elements like wood and greenery brings Japanese vibes to the area.
Additional Details:
- Step 1: Paint the wall with a gray color. Paint the boards with the same color.
- Step 2: Create a hole for an air conditioner on one of the boards. Use paper to cover it first on the opposite side of the board where it won’t be seen. Then cut out for wiring for an air conditioner on the other wallboard.
- Step 3: Use another board to cover it.
- Step 4: Use some white fabric to cover the hole on the centerboard. Create a decorative design with a bamboo mat. Then, attach some potted plants.
- Step 5: Use the boards to create a divider. Use some wooden bars to unite the boards in the middle.
- Step 6: Glue 3 boards at the top and bottom.
- Step 7: Cover the centerboard with a bamboo mat and use skewers to stabilize it.
- Step 8: Use a magnetic strip on the hole on one of the boards. Then, attach some other small plants.
- Step 9: Glue fabric to cover the magnetic strip. Adorn it with some beads and other small elements to make it look like a hanging plant.
- Step 10: Use a thin board to cover the wallboard at the wall for lettering.
- Step 11: Use thin frames in the middle and make some light window curtains look like a curtain.
- Step 12: Combine thin white iron hooks with flower pots and arrange them on the floor.
- Step 13: Place some plants on the hooks and hang curtains to make it look like an indoor garden.
9. Cover Half of the Room with a Partition
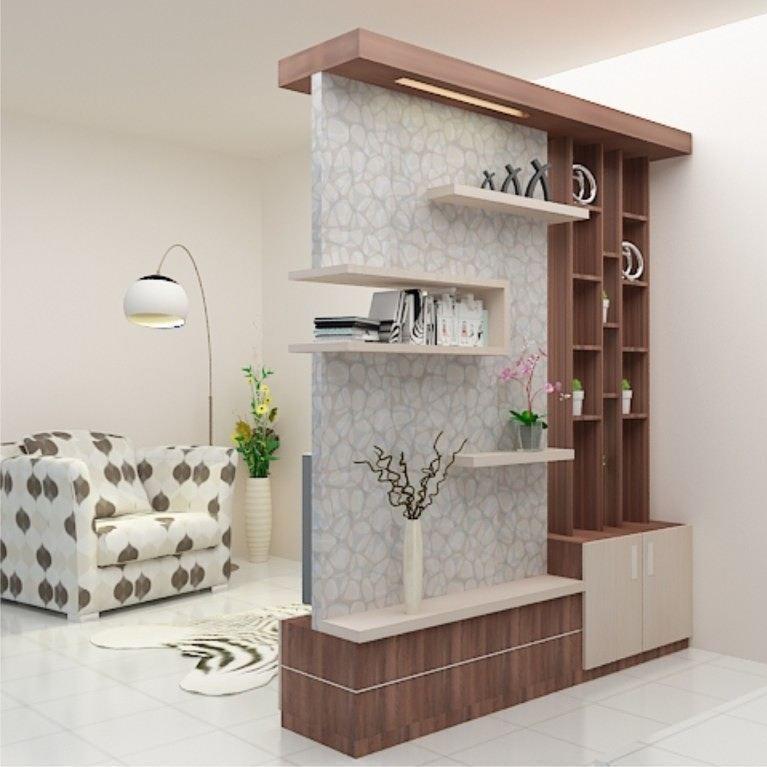 Crafting privacy is one of the many reasons why many people install a partition. But it isn’t limited just to separate the room. It works as a room decoration or a design that beautifies it as well.
A partition serves as an additional wall on which you can hang some pictures or artwork. It’s even easier and cheaper since you don’t have to build a concrete wall.
It shows some creativity, adds color, and becomes a space-related solution. A partition can have half of the room covered and leave the rest to come in or out. It can also fully cover the entire room.
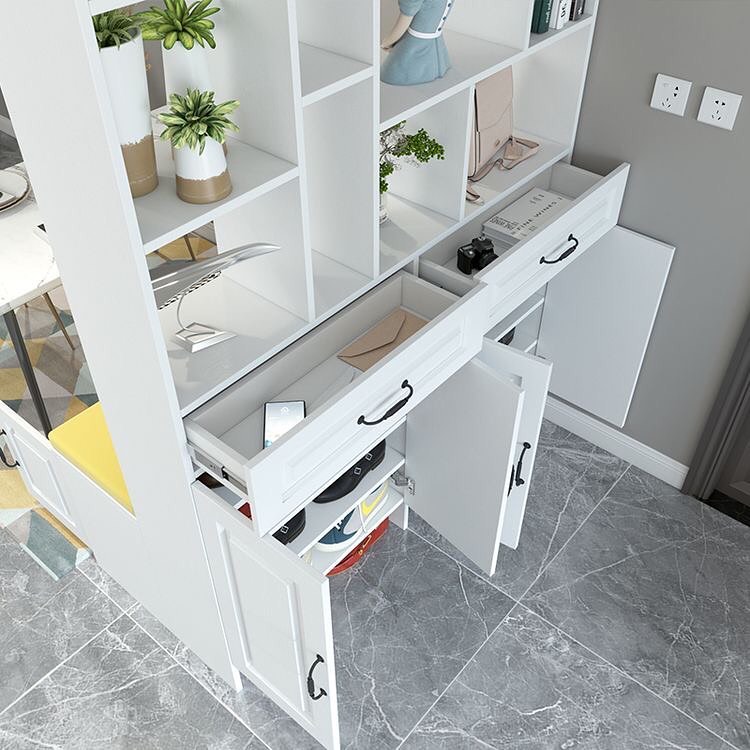
This partition, for example, serves as a decoration and additional storage, which makes it a great room divider. The combination of wood and marble carves out luxury to this space. More importantly, it has several shelves and cabinets that you can use to eradicate clutter.
Detail Instructions:
- Step 1: Place a thin board at the corner. Then, measure its length and use a template to draw the rest of the boards.
- Step 2: Use a nail gun to secure all of the boards on top of each other. Secure them into a rectangle shape until you reach the ceiling.
- Step 3: Use thin iron hooks to hang some cabinets from it. Arrange them in order from lowest to highest.
- Step 4: Drill another nail gun to secure the cabinets.
- Step 5: Arrange the items on top of the cabinets.
A Concrete Partition Idea
If you want a partition that is more like a part of the room, then the concrete one will likely be something you’re looking for. It can be both plain but still functional and somewhat decorative too.
8. Craft Nicer Details
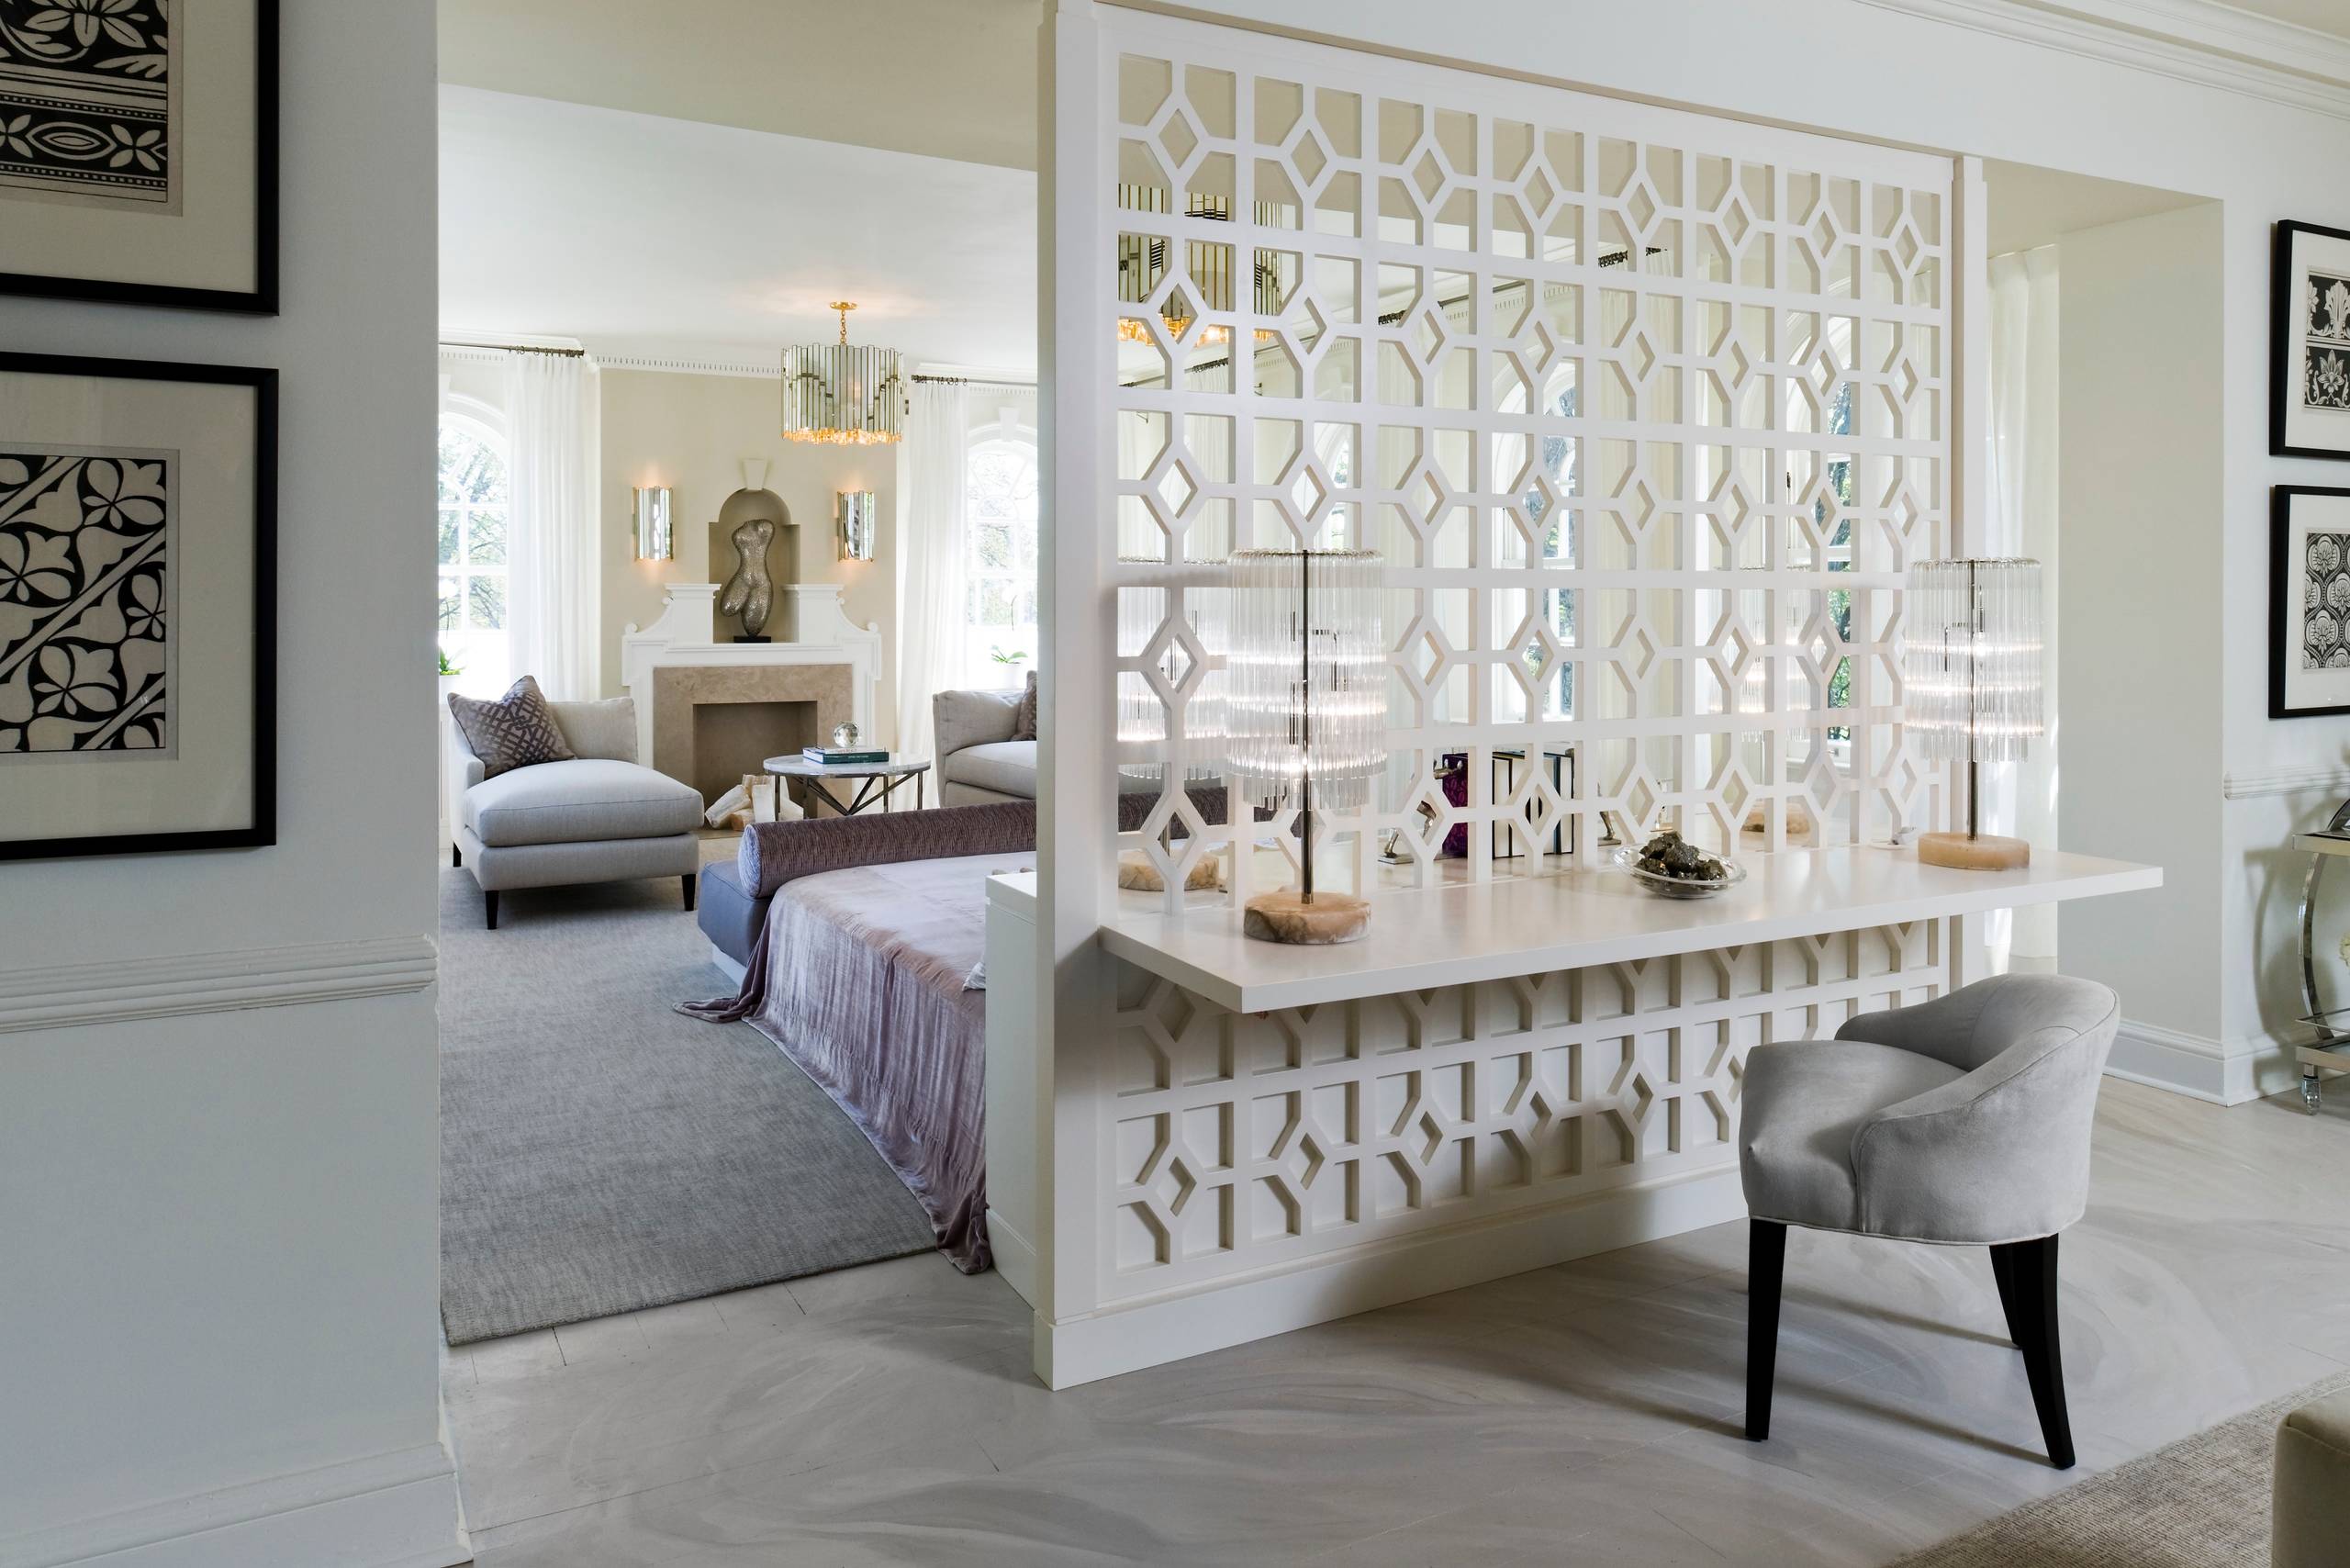 This headboard has an artistic look with its decorative bees-nest-like pattern. Its beauty will undoubtedly catch your eye in an instant when coming to this room. On the back, there’s also a small hanging shelf.
It means this room divider is not only for a display. It serves multifunctional purposes, too. The pattern is a choice of style. You can have it in a full panel and have a door or two if you want more privacy. This alternative is an excellent option if you’re tired of the plain white walls and don’t want to use a different color. This partition wall looks like the highlight of your bedroom, and it’s impossible to see it as a wall all through. The pretty flower pattern and wooden sticks make this room feel bigger and provide some storage space underneath it.
Other Details:
- Draw the pattern first.
- Use scissors to cut the pattern on both sides of the headboard.
- On one side, tape on some shelf supports on the top of the panel for hanging some books or decor items.
- Measure whether you need to cut off some wood too.
- Once you have your control panel ready, screw it into the back of the headboard.
- Screw the other side on to complete it.
- Use screws to hang some decorative items above it.
- Crafty Partition Ideas for Bedrooms
- Complements the Decor
7. Build It Over Your Head
 If the ceiling is considerably high, a partition shouldn’t have to reach it as it might be unnecessary. Build it above your head would be enough. When you would like to make something bold, you can paint the partition with the same shade of color as the room is.
Or consider having a different color to have a contrast. You do not have to paint the room divider, but you can get it by adding some plants on the racks to add texture and balance the surrounding with its foliage.
This partition, for instance, looks great, although it does not reach the ceiling. The use of simple design and monochromatic color accentuates the modern style immensely.
Additional details:
- Use a simple design.
- Use a wooden rack with glass to display some flowers and vases.
- Add a mirror on the rack for a focal point.
- Create plenty of space between the divider and the wall for further use as a decoration or storage area.
- Use different colors to have contrast with the main color scheme of the room and add some details to it as well as to incorporate it into your decorating style, if you have one anyway.
- Cut out the design and place two boards on top of each other. Cover them with a thin board and paint it a white color.
- Get some small decorative items like glass bottles, metal pipes, or wooden sticks for hanging onto straws to add some texture and balance the room’s design with its flowery pattern, too.
- Fill the shelves underneath the partition with plants.
- Decorate the rooms with some pictures or ornaments.
- Use it as a room divider if you want to have some extra storage space for things that don’t fit into the small frame you’ve got there at that particular place.
- Cut it into two parts, cover them with wood to match the room’s overall design, and hang some shelves for additional storage underneath to use up any extra space you might have.
- Use a mirror on the backside to reflect some light and make this space look much bigger.
- Create a Pretty Accent Wall
This room divider is also an accent wall. However, it does not involve any painters and such work as you might think at first glance. It creates a pretty accent wall to decorate your room with, as you wouldn’t need anything else for now except for this partition and the concept of simplicity.
6. A Wooden Hanging Partition Idea
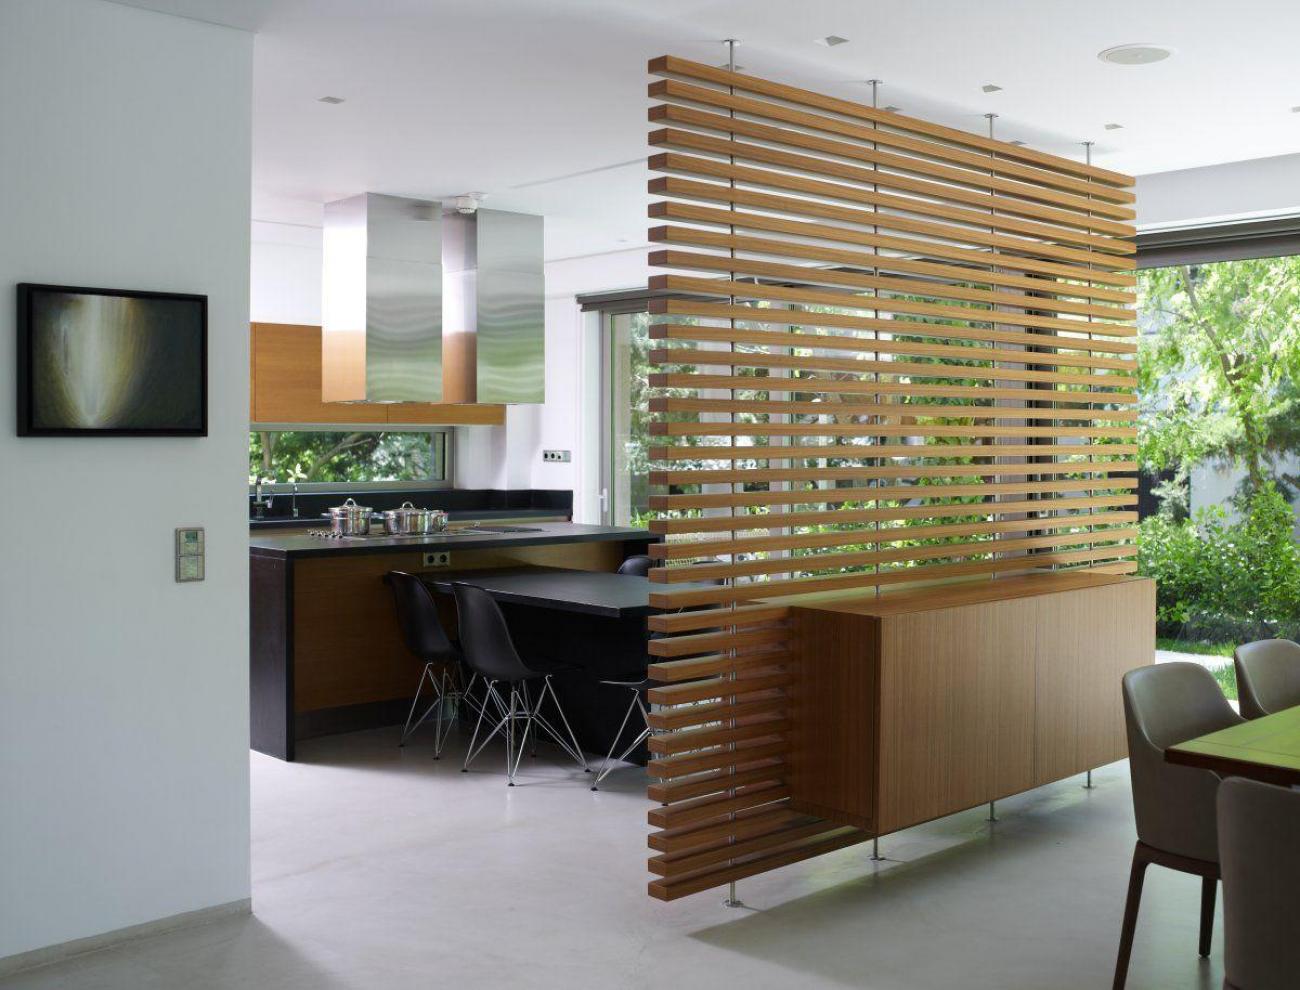
The panel uses rods that pierce through the floor and ceiling to prevent it from shaking when it gets bumped. You can adjust the gap for each wooden piece by lowering or adding the number of wooden pieces. Make sure you bore the holes to the same length so that you can get it even when installed. It also comes with small storage next to it, which is an innovative feature of it.
Details Instructions:
- Draw the perimeter.
- Cut the pieces to size with a circular saw or a jigsaw.
- Drill holes through the floor and ceiling in the exact length you want for each vertical piece, and screw it in to stabilize it in place.
- Screw metal rods through the holes from one wall to another, from the ceiling to the floor, until you reach all four walls of your room divider.
- Use a level to make sure everything is straight and even.
- Put together the partition and hang it up with some screws and nails.
- Fill the shelves underneath to store your stuff, such as books, decorative items, or anything you want to display there.
- Add a mirror on the back for an ultimate focal point of the room divider and some extra light that makes it look bigger than it is actually.
- Use a solid wood board as the base of the divider and give it some color and give it texture.
- The use of wood adds excellent detail to the overall design and simple structure.
- Use a round saw guide for your jigsaw instead to get a smooth edge, especially if you’re after detailed, precise cuts that create rounded corners as this one has gained.
- Cut the pieces to size and drill holes through them if necessary to cut out without any damage or tear.
- Attach the wood by using a brown ribbon and a tiny nail through each piece if necessary so that you can connect and move them as you please, especially those that would be suspended from the ceiling.
- Fill up those shelves underneath to maximize storage space and balance out the design with its pretty flowery pattern and the texture it provides.
- If you have a mirror on the back, attach it to the partition with some nails.
- If you want to show off, put some hangers on them too for decorative items that you would display there.
- Cut the top of one wall and insert a mirror and a decorative shelf underneath it as its focal point and additional storage space underneath it.
- Use a round saw guide for your jigsaw to cut the perfect shape, especially if you’re after precise cuts that create rounded corners, as this one has got.
- Fill up those shelves underneath with some books, decorative items, or other stuff you want to display there, just like what you would do with any additional storage space except this one.
- Add a mirror on the backside of it if possible to reflect light and make this space look bigger than it is actually.
5. A Glass Divider Idea
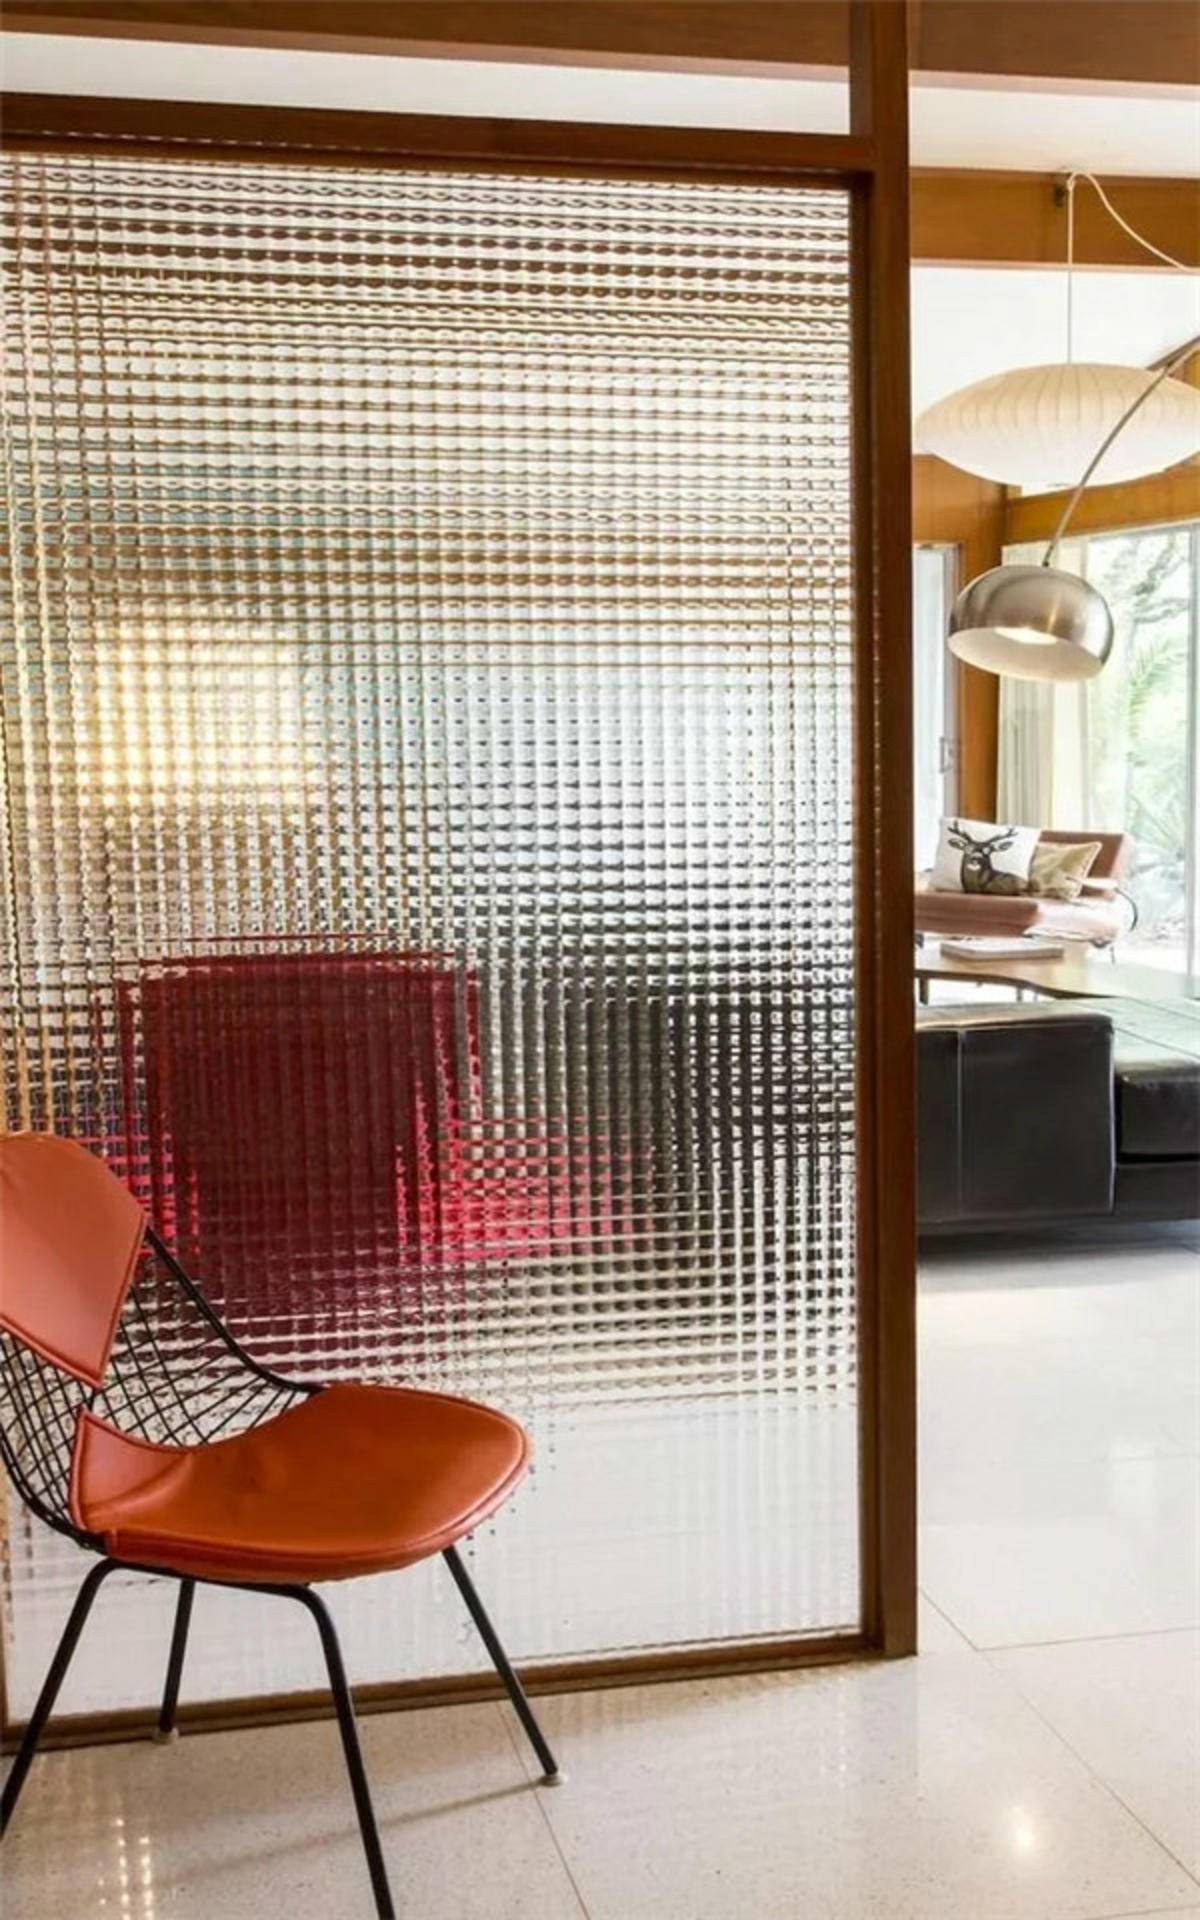 You can use plenty of materials for creating a room divider, including glass, wood, or metal. With glass, you can have your room appear to be transparent, but you can blur it as well, depending on what kind of glass you use.
The thickness of a glass panel is something you should be paying attention to. The wider the glass, the thicker it should be so that it won’t easily break when it accidentally gets hit.
Glass frames give a nice detailed look on a room divider, and they could also be an excellent way to prevent the glass from breaking.
Before you replicate the idea, you need to pay attention to:
- Develop a plan of what you need for this room divider.
- Develop the design of the room divider by drawing up some sketches or drawings, or imagine in your mind’s eye how it would look like in real life.
- Develop a budget for how much it is going to cost you for this project.
- Develop a timeframe for when to complete this project.
- Choose the materials you need to build the room divider based on your design and budget.
- Plan out how much material you will need for each part of the design to ensure you have enough materials in hand in case something goes wrong or there is a fail in the process of building it.
- Take into account the number of measurements you need to make after cutting out the wood for your room divider to add more stability and support.
- Cut the parts from the wood using a saw or a jigsaw so that each part would have a perfect shape when you put them together with another piece of wood.
- Cut large circular holes in the floor and ceiling to house each wooden piece in its place when it is hung up in a particular spot in your room.
- Hang up the wooden pieces in their place.
- Drill large holes through the floor and ceiling so that you can add metal rods to support it in its place, and fill up the spaces between them with cement so that it would be easier to hang up without any movement or shake when bumps are applied on it using a hammer or a wooden piece.
- Drill holes in the wooden pieces, attach them using screws, and then hang up the entire room divider in its place.
The thickness of glass you need to pay attention to when you want to replicate this idea is 6mm.
So, building a room divider can be very easy with common materials like wood, aluminum, and metal. You only need wood for it since it is easier to make with it since there are many ways you can make it uniquely different from another person’s room dividers.
4. A Shoe Rack Divider
 A shoe rack typically comes in a huge appearance, which has its advantages and disadvantages. But a shoe rack can be versatile furniture that works best for storage, a display platform, and a room partition.
The above part has racks for displaying many exciting objects. It has many boxes of columns in many different sizes. It means that each of the boxes is for storing anything of the same size.
Detailed Instructions:
- You can build a simple yet attractive rack using a round saw guide, a metal strap, wood glue, and screws. It should have a bar to hold the shoes.
- Drill holes on the flooring where you will hang it from, and drill holes through the wood and the metal strap for an even look.
- Attach those hooks on those bars to those steel rods you found earlier for hanging them from shoes and other heavy items under them.
- Use the same wood glue to glue the metal strap onto the outer rim of each box, and then hang them from underneath.
- For the last step, you can use a hammer to attach them to have an even look. Some people do this by screwing them together, but it may take too much time for you to do so. The simpler option is using wood glue for this part.
10 DIY Shoe Bench Project Ideas
10 DIY Shoe Rack Project and Storage Ideas
10 Shoe Storage Project Ideas for Limited Space
10 Efficient Shoe Bench Storage Ideas to Untie the Mess
10 Creative DIY projects that will Revamp your Shoe Storage
3. Simplify your concept
 When it comes to creating a modern room divider, you have to stick to simplicity. The simpler it is, the better it will be. You do not need to add any sophisticated trims. A wooden frame with a decorative metal panel will be enough.
You should also need to consider the location of the divider first before you permanently place it there. Avoid putting it in an awkward position that will bother your movement or ruin the room’s concept or design.
Since it is a wooden frame and metal panel, it’s likely to be heavy, and it’s not easy when you try relocating it by yourself. It might as well destroy the divider itself.
Therefore, you should be precise about the spot and size.
2. Alternative to A Glass Divider
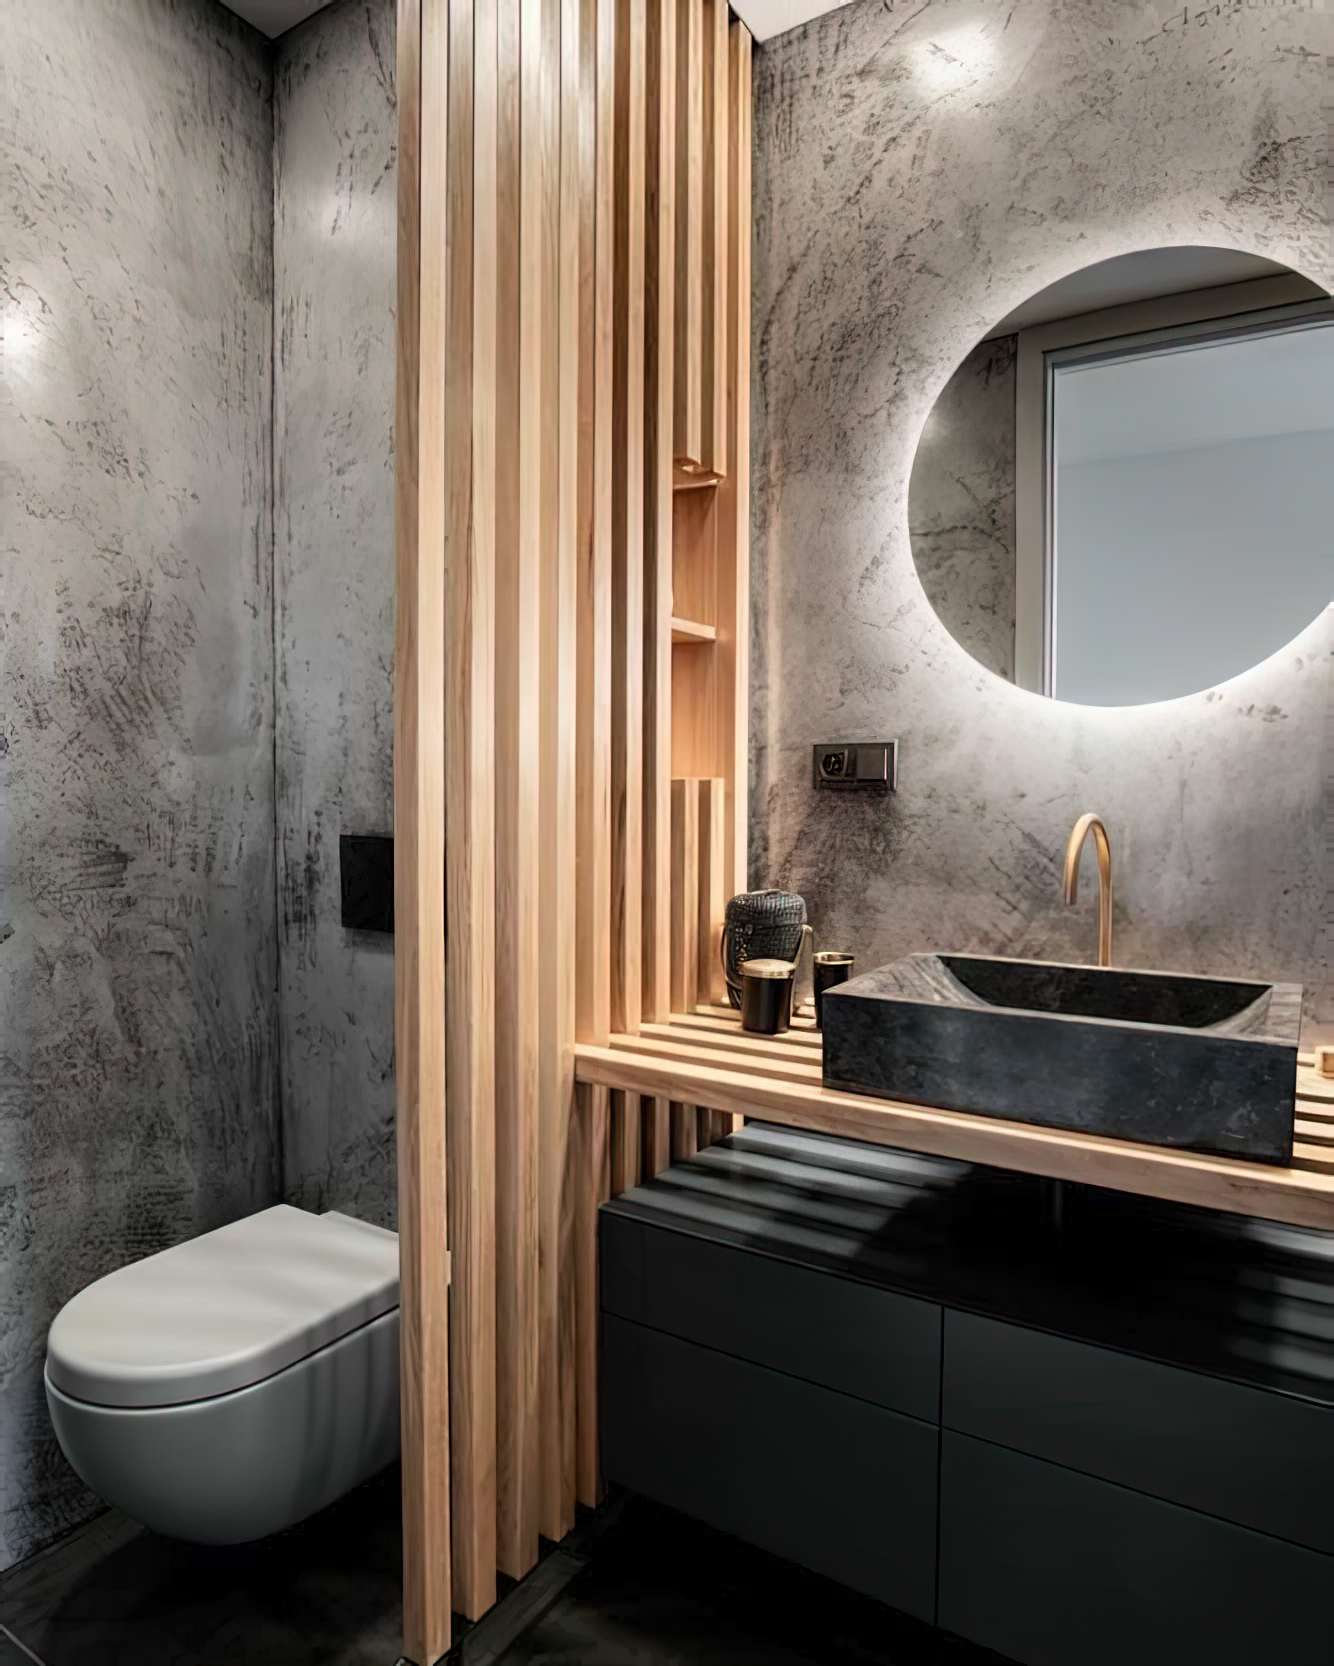 A glass divider is common in the bathroom as it is resistant to moisture. It also has the advantages of its transparent feature, which is suitable in the bathroom.
But there is always an exception as you all have your own style or design that you like much.
Wood is a pretty and versatile material that matches almost any material. If you know how to deal with water splash, wood actually makes a lovely installment. You may layer it with water-resistant paint or any substance you can come up with.
Other room dividers you can select and learn are:
1. Room Divider with a Folding Decorative Side
2. Room Divider with Mirrors
3. Room Divider with Sliding Doors
4. Room Divider with Blinds or Sheers
5. Room Divider that Extends to the Ceiling
6. Room Dividers that Slide under the Window Sill
7. Expanding Screen Room Dividers
In general, to build an Expanding Screen Room Divider, you’ll need
- – To start with purchasing the screen itself. Usually, it is available in 8 yard long pieces that are 4 feet wide and 14 inches high.
- – Buy one end cap to every four yards of the screen. Make sure that you know how to install it, as it can be tricky at times.
- – To Install some metal framework as the base of the project.
- – To Hang up the screen onto your metal framework and install additional crossbars for supporting it better.
If you want to save money, there is an alternative to these parts that come at a much lower price than they usually do.
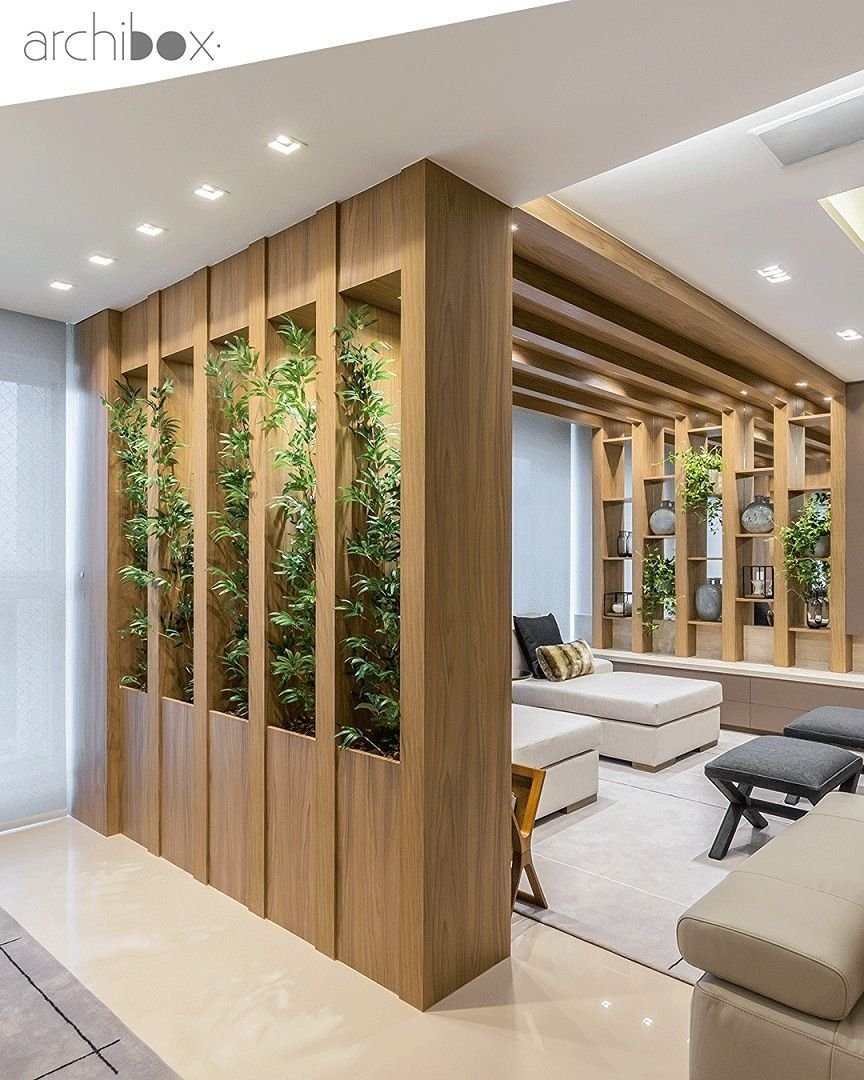
Lastly, number 1. Bring Nature to Your Room
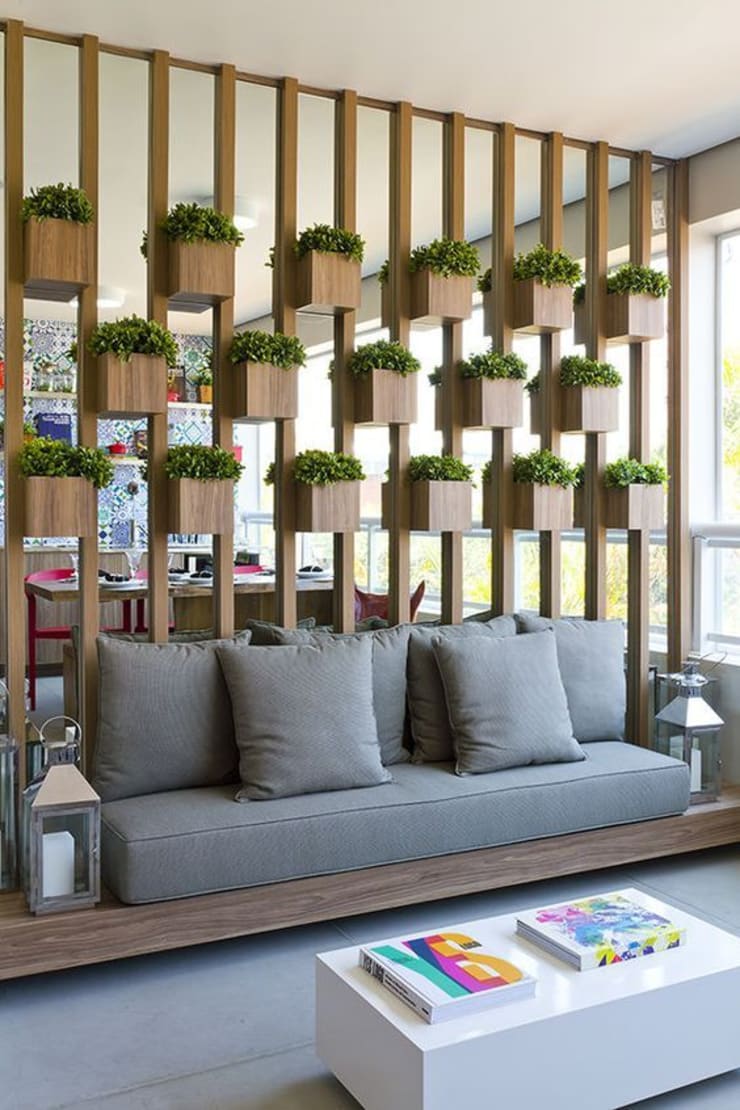 When a modern design is fused with the nature-inspired concept, this is what it looks like. This living room reminds you of how beautiful greenery is.
Each of the columns on the divider has a planter made out of wood. Since wood leaks water, you may put a pot inside the planter and not give excessive water as it will mess with your room.
The project is adjustable, and to replicate it, your general instructions are:
- Outline the wall; the divider needs to be attached. You can use a level to make sure that it is perfectly vertical.
- Put nails on the outline, and then hang up the wooden planters.
- Make holes on the planters and cover them up with netting for plants to grow in them. You can choose from many plants; you can put them all in there or just a few of them, depending on your preference. And also your expectation from that project.
- Hang up the decorative side panels to the room so the netting is visible.
- Add lights for added illumination.
To create a modern room divider, you can incorporate many different colors, shapes, and styles to make it look unique.
The project is simple to do with a medium difficulty level since most things are reused or already available in your house.
Conclusion:
So Building a new Modern Room Divider and Partition does not have to be rocket science. You just need to find suitable material, learn the basics of how to use it, and then apply it to your project. It’s doable even if you don’t have experience.
If you want to start making your modern room dividing walls, you’ll first need to choose your simpler or cheaper alternative. You can decide on what material you want for this project. There are so many materials that you can choose from if you wish to a magnificent room divider.
References:
10. Pinterest.com
9. Pinterest.com
8. Decoist.com
7. Pinterest.com
6. Home-designing.com
5. Pinterest.cl
4. Pinterest.com
3. Recommend.my
2. Pinterest.com
1. Balconygardenweb.com