When it comes to a small house, you may need to consider forgoing some walls to open up the space. Unfortunately, you will have to sacrifice your privacy if you do this. Furthermore, there will not be clear boundaries between the rooms.
Well, ripping some walls off may be a good idea. The terrific news is you can still maintain your privacy while keeping the clutter at bay because these 10 partition storage room dividers will get your back.
To replicate the ideas, you need to pay attention to:
- Use a portable table to get a picture of your room.
- Measure the width and the height of a wall that you want to remove.
- Note down the measurements and also their exact location on your floor plans or floor plan. It can be helpful if you would like to add storage when you make room dividers later in the future when you place furniture where they belong in these rooms (by the way, add storage is one of many reasons you’d make partitioning rooms).
- Measure the opening to make sure it’s adequately measured. Also, you will need to know the height of the opening that you can calculate by subtracting the thickness of your wall from the maximum height of your ceiling.
- Make a list of all items you wish to store in each open area.
- Measure all items on your list that are the right size for the available spaces.
- Create a list that shows each item that will fit into its designated place, including fabricating any partitions, doors, and shelves needed to create a proper storage unit for it.
- Make a list that shows each item sorted by size, so you’ll know how much space is needed to accommodate each of them.
- Make a list of all possible combinations for your items that can be sorted by height, width, or length (for example, small bookshelf (width) + medium planter (height) = 1 unit; large picture frame (height) + small antique table (length) = 1 unit; long plant stand (length) + small table lamp (width) = 1 unit; etc.).
- Disassemble or move the items that will go into the partitions you had made for them using sticky tape.
- Move the partitions to their new locations once you have found the best spots for them on your floor plan or floor plan.
- Put all of your items securely into their respective storage areas or put them into bins, baskets, etc., on shelves outside their new rooms.
- Create a new floor plan on paper if necessary, following the diagram you are making with all of your measurements and lists of essential items on each open space on it.
- Put your items back together at the exact locations they used to have before you ripped the walls off.
- Re-measure your storage areas to ensure they are all at the proper height, width, and length.
- Create a list of all items you wish to store in each storage area or create a room divider plan if necessary for each open space on your floor plan.
🔊10 Partition Storage Room Video:
List Entries:
10. Divide the Room with Shelves
 Shelves are a must-have item when it comes to furnishing a living room. They are versatile pieces that you can use to store your books and display your family treasures. More importantly, they usually have ideal heights that can make a perfect room divider.
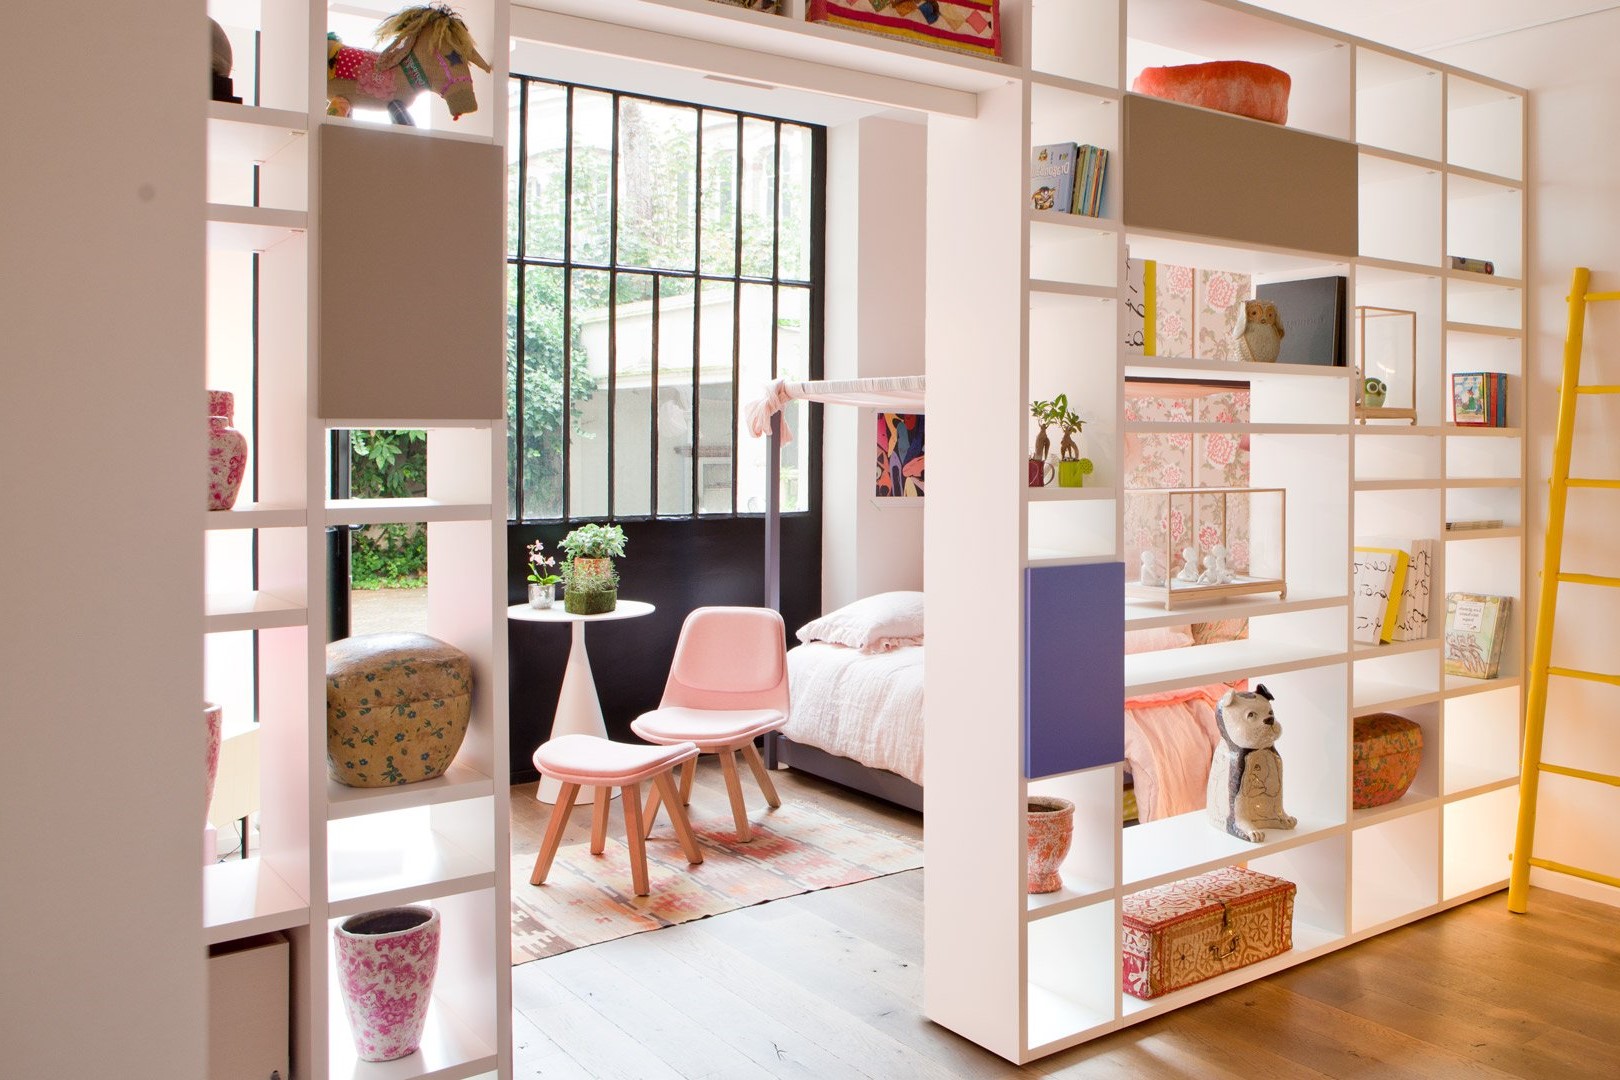
These custom shelves, for example, make a great partition that separates the bedroom from the other rooms. They expand from the floor up to the ceiling and from one wall to the opposite, creating a clear boundary.
The shelves even have door-like access that allows you to travel to another room. To add more privacy, you can try hanging a curtain.
Your instructions:
- Step 1: Cut the pieces to fit the space you want them to be used in.
- Step 2: Assemble and secure the shelves using wood screws.
- Step 3: Secure the shelf dividers using screws and glue.
- Step 4: Build custom shelves with boxes and other storage containers
- Step 5: Replace the doors with fabric panels.
- Step 6: Hang curtains on both sides of the shelves to hide them when they are not in use.
Additionally, Measure and cut down boards for equal vertical height if your bookshelf is tall.
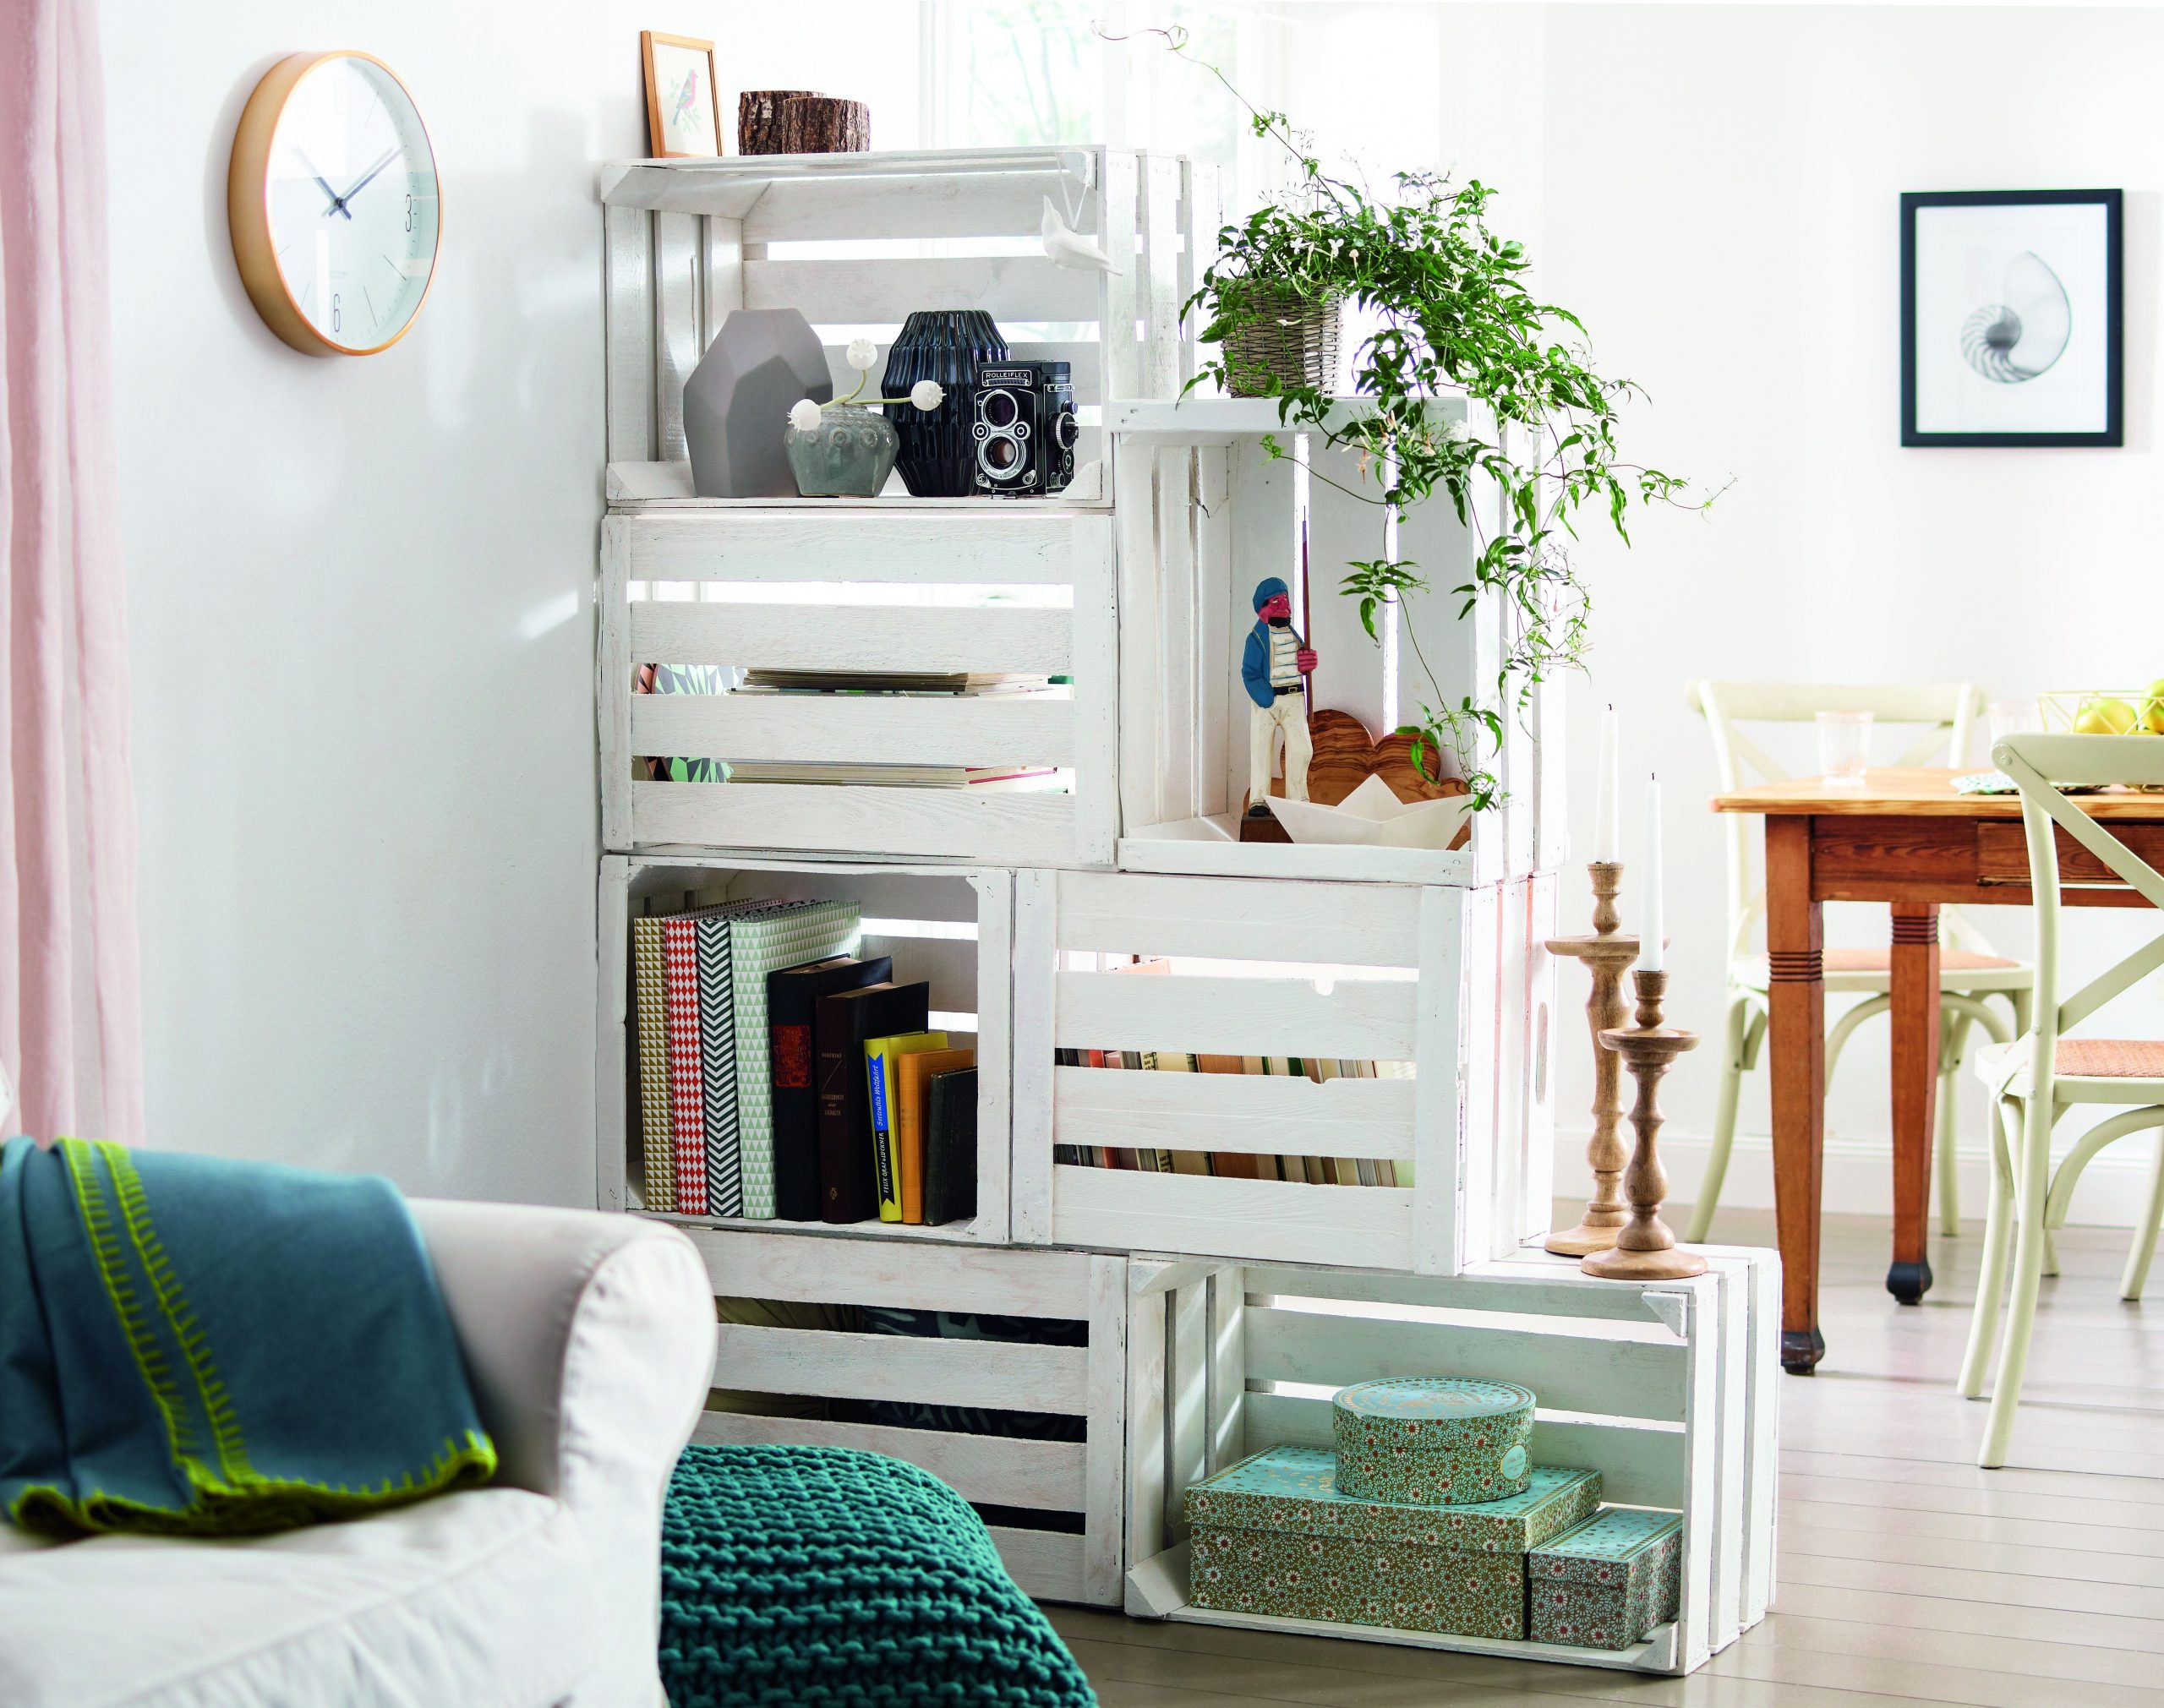
9. Repurpose Wooden Crates
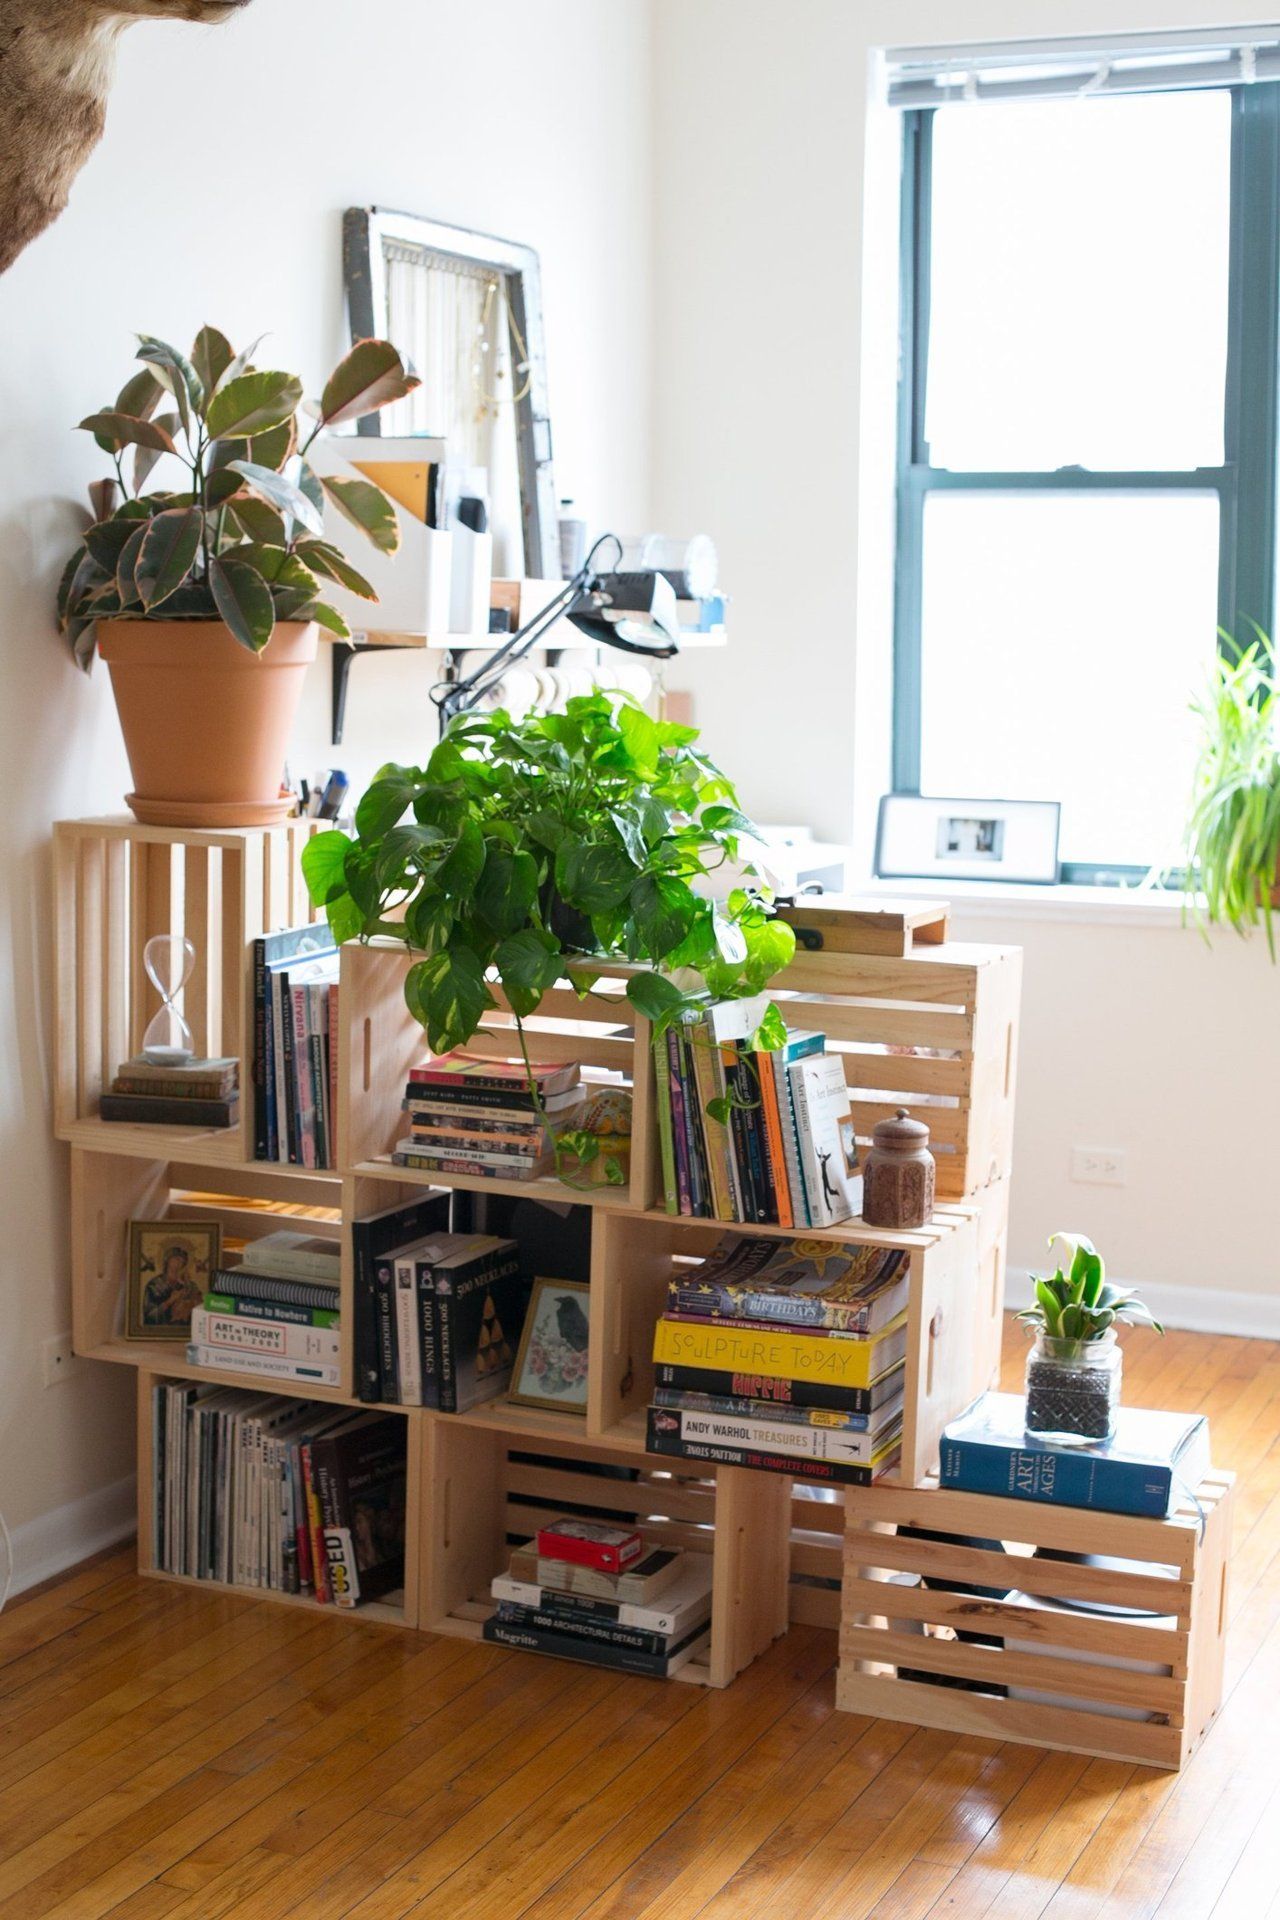
Making a room divider from scratch might seem to be a good idea. However, it may require intermediate to advanced carpentry skills, which is – unfortunately – you do not have. Therefore, you can repurpose what you already have, like wooden crates.
To make a room divider out of wooden crates, you just need to stack them up according to the design you desire. You may also need to glue and screw them together to make your DIY shelves sturdier.
If you plan to paint the crates, make sure you sand the sides and edges thoroughly. This way, the finish that you are going to apply will work like a charm.
Your instructions:
- Step 1: Measure the length, height, and width of where you want your new wall.
- Step 2: Measure the proportion of this space in its sides (width).
- Step 3: Calculate the number of crates you will need to make your room divider.
- Step 4: Go shopping for wooden crates.
- Step 5: Cut them down to size using a table saw. You can use the cut-off parts for other purposes.
- Step 6: Assemble boxes using wood screws or nails and glue. Make sure all sides are flush with each other. If they are not, use a nail gun or a hammer and a punch to ensure they fit tightly together.
- Step 7: Secure the crates together using wood screws. It is optional to glue them instead.
- Step 8: Add more crates or boxes for extra storage
- Step 9: Paint the containers or boxes how you want to depend on the color you prefer.
- Bonus: Get Tool-Shelves
If you have around 40 free feet around your home, here is how you can convert them into DIY shelves for storing all of your stuff, like old books and CDs. This idea is straightforward and quick to make, so why not try it? All you need are hammers, chisels, screwdrivers, electric drills, tape measurer, and pencils.
8. Built-in Fireplace with Storage
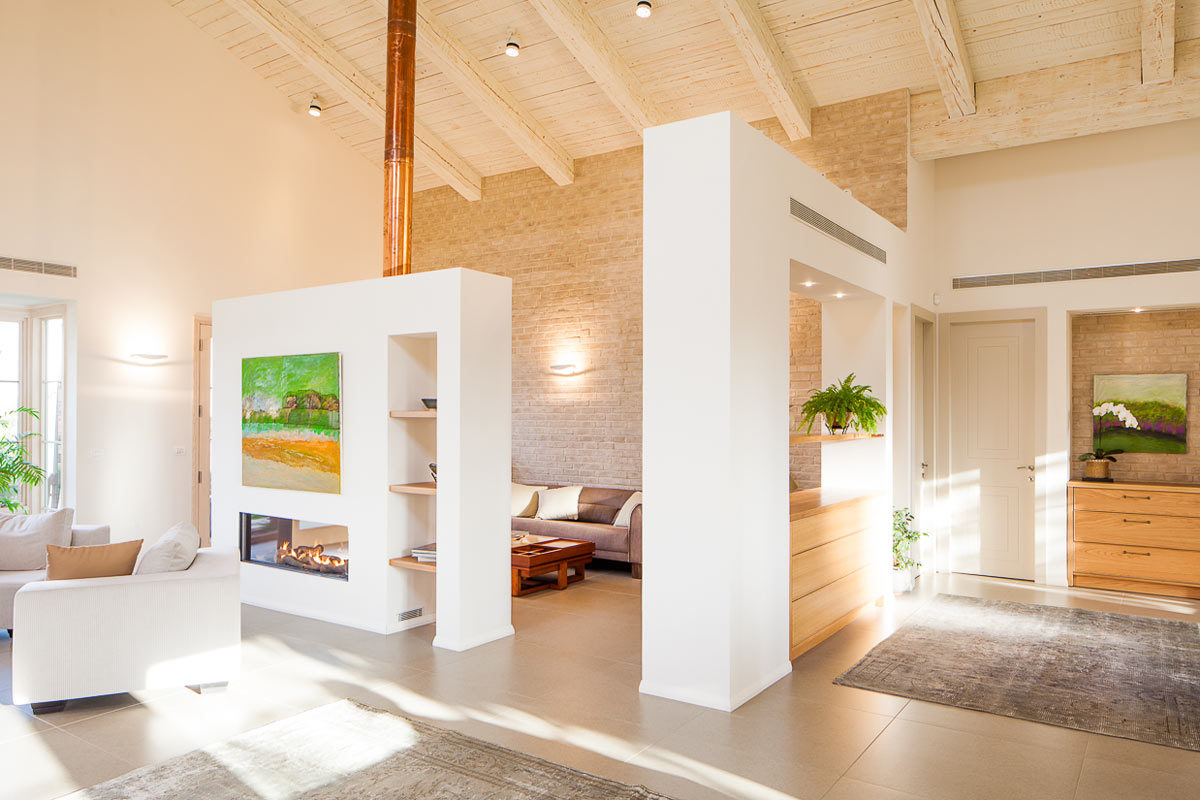 A fireplace can be more than just something that can keep you warm when the weather is getting cold. In fact, it can be a valuable additional piece that will enhance the look of your living room. Furthermore, it can also function as a room divider.
This fireplace, for example, will not only keep the room warm but also add some sort of style. It separates the living room and bedroom nicely. Moreover, it features some built-in shelves that you can use to display your knick-knacks.
Your instructions are:
- Step 1: Cut down the wall between the rooms by removing the fireplace and removing or repositioning any electrical outlets, sprinklers, and cabinets.
- Step 2: Reattach the fireplace to the wall. It may be a good idea to add 2 to 2 feet of height since you will be placing this again in your room divider.
- Step 3: Layout your storage units and shelving in this space in a way that allows access to them without opening up doors or drawers. You can always add another entry if there is an opening for one already.
- Step 4: Measure the width and height of your opening and cut down plywood according to size by using a circular saw.
- Step 5: Assemble shelving and secure them with screws based on the height of the wall and desired toppers. You can also choose to use pneumatic caulk or other adhesive methods for extra security.
- Step 6: Secure your shelves by using clips to mount them in place. Then, you can paint your custom shelves according to your preferences.
Bonus ideas 1: Double Dividers
If you have a lot to provide storage space, you may want to consider building an additional one instead of just wall-to-wall shelves available in different sizes and shapes. This idea is beneficial if you have multiple rooms that need dividers for storage purposes only. This way, everything will be accessible anytime while maintaining the symmetry of the space.
Bonus ideas 2: The Fireplace Bookshelf
This fireplace occupies less than half of a wall and looks like a decorative piece. That can be placed anywhere in your home. This bookcase is mostly made from wood, and you will use fireproof materials.
For example (vinyl on the inside of this room divider),
So you do not have to worry about the fire damage to your home.
There are plenty of advantages or DIY design ideas that can be created using this type of furniture.
7. The Bi-Fold Pegboards

Pegboards are such a versatile storage solution. You can hang them in your kitchen, garage, bedroom or even turn them into a chic room divider.
If you want to make a partition using pegboards, you will need three or four pegboards. After that, assemble the pieces using hinges so that you can fold and unfold them.
The next step is the fun part. You can add as many dowels and shelves as possible to be your additional storage solutions.
Detailed Instructions:
- Step 1: Assemble the pegboards using hinges. The number of pegboards you use will depend on the size of your wall and the number of shelves and hooks that you can add.
- Step 2: Hang up your shelves and add other storage solutions like dowels or bins based on your space’s requirements.
- Step 3: Paint them in any color to make them blend with the room’s décor.
- Step 4: Install hooks and rings like curtain ties for extra security.
- Step 5: Make it permanent by screwing down the pegboards to your wooden studs.
Bonus idea: One Panel Room Dividers
A single panel is easier and faster to make than a double or triple panel room divider. However, it does not guarantee you more privacy than other models. It is not any different from an open doorway.
Nonetheless, if you have a small house and you want to maximize the space without adding too much weight or bulk to your home, then this might be an ideal choice for you.
You will need at least 2 yards of fabric cut into 1-foot wide strips. Make sure that the fabric is light enough so you can hang it around your walls. Iron them, so they are ready to be displayed on the wall. Then, just arrange these strips in a way that they can block out the sight of your room’s opening.
Aside from that, adding curtains can also help keep bugs and dust away from your living room or bedroom.
6. The Room Divider and Wardrobe Combo
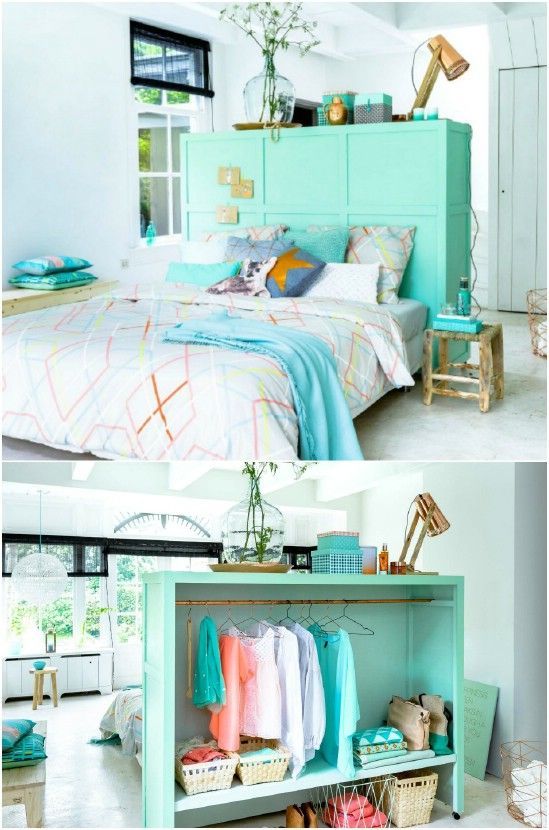
A small bedroom does not give you much space to have a comfortably-sized wardrobe. However, it does not mean you can forgo it whatsoever.
This wardrobe, for instance, not only keeps your clothes organized but also becomes a stylish headboard. Furthermore, it can also be a creative room divider that separates your bedroom from another room.
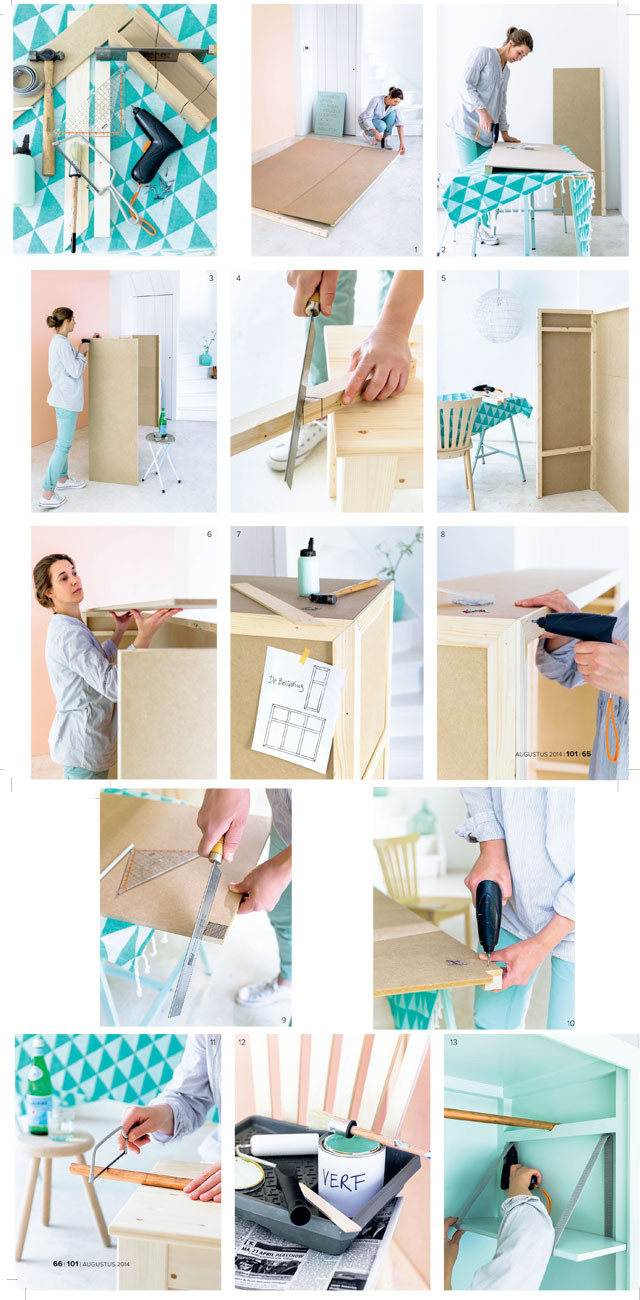
Detail instructions:
- Step 1: Cut down the wall between the bedrooms using a circular saw.
- Step 2: Attach the metal brackets to both sides of the wall using your screw guns.
- Step 3: Attach the left and suitable brackets to each end of your wardrobe with screws and finish it off by painting it in any color you like.
- Step 4: Add curtains if you need privacy.
- Step 5: Hang up your wardrobe and place your dressers and cabinets on it like any other furniture.
Bonus idea: The Curtain Rod Room Divider
A curtain rod with three or four hooks can be your room divider for sleeping, working, or doing crafts. This idea is also a good choice if you want to build something both functional and attractive at the same time. It can even support heavy items like suitcases or suit coats.
You will need several hooks, the width of the rods (and length, too), and measurements of pegboard to hang them on your wall. The pegboard should be 1 x 6 feet in size if possible.
Bonus idea: The Parcel Shelf Room Divider
This room divider features a metal wire shelf and can be used as a headboard or room divider. It also folds away when not needed so that it will not occupy much space on your wall. You can also remove it when you are not using it since it is lightweight, making installation easy.
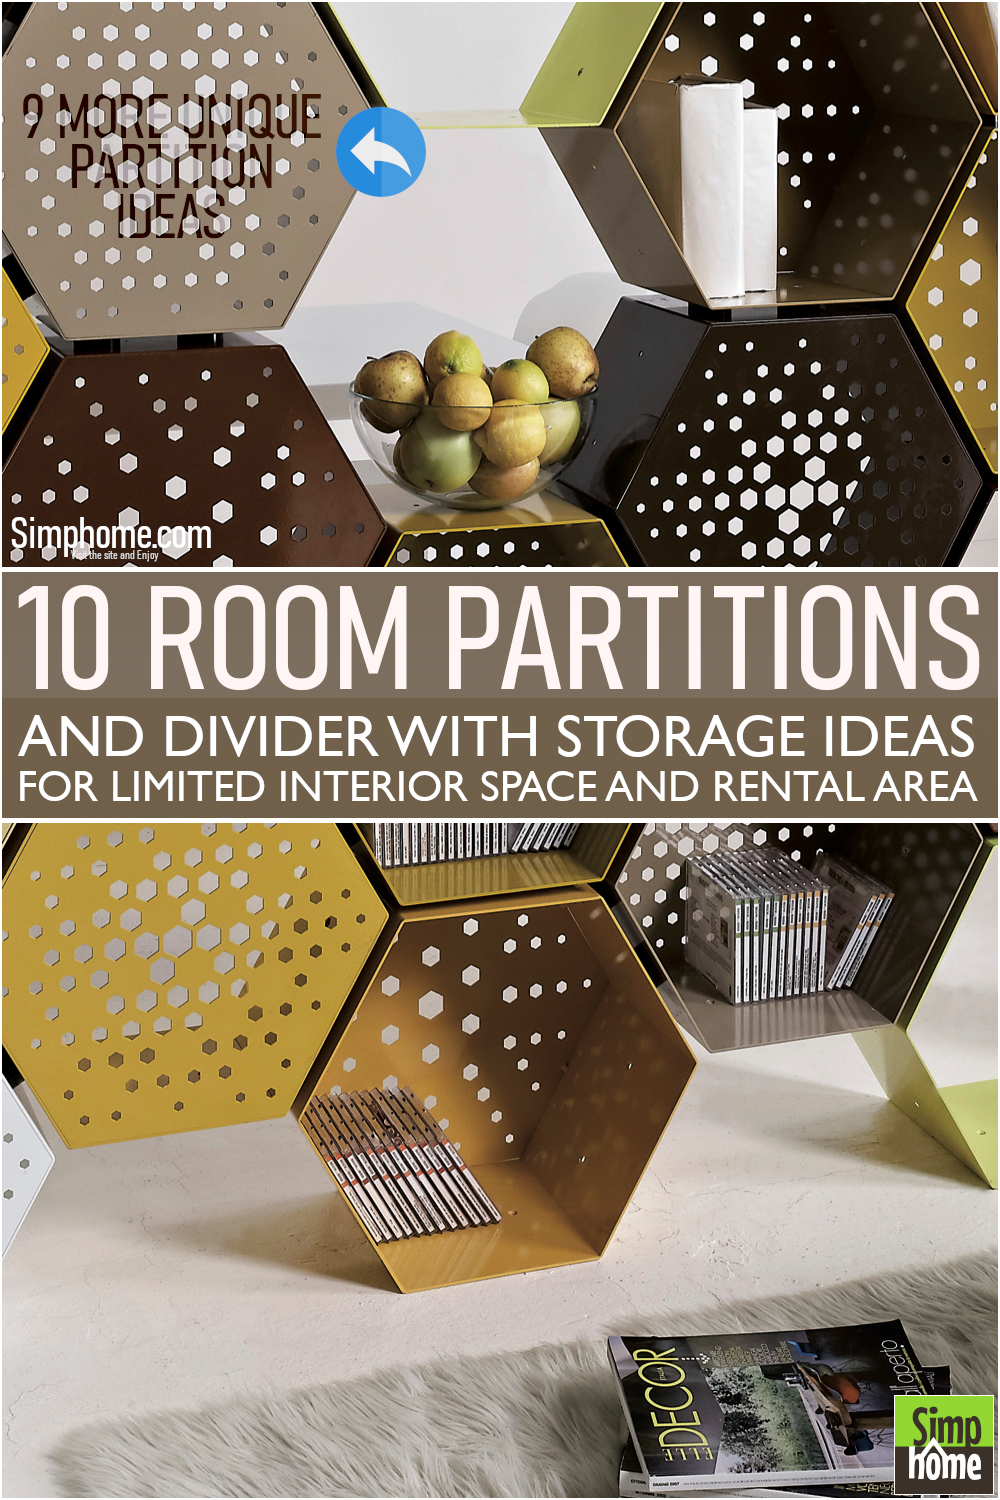
5. Honeycomb Room Divider
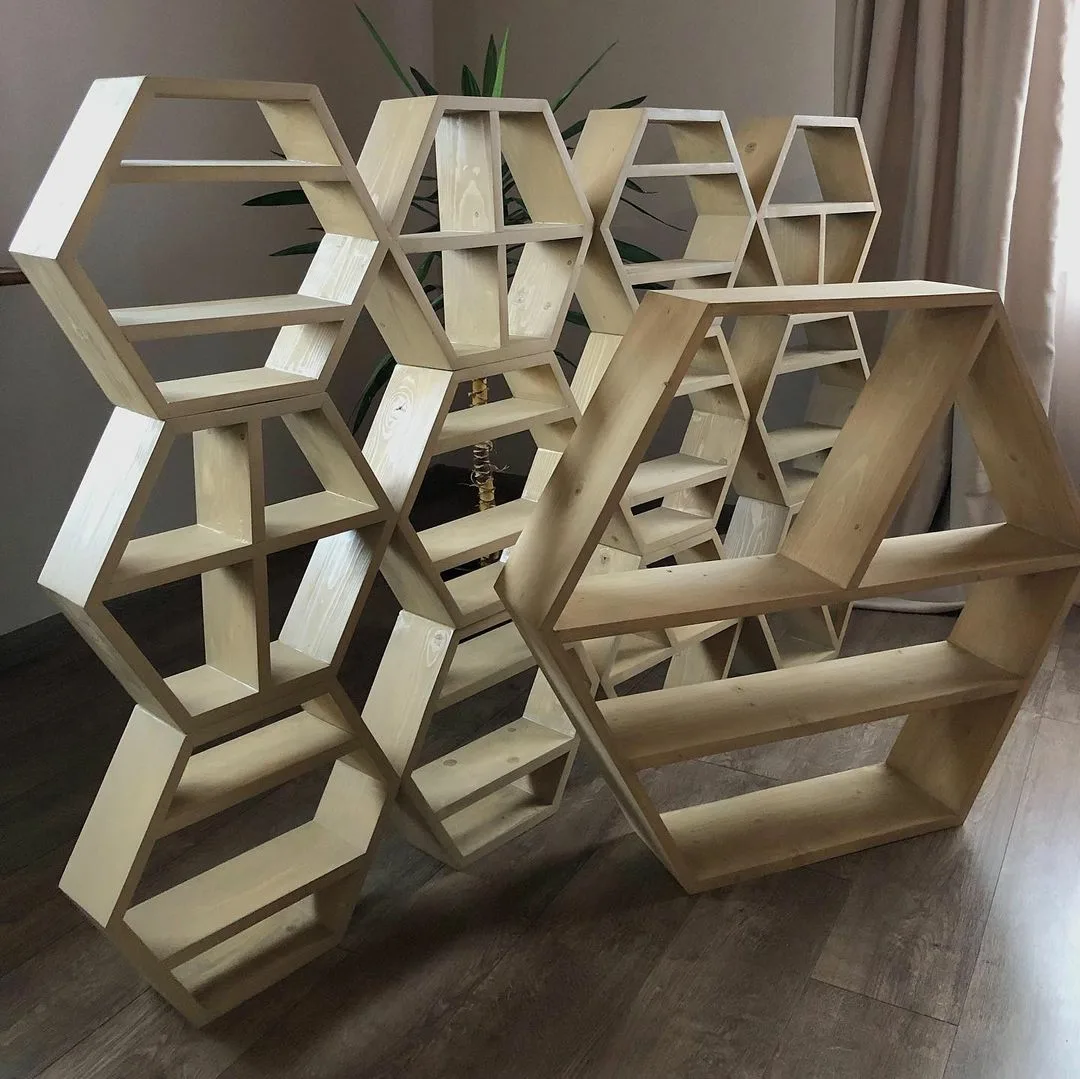 Shelves are not always rectangular or cubical. They can be anything to meet your home style. If you are into modern or contemporary interior design, you should put these shelves on your list.
The hexagonal shapes, which look like a honeycomb, will help you cut the clutter and decorate the room immensely.
They may not give you the ultimate privacy, but they can create a clear and chic boundary that distinguishes your dining room from the rest of your rooms. The shelves come in white and gold, which matches the chairs and table legs. This way, the partition will look united with the existing furniture.
Detailed instructions:
- Step 1: Start with the chair legs. Place the metal brackets on your wall exactly where you want to hang your honeycomb shelves.
- Step 2: Use the screw-guns to attach the chair legs to the brackets.
- Step 3: Attach your honeycomb shelves to these brackets by using screws for extra stability.
- Step 4: Add curtains if you want more privacy.
- Step 5: Mix and match with other furnishings.
Bonus idea: The Cube Room Divider
You can use the cube room divider in a variety of rooms. Its curvy, curved front can be a door or a bench seat for reading or a bench seat with storage compartments underneath, so you don’t have to clutter your room.
It is also not any different from an open doorway, but it can create more privacy than other models you might try out on the market.
Whether for creating original partitions or an exciting headboard, these dividers are helpful even if they provide the ultimate privacy. However, they will make your house more attractive and functional at the same time.

Bonus idea: The Doorway Divider with Hanging Shelves
In a small room, hanging shelves is a good way for you to maximize its space so you can use it as storage or as a place for extra books. You will need an old door with hinges, some wood for the shelves, and a drill to attach them to your wall.
- Step 1: Screw the hinges and the handles in their places.
- Step 2: Attach the shelves in any way you like by screwing them on.
- Step 3: Paint your wall in any color you want and add curtains for more privacy if you need it.
You can also use these dividers in other rooms like a linen closet, bathroom, or kitchen mudroom (or laundry room) if you have one. You can also hang towels, clothes, or other items that you often use on your partition to maximize its storage space.
Honeycomb Divider For Public Space 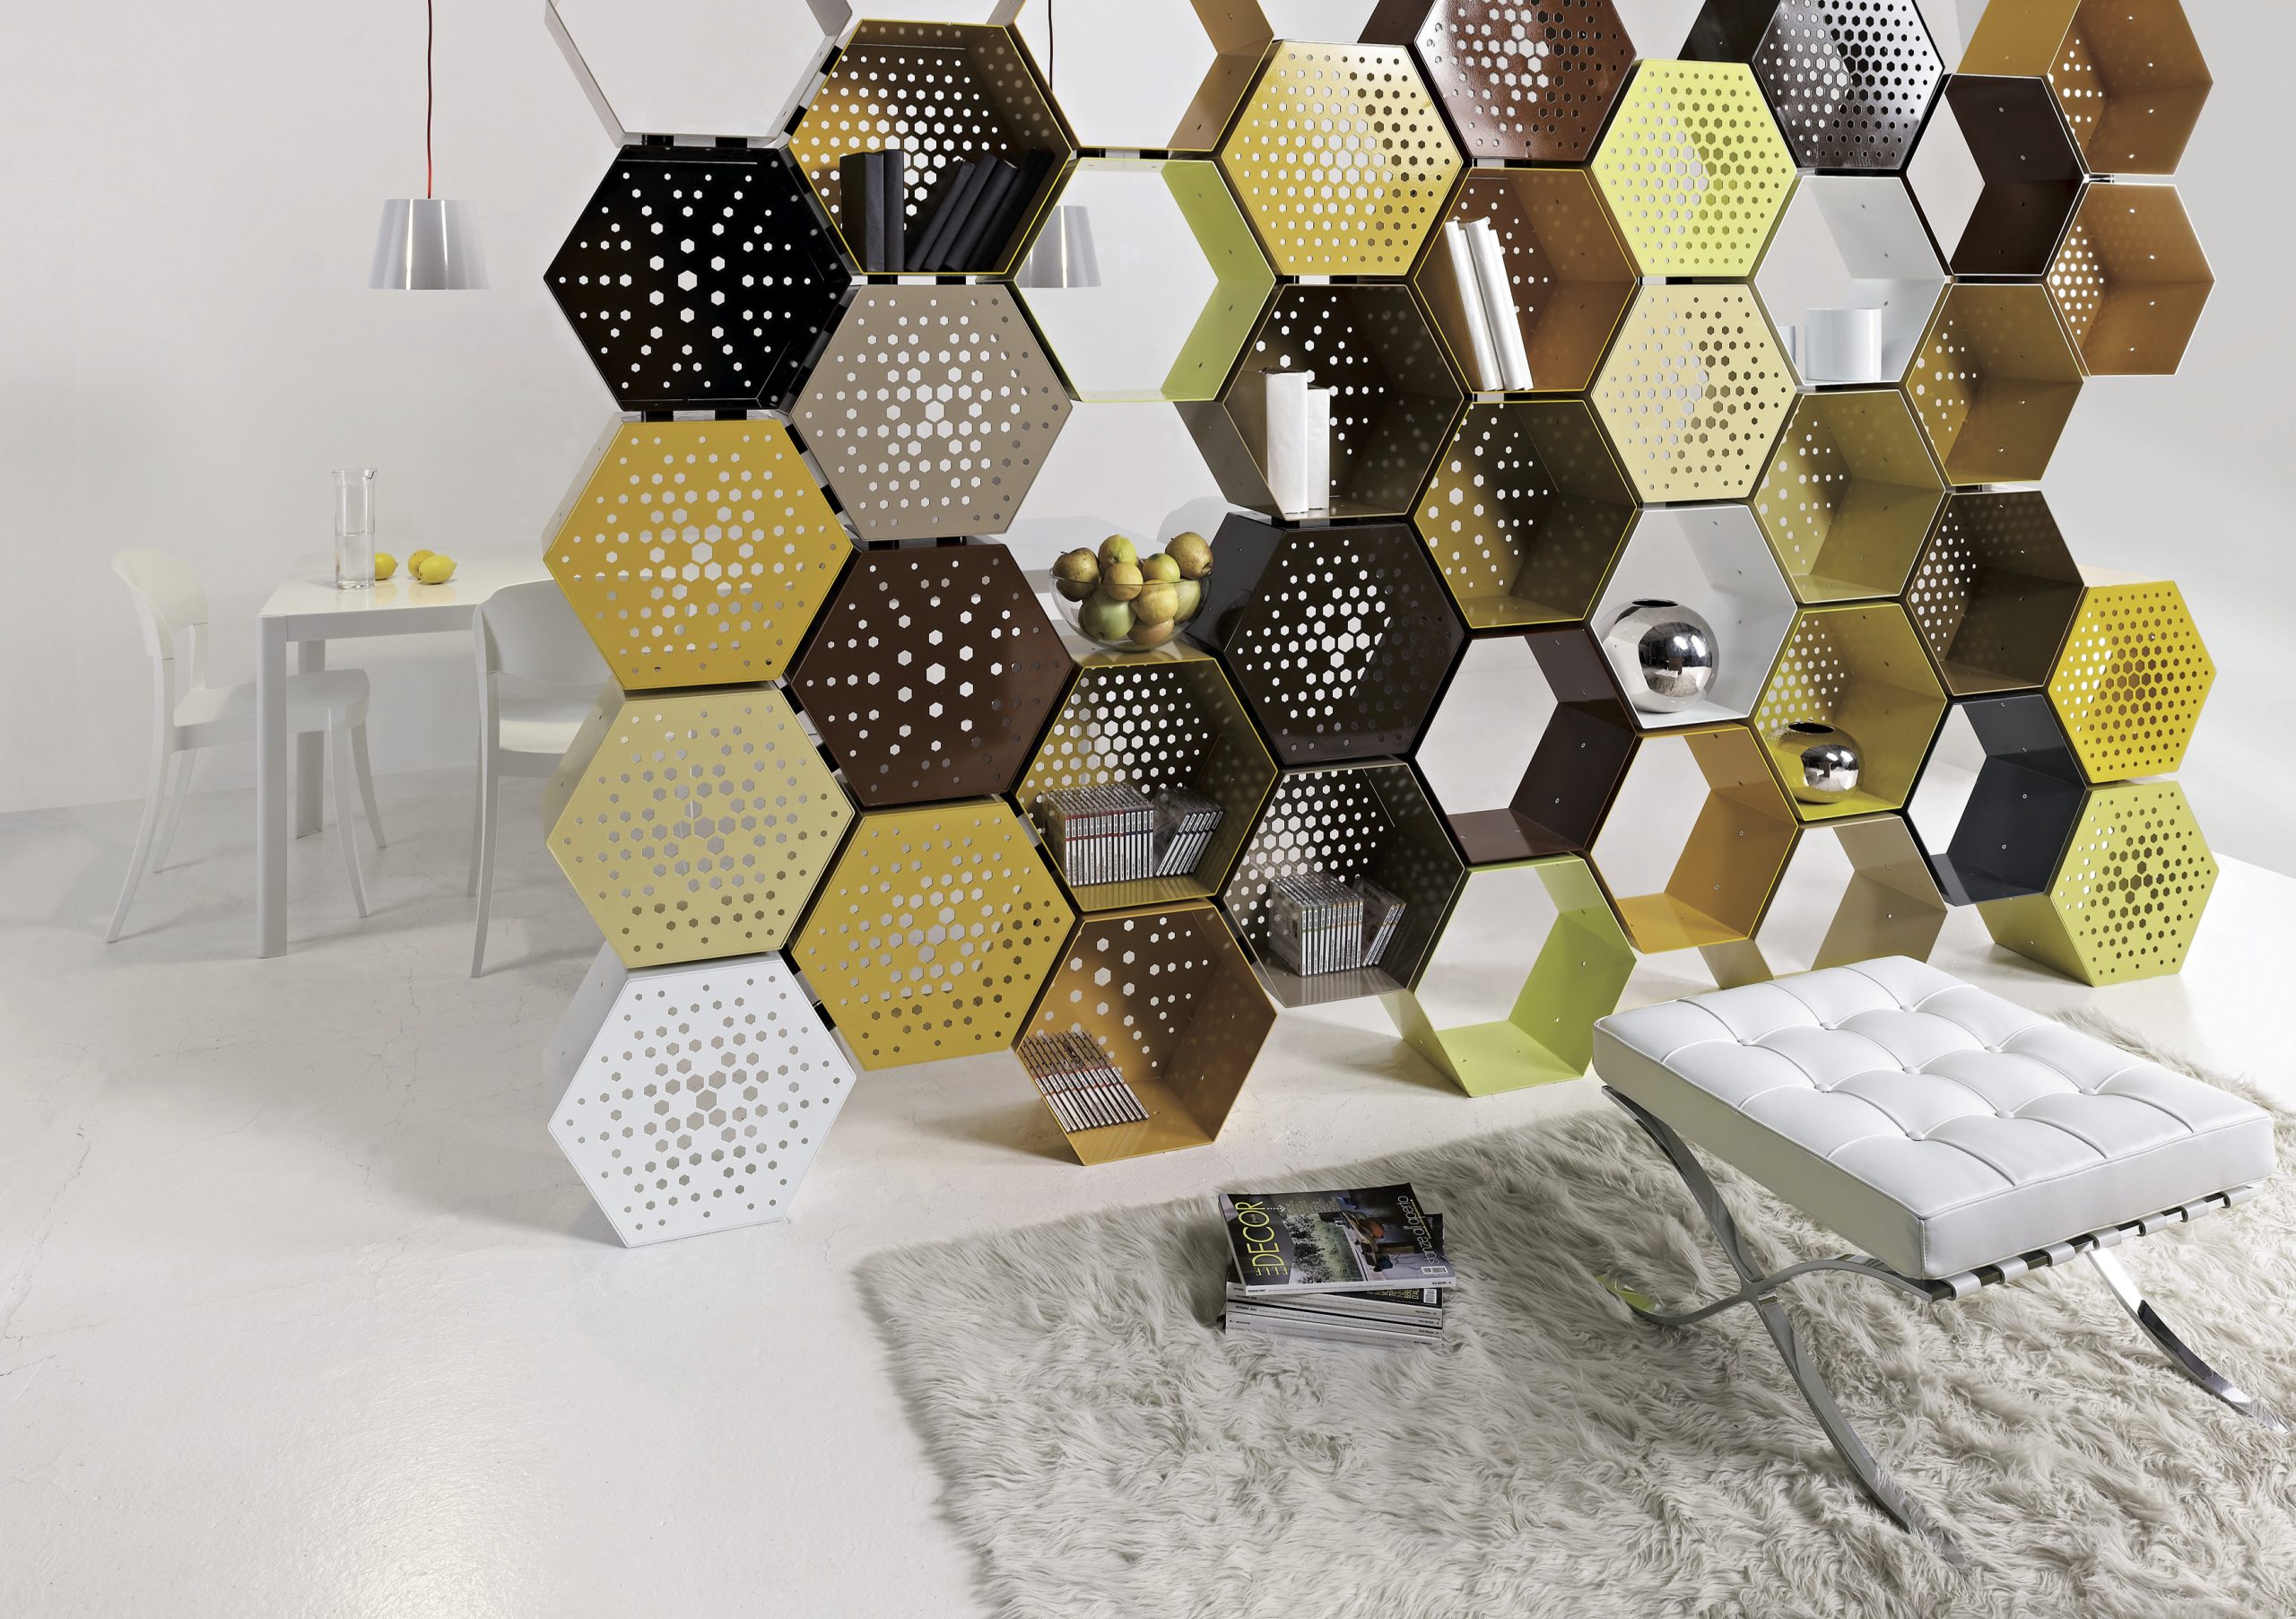
The Honeycomb Divider Idea for A White Living Room
4. The Built-in Shelf Idea
 Having a private home office is great. However, it can be hard to make this idea tangible if you do not have much space available. Well, do not give up hope. This room divider can be the solution that you have been looking for.
This built-in shelf makes a clear and practical border between the bedroom and home office. It even comes in the same color scheme as the wall to make them look united. More importantly, it provides ample storage space to store your books, files, and even cute dolls.
Detailed Instructions:
- Step 1: Cut the wood to the desired length and width.
- Step 2: Screw the brackets on both sides of your wall.
- Step 3: Attach the wood shelves to the brackets by screwing them tightly.
- Step 4: Add curtains if you need more privacy.
Bonus idea: The Build-in Headboard for Bedroom
The headboard that you build into your bedroom will be helpful for decorative purposes and practical ones. You can also use it as a room divider if you want privacy in your bedroom but not in the rest of your house. It can also be used as a hamper or even a closet organizer if your room does not have many other options for storage.
- Step 1: Use a circular saw for cutting the wood.
- Step 2: Screw the brackets to the wall at both ends.
- Step 3: Attach the built-in headboard to the brackets by inserting screws and paint your wall in any color you want.
3. The Colorful Room Divider
 The Ikea Expedit is your top-notch choice when it comes to holding the clutter at bay without neglecting the stylish look. Like many other Ikea products, these shelves can serve you a double duty if you hack them.
To make this striking room divider, try putting the Expedit desk and shelves together. This way, you can get a wider partition, perfect to separate the living room and bedroom.
After that, install two eyehooks on each cube to hang colorful canvas. Doing this will add some pops of colors to the space and block the view, which is good if you want to get your ultimate privacy.
Detailed Instructions:
- Step 1: Choose the color you want for your canvas. You can get away with any bold or bright colors you like, but choose something that matches your room’s overall color scheme.
- Step 2: Paint both sides of your wall in white if it is not already.
- Step 3: Measure the height of your Expedit cubes and paint two squares on each cube using a pencil just small enough to fit into their thickness.
- Step 4: Use an electric drill to attach the eyehooks into each square hole.
- Step 5: Hang your colorful canvases on these fresh eyehooks.
2. Divide the Room with Kitchen Cabinets
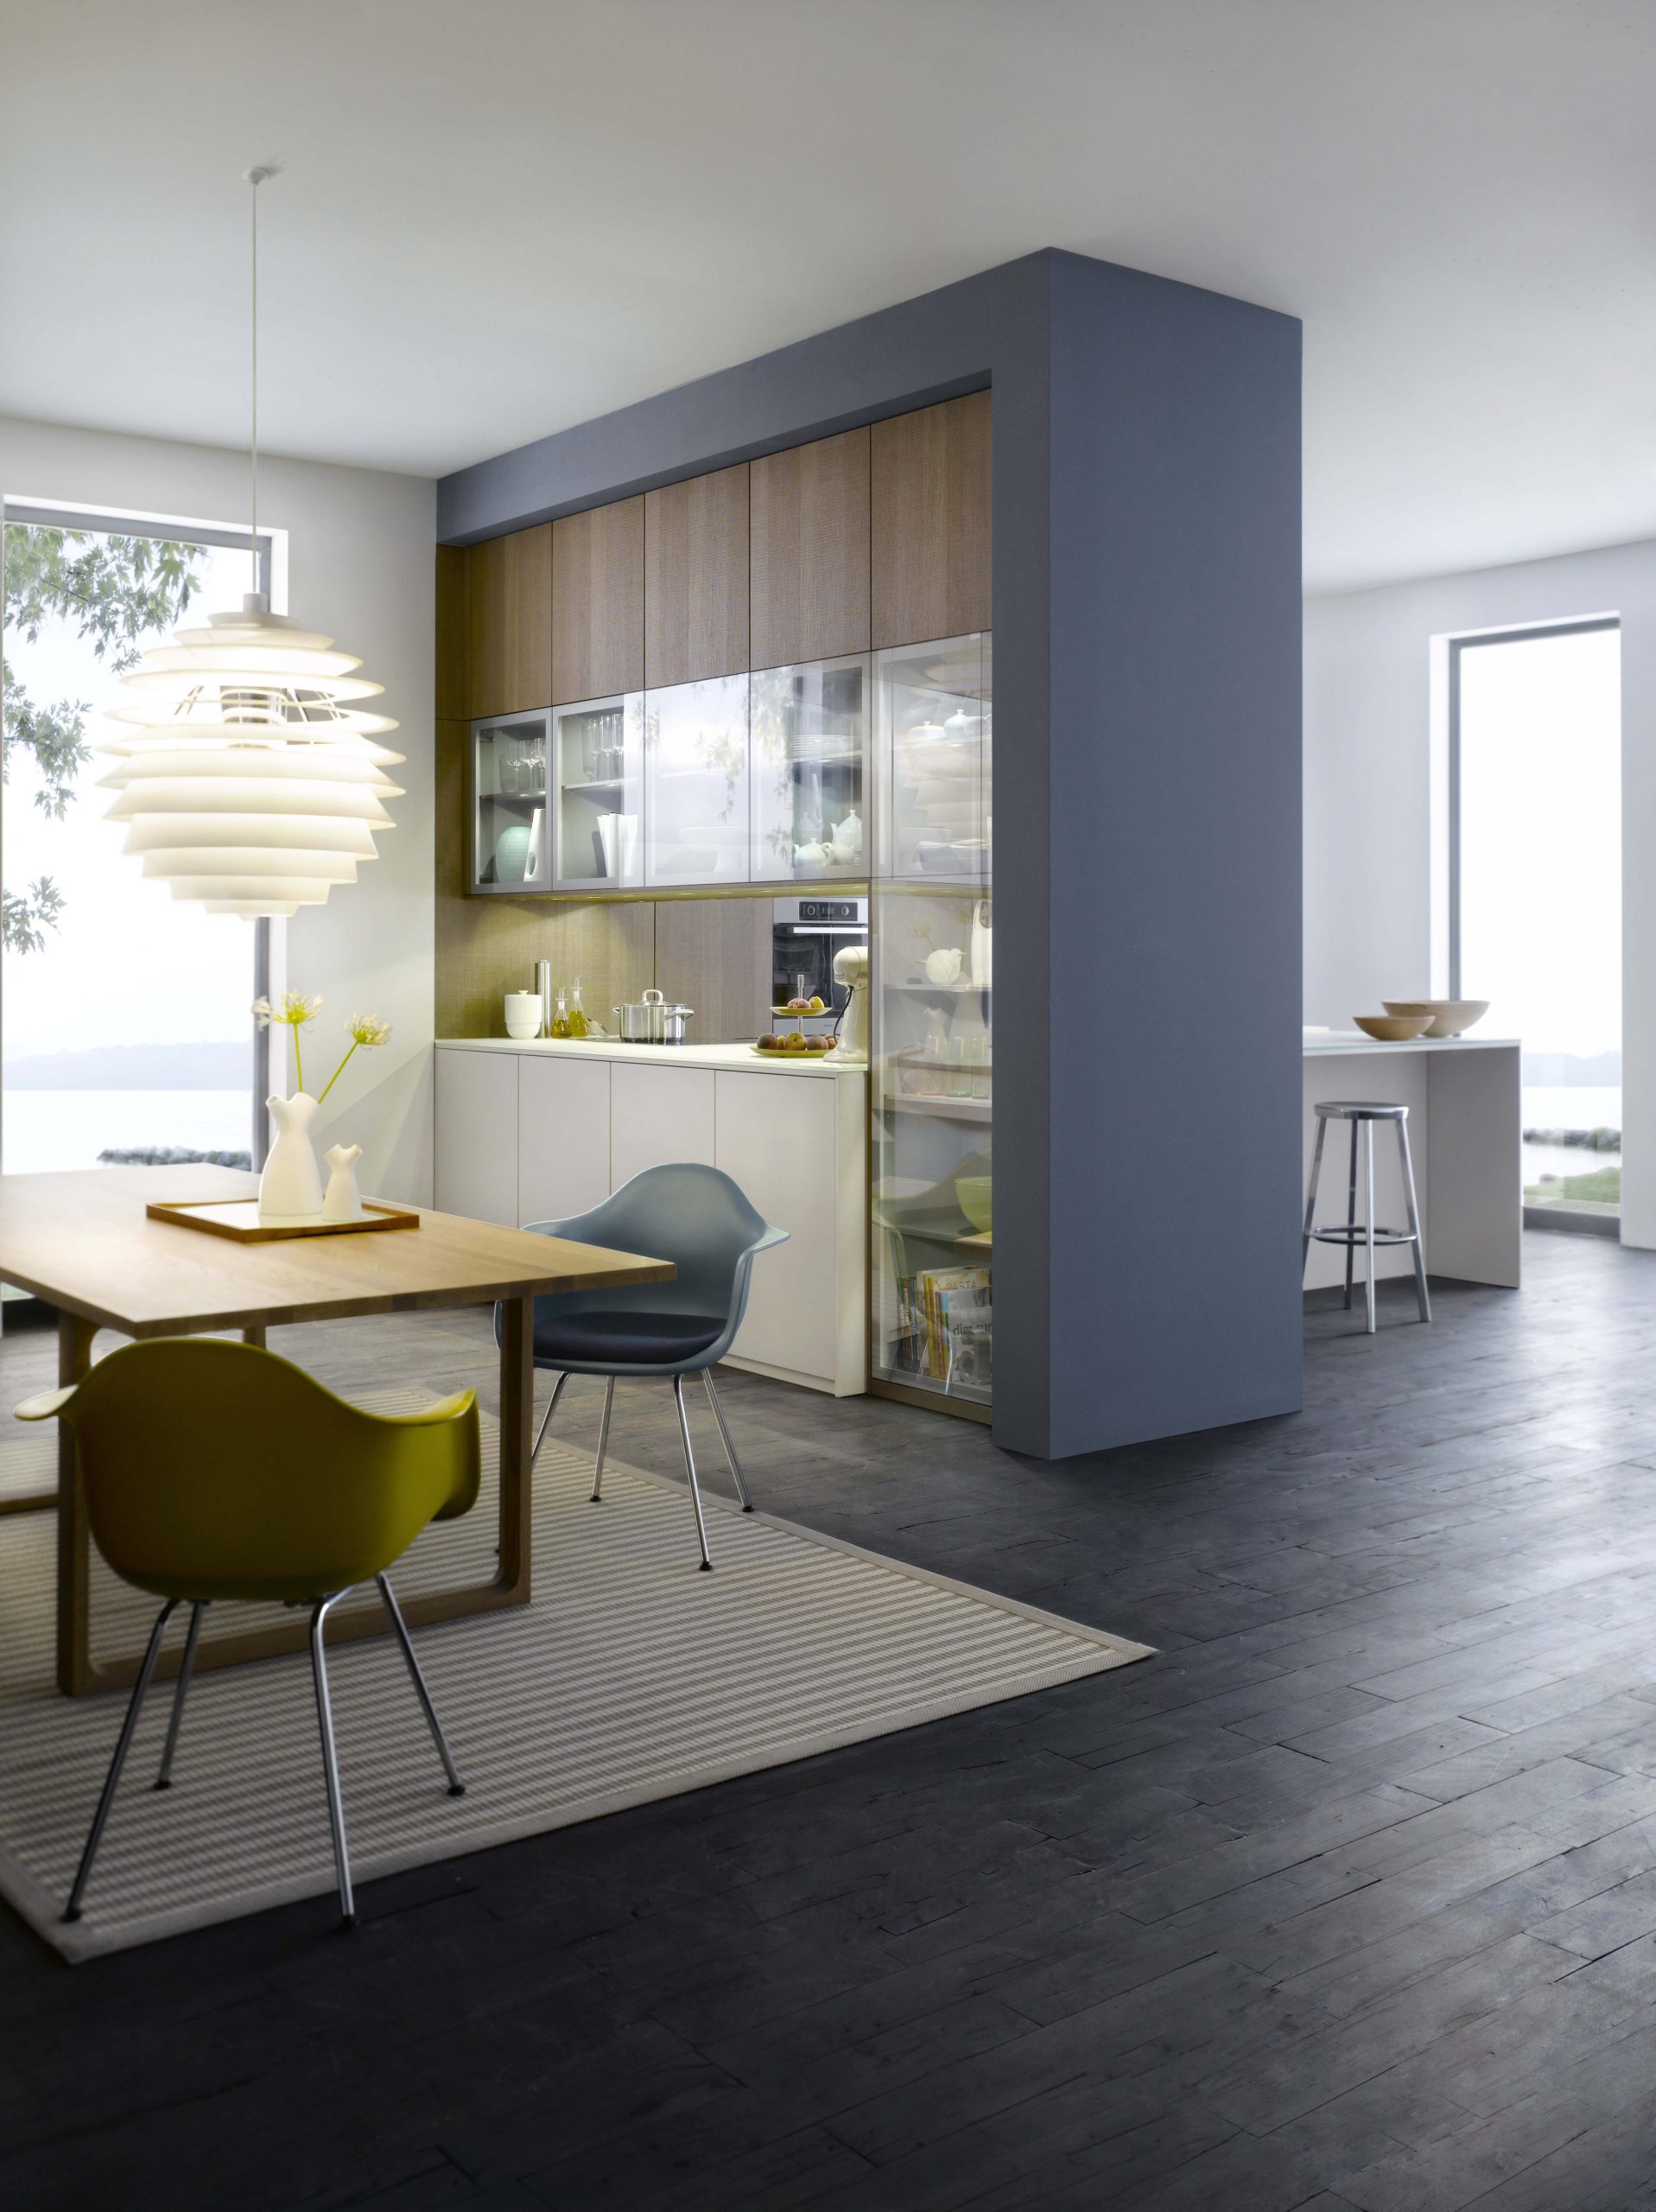 People usually mount their kitchen cabinets on the wall. However, this one is a bit different. Have you ever seen floating kitchen cabinets?
These cabinets stand on their own in the middle of a room, just like a kitchen island. Not only do they provide ample storage and countertop, but they also make a distinctive partition between the dining room and living room.
Instructions:
- Step 1: Measure and cut the wood using a saw and hammer in woodworking.
- Step 2: Attach your cabinets in place in your living room.
- Step 3: Hand-paint the front of the cabinets in any color you like or spray-paint it if you don’t have enough time.
- Step 4: Add hooks on the kitchen cabinets to add more storage space.
- Step 5: Decorate the cabinets if you like.
Bonus idea: The Floating Cabinet Shelf Idea
It is not better for your privacy, but it gives your kitchen extra storage space. Besides, this floating cabinet shelf will make you save more money since you do not need to purchase one at the store.
- Step 1: Purchase pine cabinets that are small enough to fit into your ceiling space.
- Step 2: Mount them in place by screwing them onto the wall.
- Step 3: Use hooks if you want additional storage space for other items. Additionally, if you have a small or medium-sized kitchen, having a floating cabinet shelf is a must if you want maximum countertop and storage space.
- Step 4: Hang your kitchen utensils, such as the pots and pans on the hooks.
Lastly, Number 1. The Natural Room Divider
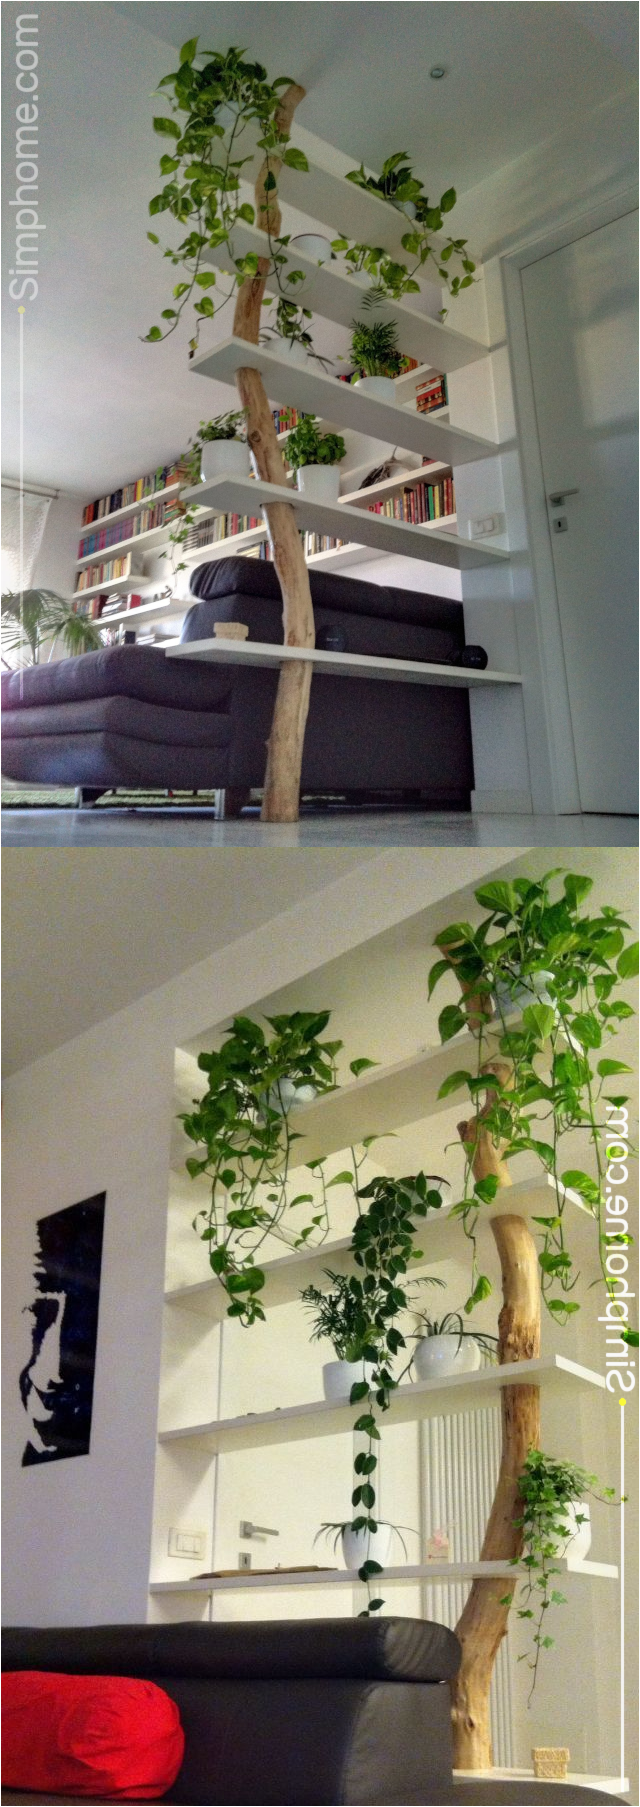 Bringing in the charm of nature has always been a terrific idea since you can add positive vibes to the space. You can make it real by opening up the window, growing a little greenery inside the house, or making these nature-inspired shelves.
To make these shelves, you need to thread a treated wood trunk or branch through several boards. Mount the boards on the wall, and you are good to go. Do not forget to secure the trunk or branch to the ceiling and floor.
Once the shelves are ready, you will get a chic room divider and storage space that can impress everyone who sees them.
Instructions:
- Step 1: Get a few boards and a log.
- Step 2: Measure and cut the boards to create your shelves.
- Step 3: Find several branches or logs that are straight and strong enough to support the shelves well.
- Step 4: Get some brackets, screws, and glue.
- Step 5: Measure the length of the brackets and screw them onto each branch or log. Remember that one branch or log can support only one shelf. If you want more, you need to secure them together using long screws so they can support more weight and look better.
- Step 6: Attach your shelves to the brackets by inserting screws through all of them. You can also insert glue if needed for binding purposes.
- Step 7: Hang the log or branch on top of your bookshelf. Place a book on it, and you will have a ‘chic’ natural wall divider with ample storage space.
- Step 8: You can now hang more branches or logs from the ceiling to create further layers of shelves.
Bonus: The Modular Room Divider
The modular wall dividers are convenient as they provide all kinds of functions and sell as a standalone product and an addition to existing pieces of furniture and decor in the room. The modular wall dividers come in various styles and designs, so it is up to you to choose which suits your taste and needs best. However, the only drawback of the modular wall dividers is that they are relatively complex to build. Some also need special tools and construction skills, which not all people possess.
So if you want a stylish and straightforward wall divider that requires no carpentry skills and no professional assistance, then this Ikea hack might do just fine for your needs.
Instructions:
- Step 1: Take your time to measure the space between two walls.
- Step 2: Purchase two Ikea Kallax Shelves and one Ekby Valter Shelf Bracket at $10 each (originally $23).
- Step 3: Start building the shelves by connecting them using wood dowels or screws, depending on your choice.
- Step 4: Attach the brackets to the wall using screws.
- Step 5: Screw your shelves on the brackets.
- Step 6: Congratulations! You have just built your very own DIY modular wall divider for $40.
You can now place whatever you like on these shelves, be it pictures, decorations, plants, or any other stuff. Also, you can easily remove one of them if you want more space to enter your living room or bedroom. Well done!
Conclusion:
The above are some of the most common methods of creating a stylish, practical, and spacious wall for your home. These are also very easy to execute, so that you can give them a try at any time. The results will impress you.
Furthermore, if you have any questions or comments, please share them with us to improve this article!
So, although you choose to ditch some walls, it does not mean you have to forgo your privacy. These 10 partition storage room dividers will provide privacy and create clear boundaries between rooms while cutting the clutter.
References:
10. Renoguide.com
9. Renoguide.com
8. Mochacasa.com
7. Loveproperty.com
6. Pinterest.com
5. Homedit.com
4. Lushome.com
3. Homedit.com
2. Home-designing.com
1. Morningchores.com