Key points:
- It provides you with more storage without compromising the look of your cupboards
- It is versatile so that it can handle various items
- No matter how small or large your kitchen is, this will add a lot of charm to it
Precautions: Be sure to measure the space before having a professional install. If you’re short on space, try just to open a few shelves and see if they will work for you.
- Use Shelves in Your Window: If there is space in your window, why not turn the empty spot into additional storage? Place shelves on your window and give it that finished look. This idea is also helpful if you want to use bars in the window.
- Use Shelves for Your Dishes: If you’re short on space, use these shelves to display your dishes. It’s a fun way to store and also adds a decorative touch. This idea is sound, especially if you have friends who visit often and you want to show off your kitchen with whimsical décor
- Use Shelves to Hook Your Hangers: If you’re short on space, use your shelves to store your hangers. It’s easy and efficient, especially if you have a lot of clothes and the closet is not an option.
- Use a Ladder for Shelves: Instead of using shelves for the smaller items, you can use a ladder to keep them. This idea is practical, especially since you can take advantage of that space at the top.
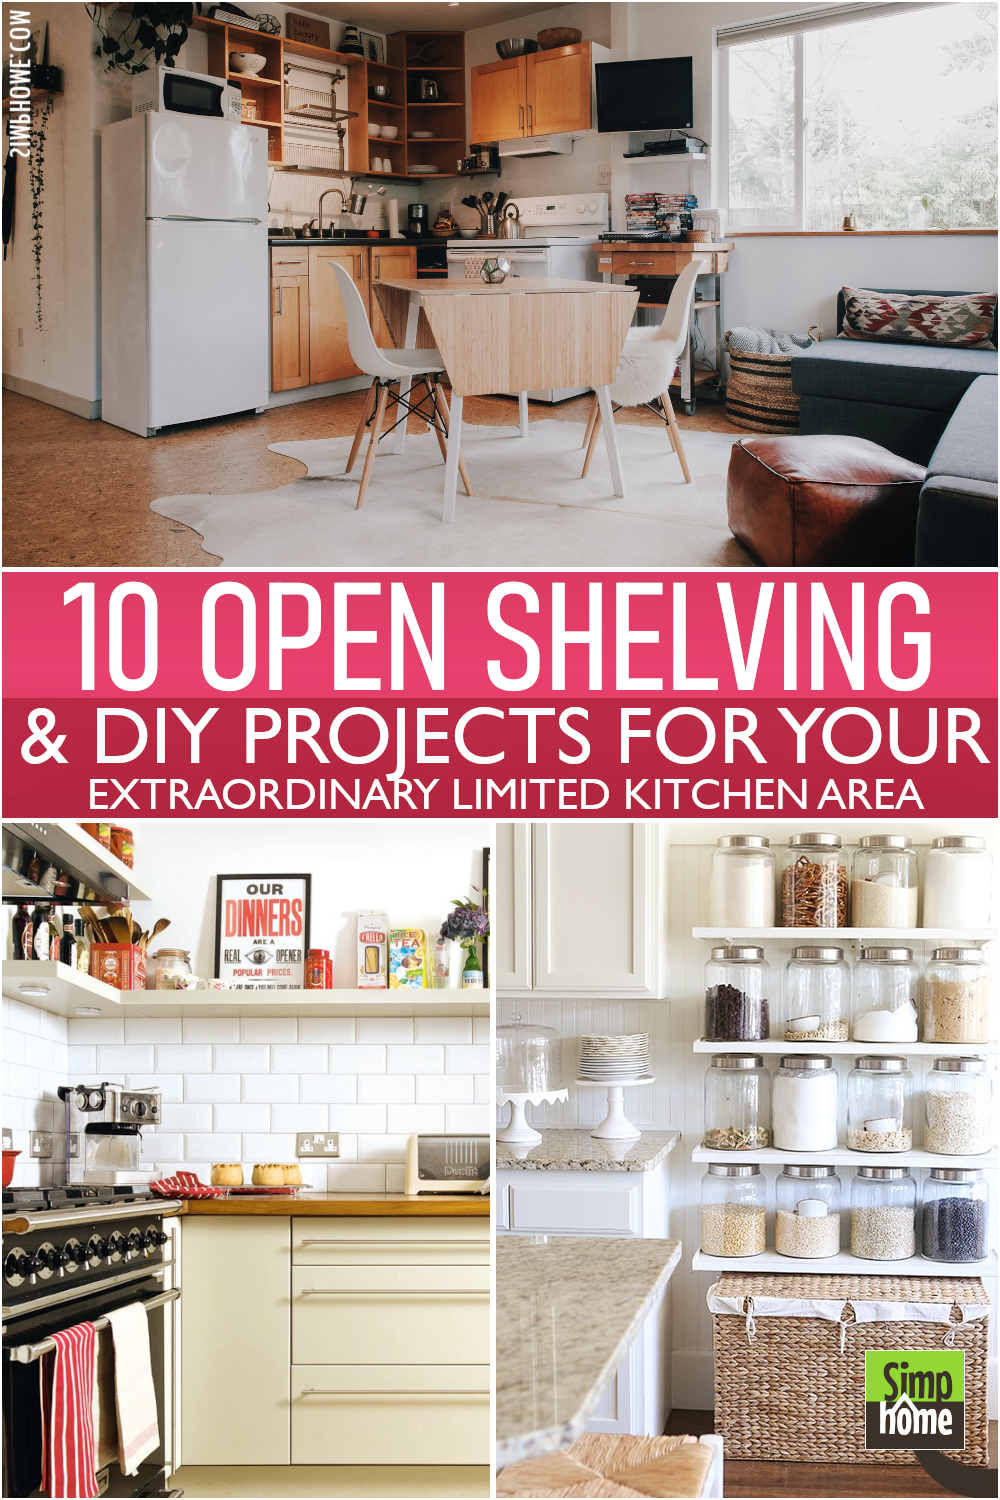
Open shelving is one of the kitchen elements that you should not miss. Moreover, it becomes essential if your kitchen is not spacious. Not only will it provide ample storage, but it will also spruce up your kitchen a lot. Since everything is on display, you can see what you need to use at a glance. Thus, you will not waste your time only searching for the thing you will use.
Even if it is mainly seen as the tiniest part of a kitchen, open shelving can still be a statement in it. It is both practical and visually pleasing, making it an eye-catching element for the kitchen.
If you want to have both functions in your kitchen, here is a list that mentions 10 Various Ideas to Complete Your Limited Kitchen with Open Shelving. Please have a look and get inspired! As always, Simphome presents you with the list.
🔊10 Open Shelving Ideas for A Limited-spaced Kitchen Video:
List Entries:
10. Herb and Spice Corner
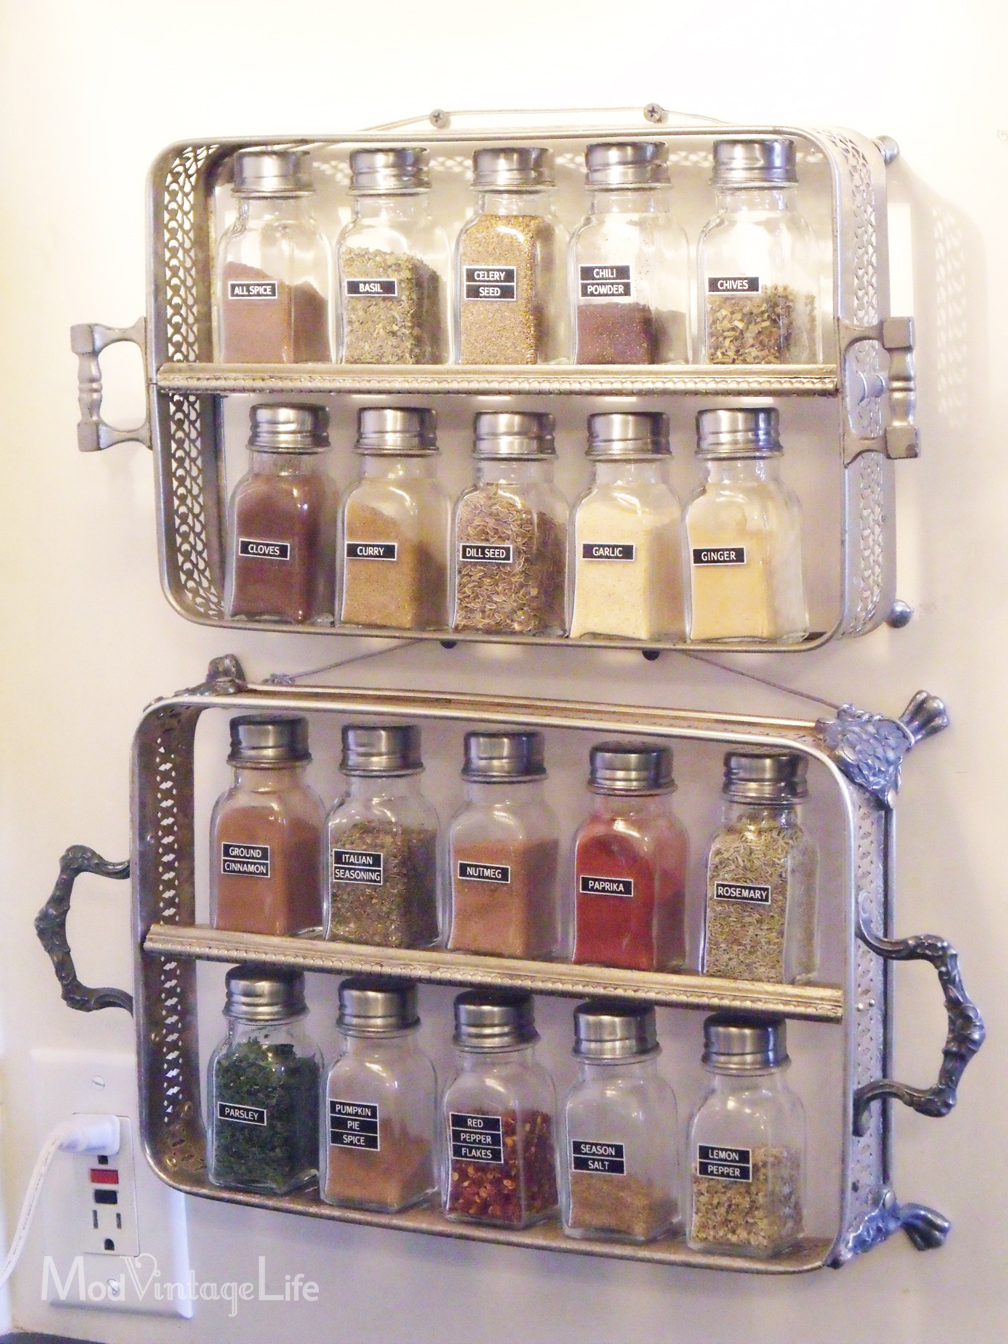 Herbs and spices are stuff that everyone should have in the kitchen. They are the primary ingredients for cooking. So, having proper open shelving for them is a need.
You can find many ready-made shelves in stores. However, if you want something unique and appealing without costing you a fortune, you can give this idea a try.
You need to get silver serving pieces from a thrift store and some wood boards to make these shelves. Then, drill two small holes through each shelf. This way, you can thread a wire through them to hang them.
Relevant details:
- Start to tweak the project with the Edge boards, which are cheaper than the Rustic and the Dramatic.
- Cover edge boards with pine 1x4s.
- Save money by buying flat-patterned wallpaper instead of pricier fancy paper to cover the back wall
- Before hanging on the wall, paint each shelf with a primer, then two coats of gray chalk paint
- Wrap lightbulbs with ribbon
9. Building a Coffee Bar
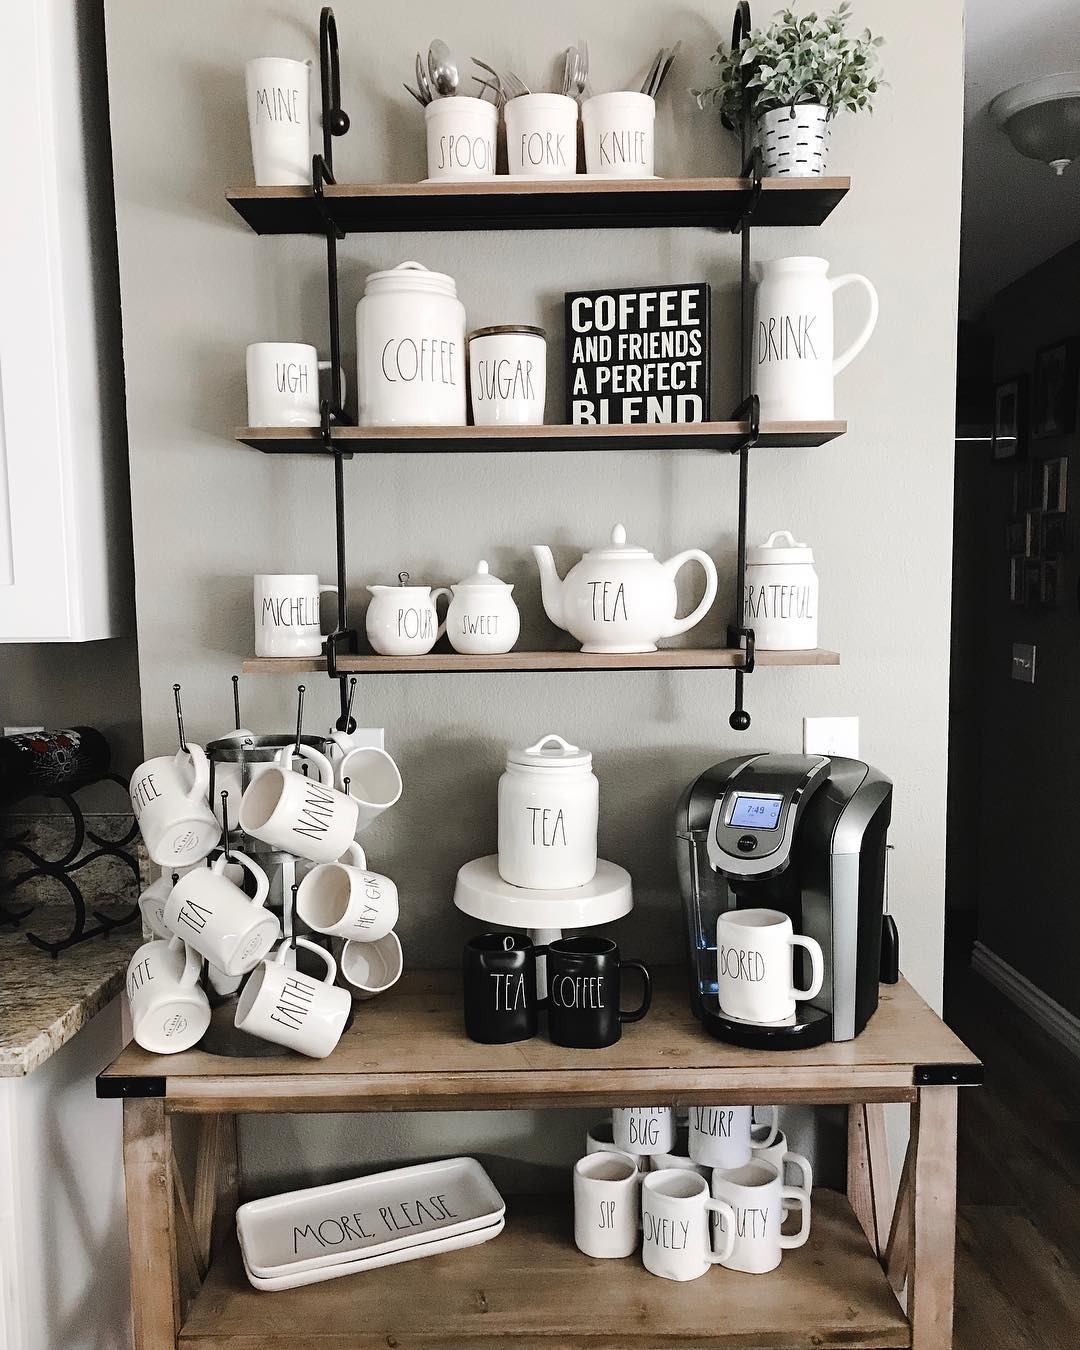 Are you someone who loves caffeine so much? If so, consider building your own coffee bar. Whether in the morning, noon, or even at night, it will help you easily get your daily dose of caffeine while saving your money. Another good thing is you do not have to make a run to the nearby cafe anymore.
It doesn’t matter if your kitchen has limited space. You can create the bar using open shelving.
Utilize a tiny space for your coffee pot and coffee machine –if you have it. Then add a couple of shelves above them. Place your favorite coffee beans and other coffee maker utensils or even your favorite companion cookies while enjoying a cup of coffee. You can also try to personalize it to your liking to boost your mood.
Simple instructions to build a simple Coffee Bar:
- Step 1: To begin, you need a cabinet with open shelving. Then add a couple of shelves above the cabinet. Next, place your coffee pots and coffee beans on the shelves one at a time to build your bar.
- Step 2: Decide whether you plan for morning or afternoon or even overnight brews in the bar. Place your coffee pots only when necessary for you to make your brew.
- Step 3: If that’s not sufficient enough, simply add additional cabinets and shelves on the other side of the first one. It will give you more space to store even more items and utensils while chilling out with friends over a cup of coffee. Best tip:
You have to be prepared for the mess –so do not forget to clean it frequently as it will accumulate with time. You can clean it with a simple, damp cloth.
Here are some of the tips and tricks you should consider when you build your coffee bar:
- 1). A coffee bar is something you can create anywhere. You do not have to make a lot of space for it, mainly if your kitchen has limited space.
- 2). Do not take the shelves for granted. You have to be very careful in choosing them since they must fit neatly and safely on top of the cabinet doors. Also, they must be able to accommodate your favorite coffee pots and other utensils.
- 3). Coffee is a hot beverage that you should not take lightly, especially when going through the pain of a cup of coffee every morning. So, make sure that you have your favorite coffee maker and coffee beans when you build your bar.
- 4). Add shelves on the opposite side of the cabinet for more storage space for other items like coasters, condiments, glass jars, and cutlery. You can also include some pretty lamps, vases, and even artwork on those shelves.
- 5). You can also consider adding some open shelves if there is any extra space left.
Here are some things you should observe when building your coffee bar:
Make sure it fits the theme of your kitchen and other furniture.
Keep in mind that you must have your coffee before working on anything else. So, plan early and finish the work on time. It will help you save time and energy for more important things to do later.
Do not place chemicals or products containing chemicals next to your coffee bar, as it may contaminate the drink’s flavor.
It is recommended to keep away from an open fire stove not to make the coffee bitter. Ensure that the coffee bar is placed in a relaxed and quiet place away from children, pets, and other chemicals.
Furthermore, you can even personalize your coffee bar with handicrafts like candles, vases, and plants. If you are not into these, it is advised to use the open shelves for the extra items.
Here’s a practical guide to finishing building your coffee bar:
- 1). Draw a layout of your coffee bar. It will help you determine where to put everything –from the cabinets to all other accessories that you need for your coffee bar. Draw them as simple as possible so as not to miss out on anything important.
- 2). Decide which coffee maker you would like to use, do not take the ones too expensive. Follow the guide and check out what your budget can afford.
- 3). Build your display cabinet first. It will serve as a valuable storage space for coffee beans and other utensils.
- 4). Adding shelves to the opposite side of the cabinet will give you more storage room for accessories like coasters, condiments, glass jars, and cutlery.
- 5). You need to consider personalizing your coffee bar if there is any leftover space if you want a slight change in style –even in color.
8. Building open shelving from your old cabinet
 If you are bored with the tired cabinets in your kitchen and want to try something new and more efficient, try replacing them with open shelving unit. It does not have to be pricey, though. Even better, it could be a zero-money action.
To get started, try to remove the doors of your existing cabinets. That easy way will give your kitchen a different look without undergoing an entire remodel.
Unless you are okay with spending some money and energy, repainting the interior with a different color would be awesome. It will indeed create a new look to your entire kitchen area.
7. Upcycling Reclaimed Wood for Rustic Look Shelves
 If you are a DIY addict who is highly motivated by the idea of 3R –reduce, reuse, and recycle, this idea might perfectly fit you since the project uses unused stained or reclaimed wood as the primary material.
Aside from being part of the green movement, upcycling your reclaimed wood into a set of floating shelves will create an instant character of a farmhouse-style kitchen.
An old cabinet is an excellent substitute for open shelving since it has enough storage capacity, especially if the cabinet is large. It will be the perfect countertop for your kitchen with the correct number and proper design.
To get started, first, you need to remove the doors and shelves of your old cabinet. For this part, you will need a power drill. Once you finish drilling all holes, you can attach the boards with screws.
It’s up to you whether or not you want to paint them at this point. After all, some readers might prefer staining or painting them instead of simply spray painting them for extra details on the cabinets.
Also,
If you have an old cabinet in your kitchen, repurpose it and turn it into rustic-style open shelving. First, remove the doors, pull out all cupboards, and then lay the cabinets flat on their side to set them up for spray painting. Once all the cabinets are painted, you can arrange them horizontally on your kitchen countertop.
6. Elegant Glass Jars Display
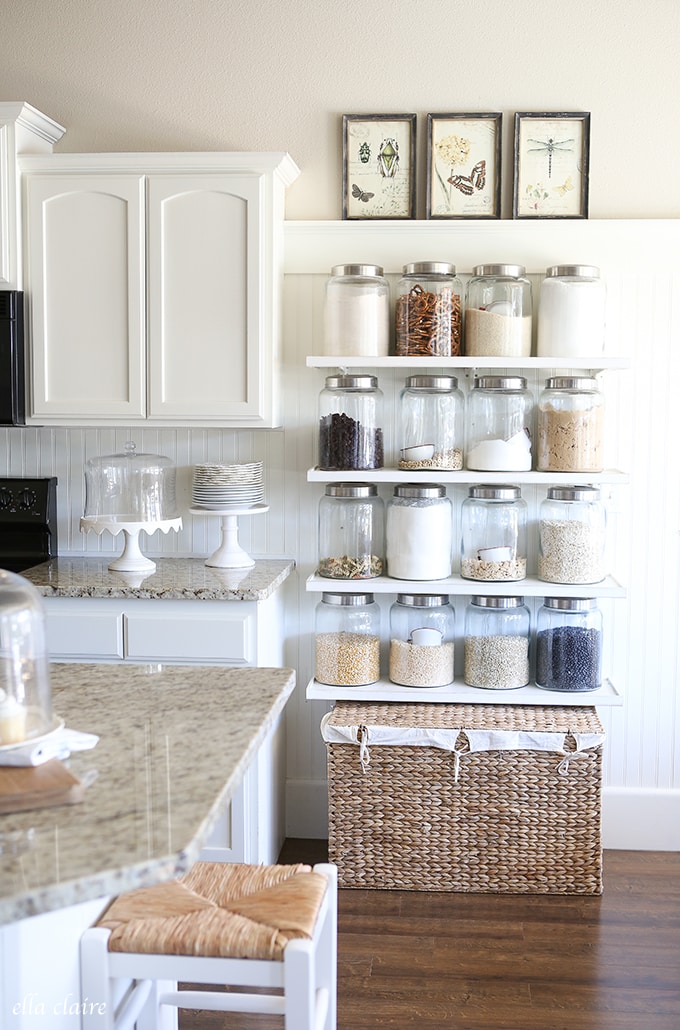
Firstly, put your cooking essentials in several glass jars. Don’t forget to label the jars so that you know where to find salt, sugar, herbs, and spices. Consider writing down the purchased date and expired date if necessary.
After that, place them on the shelves. Make sure the heavy stuff is in the lower area. Then, consider the most frequently used supplies in the most easily reachable location.
Storing the stuff in a glass jar provides you with various advantages. It helps you create elegant and tidy shelving, making it easy to spot whether the ingredients are running out. It also makes sure the dry goods will be kept airtight.
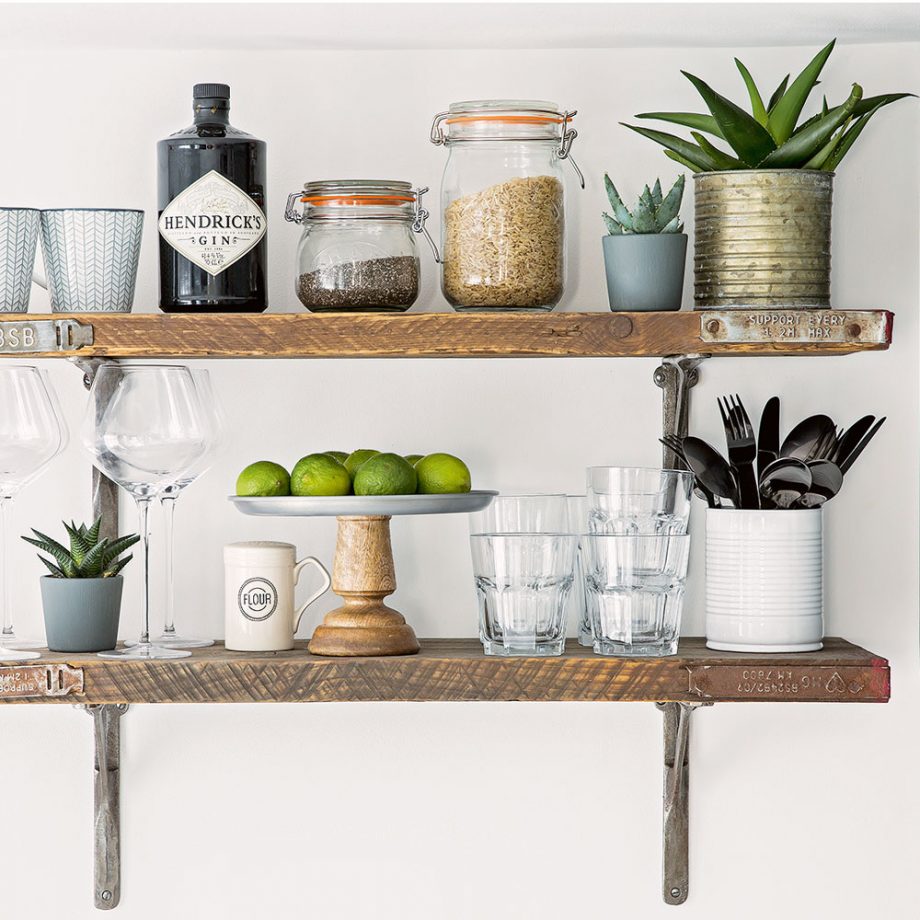
5. The Industrial-Modern Design Kitchen shelving Idea
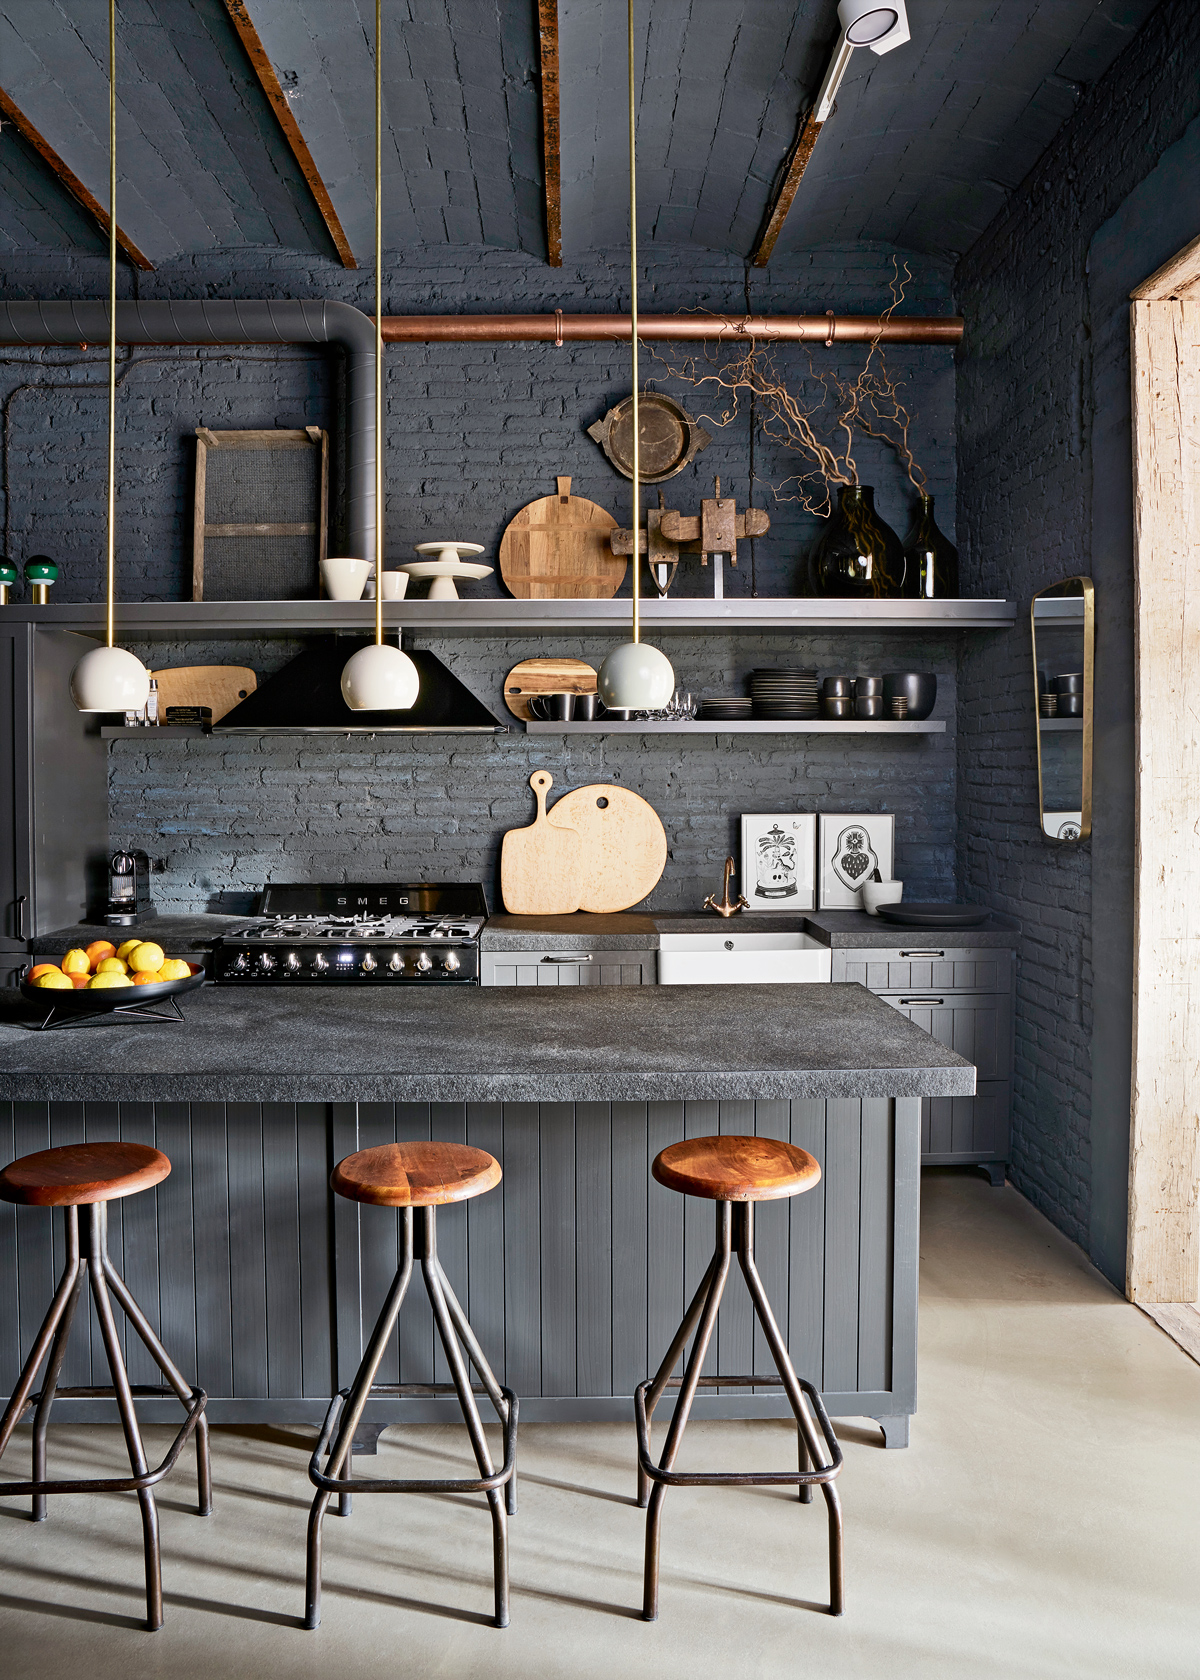 Industrial style has become more popular lately. Why don’t you try to apply this style to your kitchen? It’s easy to implement it to your open shelving as long you pay attention to some key features.
You can build the shelving made from metal, iron, or wood. If you choose wood, paint the surface with a charcoal finish or matte black. The color will complete your industrial-look kitchen.
To replicate the idea, you need to clean up your kitchen shelves. Then, buy a multipurpose industrial shelf rack and place it on the open shelving. This step allows you to organize your cooking accessories at once.
There are more than one ways to place the rack, depending on what you need it for. You can also choose to build your shelf shelving from wood or metal.
Afterward, check out different cooking accessories like cookware, baking dishes and pans, and other things you need to complete your open shelving.
You can also add accessories to your shelves to upgrade a little further, such as containers with printed labels of various cooking items and a hanging basket for your spoons and knives.
Alternatively, you can also Display Your Cookbooks with Ladders.
Casters on the bottom of the ladders make it easy to move the bookshelves around or pull them in or out of storage areas, wherever you need them most.
Instructions:
- Step 1: Choose your bookcase.
You can use a large bookshelf or create a smaller space using ladder-style bookcases. - Step 2: Measure your space.
Select the correct dimensions for your bookshelf(s). A 10-foot-long bookshelf will fit nicely in most spaces. Plan on having enough room for the ladder, too. - Step 3: Install your ladders to your bookshelves.
Make sure you install the brackets at this time to ensure a secure fit if you choose to secure the bookcase with screws, drill pilot holes, and countersink them before attaching the brackets.
For security, use washers and lock nuts, too! - Step 4: Place all of your books near the shelves, if necessary.
- Step 5: Place shelves against the wall.
- Step 6: Mix and matchbooks with objects like vases, towels, or candles.
4. Open Shelving with Japandi style
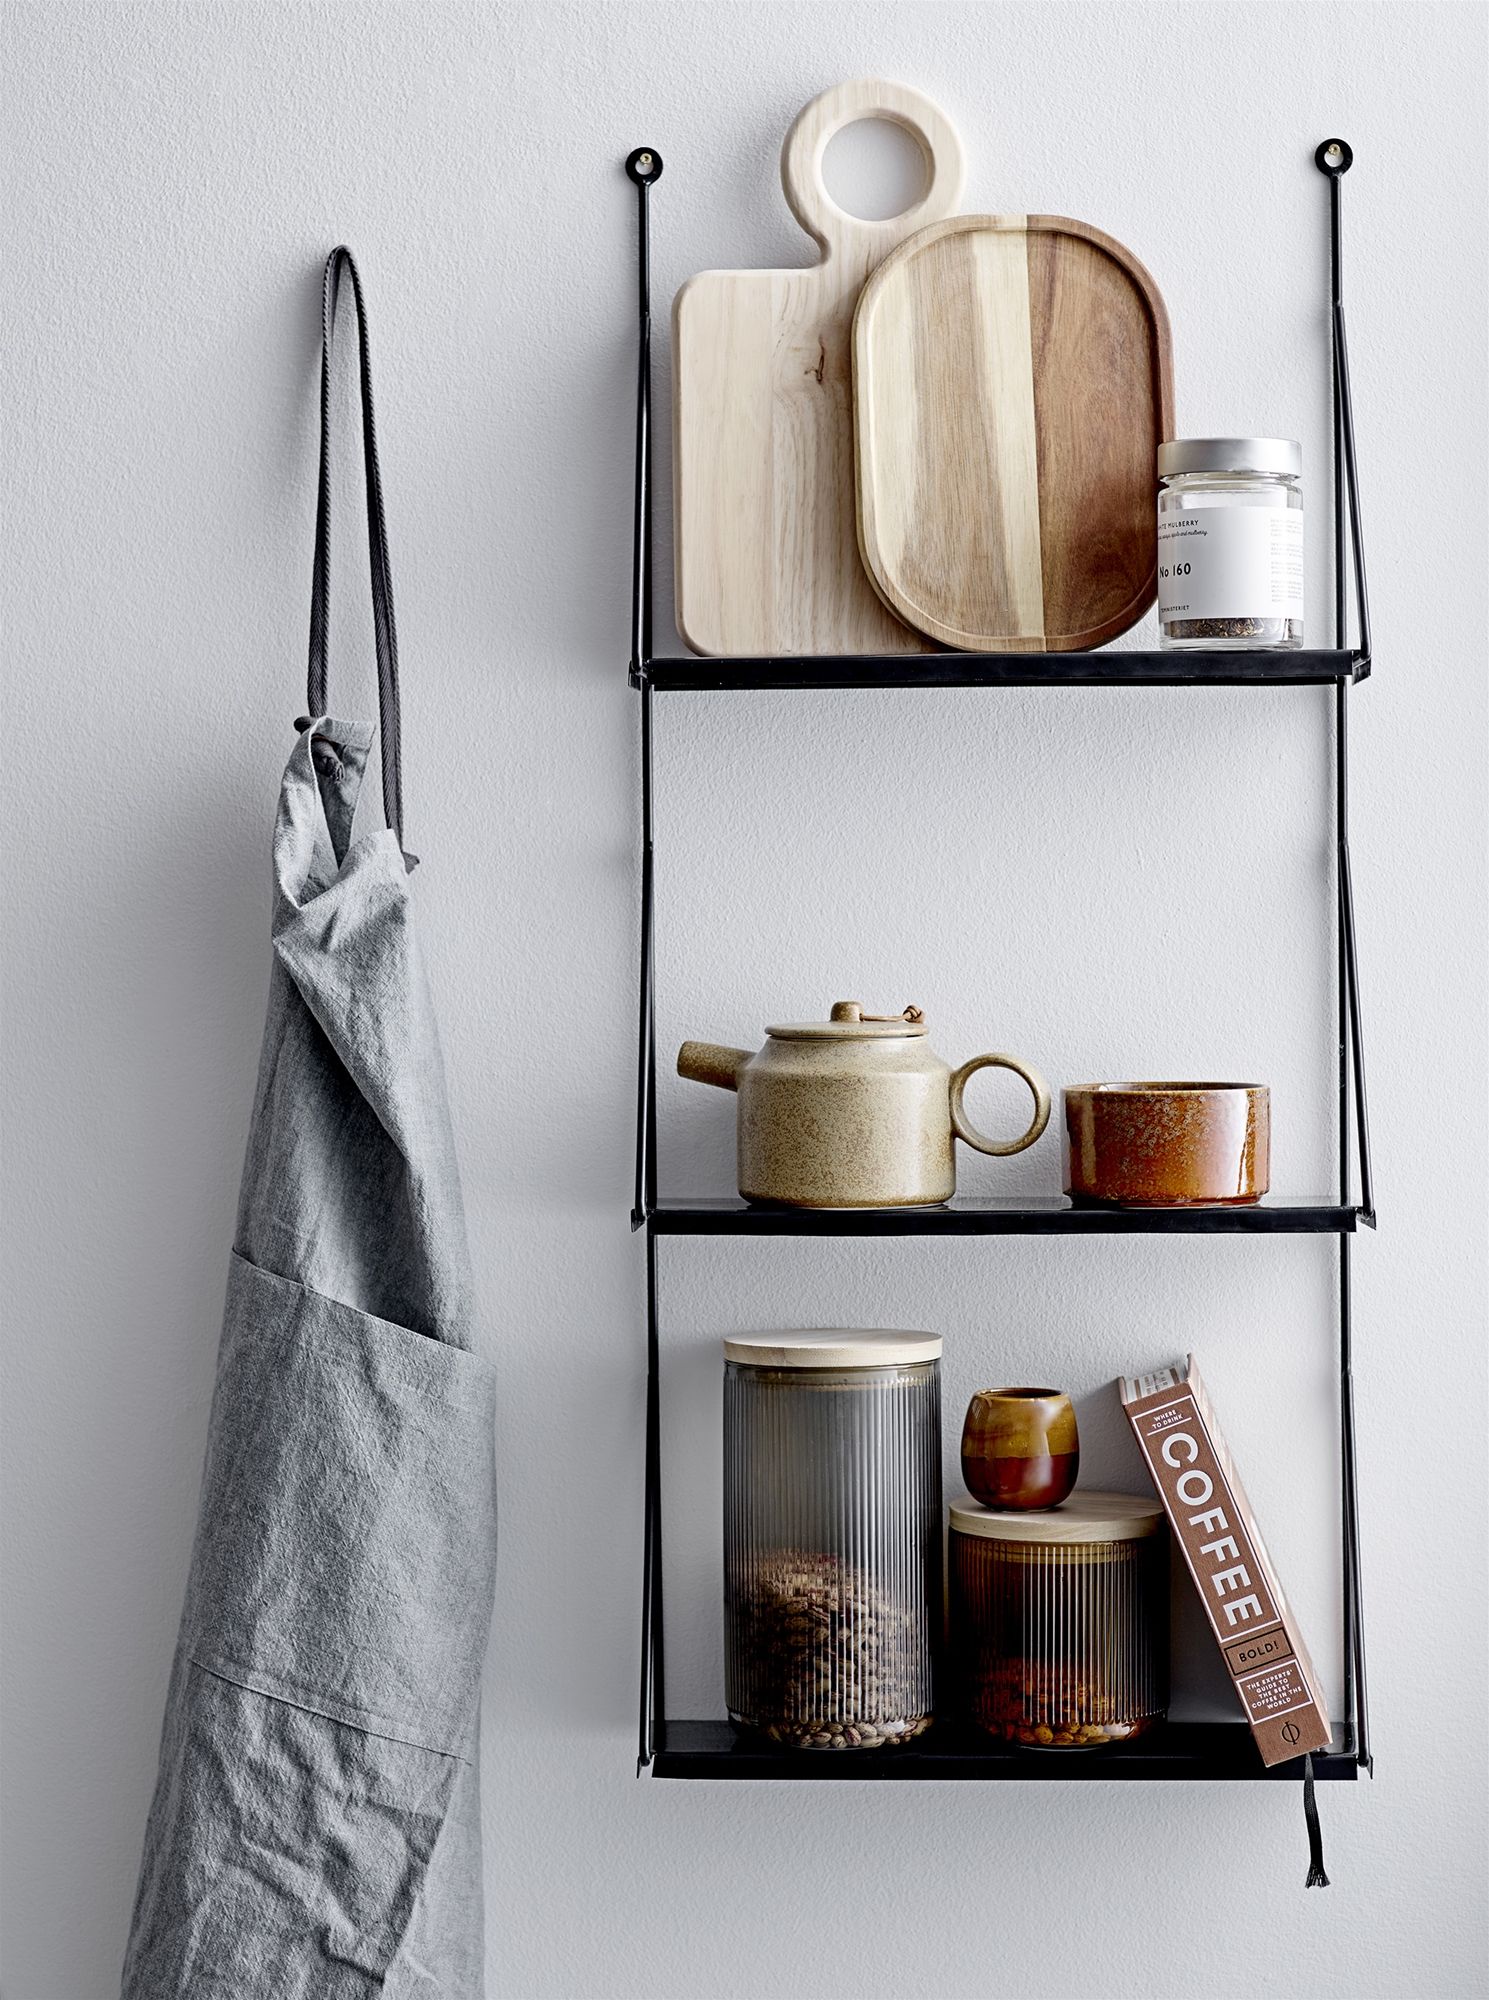 Japandi is a combination of Japanese and Scandinavian styles. It lends the smooth and modern lines of the Scandinavian design while showing off the sleek, elegant, and functional of Japanese aesthetic. Thus, it mostly has simple lines and shapes. Plus, it also features strong use of black.
To reproduce Japandi shelving, you can use natural materials like wood to embody the Japanese style. Make sure to apply neutral tones or black to lend the Scandinavian look. Then, you can store some glass jars and cutting boards.
3. Showing your personal interest would never be wrong
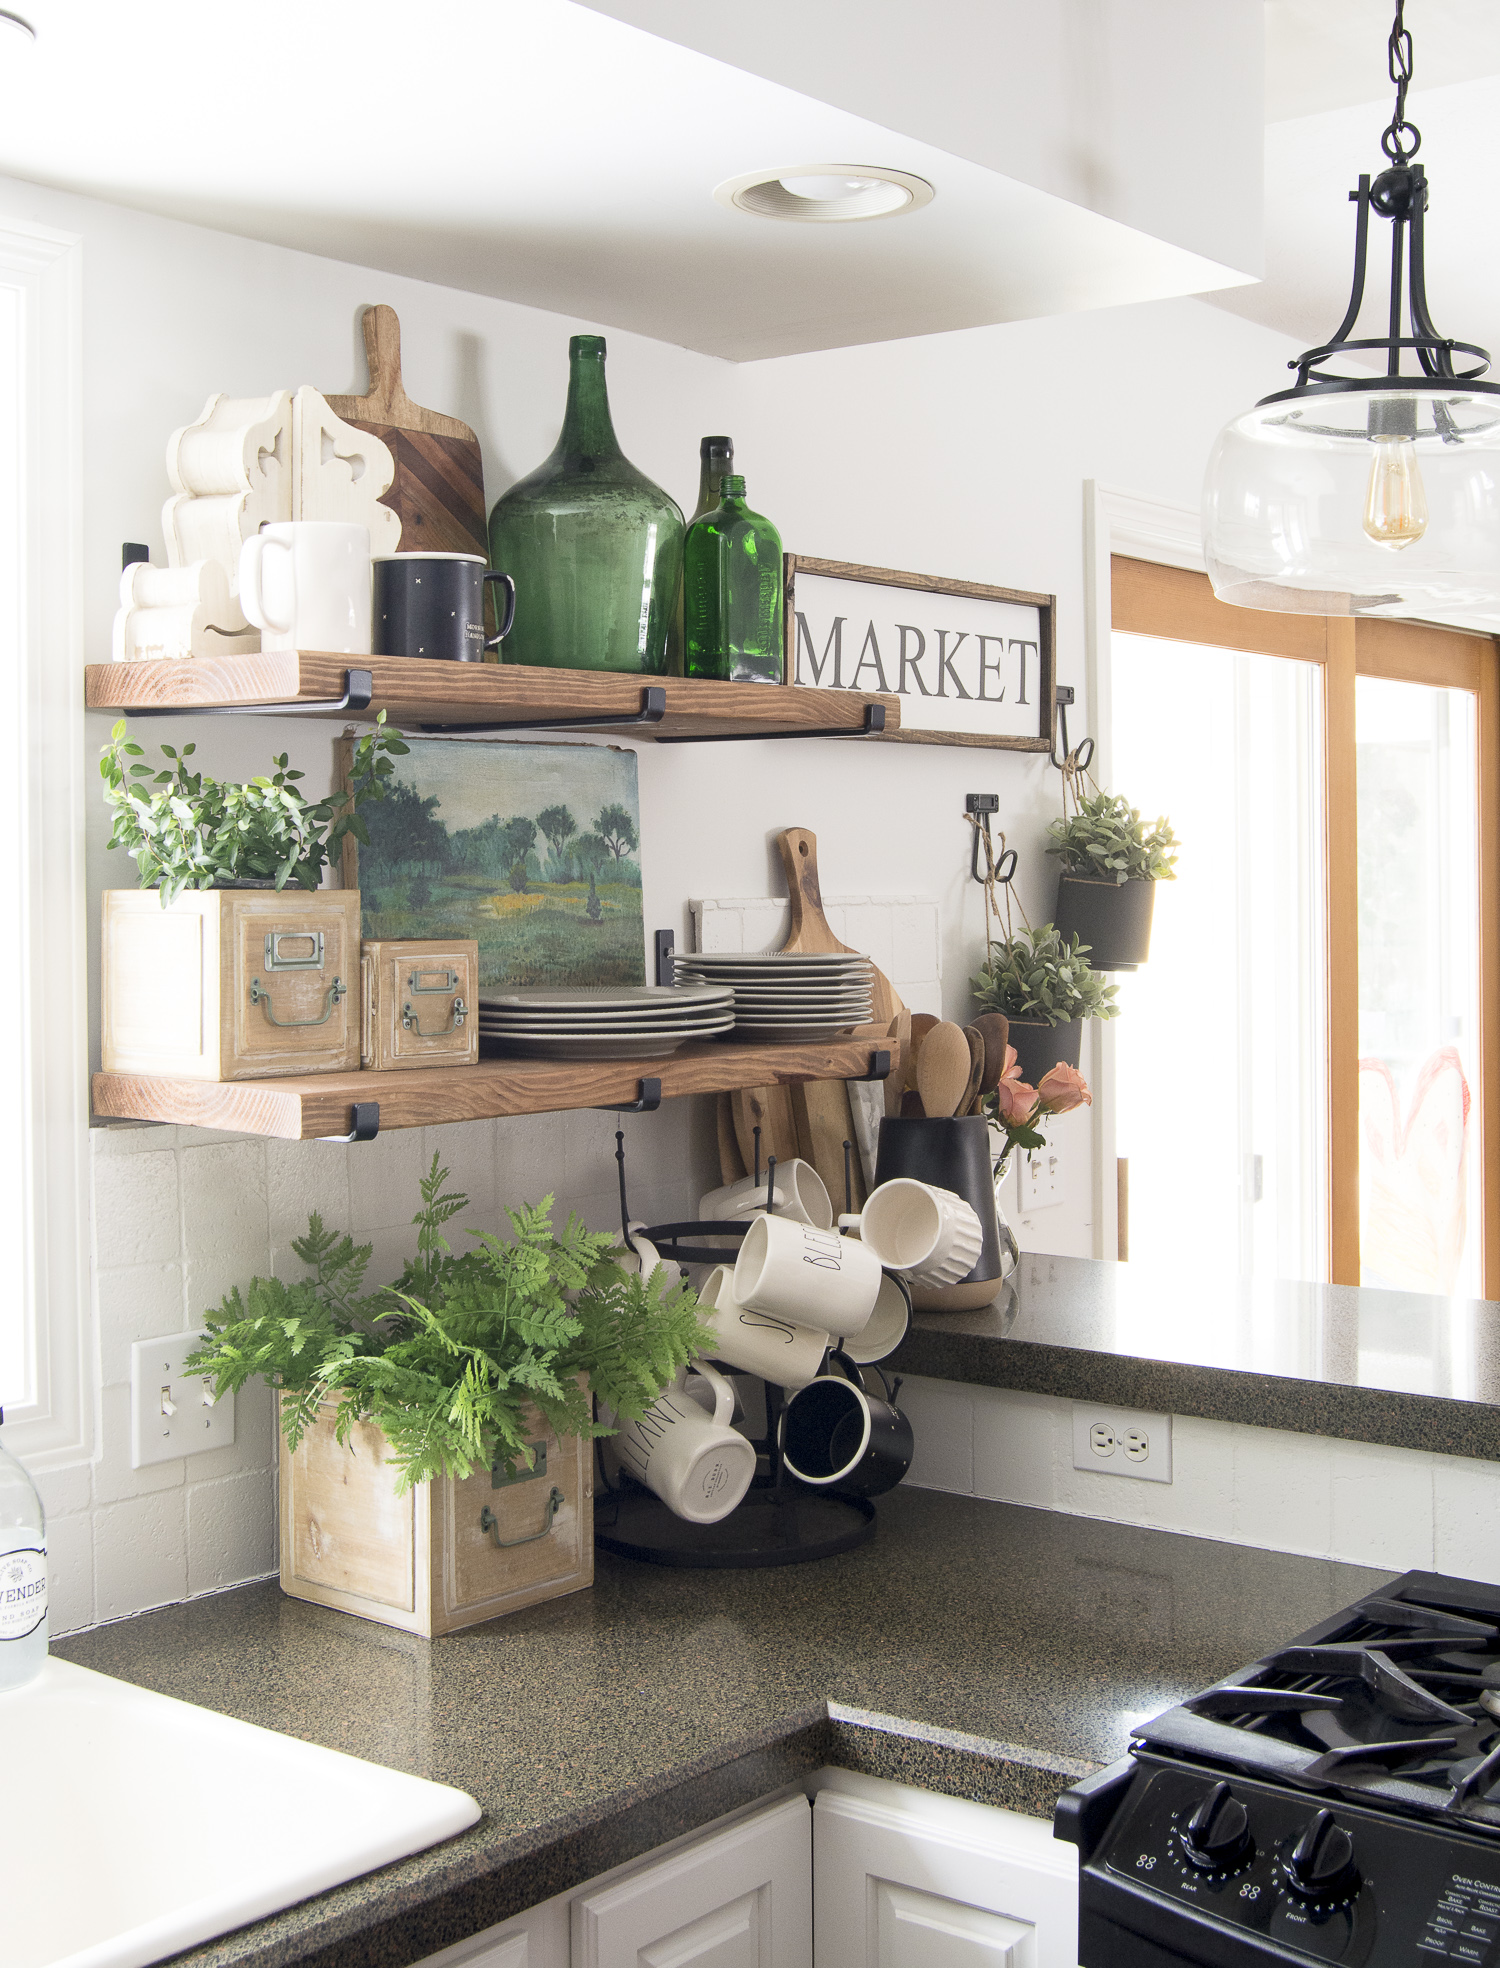 Who says that you are only allowed to put cooking essentials, plates, glasses, and bowls on the open shelving. Nothing could be further from the truth. You can break the common rule and modify it as you wish.
It could be an exciting spot that allows you to express your identity. If you love art, placing some paintings would be okay. If gardening or reading books is your thing, you can display them and the other kitchen stuff.
Detail instructions:
1. Start to personalize it with your favorite cookbooks.
2. If you love your books, make them look beautiful with a simple shelf design.
3. Put some framed pictures here and there to make it exciting and inviting.
4. Make a table with a clock to set out a lovely ambiance and mood.
5. Store your favorite pots and pans here
6. Put some different bowls, mugs, or plates here so that the kitchen shelves will look varied and appealing
Other ideas to turn your kitchen more unique and personalized:
- No 1. When you are bored of traditional open shelving, you can make it look more exciting with a few changes. You can add chalkboard paint and make it into a menu or diary for house ideas.
- No 2. Attach hooks to the kitchen wall to hang pots, pans, and small baskets for sandwich bags. Hang up some tea towels to make it look tidy.
- No 3. Use hanging towel racks as a fascinating item on open kitchen shelving because they can fit in any space no matter how limited the area is. You can mount the rack on either side or beside a cabinet with a practical design that matches the theme of your kitchen décor.
- No 4. Hang up some decorative flower pots to make the open shelving looks tidy, attractive, and stylish. You can do this easily with a trailing plant or pot plants appropriate for indoor plants.
- No 5. Add some floral arrangements to create a cheerful mood in the kitchen that could be used as decoration for your table, shelf, or as the center of a fresh dish idea.
- No 6. Place nameplates, magnets, magnets, and chalk pieces for recipe book’s recipe ideas on the open kitchen shelving even though these are not necessarily necessary in traditional kitchen style because they can create an innovative look on a rustic shelving system.
- No 7. Hang up a mirror to make the kitchen look broader and more attractive.
Another idea in using open shelving to achieve a stunning style is to use some design elements.
Some design elements that you can apply for your open shelving include the following:
- Hang up some candlestick holders or lanterns on both ends of your kitchen wall to create an exciting atmosphere. This idea will allow any flatware or serving pieces that you want to display.
- Place a small table next to the kitchen wall, which is designed with hanging shelves full of quotes, photos, and other decorative items that you can place near hanging shelves, which can be hung up in any place you want them!
- Hang up some items that are not in use. For instance, you can hang up a hat rack, which is commonly used for holding a pair of umbrellas or a coat hook with a cabinet door over an open shelving unit, and put your coats or umbrellas on it.
- Put some hooks on the wall to hang some pots or pans. Which usually are placed on the floor to save space and avoid any clutter around the kitchen
Other ideas:
- You can add herbs pots on your kitchen wall hung up from mounted shelves or brackets near your stovetop. Mount all herbs in one place and have them close at hand for flavorful recipes!
- You can decorate your kitchen wall by hanging a chalkboard for writing about the next batch of sandwiches or other memorable events.
- You can hang up some decorative items, such as a lampshade, on the open shelving on the side of your kitchen walls, which is right beside your kitchen sink.
- You can hang some framed pictures on the open shelving next to your stove or oven to create some interesting focal points.
- You can place small jars in different places to display anything important to you, add color and pattern to any space that needs one, and decorate it with this simple idea.
- You can create a wall of sorts by hanging some office supplies on the open shelving next to your sink or living room.
- You can place some decorative dishes and glassware on the shelves near your kitchen sink and your dining table to add color and pattern to them while ensuring they are not disruptive to the other kitchen items.
- You can install floating shelves next to your open shelving unit, placed in front of a small decorative bowl filled with loose change. Hanging objects on these shelves will serve as an excellent small table for important items such as lists, addresses, and pocket changes.
- You can get some decorative and serving trays, which you can use as storage for small items, tools, and other valuable business items.
- You can hang some decorative plates, mugs, or small bowls to decorate the kitchen area.
Other useful advice:
To create a more modern look in your kitchen, you may want to replace the open shelving unit with a countertop unit fitted with bottom-mounted drawers and cabinets that mount in front of the open shelves. It helps many people to organize their kitchen tools and keep them in one place so that they are always at hand when need them.
2. Gardening in your open shelving
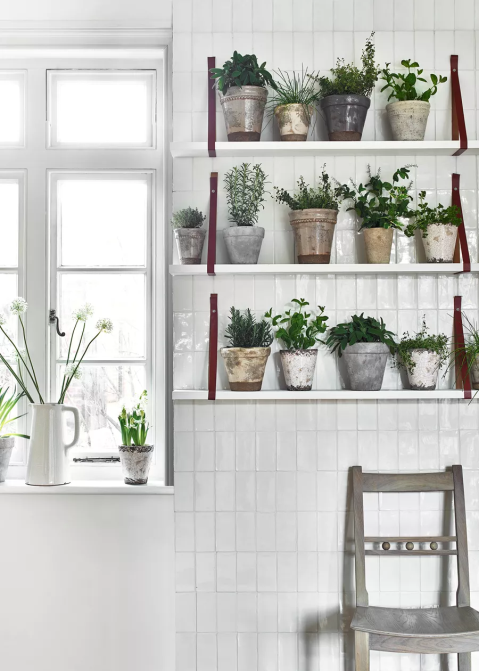 A green thumb will always look for space to grow plants. Thus, this idea should be in your consideration. Building a mini herbs garden in a set of open shelving would impress you.
First, you need to decide on the right position. Make sure that the shelving gets sufficient sunlight. It will absolutely help you grow many herbs such as rosemary, parsley, basil, and oregano. However, don’t forget to take care of them. Water and fertilize them regularly.
Second, decide where you would want to plant your herbs. Keep placing the herb pots on the shelves and filling them with potting soil. Then, secure them with a substantial piece of wooden board or metal bar.
Third, make sure that you water your herbs every month. Also, choose the right place for them to grow their roots. A hanging basket may be great for that purpose. Also, mix some decorative items such as ribbons and tags to make them more attractive in your house.
Forth, buy a hanging basket in an online store to enhance the appeal of your herbs and decorate your kitchen.
~ A Hanging Angle Open Shelving Unit idea
This storage unit will provide you with great storage solutions for everything essential for your daily life. This open shelving system gives you more than a 300% increase in space than traditional shelving units. It is fitted with two steel columns and two steel beams that can easily hold heavy items such as books, ornaments, wine bottles, bags, or anything else in your home. This furniture is covered with an aluminum machine-finished cover that protects it from rust or damage.
Lastly, number 1. The subtle art of Open Shelving: Keep it organized!
 You don’t need to overthink about which idea you should execute. Forget all those ideas you have in mind. Sometimes you just need to stick to the basics: keep it organized.
Whatever open shelving design you have, make it always clean and organized. You only need to create a regular deep tidying schedule to achieve it. For the daily, just make sure that everything belongs in their own place.
Detail instructions:
No 1. Start from the top and work your way down
Start from the top shelf, then the middle shelf, and finally, the bottom one. That’s it! This suggestion is an excellent way to keep things organized and make it easy to use them whenever you want.
Example:
Let’s take an oyster open shelving unit as an example. Its basic structure would be as follows:
- (I) Bottom Shelves;
- (II) Middle Shelves;
- (III) Top Shelves;
- (IV) Spices and Condiments.
Here they are arranged in their respective places in chronological order.
No 2. Do it step by step.
If you want to get into detail, you need to start from the bottom shelf and work your way up.
Start from the bottom shelf and put things in their respective places.
Remember to take note of their unique numbers (their label or their name) before putting it back:
Containers with labels and numbers (Note: If you do not have a lot of containers with labels, maybe you can consider putting simple stickers on them for easy identification and quick reference).
This idea will help minimize the clutter in your storage space (Labeled Containers – Subtract all those Containers without labels or numbers).
A. Sealed Nuts & Spices
B. Unsealed Nuts & Spices
C. Tomato Paste; Unsealed
D. Tomatoes; Unsealed
E. Flour; Sealed
F. Cornstarch; Sealed
G. Soya Sauce; Unsealed
H. Garlic Dried Seasoning; Unsealed
I. Natural Sweeteners; Sealed
J. Garlic Powder
K. Sugar
L . Salt
M . Pepper
N . Black/Red Chili Peppers
O . Soya Bean Paste
P. Red Chili Oil
Q . Vinegar
R. Olive Oil
S & T. Vinegar & Oil
Remember to clean your open shelving unit before using it again. Otherwise, the food debris will accumulate and later make the space impossible for you to use. So do it at least once a month, even if you are not using it.
To clean your open shelving unit, wash it with soap and water and wipe it with a soft cloth or paper towel.
Do not forget to dry it well before putting back up on your open shelving unit. This idea will prevent food debris from clogging the cracks and making them unsightly around the shelves.
Use warm water for washing or sponging.
No 3. Cleaning old furniture
If the upholstery of your kitchen furniture looks quite old, it would not be a bad idea to replace them with newer ones. Most of the time, kitchen chairs are covered with vinyl and are not easy to clean.
All you need to replace is a new chair cover, a pair of scissors and a glue gun. It’s that easy!
Before you go ahead, take caution in removing the upholstery by cutting around it or using knives or scissors to remove them on both sides. Before gluing, you have to make sure that everything is smooth and looks neat.
No 4. Add Colors to Shelves
If you are the type that loves adding colorful decorations to your home, then this idea is for you. Colorful decorations, particularly in the kitchen, can add a lot of aesthetics and ambiance. More often than not, kitchens are too plain or white for some people.
To achieve this design, you simply need a drill machine and appropriate screws (the size should be smaller than the width of your shelf). It’s that easy! Just make sure that you put the right color on each bottle so everything will have its place.
No 5. Have a Fun with Baskets
Another idea is to add baskets to your open shelving. This idea is the best way to help you keep the clutter under control. It will also create a fun atmosphere and exciting atmosphere in your kitchen.
It would be great to color coordinate them and use labels to make it easy to distinguish between them.
If your shelf is wide enough, you can even put more than one basket on each shelf, but make sure that the items in the basket are only similar in size so everything will fit nicely.
Here are some examples:
No 6. Use Baskets to Catch Food Debris
If you are the type that loves to catch food debris, then this idea is for you. There is no need for you to hide them away in the cabinet and make a mess of your cabinets and shelving unit.
Simply use your baskets on the open shelving unit and keep them to use whenever you want. You can also customize it by adding additional tools like cleaning sheets, clothes, and different tools if you think they will help more.
No 7. Display the Fun Things
If you have a lot of kitchen accessories, why not make them a part of your kitchen? You can organize kitchen accessories to look fun and exciting to the eyes.
You can follow the project by arranging them on the shelves so that you can view them easily. You may use some photos, toys, or statues if you want.
No 8. Using Lazy Susan for Your Condiments
If you want to add a little bit of style to your condiments, then choose Lazy Susan. This idea is one of the most popular kitchen tools used these days because it can make things easier for you. To use Lazy Susan, all you need is a large shelf and small baskets to keep the items in their place.
Since Lazy Susan is accommodating in organizing your condiments, it can help you manage your open shelving units as well. Make sure that you use a large shelf to add more baskets on top of it and make things even more organized.
Take caution here because not all basket sizes are compatible with Lazy Susan. You have to be very careful when choosing the size of the basket because it will quickly take over one-third of the shelf space (so you will have only two-thirds left).
This is the end of 10 Various Ideas to Complete Your Limited Kitchen with Open Shelving list. Hopefully, it inspires you.
References:
10. Modvintagelife.blogspot.com
9. Swankyden.com
8. Thespruce.com
7. Idealhome.co.uk
6. Ellaclaireinspired.com, Countryliving.com
5. Homesandgardens.com
4. Idealhome.co.uk
3. Idealhome.co.uk, Graceinmyspace.com
2. Neptune.com, Fourgenerationsoneroof.com
1. Familyhandyman.com, Homesandgardens.com