You will be surprised at the level of creativity you can achieve by thinking slightly out-of-the box. These ideas are to help you create nifty storage options and furniture pieces that not only accentuate the aesthetic appeal of your home, but also fill unused spaces and ensure your surroundings are free from clutter. Thus your home is always neat and organized, which makes you feel good, while creating favorable impression on guests.
As info: This list has 3 different parts and 1 part for video format of this list. I hope you’ll enjoy more learning experiences with these 2 different formats. Enjoy
PART 1:
1. DIY Project: Copper Tubing Side Table.

2. Convert the IKEA FROSTA Into the Perfect Laptop Desk.
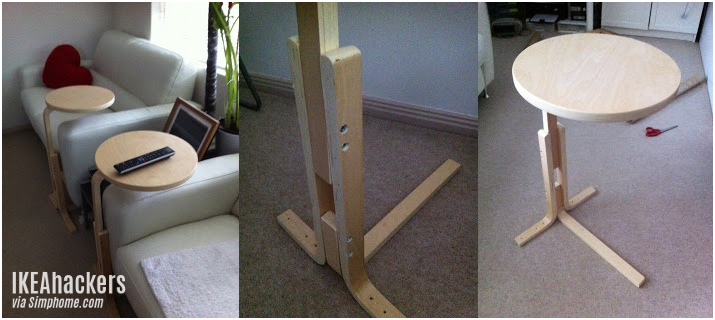 Position bottom 3 legs, but ensure the long end is touching the floor for better stability. Drill two holes in the sides of the bottom three legs and fasten screws in holes. Now you have a couple of bits, as well as the top and legs. Position top bit on top of legs at desired height, drill holes at the side of the legs into the middle stem fixed to the table top, and finally fasten screws in the holes.
3. Log Slice Table.
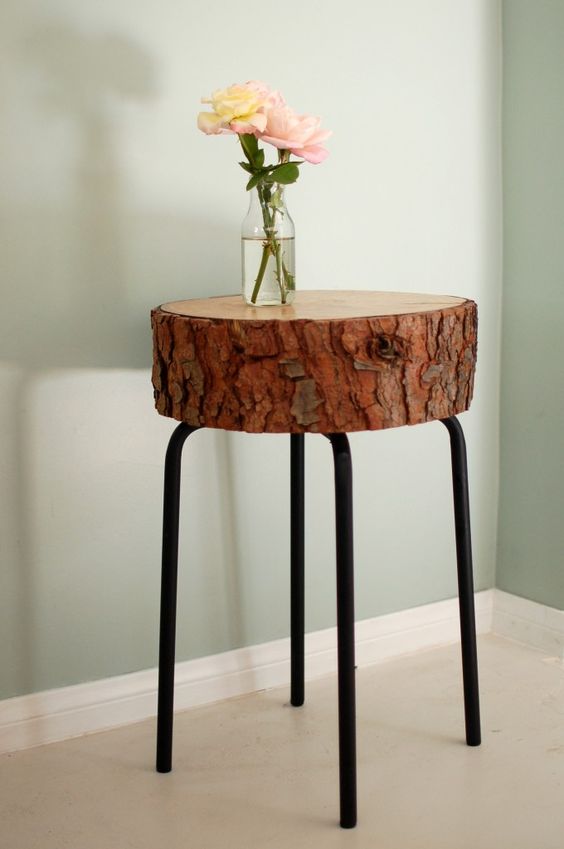 Get a sturdy piece of log to cut a 5-inch slice for the table top by using a chain saw. Use a belt sander to level out the surface and smoothen the roughness. You will also need an orbital sander beginning with 80 grit, because the belt sander leaves blemishes. Ending with 200 is adequate for a good polish. Use 3 coats of polyacrylic to the top for protection from nicks and liquids and clear lacquer spray on sides. Attach logs to the legs of an IKEA Marius stool and you are done!
Btw, visit ikea furniture makeover here if you want more creative ideas related to DIY IKEA products improvement.
4. Upcycled Old Door: Now It’s a Side Table.
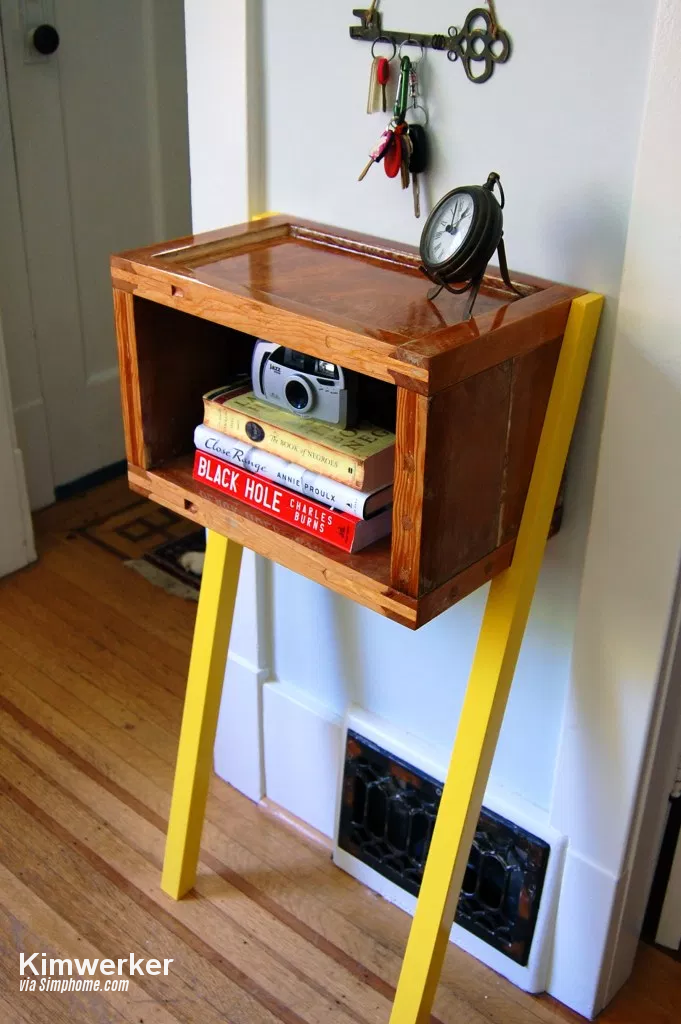 The center panel of a leftover door comes in handy to fashion a side table. Strip off the paint, cut a rout piece from another section to fill in the side of the table top, and glue it into place. Create the sides and back of the box by piecing together pieces from the sides of the door. One solid piece serving as the bottom.
Use a spare two-by-four cut down to match the thickness of the door to make the legs. Apply clear varnish on the box and 4 coats of eco-friendly yellow paint on the legs.
5. DIY Project: IKEA Bedside Chair.
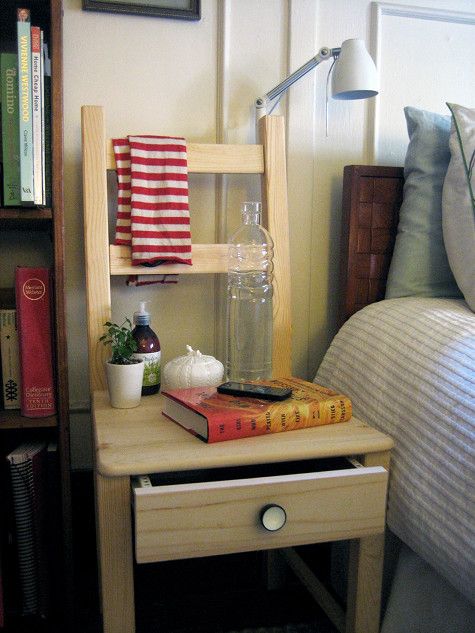 The chair doubles as a handy storage option as well. Take the seat off the chair, attach two piece of the drawer slides to the left and right, and make them flush with the top edge of the sides. Screw the front of the drawer slides into the chair legs with one screw on each side and use screws in the back too. Slide the drawers into the space. Re-attach the seat once you are done. Follow instructions for attaching the sconce and light bulb. More about 28 IKEA Chair makeovers.
6. Side Table Hack by Matsutakeblog.
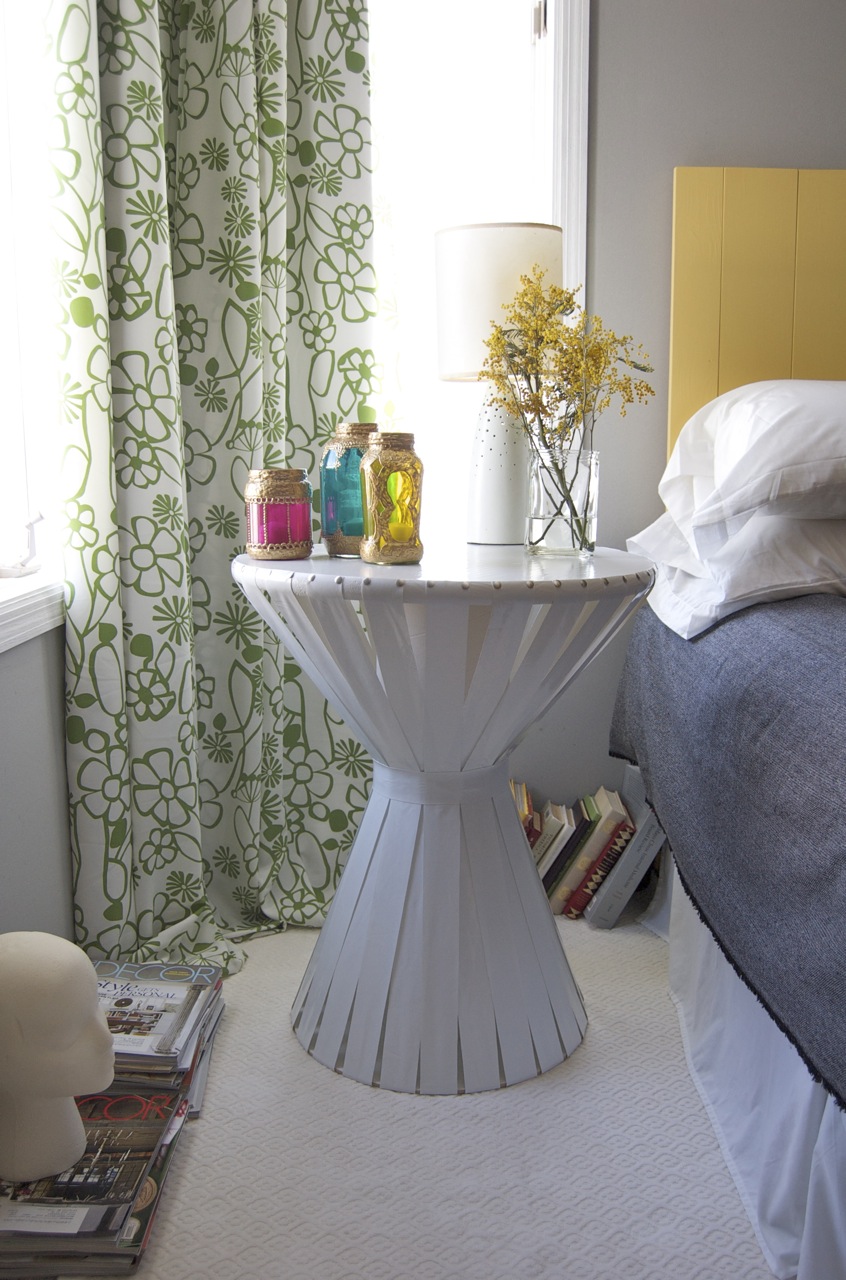
7. Beautiful DIY Record Side Table.
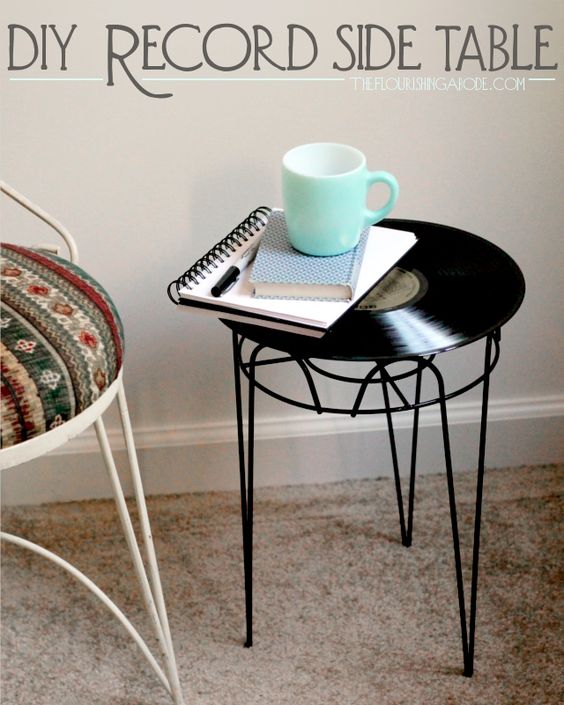 Wipe the record dry before before attaching to table – no dust or dirt should be trapped between grooves. Apply a line of hot glue the entire top edge of the planter – it needs to be even. Place the record on top immediately and position it in center. Let the glue cool and harden.
8. Pure + Simple Side Table by Kate Pruitt.
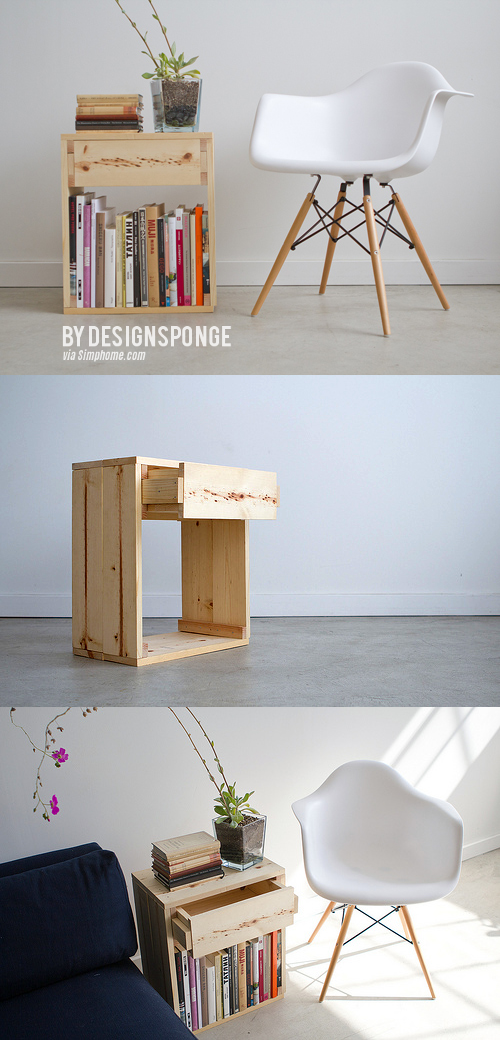 The frame needs 1” x 2” x 11” corner supports, 1” x 6” x 18” top and bottom panel, and 1” x 6″ x 20” side panel. For side panels, use minimum of four nails per 1 x 2 support, as they will provide stability to the frame. For the rest you require 1” x 6“ x 15” front and back planks, 1” x 4” x 9.5” side planks (one on each side), 1” x 3” x 11” outermost side planks, 1” x 4” x 15” bottom end planks, 1” x 3” x 15” bottom middle planks. Once the construction is done, just slide the drawer into the frame.
9. Micke Office Drawers to Living Room End Table.
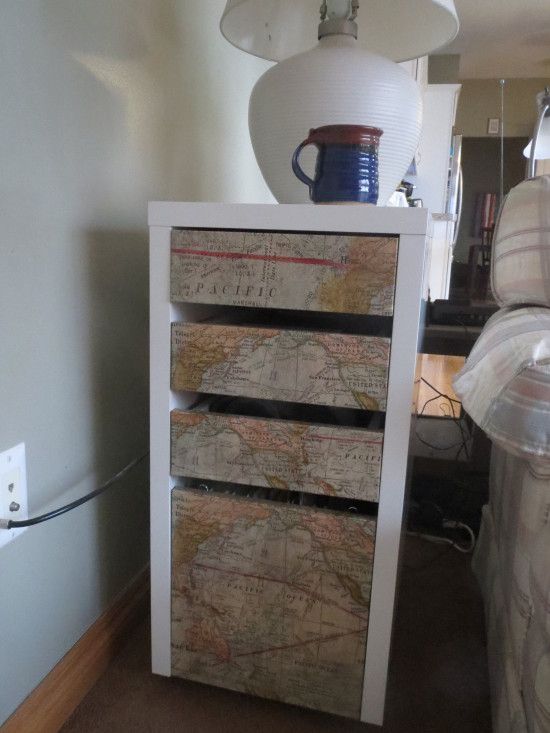 Remove front portion of drawers, and wrap fabric around them – bring edges together at sides so there is less overlap. Decoupage can stick everything down, but you could apply 2 more coats for better finishing. Using a small nail, poke out the holes in the drawer fronts and tighten them back in place.
10. Tarva Nightstand IKEA Hack by Danielle.
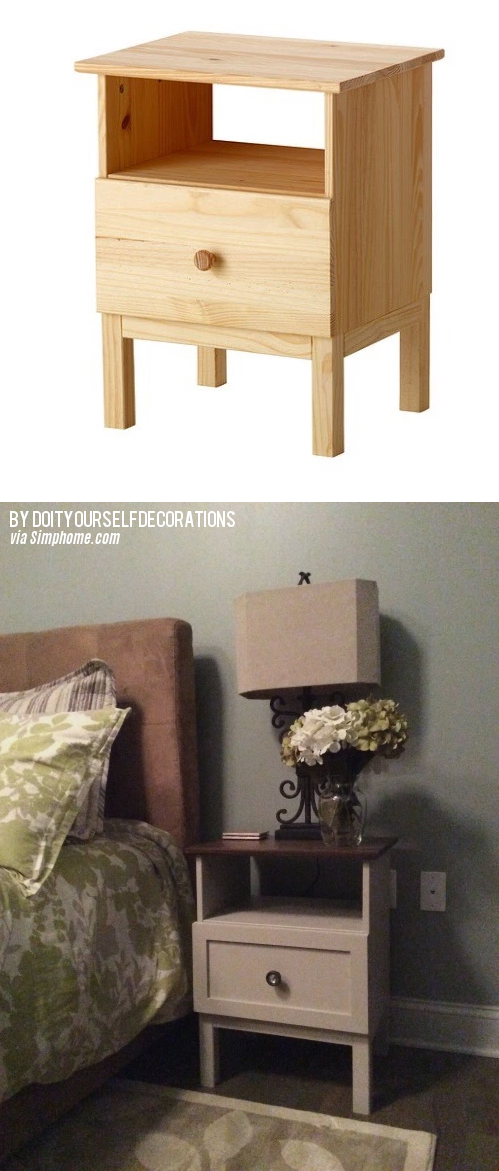 Use a paper towel to stain the top – the coat should be thin and even. Apply 3 coats of of polyurethane to help protect the table top. Paint the legs and base with chalk paint and let them dry.
Rub wax into the wood to wipe off the excess, after which you let it dry overnight and buff them for shine. Add a frame to the front to give the piece more character and depth. Paint and wax the front to match the base, before adding knobs.
PART 2:
11. Turn the Vittsjo Into a Gold And Marble Side Table.
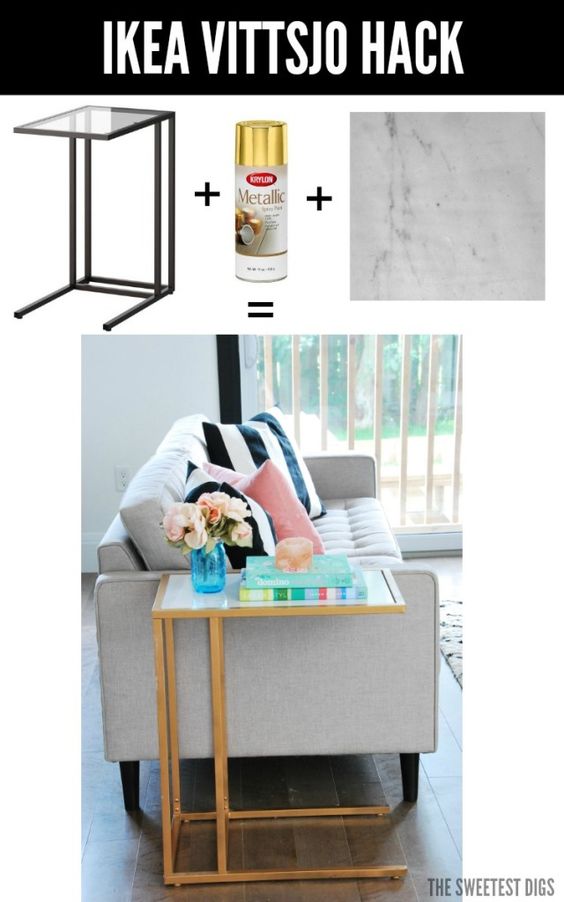 Assemble the table and spray it with gold. Roll out granite marble paper, place glass piece on top, and cut out the portion of paper needed, leaving some extra around edges. Hold the edge tight, peel off the backing about 1/4 of the way and stick it down on the glass starting on one side, and smooth out bubbles with a dead credit card. Work on the edges and fix the new marble table top.
12. Industrial Side Tables.
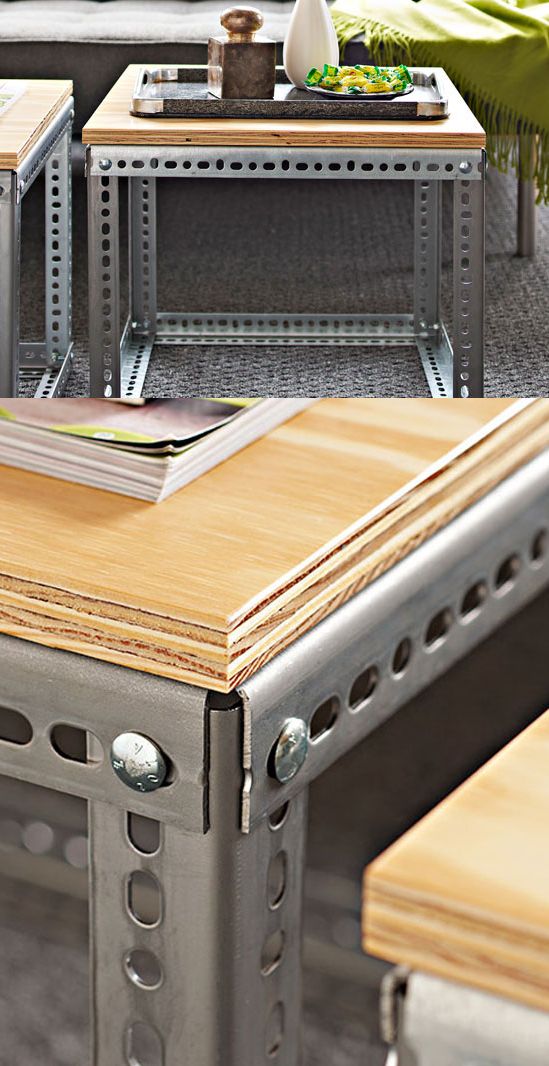 The legs and rails should be trimmed from L angles at 15 and 18 inch lengths respectively. Connect a leg to two rails with bolts, lock washers, and nuts – this creates your first table corner, so please continue till you get a cube. Cut an 18½”×18½” piece of plywood. Sand and finish with polycrylic, polyurethane, or paint. Attach cube to the plywood.
13. IKEA Lack Hack Table by Simply Lkj.
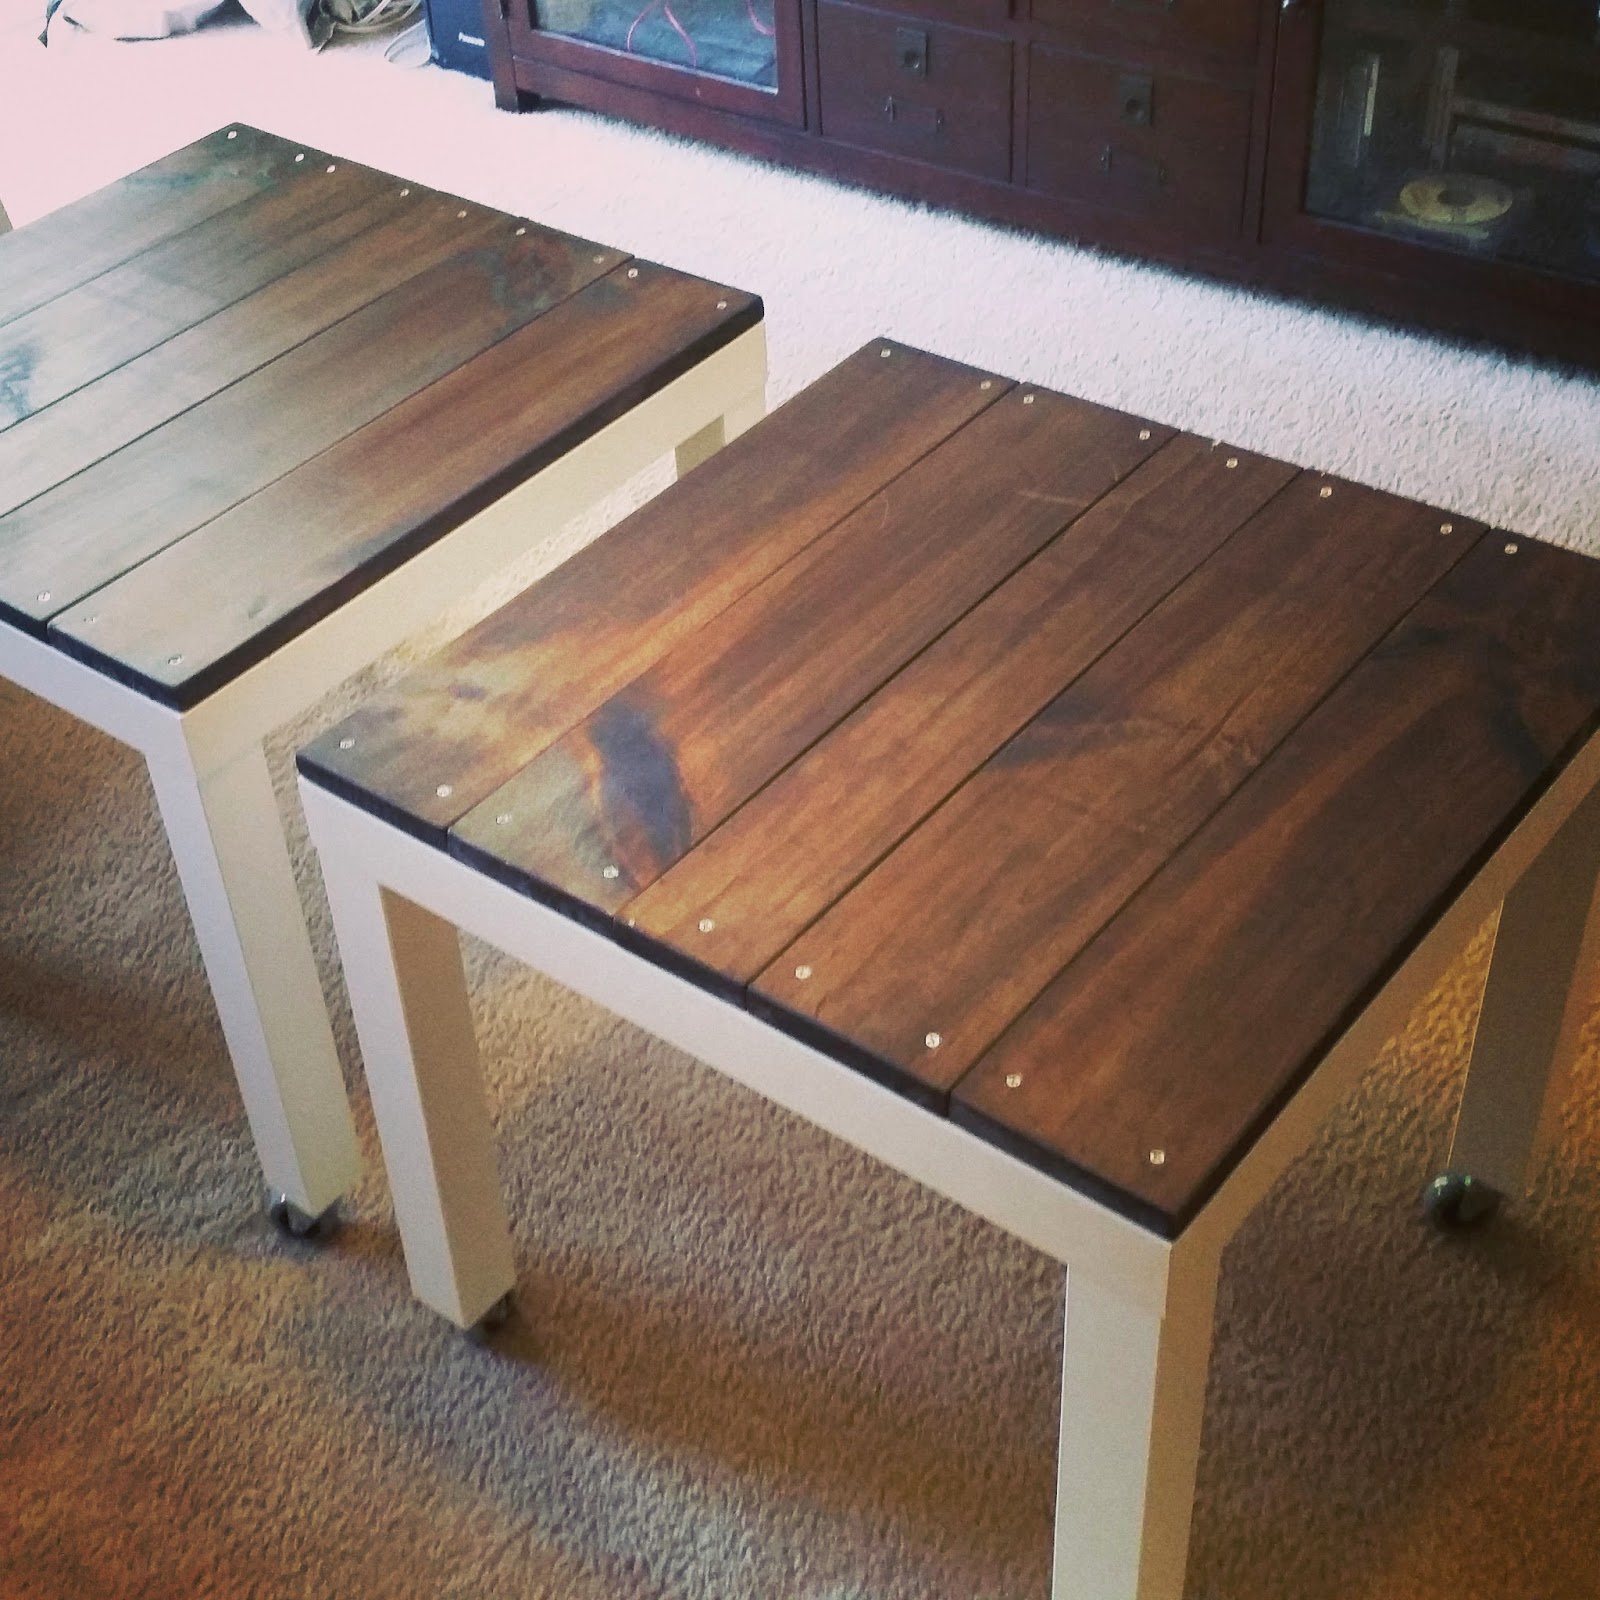 Gorge on pizza and soda while watching your favorite movie on TV or enjoy your dinner while listening to music on your brand new stereo. Add casters (wood planks) on top of the tables. Stain pine boards and bolt the planks on top with wood screws.
14. DIY IKEA Hack – Copper End Table by Popy talk.
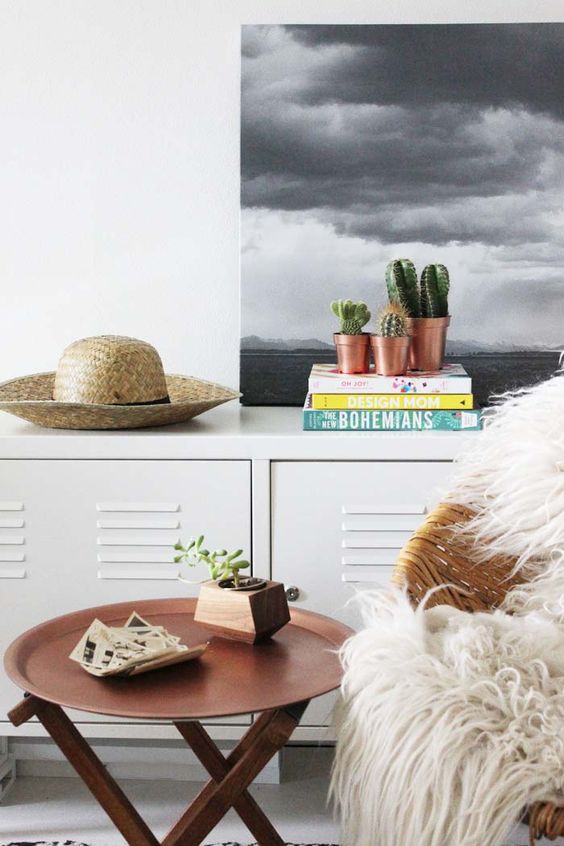 Spread open a newspaper, place a clean dry tray on it, and spray to cover the original design. Dry for 30 minutes, spray again for spots you have missed, and let it dry again. Put on top of foldable chair and secure it using Velcro with its sticky back on the bottom of the tray and align with the chairs’ wooden edges.
15. Dipped Nightstand by Twinstripe.
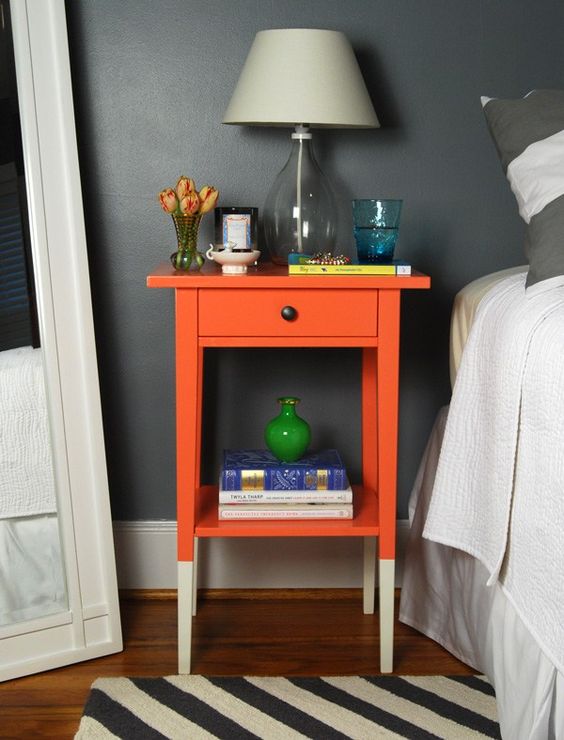 Lay out all pieces of nightstand. To impart a dipped look, use painters tape to mark off the area you don’t want to paint. Prime the furniture and let it sit. Don’t forget to check for drips, or else you will need sanding. Paint with Valspar’s Tropical Blossom latex paint. After this is dry, assemble the nightstand and peel off painters tape. Finish with a coat of polycrylic and let it dry for 24 hours.
16. Hallway Storage Solutions: DIY Side Table – By a Lovely Drawer.
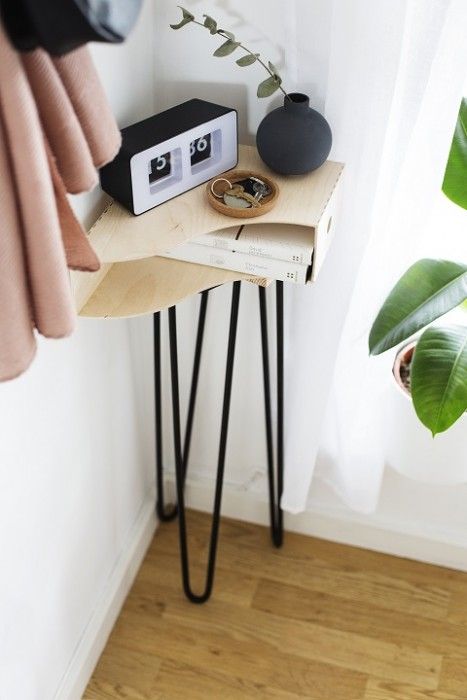 Spray paint hairpin legs with 2 light coats. Place the block of wood on one of the bigger sides of the box file, stand the legs as you would prefer, and draw around bottom section of legs with a pencil.
Attach three legs, and turn them over to see if they are securely fixed. Cover the top of the wood off, apply a thin layer of wood glue and position the box file on top. Push down and let it dry!
17. IKEA Malm End Table DIY.
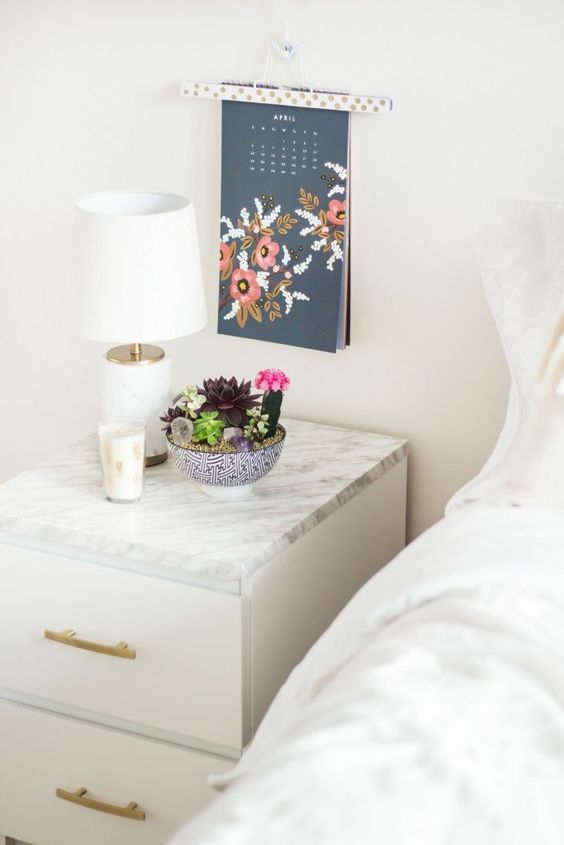 Measure holes for drawer handles, drill them in, and place the contact paper on top. Ask a friend or family member to help out by holding the paper tautly till you finish sticking it on the entire surface from back to front. Smoothen bubbles with a plastic card.
18. Penny Topped IKEA Lack Side Table.
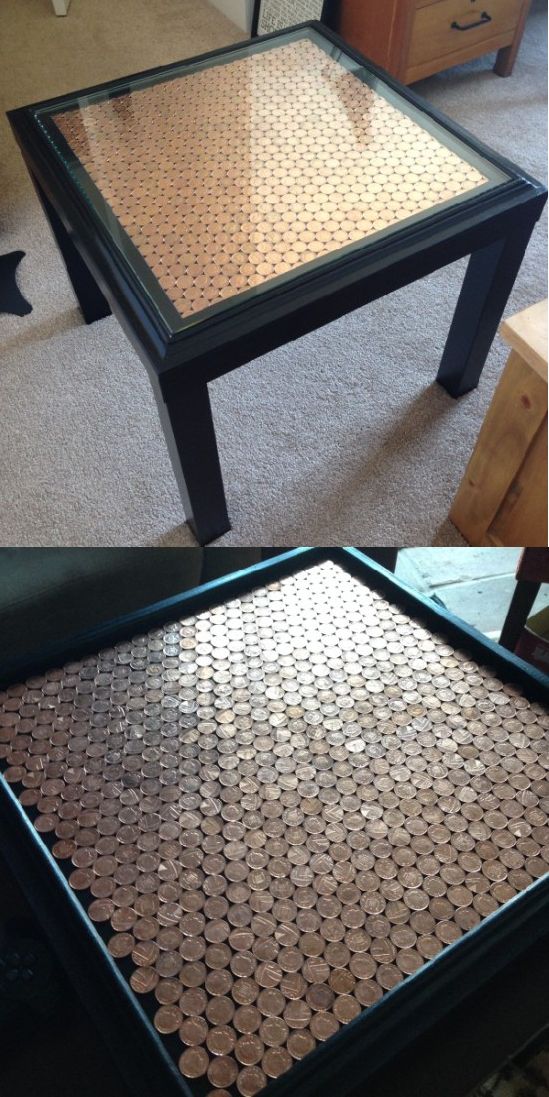 Use a picture frame mount so the coins don’t go right to the edge on all sides – just float away under the mount. Molding is used for the edges to create an insert for the coins. Utilize reinforced glass to prevent damage. The 10 mm thickness is ideal for the depth left by the molding.
19. Three Tone Selje.
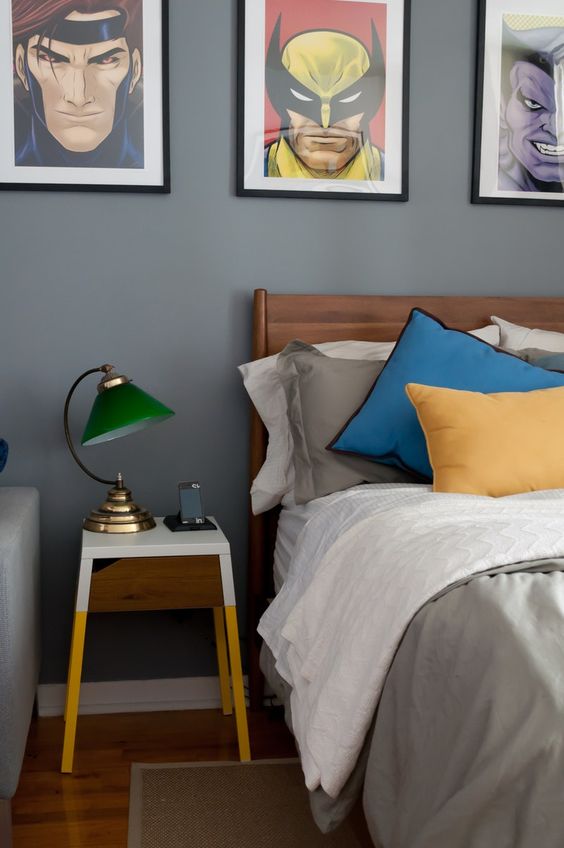 Wipe down pieces before painting for removing dust and dirt and then mark off the area you don’t want to paint using painter’s tape. Prime furniture and let it dry. Once the cover coat is dry, paint the nightstand and let it sit. Afterwards just assemble nightstands and remove the tape.
20. Nightstand Remix by Beautifulprotest.
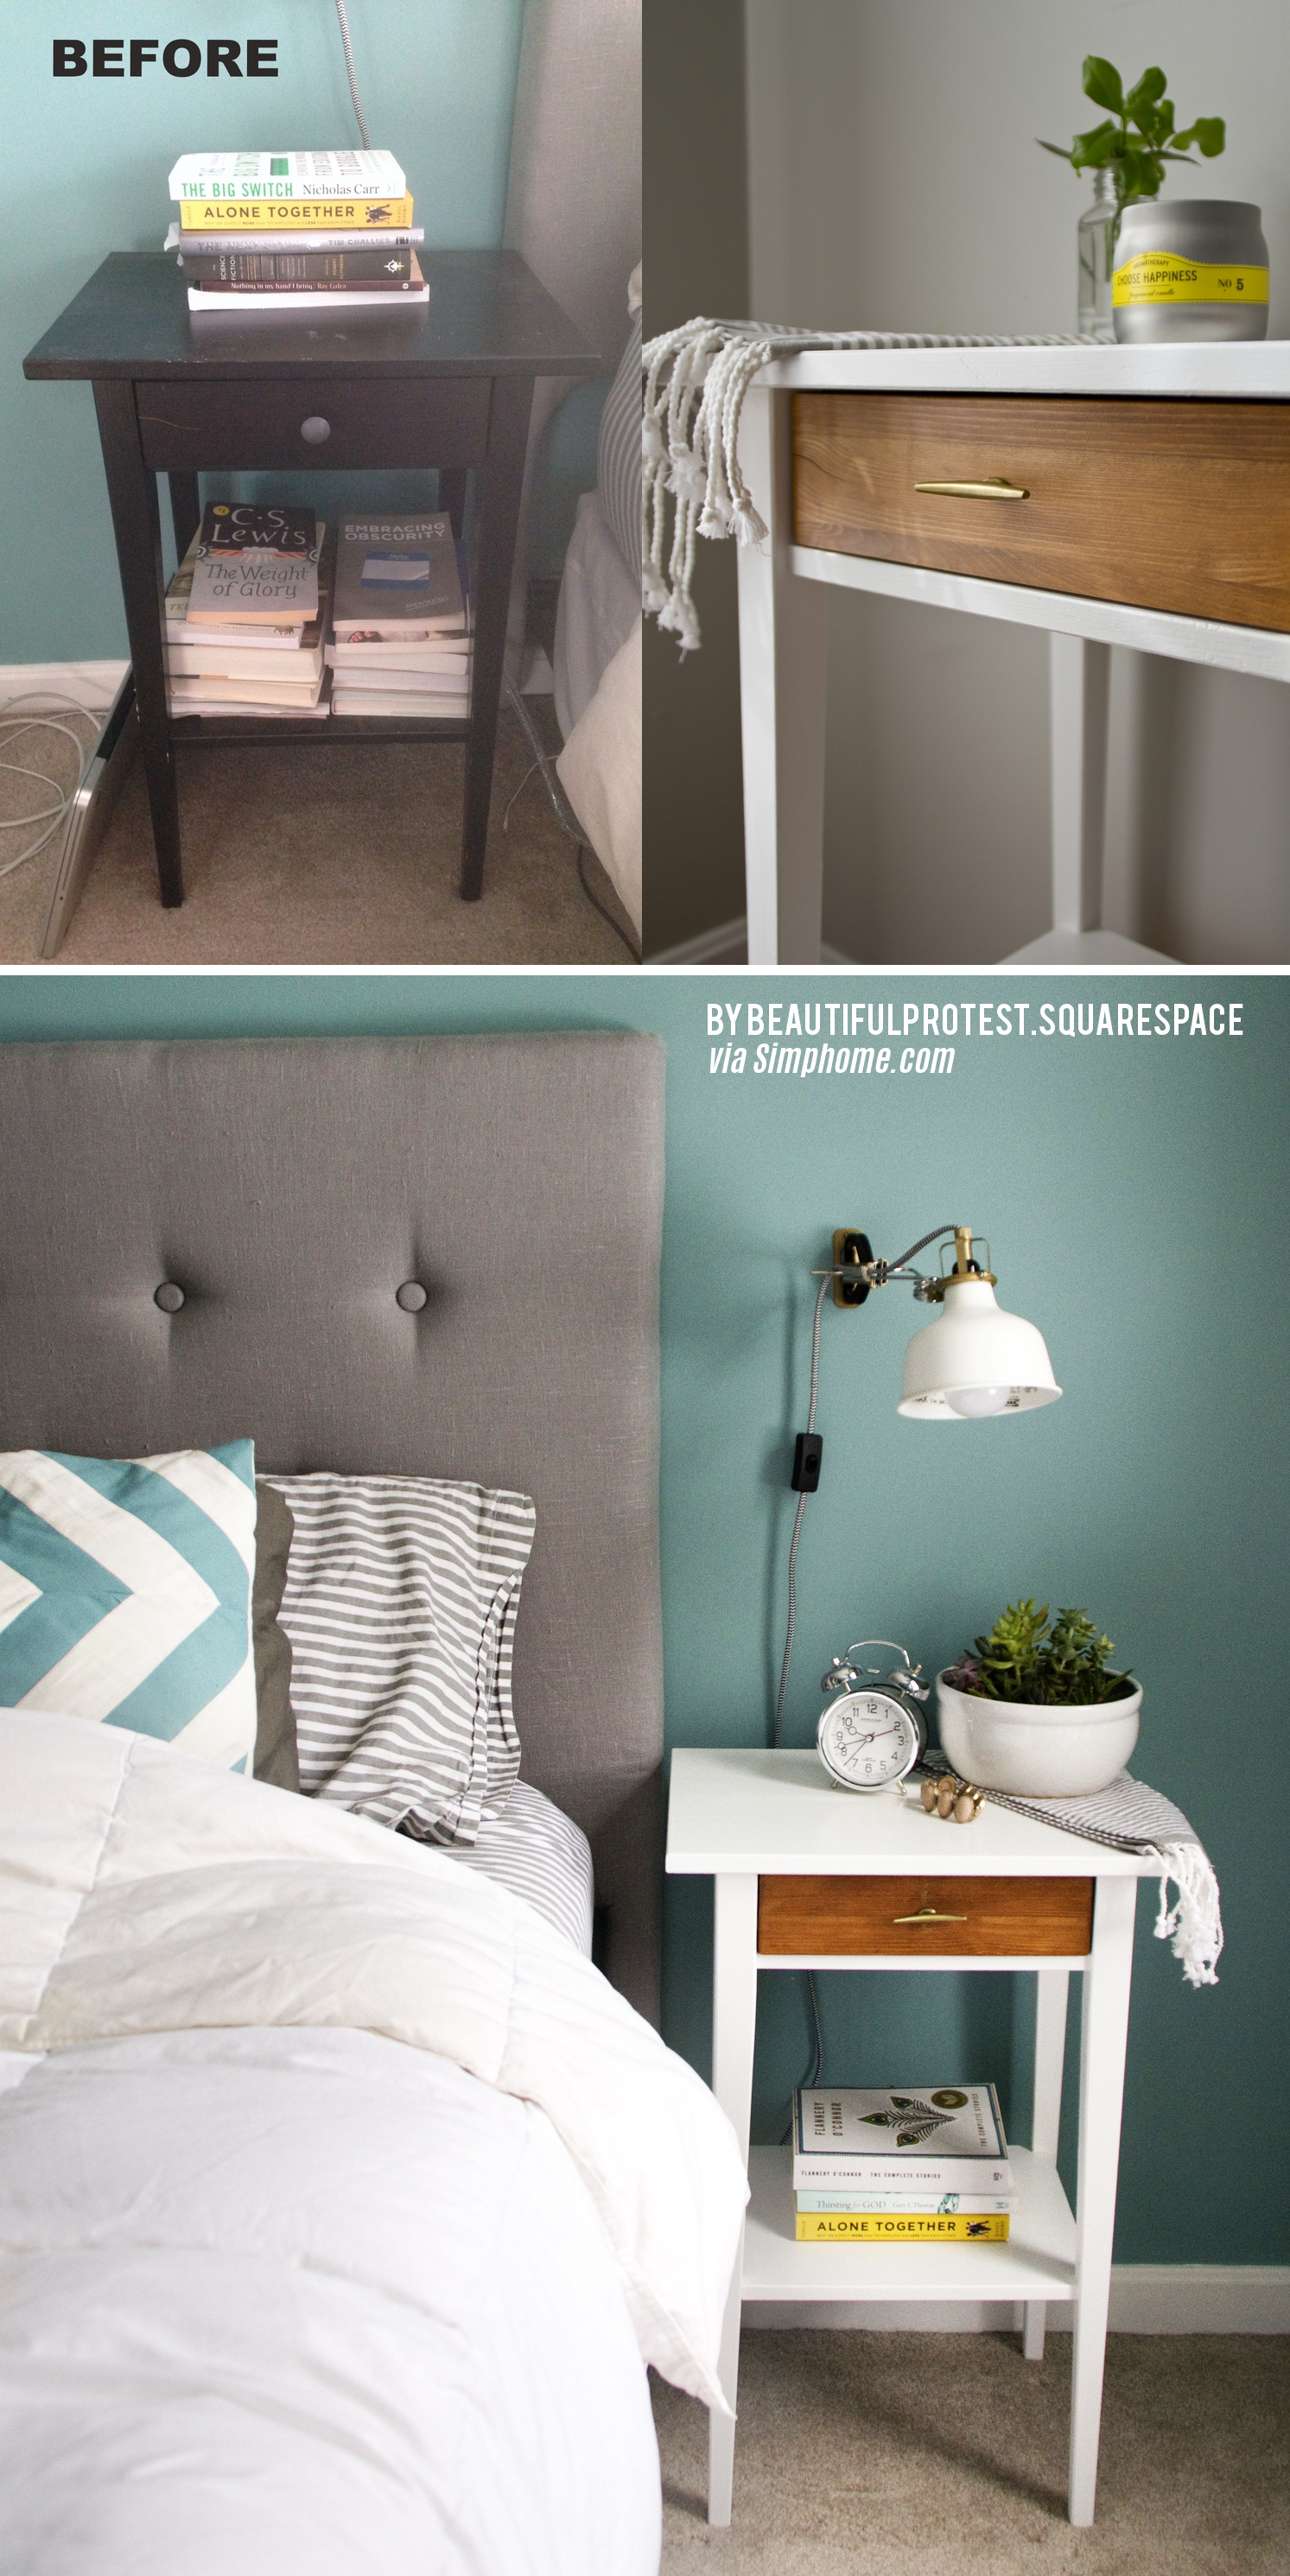 Use a palm sander to sand away the black finish before staining. Sand top surfaces of the tables with 100 grit paper, and prime with a KILZ oil-based, stain-blocking primer. Apply 3 coats of white cabinet paint and replace the knobs. More about DIY furniture hauls here.
PART 3:

21. IKEA Dresser Hack by Thislewoodfarms.
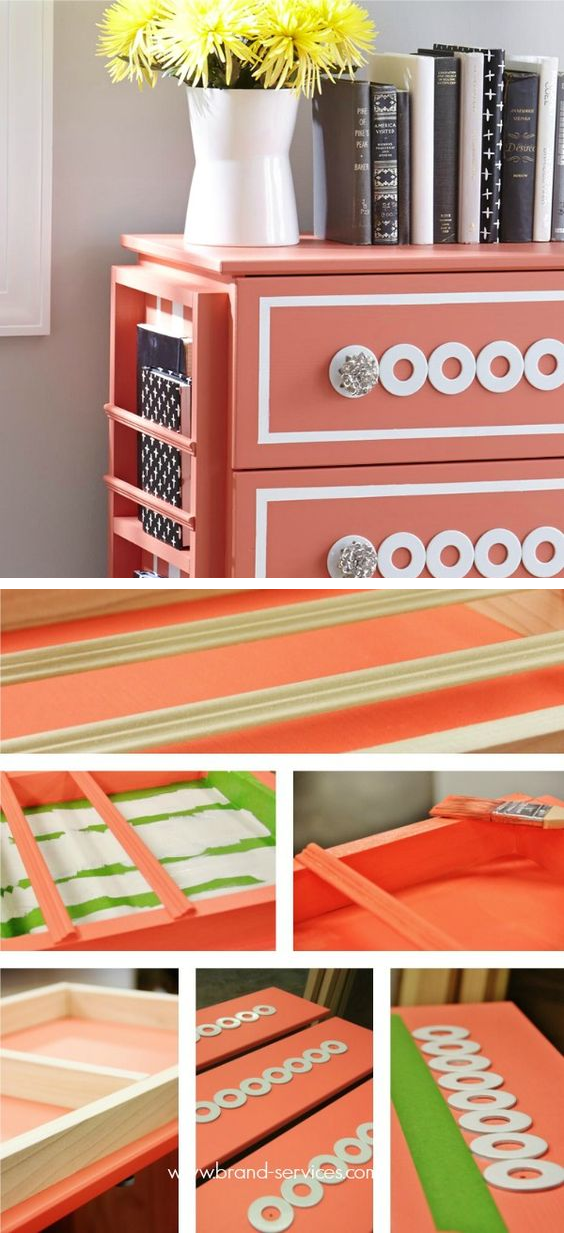 Cut two long boards of 20 inches and three short boards of 12 inches . This is done to set the bookcase from the edge, and you can adjust the boards accordingly. You will need 24 washers and ProBond Advanced Glue.
After the boards are positioned, tape off with painter’s tape around the drawer. Paint the center of washers where the drawer pulls will be. After the paint dries, add the drawer pulls.
22. Four Style IKEA Hack Nightstand.
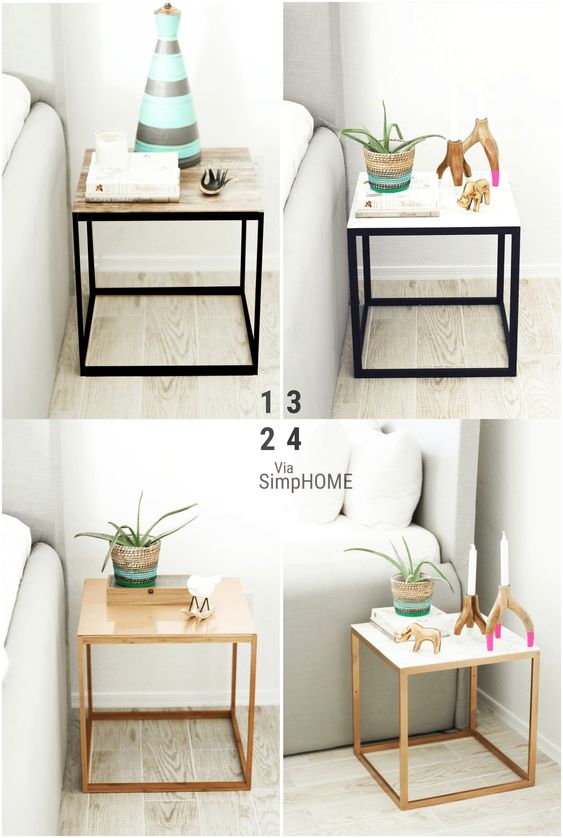 Assemble the table without wire tray underneath. Use two sheets of contact paper for the table top, so you can get a seam. You can get 4 types of nightstands such as : rustic black and wood, stylish copper and wood, traditional marble and black nightstand, or, fun copper and marble nightstand.
23. One Step Marble Side Table.
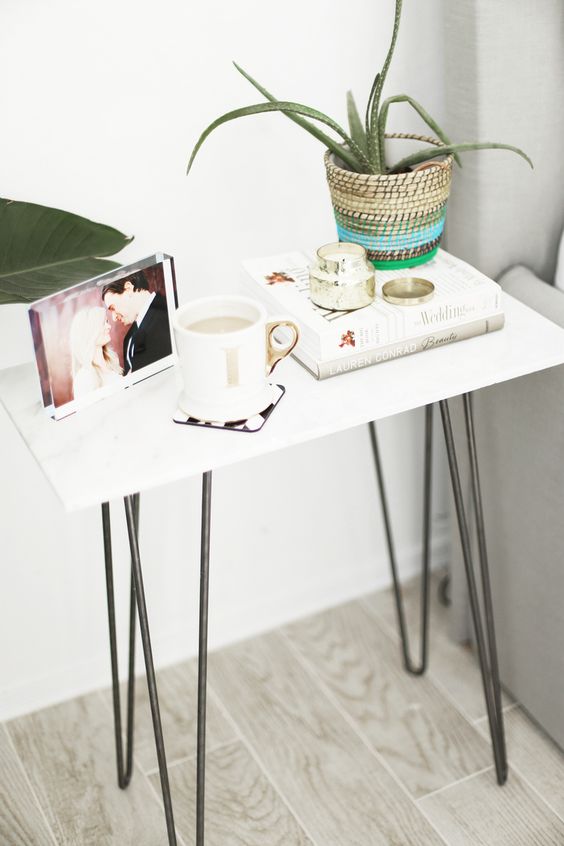 Turn the marble tile over, measure and place hairpin legs on them, and trace “L” shapes on the tile with pencil. Use clear sealant on the legs so it doesn’t show through the porous tile. Place the hairpin legs back onto the tile lining them up with your trace marks. Wait 2 days to dry.
24. Double IKEA Lack Tables.
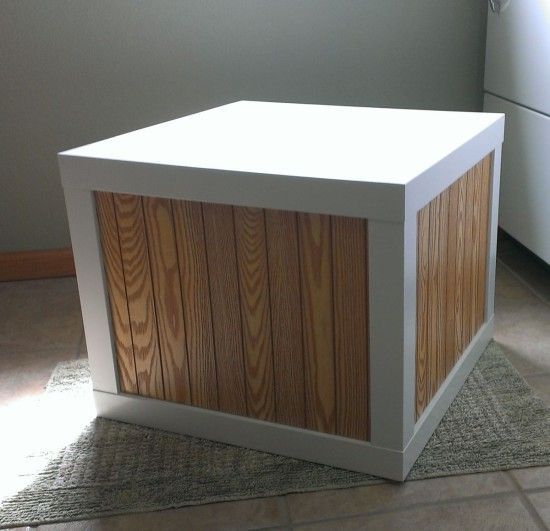 To insert panel, cut grooves in legs, and shorten them by 2 inches. Keep bottom base full piece and glue back on after cutting. The paneling should be sized to fit inside legs. Slide panels inside grooves after respraying Lack pieces. Fit table top as base and screw it on.
25. A Table Lack with Wood and Chalkpaint.
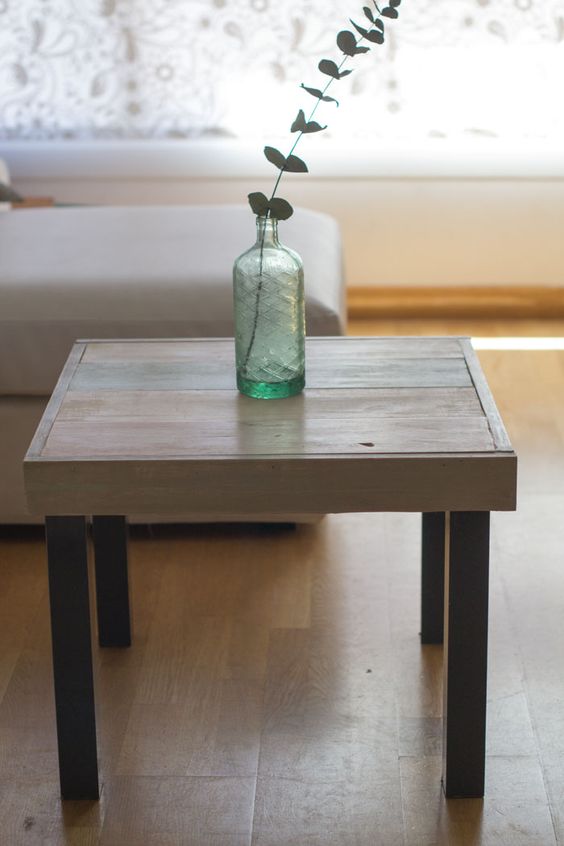 Cut planks to the size of the table Lack. Paste with hot silicone to keep them stationary and fix to base with screws. After you are done, sand and paint to impart an authentic chalk paint table.
26. IKEA Lack Hack with Marbled Paper.
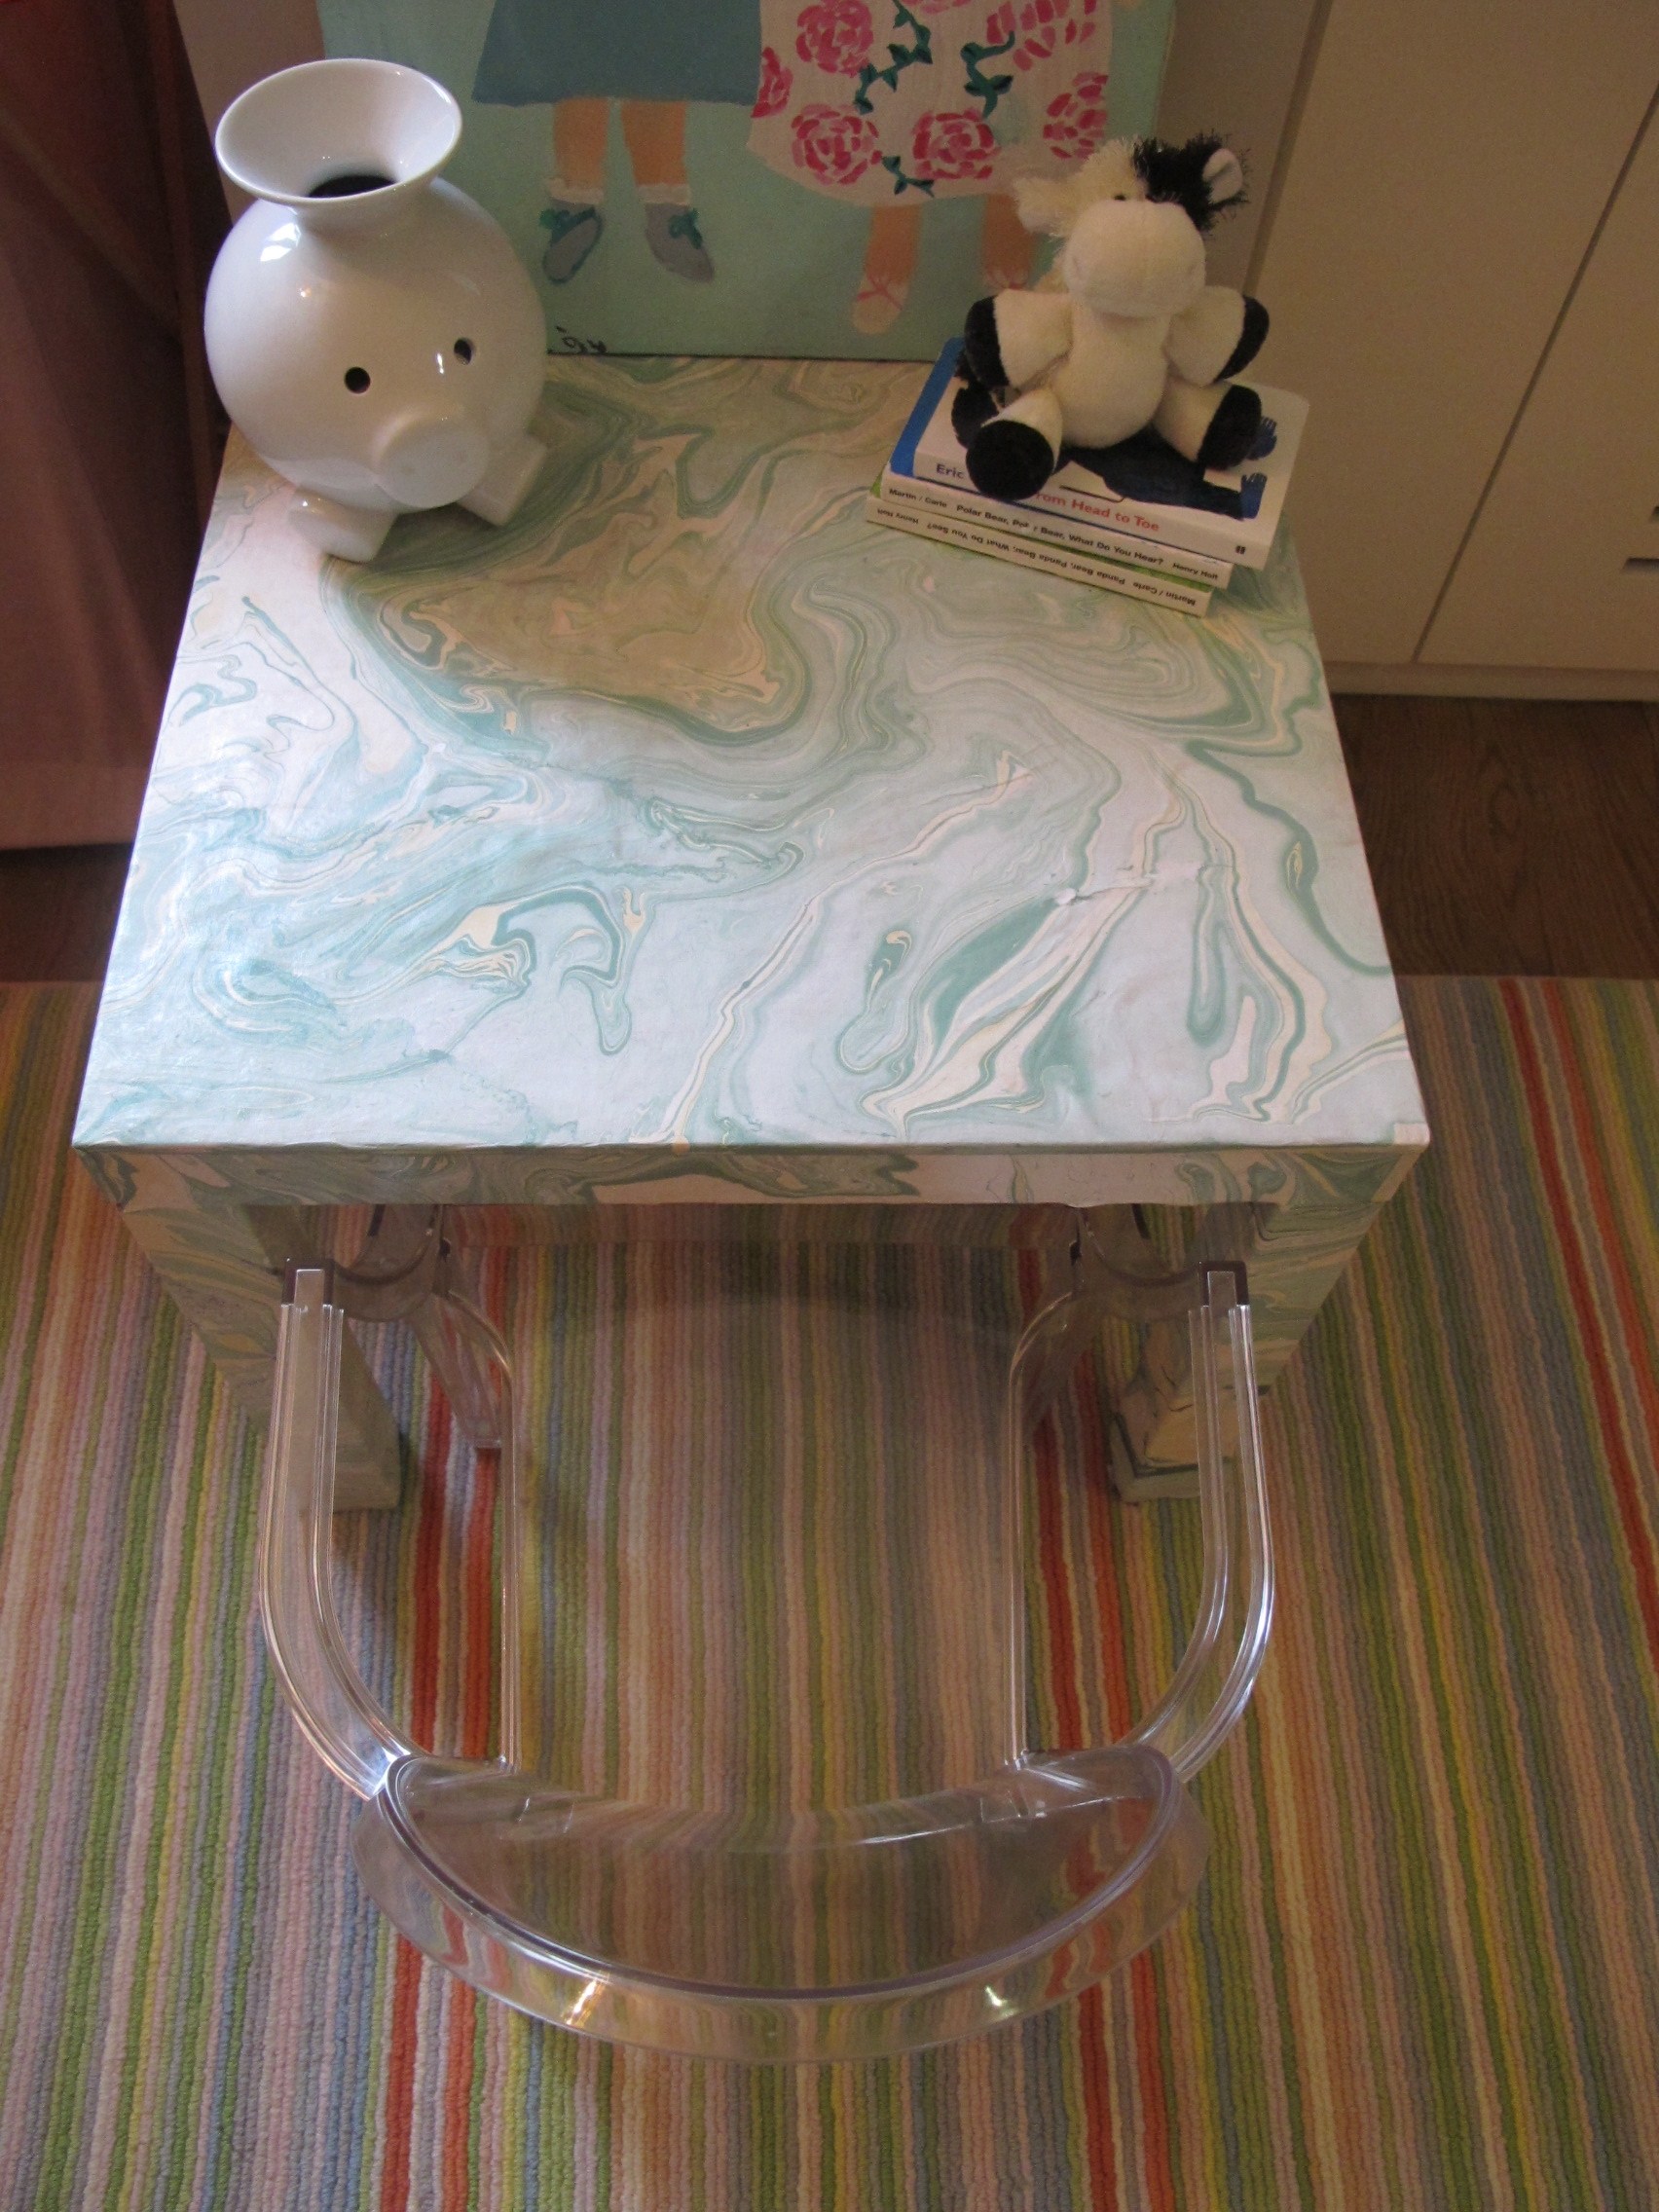 Use Modge Podge and Spra-ment
to sticking the paper to table. Cover both sides as Modge hardens, and use several coats of clear lacquer to prevent tearing. Last, Smooth out the bubbles.
27. IKEA Side Table to Sisal Rope Table.
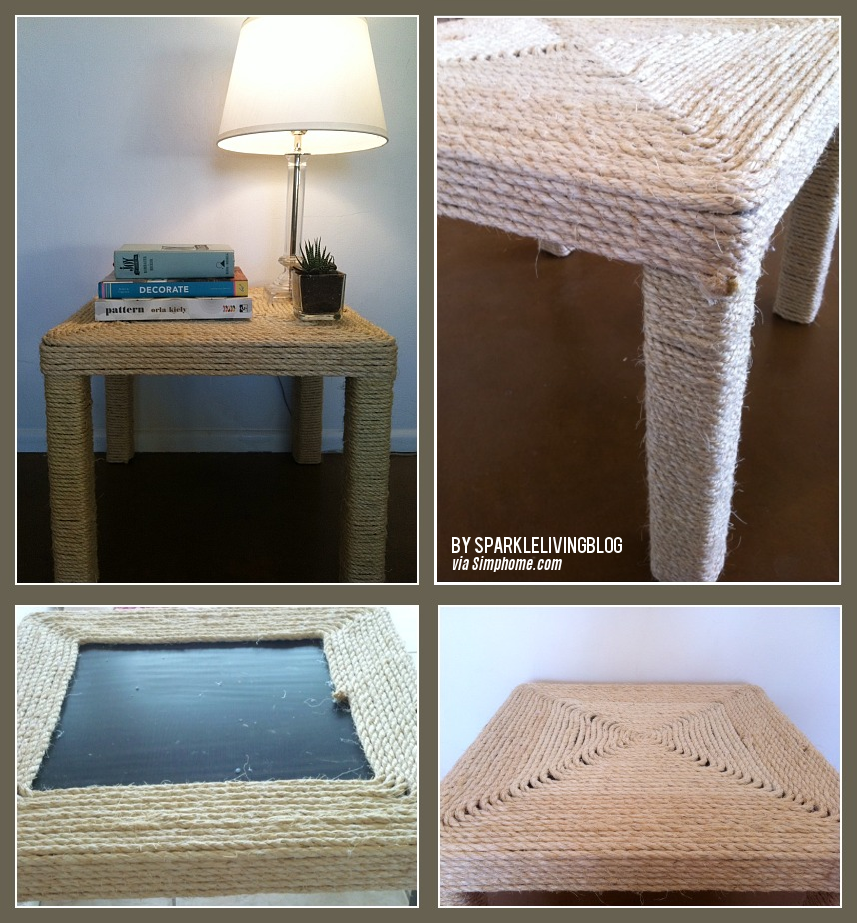 Sand the table and start by using hot glue gun to stick a rope on to the bottom of the leg with a side that faces inside. Glue down the end to the table well, and put some E600 glue at the end of the rope to keep it from unraveling. For the top, begin on the outer edge and keep wrapping till you cover the square shape.
28. IKEA Lack Table Rehashed.
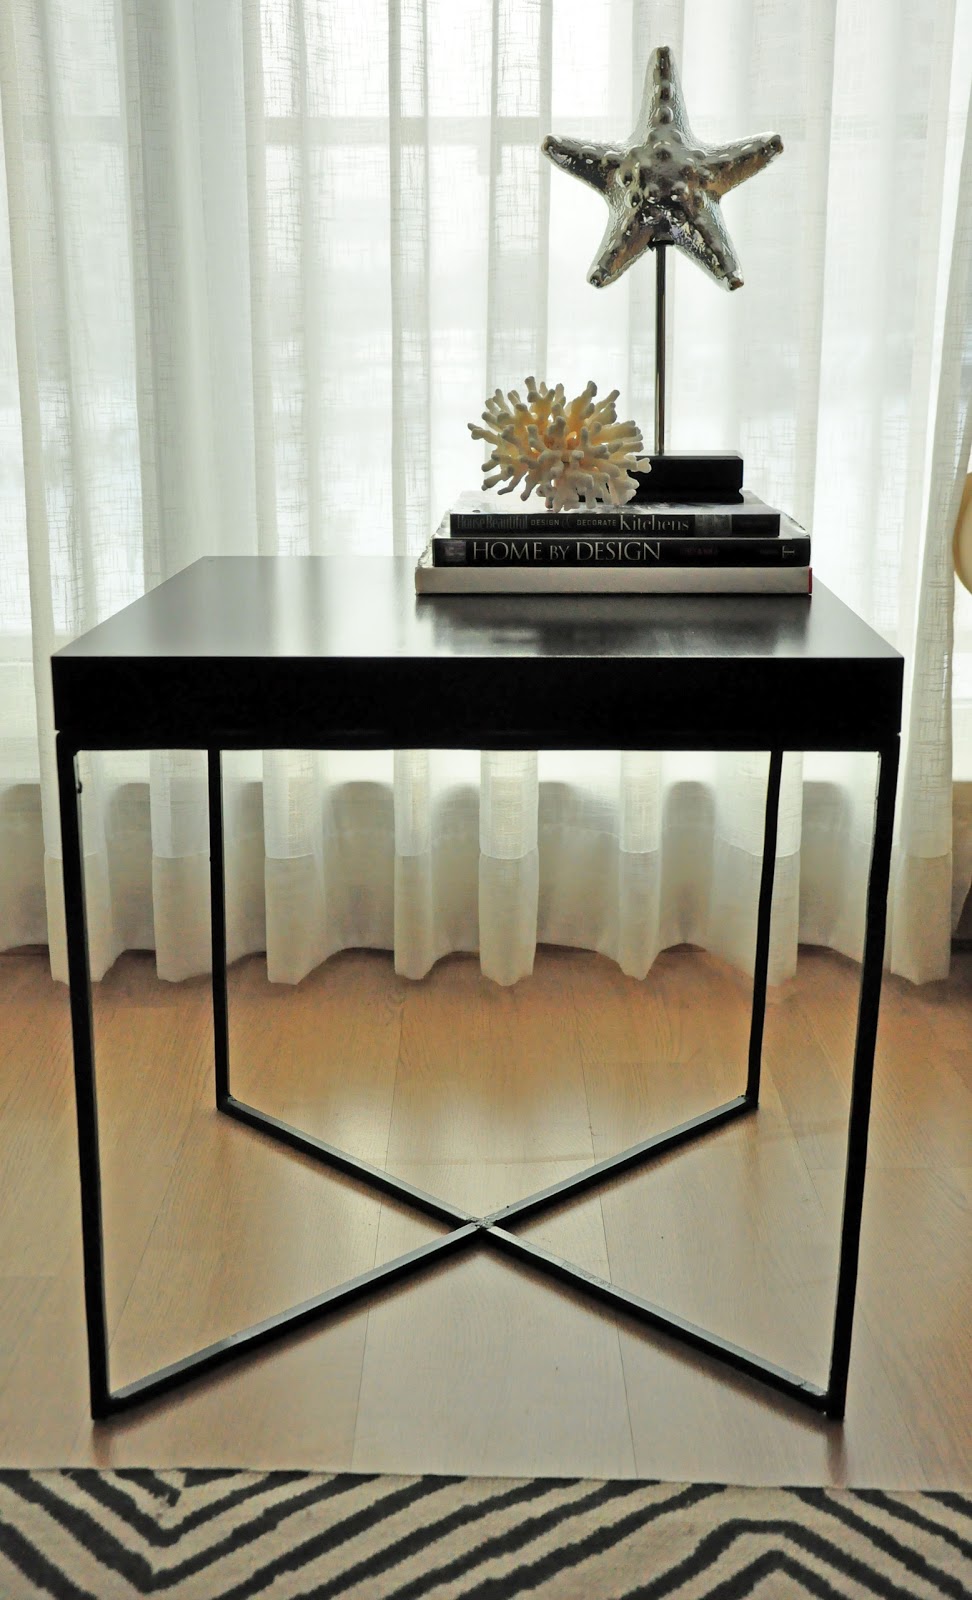 The base is x-shaped at the bottom, with a square on top, for supporting the table top – the weight is evenly distributed. Unscrew the Lack side table for the table top and buy the metal frame separately. To reduce effort, purchase pre-cut square pieces of wood from a hardware store, saw the corners, glue them together, clamp, and leave for a week.
29. IKEA Lack Hack – From Coffee Table to The Perfect Bedside Table.
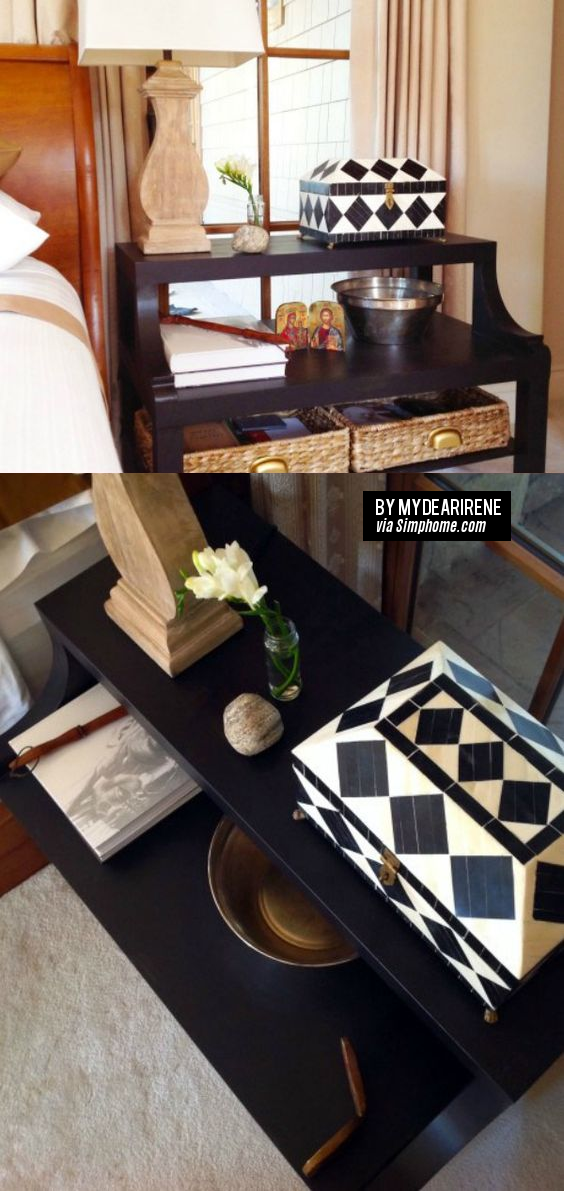 Use two IKEA LACK coffee tables for one bedside table. From the new table package, only use the upper thick tabletop and two legs. Don’t forget to buy two wooden corbels for the front legs to hold your new shelf. You will also need lots of epoxy glue.
Before painting sand off excess dry wood filler. Start with a generous coat of primer and continue with black satin paint.
30. Easy DIY Sofa Tables.
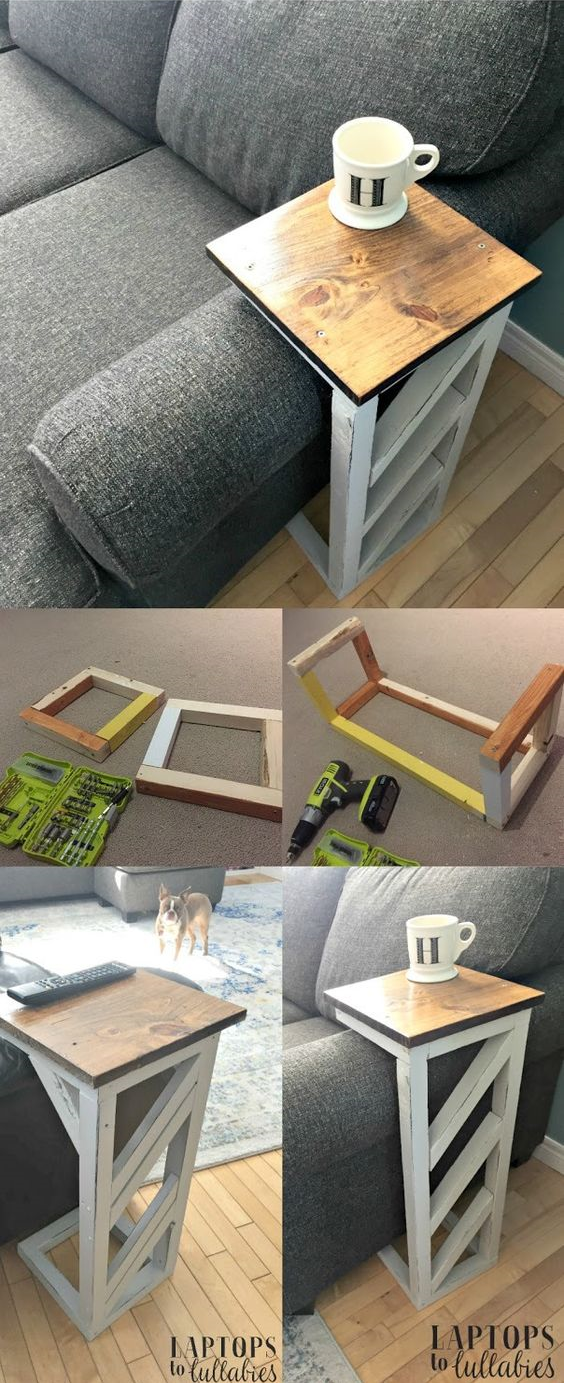 Cut down a 2×2 into eight short lengths. Connect 2 longs and 2 shorts to create two wooden squares. Cut two legs and screw them into the squares on one side, allowing the table base to be slid under a couch or chair. Screw on a large square of wood as the table top. Paint the table as per your choice and protect the top with 4 coats of polyurethane.
And now for the bonus… an extra hack! DIY IKEA Coffee Table Hack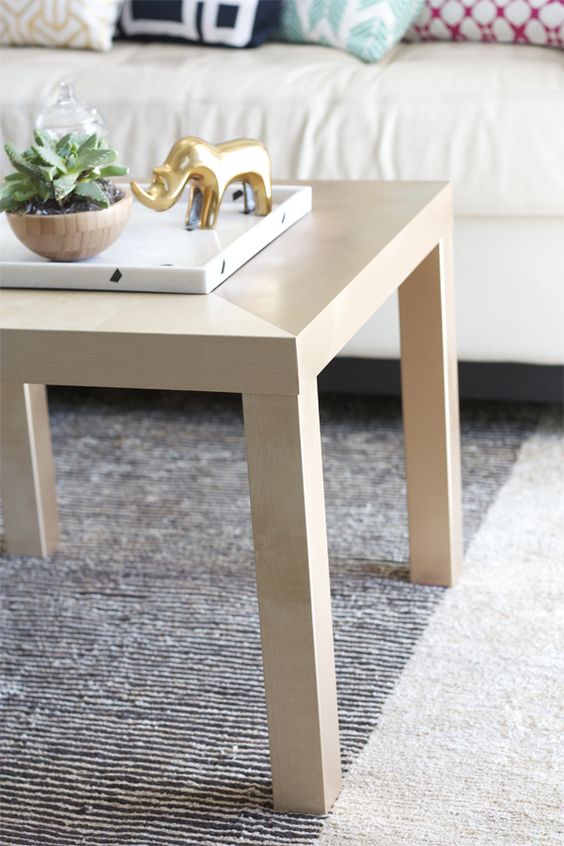 Use painters tape for masking areas you don’t want to paint, while continuing the diagonal line on the legs spray paint and lacquer them with several coats to protect against scratches or chips. Show off your creativity and skills – get working to create interesting furniture and decor pieces or vintage for your home.
30+ Side Table Hacks (IKEA and Non IKEA) Video:
Lastly, Here I have for you a video format of this list that I hope you’ll enjoy and share.
See you again later with more furniture makeover list and thanks for reading or watching.