10. Under-bed Storage Box!
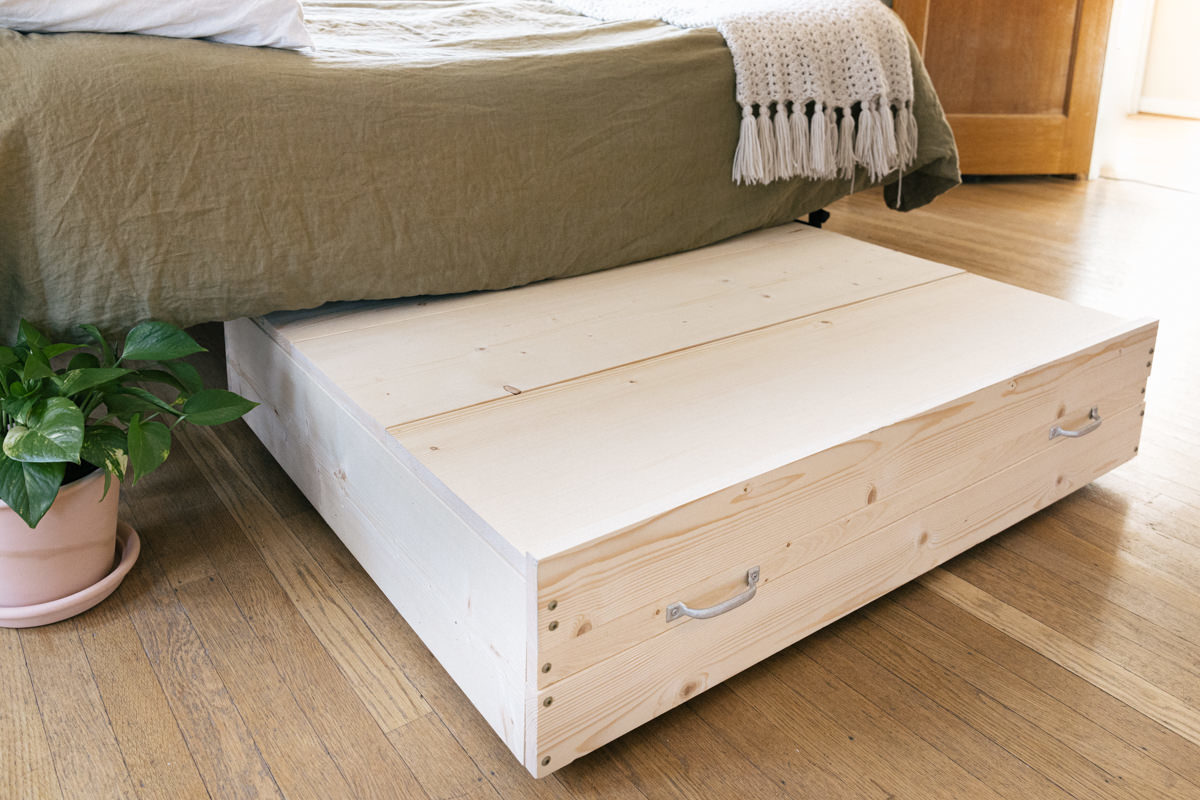
Under-bed storage has always been a lifesaver, but what if we told you that you can now maximize all that unused space while also evicting any pesky monsters living under there? Yes, it’s true! With following handy under-bed storage box from Dunnlumber, you’ll have a customizable and easily accessible storage solution that can also double as a table for your Lego building or jigsaw puzzle assembly needs. Let’s get started!
Step 1: Cut the Wood
To ensure your storage box fits perfectly under your bed, measure the height of your bed frame clearance. We designed our box to fit under a bed with 9″ of clearance. However, feel free to adjust the height of your box accordingly. For the vertical sides, we used one-by-eights. You can modify the width of the boards to make your box taller or shorter.
As for the width of the box, we went with 42″. However, you can adjust this measurement to your preference. Just remember to adjust all 42″ lengths mentioned in this project to your desired width.
Step 2: Sand and Stain the Wood
Once you’ve cut all the pieces, it’s time to sand down any rough edges or spots on the boards After sanding, if you’d like to stain or paint your storage box, now is the perfect time to do it. You can technically paint or stain once the project is complete, but it’s much easier to cover all sides of the boards before assembling everything together.
Step 3: Assemble the Box Sides
Take your three pieces of one-by-eight wood and align them to create the sides and back of the box. Make sure the two shorter pieces butt up against the longer piece, resulting in a 42″ width for the back of the box.
To securely fasten the pieces together, use #8 x 1 ¼” screws. We recommend pan-head screws with a smooth convex head for a neat finish. By the end of this step, you should have a “U” shape structure.
Step 4: Attach the Front Boards
For the front of our box, we wanted it to be slightly taller than the other sides. To achieve this, we used two one-by-fours with a one-by-two stacked horizontally between them.
Begin at the bottom by attaching a 42″ one-by-four across the open end of the “U” shape you created in Step 3. Again, use the same screws as before. Next, attach a 42″ one-by-two and another 42″ one-by-four in the same manner. The top piece should be taller than the sides and back of the box, creating a visually appealing design.
With the back and sides of the box now attached, it’s time to move on to the floorboards.
Step 5: Add the Floorboards
The floor of the box will be made up of three 40 ½” one-by-twelves. Place them inside the rectangular box to ensure they fit properly. If needed, trim them for a perfect fit. Once you’re sure they fit, set them aside for now.
Take the two 33 ¾” one-by-two pieces and position them on the inside edge of the box along both sides. Use #8 x 1 ¼” screws to secure them in place by driving them from the inside of the box through the one-by-two and into the sides of the one-by-ten. Additionally, center the two 36″ one-by-twos (on edge) to the bottom of the back and front of the box. These four one-by-twos will form a ledge for the one-by-twelve floorboards to rest on.
Step 6: Assemble the Box Lid
Lay out the remaining three one-by-twelves on a flat surface, butting them up against each other to form the lid. If one side looks better than the other, place the good side facing down so it shows once the lid is flipped over.
Square up the ends and attach them together with three 32″ one-by-twos using the same #8 x 1 ¼” screws. Position one of the one-by-twos near the center and the others towards the edges, but not all the way to the edges.
Before moving on, it’s a good idea to make a faint mark along the top edge of the box sides where you’ll position the screws for the one-by-twos. This prevents accidentally driving a floorboard screw into an existing screw. Finally, place the floorboards back in and screw them into the one-by-twos using #8 x 1 ¼” screws.
Step 7: Mount the Hinges
To effectively open and close the lid, you’ll need hinges. We used 4″ T-hinges for ours. Begin by positioning the short wing of the hinge vertically on the back wall of the box, with the long wing across the top wall of the box. Attach the short wings securely using the provided screws.
Next, lay the lid in place and mark the hinge at the back edge. Remove the lid and transfer that line to the other side of the hinge (you can utilize tape for accuracy). Lay the box upside down with the lid (upside down) aligned with the marked line on the hinges. Fasten the long wings of the screws to the underside of the lid.
Step 8: Attach Lid Support
To prevent the lid from slamming shut, attach spring-loaded lid supports. These can be easily installed by following the instructions on the packaging. Start by marking the screw holes and then securely screwing the two ends of the support into place—one end at the bottom of the lid and the other near the top of the back wall. Test the closing of the lid and, if necessary, sand the bottom of the lid’s front lip for a smoother closing motion.
Step 9: Attach Casters
A crucial step for easy access is attaching casters to the bottom of the box. Flip the box upside down and secure four casters onto the bottom side of the floorboards using ⅝” screws. Use a scrap board to position each caster 1 ½” in from the corners of the box.
Step 10: Attach Handles
Lastly, to make pulling out the box a breeze, attach handles to the face. You can choose handles that suit your aesthetic taste. Drill holes and use rope handles, purchase cabinet pulls, or even opt for screen door handles. Just ensure that the screws used for attaching the handles don’t poke through the face of the box.
And there you have it, your very own DIY under-bed storage box! Simply roll it under your bed, and enjoy the newfound space. Fill it up with items of your choosing, and revel in the organized bliss.
9. A Pallet Bed Storage Box Idea
Wave goodbye to the old mattress-on-the-floor routine – it’s time to build a chic, wallet-friendly DIY pallet bed that might just have you hitting the snooze button a few extra times.
With a nod to trendy industrial vibes (or a dash of rustic charm, you pick), this project is perfect if you’ve got some basic power tool prowess and an afternoon to tinker. We snagged insider tips from Kate Espada, film industry set magician, to guide your transformation from pallet to posh sleeping paradise.
What You’ll Need:
- Wood pallets (about 40-by-48 inches)
- Sander (because no one enjoys splinters)
- Sandpaper, the finer the better
- Stain or paint to make it your own
- Paintbrushes (get creative!)
- Optional: lacquer for durability and shine
- Flat brackets to hold your dreams together
- Corner brackets for right angles and tight spots
- 1.5-inch screws because size does matter
Here’s the Scoop:
- Measure your mattress like a pro. Knowing the dimensions will dictate your pallet count—don’t forget to double up for height and add some for a headboard if you’re feeling fancy.
- Shop those pallets (twice the needed amount, remember?) and line them up for a sanding session. Smooth all surfaces—you’ll thank us later.
- Time for color! Stain or paint each pallet in your chosen hue. Patience, grasshopper—let them dry fully.
- To seal the deal (and edges), brush on a layer of optional lacquer. Think of it as the palette’s armor. Dry time? Oh yes, that too.
- Now, lay them out where your bed will go and pre-plan any adjustments. A well-laid plan leads to less “oops” later.
- Unite the bed pallets with flat brackets, secure and strong with 1.5-inch screws. For a headboard, double bracket those bad boys and anchor them with corner brackets to the floor pallets.
Cue the drumroll—you’ve just turned plain pallets into a sleep sanctuary! Pop your mattress atop your handcrafted frame and dive into those well-deserved Z’s. Feeling a decor twist? Toss on a skirt and slipcover and boom, minimalist morphs to magazine-worthy. Sweet dreams on your new pallet bed haven, DIY royalty!
8. The Bookshelf That Joins You on Life’s Final Chapter
Imagine this: a bookshelf that not only holds your cherished novels and curios but also transforms into a vessel for your last voyage. No, it’s not a fantasy plot twist—it’s designer William Warren’s ‘Shelves for Life’, a sustainable piece of furniture guaranteed to be forever by your side (even when you’re six feet under).
Here’s the scoop: The shelves you lovingly fill will one day cradle you, with the wood maturing alongside you, gathering stories and stains. Concealed underneath is a brass plate waiting to be turned over and engraved with your legacy.
When your grand finale arrives, the shelves are dismantled and reconfigured into a solemn yet personal coffin. This isn’t your standard send-off box; it’s a statement piece, a final reminder of life’s imprints, destined for more than just functional shelving. It’s eco-conscious, it’s profound, and yes, it’s also kind of quirky.
Launched at the 2005 London Design Festival, these shelves-cum-coffins continue to turn heads and spark conversations about life, death, and everything in between. Warren offers the plans free of charge, fueling a DIY spirit that intersects with profound introspection.
William, a consultative furniture virtuoso and Senior Lecturer, believes that thoughtful design should evoke emotion and reflection. He lives by the philosophy that possessions should narrate a story, and what better tale than one that follows from your first shelf to your final rest?
Want a personalized design for your life-story keeper? Hit up William with your dimensions, and he’ll craft you a bookshelf that’s true to your lifeline—complete with memories, spills, and charm. It’s a testament to a life well-lived and a send-off in style, minus the exorbitant coffin price tag and faux-luxe finishings.
In embracing Warren’s vision, you choose to celebrate a life of authenticity, leaving behind well-loved woodwork, coffee stains, and all—as you embark on your eternal adventure. Curious? Check out William Warren’s work, and consider the shelves that could one day be with you, in both spirited discussions and silent slumber.
7. How to modulate your Sets like a famous designer?
Delve into the world of SPOT, a stunning furniture series where form meets function, offering a harmonious blend of storage solution and style. This line takes on a design challenge that many have nodded to but few have mastered—the ability to create a unifying visual language that threads through each piece, making them instantly recognizable as part of the same design family. And, let’s raise a glass to that—it’s a feat worthy of applause.
The hallmark of SPOT is its distinctive ‘A’ shaped cross-section, a clever nod to both aesthetics and practicality. Not only does this signature design make each piece stackable and versatile, it also carves out a niche aesthetic that could define a space with its bold, repetitive patterns.
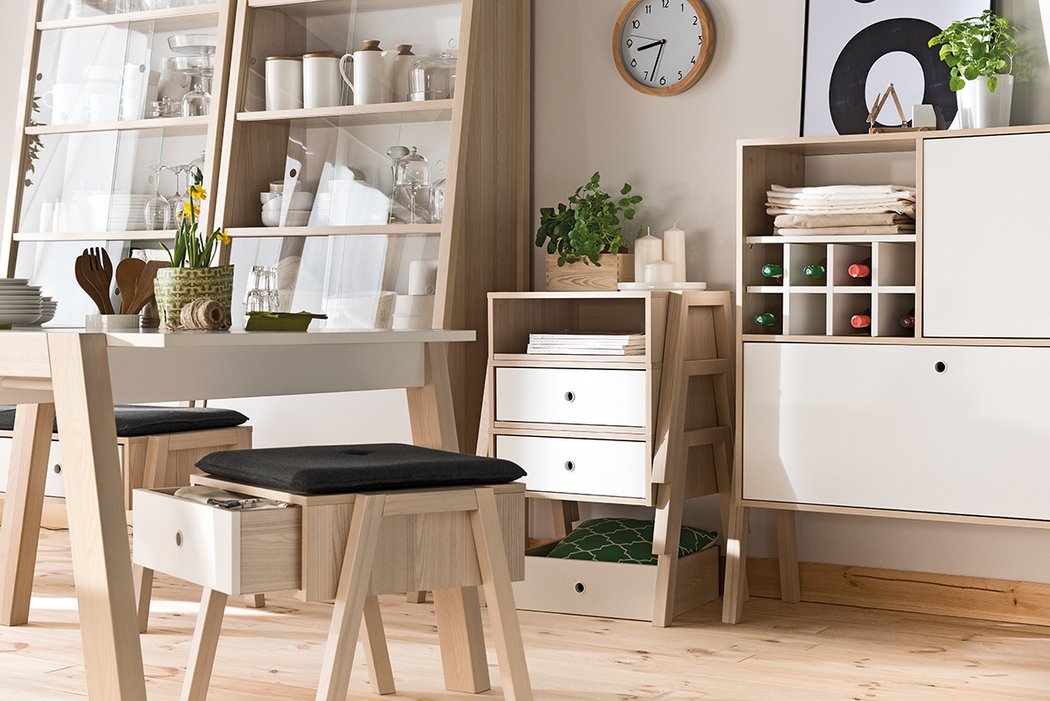
Yet, the true beauty of design lies in the ability to curate it to one’s personal narrative. SPOT’s collection is akin to a versatile wardrobe; while the ‘A’ shaped language acts as a classic staple, akin to a little black dress or a tailored blazer, each room benefits from its own unique accessories and flair. Incorporating SPOT into your home becomes an act of personal expression—like choosing the right spices to bring a dish to life, SPOT can complement any room’s character, enhancing without overwhelming.
So, imagine your living space as a gallery, each room a canvas—SPOT could be the bold stroke that threads continuity. Yet, the story each room tells can differ, as diverse as chapters in a novel, with SPOT pieces framed by distinct decors that reflect your eclectic taste.
In the end, these furniture pieces stand as a testament to the SPOT line’s potential. It’s not about having every room mirror the other, but rather how each piece can merge into the tapestry of your habitat, quietly commanding attention without stealing the spotlight. Whether it’s anchoring a single room or selected as a recurrent theme, SPOT invites you to savor the joy of designing a home that is both cohesive and captivatingly unique.
6. Amsterdam Center’s Built in Bed Idea
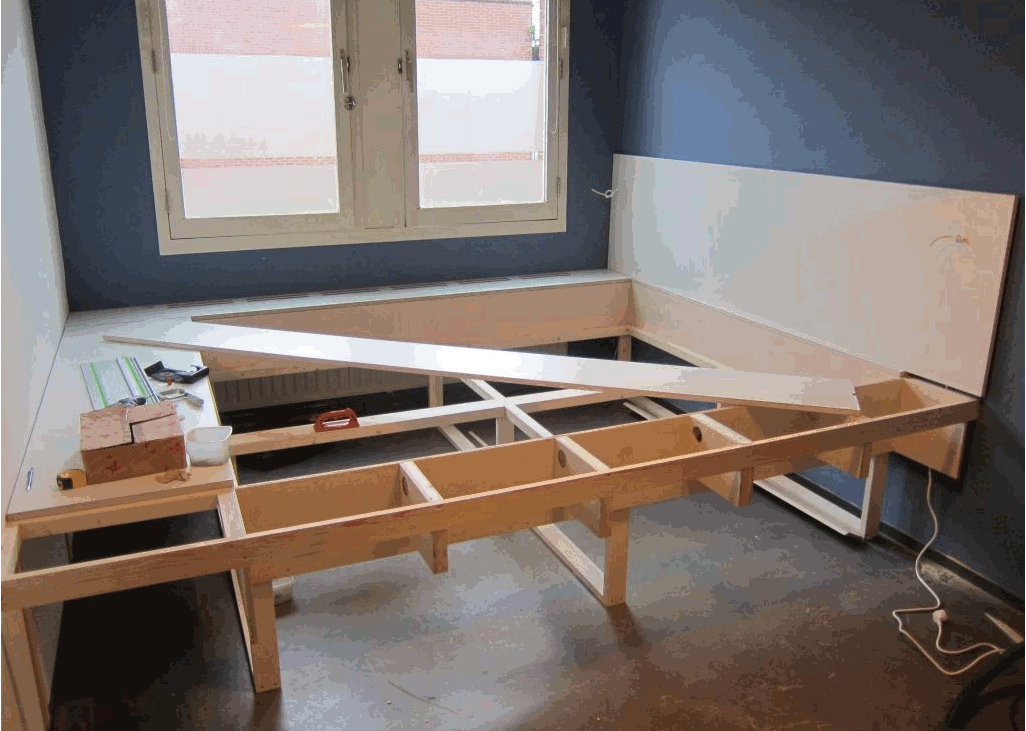
Imagine stepping into a space so ingeniously designed, every inch offers functionality without sacrificing style—a living area that caters not only to the eyes but also to the practical demands of storage. The mission is clear: maximize storage space without cluttering the sanctuary of home. And the execution? Nothing short of brilliant.
As you approach this masterpiece, you’ll notice the bed, a centerpiece of tranquility flanked by compartments with sleek flaps. These aren’t just decorative touches; they’re carefully crafted pockets of space, each awaiting to tuck away your belongings, keeping the clutter out of sight and mind.
Beneath the slumber oasis, extendable extra-long drawers slide out gracefully, revealing a surprising depth of storage – the perfect hideaway for linens, seasonal clothing, and treasures that make a house a home. Here, the architects of space transform the once-empty void under your bed into a strategic repository.
But the innovation doesn’t end there. Swiftly, your gaze falls upon the staircase, another stylish yet utilitarian feat where each step offers a hidden compartment. The stairs now do double duty, providing both ascent and discreet alcoves for those cumbersome items that too often find no refuge.
And let’s not overlook aesthetics – the pesky radiator, once a sore spot in the room’s complexion, now lies seamlessly integrated into the décor. The birch plywood covered with pristine white HPL is not only robust but also a breeze to maintain. Elegantly milled ventilation slots crown the top of the radiator casing, ensuring functionality melds into the design, whispering of the creator’s foresight and craftsmanship.
Relevant Idea: The Boomerang Bed
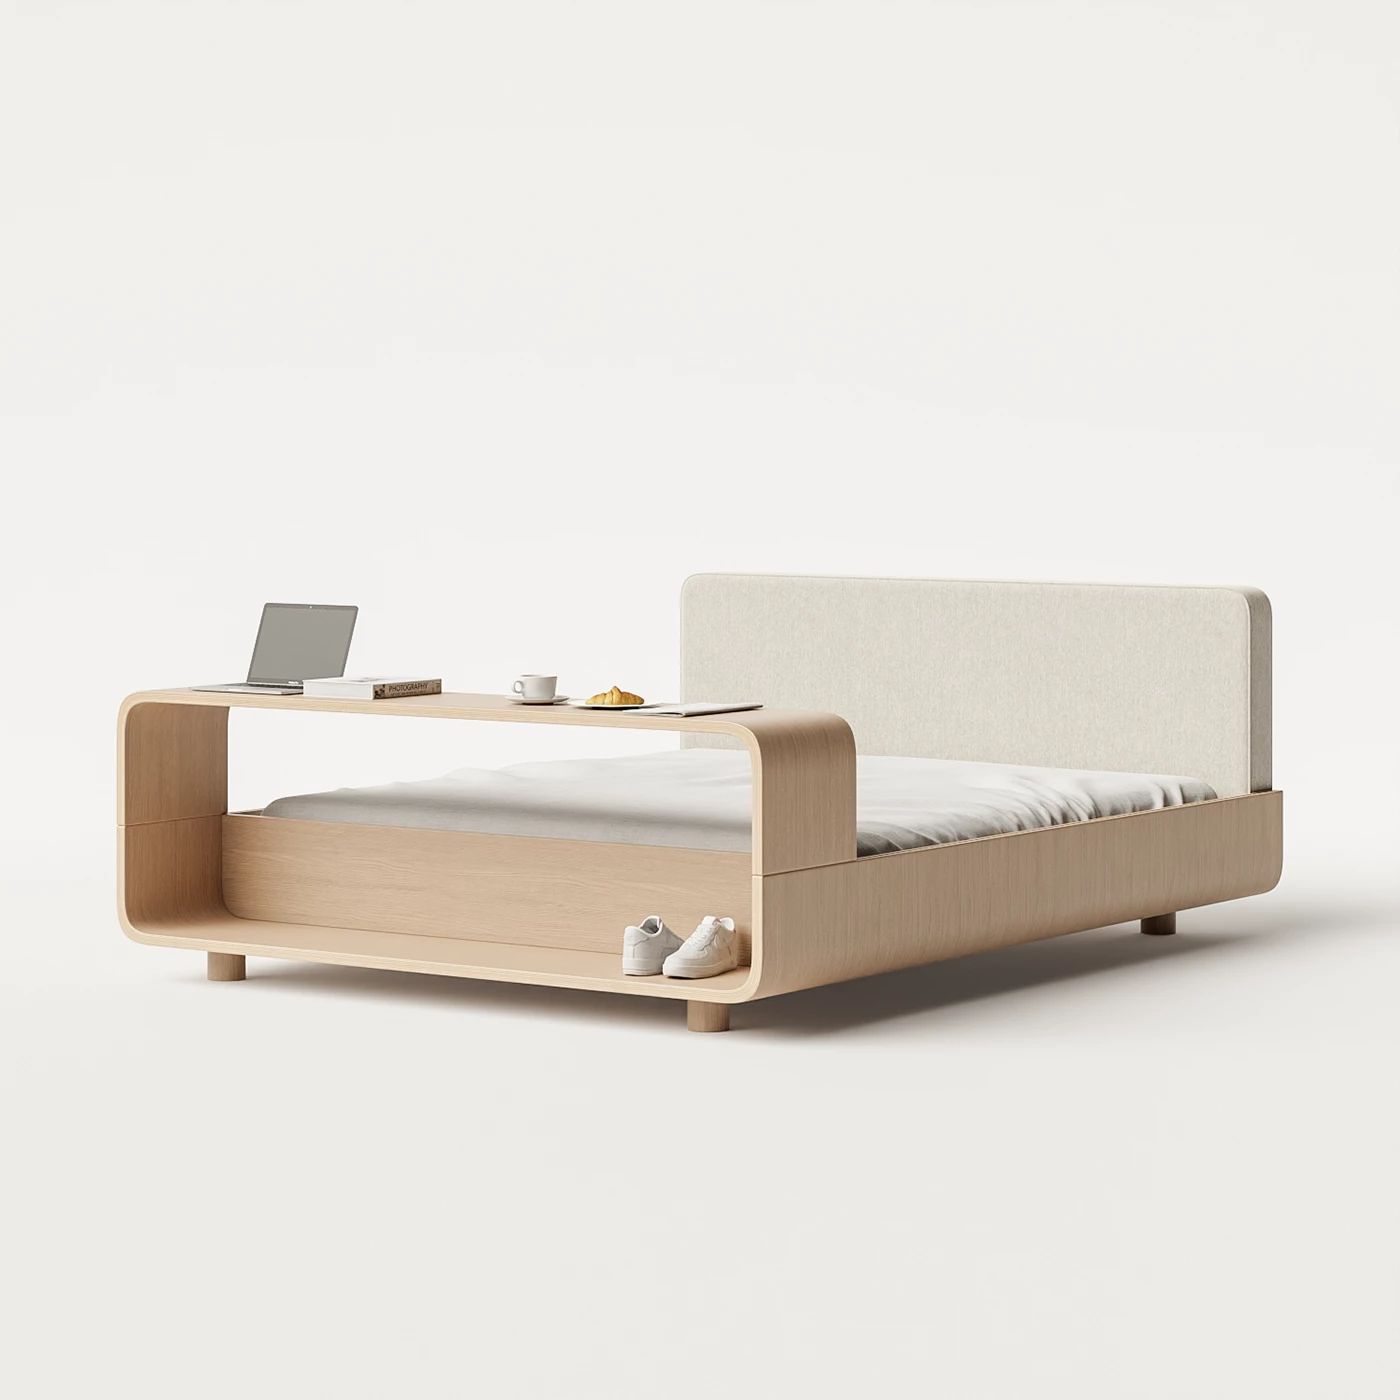
The Boomerang bed by Cácio Furniture is the quintessential solution for the space-savvy. It effortlessly transitions from a restful haven to a desk or breakfast spot with its sliding top. Below, an open storage compartment awaits shoes or linens, while the upholstered sideboard adds an extra layer of indulgence.
Streamlined and multifunctional, Boomerang is an urbanite’s dream—where comfort meets cleverness in a sleek, space-maximizing design that’s as practical as it is stylish. It’s not just furniture; it’s a lifestyle upgrade for any modern space.