15. A Modular L-Shelf Idea
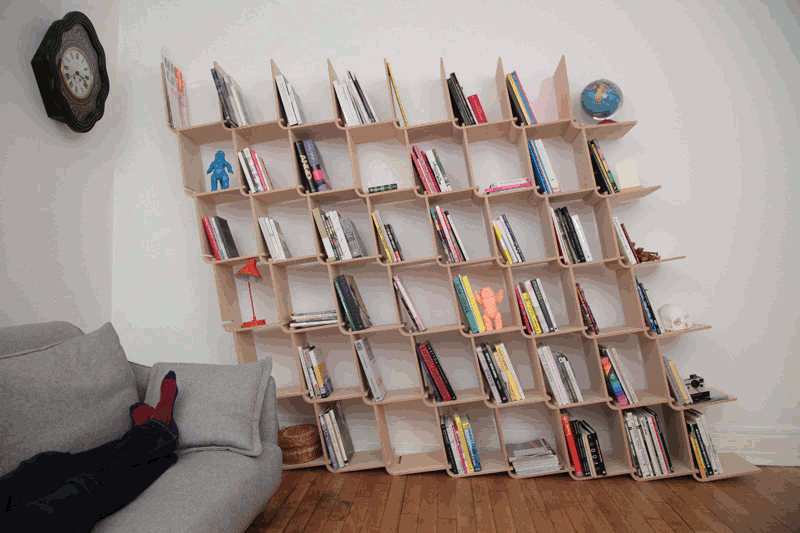
Picture this: your living room, but with a game-changing addition—a statement shelf that’s as easy to put together as it is on the eyes. Allow me to introduce the ‘L Shelf’, designed by the crafty Aurélien Veyrat of Objet Optimisé. This isn’t just any shelf; it’s the minimalist masterpiece that your succulents and page-turners have been dreaming of, marrying functionality with pure, unadulterated style.
Here’s the lowdown: the ‘L Shelf’ is born from a single module, an elegantly bent piece of wood that’s the brainchild of a woodworking wizardry rendezvous. Choose between birch or walnut to match your room’s vibe. And the best part? You won’t find yourself wrestling with glue or scrambling for screws—this beauty slots together with the simplicity and satisfaction of that last puzzle piece.
Imagine bending wood into sculptures that double as shelves—this is ‘L’. It’s that simple but optimized bend, initially meant for graceful armrests or comfy seats, that’s been repurposed into, well, the coolest shelf in town. It’s playful, transformative, and as adaptable as they come. Need to store your book collection, vinyl records, or that impressive assortment of action figures? ‘L’ has got your back.
Think of ‘L’ as the DNA of your décor, a fundamental building block that invites endless configurations. It’s the silent underscore to your life’s exhibition, modular to its very core. Want a cozy nook for your knick-knacks or an epic wall-to-wall library? Keep joining those ‘L’ shapes, and watch your storage dreams multiply.
Ready to revolutionize your space? You can snag an ‘L Shelf’ faster than you can spell “chic storage solution” at Objet Optimisé’s online boutique. It’s storage, it’s sculpture, it’s the “L Shelf”—equal parts utility and charm, with zero trips to the hardware store. Welcome to the future of furniture, where simplicity and sophistication lock in a perfect embrace.
14. An adjustable-wall-mounted-shelving ideal for a sloped ceiling
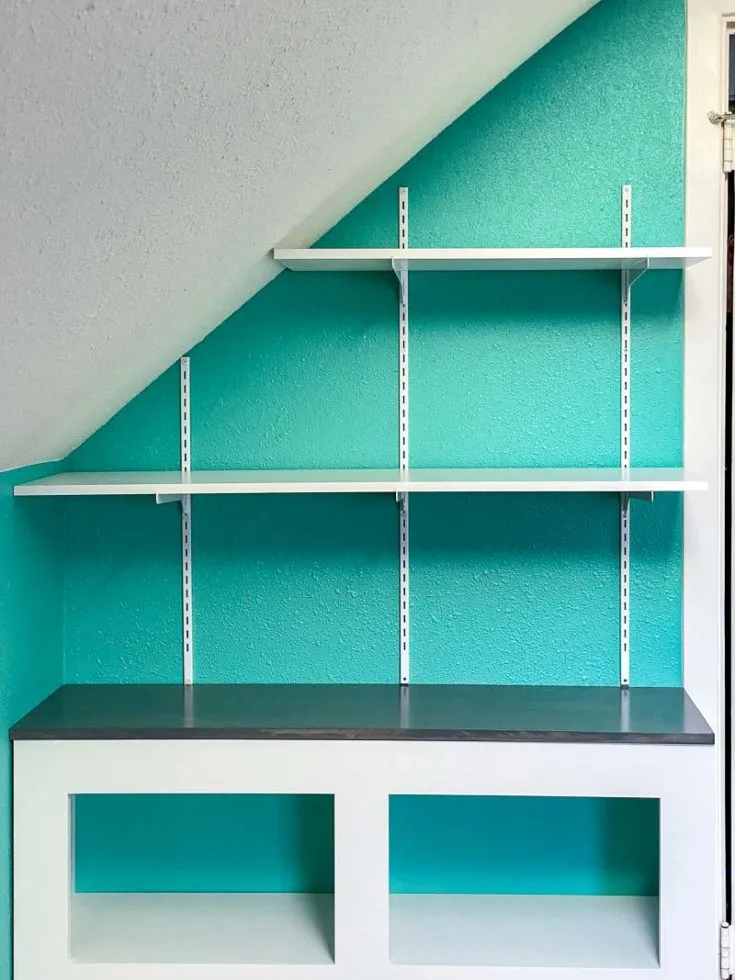
Transform your space with adjustable wall shelves for a sloped ceiling and make the most of your vertical real estate. Ready to get started? Here’s what you’ll need:
- Vertical shelf supports (standards): Find a style that suits your taste at places like the Container Store or Home Depot.
- Shelf brackets: Choose brackets sized to match the depth of your shelves. 12″ brackets work well, while larger shelves might require 16″ ones.
- Wood or melamine board: Match the depth of the shelf brackets. Prefinished melamine shelves are available in various colors and finishes.
- 3″ wood screws
- Stud finder
- Level (magnetic ones work great!)
- Drill
Let’s build those wall shelves!
Step 1: Paint the walls behind the shelves (optional).
It’s easier to paint now rather than taping off later.
Step 2: Find and mark the studs.
Use a stud finder or alternative methods to locate studs for attaching the vertical supports.
Mark their edges with a pencil. If no studs align with your desired location, consider using weight-rated hollow wall anchors.
Step 3: Line up the bottom of the brackets.
Mount all the vertical brackets at the same height to ensure level holes for the shelf brackets.
Line them up with the top of a cabinet or draw a pencil line along the wall where the vertical standards should start.
Step 4: Screw the vertical brackets to the studs or anchors.
Start with the first standard screwed through the bottom hole into the stud.
Use a level to ensure it’s perfectly straight.
Repeat the process for the remaining standards, ensuring good weight distribution for wider shelves.
Step 5: Install the shelf brackets.
These adjustable brackets allow flexibility in their placement.
Insert them into the holes in the standards, with the point facing up.
Use a hammer to tap them firmly in place.
Step 6: Cut the shelves to fit.
Measure the span of the wall, accounting for any desired overhang.
Cut the shelves using a miter saw or circular saw.
A circular saw jig can help maintain a straight cut line.
Add edge banding to hide the particleboard interior, if necessary.
Step 7: Place the shelves on the brackets.
Test the fit, ensuring the standards are at the correct height for secure placement.
Step 8: Prevent the shelves from shifting.
To keep the boards from moving easily, consider using shelf clips or cutting small grooves on the underside of the shelves.
Now, step back and admire your adjustable wall shelves. You’ve effortlessly created a functional and space-saving storage solution that perfectly matches your sloped ceiling. Enjoy the extra organization for your toys, books, and more!
13.Turning IVAR to A Mobile Shelving System
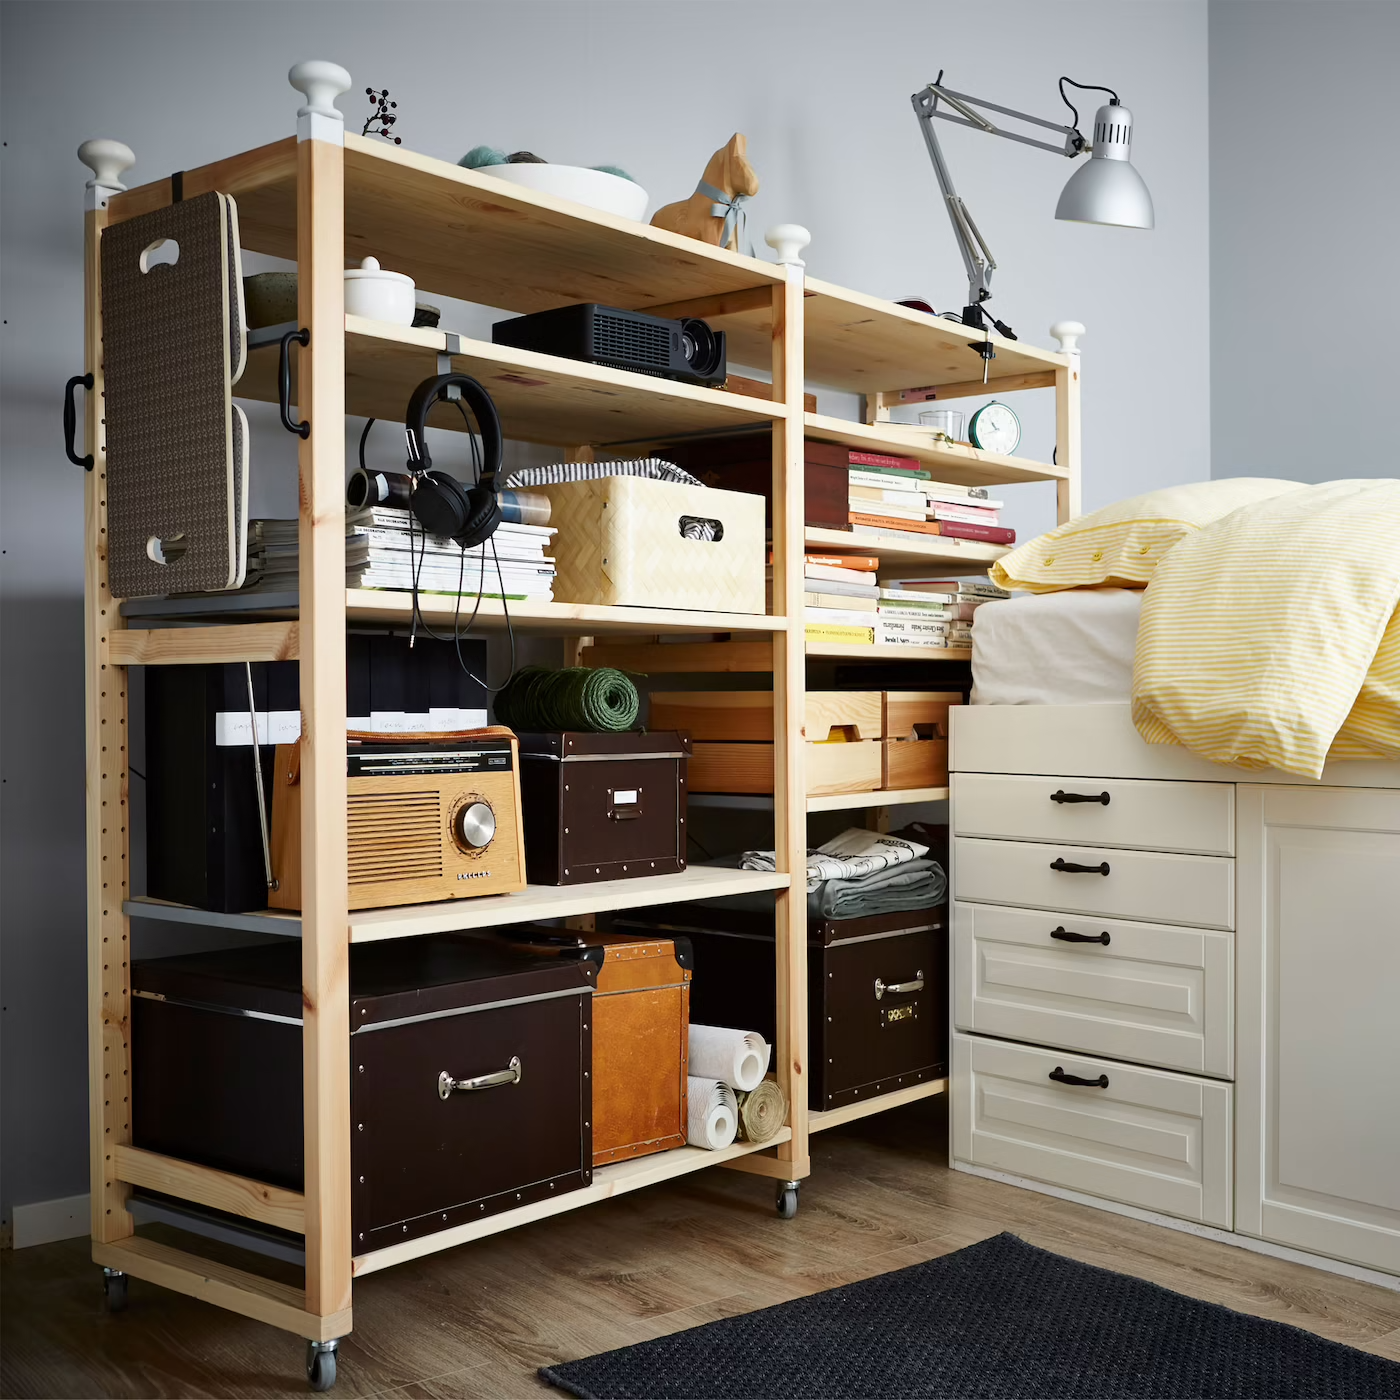
Transform your IVAR into a rolling storage champ! Perfect for tight spots, this hack lets the unit tuck away and wheel out when you need it. Here’s your toolkit for the task:
- IVAR (2 sections/shelf)
- 6 RILL castors (50mm)
- 6 NORRBYN knobs
- 2 FÅGLAVIK handles
- 3 wood strips (500/40mm, pine is best)
- 12 screws (50mm)
- 24 screws (20mm or longer)
- Electric drill
- White paint, brush, masking tape
Your action plan:
- Start by putting together just the IVAR side units. Fasten the wood strips to the unit’s base with two 50mm screws per leg. After that, secure the castors with four 20mm screws each.
- Follow the instructions and assemble the rest of your IVAR.
- Ready for some flair? Attach your six knobs. A dash of white paint will give them a seamless look—masking tape will keep those lines clean. Pro tip: Predrill to make screwing easier, but keep the pilot hole snug, just a tad smaller than the screw itself.
- Handles aren’t just practical, they’re chic. Drill a couple of 5mm holes on each side unit to fix the handles with 4mm x 50mm screws.
- Play it safe—anchor shelves to walls to avoid tipping disasters. With a rollable unit like this, though, you need flexibility. Enter the EKORRE bracket with a trusty metal wire, looping easily on and off the top shelf.
- And that’s a wrap! For an extra twist, why not pop on some hooks for bonus hanging space? Enjoy your nifty new storage piece!
12. Adjustable plywood shelving system with Slot Joint
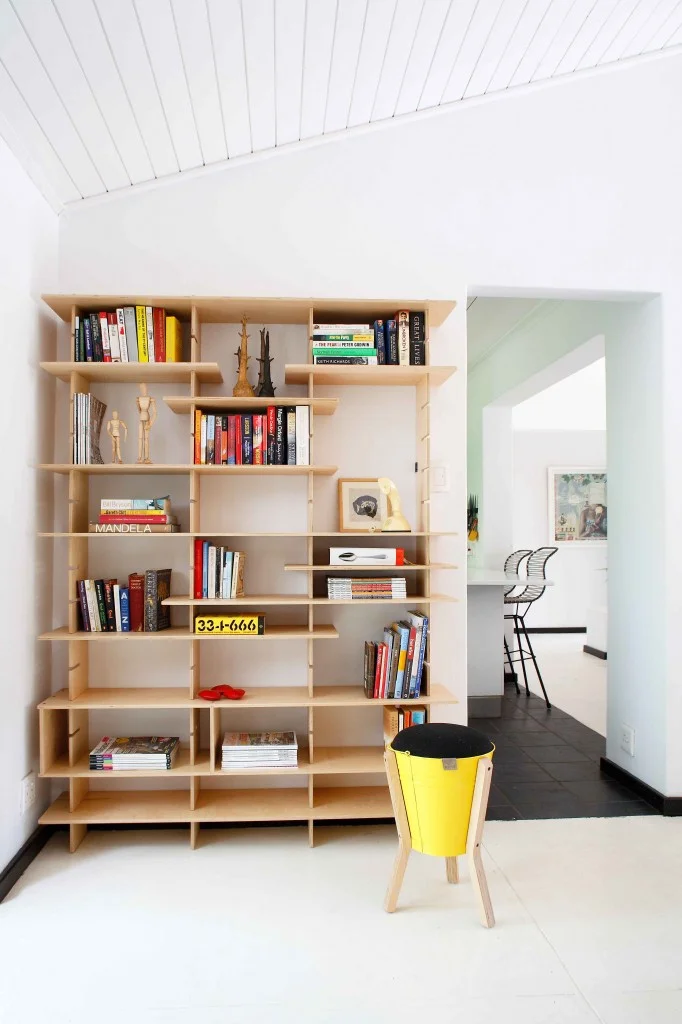
Hey, DIY enthusiasts! Ready to flex those crafty muscles and build an ultra-cool, height-friendly bookshelf that’s perfect for your loft’s limited space? Your friends are about to be super jealous of your new 8ft tall masterpiece—ready to pack it with books or create a stylish clothing display. Follow this guide to make a shelf that’s “easy-peasy” and no pesky hardware needed.
You’ll dive into this adventure with:
- 4 sheets of swanky Apple Ply (that’s 4×8′ of high-grade Russian birch in 3/4″ thickness) costing you $493.88.
- Some elegant brass brackets adding $11.10 to your tab and polyurethane satin for a suave finish plus those little extras (rags, brushes) for about $45.
- Grand total? Just a mere $550.00.
Let’s create those slots that go together like peanut butter and jelly. Oh, and to make them fit like a glove without endless sanding, measure that plywood with calipers, because even the best have variations!
Get your machine working like a ShopBot DJ, mixing up your .DXF shelf plan files and churning out some smooth .Sbp files for that CNC Wood Mill magic.
Now, gear up for a “sand-a-thon!” Take that orbital sander and give every piece a tango with 220 and 320 grit, especially paying attention to those side cuts—they’re the real MVPs that deserve some hand-sanded affection.
Let’s talk finishing moves: Steer clear of streaks and drips by skipping the foam brush and opting for a wipe-on polyurethane or oil/wax finish like Rubio Monocoat. Treat each side with a few wafer-thin layers using a cotton rag, and if you’re feeling it, a 400 grit light sand for that baby-bottom smoothness.
Remember, safety is more than just a suggestion! Arm yourself with gloves, a respirator, and do all your chemical wizardry in a space that’s got enough airflow to keep you dancing safely through your project.
Give those parts a solid 24-hour beauty rest to dry. Then put it all together and – voilà! – you’ve got an adjustable storage tower of power that’s not only functional but has all the charm of a bespoke furniture piece.
And if those slots are acting all tough and snug? Here’s a slick tip: coax them gently together with a little soap lube (yes, your ordinary bar of soap works wonders). Now, stand back and admire that stylish, slot-joint adjustable bookshelf that’s all you.
11.Narrow Shelving Project Idea
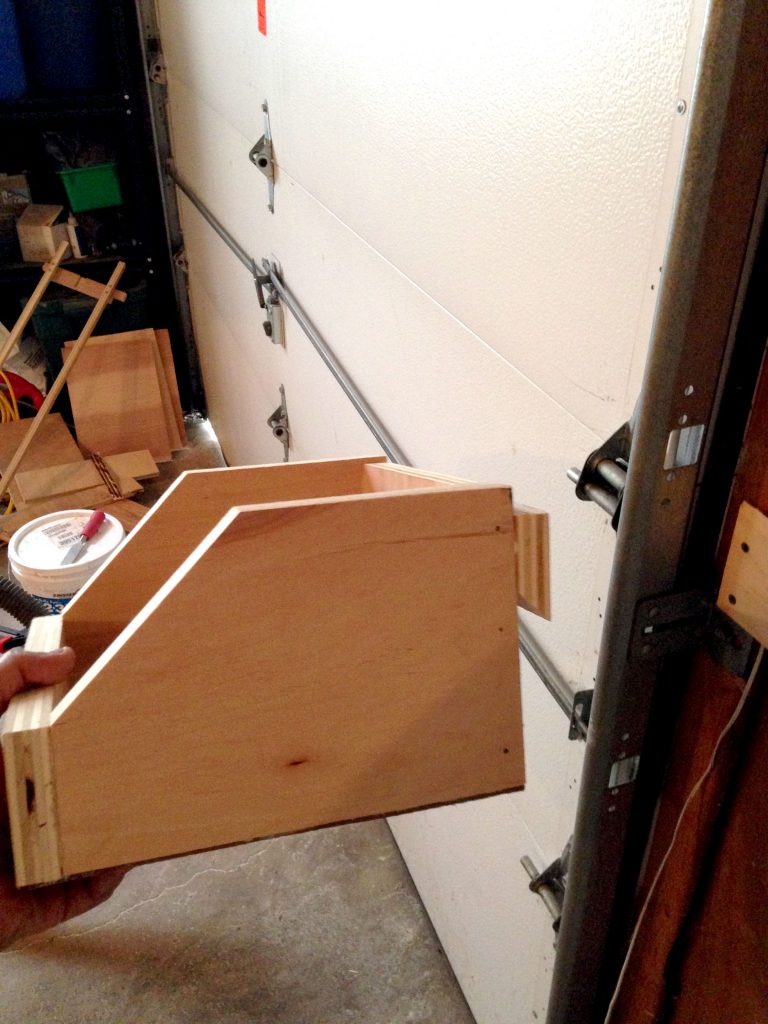
Behold the magic space between your garage doors or behind bedroom door!
It’s just begging for some nifty, narrow shelving. Why let a good gap go to waste, right?
Here’s your game plan to max out that garage storage: Let’s talk scraps.
If you’ve recently tackled a project (like that swanky built-in bookcase with a window seat), chances are you’ve got some birch plywood lying around. And not just any plywood—this is the kind that Home Depot prices at $50 for a 4×8 sheet, so we’re not letting any piece go unused.
Ditch the dull flat shelves idea.
We’re upping the ante with wall-mounted boxes.
Imagine flinging your garden gloves into a neat little cubby as soon as you step into your cluttered space.
Even cooler? Make the boxes detachable using French cleats; lift them off the wall, tote them around, and then pop them back up. It’s a clever storage with a modular twist.
You’ll carve out these boxes from ¾” scrap birch plywood.
The box bottoms go even lighter with ⅛” thick plywood.
Get that table saw buzzing for some miter cuts—those side pieces crave a sleek angled profile.
Slide into the 45-degree cuts for those French cleats; you’re crafting a custom fit.
Now for some build buzz: whip out construction adhesive, bar clamps, and your sweet 16 (gauge) finishing nail gun to bring these pieces together. Good old finishing nails can work in a pinch, too. They’re just sidekicks, really, as the adhesive is the true hero here, flexing its muscles once it sets dry.
Here’s a hot tool tip: the gauge on a nail gun is like the thickness meter.
A 16-gauge is your go-to. It’s thick enough for hardy stuff like birch, and you’ll be using that nail gun for everything—tackling trims, shelves, and that random woodwork whim on a lazy Sunday.
With your newly minted nail gun, those five box shelves will rise from the sawdust in no time.
Amidst the glory of your French cleat boxes, the creative current hits you—make a battery charging station for all those cordless tools! A few L-shaped shelves, some snug supports, and hey presto!
All your chargers, batteries, and even those little doodads are organized neatly.
Don’t stop there. Stick on a plastic box for those random pens and markers.
Install a metal strip just so, and your measuring tape will have a home that’s both handy and predictable.
All this in one Saturday, and not a penny extra spent—all from leftovers.
But even if you couldn’t splurge on the nail gun, a hammer can still seal the deal.
So, whenever that storage inspiration sparks, you’re all set.
Remember, with a little ingenuity, your garage can go from cluttered chaos to streamlined storage sanctuary.