16. IKEA PAX Magic: A Chic, Built-In Closet Under a Pitched Ceiling Idea

Ready to tackle those awkward attic spaces with style? Grab your IKEA PAX and let’s transform that quirky corner into a fabulous, functional closet with a touch of Farrow & Ball elegance!
- First, meet your new best friend: the IKEA PAX wardrobe. This versatile piece is about to make your pitched ceiling conundrum a thing of the past.
- Opt for two frames measuring a spacious 29 1/2 x 22 7/8 x 92 7/8 inches, and fill them with clothes rails, shelves, and drawers galore.
- And here’s the trick for that seamless fit: cut the internal frames at a clever angle, and secure them snugly beneath your slanted ceiling.
- Now, to ensure everything stays put, anchor those frames to the wall using sturdy furniture bolts. Trust us, it’s a must, especially if you plan on loading up your new closet.
- And for that extra touch of brilliance, why not add an LED lighting strip beneath the shelves? IKEA’s NORRFLY strips are perfect for this, lighting up your wardrobe life in an instant.
- Next up, let’s tackle the gap behind your closet. A few sheets of MDF cut to size, glued to the sides, and seamlessly caulked at the wall should do the trick.
- Now, on to the doors! Craft them from MDF boards, add your chosen molding for a dash of traditional charm, and secure them to the PAX units with hinges. A bit of caulk, a touch of sanding, and voila!
- It’s painting time! Unleash the magic of Farrow & Ball’s Sulking Room Pink, creating a warm, cohesive boudoir that seamlessly blends closet and wall.
- Finish it off with some glam gold handles from Anthropologie, and there you have it – a chic, built-in wardrobe that looks like it’s always belonged.
- And there you stand, in your transformed space, surrounded by the beauty and practicality of your creation. Sure, some might say you could’ve added a pull-out drawer at the back, but hey, it’s your masterpiece. And it’s perfect just the way it is.
So, feeling ambitious? Roll up your sleeves and get ready for a weekend of transformation. Your chic, built-in closet awaits!
15.PAX Closet Hack from Dimpledetails
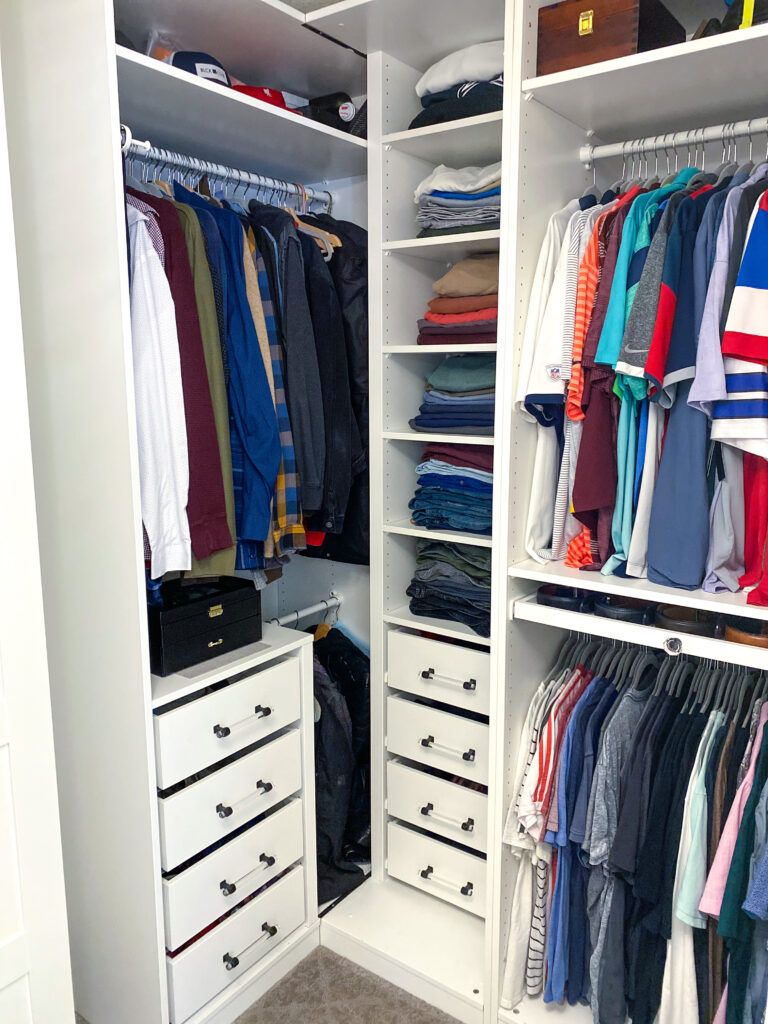
Ready to transform your closet into a realm of organized bliss with IKEA’s PAX system? Gear up, because I’m about to lead you through a closet metamorphosis that will tick all your storage boxes—and then some.
Crafting Your Closet Space
First, let’s piece together your wardrobe wonders. Begin by choosing the PAX units for their stellar adaptability and then follow these hacks to make each space uniquely yours. You’ll need eight drawers for your clothes—perfect for those who seek order amidst chaos. Then carve out a niche for your jewelry and a slot for those odds and ends that tend to wander off.
Shoe Storage, but Smarter
Do shoes take over your life? Tame them with six sleek pull-out shelves. The catch? They might trap odors. Sneak in charcoal bags to banish any whiffs without sacrificing a smidge of style.
His Corner, Elevated
Time to spruce up your partner’s side—update and customize the PAX interiors to suit evolving needs. Affordable and flexible, this system allows for fuss-free changes, so his side stays neat (color-coordinated or not).
The Jewelry Drawer Transformation
Transform a simple drawer into a treasure trove for your jewelry. A velvet liner might be a worthy addition here, ensuring every piece has a place and stays untangled.
Miscellaneous Made Magnificent
Allocate a drawer for those sundry items to live. With measured compartments, they’ll be exactly where you expect, every time.
His ‘Find-It-Myself’ Drawer
Save your partner the treasure hunt with a dedicated belt drawer. With this simple step, his daily routine becomes smoother, and your life, a tad quieter.
Dress to Impress: Choosing Drawer Pulls
Splurge on select drawer pulls to infuse luxury into your closet’s look. These aren’t just handles; they’re statement pieces that elevate your space from storage to sanctuary.
There you have it. Stay tuned for a full cost breakdown and links to all items for your reference. Until then, enjoy stepping into your sleek new space that’s as functional as it is stylish. Remember, this is your narrative—each shelf, each drawer, each pull is a chapter of your closet story. Now go forth and organize!
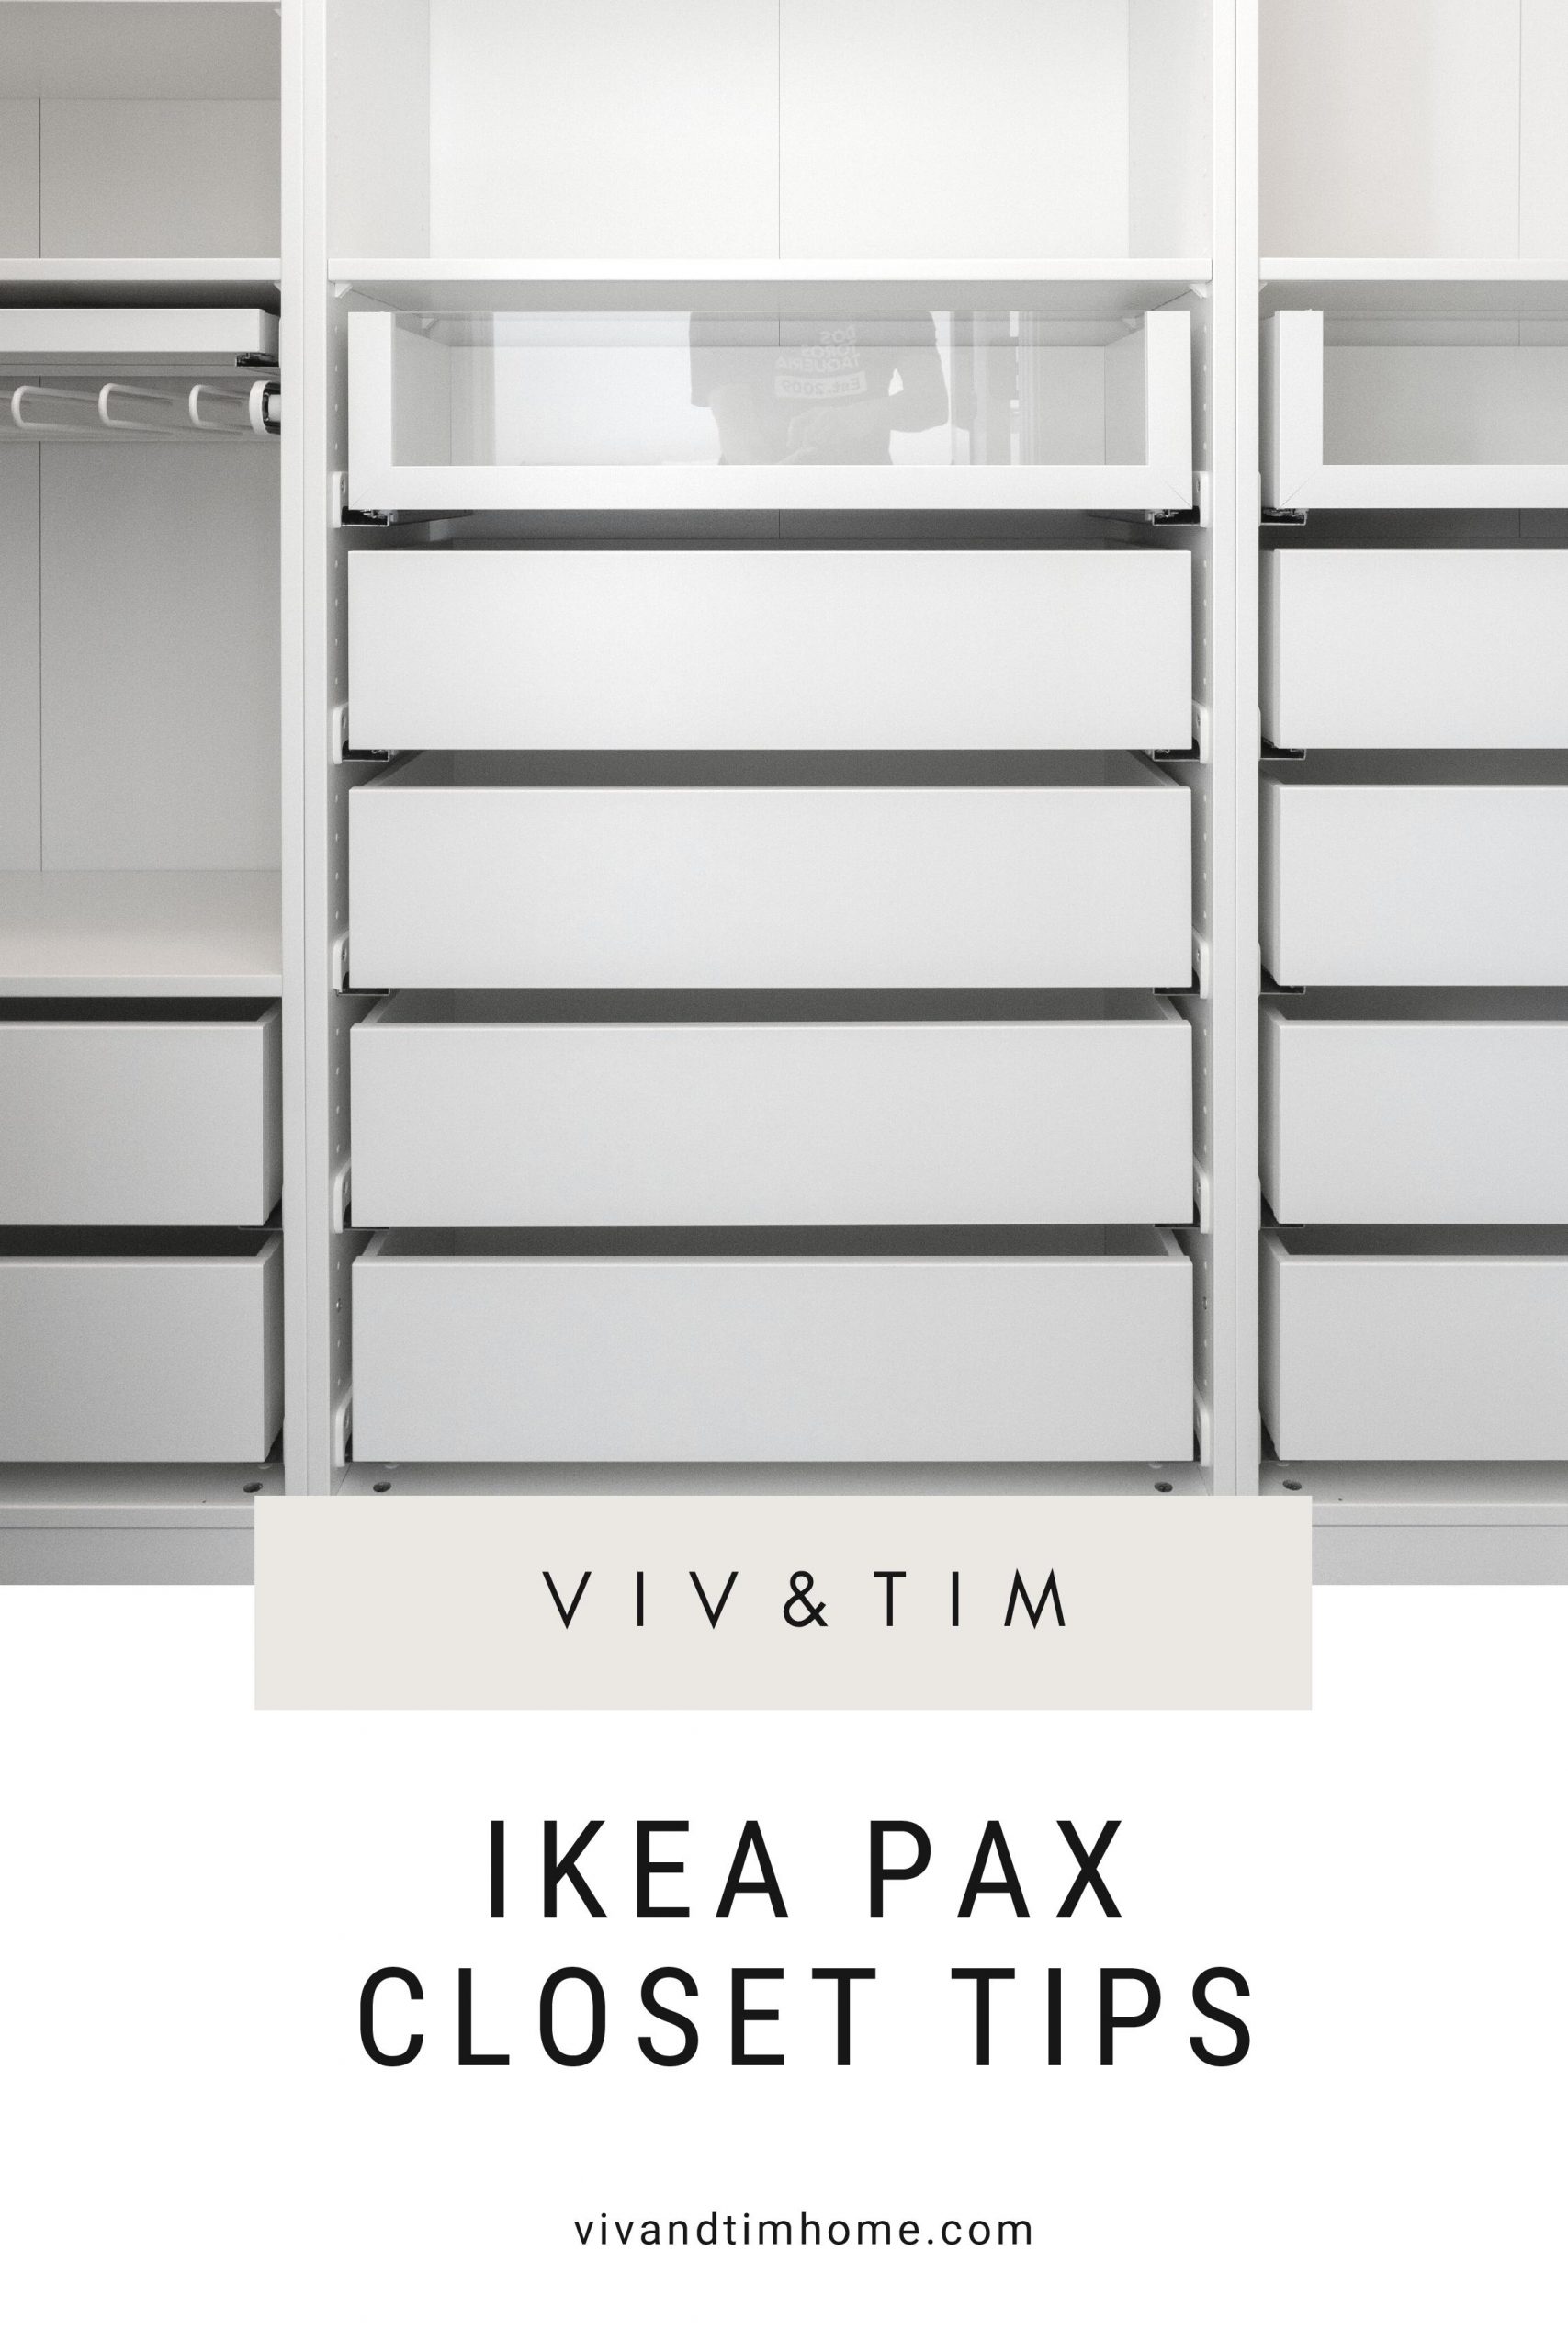
14. Closet Transformation Extravaganza: The IKEA PAX Edition
Let’s Dive Into Your Closet Adventure!
Snap on your DIY hat! You’ve got a closet craving more than just space—93″ of vertical leap and a lean 13″ depth, to be exact. Say goodbye to those builder-grade wire shelves. It’s time for your walk-in to walk the talk.
Building Blocks: Drawer Assembly First!
First things first: Let’s tackle those drawers. Queue up your favorite playlist because it’s assembly time! Got some drywall patches drying? Perfect timing for some satisfying construction sync.
Pro tip: A ratcheting screwdriver is like having a superpower. Grab a Philips and a flathead, and thank the stars (or Amazon) you don’t need to switch heads every time.
Anchor Pointers: Don’t Forget the Screws!
Whoops! IKEA forgot to toss in screws with their wall anchors, so scout your stash or make a quick hardware run. Drywall anchors from previous missions? They’re your new best friends.
Marking Mastery: Painter’s Tape Is Your Guide.
Here’s a bright idea: Use painter’s tape to mark those elusive hole numbers for your accessories and shelves. Print out that IKEA PAX planner summary, and keep it close—you’re going to need it.
Frame Fusion: Bar Clamps for the Win.
Joining frames without a gap? IKEA says ‘Bar Clamp’, and you say ‘Gotcha!’ Clamp ’em down, and drill away. It’s like a high-five for your frames—they’ve never been closer.
Cut to Fit: The PAX Customization Dance
Got a stubborn nook that’s just shy of 29″? No sweat. Measure twice, cut once, and let your circular saw do the cha-cha on the PAX frame. Remember: Painter’s tape is your cut’s best tux—it dresses up the edges neatly.
And the backboard? Box cutter ballet. It’s not graceful, but it does the trick.
Tool Talk: Measuring Tape and More
Of course, you’ll need your trusty measuring tape, drill, driver, and that handy speed square. Table saw? Overrated. Your circular saw and track are the dynamic duo for this gig.
Finishing Flair: Say No to Naked Holes
VARIERA cover plates are your holey grail—$1.29 for a centurion pack of covers. Slap ’em on for a sleek finish, but don’t stress about using all 100—unless you’re feeling extra.
Hang Tough: Chrome Rod Upgrade
IKEA rods? Nah, you’re going for chrome, baby. Cut those oval beauties to size (don’t forget the angle grinder or a trusty hacksaw) and place them just right. A drill, some screws, and voilà—your hangers never had it so good.
Accessory Accolades: Pants Hangers, Trays, and Drawers
Pants hangers that don’t spill your slacks, trays for treasures, and a sea of drawers (17 to be exact) for ultimate concealment—your closet is now a clutter-free kingdom.
Bonus tip: Keep those felt organizers in line by pressing down the folds before assembly.
Timeline Triumphs: The Speedy Finish
First frame’s a puzzle, sure, but by the fifth, you’re a pro, clocking in at 30 minutes. Set aside a weekend, and power through—this is the bonding bonanza you never knew you needed.
The Big Reveal: Your Finished Closet!
It’s a labor of love, but wow—those soft-close drawers are the cherry on top. With all the customization magic, you’ve got a budget-friendly, built-in marvel.
Thrilled? You should be. Now, go fill that PAX paradise with all your gear, and don’t forget to share the glory on @vivandtim.home.
13. IKEA Pax Hack into A Built in Closet Idea

Ready to turn that odd alcove in your master suite into a chic storage mecca? Here’s a step-by-step guide to DIY your own built-in closet using the IKEA Pax system—without breaking the bank or losing your cool.
- Step 1: Prep the Space
Before you dive in, make sure the coast is clear. Remove any trim or obstacles for a seamless fit. You’re aiming for a snug setup that sits flush against the wall. - Step 2: Assemble the Frame
Teamwork makes the dream work—build the closet’s outer frame with a buddy. Once you’ve constructed it face down, hoist it into place. Avoid stepping inside to protect the structure. - Step 3: Set It Up
Fit everything in nice and tight. Add in the drawers for the central console, but don’t get too attached—they’ll be customized soon. Ensure the unit is level; those adjustable feet are lifesavers. - Step 4: Trim and Drill
Get your doors to align with your vision by trimming and drilling new hinge holes. A template ensures precision—just think about the position of future drawers and shelves. - Step 5: Add Trim
The trim is what transforms this from flat-pack to fabulous. Measure, cut, glue, and nail your way to a bespoke look, using caulk to fill any gaps. Remember: painting over caulk only works if it’s paintable caulk. - Step 6: Detail the Console
Match the Pax doors with extra trim around the console, making everything look like one unified, elegant piece. - Step 7: Dress the Drawers
Order custom-cut drawer fronts from Home Depot (measurements provided) and secure them without drilling through the front. Keep in mind the placement of knobs later on. - Step 8: Prime and Paint
Prime your pieces twice, sand for smoothness, and then use a paint sprayer for a flawless finish. Let it cure—patience is a virtue that pays off in durability. - Step 9: Reassemble
Post-painting, it’s time to put everything back together. Drill a hole to hide unsightly cords, then step back and admire your handy work. - Step 10: Install Knobs and Pulls
Choose stylish knobs and pulls to complement your décor. Measure carefully, then drill. It’s the little details that count. - Step 11: Organize
Fill your new closet with IKEA inserts for a custom look without the fuss. Revel in the joy of a perfectly organized wardrobe space.