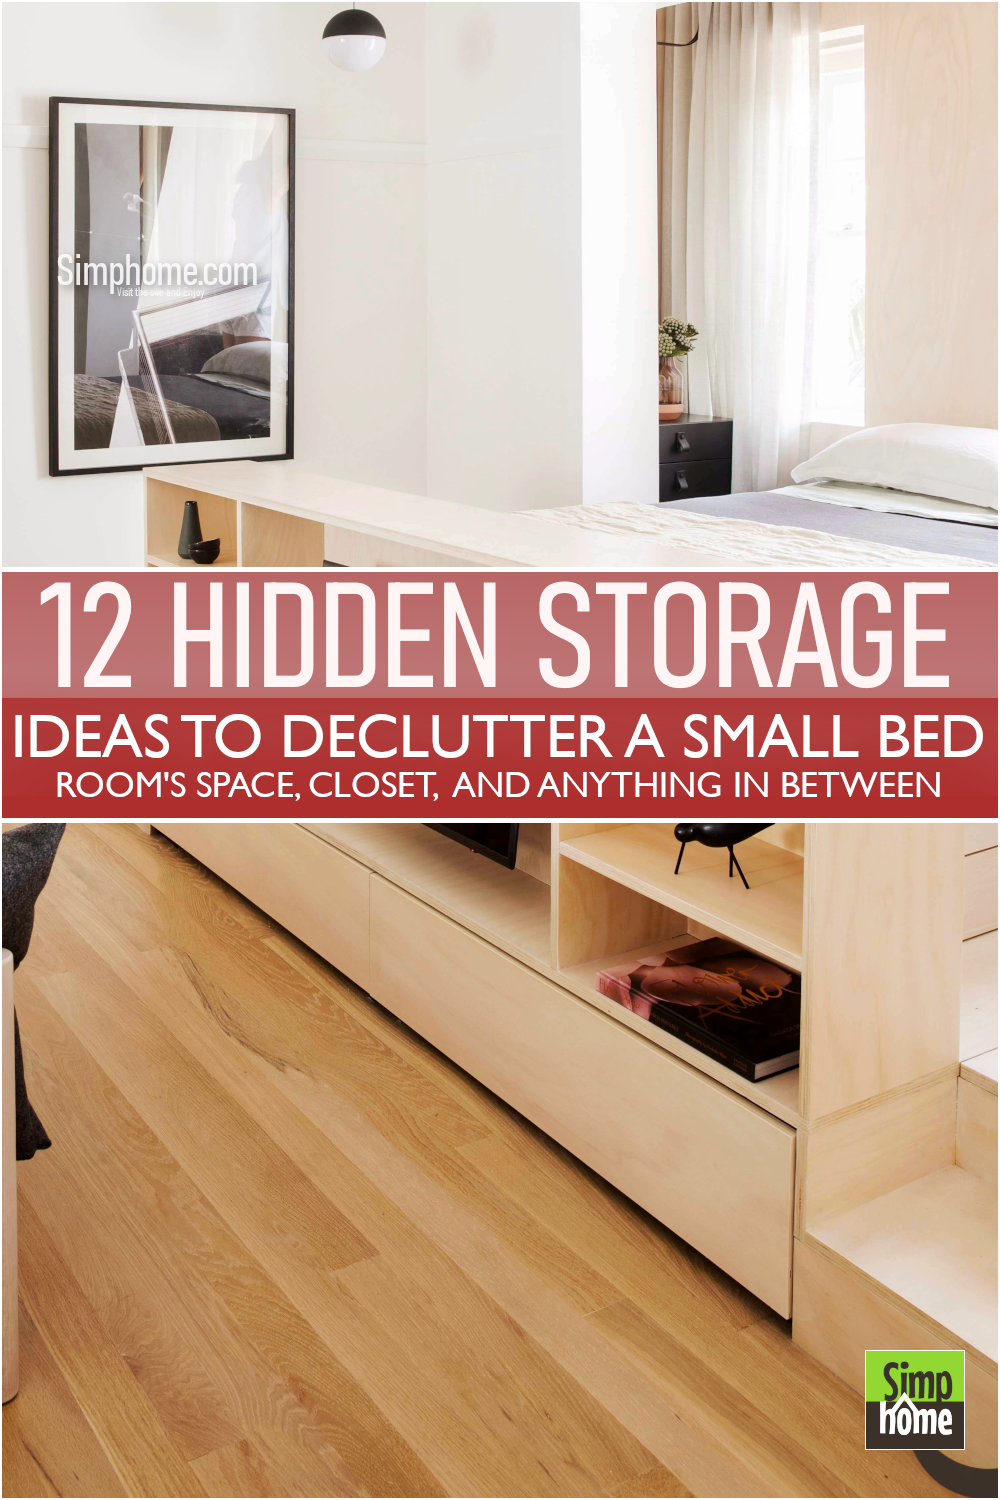
The most challenging thing about a small bedroom is it is prone to clutter. You always try to organize and declutter it. However, the mess will always be back. Then, you begin to wonder who the culprit is.
Well, this perpetual plight might happen because of the limited storage you have in your room. No wonder you use any reachable surface to set down things that collect clutter.
If you are dealing with that, you need to stroll around these 12 hidden storage ideas to declutter your small bedroom mess. Following the previous small bedroom organizations, the list is also presented for you by Simphome.com.
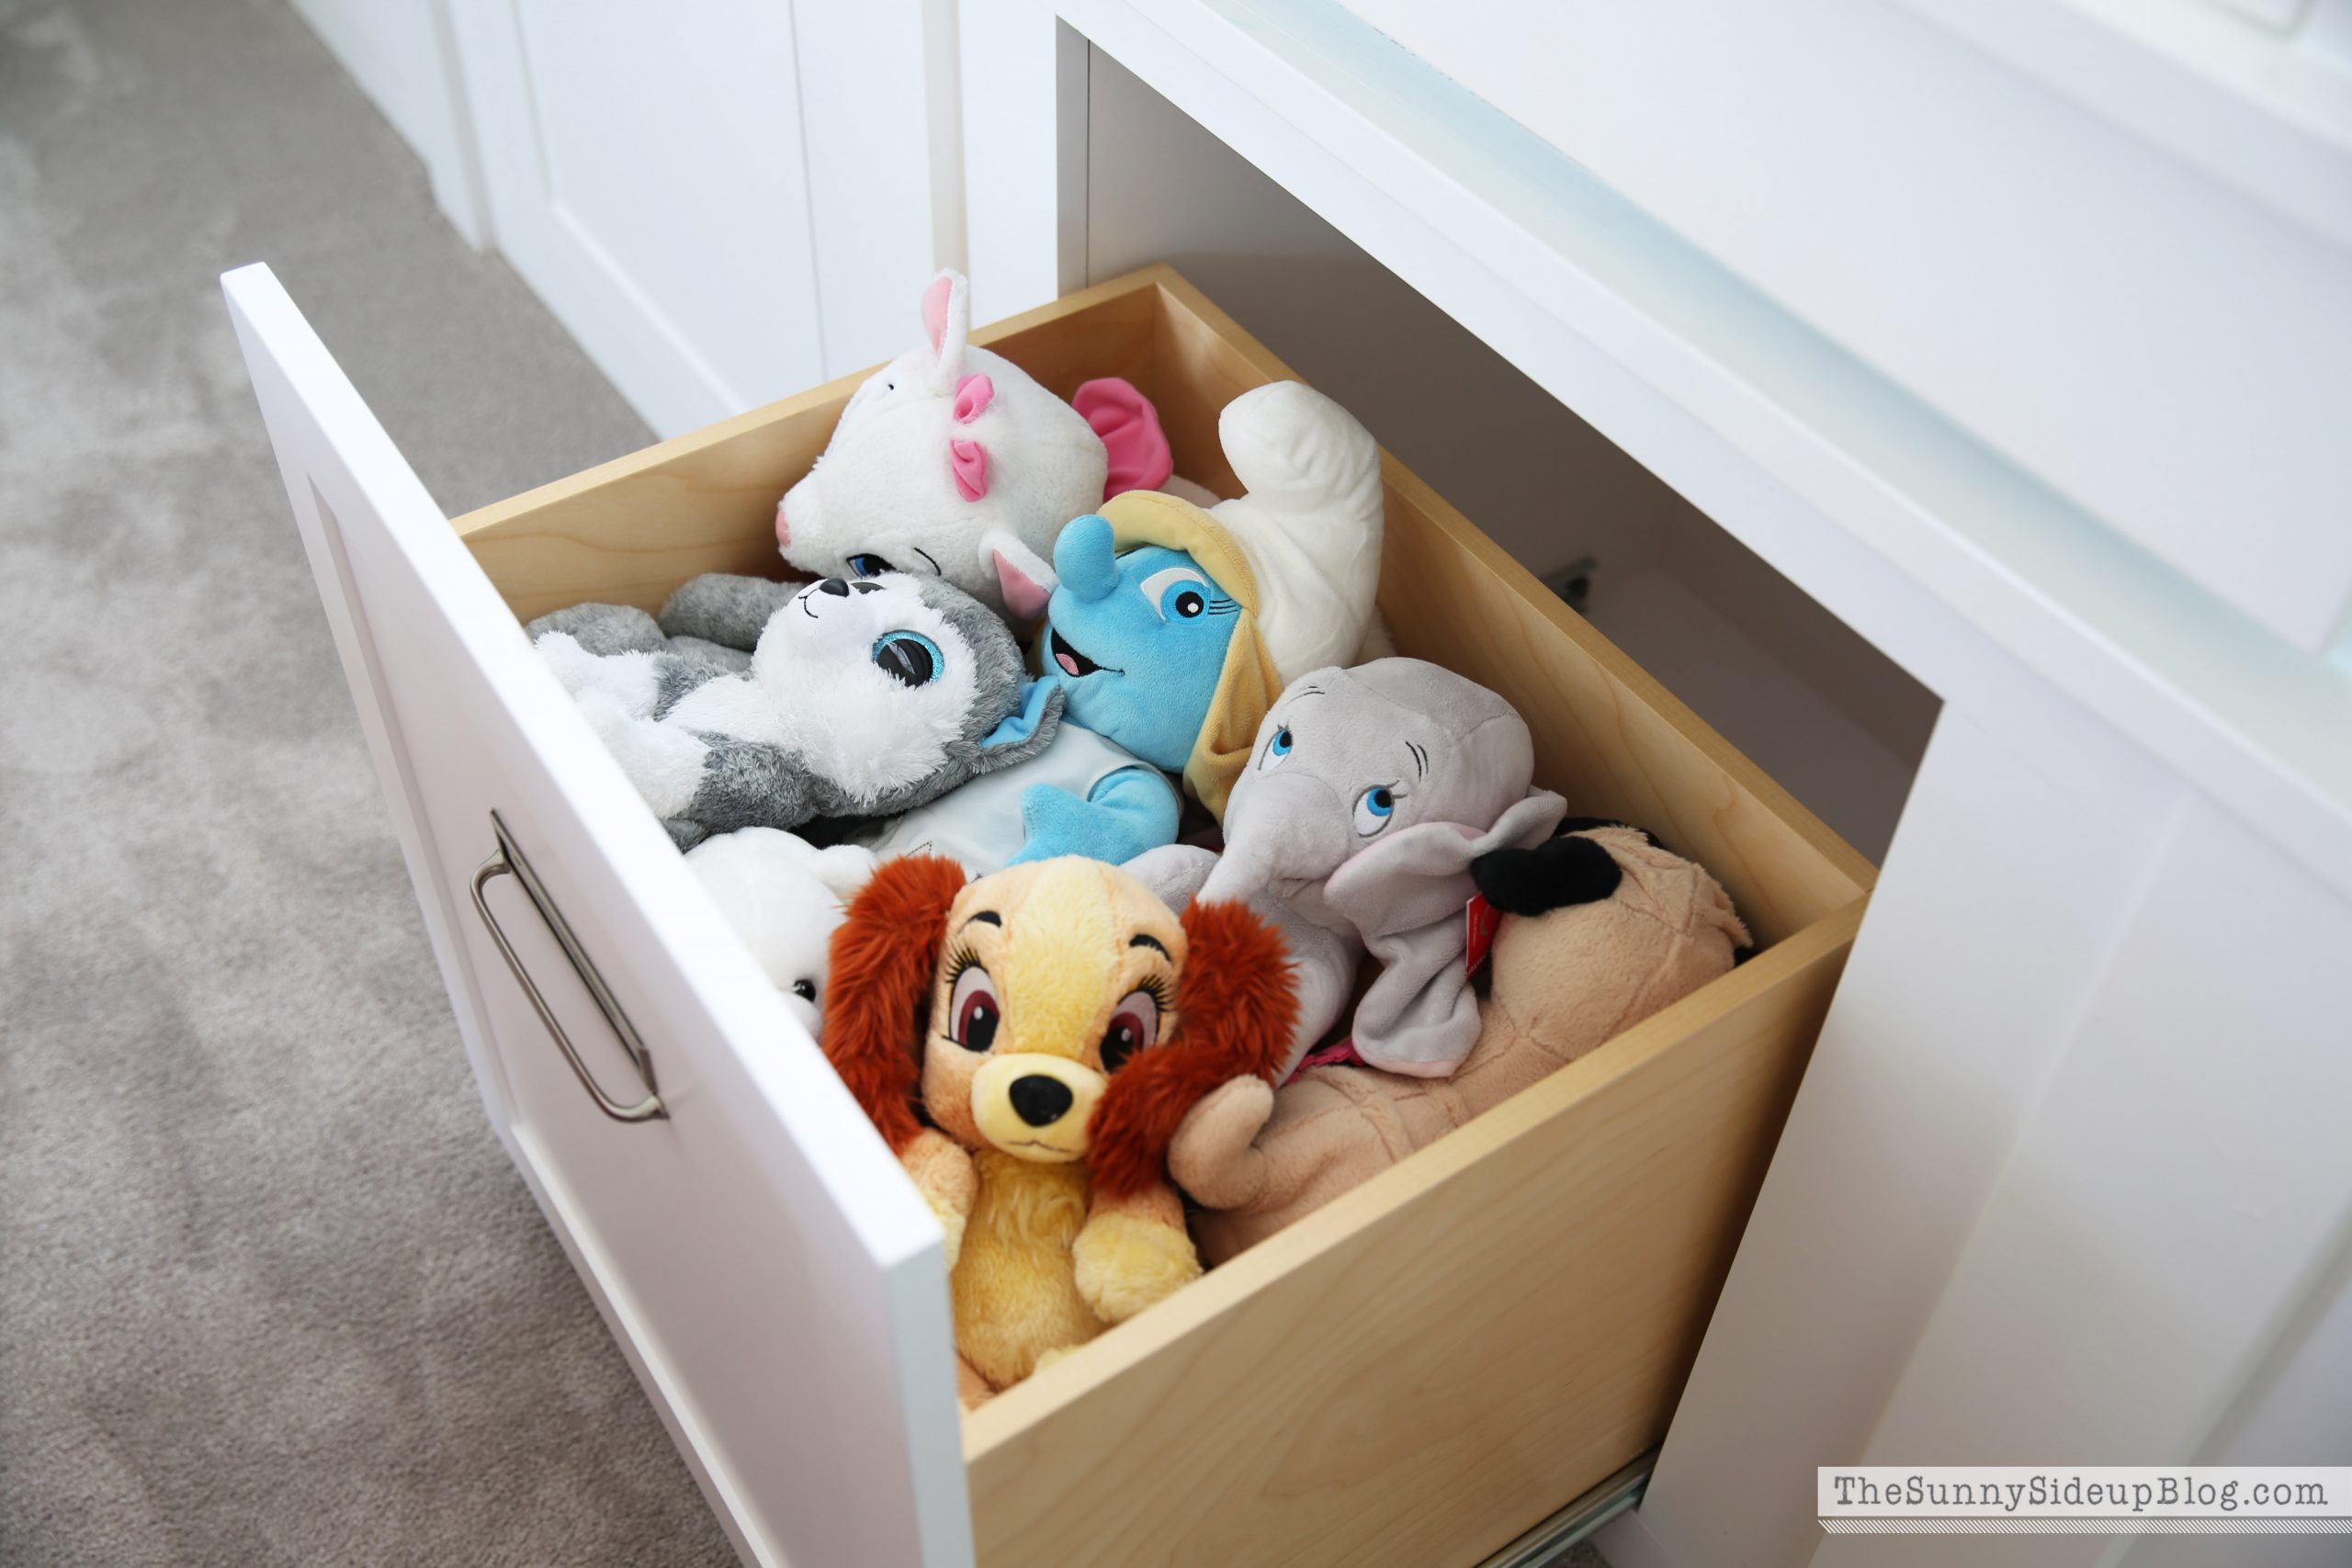
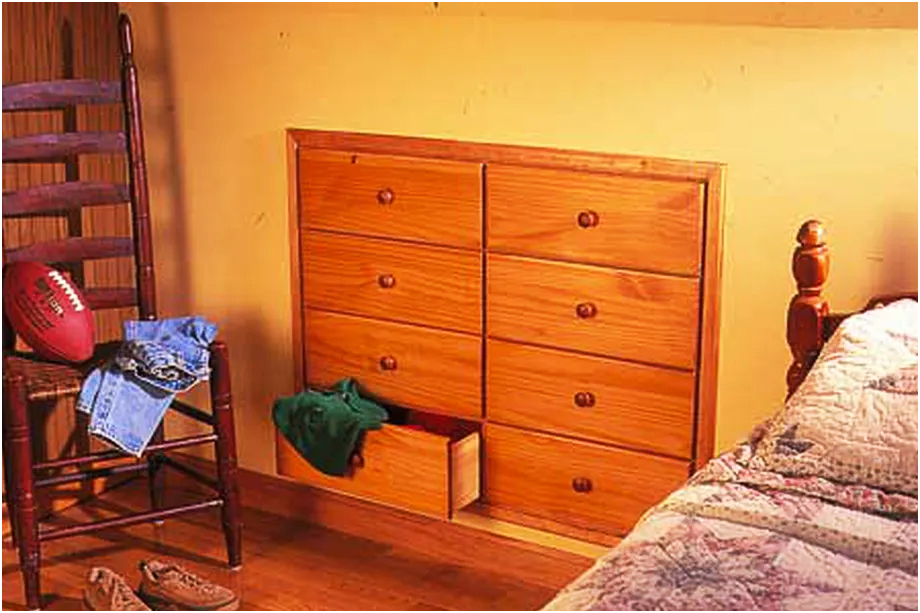
The best way to eradicate clutter is by investing in some storage, like a dresser or a closet. However, they may ruin the foot traffic and make your small bedroom feel more cramped. Therefore, you need to build or purchase storage that stays flush with the existing décor.
These drawers, for example, stay flush with the wall. You probably will not notice them since you think they are parts of the wainscoting. Isn’t it amazing?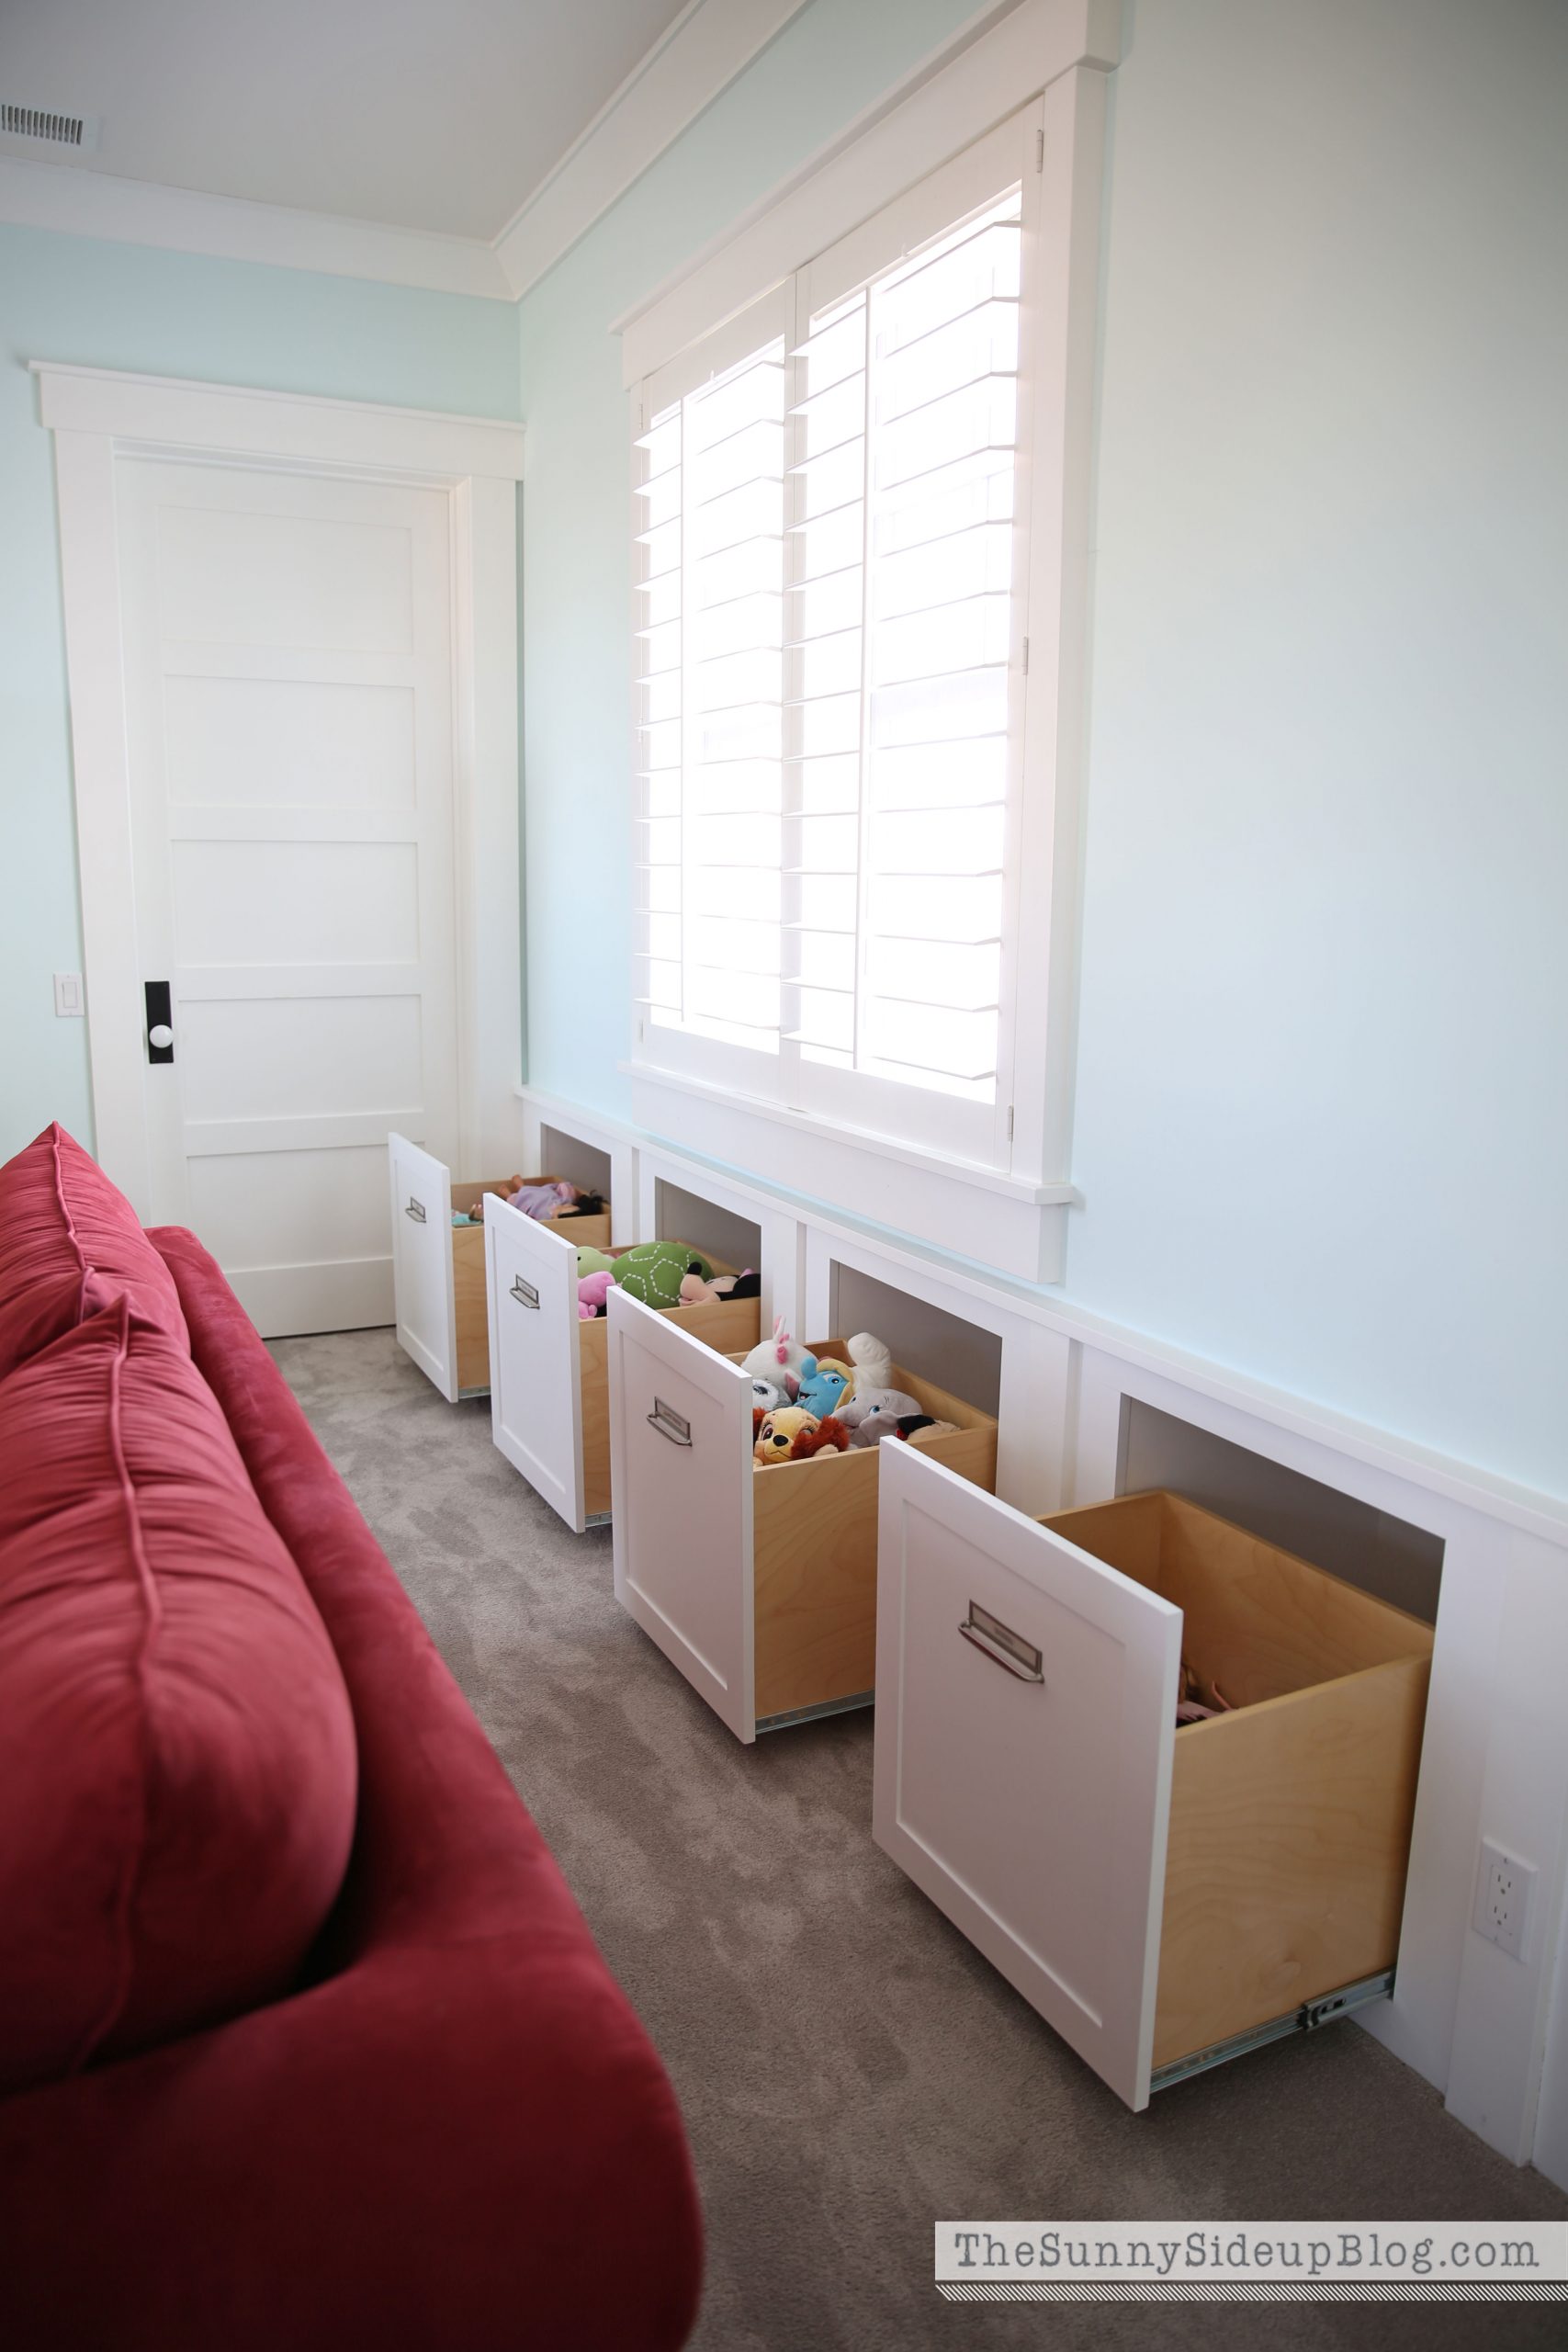
However, you can build these drawers if you have knee walls because they provide ample space for storage. Do not forget to install the same wainscoting paneling to the front to camouflage them.
Quick Instructions:
Step 1: Paint or cover the wall using textured paint or stucco.
Step 2: Decide where you want to install your hidden drawers.
Step 3: Measure the dimensions of the panels and cut them.
Step 4: Stick them into place and then measure them to align them with other parts.
Step 5: Repeat the process for each panel. Then, apply a second coat of finish and priming if you have chosen textured paint for your wainscoting paneling.
Step 6: Install the hinges and add the drawer pull inside the panels.
Step 7: Add a wooden knob to cover the screws of both panels and then reinstall them.
Step 8: Use decorative paper or fabric to cover your drawers.
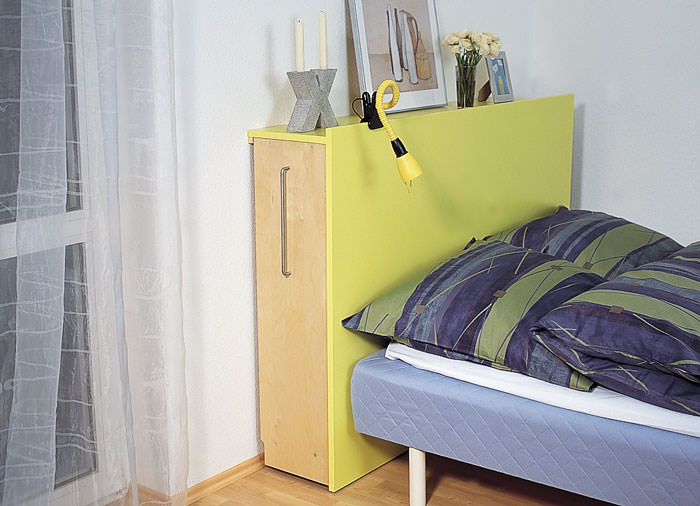
You may think that the headboard will just gobble up the valuable space in your bedroom. Nothing could be further from the truth. This headboard will not take up space. It provides ample storage instead. It has several shelves that you can use to store books or any other thing.
You can get it in stores or make it yourself. You just need to assemble some boards for the outer frame. Then create the shelves. Make sure that they can fit into the frame snugly. Install casters at the bottom so the shelves can easily slide when you pull them out.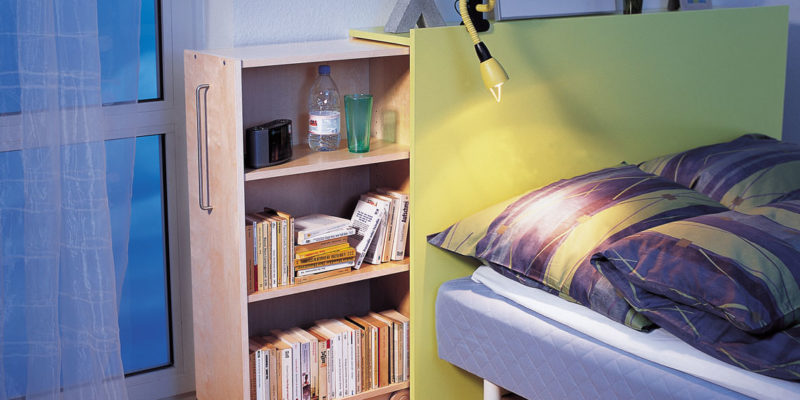
To build your bed headboard with storage like this example, after collecting all the requirements, your quick instructions are:
Quick Instructions:
- Assemble the frame by attaching the casters first; make sure they are perfectly aligned to make sliding out easy. If you want to keep it for some time, you can use screws or nails on each corner of each board before assembly to ensure that they stay together until you install them permanently on your small bedroom wall.
- Assemble the frame with the casters in position. Make sure that assemble can easily slide in and out of place. You can use screws or nails to hold it together temporarily if you want. Then make the shelves using 3/4-in plywood; attach them to the frame with 1-in screws after cutting slots.
- Attach your headboard to your wall, so it is snugly located with its frame. Make sure it can easily slide out of place when you pull out each shelf for storage purposes.
Tip: You can use pine or hardwood plywood for the construction.
10. Built-in A New Cabinet Literally inside the Wall
You may think you cannot do anything with it. That is not true. Every finished attic features knee walls that you can use to create hidden storage. This is how it works.
- First, you need to get a dresser. Then, trim off the front edge and the overhanging ends to make it slide easily into the wall.
- Next, create a smooth and flat base by cutting off the feet.
- You may also need to trim the dresser a bit if necessary. This way, it can slide smoothly into the wall without bumping into the roof rafters.
- If you do this, you will also need to close the gap that you have cut.
- Finally, apply any finish you like to the dresser.
- Next, cut out the wallboard to create an opening for the dresser.
- After that, remove the interferences and install two support braces on the floor.
- Finally, you can insert the dresser and screw it into the wall.
The additional information you need to know to replicate the project are:
- Create an opening for the drawers by cutting off the wallboard. Make sure you cut off enough wallboard to make the dresser slide into the wall without hitting any roof rafters. If you want, you may need to trim your dresser a little so it can slide smoothly into place without bumping against anything.
- Sand and apply finish to the dresser, especially if it has old paint.
- Install support braces to stabilize it.
- Screw the dresser into place.
9. The Floating Desk Idea from DIY Huntress
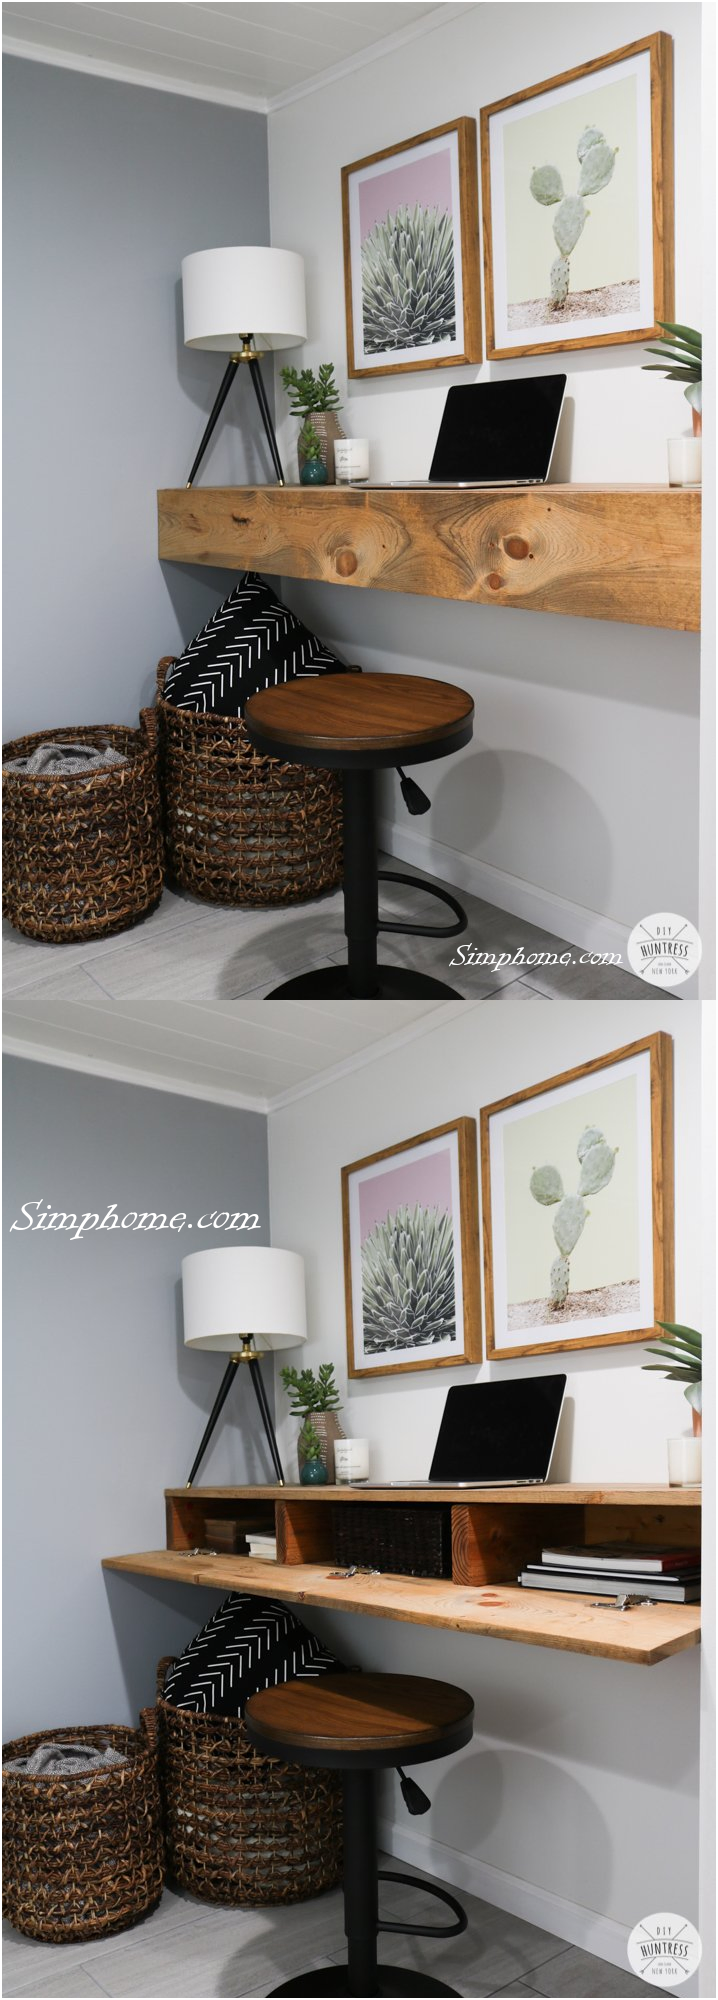
Making a floating desk can save some if your bedroom lacks floor space. This way, you can have your private home office despite the small room. Even better, you can add hidden storage to help eradicate clutter.
- First, you can create the top and bottom by assembling three 1’x4’x6’1’x4’x6′ laminate boards.
- You will need a lot of glue and clamps in this step.
- While waiting for the glue to dry, you can begin to make the support for your desk by screwing some 2’x6’2’x6′ boards to the wall.
- Once the support is ready, screw the top and bottom to it.
- After that, install the hinged door, and that’s it.
The additional information you need to know to replicate the project are:
- Measure the height and width of the room, and then cut out the top and bottom pieces of laminate.
- Make sure that your desk can slide easily in and out because it must be able to open up so you can use your office.
- Screw two 2’x6’2’x6′ boards to the wall for support.
- Cut out a hinged door from wood, and screw it into place.
- Use a lot of glue and clamps to assemble the top and bottom pieces with the support, and then use screws for everything else.
- Apply finish or paint if you wish.
8. The IKEA Window Bench Transformation Idea
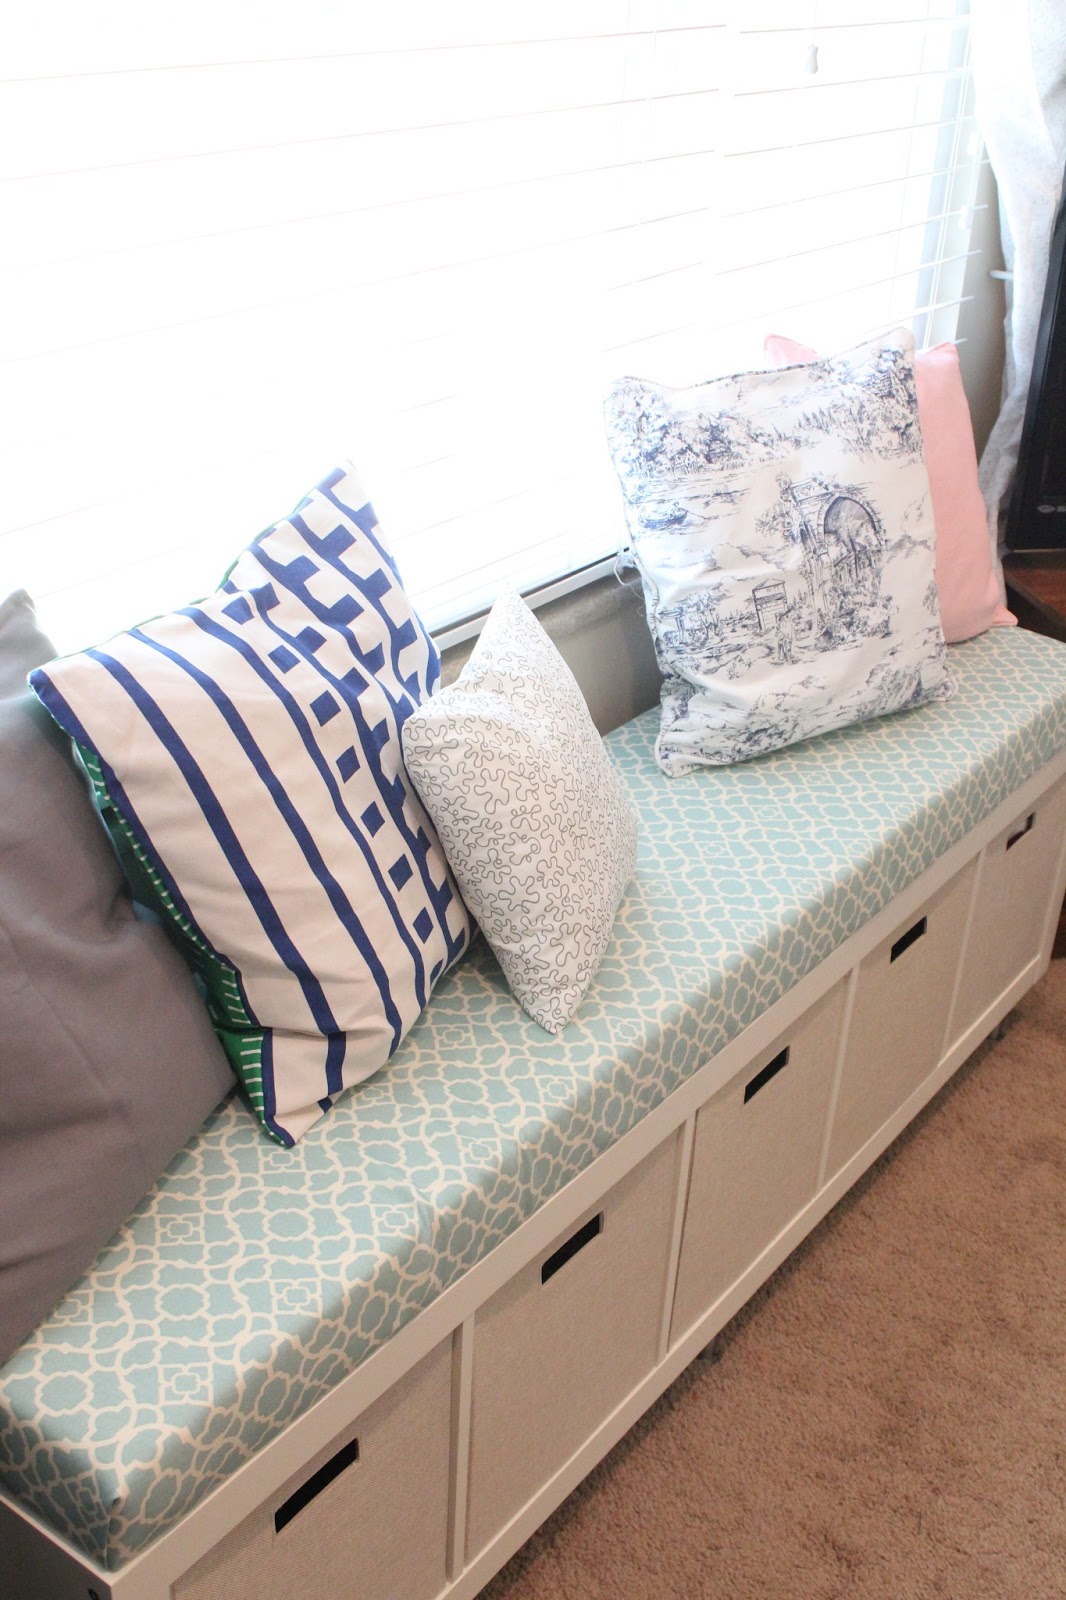
An Expedit shelving unit from Ikea is not only versatile but also durable. You can even turn it into a window bench.
- You just need to install six Capita legs on one side to add extra height.
- After that, get an MDF board and top it with foam.
- Then, layer the foam with quilt batting before adding fabric.
- Next, secure it with a staple gun.
- Finally, top that shelving unit with the cushion, and screw it to keep it in place.
Or, if your window space is something you can’t deal with anymore, you can consider learning The Chest trunks from Nick and Alicia.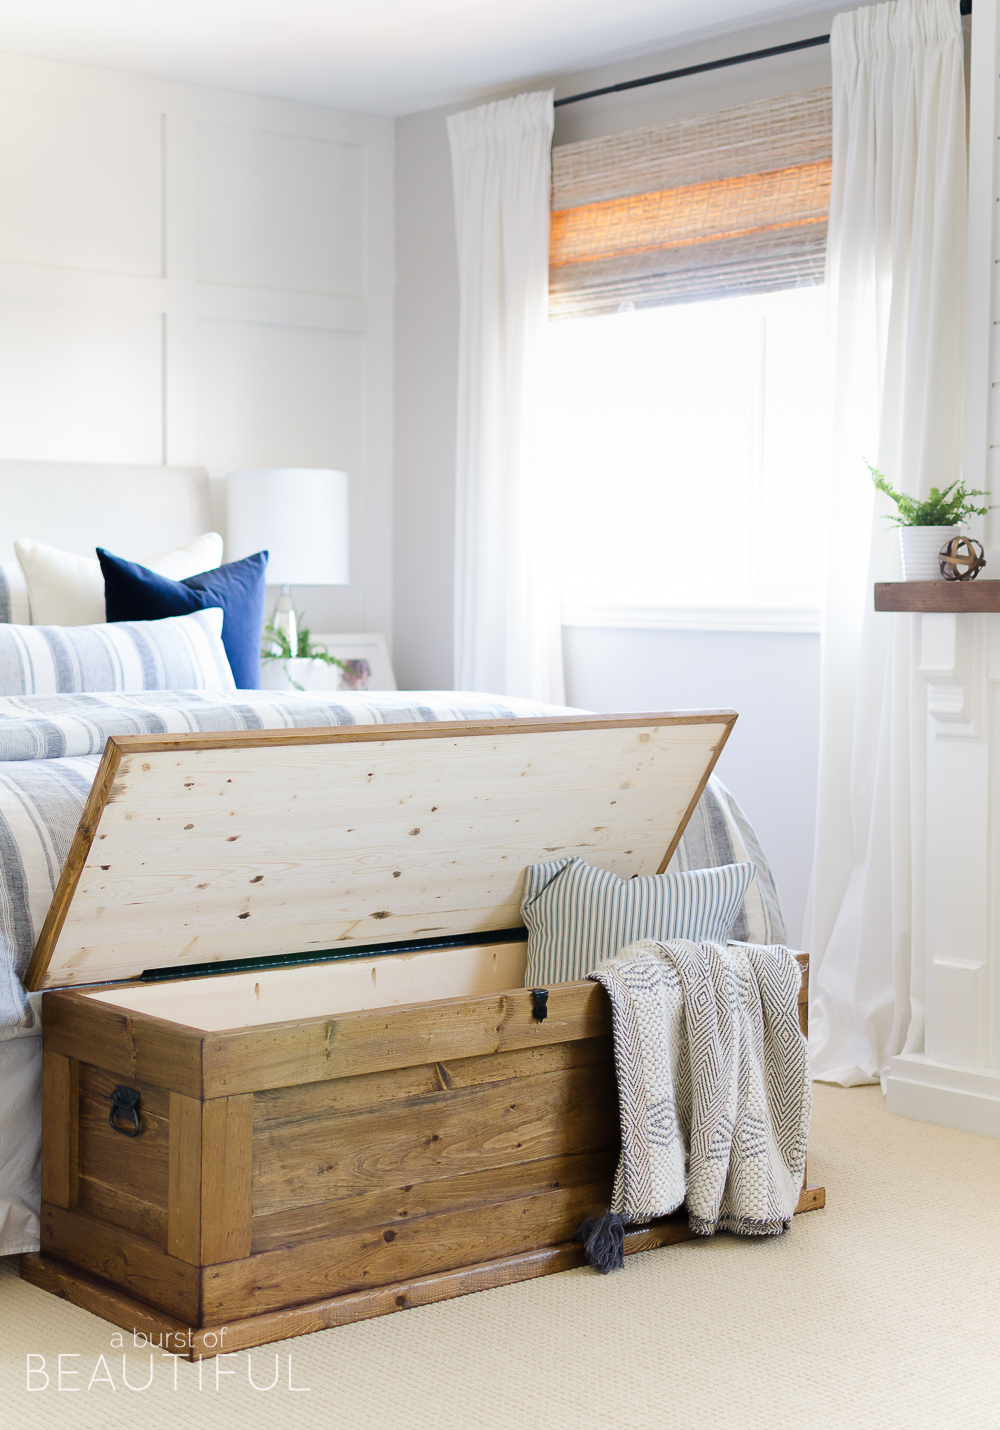
To make this chest, you will need some boards, lid supports, and piano hinges.
You can also top it with a cushion to turn it into a comfortable bench.
In detail, the simple chest comes with the following instructions:
- Cut and assemble the boards and lid supports.
- Top the boards with a cushion, and attach them to keep them in place. Then add casters to the bottom.
- Add piano hinges to each side of the lid supports to keep them in place when you open or close the chest cover.
- To make the chest into a seat, you can cover it with a blanket.
- Finally, attach additional supports to ensure this bench will hold its weight.
The additional information you need to know to replicate the project are:
- Measure your space’s length, width, and height, and then cut out the boards to fit correctly.
- Make sure you use enough glue for all joints to stay in place after assembling everything.
- Attach the boards to make sure they are secure.
- Put the lid supports on each side of the chest. Next, cover their top with a cushion and attach it with piano hinges.
- Finally, attach additional supports to make sure this piece will hold up its weight before you can use it.
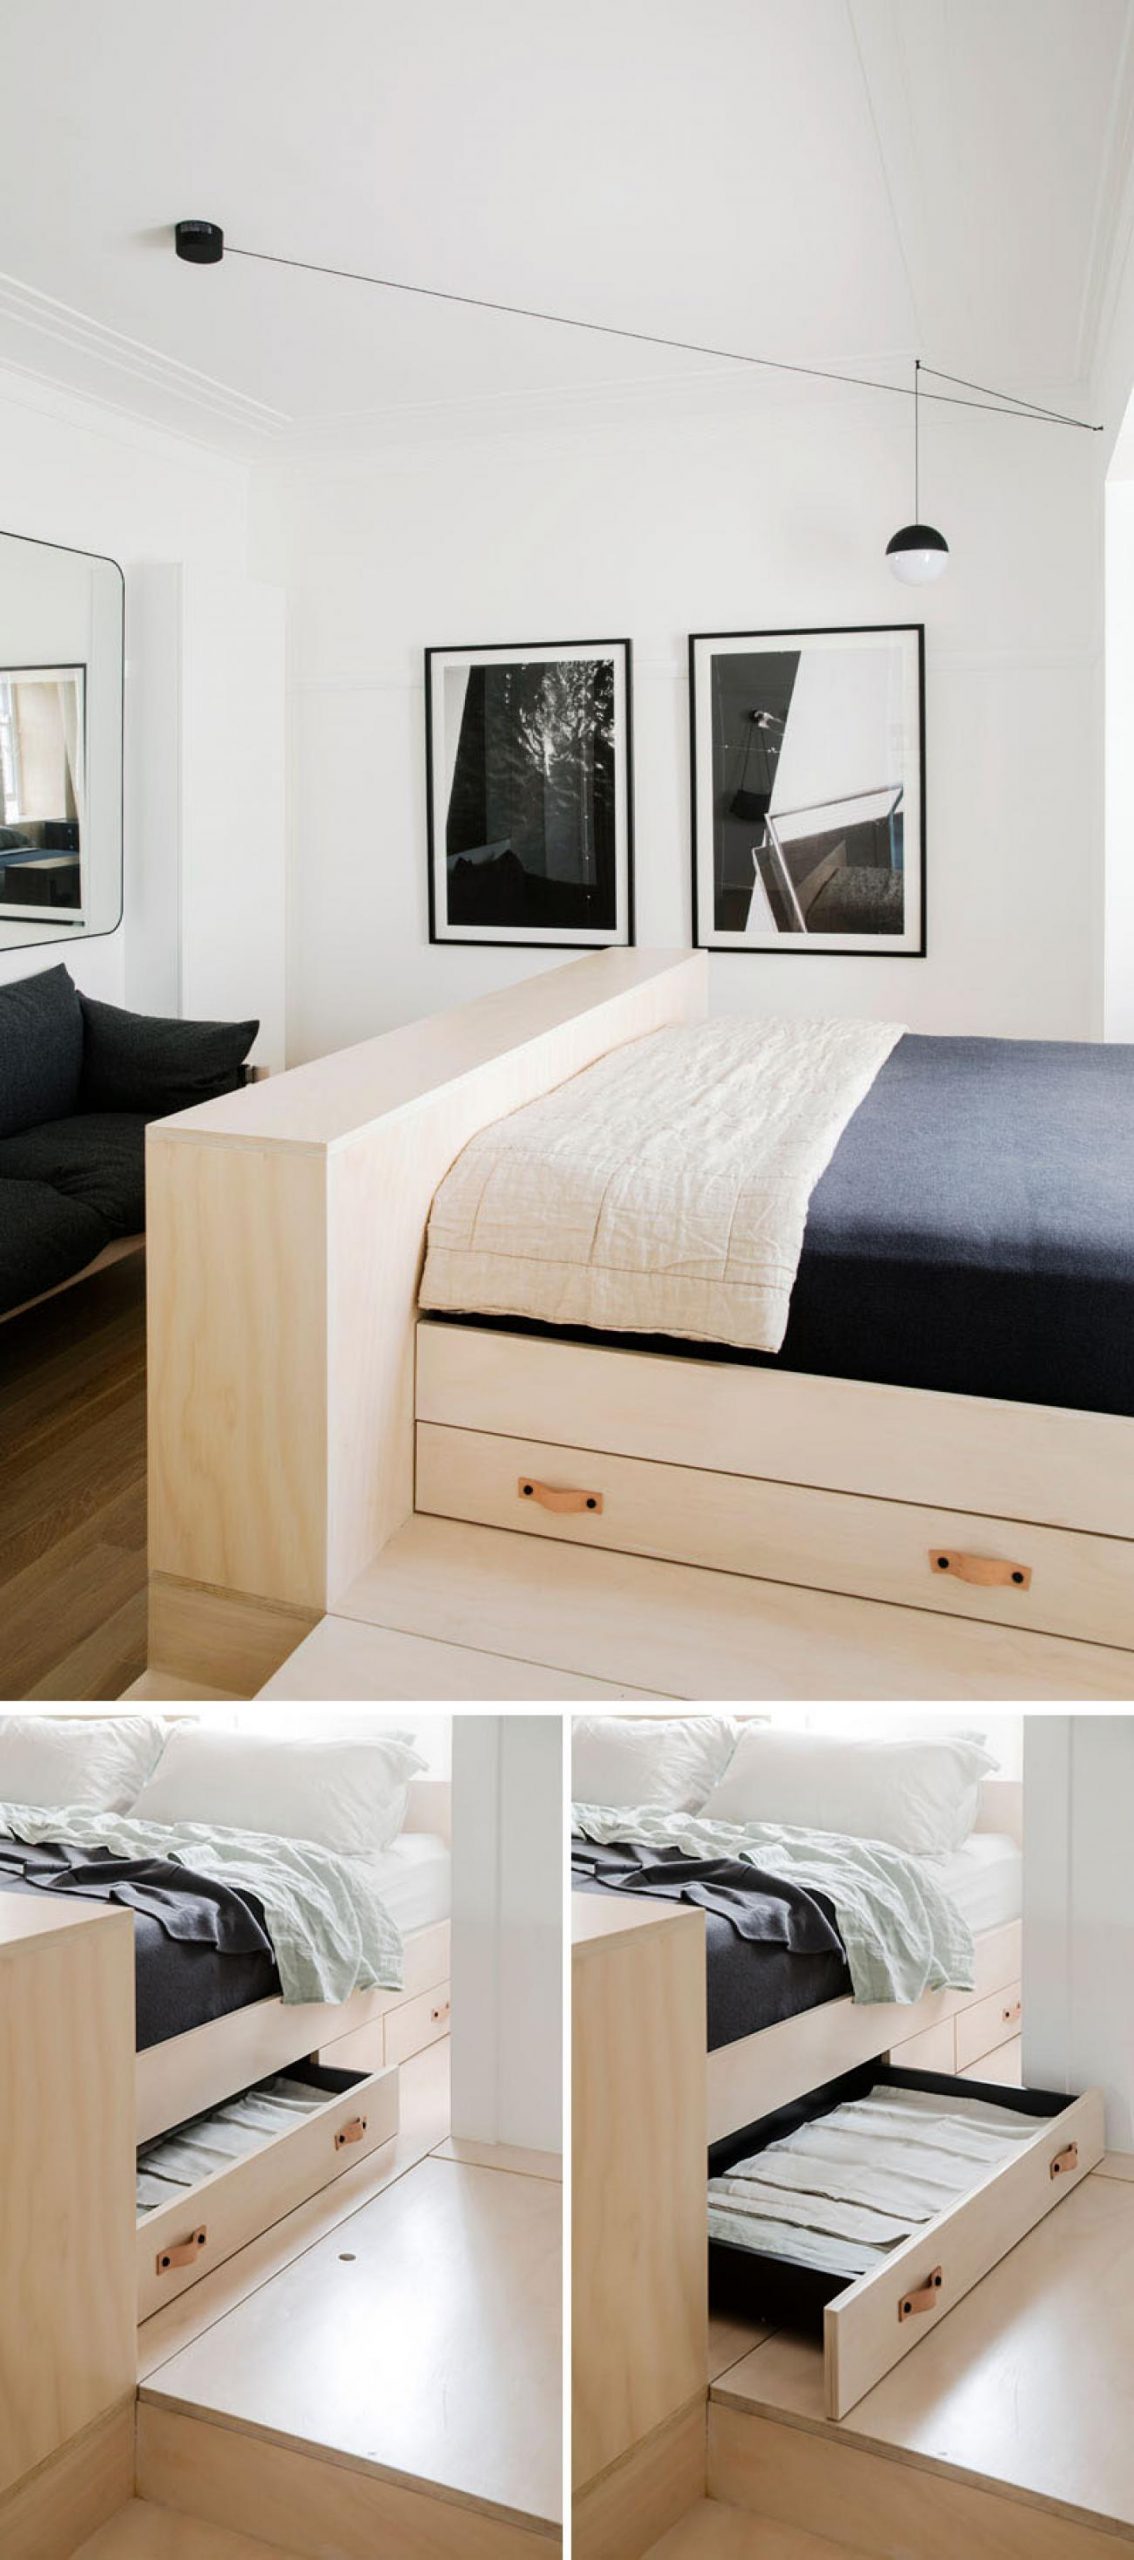
7. The Comfy Bed Idea with Extra Drawers
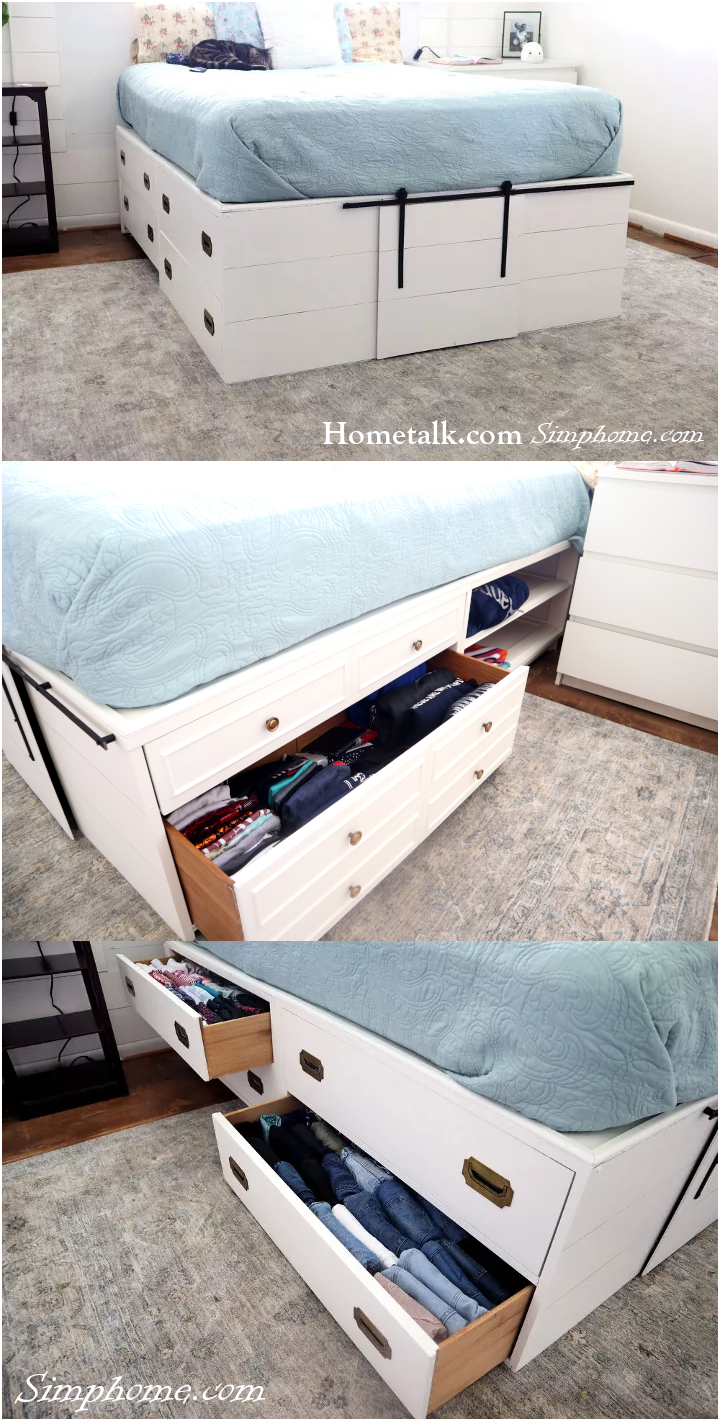 Besides a shelving unit, you can also turn two old dressers into a platform bed with storage.
- First, you need to cut the dressers to size. After that, you can paint them the color of your choice. You may also need to adjust their heights so that they stay flush.
- After that, arrange the drawers. You can screw two pieces of the drawers to secure them in place. Next, top them with a plywood board and then a mattress.
- You will see a pretty large opening under the bed.
The choice is yours. You can leave it that way or install a sliding door to conceal it.
- First, cut off the legs from two old dressers.
- Screw them to the floor, then adjust their heights so they don’t stick out from beneath your bed frame.
- Paint them a color that suits your bedroom if they are old and worn out.
- Arrange the drawers, and screw them to secure them in place.
- Top the drawers with a plywood board and then with a mattress.
- Finally, install a sliding door on the bed to hide any ugly space underneath.
Relevant Ideas:
12 Bedroom Reparations and Upgrades
12 Space-Savvy Bedroom Ideas
10 Ideas to Renew and Restore a Bedroom Bed
10 Pallet Bedroom and DIY Project Ideas
10 Small Bedroom Bedding and Blanket Ideas
10 Bedroom Bedding Ideas
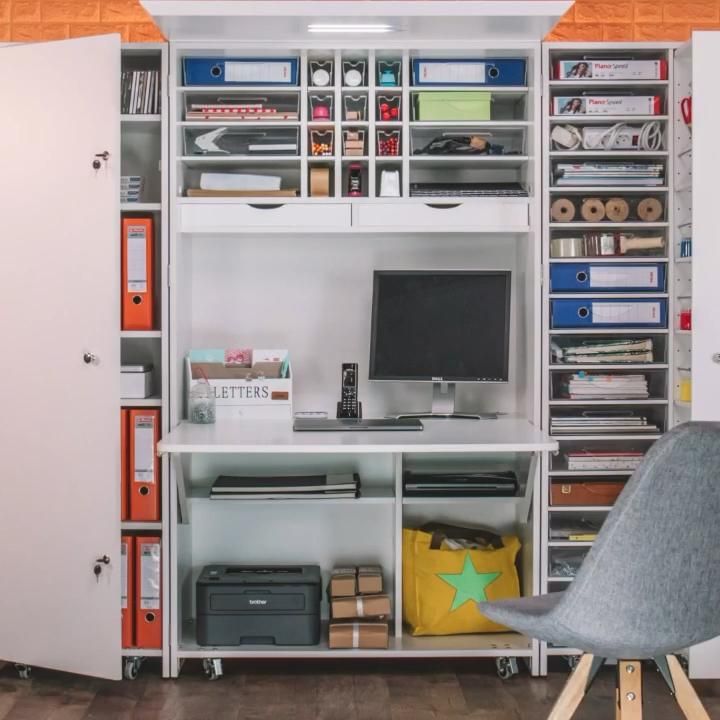 Having a private office in a bedroom is such a good idea. However, the small space does not allow you to make it tangible.
Well, that’s not true. You can make your built-in cupboard work harder. Just grab a desk and a chair, place them in it, create some shelves to hold your clothes and files, and you’re good to go. You can also install doors that conceal them.
To build the unique cupboard, your instructions are as follows:
- First, you must measure the space’s width, height, and length.
- You can cut out four boards for the base of your desk by measuring the exact sizes of your desk’s board.
- After that, use glue and clamps to assemble them to ensure they’re strong enough and will last long enough.
- Next, install shelving units on both sides of your desk with tray inserts.
- After that, install a drawer unit on one side of your desk.
- You can make this desk into a bed by installing a twin-size bed on top of it or covering it with a mattress instead.
- Finally, layer some fabric on the top of your desk to make it look more professional, and then secure it with a staples gun.
5. The Inset Jewelry Cabinet Idea
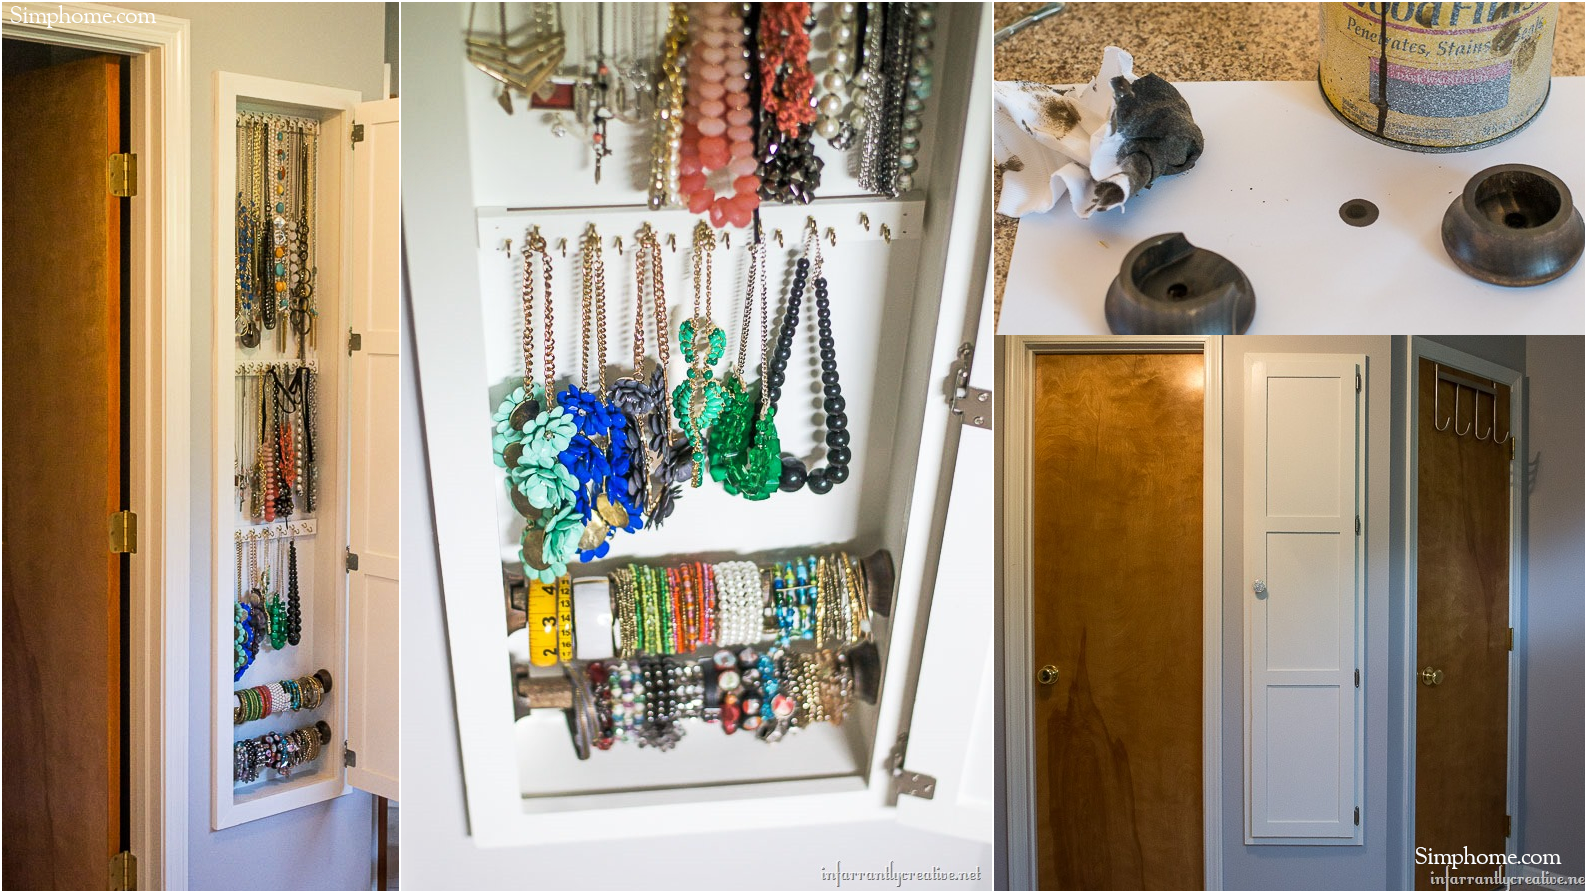 Storing your jewelry in drawers does not solve your problem with clutter. You move it to another place, which may become worse someday.
Try creating a built-in cabinet like this one to overcome this problem without cramming your room.
- First, you need to make an opening for the cabinet.
- Then, install the boards and trims.
- Next, screw in some hooks to hold your necklaces.
- For the bracelets, you can use closet rods and dowels. However, you must remove the dowel to get the bracelet you want.
- Finally, you can make the doors from some boards, trim, and hinges. And if you don’t collect jewelry, you can upgrade your mini private bathroom wall instead.
Additionally,
According to Rebecca, all you need to do to follow the project is first to measure and predrill all holes before screwing in 5/8″ cup hooks. Then level the paint stick and air-nail it into my cabinet.
It is recommended that you do one paint stick at a time, adding the necklaces, air-nailing them, and then deciding where the next one should go. It will be the easiest method to organize the necklaces.
Later you can choose Minwax Dark Walnut as the stain and screw them in place. if you want, you can also add a mirror to the cabinet door to conceal the new cabinet
4. The lovely Sliding mirror Idea
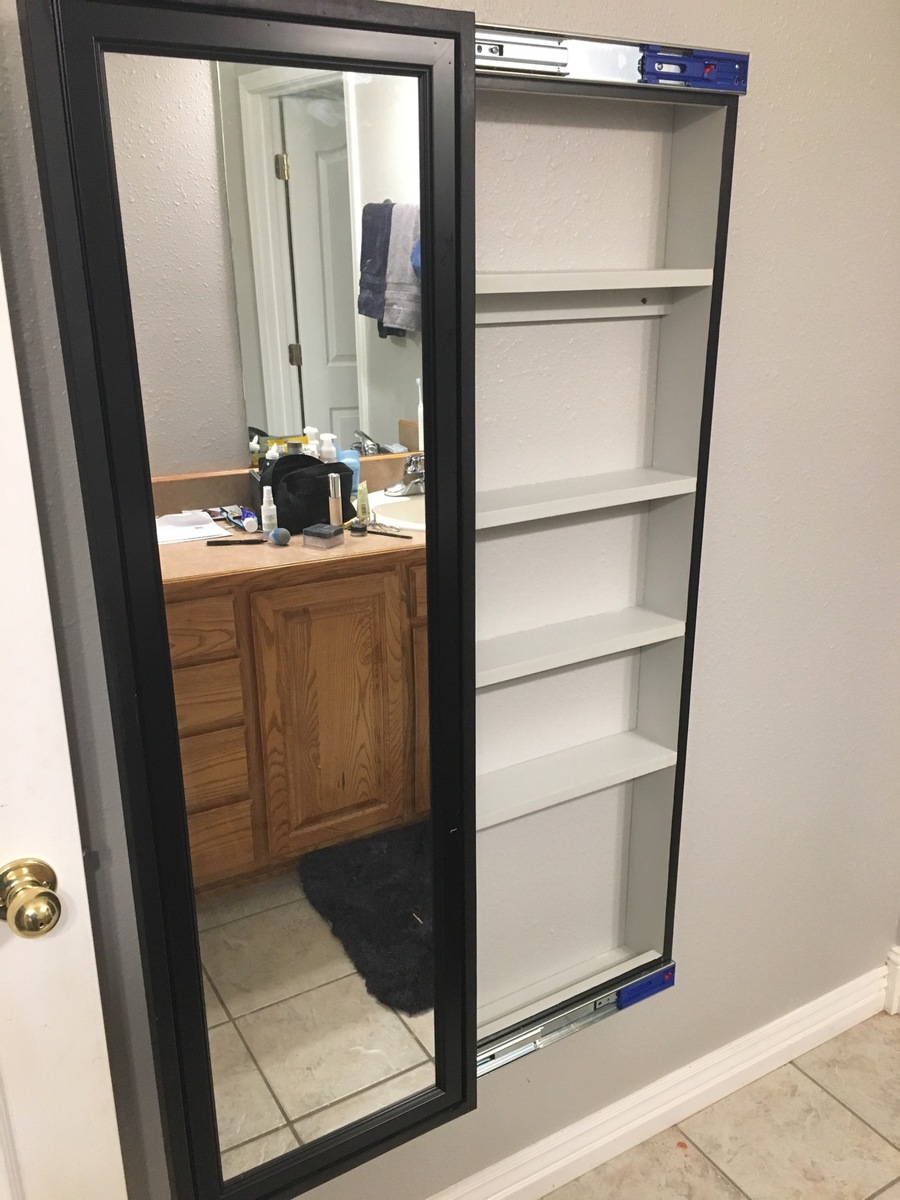 Instead of installing them separately, which can take up more wall space, you had better have both in the same spot. This cupboard is the best solution. It provides sufficient space to store your stuff. Its doors come in the form of large mirrors that slide sideways.
This sliding mirror wall-mounted vanity cabinet is the ideal answer for most cosmetic collectors! The mirror slides over the window and fits in a small space in an otherwise unused area. It houses all the cosmetics and tools and is a full-length wall mirror for getting dressed.
3. The Wooden floor with extra secret storage
 You may think staying low is beneficial for a bedroom with limited space. Have you ever thought that adding heights could be a great idea in this type of room?
Adding some heights can use the space underneath as hidden storage. This bedroom, for example, features a platform bed with drawers. You can also find stairs to access the bed.
The last step features hinges that enable you to lift the floor.
Surprisingly, you will find ample storage space underneath.
 To renovate and own a wooden floor with extra storage space like this, your quick instructions are as follows:
- First, measure and determine the size of your floor.
- Referring to the diagram, cut out 4X4 posts from 2″ X 6″ boards.
- Next, lay two posts on a worktable face down and attach them with a Kreg Jig Pocket Hole Hardware System. To do that, set up one part (A) to correspond with another (B), clamp them together with the pocket hole screws, then tighten the clamp until fully secured. Repeat this process for three more parts.
- Lastly, use Kreg’sKreg’s Pocket Holes Jig to drill pocket holes in all parts accurately.
- After that, you can cut the rest of the posts to the correct length.
- Install 2″ X 1″ x 8” Posts onto 2X4s to create your floor.
- Then attach flooring with screws into the pockets of each post, then use another hand drill with a 1/2″ Insta-Tite Flooring Glue Kit (included) to secure them to the floor.
2. Adopt Inspiring inside from this Bedroom By Vanlifecustoms
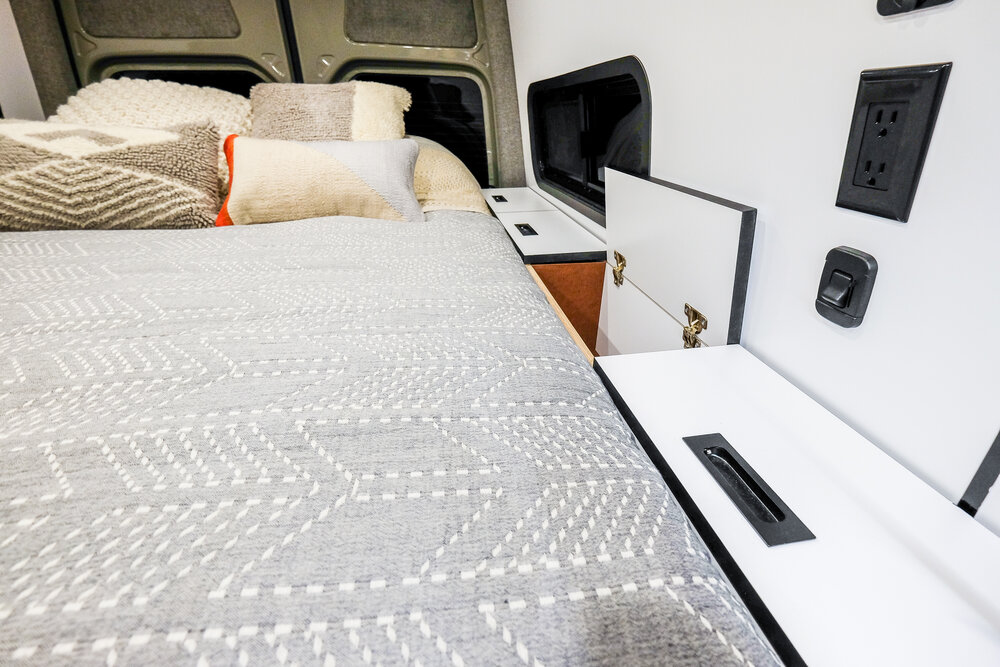 Traveling around the world sounds amazing. However, are you ready to leave the comfort of your bedroom? If you want to bring the coziness with you, you can try this idea taken from Vanlifecustoms.
This van provides everything you need daily despite the minute space. First, you need to create a platform bed to raise your bed a few feet off the floor.
This way, you can have more storage space.
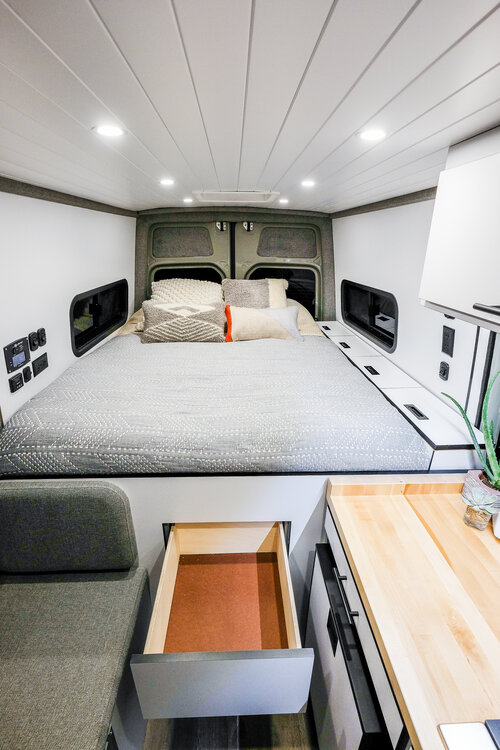 Shove the bed to one wall so. You will find a gap on another side, which is perfect for storage space.
Just add some boards and hinges to open and close the gap easily.
Besides, the lids expand the bed, adding more comfort to your sleeping space.
Lastly, Number 1. Take The Cute DRESSING VANITY WITH FULL HEIGHT MIRROR & LIGHT
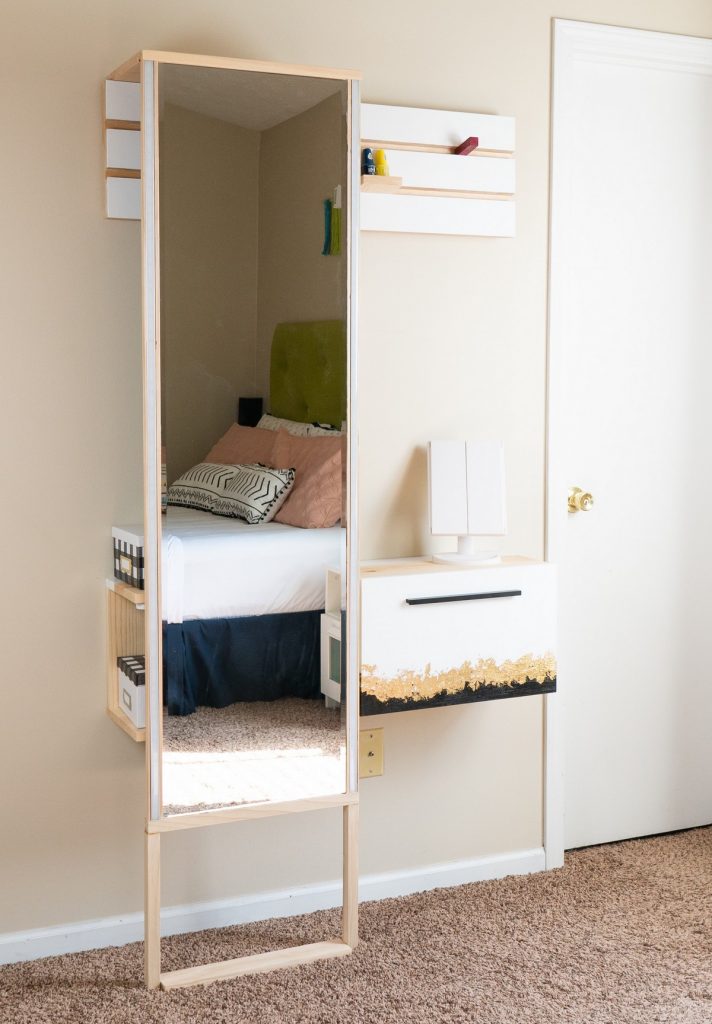 To construct the bottom shelf, which will have a drawer.
- On the left, there is a shelf, and on the right, there is a drawer. This unit is 3ft 2in length by 9.25in wide by 9.25in deep.
- You need to use a wood French cleat method to hang the unit. It’s just two wooden pieces with 45-degree angles that connect.
- One side is fastened to the rear of the item you want to hang directly, to the other side and put to the back of the item you want to hang, with the angle facing down.
- After that, add a drawer. To do so, remove the thickness of the drawer from the width.
- Then construct the drawer box to that size.
- The box is made of 1x4s, and the drawer is bottom out of 1/4′′ MDF sheet. All of the pieces were clamped together, bonded, then brad-nailed together.
To replicate the TOP BOARD WITH HOOKS, MIRROR, AND LIGHT, VERTICAL HIDDEN SHELF, and Finishing, follow the source link provided inside the reference.
Conclusion:
So Having a room with limited space is not the end of the world. These 12 hidden storage ideas to declutter your small bedroom will help make your room more functional and feel better. You can also free up some space in your bedroom to make it look like an apartment in the video promotion of your favorite Home interior influencers.
References:
12. Thesunnysideupblog.com
11. Bricoportale.it
10. Thisoldhouse.com
9. Youtube.com
8. Mommyvignettes.blogspot.com, Nickandalicia.com
7. Hometalk.com
6. Pinterest.com
5. Infarrantlycreative.net
4. Ana-white.com, Ana-white.com
3. Contemporist.com
2. Vanlifecustoms.com
1. Thenomadstudio.com