Key Points:
- Some ideal ways to transform your small kitchen include adding new appliances. That way, you can spend less time in the kitchen and more time enjoying it. But when space is an issue, you need to get inventive with storage solutions that won’t leave you with countertops covered in appliances.
- The moment you start thinking of the ideal appliance storage solution to fit in a small area, you’ll quickly realize that there are tons of options. Some of them are do-it-yourself solutions or things that you can purchase online.
- No matter your budget for your kitchen appliances, it’s essential to focus on the bigger picture. Like where will you store all of these new appliances? There may not be room for everything to sit on the countertops or in a cabinet at once.
- You can turn your old drawers, cabinets, and lids into great storage solutions that you can use to organize your kitchen appliances. Or you can invest in new cabinets or new drawers with fewer compartments.
- If you’re a bit of a DIY enthusiast, you’ll most likely find yourself getting over-excited by the prospect of being able to store everything in your kitchen with tons of space left over for other things to sit on the countertop or shelves.
If you are into cooking, you might spend most of your time baking and trying out some new menus in the kitchen. It is indeed fun and can help you blow off steam.
Unfortunately, it will not be fun anymore if clutter takes over the space. And the bad news is your kitchen is prone to this issue. But do not worry! We’ve got your back!
These 12 small kitchen appliance storage project ideas and DIY will help you organize things better without costing you a small fortune. As always, Simphome presents you with the list.

🔊12 Small Kitchen Appliance Storage Project Video:
List Entries:
12. The pull-out organizer idea from @Welcome2thewoods
Do you have any awkward space between the end of your cabinet and the wall? Do not waste any nook and cranny because they can be helpful and significantly impact your kitchen. So, what should you do? It is easy. You can turn it into functional storage space.
- First, you need to measure the opening gap between the cabinet and the wall.
- Then, make a tray for the base. You will also need to install slides on both sides of the tray to pull it out easily.
- After that, make a frame with notches. Make sure that the frame has the same size as the tray.
- Next, glue down dowels or scrap wood to each notch.
- Then, install drawer slides on both sides of the frame.
- Finally, screw it to the cabinet front.
You can use this pull-out storage to store your baking sheets, butcher blocks, trays, pans, muffin tins, etc.
General instructions:
- Step 1: After measuring the gap between the cabinet and the wall, cut out a piece of plywood to make a base.
- Step 2: Slide the base into the cabinet opening and measure how much space is remaining for a drawer. You will need about 2 inches.
- Step 3: Cut two pieces for a frame with the exact dimensions of your plywood.
- Step 4: Attach one end of each frame to one side of the base with glue and nails or screws. Attach it to another side with glue and wood screws.
- Step 5: Cut into notches in the frame on each base side.
- Step 6: Glue dowels or scrap wood to each notch and let it dry properly.
- Step 7: Screw on the drawer slides to both sides of your frame, and then tighten the screws for a snug fit.
11 The DIY Canned Food Dispenser from Ana-white
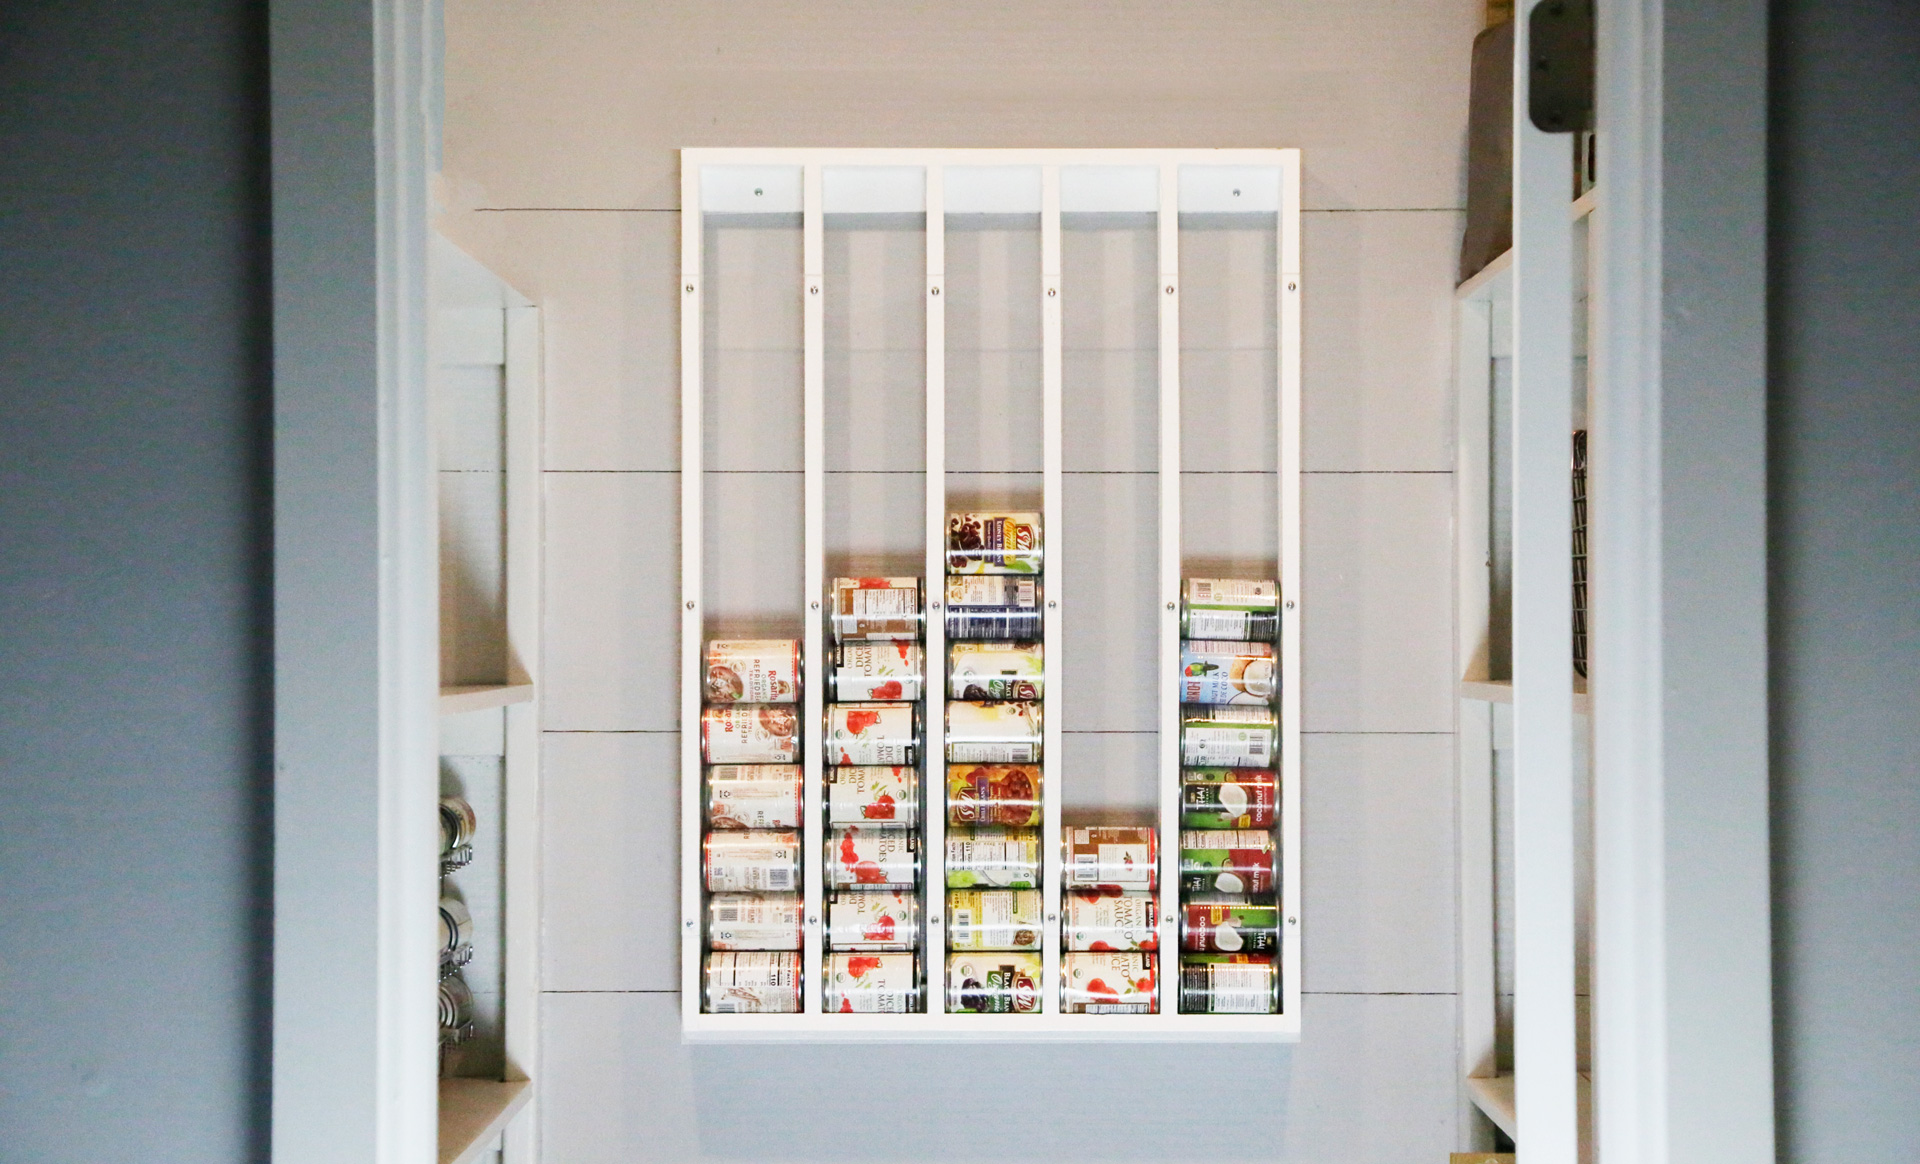 Canned foods can be your savior when you race against time or do not feel like cooking any dish entailing complicated recipes. Thus, having them available in the pantry is a terrific idea.
However, piling up canned foods can take up a lot of space in your pantry. Even worse, you cannot access what is stored behind them. For this reason, keeping them separately in this canned food dispenser would be worth the effort.
To make this canned food dispenser, you will need to attach the sides to the bottom and top pieces. Then, screw vertical dividers. Next, attach the back supports on the top and bottom.
After that, attach the acrylic glass to the front. Make sure you leave a 3-¾” gap on top to enable you to load the dispenser and the bottom to allow the canned food to be accessible.
10. The Pull-out kitchen ladder by @Alexdodman
This is another solution for the awkward space left untapped in your kitchen.
To make this pull-out kitchen larder, you need to measure the gap between your cabinet and wall. Then, cut the plywood to size to create shelves that fit snugly into the awkward space.
After that, install wheels at the bottom for easy access and copper pipes as the railings that prevent your stuff from falling. Finally, screw another copper pipe on the front as the handlebar.
Relevant instructions:
- Step 1: After measuring the gap, cut the plywood to make the base.
- Step 2: Attach rails on both sides with screws.
- Step 3: Cut out notches where you want your shelves to be placed.
- Step 4: Wheels and attach them to the bottom of your larder.
- Step 5: Lastly, screw another copper pipe on the front handlebar for easy access.
9. The Simpler pull-out kitchen ladder @Laurynlady
Pull-out kitchen shelves have always been an intelligent solution for any awkward space in your kitchen, including the 5-inch gap between the fridge and wall.
The previous pull-out shelves ideas are stylish. However, they are somewhat complicated. Are you looking for a simpler yet practical one? You can try this one.
- You only need to get wooden boards that can fit snugly into your 5-inch gap.
- Then, cut them to size, sand, and stain the pieces thoroughly.
- After that, screw four wheels at the bottom.
- Next, install any handlebar of your choice, and you are good to go.
- You can install a large wooden sheet at the back and dowels in front to make canned foods and spices stay in place for peace of mind.
8. Before and After An Ugly Wall to Open Kitchen Storage
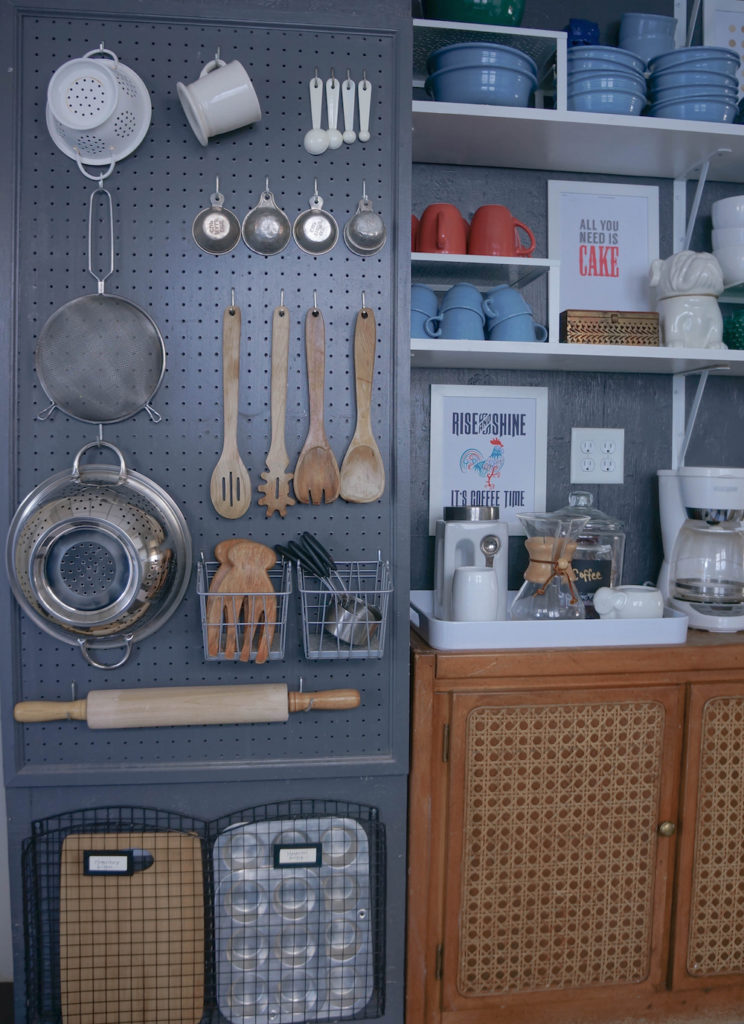 Sometimes, you do not feel like looking at your kitchen because it is a real eyesore. If it happens to you, maybe it is time for you to update your cooking space.
This spot used to be exasperating with the tired wall. Now, it looks impressive and is eminently functional.
- To carve out this look, you need to cover your wall with a thin layer of plywood.
- You will also need to wrap the chase with a 2×4 to make it sturdy.
- Then, paint the plywood gray for a modern look.
- Next, place a china hutch or any second-hand storage you can find for cheap.
- Please make sure it is sturdy, though. Then, install shelves above the cabinet.
- Finally, attach a pegboard next to the hutch for more storage.
Pegboards are versatile. You only need to add some hooks to hang kitchen utensils. Try grabbing a magazine rack to store muffin tins and cutting boards for more practical storage.
7. How to Hang Solid Wood Floating Shelves for your tricky corner area
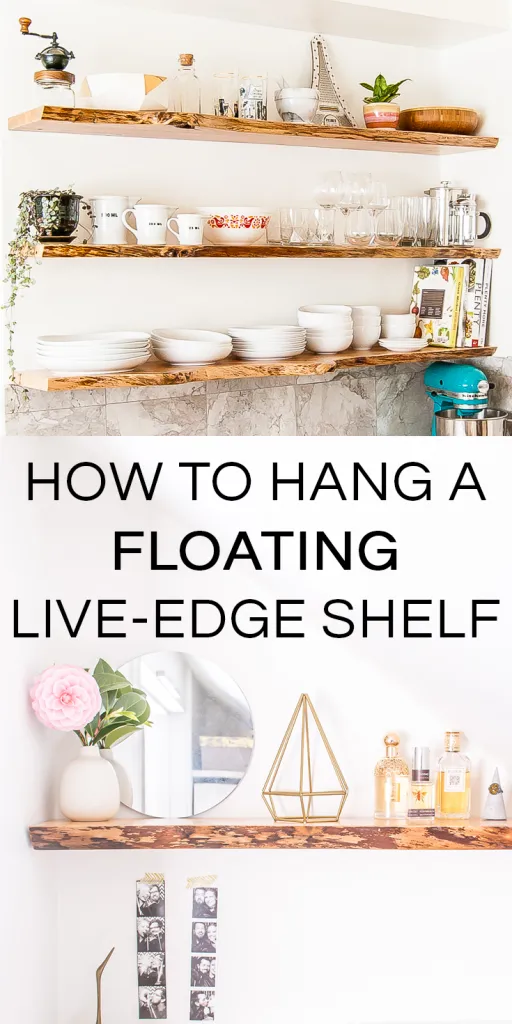 Do you want to add a bit of a rustic look to your kitchen? Try these floating shelves.
You will need some solid wood to make these floating shelves and cut them to size.
- Next, find the studs on your wall.
- After that, drill into them with a ¼” drill bit, and then switch to the ½” bit. Make sure you drill through the centers of the studs.
- Next, you can begin to install the brackets.
- Then, drill the holes in the wood you will use for the brackets.
- Make sure they are straight, level, and accurate.
- Then, you need to build a jig, a sleeve that will hold your wood straight.
- Next, find the center of the shelf thickness-wise.
- After that, drill a hole in the jig you have made at this point.
- Then, drill the holes in the back of the shelf wood.
- Next, slide the wood onto the brackets to see whether it is level.
- Once it is level, take the shelf back to sand it and apply any finish you want.
- Finally, install the shelf in place.
Relevant instructions:
- No 1. Make some measurements, and then buy the wood you need.
- No 2. Cut the wood to size.
- No 3. Find the studs with a stud finder, drill holes in them with a ¼” drill bit, and then switch to a ½” bit.
- No 4. Use a jig to hold the wood straight while drilling holes with a ½” bit to keep it firmly in place.
- No 5. You can screw the brackets to the wall now.
- No 6. Install the shelf using your jig, and ensure it is straight and level.
- No 7. Sand and finish your shelf, and enjoy!
6. Some of the finest ideas on how to Organize Kitchen Drawers by Halstromhome
 Sometimes you do not need to make new shelves or cabinets to organize your kitchen. Decluttering and reorganizing what you already have can be the best way to tidy up the space while saving some money.
- First, you have to take everything out to start fresh.
- Then, figure out what to go where. Knowing where certain items should go is essential because it can help you save time.
As a good rule of thumb, you had better place the items you regularly use in the drawers that you can access easily. - Then, consider investing in drawer dividers and plastic containers to store small items.
5. The Fold-down Extra table idea
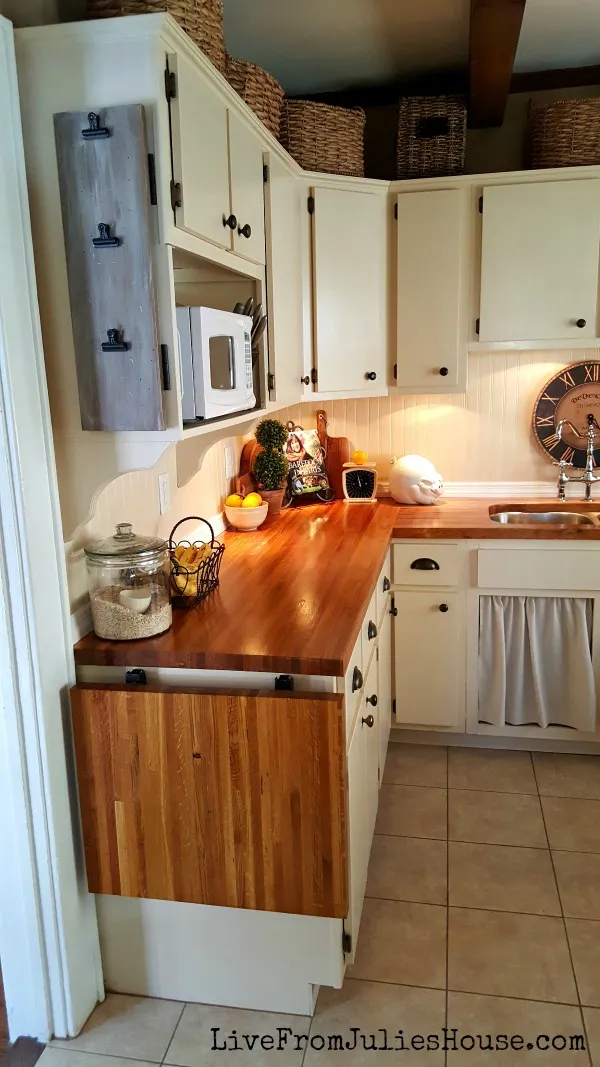
Do not worry! By making this foldable table, you can expand your countertop without taking up more space.
You only need to get a butcher block. Then, cut it to size and attach it to heavy-duty folding shelf brackets.
Relevant details:
- Step 1: Cut the wood to size.
- Step 2: Drill holes in the wood and divide it into two pieces.
- Step 3: Attach the brackets to the wood and then measure where your screws are going through to mark them with a pencil.
- Step 4: Screw the brackets on both wooden boards and lay the butcher block on top.
- Step 5: Install some screws, turn over your foldable table, and enjoy!
- Step 6: Once you are done, attach the wood with a screw to the underside of the table so that it does not fall out.
- Step 7: You can put your other heavy items on this table.
4. The Cube Shelves
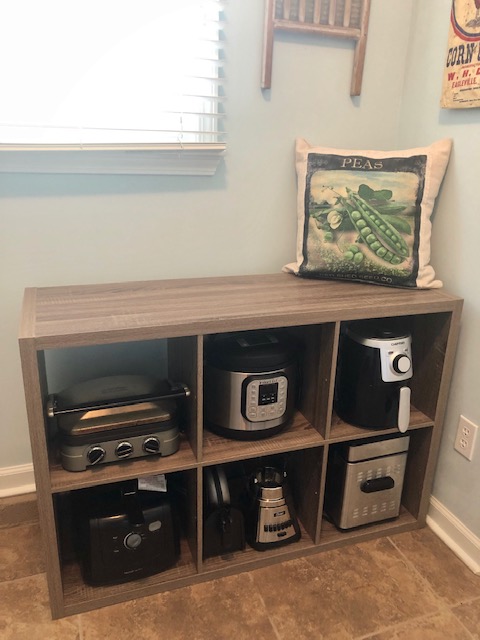 Organizing kitchen appliances do not have to be arduous. You can simply invest in cubbies to perform this task.
If you cannot find the cubbies that suit your need well, you can make them yourself. Make sure each cube is big enough to accommodate the kitchen appliance you use daily.
To build your cube shelves, your detailed instructions are:
- Step 1: First, you will need to make your boards. It would be best to consider using melamine boards as they are thicker and more durable.
- Step 2: Measure the dimensions of the shelf.
- Step 3: Cut your board with a miter saw and use a finishing nailer to attach it to the wall.
- Step 4: Attach some screws on both sides of the board and ensure they are level.
- Step 5: Install a groove into each cube side and screw them on with screws.
- Step 6: Get some wood screws and screw the cubes to the shelf.
- Step 7: This is all you need to do. Now, you can organize your kitchen appliances without wasting too much space.
3. Optimize your Limited Kitchen Interior design and hide your dining table
 This dining table will allow you to enjoy your meal comfortably without worrying about limited space because you can hide it away when you are not using it. Are you wondering how it happens?
This table features a table-rotation mechanism that allows it to swivel back and forth. This way, you can have a proper dining area while keeping valuable space.
Relevant instructions:
- No 1. Cut the wood to the length you want.
- No 2. Join two wood pieces together with a bit of plywood with the same dimensions.
- No 3. Attach some brackets and then support to the underside of your table to make it sturdy.
- No 4. Get some recessed screws and screw them into your tabletop, then measure how deep they are going through with holes so that you can drill more holes on the other side of your tabletop.
- No 5. Attach your table to the brackets, and then flip over your table.
- No 6. Install some brackets onto the underside of the table where you have drilled more holes to make it sturdy.
- No 7. Again, attach the table to your brackets, and flip over your table. This time, you will notice that there are only a few holes on the underside of your table.
2. Give your kitchen cabinet some piano hinges and a magnet. Ideas from @lhk Interior and Theneatnestco
If space is limited, every inch counts. Therefore, this DIY bi-fold door can be your safe bet. The most important thing is you can make it yourself with piano hinges that allow you to fold the door in half and a magnet on top that holds the door.
Or Simply a lazy susan
Lazy susan has always been an excellent storage solution. In fact, it can tackle the corner of your cabinet. You only need to assemble and install a lazy susan kit in the corner of your cabinet. Then, place the cabinet in front to hide the lazy susan.
Lastly, Number 1. The Pull-out shelf for the garage idea
 Storing kitchen appliances in a cabinet may help you tackle clutter. However, you will find it hard to access the small one hidden at the back.
To overcome this problem, you can install drawer slides to help you pull the shelf out for easy access.
To replicate the project, your instructions are:
- Step 1: Prepare a piece of plywood and use a router to cut it so that the size is identical to your cabinet.
- Step 2: Attach some brackets underneath your cabinet.
- Step 3: Flip over your cabinet and drill some holes at the bottom of your cabinet so that you can screw in your drawer slides.
- Step 4: Install some screws into the board and then attach it on top of your drawer slides and flip over the electrical outlet.
- Step 5: All you need to do is place the drawer slides into your cabinet, and they will hold the shelf in place firmly.
Conclusions:
So, some of the best ideas to manage your kitchen appliances are making yourself a kitchen island, utilizing a foldable table, and using a lazy susan. You can experiment with installing a pull-out shelf, hanging kitchen cabinet doors, and putting your refrigerator in the garage with a pull-out shelf.
Also,
You can produce and then draw your organizing Kitchen Storage System. You only need to get a pencil or pen and paper. You can follow step-by-step instructions to create a kitchen storage system vertically and horizontally. Then, you can use an app like Google Sketchup drawing software to make the final printable design file.
Going for passions is always good, especially if it can result in positive vibes. You can keep baking and cooking comfortably and let these 12 small kitchen appliance storage project ideas and DIYs do their jobs.
References:
12. Tiktok.com/@welcome2thewoods
11. Ana-white.com
10. Tiktok.com/@alexdodman
9. Tiktok.com/@laurynlady
8. Curbly.com
7. Diyinpdx.com
6. Hallstromhome.com
5. Livefromjulieshouse.com
4. Thelittlefrugalhouse.com
3. Livinginashoebox.com
2. Tiktok.com/@lhk.interiors, Tiktok.com/@theneatnestco
1. Lemonthistle.com