5. Kallax hack with Reinforced L-Frame
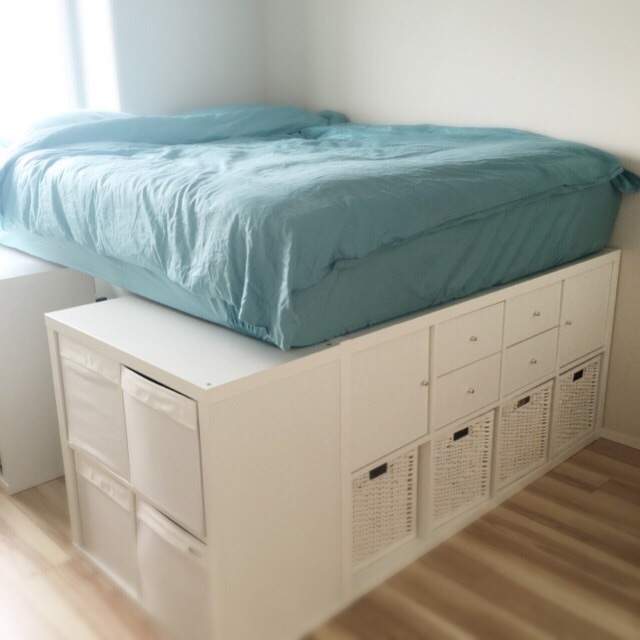
Ready to transform your space with a genius IKEA hack?
Let’s create a Kallax bed with ample storage, ideal for small bedrooms or for anyone with a flair for organized spaces.
This isn’t just a bed; it’s a storage solution and a style statement all rolled into one, ideal for a new box bedroom or an underutilized bedroom of yours!
Gather Your Materials:
- Kallax Shelf Units: 2 units (77×147 cm) and 3 units (77×77 cm)
- L-shaped Steel Frame: 150 cm length
- Pine Wood Boards: 90 cm width, 182 cm height, 1.8 cm thickness (2 pieces)
- Pocket Spring Mattresses: HöVÅG, 80×200 cm (2 pieces for a queen-sized bed)
- Mattress Pad: TUSSÖY, 160×200 cm
Assembly Steps:
- Arrange the Shelves: Begin by positioning the five Kallax shelves. Place the smaller units in the center for support and the larger ones around to form the frame.
- Reinforce the Structure: If there’s a gap on the wall side, reinforce with an L-shaped steel frame from a hardware store. Secure it with screws for added stability.
- Prepare the Bed Board: Cut the pine wood boards into two 50×182 cm pieces and one 40×182 cm piece. Leave space between them on the bed frame for ventilation.
- Set the Mattress: Place the two semi-single HöVÅG mattresses side by side for a queen-size effect. This setup minimizes disturbance from movement during sleep. Cover the gap with a TUSSÖY mattress pad for comfort.
- Add Final Touches: Cover the bed with a sheet. Customize your storage beneath with Kallax accessories like drawers and baskets. You can even add doors for easier access.
- Enjoy the View: The elevated height offers a new perspective – enjoy the scenery from your window right from your bed.
This bed not only maximizes your storage space but also turns into a fun play area for kids or a secret hideout with cushions and toys. With a total cost of around 130,000 ($885.53) to 140,000 yen or ($953.64) (excluding the mattress), you get a spacious, multifunctional bed that’s a breeze to assemble.
4. IKEA Pax hack from GJ Homedesigns
Get ready to tackle a fun and functional DIY project – creating your very own IKEA Pax Fluted Hall Tree! Perfect for those without a coat closet and craving more storage in a laundry room (originally) or your box bedroom. This isn’t just any hall tree; it’s a custom-made, modern storage marvel that’ll make your friends go “Wow!” after they find it crusted near your bedroom door.
Here’s How You Do It:
- Plan Your Space: Assess your laundry room. No coat closet? No problem! Measure the available space to ensure your hall tree fits perfectly.
- Design Your Hall Tree: Envision a hall tree with a bench, ample space for coats and jackets, and extra storage for shoes. The beauty of DIY? You get to tailor it to your taste and needs.
- Gather Your Materials: Head to IKEA for a Pax unit, the heart of your hall tree. Then, hunt for additional pieces to complement the Pax and fit snugly in your designated corner, achieving that seamless built-in look.
- Add Fluted Doors: Elevate the style with fluted doors. They’re not just trendy; they add texture and depth to your hall tree.
- Install LED Strip Lights: For a magical touch, incorporate motion-sensing LED strip lights. This not only adds a cozy ambiance but also enhances the functionality, lighting up as soon as you step into the room.
3. A multi-functional Project to radically transform a box bedroom
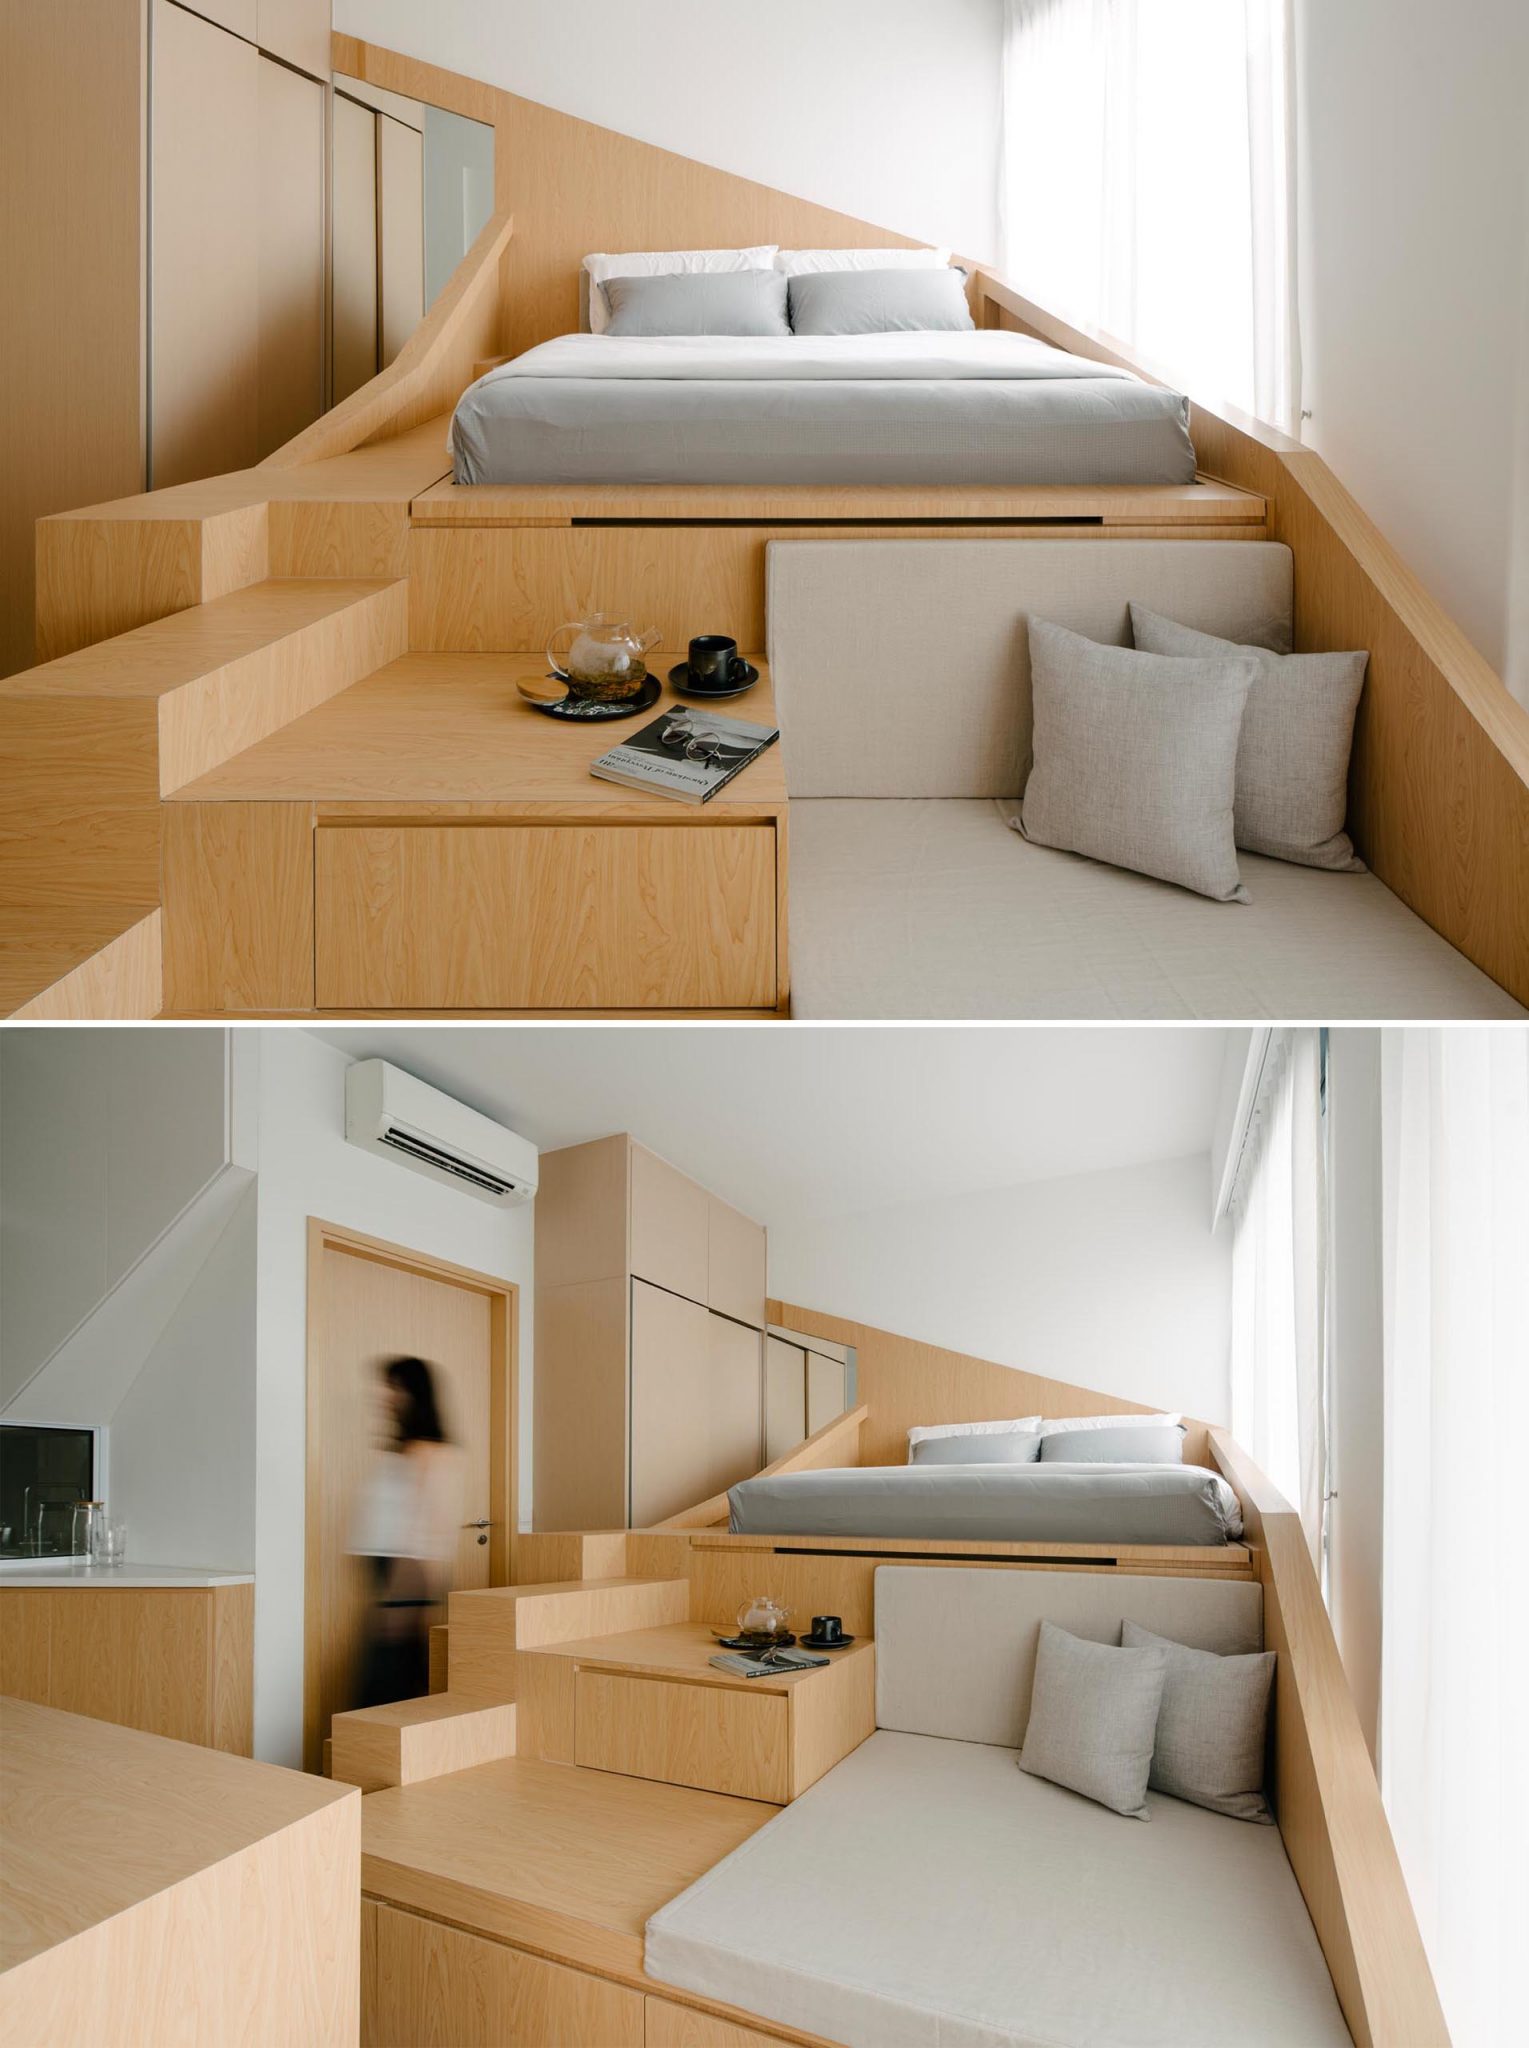
Imagine transforming a tiny 462 square feet (43 square meters) apartment in Singapore into a multi-functional wonderland! This small space, originally featuring just a basic kitchenette, bathroom, and a floor-to-ceiling closet, is about to get a major uplift.
Step into the ‘Before’ Scene:
The apartment starts with plain, empty walls, except for the window wall offering city views and inviting natural light. It’s your typical studio layout, ready for a dramatic transformation.
Now, Unveil the ‘After’ Magic:
Post-makeover, the apartment boasts a sleek glass partition wall, neatly separating the entryway and kitchen from the main living and sleeping area. This clever addition enhances the apartment’s flow and functionality.
The Showstopper – A Custom Loft Bed:
The centerpiece of this transformation is a custom-designed wood platform bed. Ingeniously using room height, it cleverly incorporates ample storage underneath. This isn’t just a bed; it’s a space-saving hero, perfect for compact living.
Multifunctional Design Elements:
But wait, there’s more! Integrated into this loft bed is a cozy sofa, strategically placed by the window. It’s a versatile spot, doubling as a seat for your desk or dining table and a relaxing nook to enjoy the views.
Stairs with Style:
The journey to dreamland is via stylish integrated stairs, seamlessly blending into the bed’s design. These aren’t just steps; they’re a statement of style and practicality.
Nighttime Glow:
As dusk falls, hidden lighting around the bed springs to life, casting a soft, inviting glow. This feature adds a layer of coziness and modern ambiance to your personal haven.
A Wall of Wonders:
Opposite the bed, a custom wood wall stands proudly, serving as a backdrop for your TV. Its angular design isn’t just visually appealing; it’s a smart storage solution, proving that in small spaces, every inch counts.
From a bland studio to a chic, multi-functional apartment, this transformation shows how smart design can turn tiny spaces into comfortable, stylish, and practical homes. Ready to revolutionize your box bedroom?
2. An inspiring Kallax Refurbished project @Designingparkside
Ready to channel your inner DIY wizard? Let’s turn those broken 2×2 IKEA Kallax cube shelves into an incredible craft table for your office! It’s time to show off how versatile and fun upcycling can be.
Step 1: Repair and Prep
Grab your @loctiteglue Power Grab Ultimate Crystal Clear Construction Adhesive. Apply it to repair any damaged sides of the Kallax shelves. Once it dries, give your units a good sanding to smooth out any rough edges. Now, they’re ready for a fresh start.
Step 2: Prime and Paint
Transform your shelves with primer and paint. Choose a color that sparks creativity or matches your office vibe. This step isn’t just about aesthetics; it’s about giving your shelves a new lease on life.
Step 3: Add Shaker Style Trim
Elevate the look by adding shaker style trim to the doors and drawers. These trim pieces, tailored for the Kallax inserts, will add a touch of elegance to your craft table.
Step 4: Craft the Tabletop
Time to craft the tabletop. Cut a base and top from plywood, ensuring they fit your shelves perfectly. Don’t forget to add edge banding along the sides for a polished look. Prime and paint these pieces too.
Step 5: Mobilize with Castor Reels
Attach castor reels to the bottom. This nifty addition turns your craft table into a mobile workstation. Now, you can easily move it around your office as needed.
Step 6: Assemble and Customize
Put all the pieces together. Swap out the standard IKEA handles for chic gold ones to add a dash of luxury. (Source: Designingparkside)
1. A DIY Modern Under-bed Drawer Idea
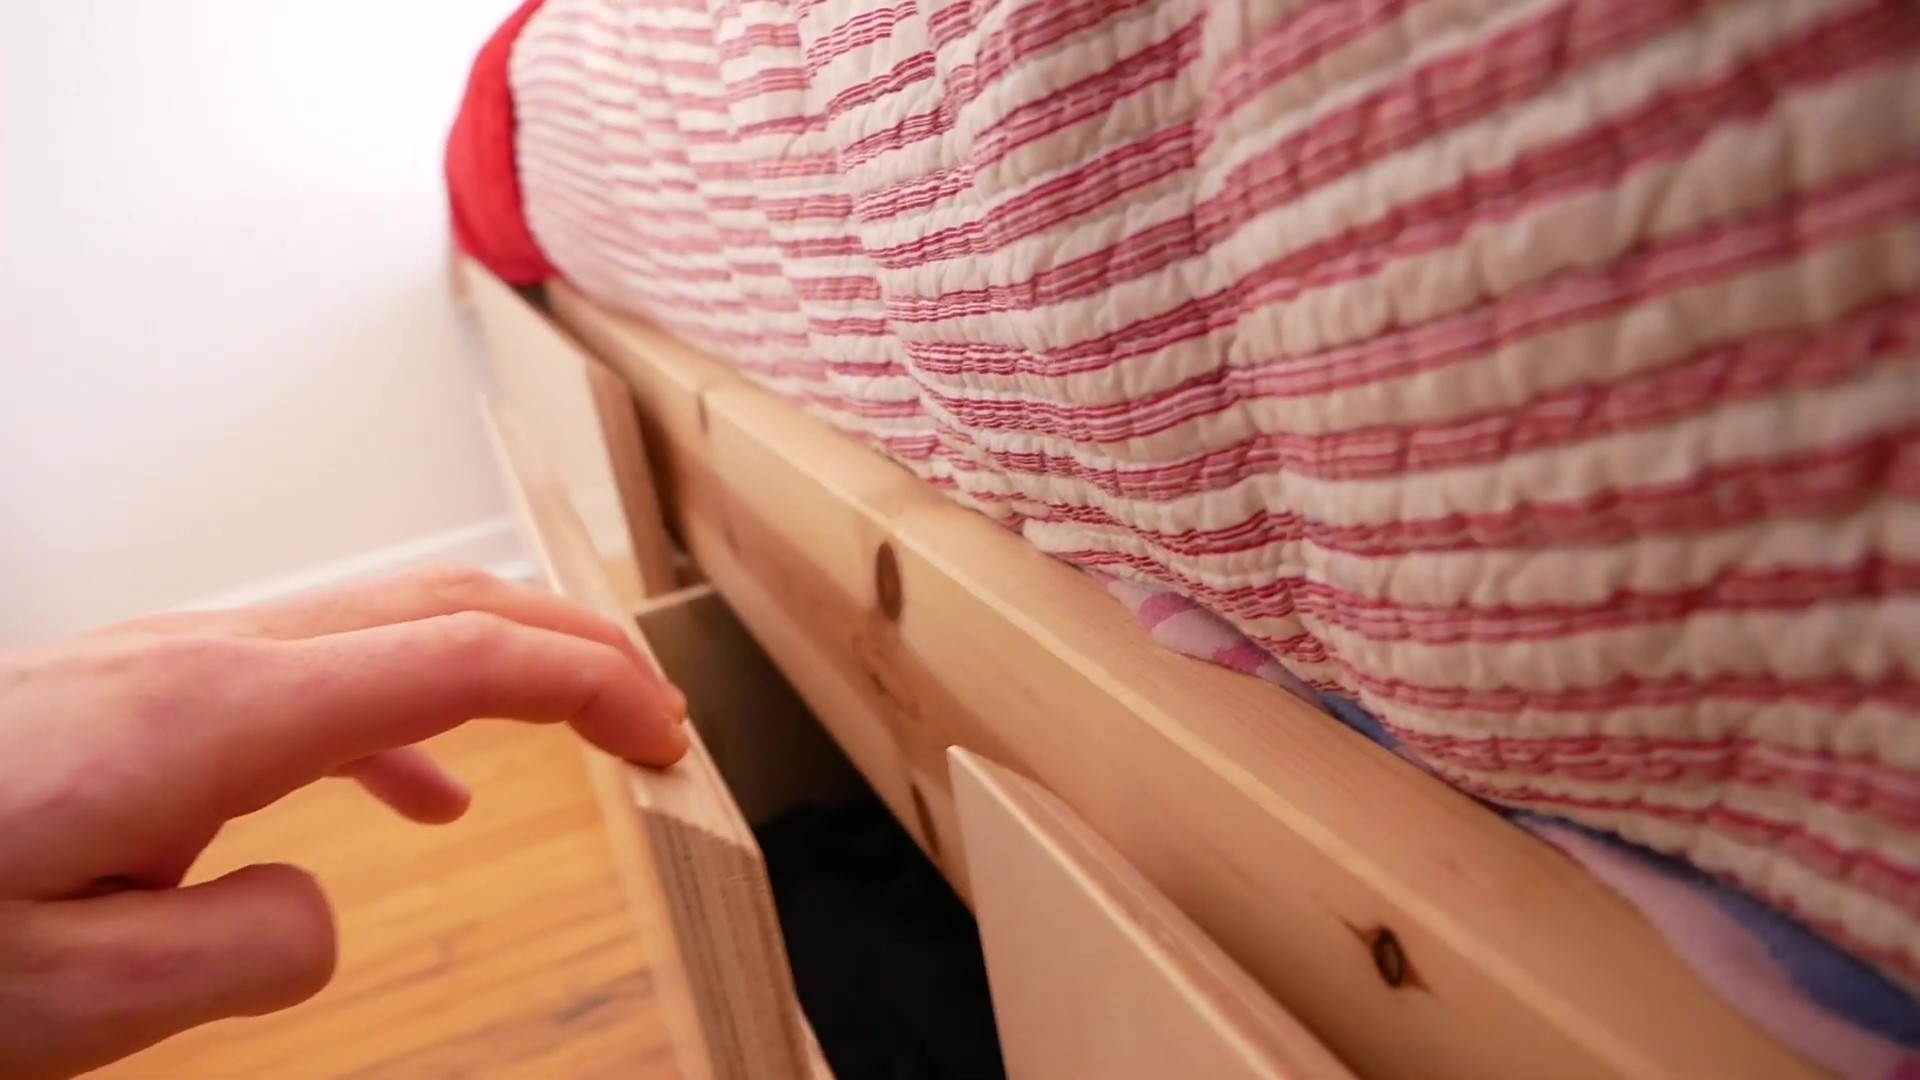
This time we are transforming a simple IKEA bed frame into a storage haven with sleek, modern under-bed drawers. If your bedroom is on the smaller side, this project is a game-changer. You’re not just building drawers; you’re creating a stylish, space-saving solution. So, roll up your sleeves and let’s dive in!
Next, you will read a transcription deduction from the @Morleykert video.
Step 1: Raising the Bed
First, let’s give ourselves some room to work with. The bed frame currently sits at a mere 7.5 inches off the ground. To fit our dream drawers, we need about 12 inches of clearance. Time to build some risers. Forget those bulky plastic dorm-room risers; we’re going for something sleeker. Using 1×2 lumber, create subtle yet sturdy risers that blend seamlessly with your bed frame. You’ll need to install these at the four corners of your bed, ensuring they’re securely screwed into the existing legs. For the center legs, simply replace them with longer 1x2s. The goal? A lifted bed that’s as solid as it is before.
Step 2: Building the Drawers
Now for the exciting part – the drawers! You’ll need half-inch plywood for this. Cut four pieces, each 48 inches long, 17 inches wide, and 10.5 inches deep. Tackling this in a lumberyard parking lot with a cordless circular saw? Bold move, but let’s keep the cuts simple and quick. Back home, start assembling the drawer boxes. Attach the sides to the bottom piece, ensuring everything is flush and square. Remember, consistency is key for a smooth fit under the bed.
Step 3: Adding Casters
The wheels make the drawer, literally. To not lose precious height, recess your 2-inch tall casters into the drawer bottoms. Carefully cut slots in each bottom piece, then attach the casters with short pan head screws to avoid interference with the wheels.
Step 4: Sanding and Finishing
Give each drawer box a good sanding. We want these drawers not just functional but also a treat to touch. Once smooth, finish them with a semi-gloss varathane for that extra sheen and protection. This is where your drawers start to really look like part of your chic bedroom setup.
Step 5: Crafting Drawer Fronts
Now, for the fronts. Use 3/4-inch Baltic birch plywood, cut to cover the entire bed frame, with a half-inch gap between each front and a one-inch gap from the floor. Instead of conventional pulls, go for a 45-degree bevel cut at the top of each drawer front. It’s not just about avoiding shin injuries, it’s about adding a touch of minimalist elegance.
Step 6: Assembling and Installing
With the drawer boxes ready, it’s time to bring it all together. Use double-sided tape and plywood spacers to ensure even gaps between fronts. Secure each front with countersunk inch-and-a-quarter wood screws. Adjust your strategy for any uneven floor areas to maintain those clean lines.
Conclusion
And there you have it! Four massive, modern drawers, adding significant storage space to your bedroom without cramping your style. These Baltic birch beauties aren’t just functional; they’re a statement of your DIY skills and smart design sense. Celebrate your success with a well-deserved break and admire your handiwork. You’ve just elevated your bedroom’s form and function in one go!
2nd Project from Foureyes Furniture
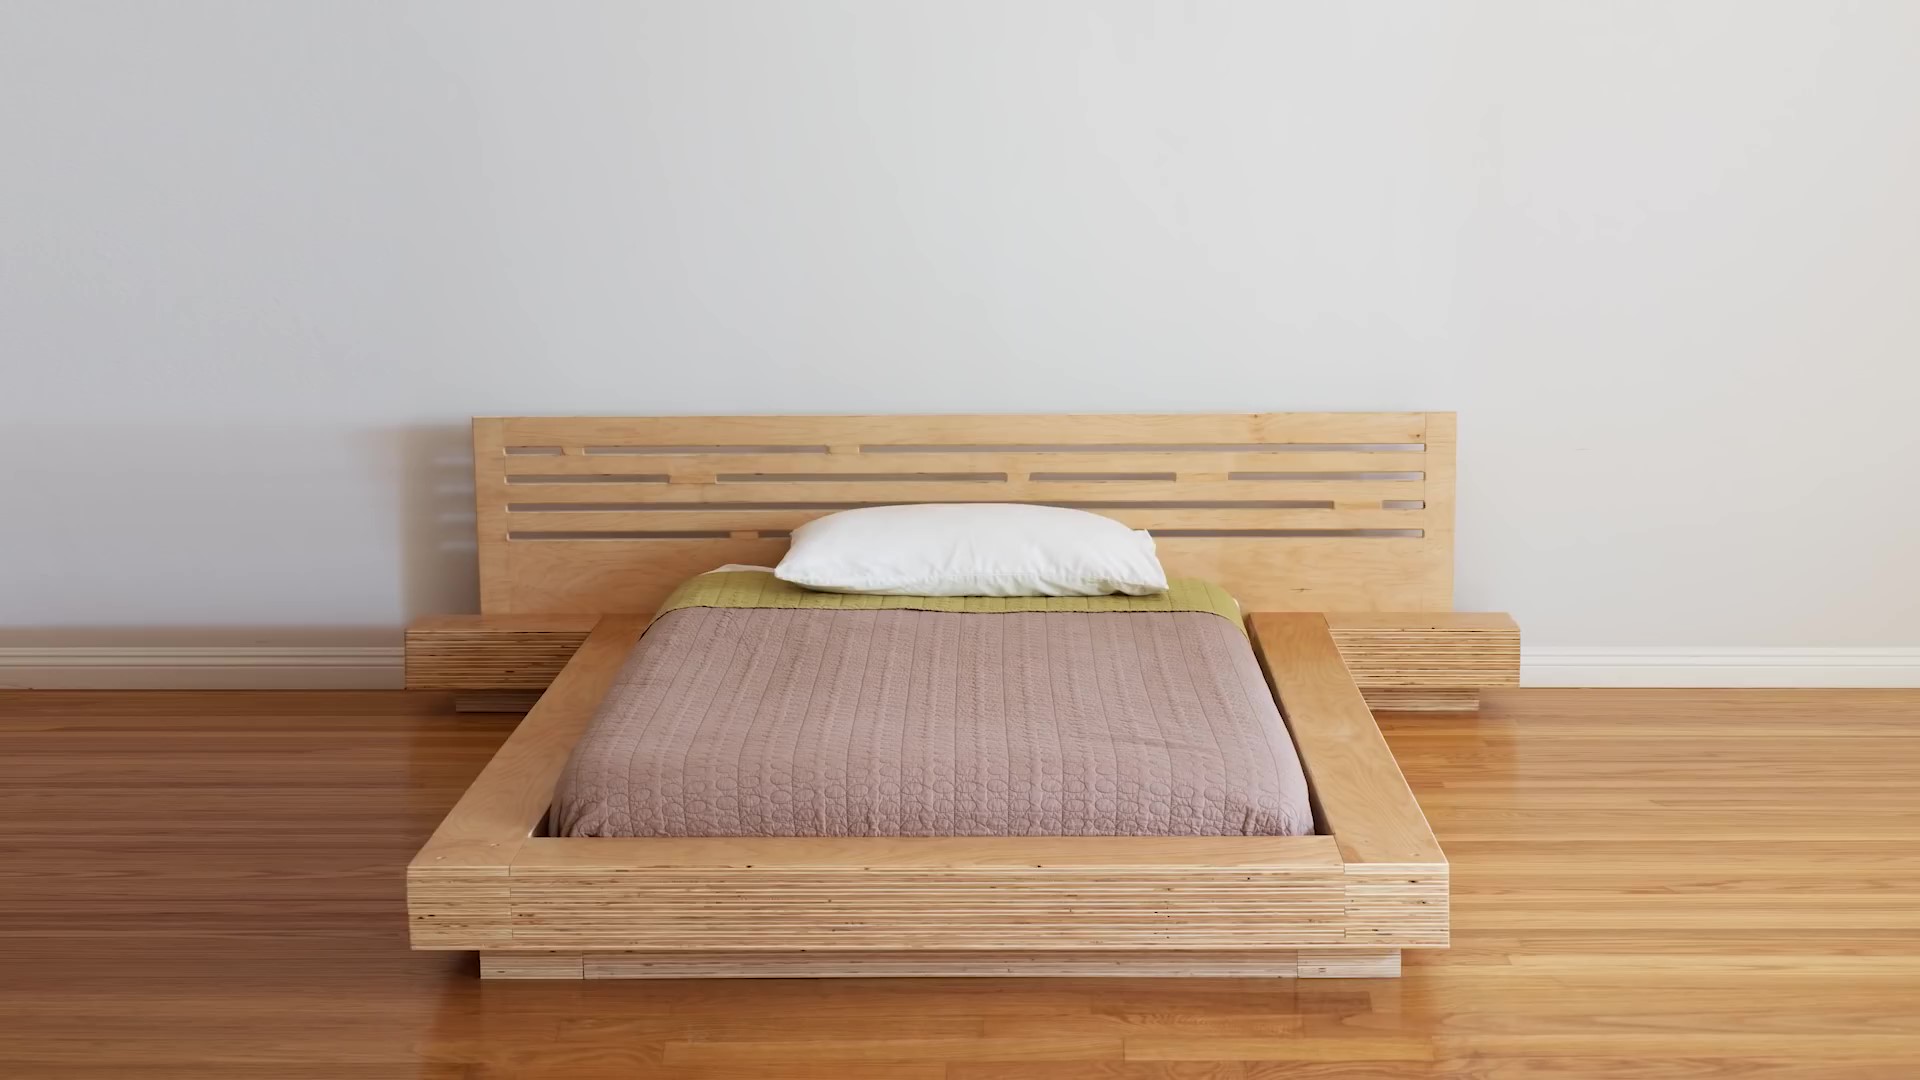
Ready to embark on an exciting journey to create your very own modern plywood platform bed? This isn’t just any bed – it’s a masterpiece crafted from 7 sheets of plywood, comprising 66 pieces and showcasing 660 exposed plys. You’re about to turn these materials into a stylish, functional piece of furniture. And guess what? It’s easier than you think!
Step 1: Gather Your Tools
You’ll need:
- A circular saw
- A speed square
- A drill
- A sander
- Table and miter saws (optional but helpful)
Step 2: Breaking Down Plywood
Start by cutting your plywood sheets into manageable pieces. This step is all about ripping and cross-cutting, so get ready for some serious saw action! Remember, patience is key, but the right tools can speed things up.
Step 3: Ripping Strips
You’re going to rip strips from day to night – literally. Our source used 3/4 inch maple plywood from PureBond, an American-made, high-quality option available at most home improvement stores. So, rip away until you have all your strips ready.
Step 4: Cross Cutting
The next day, begin cross-cutting your pieces to their final lengths. Use a simple jig for accuracy. This will ensure each piece is precisely cut and fits perfectly in your bed design. Note: The measurements will vary based on your mattress size, but you can find detailed plans on Johnny Brooke’s website.
Step 5: Gluing Major Components
Now, let’s start assembling. You’ll create ten sections – five for the base and five for the platform. Each base section is a stack of four plywood pieces, all cut to the same size and glued together. The platform pieces consist of four shorter and four longer pieces. The shorter ones are 14 inches shorter than the long ones, creating a 7-inch overhang on each side.
Step 6: Assembling the Bed
Begin by gluing the sections from the bottom up. Use finish nails from the underside for quick assembly. If you’re redoing this, cut the long pieces a half-inch longer for a perfect flush fit. Keep an eye on alignment, as even small errors can multiply.
Step 7: Sanding and Fitting
Use a belt sander to smooth any discrepancies. Then, dry fit everything together. To reduce friction and make assembly easier, apply some Johnson’s paste wax between the joints.
Step 8: Final Assembly
Put it all together and drill holes for long screws. These screws can be visible or hidden – it’s your choice. Remember, organizing your pieces and maintaining a clear workflow is crucial for a seamless build.
Step 9: Attaching Brackets
Use metal L brackets to secure the base pieces and straight brackets for the headboard base pieces. Align them carefully to ensure a snug fit.
Step 10: Installing the Headboard and LED Lights
Finally, install the headboard and plan out your LED light pattern. The headboard construction details are available in a separate video by Johnny Brooke.