The inevitability of running out of space. In an ideal world, we’d only have need for a finite number of appliances, cookware and utensils, and items. And whenever we need to replace stuff that’s defective or has been exhausted, we place the replacement where the old stuff used to be at. Except, reality isn’t as Elysian as described in the preceding paragraph.
At some point, you’re going to run out of space. You may already have, are close to it, or just dread the thought of it. Regardless of the stage you’re at, you can always use clever and unique organization ideas to postpone the D-day.
🔊12 Unique Kitchen DIY Organization Video:
List Entries:
12. The Magnetic Spice Organizer

You might be able to get away with having a muddled up collection of spice bottle and bags for some time. But after a while that gets long in the tooth and a little organization becomes necessary. There are no shortages of spice organization ideas, but this has to be one of the most uniquely creative ones.
For the most part because it is dead simple to set up. Granted, you’d need one side of your refrigerator to be clear and accessible. But once you have that, all that’s left on your materials list are small square metal containers, magnetic tape, and a pen (to label each tin). That’s it.
Simply slap magnetic tape to the underside of each tin (some spices are heavier than others are, so make certain you use more tape for tins with heavier spices), and arrange them on your refrigerator as you deem fit. This guide walks you through the process with a tad more detail.
Paused there, Here I have the video format of this post.
11. Organizing a Pots & Pans Drawer with Dividers

If you store your pans and pots in a drawer, you know how hard near impossible it can be to arrange them neatly. You’ve probably thought about using a different type of storage for them to save your sanity. Well, hold that thought! This DIY is the easy fix you’ve been frantically searching for, and it would make organizing your drawer a cinch. It primarily requires four strips of molding and panels that’d serve as the dividers.
Here’s the complete rundown of the project—which in summary is giving the inside of the drawer a new coat of paint, gluing two strips of molding each to the top and bottom of the front and back ends of the drawer (four in total), and sliding the painted panels between the molding strips. Easy!
10. A Kitchen Shelf for Spices and Kitchenware

The core of this project is a pallet. In the original guide, an abandoned pallet found on the street was re-purposed. It’d need a touch up (hitting the nails in, sanding, and light painting). But once that is done, you can go to town on how best to transform it into a kitchen organizer.
You could follow the guide to the letter, with the use of ledges (for storing spice jars), magnetic knife holders, hooks, and a metal flowerpot (for pens and scissors). But that isn’t set in stone, and you could be creative as well with the materials you use.
9. Use Glue Dots Mounting Tape to Add an Extra Shelf in Your Upper Cabinets
 Making better use of vertical space is perhaps one of the most satisfying organization hacks. There it is just wasting away until you do something about it. In your upper cabinets, an extra shelf would do.
And the best part about this project is that you don’t need power tools and intense woodworking. Well, you would need a 1” x 3” pine wood board, which you’d split into 4 pieces. Beyond that, the only other tool (which doubles as a material) you’d need to make the shelf is the
Glue Dots HybriBond Repositionable Mounting Tape
What does it do? Secure the supports to the inside of the cabinet. Here are the steps you’d have to follow.
Furthermore, aside from the ease of getting the project done, you’d also not have to drill holes, which can be a significant deal if you’re a renter. It is this quick storage unit you can install and dismantle any time without leaving any trace.
8.Can Dispenser

The primary material you’d need for this project is an IKEA Photo Box—the type used in the guide is Kassett. Obviously, you wouldn’t be using it to store photos, instead you’d repurpose it into a can organizer/dispenser using a quick, easy number of steps.

You’re free to use as many boxes as you need (and as your space allows).
7.Canned Food Organizer
 The can dispenser DIY above is basic and gets the job done. Not that there’s anything wrong with that. But this organizer solution is much more. It is more durable, as it is made of wood.
And it has a nifty rotating (or rolling) trick, where you load newer cans in the upper compartment, and they roll down into the lower compartment. The implication is that it gets you to use older cans before newer ones. Which doesn’t occur as seamlessly with the alternative solution above. It is a simple project really, and this guide shares everything you’d need and the steps to follow.
6. Produce A Storage Cart
 It may not really be common knowledge, but the refrigerator isn’t the best place to store most of your produce. Besides leafy greens (which you’re most likely aware of), most veggies and fruits should get more open air. To put that accurately, you should keep them separated, well ventilated, and stored at room temperature.
But then you think about how much space it would require, and you know an hack is in order. There are several nice-looking, creative, and functional DIY hacks like this and this. But there’s no reason why you can’t invest a few tens in this cool produce cart from the folks at BHG.
Its quality construction and simple design certainly stands out. But it’s easy to underrate the nifty countertop on top and casters underneath for quick, seamless mobility.
5. The DIY Appliance Garage

That toaster may have looked great in the ad. But next to your other small appliances on your kitchen counter, and the resulting clutter make you go like “Ehh, maybe not.” You think to yourself, is there some way to keep ‘em out of sight but without the difficulty associated with pulling each out of storage every time?
Actually, the answer is yes. How about building yourself an appliance garage? It is as functional as it sounds. You simply slide and push the doors back into the cabinet, and there’s your appliance all gearing to go. When you’re done, you pull the doors out and slide them shut. You’d literally not have to fiddle with the appliance. This guide takes you through the process comprehensively and even provides a cut list that you could adapt to any space.
4. Undersink Cabinet Organizer
 It’s not weird at all that the cabinet space under your sink is heavily underutilized. That’s understandable. There’s not enough room to get enough in-cabinet structures in there.
However, you can do something about it using a half sheet of plywood and baskets you could get for cheap at a dollar store. The setup (follow the guide here) is simple, yet so effective; as the baskets slide out effortlessly for improved accessibility.
3. Undersink Makeover
This DIY is a different take on how to go about organizing your under-the-sink cabinet. You certainly don’t want this.

…When it could look like this

In a nutshell, the project involves a nice touchup with contact paper (so it doesn’t look bland), a repurposed drawer (which isn’t exactly a material that you MUST use), and a couple of fancy baskets. And yea, you get to optimize the inside of the cabinet door as well.
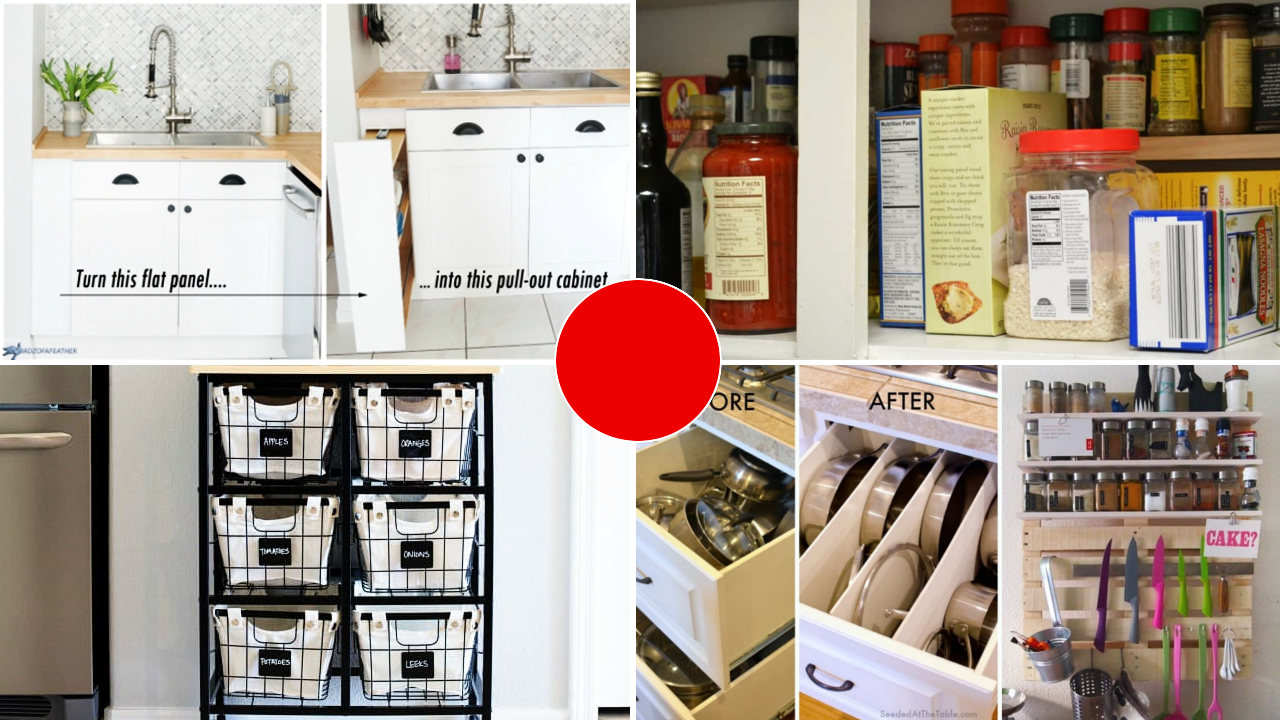
2. Transform a Filler Strip into a Pull-Out Cabinet
 If you have a filler panel, you’ve probably not thought you could get anything out of the itty-bitty space it occupies. It is however possible to build a custom base pullout cabinet into that space. And you can make something happen with a gap as small as 3”.
This slide previews main attention about the project from dimensions you can work with to the steps. It isn’t overly difficult and of course you can customize the shelves dimensions and number of shelves according to your needs.
You may want to use a shelf to store a few mocktails bottles…

Or a couple of shelves to organize spices.
1. Simple Added Storage with Mini Racks for your beverages
 Figuring out where to add storage in a tiny kitchen can be toughie. But this hack takes the simple approach—maximizing the space above the upper cabinet with the installation of a shelf. There’s absolutely nothing complicated about it. You only need a board cut to size, a couple of wine racks, and paint.
The interesting thing about the guide to this project is its departure from the standard strict overview of only the building process. It also provides useful insight on styling. Form and function are indeed not mutually exclusive.
If you’re recovering alcoholics guys, gals, or moms or pregnant moms, you can replace the wine with any 0.00% wine or alcohol-free beverage you desired, the product seller wouldn’t mind. I assure you.
Conclusion:
“Going big on storage”.
For the most part, most of the ideas on this list fall into the “repurposing old spaces” and “adding new storage solutions” categories. Which reiterates the fact that organization in the kitchen is primarily about effective storage after all. Kitchen DIYs aren’t usually complicated and the projects you already checked through stay true to that notion.