The easiest solution is to have two single beds in your home that will not only make use of the area but will serve as extra storage for things you need daily. This blog post features ten double beds that are perfect for small spaces.
Having A small bedroom does not allow you to have the privilege of sleeping in a comfortably sized bed. You have to put up with a smaller one, like a single bed. Well, that is not necessarily true.
You can sleep comfortably despite the limited space you have in your room if you invest in a double bed, which is larger than a single one. Still, you have to know how to pick and arrange it to fit in.
Before making a run to a furniture and décor shop, you had better check these 10 double beds for small bedrooms and tips.
For more detail, head on to reference as usual,

🔊10 Double Beds for Small Bedrooms and Tips Video:
List Entries:
10. Pick A Low Platform Double Bed
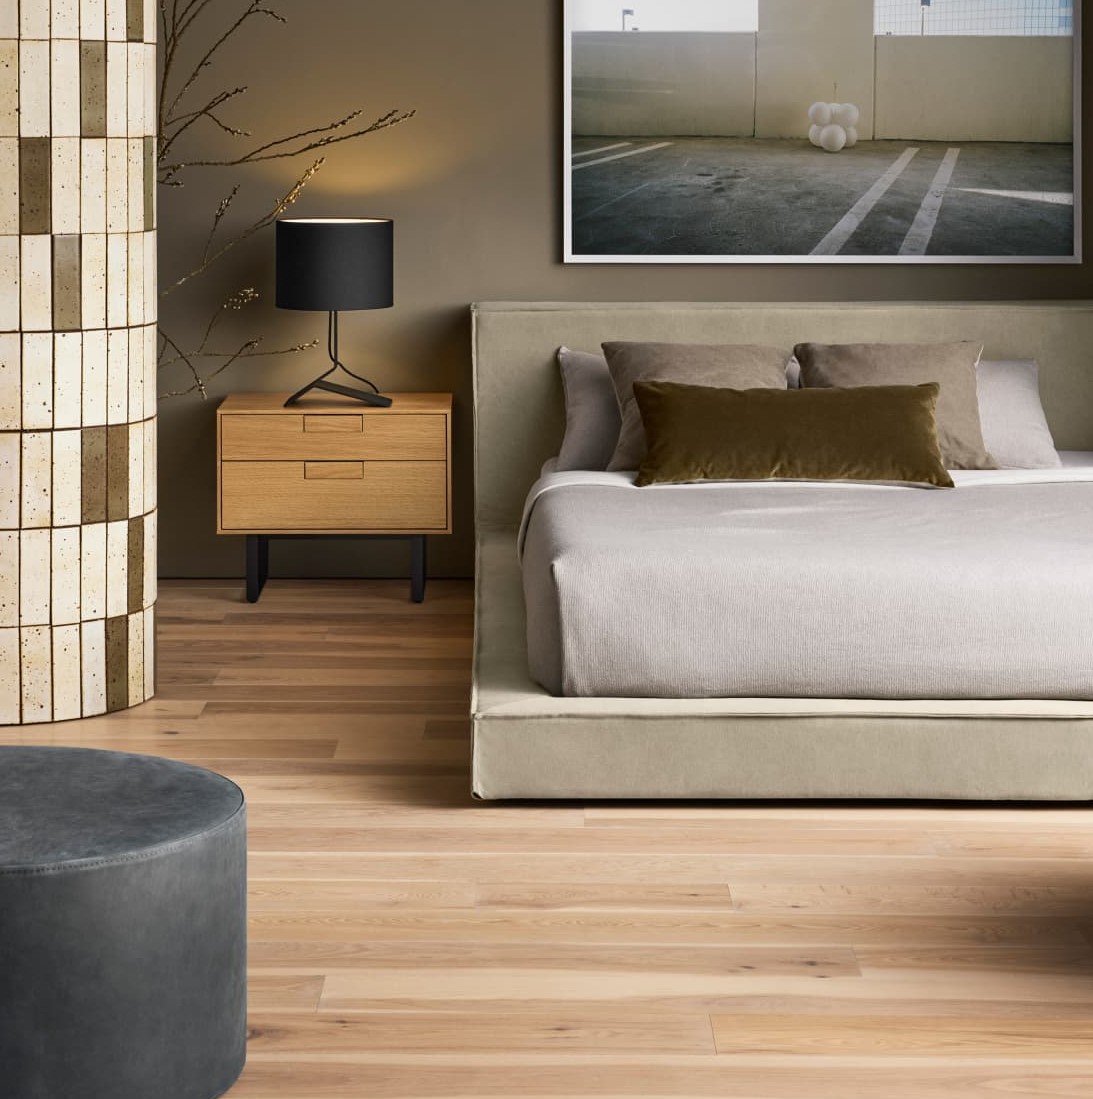 A low ceiling could be a reason why your bedroom looks small. If that is your case, choose a low-level platform bed. A low-level platform bed stays close to the floor, allowing you to have more space. It will automatically make the room feel larger, and the ceiling seems higher since it is flush with the floor. You can also place lights on the floor to make the room glow.
To build your low-level platform, you’ll need to make the base of the bed, then raise it about 30 cm (1 ft.) to build up the platform. You should raise this platform enough to support your head but not so high that you would bump your head as you lie down.
Detail instructions:
- No 1. The Platform Foundation
In detail, build a 9-inch-wide base from 2 x 4s, then screw them together to form a rectangle 21 x 31 inches. - No 2. The Upper Platform
Use one of the following two plans to build an upper platform:
2.1. Make a 15-inch-wide I beam that is 3 feet long to create a frame, then add two 11 inch boards to form the sides and back of the frame.
2.2. Cut out several pieces of plywood that are 15 x 11 inches, and screw them together in a “T” shape so that they are the same size as the two sides and back of the frame in 1 above.
Put the structure together like a box with a lid. The beam should be centered in the middle of the frame, and you should secure it at each end with glue and screws.
Make sure that the frame is sturdy enough to not have to worry about its falling apart when you stand on it.
Place the frame onto your bed’s base so that it is centered and secured at each of its four corners using glue and 3-inch screws. The raised platform will make an excellent storage space for overstuffed pillows or extra blankets. - No 3. The Frame Top
Glue and screw together the two pieces of plywood to form one 15 x 21-inch side of the frame. Make sure that the frame is rigid enough to not have to worry about it falling apart when you stand on it, but not so heavy that you will have a hard time carrying it or moving it from one room to another once you are done using it. - No 4. The Bed Arm
In detail, start by screwing together two pieces of 2 x 4s to form a rectangle that is 31 x 10 inches. Be sure to place your screws on the edges to keep the wood from splitting while you build the frame.
Remember that this should be the same size as one side of your platform.
You should also set up another rectangle, 30 x 6 inches, to make the headboard, which you will center on top of the frame. Put three screws through each corner into the frame’s top and bottom using glue as a binding agent along with your plywood-covered mattress support slats for added stability and comfort. - No 5. The Headboard Part
You should build this part to be the same size as the frame’s headboard.
Place the headboard on top of the platform, then secure it to the frame, and your mattress support slats with glue and screws as necessary so that it remains securely attached. The headboard should be flush with one side of your platform, leaving a 15 x 21-inch space between them. - No 8. Attach The Legs To The Frame Top
The legs are an important part of this structure since they will support it below. Instead of using wood or metal legs, you can use other types of legs, for example, those that come with your bed.
Whatever the material you use for the legs, make sure to support your weight. - No 9. Attach The Mattress Support Slats To The Frames
Choose a thick mattress and place it on top of your platform to determine how many slats you have to attach under the frame to support it. You will have no trouble scanning through the list of options and picking one that is right for your frame since there are a lot to choose from in this section:
9.1. 4 x 1-inch wires secured into each corner of your frame’s top by glue and screws.
9.2. 4 x 2-inch wires wired down the center of your frame’s top.
9.3. 4 x ½ inch boards wired into each corner of your frame’s top by glue and screws.
9.4. 4 x 3-inch boards or 2 x ½ inch boards wired into each corner of your frame’s top by glue and screws.
9.5. 4 x 1-inch boards secured into each corner of your frame’s top by glue and screws, making sure to cover all cracks and holes in the corners as well as around the sides with bits of wood, carpet, or other soft material to prevent the corners from splitting out when you stand on them. - One more thing: You can add lights on the floor if you like to make the room glow!
Alternatively, you can Pick A Split Level Platform Double Bed
There are many ways you can arrange your bedroom to suit your needs and decor, but one of them would be to use a split-level platform double bed. It is an excellent choice because it has a pair of beds stacked on top of each other, allowing you to choose which bed is the upper or lower mattress based on what you prefer to be on which side of the bed.
9. This time, give your bedroom a more modern Murphy Bed
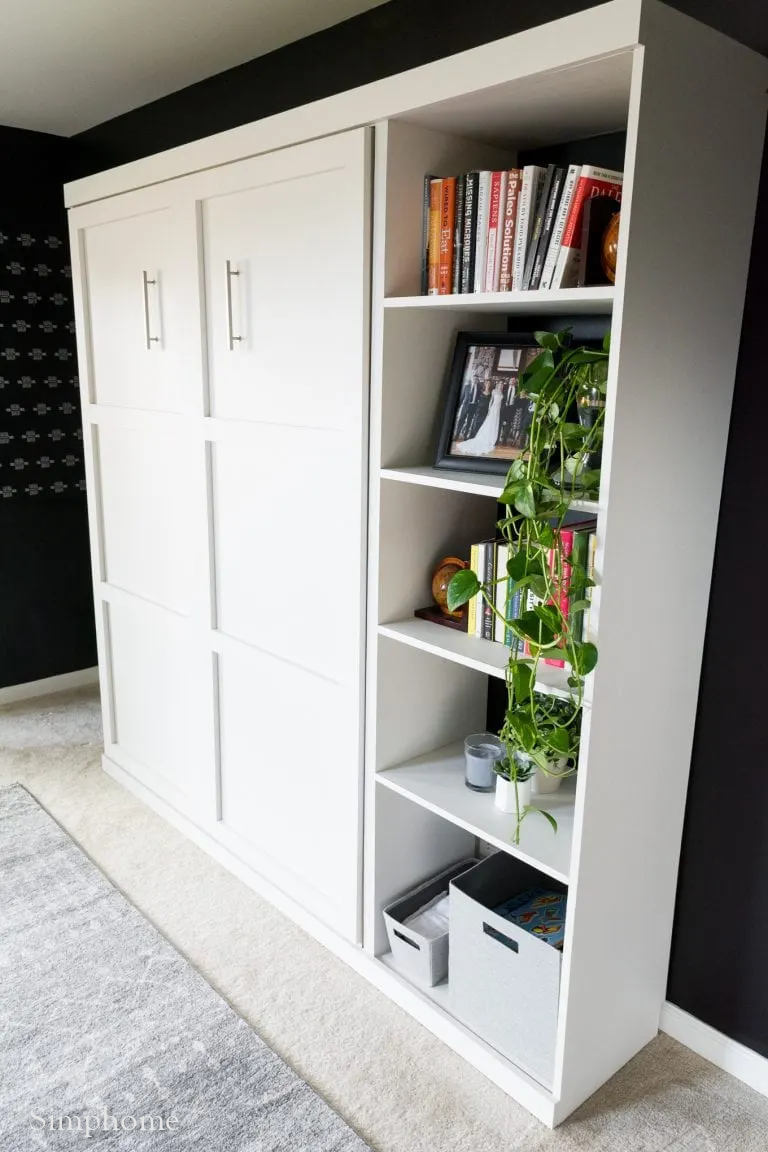 Investing in a murphy bed for your small bedroom is a genius idea. This bed type allows you to have more space, especially if it is not bedtime, because you can fold it up. This way, you clear any obstacle on the foot traffic.
This furniture invention might sound pricey. If you think so, try to look for a second-hand one.
If you cannot find the best one that can fit in with your bed, try to DIY it! Challenge yourself to build your own murphy bed.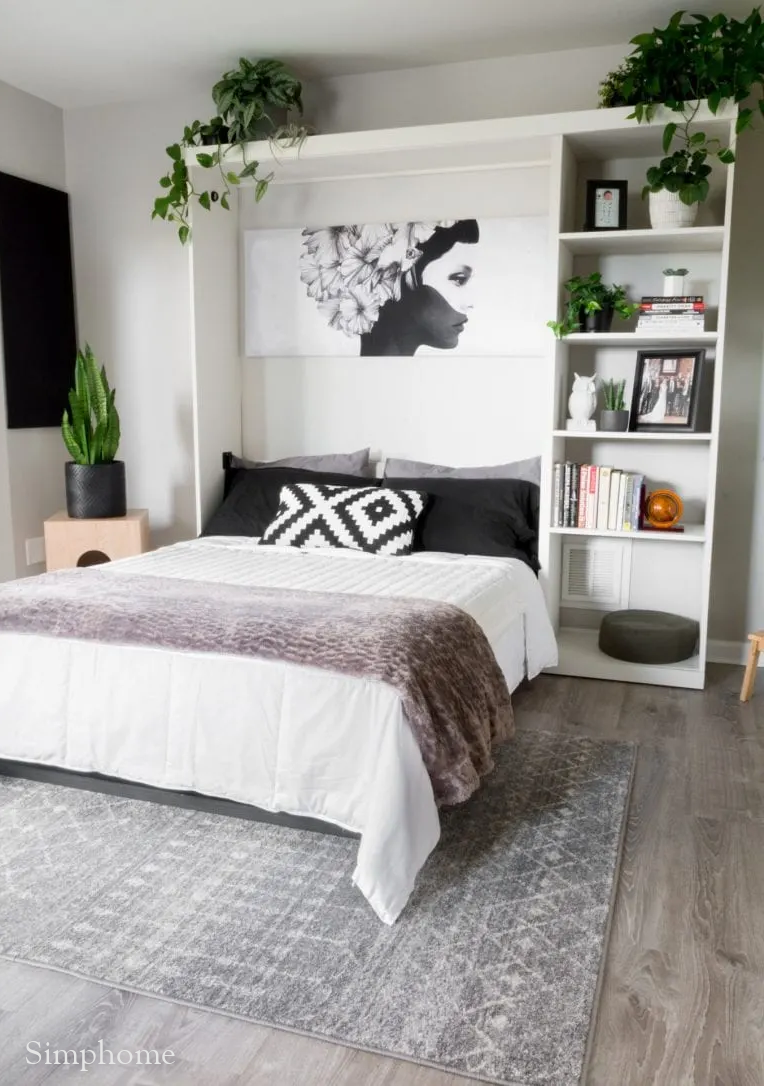 You can find various DIY murphy bed hardware kits in stores. Then, build it based on the instructions. If you want to build it from scratch, by all means. You need plywood to make the frame, hinges, and pistons that enable it to stay up and down.
Detail instructions:
- Step 1; Cut the plywood sheets to fit your bedroom. There will be 22 pieces of plywood if you want it to fold in half.
- Step 2; Attach the motor mount and pull the latch out of the box. Attach this piece to the center of one of your legs and attach the other piston to its bottom side. Then, insert it into your small frame made from plywood using hinges.
- Step 3; Place another frame on top of your first frame, then attach it to a ceiling or wall using a buncha-NOOPs (nails-on-OPs). It is good if you secure them with screws or nails from underneath.
- Step 4; Place your mattress on top of the frame. Place a piece of wood between the mattress and the frame. Then, place a piece of wood underneath it. This piece protects your mattress from falling towards your feet.
- Step 5; When you are done in this step, you might want to attach it to the floor with some ropes to get it to stay upright.
- Step 6; Start building your platform to support a bed. It should be as wide as your mattress, and it should still be able to slide in under the bed and out from above it.
- Step 7; Place your springs on top of the platform with rope underneath.
- Step 8; Add plastic tubing to both sides of the frame and ensure that they are secure and will not fall out of place.
- Step 9; Now you can test it out! Push your murphy bed up or down and try walking under it! Have fun!
All in all, this will turn into a space-saving idea for you if you live in a small room or a tiny house because this bed folds up.
8. A Loft Bed for Extra Floor Space Idea
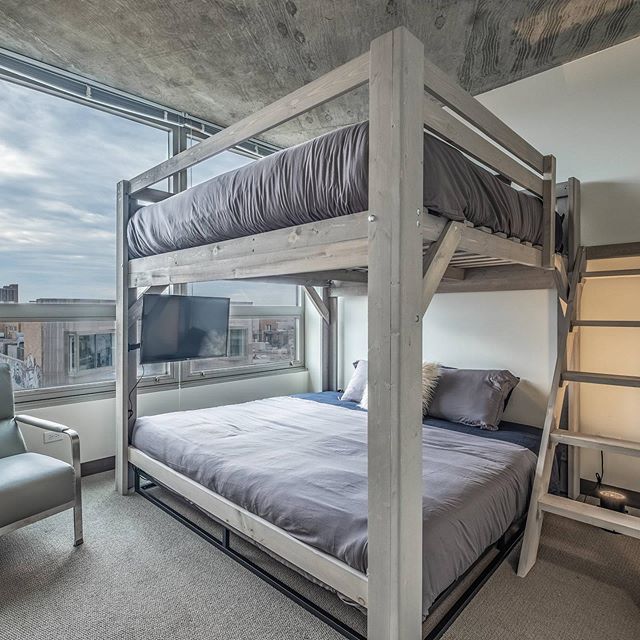 A double-sized bed can be very space-consuming, but when you turn it into a loft bed, this will give you extra floor space.
You can set a home office under the bed to work comfortably. Another idea is to carve out a cozy spot with a couch or loveseat to enjoy movies together.
You can bring up limitless ideas to maximize the free space underneath. That totally depends on what you need.
Detail instructions:
Step 1: First, you have to remove the mattress from the bed.
Step 2: You need to measure and draw the loft bed design on the floor with a chalkboard.
Step 3: After that, cut out the pieces of wood and assemble them.
Step 4: Attach it to your wall. All the supplies you need for this project are available at any hardware store or home improvement center for under 100 dollars.
9. Adults-Only Loft Bed Using a Bolster
An adult loft bed is not just for your kids, but you, too! You can save money from converting a normal bed into a loft bed as it will cost you less to buy the materials like wooden supports to create the structure of a loft than buying a ready-made one or paying for conversion service.
The instructions on building an adult loft bed are not different from building a kid’s loft bed. You have to dismantle your existing bed.
The first step is to find out the size of the frame and measure it. Draw a diagram on the floor, design out your dormer, and cut out lumber, as well as I-beams to establish a stable structure.
Then, you need to attach them using wood glue and screws. Your next step is installing railings for support and bedding like a box spring or futon mattress at the bottom part of your bed structure.
7. A typical double bed with storage
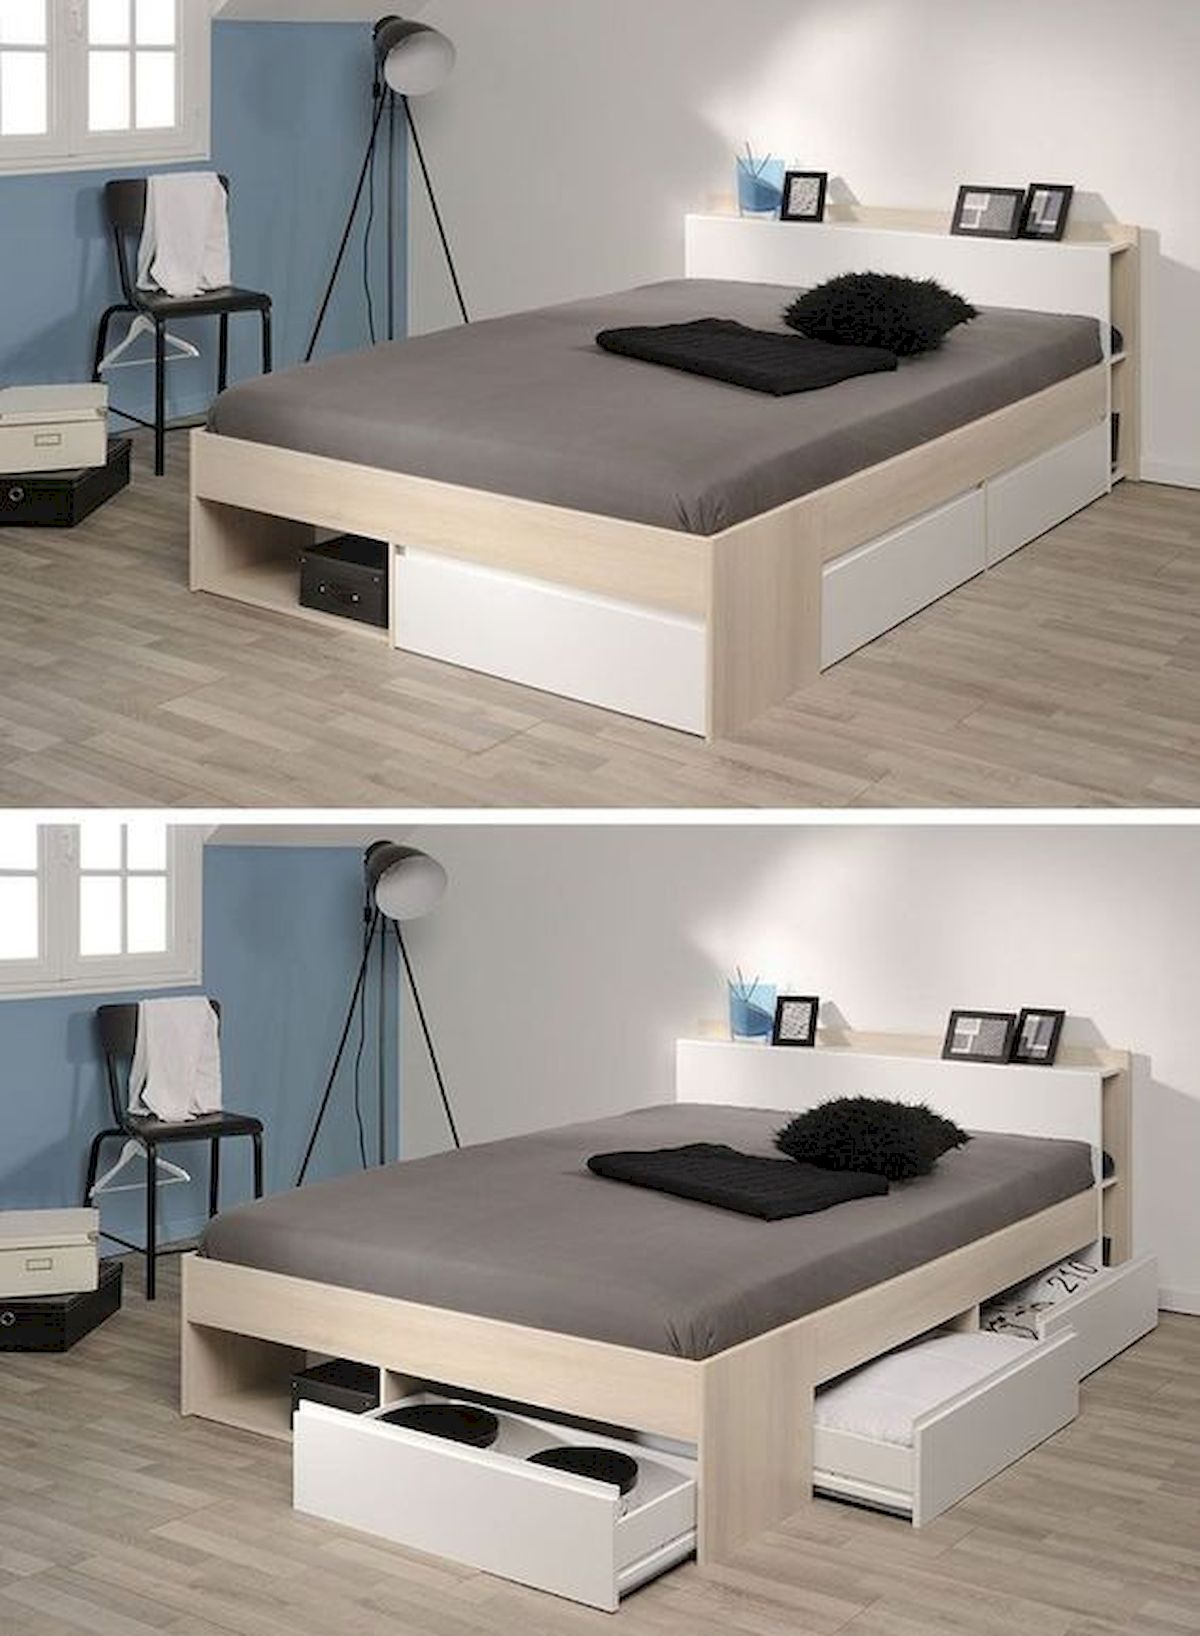
Most storage beds give you plenty of drawers and shelving to store either your clothes, book, or anything.
Besides helping you optimize the bed’s function, it will make your bedroom more organized and comfortable.
Detail instructions:
- Step 1: Remove the bed rail and the frame.
- Step 2: Then, remove the box spring from its housing.
- Step 3: Now, place the mattress on top of the flooring. You can use a sheet or a comforter to cover it.
- Step 4: Before putting up the base unit, make sure that you have placed all of your belongings that you want to keep in storage. If there is any kind of item you don’t want to store, then take it out and leave it outside where you can put it in when you’re done assembling your unit.
- Step 5: The next step is to place a mattress cover at the bottom of the bed. This step will protect the plastic from any damage you might do when moving it in and out of your storage unit.
- Step 6: Now, follow the same steps for placing up the rails. Be sure that you have used enough hardware screws so that your bed will stay firm when you’re not using it.
- Step 7: You will need to put up your bed. You will want to make sure that every part of your rail and frame is lined up adequately before starting any tape or glue job on them.
- Step 8: When you are finished putting up your bed, the last step is to put on a mattress cover. This trick will possibly protect the storage unit from any damage when you are moving your large furniture piece in and out of the unit.
6. The Jumbo size Sofa Bed idea
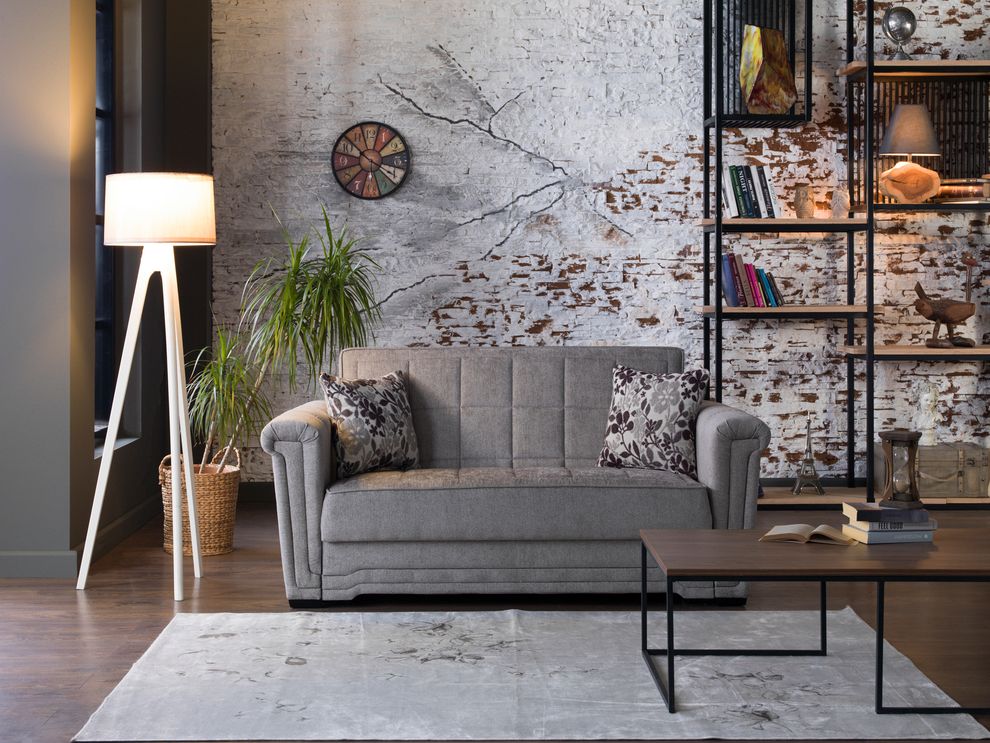 Purchasing a large-size sofa bed is also worth the try. Moreover, if you dwell in a small apartment or housing, the room is limited.
This furniture is a multifunctional one. It will not only provide you with a comfortable space for sleeping, but it can also be a pleasant zone for guests. Some types are even available in a double-bed size with built-in storage.
When buying this item, ensure that you have enough space to accommodate your loved ones when they need to stay overnight. Also, you have to ensure that the bed has enough storage space for guests and essentials.
Another type of furniture that can be a total solution is the bunk beds. They are pretty popular among teenagers, especially girls. They are often made of wood and others with metal materials or strong steel frames. These pieces act as open-plan designs, but apart from the room area, they offer lots of spaces for storage purposes. Therefore, you can use them as additional furniture for storing things for your guests and yourself to create more place inside your house.
5. A Thin-metal Bed Frame Idea
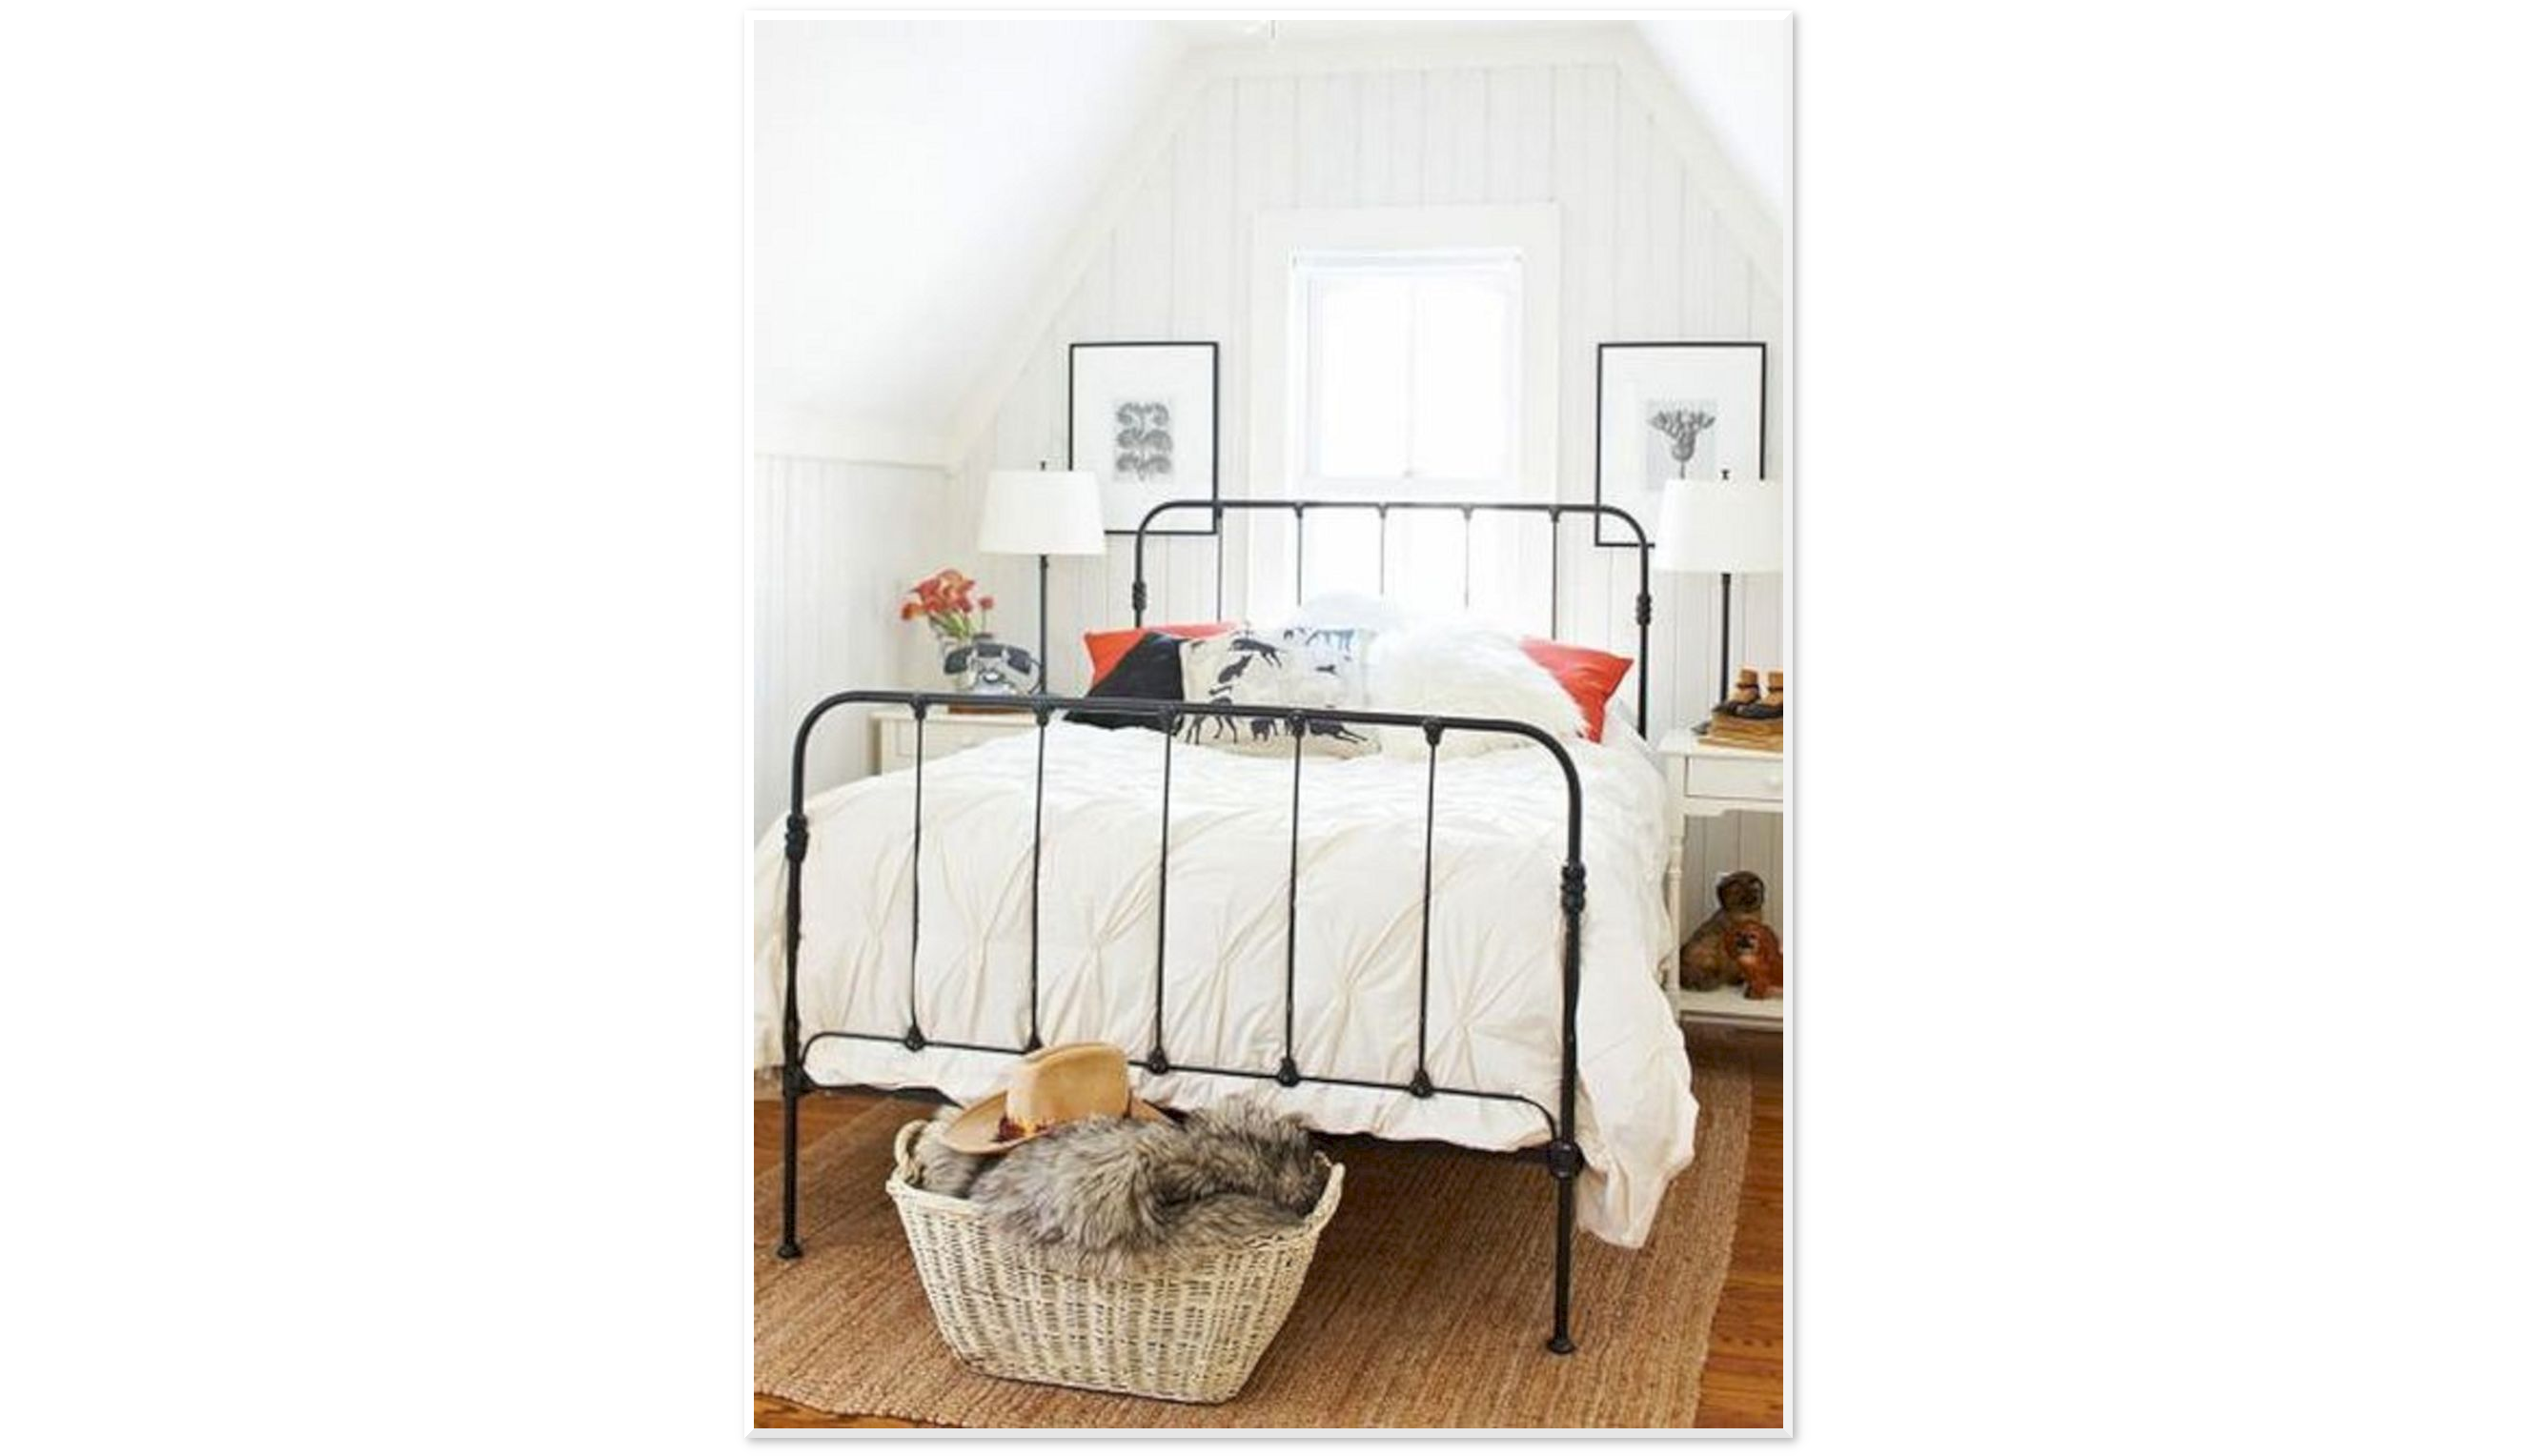 You know that the size of the double bed mattress is rather big. Then, imagine if you have to put it in a bed frame. The size could be even greater, meaning it will take more space. So, choosing the right bed frame material should be one of your considerations.
Metal is a good option. It is strong and will support the heavy mattress perfectly. Plus, if you want to create a vintage or farmhouse style, this idea will genuinely work.
To replicate the idea, you can also use pipes:
Instructions:
Step 1: To start, measure the width of the base of the frame. Put a level on it and draw a line.
Step 2: Then, you can start cutting your pipes. Draw a right angle at 5-cm intervals.
Step 3: Cut each pipe into two lengths (using two saws or other power tools).
Step 4: Now do the same thing with all pipes from both sides, ensuring that all have equal distances from each other.
Step 5: Put all pipes to form triangles, then arrange them to form a circle. You can also use special tools to make this easier.
Step 6: Use epoxy to connect the pipes and then dry.
Step 7: After about a week, sand the surface of the pipes for a smoother look.
Step 8: Paint the frame using white spray paint, and attach the mattress to it.
4. A Faux Headboard idea to double up your space
 Instead of using a bed frame with a bulky headboard, installing a faux headboard is better. Furthermore, this tip is also DIY-friendly.
If you want to create your faux headboard, you need to get some wood board. Pay attention to the measurement. Adjust the width as your preferred style. You can make it as wide as the one shown in the picture above or a narrower one.
Next, paint the headboard. Pick a light color that creates a more spacious effect on your small bedroom. Then, it is also possible for you to freely decorate the faux headboard by adding trim. It will totally depend on your bedroom’s interior design.
To replicate the idea, your short instructions are:
Step 1: Measure the bed frame
Step 2: Cut the board, but before that, make sure that you are accurate enough on doing it
Step 3: Paint the board
Step 4: Decorate it
The most important tip is to keep it simple so your bedroom won’t look cluttered. Remember that when you have a small space, simplicity is the key to making everything look tidy. Even though you have a double bed, you don’t need to fill up all your small bedrooms with the contents.
Alternative directions:
- Step 1: Measure your bed frames
- Step 2: Cut it using the above directions
- Step 3: Build it (as a standard headboard), but this time, for the sake of the hidden bed, you have to glue it
Once you have everything ready, it is time to complete your craft.
The most important tip is to keep it simple, so your bedroom doesn’t look cluttered. Remember that when you have a small space, simplicity is the key to making everything look tidy. Also, make sure that you have enough wall space when creating your faux headboard. - Step 4: Decorate it with trim, or paint by hanging the fabrics you desire to use. It’s all up to you. Note that you should pay attention to your headboard and the bed frame measurements. The last step is to add the pillows, like in most other types of beds. That’s all there is to this project. You can choose different colors but stick with simple colors which don’t look overwhelming on your room’s décor.
- Step 5: Paint it and add a trim (optional).
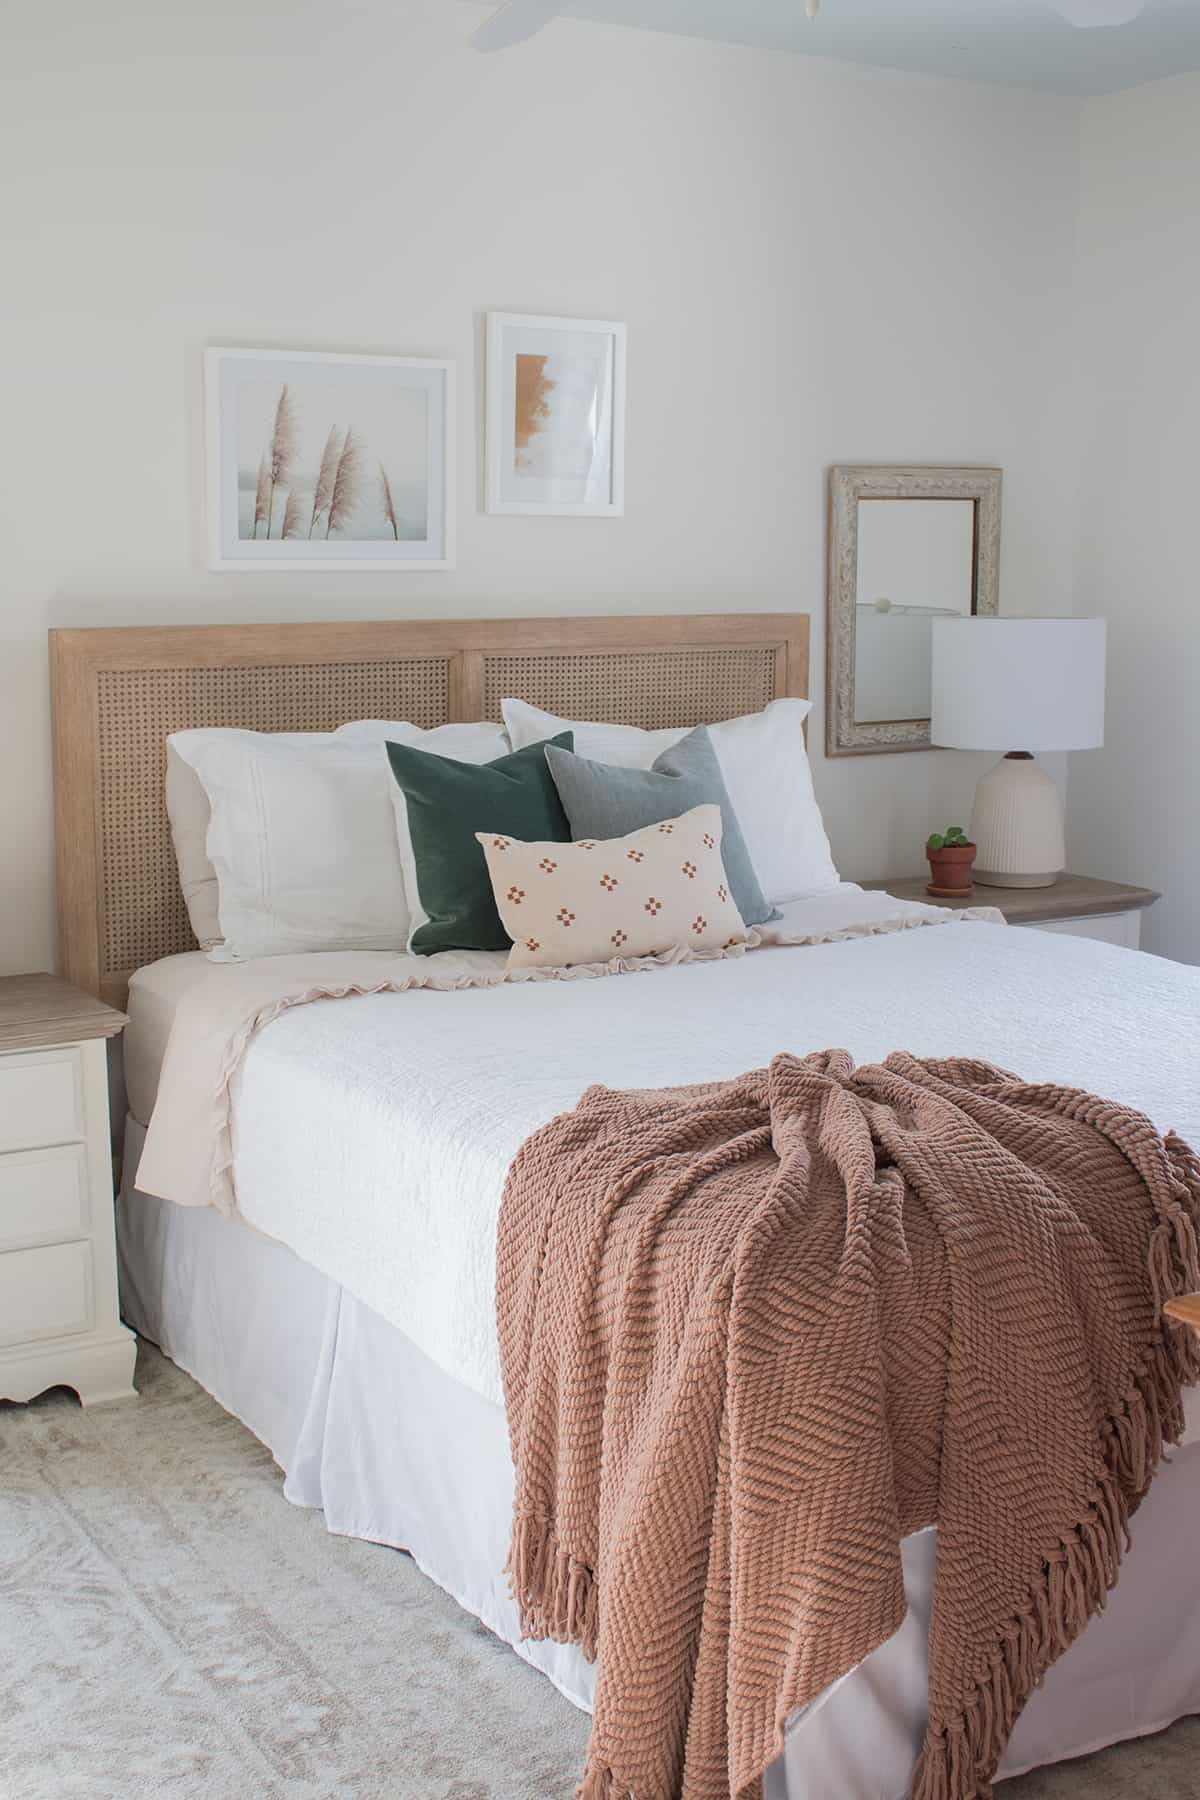
Paint a fabric-covered headboard as an attractive focal point in a small bedroom.
The main idea is to create a focal point for this single with double beds. You can make it by painting a fabric-covered headboard like an attractive focal point. Furthermore, you can also improve the look of this idea by installing fluffy pillows and soft blankets. It will create a more cozy ambiance for your bedroom.
You will need to attach the headboard to your bed frame with staples or screws, depending on the type of your bed frames.
3. Adding A Simple Interior Design
 The best-fitted interior design for a small bedroom is minimalist and straightforward. It will help you create a spacious room, which gives you easier mobility and effortless clean-up.
You have some points to bear in mind. First, a double bed is supposedly the main piece in your small bedroom. Then, downsize the other furniture.
Also, make sure that you only put the essential furniture. Even if it is small, never succumb to the desire of cramming more pieces of furniture in your petite bedroom. Arrange them properly.
Second, avoid dark colors or bold wallpaper. Pick a light color or simple pattern. And if you want to have some decorations on the wall, consider the size and amount.
The third is good lighting. Choose a simple design lamp or install recessed lighting in the ceiling.
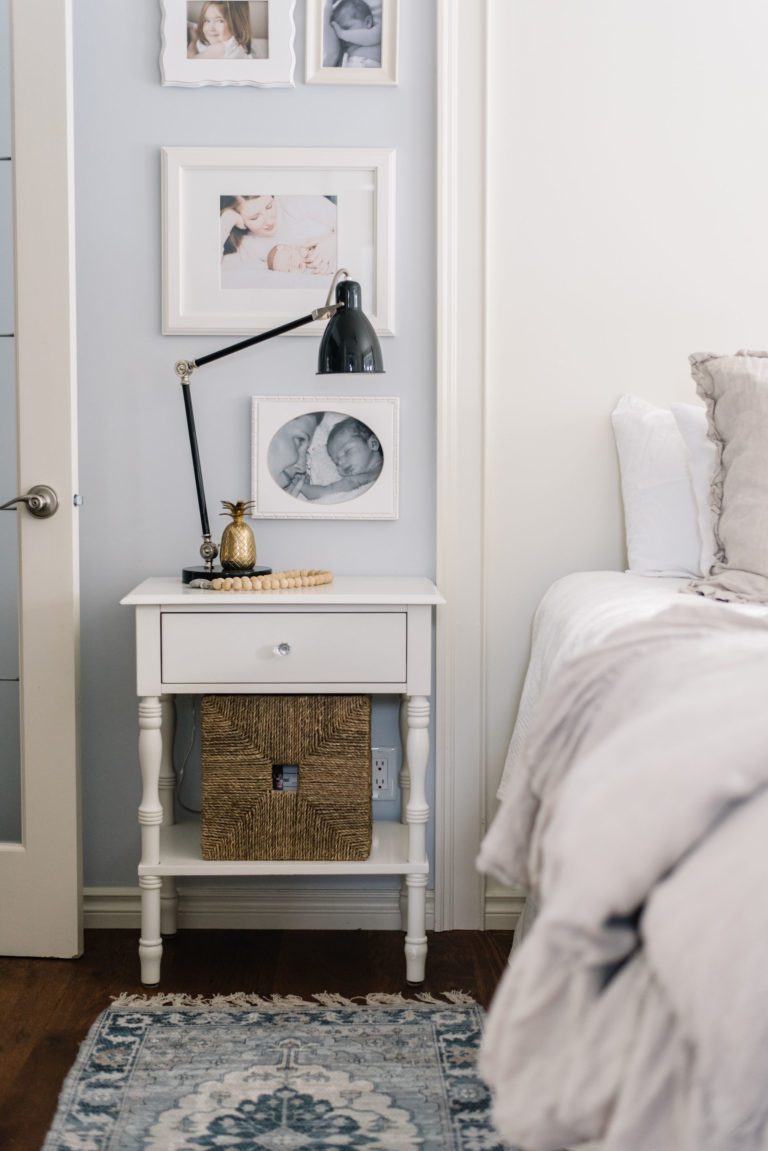
2. The Floating Shelves
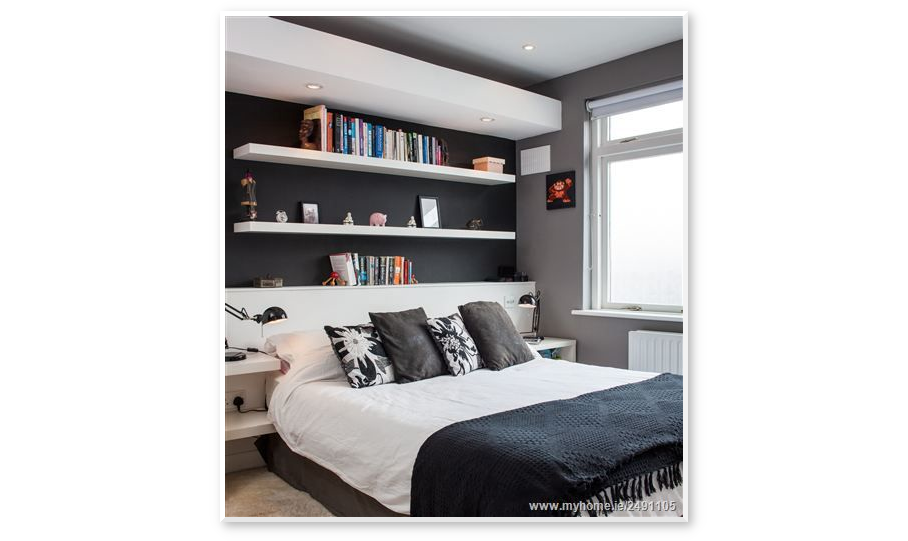 If the floor space is limited, try to optimize the wall. Inserting a double bed has already taken most of the floor space. So, doing something with the wall is allowed.
An easy DIY you can have is building simple floating shelves. Indeed, they can give you more additional space. You can place your favorite books or family photos, which help fill your room with warmth.
Instructions:
- Step 1: Measure the wall
First, measure the wall to know how much space you can have to work with. Divide that number by 1.5 to get the total sum of shelf sizes.
Straightforward math should be enough, but take help from a calculator or design software if it isn’t. - Step 2: Selecting Material
Now is the time for choosing the material for your floating shelves. Take your time and shop for materials and designs that best suit your needs. Invest in quality because these shelves will remain in this room long after you finish with it. - Step 3: Preparing The Surface
After you have selected the material, measure, cut, and nail it to the wall. Make sure that you position the nails at the back or behind your floating shelf (which will be covered by your books). - Step 4: Display Your Books
Now you have shelves—place books on them, or any other item which will add character to your small bedroom design. Don’t overdo it though, too many objects could turn out cluttered.
You can also put decorative items like candles or flowers on top of them if you wish; this will give a more homely touch to your bedroom.
Alternative ideas to access more storage areas in your limited bedroom are:
- No 1. Use Hidden Hinges
You can install hidden door or cabinet hinges. These hinges are suitable for keeping things you don’t want to be visible when the door is open. Or, if you have a vacant area on the wall and need a place to store things, consider installing floating shelves with hidden hinges. - No 2. Use A Hidden Ledge Storage
A hanging clothing rack is one solution to gain more storage space in your small bedroom, but if you prefer something more permanent, then consider a “hidden ledge storage.” This type of storage will allow you to use the wall space above your bed and give extra storage underneath it. - No 3. Use A secondary Floating Shelf
You can also use floating shelves in your small bedroom. This type of shelves is best to save as much space as possible. Instead of storing all your items on the floor, put them on the shelves.
To simply build it, your instructions are:
~ Step 1: Measure and Mark
When measuring for tiny floating shelves, always round down to the nearest shelf size. This idea will help you with the installation of your shelves.
~ Step 2: Cut To Size
You can use a circular saw to cut off unnecessary wood. Make sure that you wear protective gloves and goggles while doing so to avoid injury. Clear off all sawdust on your walls with a paintbrush afterward, especially in corners and the ceiling area, to avoid any accidents.
~ Step 3: Attach The Floating Shelf To The Wall
When you have everything cut, now it’s time to install the tiny floating shelves into your wall. There are many ways to do this, and all should be based on the size of your shelf.
For example, you can use screws. Screws come in most sizes and can be used to fasten bulky items like tables or boxes securely to the wall. Some will even feature small anchors that can accommodate small objects such as feet or hands.
You might even prefer wood nails which are much cheaper than screws yet almost as strong as large nails, which can be driven into soft materials like wood and plasterboard, but not brick and metal surfaces. Once you’ve decided on the best shelf anchors and screws for your projects, you can find the most suitable type of drill to use for driving them into your wall. You’ll need to make sure that it’s big enough to drive through most surfaces, including wood.
~ Step 4: Hang The Floating Shelves
When your anchor has been fixed, you can now attach the floating shelves one by one. Start with some of your larger items to not fall off grip-wise with the smaller ones under them. Then go around your room and attach them in a pattern of your choice. - No 4. Use A Hanging Shelf
Another option for gaining more storage space in your small bedroom is to use a hanging shelf. This shelving unit can be placed anywhere, above the bed or a single chair. This type of shelf will allow you to magnify your space and free up some floor area for other items you may need in your bedroom. You can also choose a hanging wardrobe or closet instead of a hanging shelf.
To simply build it, your instructions are:
~ Step 1: Measure and Mark
First, measure your space and mark where you want the hanging shelves to be placed. You must make sure it’s the right place because there is no way around it; you have to put your shelf there, or there won’t be enough room for it.
~ Step 2: Cut To Size
Then, you have to cut the item out of this size. If your wall has several shelves together with your hanging shelf, then find out their height from top to bottom by stepping on them and measuring how far up you stand on each step. Make sure that everything fits appropriately within the allotted space and that there are no big gaps left between them at the top.
~ Step 3: Install The Hanging Shelf
Now it’s time to install the hanging shelf into your wall when you have everything cut. There are many ways to do this, and all should be based on the size of your shelf.
~ Step 4: Hang The Hanging Shelf or Closet
When you have everything cut, now it’s time to install the hanging closet or me among the other shelves on your wall. There are many ways to do this. And all should be based on the size of your closet and shelves.
For example, you can use screws. Screws come in most sizes and can be used to fasten bulky items like tables or boxes securely to the wall. - No 5. Use A Rolling Ladder
Rolling ladders are another option instead of using conventional shelves or closets. This type of storage ladder is most commonly used in the attic, but you can also use it if you want to store too heavy items for hanging items like clothes or sheets. Mainly, these ladders store your tools and other heavy objects that you may need in your bedroom.
Turning your small bedroom into a place where you can do different activities at once will make it look bigger and more functional. One way to do this is by taking advantage of the vertical space. For example, as much as possible, hang as much clothing as you can get over your shelves and closet doors; to save even more space on the floor area.
To simply build it, your instructions are:
~ Step 1: Measure And Mark
First, measure your wall from floor to ceiling and make a mark at the height you want your closet to be. Then, draw a rectangle on the wall based on this mark. The length of this rectangle will be the length of the shelves and closet doors, while its height will depend on the amount of extra space you want to add above them.
~ Step 2: Cut To Size
Using a circular saw, cut out the shape you have drawn to serve as a foundation for your rolling ladder. Make sure that you wear protective gloves and goggles while doing so to avoid injury. Clear off all sawdust on your walls with a paintbrush afterward, especially in corners and the ceiling area, to prevent any accidents.
~ Step 3: Install The Rolling Ladder
Fit the ladder into your closet, using screws or nails depending on whichever method you use. You can even opt for attaching it with hinges if you want to. After doing that, hang the rest of the items over them (such as clothes and hangers).
~ Step 4: Hanging Clothes/Sheets/Towels
When all your tools and other heavy objects are hanging fully in place, and securely, then it is time to hang your “essential” clothes following a simple guide below:
1- Position your ladder’s footrest onto a flat surface or sturdy piece of furniture. Then, place your heavy objects (such as clothes, books, and sheets) on the ladder so that their handles are at the footrest.
2- To hang a sheet or towel: Spread the sheet over the top of your ladder and then place one end on a flat surface; then, pull it out from under the ladder (you can do this by sitting on one side of it to reach its bottom) while you hold its other end with your other hand. If you want to hang both sides of a towel at once, do not try to stretch them too far because they will break into pieces. Then, take out one end of it at a time to balance its weight.
3- To hang a towel: Lower your ladder’s handle onto the floor and then take out one end of the towel while you protect it with your free hand. Then, place its other end on the same surface and pull it out until it is entirely flat.
4- To hang a book: Place the book on the front edge of your ladder, taking care not to drop it down into your closet. Then, attach it to its back edge by placing its front edge at the footrest and its back edge on top of the shelf at a height that will allow you to write on or read from it while standing up without straining your neck.
Lastly, Number 1. Put in a Wide Mirror
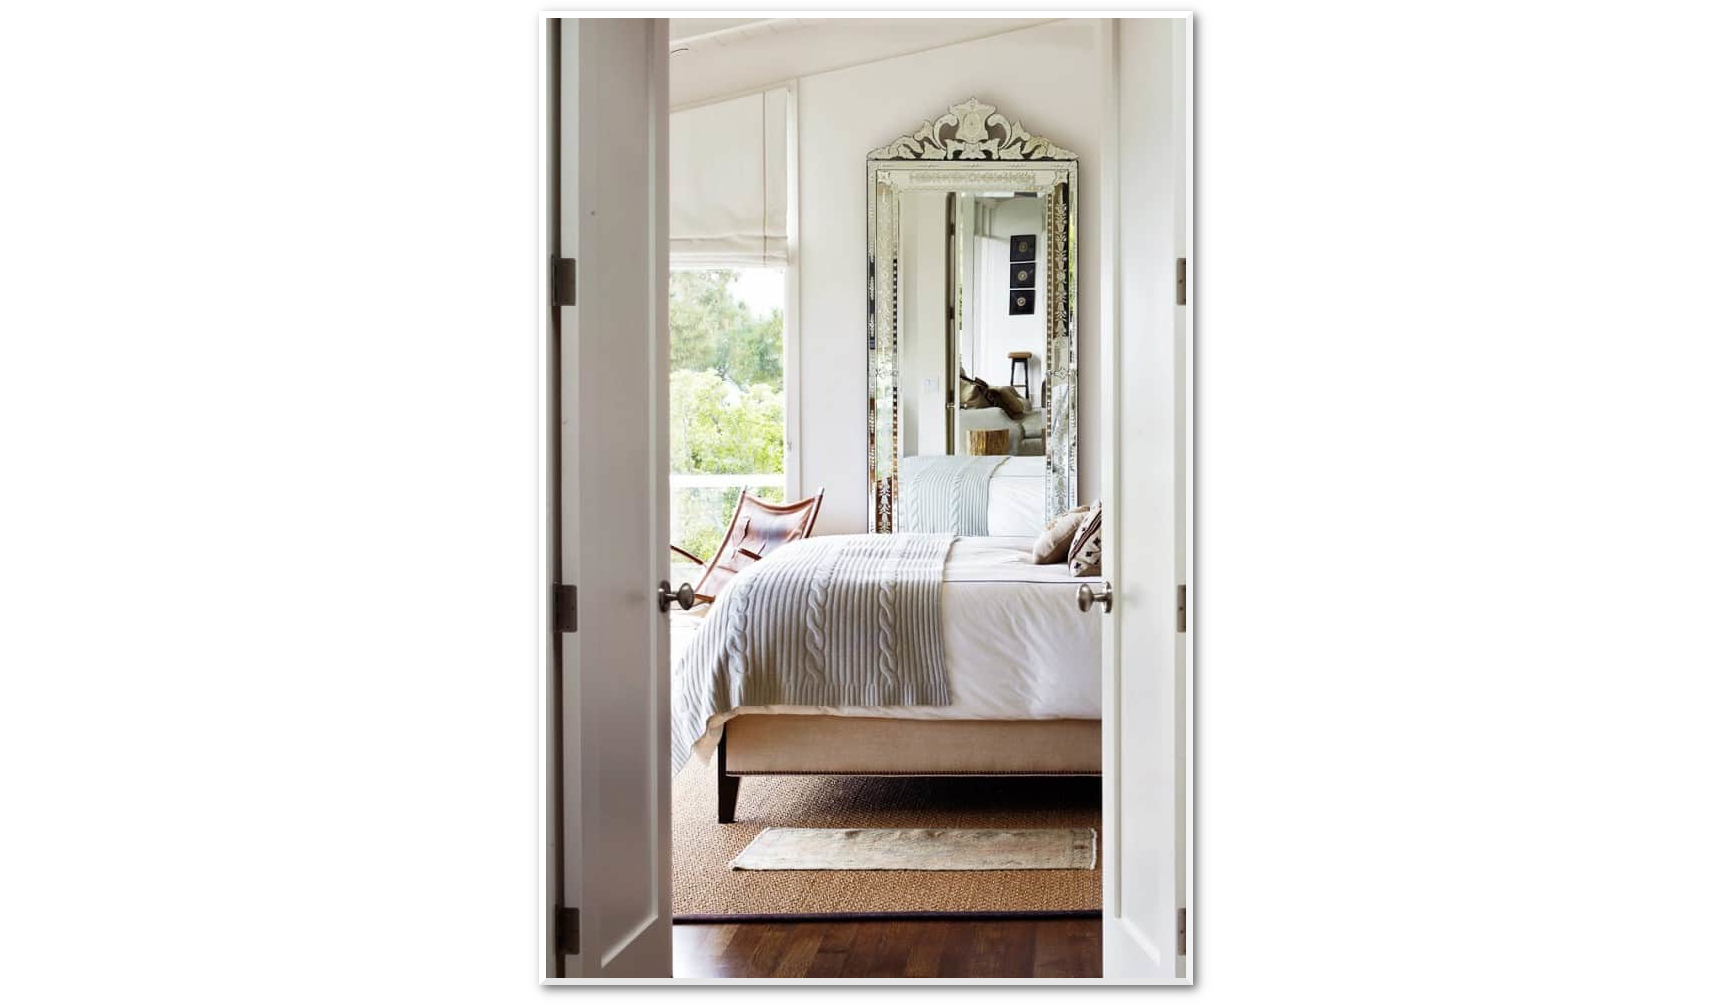 Adding a mirror in your small bedroom is a must-try tip. It will help you put on make-up or choose the right outfit, but it will also reflect light into the room. This way, you can make the space look bigger.
Mirrors come in various shapes. Whether round or rectangular, it is totally up to you, depending on the interior design you are trying to carve out.
Next, look around carefully to find the best spot to position it. One of the most strategic spots is placing the mirror facing the window.
Relevant instructions:
- Add Mirrors
Consider adding a few mirrors around the room to brighten it up. - Pick The Right Size Of The Mirror
It must be large enough for you to see yourself and still make you feel like a doll on display! Use the mirror length as a measurement, but also consider other aspects like mirror depth and surface shape because one length of the mirror would make only part of your body visible. At the same time, another will show every aspect of your body. - Pick A Mirror With Some Color
You can pick a mirror with a bit of warmth in it if you choose one of the colors in your print or fabric scheme. Avoid one that is too dark or cold, but opt for one that has some color in it to reflect your personality and make you feel good when you look in it. - Add An Accent Piece
Consider adding a mirror to reflect sunlight into the room to brighten up the whole space. This idea is especially true if the room gets dark at night or when it’s not brightly lit during the day.
Conclusion:
So, did you find any tips on how to decorate a small bedroom that you can use in your home? We hope so. If these tips worked for you, we’d love to hear from you. If not, don’t lose hope. You can still pull it off with the right tips, tricks, and lessons learned from other people’s mistakes.
Following specific rules and guidelines in designing small rooms is essential because the whole idea of decorating a small space is to make them look bigger. It’s easier said than done because we all know that furniture makes rooms look smaller than they are, not larger.
Those are 10 double beds for small bedrooms and tips that help you
carve out comfort while making the most of the space. Now, go get your double bed and implement our suggestions.
References:
10. Bludot.com
9. Bybrittanygoldwyn.com
8. Chicagoloftbed.com
6. Comfyco.com
5. Cococozy.com
4. Thegingerhome.com
3. Thehoneycombhome.com
2. Ariyonainterior.com
1. Homesthetics.net