With some creativity, patience, and the right supplies, you can develop any style that suits your taste. You can transform a plain white room into a trendy gallery or even create an exotic-looking space.
A large wall is an excellent medium as it mostly has a flat surface that is waiting to be touched or decorated. Are you looking for some guides or ideas now? In the following presentation, you will find the ten ways to decorate and enrich a large wall. These ideas will inspire you to guide your hands to improve the wall’s looks.
Before we get started, there are two essential things that you should do:
- Look at the wall as an empty canvas. and
- Decide which area you want to enhance.
More on that later, and as always, Simphome presents you with the list.

🔊10 How to Decorate and Enrich Large Wall Video:
List Entries:
10. Display Some Family Pictures
 Basically, you can enrich a wall almost with anything that comes into your mind. This idea, for example, is simple, but it’s priceless when you put your family photos on the wall.
Who on earth wouldn’t want to display happy family photos on the wall? Well, some people might just keep their pictures on an album or in a safe file on a computer. But it’s not wrong if you use them to enrich the wall.
It can be either a colored version or just a black and white one for a classic look.
You can hang a large picture or a few smaller ones on the wall. Arrange them strategically to create an excellent gallery wall.
Relevant details:
- No 1. We recommend you use big photos on a big wall.
- No 2. If you want to keep things simple, use only one photo per wall parallel to the length of the wall.
- No 3. Arrange them lengthwise, starting from the bottom and going up in your design plan.
- No 4. Use enough frames to hide most of them at once, except the center spot where you want to display all of your family photos simultaneously.
- No 5. You can either choose black or white for this kind of art project as both probably work pretty well on walls, but if you want to set up something more appealing, use some color combinations that are in harmony with each other for an eye-popping effect.
- No 6. You can quickly go for some fun designs, aka the “decorating ideas on a wall,” no matter whether you have a small wall or a large one.
- No 7. You can also add some patterns and borders for a more attractive look.
- No 8. Use the same idea to create a gallery wall on the entire vertical surface of your room.
- No 9. If you have several walls, arrange the photos in parallel stripes to make the wall look continuous.
- No 10. And if you want your large photos to be an eye-catcher, display them in an eye-catching position (it’s not difficult).
Little tip:
A 12 x 12 wall, for example, you can use a 9 x 12 frame, then print the photos in 11 1/2 x 13 1/2 and adapt it to your frame’s border so that there will be no white spaces on the image.
If you know how to work with Photoshop or Photoshop, you can make all those photos look good on one big wall, then just archive them digitally and print them out using big paper sizes.
9. Cover the Wall with a Rug
 If the wall does not look pretty or just needs something to make it look nicer, a rug with a particular pattern can add an aesthetic look to some extent.
A rug is typically wide and can cover lots of space on the wall. It enriches the wall with its colors without painting it. The size and pattern of the rug could make a slight change in the room.
Therefore, a rug should be on the list because it can smoothly decorate the wall other than shelf, painting, hanging plants, and more.
To do this, you need to:
- Step 1: Measure the width of the wall, which is around 10 feet.
- Step 2: Choose a rug with a particular pattern along with the size of your wall.
- Step 3: Cut and glue to cover the whole length of the wall and keep it from slipping by covering it with double-sided tape.
- Step 4: Smooth out all wrinkles by ironing, then decoupage or staining as required to make it look better.
- Step 5: Apply a decorative finish such as glazing, lacquer, waxing, or varnish.
- Step 6: Add accessories, mainly shelves or cabinets, in different rooms to complete your décor.
- Step 7: Stand it on the wall at a certain distance so you can enjoy its beauty with your eyes.
8. Just Re-Paint it
 Painting the wall is one of the many ways to enrich it because there are plenty of colors available, and they’re still affordable and long-lasting.
It does not really consume time when you paint the walls together. You will also find it fun when you just need an activity to blow off steam.
White, gray, and blue are some of the most common colors for many wall themes as they’re not too bright and would make a good combination if paired with other furniture.
Detailed instructions:
- No 1. White is one of the easiest colors for you to use for wall painting. You can have a different color in each room and still make it look coordinated.
- No 2. Use some neutral colors, such as the gray and light blue combination. The gray can serve as a lovely backdrop for your designs, while the light blue can give it a calming touch.
- No 3. Blue is also not too bright, like purple or red, so it’s perfect if you’re looking for a unique yet soothing color theme for your walls.
- No 4. Paint one section of the wall using a dark color and another using light colors to create depth on your walls.
- No 5. You can also apply wallpaper as a backdrop. It’s straightforward to use and doesn’t need much time, plus it makes your walls look attractive. You can get a lot of inspiration from the internet or magazines.
- No 6. Think outside the box and paint your walls with black or white to dramatically affect your room design.
- No 7. Painting stripes on the wall is an effective and minimalistic way to decorate your wall theme. It does not only serve as an opportunity for you to practice painting skills, but it will also make your room look more prominent because these stripes will weaken the sight flow inside the room when appropriately applied.
- No 8. You can also use wall stickers, decals, and stencils to enhance the design and theme of your walls.
- No 9. Painting murals is another way to make your wall more attractive. However, it will take more time than plain painting as you need to draw the picture first before starting painting.
- No 10. Just like with painting walls, there are many ways you can use to draw on your walls. You can use plain colors or paint a unique mural for each room if you have the time for it.
7. Get natural color and avoid intoxicating your interior with random chemical compounds
 Plants are not only purifying the air. They also offer more benefits, like adding texture to your living room. Some plants aren’t that fussy. In fact, they are beginner-friendly and can be put on the wall as they don’t grow too fast and are not large.
With simple shelves and pots, they can make an excellent decoration to the wall. Pay attention to what they need, like nutrition, water, adequate sunlight. They are necessary.
Be careful when watering them, though. Make sure it doesn’t leak or else the sofa and floor will get dirty.
Detailed instructions:
- No 1. Name of the plants:
Some ideal plants for indoor gardens are banana plants, fern, spider plants, ivy, and others.
~ First, The wall-plants need a proper light and suitable place.
~ Second, Plant them in the corner of the room or where they can get enough sunlight.
Keep your eyes open for other plants that can be suitable for decorative use inside your home. - No 2. Place your chosen plants:
Ensure there is enough space for the plant to grow on its own, so don’t put it too close to any items with sharp edges like tables or shelves. Also, avoid placing it too close to windows as you may easily damage your plant’s leaves by the dust in the air. - No 3. Prepare the pots:
To ensure the plants won’t get waterlogged, you have to put a layer of small rocks in the bottom for drainage. Put soil in your pots and place your plants. Add fertilizer. Water them from time to time depending on what kind of plant it is and if you see that they need it. - No 4. Arrange the pots:
Place the pots on your shelves or table to add more vibrancy to your space. It will not only be decorative, but it will also freshen up the air in your interior and improve its overall look. - No 5. Use those plants to organize your interior further
If you collect many small items, you can place your plant pots on the wall. You can also use them to organize various items in your room, such as your desk, bookshelves, or other objects that are too bulky for placement around the house. - No 6. Add texture to the wall
Who doesn’t love the texture on a wall?
That’s precisely what you get from decorative plants. Also, it will be a significant improvement to your interior’s overall look and vibe. The plants bring out the beauty of a space more than once when they are properly arranged and maintained well enough. - No 7. Illuminate your space:
Plants will undoubtedly add strength to the room and look more inviting. A living room with a set of plants will also help keep bacteria away. - No 8. Give your interior some color
The plants will lift the room’s overall ambiance while giving your wall a new look by adding color to your interior’s colors. - No 9. Use those plants to declutter some of your mess too
When you love plants, later, maybe, you’ll find that they are pretty helpful and convenient to help you organize things around the house, including your wallet, books, and other documents. The fruits of their labor can be used for decoration or serving as containers for storing small items in them after you harvested them. - No 10. Floating plant ideas
Hanging plants are also another great idea that can be used as a decoration to make your rooms look more stylish and charming. Depending on your preference, you can choose from the hanging or standing option, but you should note that the hanging planter needs a little care and attention, especially if there will be pets in the house or children who might like to climb on the plant over time.
6. Try Wall Decal
Giving your living room wall decal is a brilliant idea, especially if you want to give it a beautiful and artistic touch. You might want to buy wallpaper, but the disadvantage of using wallpaper is that you cannot easily change the décor even when you get bored with it. On the other hand, a wall decal will stick on your wall, so it is suitable for letting your imagination run wild.
To decorate a large wall using this idea, make sure that you choose the right size of the decal and make sure that you can place it anywhere on your large wall. That way, the look will be excellent as long as there are not many things distracting from the wall decals.
Short instructions:
1. Choose a wall decal that fits your style and taste
2. Choose a color scheme for your decal
3. Measure the area of your wall before placing the order
4. Cut out designs from the pattern that you want to place on your living room wall
5. Follow the instruction of installation carefully to avoid any damages during or after delivery of your order
6. Enjoy! Your living room will look beautiful with this fantastic wall art hanging on your walls
Step by step instructions:
1. Select the right size. You might need to cut the decal for placing on a large wall. Make sure you position the decal correctly to avoid messy lines.
2. Cut out the shape of your choice. This shape will be determined by how you want to place your decal on the wall, whether it will be placed over a frame or not, and where you will place it on the wall itself.
3. Attach stickers in a way that they are stuck on your wall correctly without overlapping and without forming messy lines
4. Repeat steps 1-3 with more shapes and colors which would suit your style and taste
5. Play with wall decal’s effects by applying more stickers or adding more shapes and colors. Experiment with different wall decals and see the results
6. Twist, swing, and turn the decal to look modern or unique. You can even place it on the wall in a way that you can give it a 3D effect to fit with your setting
7. If your living room is big enough, try putting several pieces of decals on different walls and creating an entire wall décor of your preferences
8. Take note that some wall stickers might be fragile, so be careful when handling them
9. Make sure that you do not put too many decals on your walls as it could easily distract from everything else on the walls
10. When applying a large number of small decals on a wall, be careful that the edges do not overlap with the base stickers and will not form messy lines
11. For those particular about their home décor, consider creating a décor that fits your style and taste. You can even always ask for professional advice when it comes to making your home more beautiful
12. Relatively new yet very popular in living room decorating is using decals to create a modern, minimalist look with “bare-bones” designs and colors, which makes the space surrounding stand out more than usual
13. Decals are also ideal for providing a living room that has a sense of minimalist elegance, as they come in various simple designs such as flowers and branches that are sure to match with any existing furniture and décor
Conclusion:
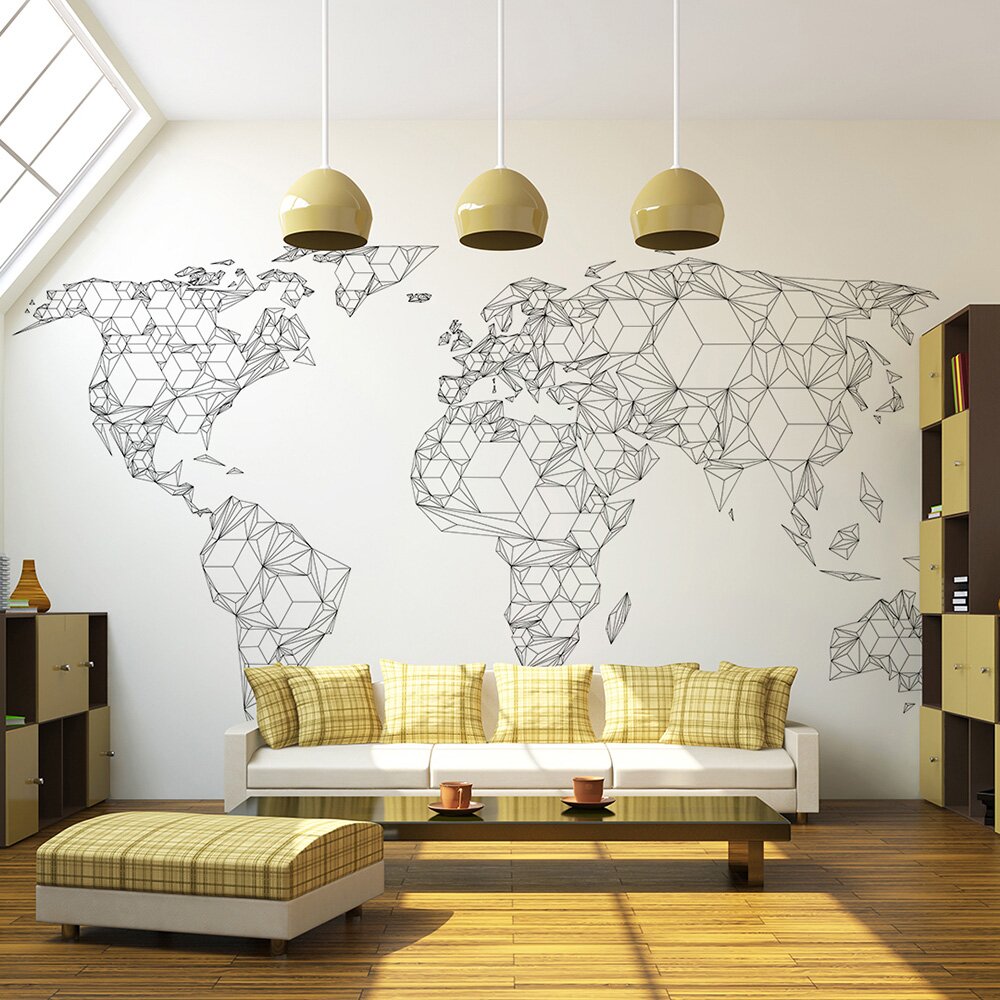
A decal has an exciting design on its surface, similar to wallpaper. It can provide some interest by adding pattern and color to your living room.
This decal is the picture, for example, features some cubes that form a world map, which looks simply stunning.
Since walls can be big or small, decals come in various sizes. Of course, the wall will look better with so many designs and colors. You can also try a combination of two or more decals that would transform the wall into what you want. There’s no wrong with conducting a small experiment, and you would be happy when you see the result.
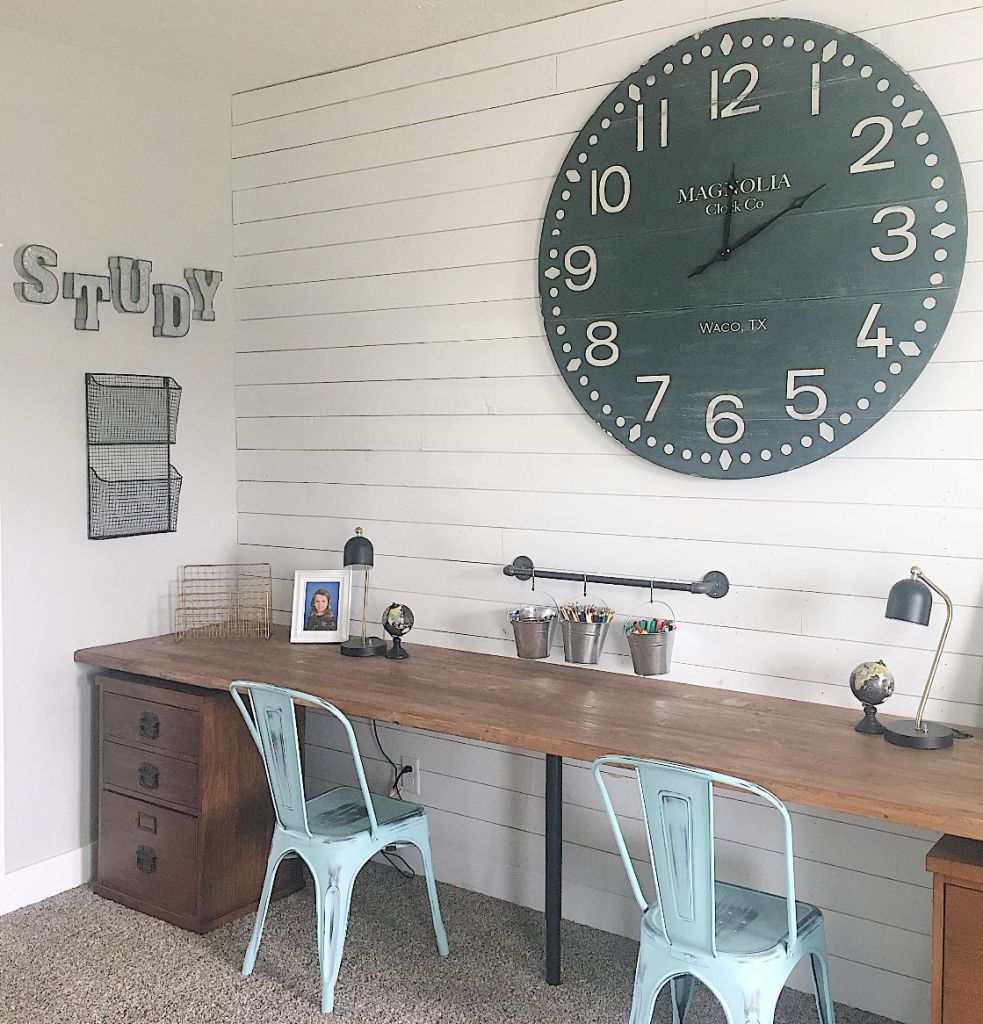
5. Put a Huge Clock on Wall
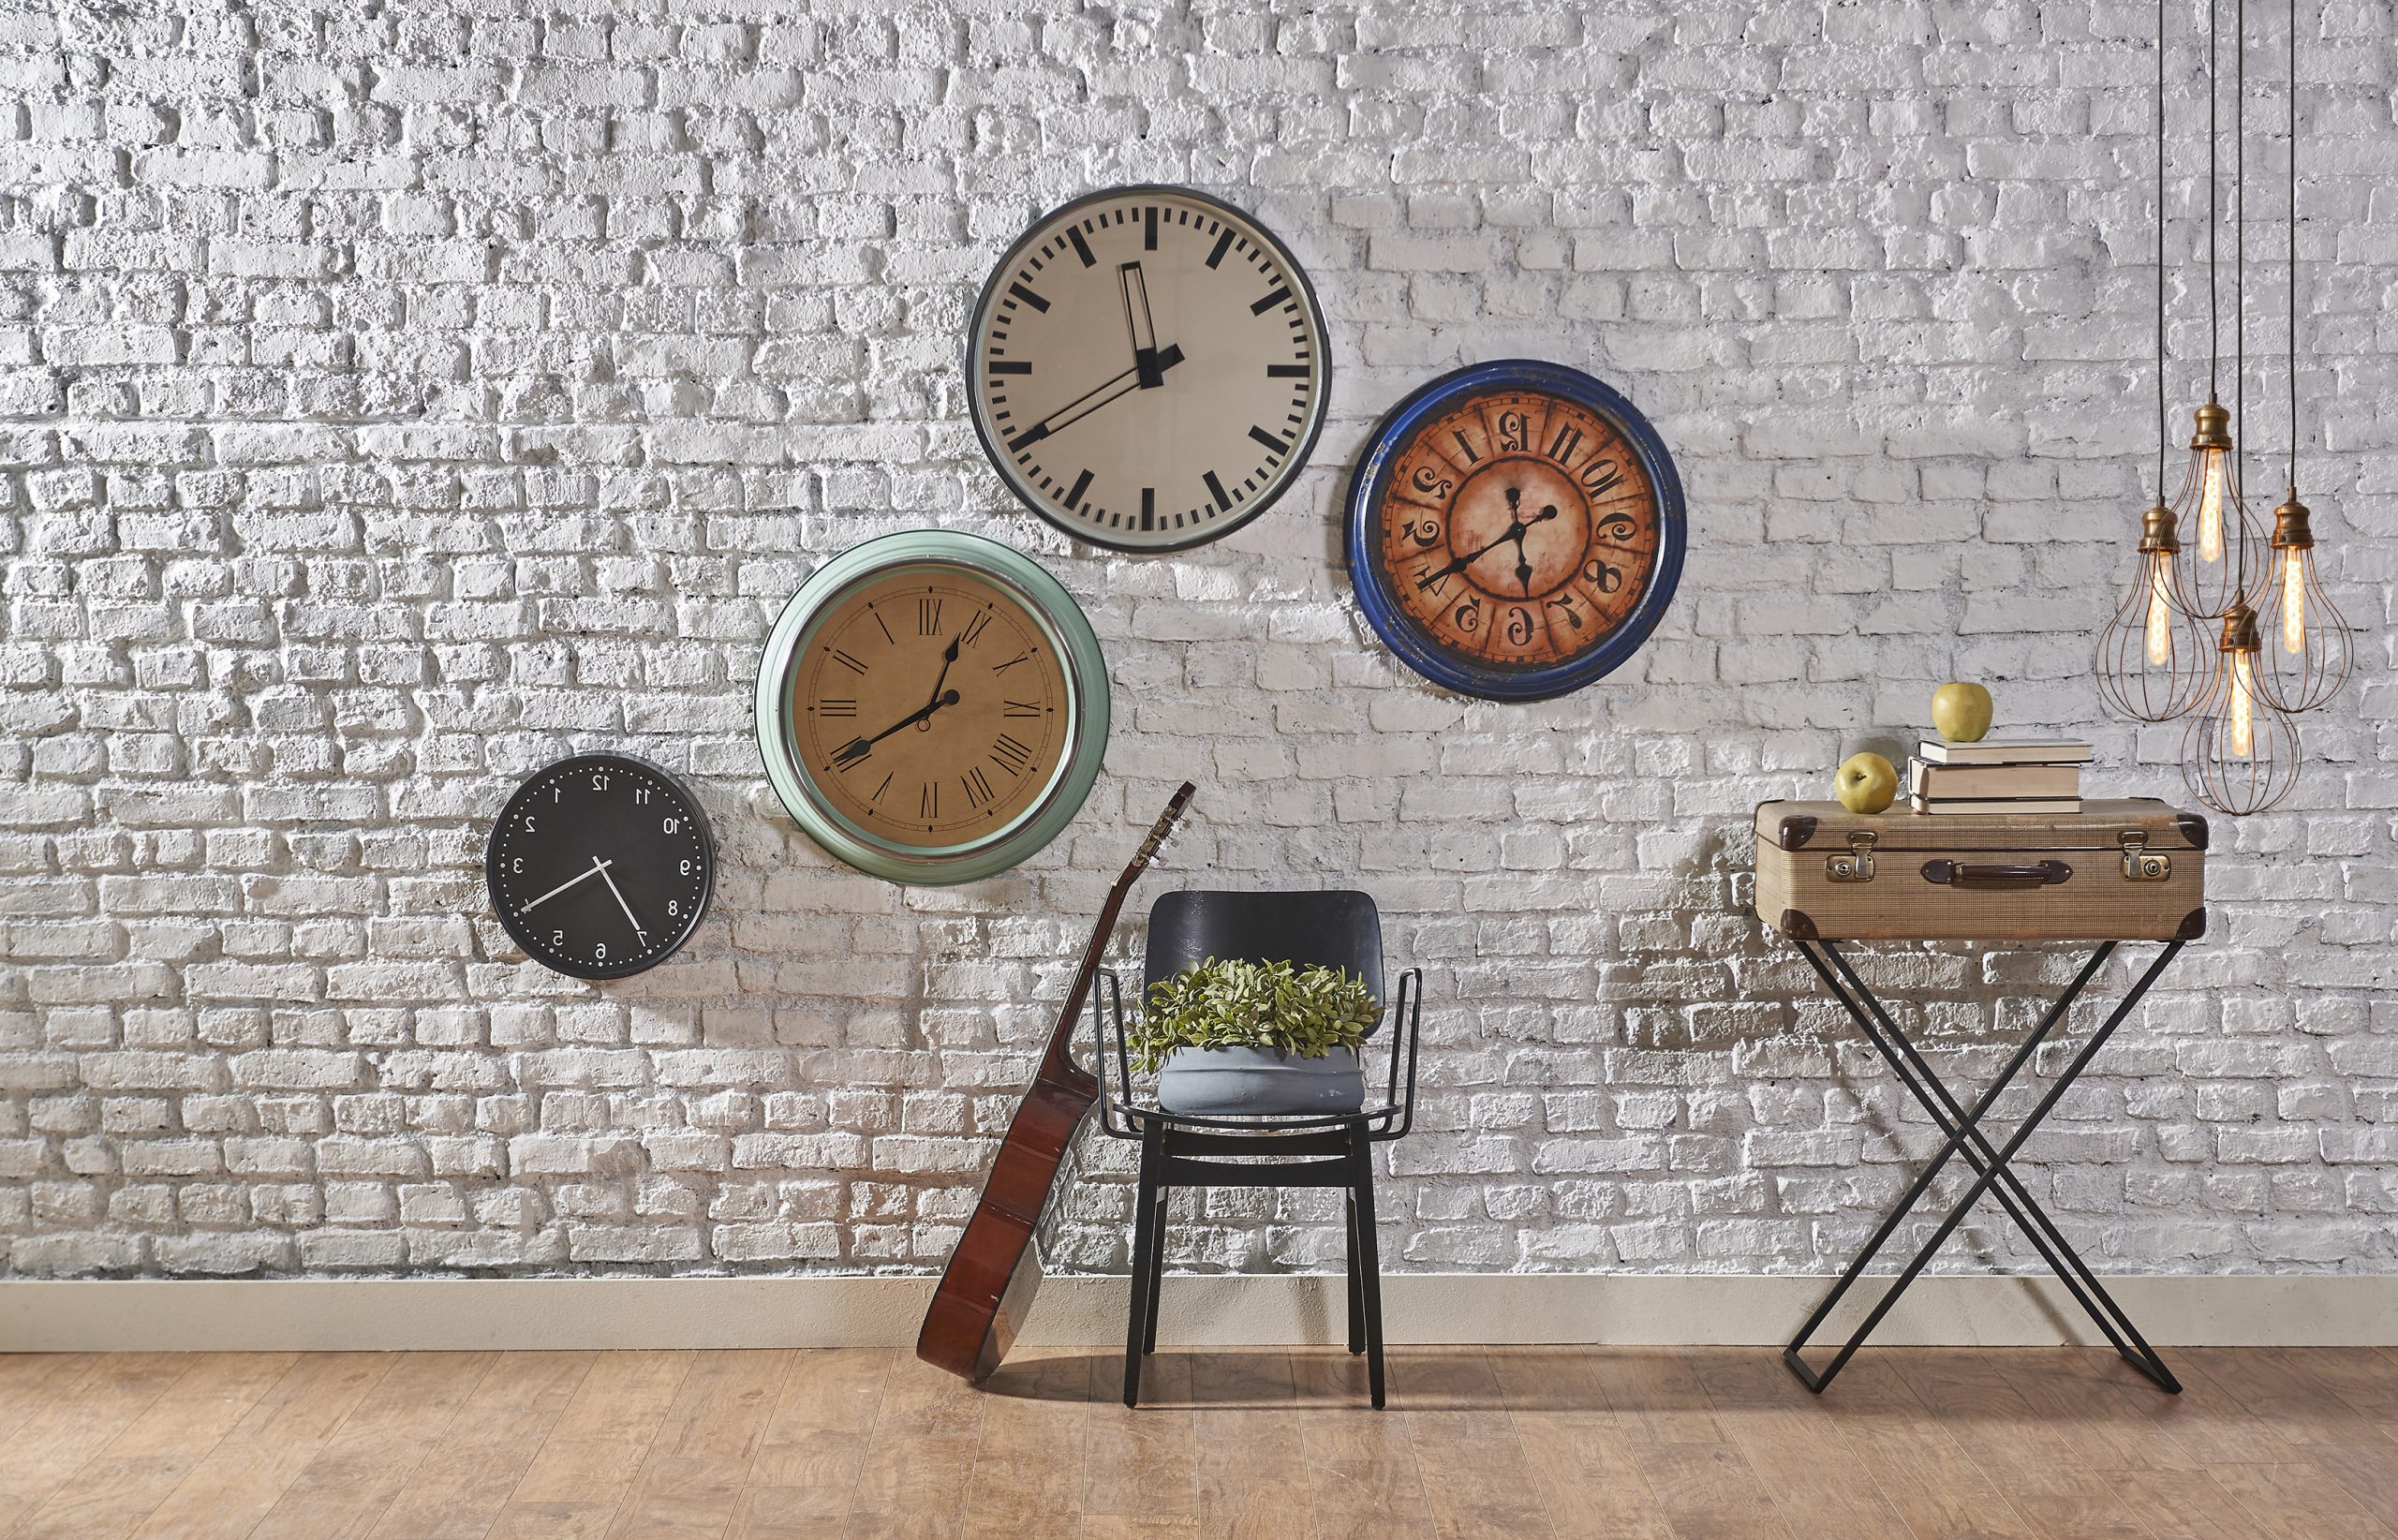 Although a smartphone has many features, including a digital clock and other things, it still feels homey to look at the real one hanging on the wall.
A clock makes a great decoration depending on its design.
In fact, many walls still have a medium to a large clock on them, although one may prefer to wear a watch at the same time. It simply shows that a clock still has its magic in drawing attention.
The good thing about having a clock on the wall as a decoration is you can check the time instantly. Well, some people even hang a faux clock for decorative purposes only.
Step by step instructions:
1. The first thing you need is to take note of the wall’s measurements.
2. Using a good digital scale, measure the wall on both sides and the top.
3. Draw a diagram on paper that will help you determine the amount of vinyl paper to be bought for each of your sides and top to achieve an accurate and symmetrical look.
4. Use a pencil to mark where you have placed your vinyl tape.
5. Write down what time it is in your local time zone, then select the appropriate clock size and color in your local store if possible, whether it is online or offline (you can pick one close to your home).
6. Assemble the clock by fixing it in place by using the adhesive that comes with it.
7. Once you are happy with the size, use a marker to make a line that will serve as your guide when graffitiing your wall with paint or whatever you plan to use.
8. Use tape to hold up your clock while working on the rest of the wall using spray paint of your choice and color.
9. Fix all screws again after you are done painting (if applicable) and hang up your new favorite wall clock!
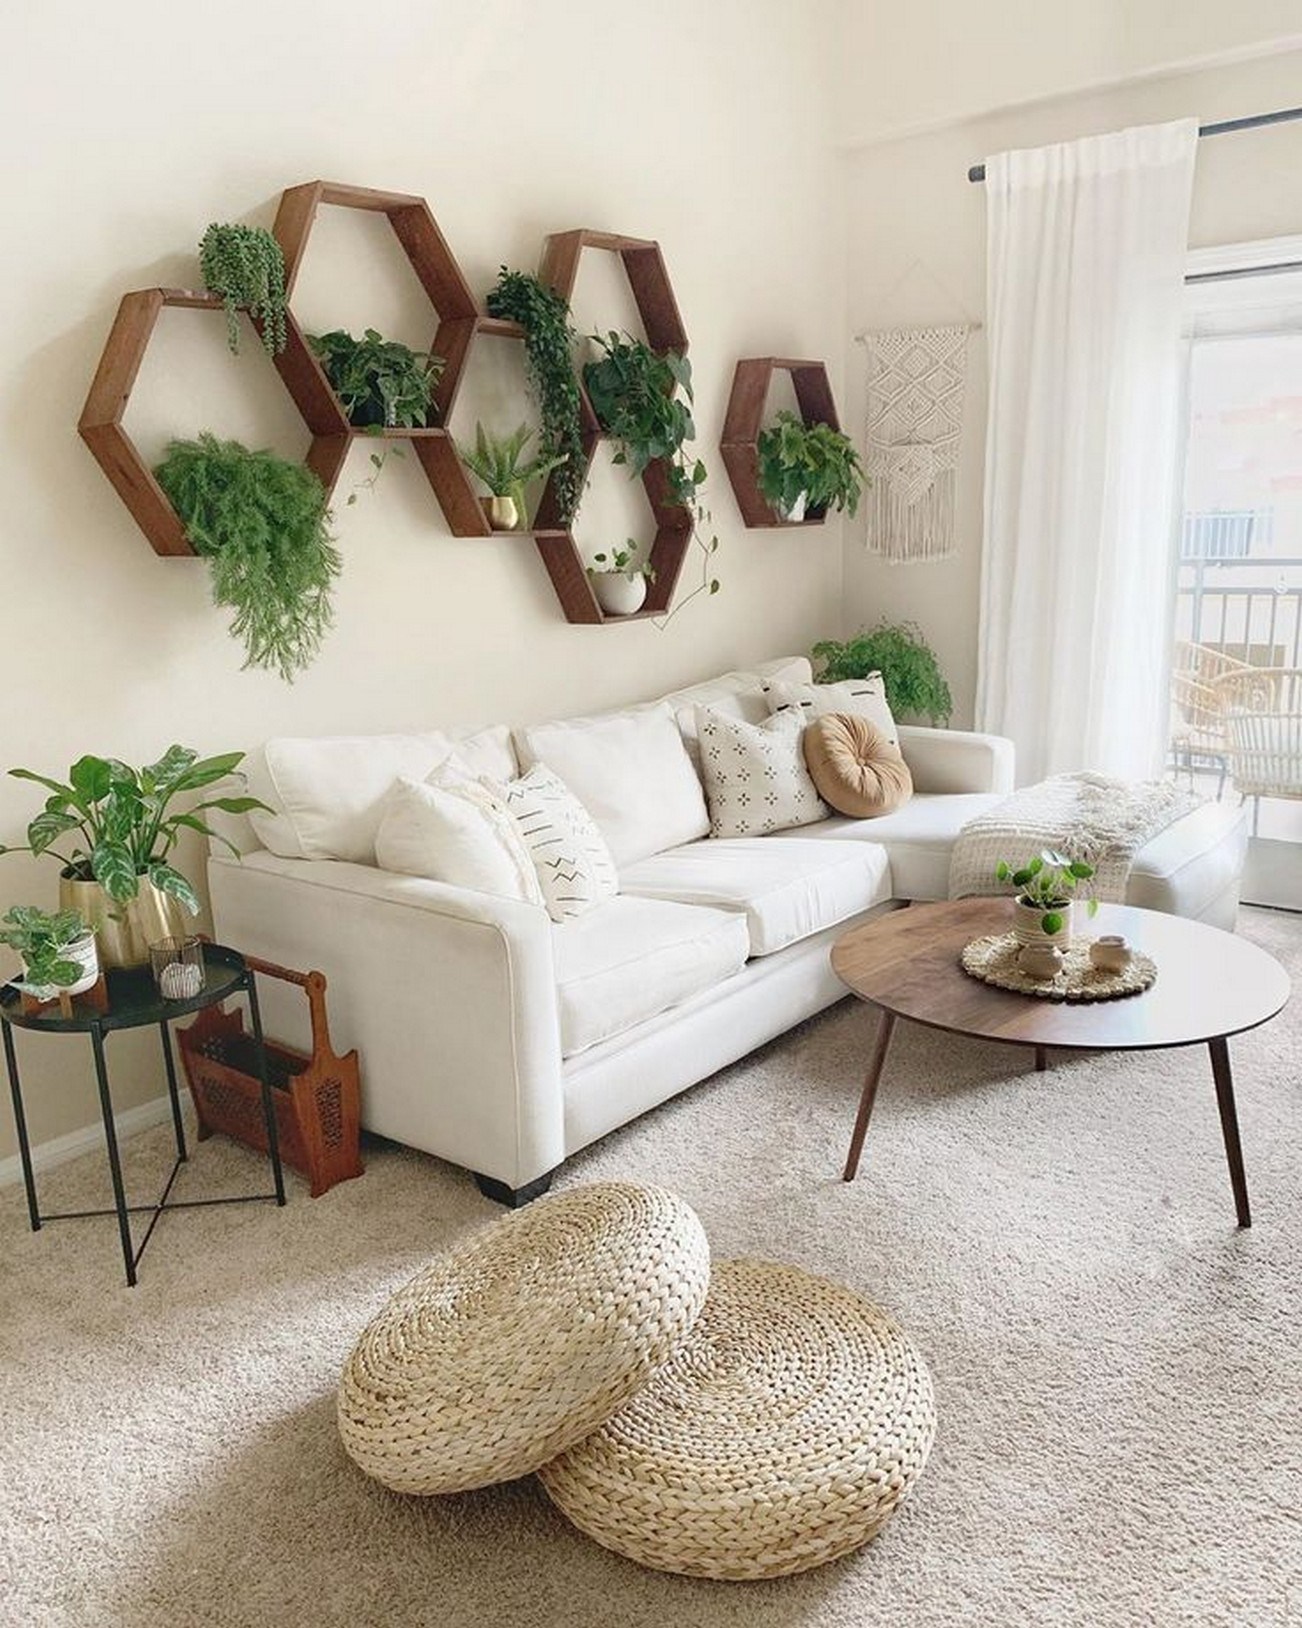
4. Multifunctional Hanging Shelves
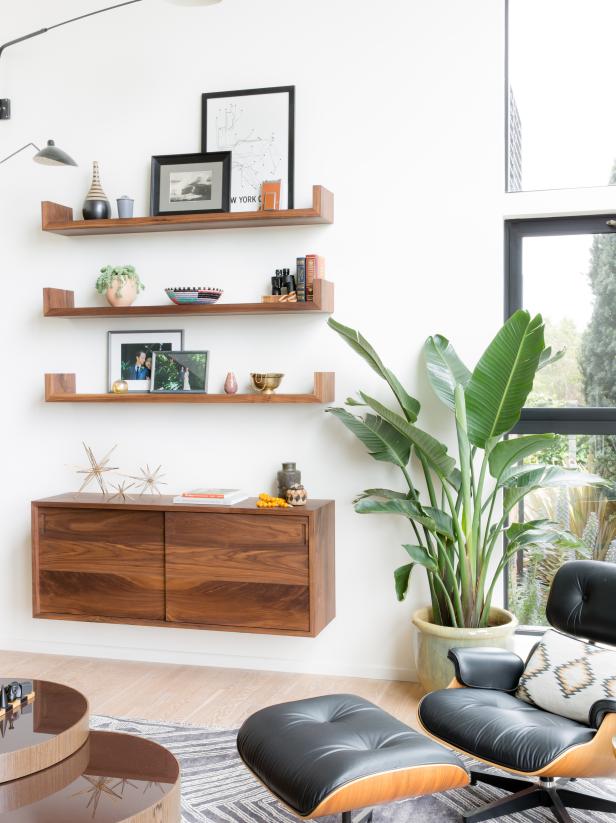 When you have a lot of stuff on the table or drawers, it means you need more storage. A hanging shelf is one of many possible ways to keep small things stored to avoid a mess in your room.
But it has to look attractive when you install shelves in a place where it gets seen a lot, like in the living room.
Therefore, some shelves come in a simple form yet stunning look. It is something that makes the wall unique in an unsophisticated way.
Step by step instructions:
1. Measure the length and width of the shelf you want and draw a rectangle in the middle.
2. Glue the smaller half of the remaining sides together diagonally to make a fun design.
3. Glue the bottom to the larger side piece, so it is tight to hang from the wall.
4. Use paint or even spray adhesive to decorate your shelf if you want to make it unique and pretty.
5. Hang the shelf in place and make it look neat.
6. You can hang similar shelves in several different places as your imagination permits you to do so.
7. Wash the shelves every once in a while not to lose their original shape and color.
The beauty of hanging shelves is that you can turn them on almost any surface, including inside and outdoors, since they are waterproof!
Alternative instructions:
1. Measure your shelf’s length, width, and height (or draw it). When drawing, make sure the top is tapered to fit through the holes found in most wall hooks (we will attach these adaptors later).
2. If you’re painting your shelves, call in a painter to spray paint or paint the sides, top, and bottom of the shelf.
3. Use sheetrock screws or drill pilot holes for hanging.
4. Clean the shelf top with a damp cloth and allow it to dry before using it for storage.
5. To hang it on a wall, drill holes into the wall where you want to hang it and then screw the hooks into place from an outside location with sheetrock screws or some other screws that are meant for indoor use (these will be re-used later on).
6. Once your shelf is hung securely, you can decide if you want to decorate it further by painting it
In conclusion:
Hanging shelves are a great way to make your living room or a bedroom more spacious and pretty. There are many things to choose from, like size, color, materials, etc. You can be creative if you want to put hanging books in your living room because they are as helpful as beautiful! And no matter how you put them up on the wall or in what form or shape you make them, they will always be beautiful décor items for a big wall.
3. Hang Your Bicycles
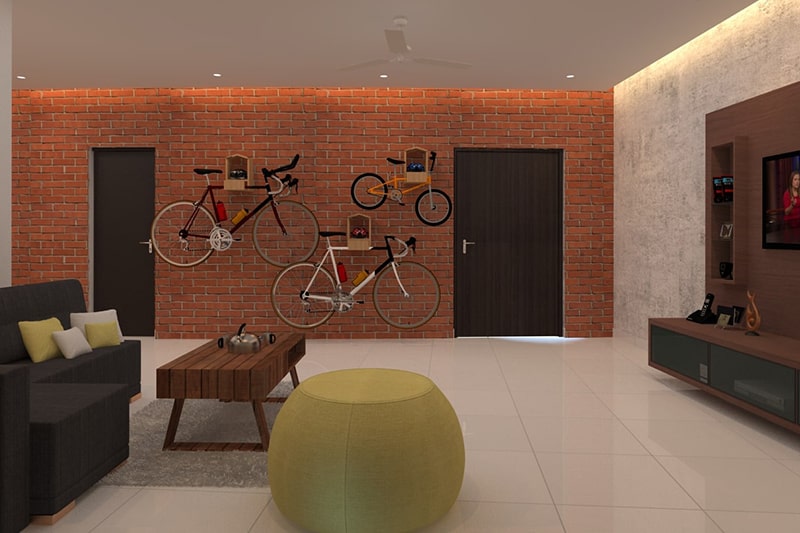 An exposed brick wall offers a distinctive charm on its own. Thus, some people leave it that way and let it look natural. But if you think you have missed something or simply want to accentuate the wall without compromising its natural beauty, you can try hanging your bicycles on it.
Hanging your bicycles instead of putting them in the garage will help you save more space while embellishing the brick wall. Make sure you hang them on the spot you can easily reach,
not too high or interrupt you when walking.
Step by step instructions:
1. Choose suitable bicycles with the correct frame size. Make sure they are comfortable enough.
2. Measure the wall carefully and make sure it can bear the weight of your bicycles as you hang it on the wall before starting this process.
3. Attach hooks that can secure your bikes properly to the wall. If you use a metal hook, connect them with screws. For rope or a fabric hook, use nails to ensure them since they are not as stable as a metal hook.
4. Hang your bicycles on their appropriate hanger and balance them well from left to right, so they do not move too much when touched by someone passing through (like your kids).
5. You can skip this step if you like, but you can surely jazz up your bicycles with cool decals or paint them in your favorite colors.
You can also add vintage bikes and a wood shelf to be placed on the brick wall. Place them over the chairs on a terrace to make them more visible and presentable.
If you want to create a loft area, hang bicycles over your bed or couch. You can also use bicycle wheels as hanging lamps. The possibilities are almost endless!
2. The Wonderland idea for large bedroom wall
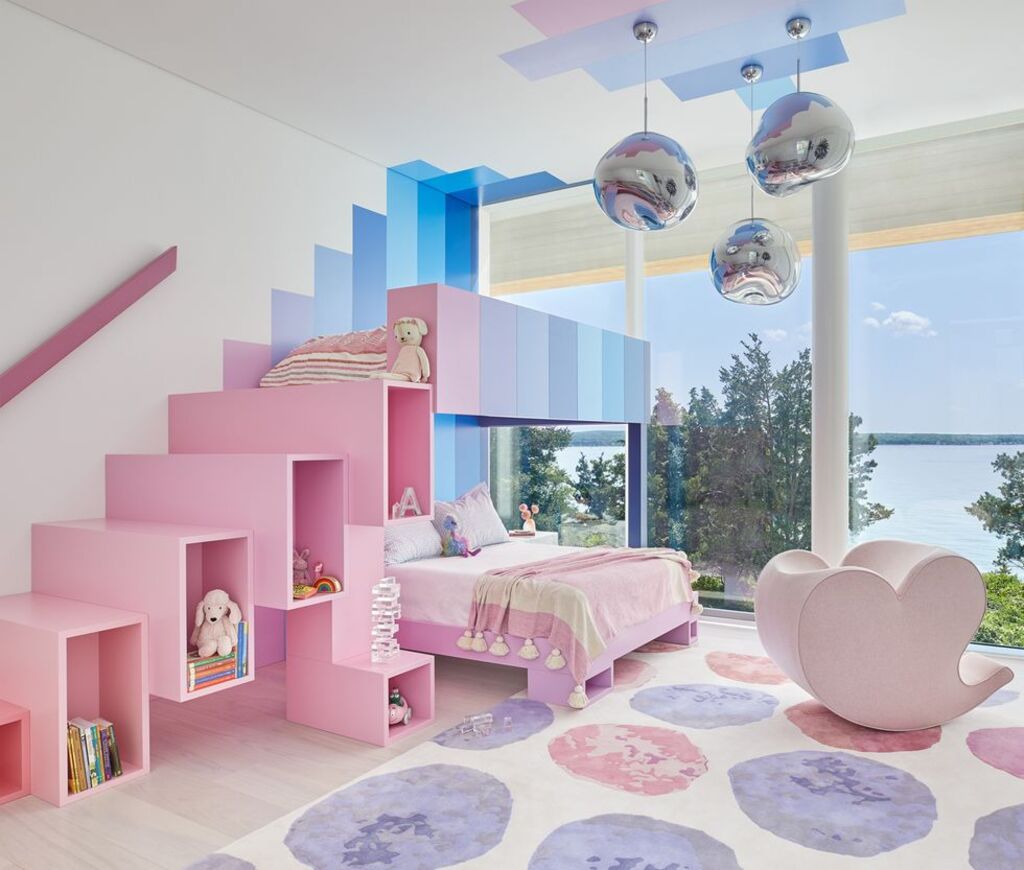 This bright room sparks a cheerful vibe with several sweet color combinations. The racks act as the stairs that help you reach the sky/ceiling.
With those vast windows opened, the room becomes even brighter. To replicate the idea, you need to start with the theme, color matching, and then you can decorate your wall with fun stuff.
To replicate the idea, in short, this is what you need to do:
On top of the white-painted wall lay a piece of a plywood board and attach a ladder to reach the great height. The room is enormous, so it is okay to paint half-wall behind. So, you have lots of space to fill with valuable items and decorations.
Also, pay attention to the back-painted wall, showing the sticks that hold the wall from behind.
Lastly, number 1. Hang a TV
 Before a flat TV rose, huge-sized and hard-to-carry TVs were popular. It took some effort to bring it to the table, and of course, it did take some space. Not only was it troublesome, but it also looked dull in terms of the design.
Then, here comes a flat TV that is slim and easy to carry and install. Although smartphones have many exciting features that allow you to watch many exciting programs, a TV still has its magic to drag you out and sit in front of it.
With such lightweight, you can easily put it on the wall, and you can watch it while filling your stomach with your favorite snack. It also makes a beautiful decoration on the wall.
Relevant instructions:
10 TV Cabinet Ideas and Mounting System Best for a Small Living Room
Things to Know Before Mounting Your Television on the Wall
No 1. How to choose the TV?
Answer: When choosing a TV, there are many factors to consider. Be sure to read the manual and select a size that fits well with the wall where you want to install it.
No 2. How to install the TV?
Answer:
1) You need a long Philips screwdriver or a drill bit and power drill.
2) Remove screws or anchors of the TV and put them on your new one.
3) Insert screws or anchors into holes of your TV again and fix them tightly.
4) Connect your TV cables with an electrical outlet, antenna, DVD player, or other devices. When they are all connected properly, turn on everything, and you will get perfect entertainment life.
No 3. How to Mount a TV on a Frame?
Answer:
1). Wash the wood’s surface with a soft sponge to clean it.
2). If you want to make some holes on the frame, use a nail to start it and then make them using a drill.
3). After drilling, put some screws into the frame.
4). Mounting your TV is ready if you connect it to something else, such as an antenna or cable box.
No 4. How to mount a large TV on a large Wall?
Answer:
1). Before mounting, you must clean and scrape out all the wood scraps in a cabinet.
2). Use a clean cloth to wipe all dust from the wall, then use a primer to dry it.
3). After the dry process is completed, you can start hanging your TV using screws and rope or a second screwdriver for easy installation.
4). When everything is done, have fun watching TV!
No 5. How to hang a large TV on studs without a stud?
Answer: A stud behind a wall requires enough material that you can provide by using sheathing material and enough space to offer them. There are some ways to hang your TV on studs without a stud:
1. Put in wood from the outside.
2. Use an anchor (metal screw) to make a hole in the wall and then put a screw into the anchor hole.
3. Hang your TV on the wall because you now have enough space for installing it. If you want to do more, you can use nail-in cord straps or other screw-in devices for hanging your TV on studs without a stud.
4. The most simple and effective way to hang a TV on studs without a stud is to use a piece of wood screwed into the top of the stud. This is not only more stable but also more effective.
No 6. How to hang a TV higher than the floor?
Answer:
1). Before mounting, you must clean and scrape out all the wood scraps in a cabinet.
2). Use a drill to put some holes on the wall for mounting screws or anchors, then use them and fix them firmly.
3). Mounting your TV is ready if you connect it to something else, such as an antenna or cable box.
4). The most simple and effective way to hang a TV on the wall higher than the floor is to use a piece of wood screwed into the top of the stud. This is more stable and effective because you can hang it from a higher position.
No 7. How to Hang a Large TV in 2 Areas?
Answer:
1). First, put some screws from your TV and anchors into the wall so that your walls will have enough space for mounting them.
2). Then hang your TV on the wall.
3). Make sure your TV is in a suitable position, and you can use a level to adjust it if necessary.
4). When everything is done, have fun watching TV!
Conclusion:
Mounting a TV is one of the practical and straightforward ways to decorate a large wall. It can be both stylish and functional simultaneously, which will make you more satisfied with your entertainment life.
A big blank wall allows you to explore your imagination and creativity. It is like a huge canvas that is ready to be tapped into. Thus, these 10 ideas on how to decorate and enrich a large wall come to the rescue.
References:
10. Pinterest.com
9. Hgtv.com
8. Homenish.com
7. Plantedwell.com
6. Wayfair.com
5. Materialsix.com
4. Hgtv.com
3. Designcafe.com
2. Elledecor.com
1. Bergerpaints.com