5. A DIY Wall Spice Rack Magic
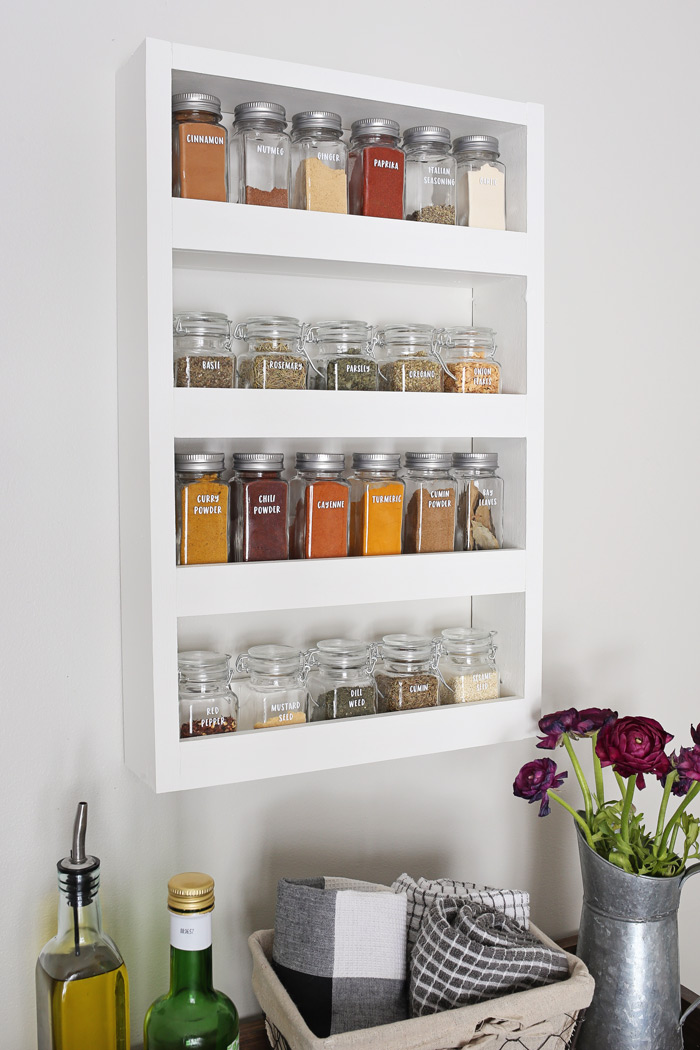
Ditch that chaotic spice box on your fridge! No pantry? No problem. Build a sleek wall spice rack to flaunt those jars with flair. Here’s your guide:
Materials :
- (1) 1×3 @ 6ft, (1) 1×4 @ 6ft, (2) 1/2″ x 3 @ 3ft, (2) 1/2″ x 2 @ 3ft.
- Kreg screws, Brad Nails, Wood Glue.
- Paint/stain for a chic finish.
Steps :
1. Cut wood (sizes like 1×3 @ 13″).
2. Add pocket holes using a Kreg Jig.
3. Create four shelves by combining pieces, glue, and nails.
4. Space shelves 5.5″ apart on the 1×4 frame, secure them.
5. Finish with the top frame piece.
Paint, hang, then flaunt your spices.
Fancy labels?
Go vinyl for waterproof chic.
Enjoy your revamped kitchen aesthetic!
4. Transform Your Kitchen with a DIY Pantry Door Spice Rack in Four Easy Steps
Space constraints in the kitchen can be a real headache, especially if you’re not ready for a full-on remodel. Fortunately, there’s an ingenious solution that not only saves space but is easy on the wallet and can be achieved quickly: a DIY Pantry Door Spice Rack. Let’s break down the process.
1. Preparation:
Before diving into the project, ensure you have all the tools and materials on hand. This will make the process seamless and efficient. Start by measuring the back of your pantry door. This ensures that your spice racks fit perfectly without any overhang or wasted space. Remember, accuracy in this step is crucial, as it determines the overall success of your project.
2. Crafting Your Spice Racks:
Once you’ve gathered your materials, it’s time to build. Begin by gluing your small and big boards together, forming neat rectangular storage units. These will serve as individual shelves for your spices. For a sturdier bond, consider applying an Insta-set spray after the wood glue. This speeds up the drying time, allowing you to proceed to the next steps without waiting overnight.
3. Personalize with Paint or Stain:
Now comes the fun part! Whether you prefer a modern, clean look or something more rustic, painting or staining your racks can add that personal touch. Think about the overall theme of your kitchen and choose a color or stain that complements it. Remember to allow adequate drying time before the final installation.
4. Installing Your Spice Rack:
With your painted or stained racks ready, it’s time to install them. Carefully attach each spice rack to the back of your pantry door using sturdy screws. Ensure they are spaced evenly and securely fixed to hold the weight of your spices.
3. Revamp Your Kitchen in Style: EntermyAttic’s DIY Journey
Are you tired of your old kitchen that no longer vibes with your home’s aesthetics? Let’s twist it! Take a peek into EntermyAttic’s 10-year-old kitchen, which had become a mismatched space over time. Ditching the idea of splurging on a brand new one, they rolled up their sleeves to DIY the makeover.
Dive in:
- Before The Splurge: A drab, messy kitchen with outdated tiles and a cluttered spice rack.
- The Revival Blueprint: Fresh, 18 mm thick wooden fronts, modern handles, new wall tiles, and a neat cabinet layout.
- Woodwork Wonders: Using precise measurements, old kitchen fronts were revamped with plywood and crafted to perfection with the PKS 18 LI saw.
- Add Some Color: Their choice? Satin lacquer “Mooi Easy Kitchen Cabinets” in G5.13.66. There is no primer, just straight-up vibrant goodness!
- The New Fronts: After drying, these fronts slid right in with a special tool, the “Concealed Hinge Jig,” ensuring the perfect fit.
- Smart Storage: An innovative, space-saving pull-out coffee shelf. Yes, please! Plus, a DIY wine rack.
- What’s Next: Choosing a new kitchen countertop, tiles, and eye-catching light yellow tap!
2. Gospel Oak Transformation Plan from Uncommonprojects
Rejuvenate your tired-looking kitchen with the 1980s Gospel Oak kitchen without losing its modern charm! Seamlessly integrate 21st-century appliances into its iconic design. Retain the striking graphic lines and bold black essence, but introduce a touch of today with contrasting colors. Highlight features like the luminous green sliding door, generous storage, and that show-stealer: a carnation pink cabinet. Marry the old with the new, making your space both practical and vibrant.
1. A Kinetic Folding Door to Give Your Mundane Cabinet Ingenious Details
To construct this door, you’ll start with two exact squares. On each half, make two 45-degree angle cuts: one diagonally from corner to corner and another parallel cut that’s situated halfway between the diagonal cut and the meeting corner of the two halves.
While our source initially considered magnets for closure, you might find the door snaps shut seamlessly without them. Remember to adequately reinforce the two corners where you place bearings on the top and bottom. Employ the technique shown at 2:05 on the central bearings to ensure a firmer hold. For a refined touch, you could integrate barrel hinges akin to those in jewelry boxes, achieving a more discreet appearance.