10. The Ultimate Hidden Kitchen Drawer Guide
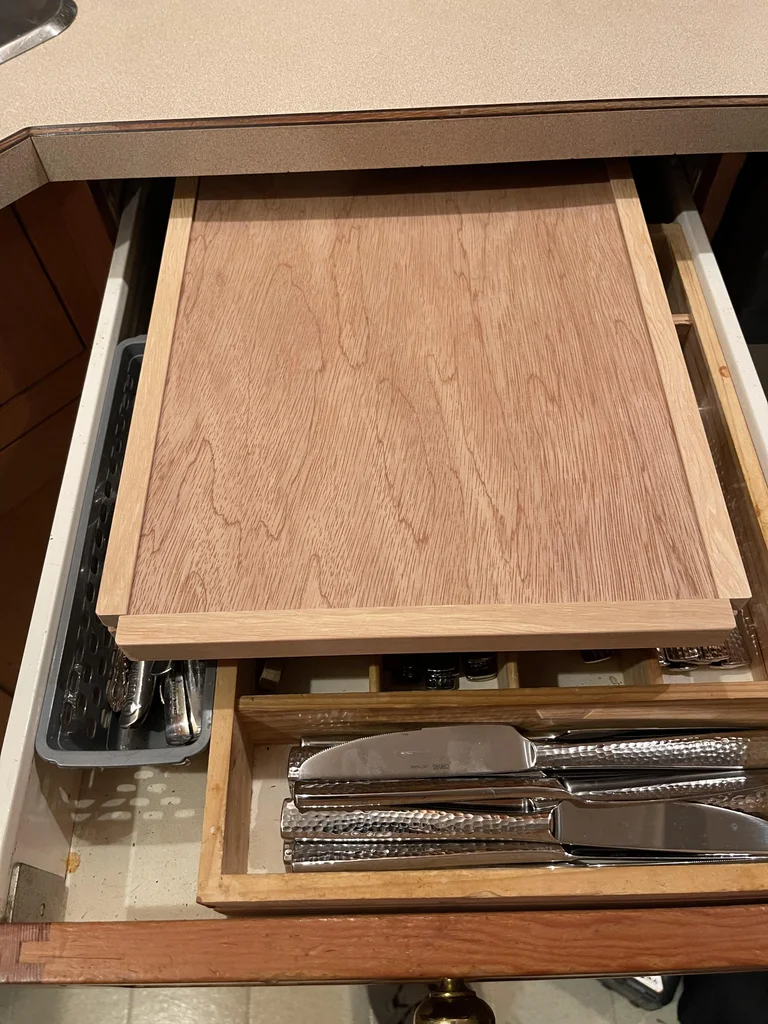
Tidying aficionados, DIY lovers, and those searching for maximizing kitchen storage gather ’round! Ever thought about that sneaky little space right above your kitchen drawers? Most haven’t, but with a sprinkle of creativity and a pinch of woodworking prowess, it can transform into a storage gem: the hidden kitchen drawer.
Here’s a step-by-step guide to this nifty project:
Materials:
- Solid stock remnants: This is an excellent opportunity to repurpose those offcuts you’ve been hoarding. Approximately 3 sq ft should do the trick.
- Door skin plywood: Again, just about 3 sq ft of 1/8” thickness.
Step 1: Measurement
Before diving in, measure the free space above your kitchen drawer. For instance, if you have a 1 1/2” clearance in height, 14” in width, and 23” in depth, you’ll want to craft a drawer with dimensions a tad smaller for easy maneuvering. So, you might settle on a 1 1/4′ thick, 10” wide, and 18” deep box.
Step 2: Milling & Cutting
You’ll need pieces for the side rails, the drawer box’s sides, and the drawer’s front and back. Precision is key here! After cutting your main pieces, run a dado cut down the longer side pieces and side rails, using either a specific dado blade or making multiple passes with a regular one.
Step 3: Assembling
Now, this step requires a keen eye and a steady hand. Attach splines that snugly fit into the dado cuts. This strengthens the drawer and ensures smooth motion when opening and closing.
Step 4: The Lid
On your two long side pieces, make a 1/8” cut to create a slot for the drawer’s lid to slide into. Adjust the front piece so the lid can slide in effortlessly.
Step 5: Crafting the Base
Cut a piece of door skin plywood to match the dimensions of your box. Secure it as the drawer’s bottom. Create another piece to fit into the saw cuts of the drawer, ensuring it moves with ease. This is your drawer’s lid!
Step 6: Final Touches
Add a handle to your lid, ensuring it’s secure yet stylish. Then, work on the drawer’s front pull, ensuring it’s both functional and complements your kitchen’s aesthetic.
Step 7: Installation
Once you’ve built your hidden drawer, mount it to the underside of your existing cabinet.
9. Two Slide-Out Fridge-Gap Pantry Ideas
1. Boston09’s Slide-Out Pantry:
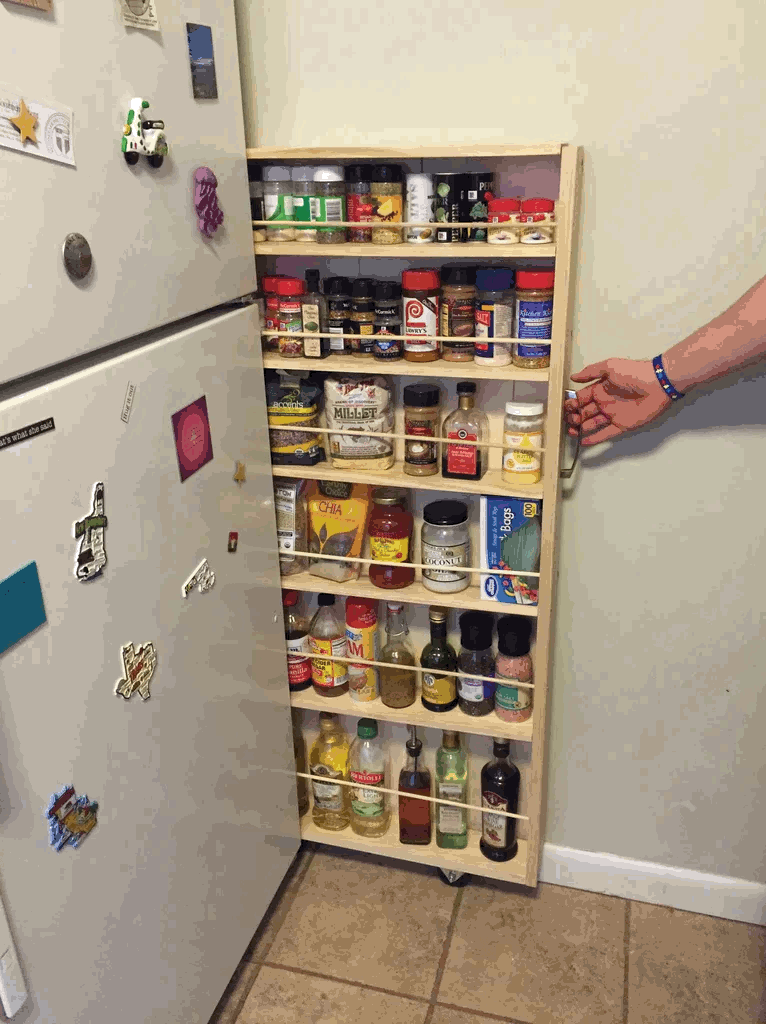
Living in a snug apartment? This DIY pantry utilizes the 4.5-inch gap between the fridge and the wall. Simply slide out, grab, and hide! For a smoother project, use an electric saw.
Key materials: 24″x48″x0.75″ wood board, several 24″x4″x0.5″ boards, caster wheels, handle, wooden dowels, wood glue, and screws. Create the frame, assemble shelves, add wheels and handle, and voilà! Stealthy storage maximized!
2. Amanda C’s Life-Changing Hideaway:
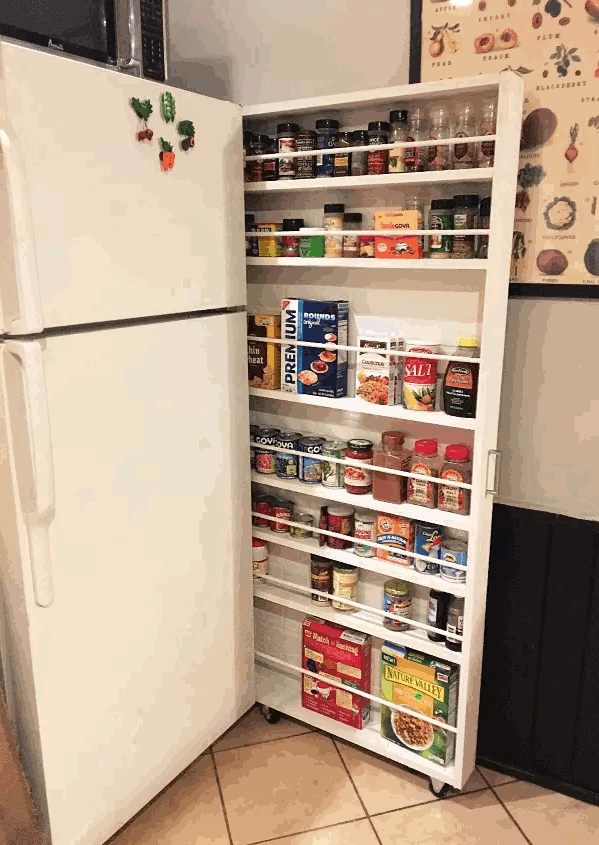
Ready for an Organizational Revolution?
- Use wood, paint, and imagination to make a slide-out pantry.
- Measure the fridge’s height and depth.
- Cut panels accordingly, including shelves.
- Assemble ladder-style, attach back panel, place dowels, and paint.
- Add wheels for easy mobility, attach the handle, and stock up!
A discreet marvel that keeps your ingredients at arm’s reach. Bonus: Spice up the back panel for a delightful surprise!
8. A DIY Outdoor Bar Cart With Ice Storage Idea
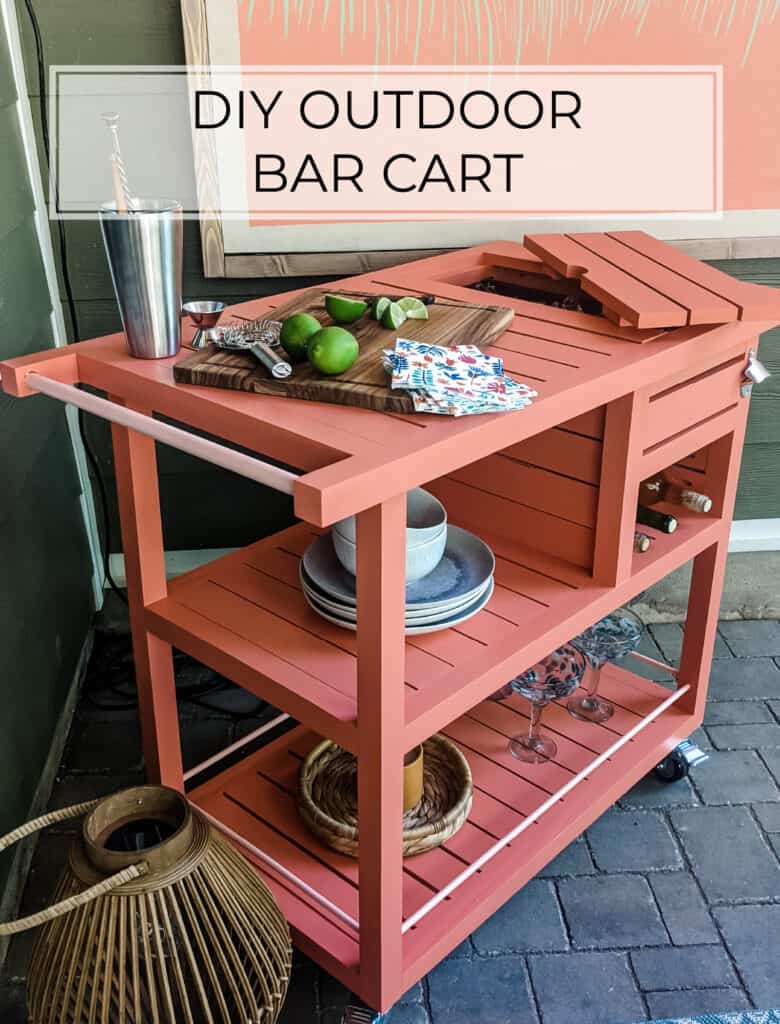
Prepping for an outdoor bash? No more running up and down for cold drinks.
Here’s how to craft a spacious bar cart with ice storage.
Tools You’ll Need:
Miter Saw, Drill, Kreg Jig, Jigsaw, 1/8” & 3/4” Paddle Bit.
Get Shopping:
- 9x 1x3x8 boards (consider pine for outdoors)
- 6x 2x2x8 boards
- 1x 3/4” 36” dowel and 4x 3/8” 36” dowels
- Wood glue
- A mix of exterior screws (2.5″, 1.25″, Kreg types)
- Paint or sealer (we loved Sherwin Williams Lei Flower)
- 18” planter box for ice
- 4x 3” wheels
- Optional: bottle opener & hooks
Let’s Get Building!
- Pocket Holes Galore: Set up for 1×3 slats on 3/4” and 2x2s on 1.5”. Drill them in designated boards.
- Base & Shelf Assembly: Use 30” 2x2s and 1x3s with pocket holes, 1.25” Kreg screws, ensuring 1/4″ gaps. Duplicate this structure.
- Top Creation: Carve a semi-circle on top cooler slats for lifting. Attach supports with 1.5” screws. Set 2x2s, and assemble.
- Assemble: Drill, glue, screw legs, dowels, and structures. Make sure everything’s aligned!
- Ice Bucket Box: Attach cooler sides, front, back, and supports using 2.5” Kreg screws.
- Mount the Cooler Box: Affix this box to the shelf and legs. Precision is key.
- Add Cooler Box Slats: It’s tight, but ensure 1/4″ gaps. Attach using 1.25” Kreg screws.
- Top On: Align and fix the top to the cart legs with 2.5” screws.
- Wheel Time: Add blocks from spare 1x3s, glue, screw, and mount the wheels.
- Add-Ons: Fancy a bottle opener or hooks? Attach them now.
7. A Mobile Kitchen Idea for cheap
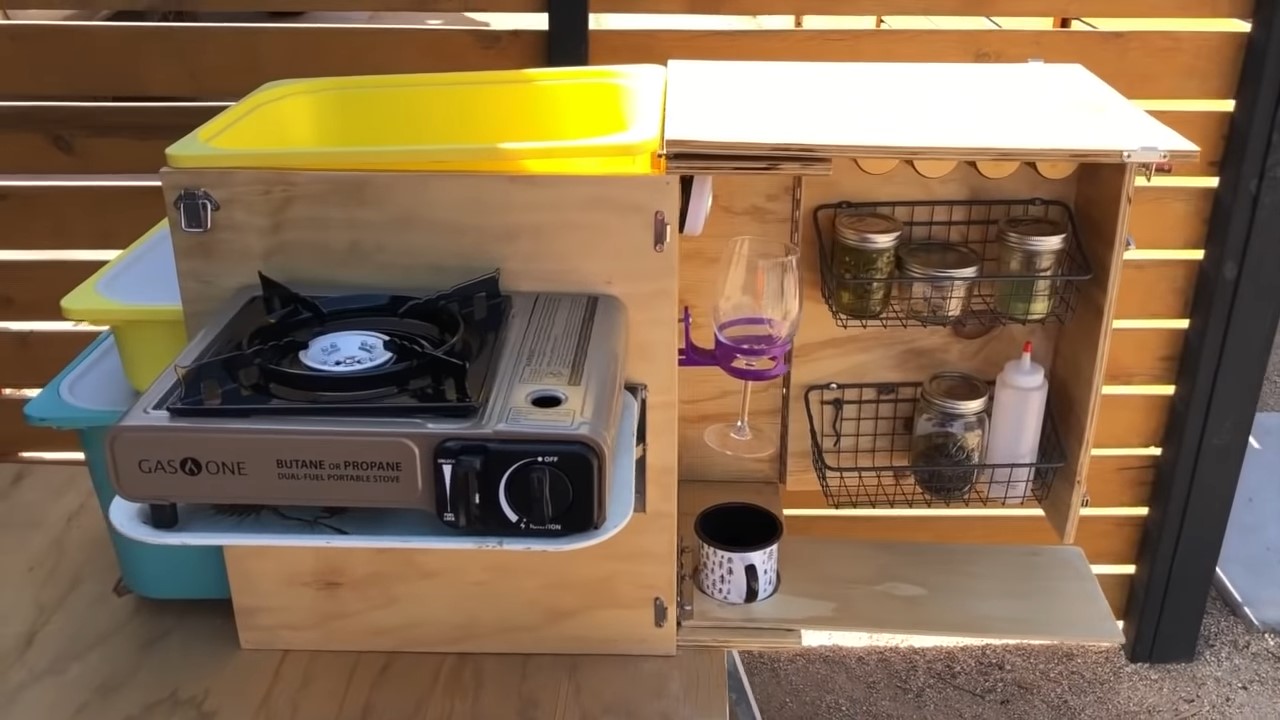
First, you opt for IKEA tubs, one shallow and one deep, eliminating the need for custom drawers. With these in place, you measure the required size for the main compartment. Heading to Home Depot, you score a quality board at a discounted price.
Using this and some scavenged plywood, meticulously cut out the base, back, and divider. Even as a novice woodworker, you can employ the existing rabbet joinery on the board. After sanding the pieces for smoothness, assemble them, ensuring a snug fit for the tubs on rails. The subsequent work will be the pantry. For the stove compartment, craft a flip lid, then a finishing touch.
6. A DIY Kitchen Wall Storage

Eyeing that blank wall next to your fridge or cabinets? Transform it into a vertical storage gem! This shelf is perfect for slender items like cutting boards and books. While Pinterest has plenty of similar ideas, tailor yours to fit your space seamlessly. Aim for the built-in look by aligning shelves with cabinets and choosing to stain over painting for warmth. To begin:
- Plan Your Space: Decide shelf depths based on items and how they should protrude.
- Gather Materials: You’ll need frames, shelves, lips, and rails. Opt for lips for item safety and railings for larger items.
- Build: Connect your frame, then shelves. Add lips (use screws over nail guns) and finish with rails.
- Installation: Brave the drill! Attach to cabinets, fill holes, sand, stain, and seal.
- Style: Populate with your kitchen essentials, enhancing both storage and aesthetics!