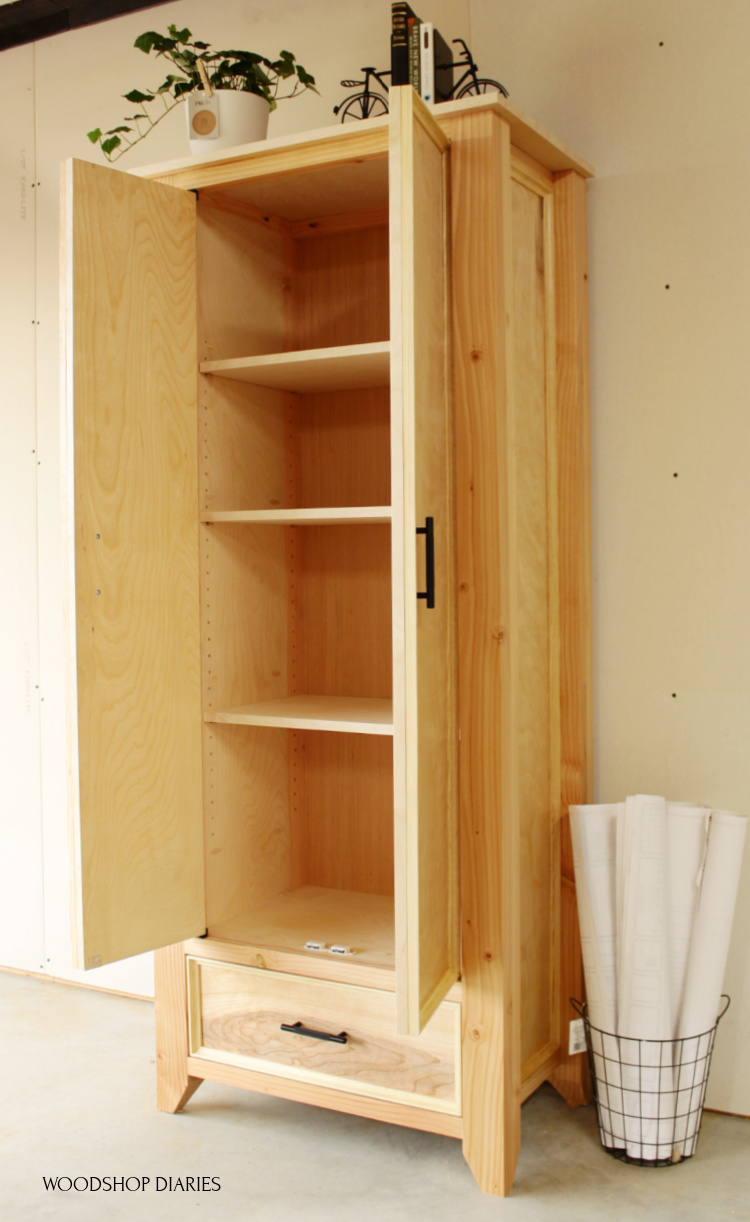
12. The DIY Modern Wardrobe Project idea
![]()
- Start by cutting all the wood to the dimensions you need. It includes the frames, shelves, and drawers.
- Then create the frame by attaching all the parts with wood glue before finally adding nails or screws for fastening.
- Install dividers or shelves at the top, and remember the back. Make sure each shelf has proper spacing, about 8 inches here.
- After all the frames are assembled, it’s time to create the drawers. It’s essential to keep the shape square, so use band clamps.
To improve the look, add an edge band across the visible end of the cabinet. Then sand and paint everything with the color you want. Otherwise, merely polish it to bring the farmhouse ambiance into the room.
Last but not least, install the drawer slides, rod, and pull handle.
11. A Wardrobe Makeover project idea by @Tastemade
![]() In this section, you will use peel-and-stick wallpaper as the mainstay to elevate an old wardrobe to look more fashionable.
In this section, you will use peel-and-stick wallpaper as the mainstay to elevate an old wardrobe to look more fashionable.
- Starting by unscrewing your closet handle, you must stick wallpaper with a neutral design and color on the closet door. It would be best if you were slow while installing this wallpaper.
- Rub the wallpaper using the squeegee to avoid bubbly surfaces on the door.
- Cut the remaining wallpaper and trim each side according to the area you want to cover. Do the same for the other closet doors.
- Next, measure and mark where you will hang the rectangular mirrors, then add screws.
- Hang those mirrors there nicely.
- Finally, replace the handle with a new one. Better to choose the model that best suits your closet theme. You can also match the color to the mirror’s edges for harmony.
- Last, add a few hooks on the side of the wardrobe as extra storage to hang your jacket.
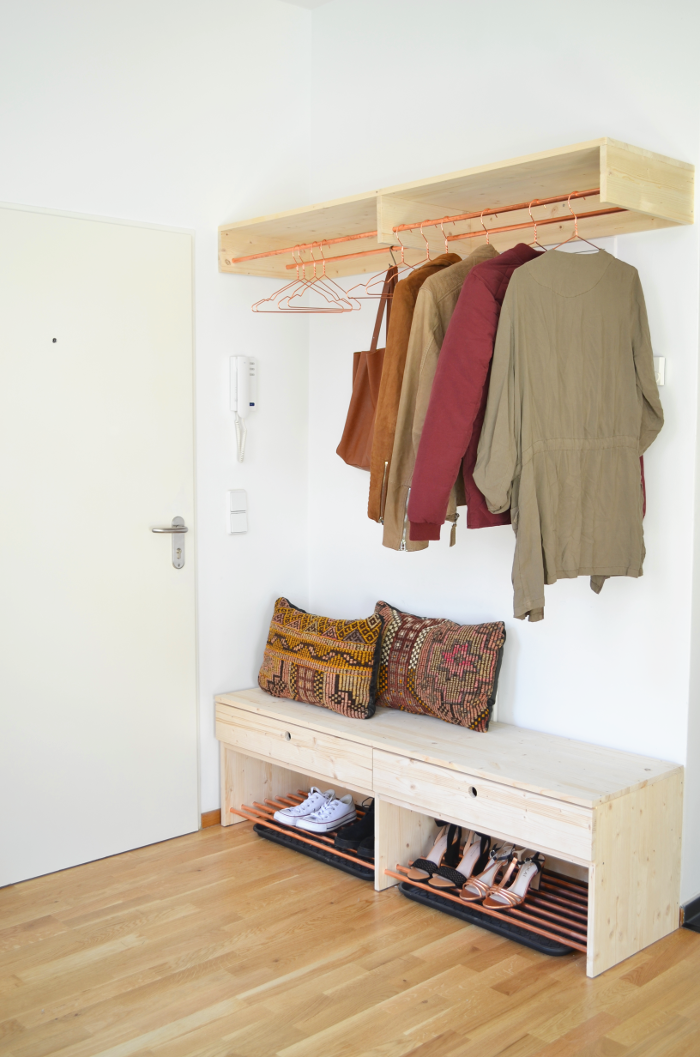
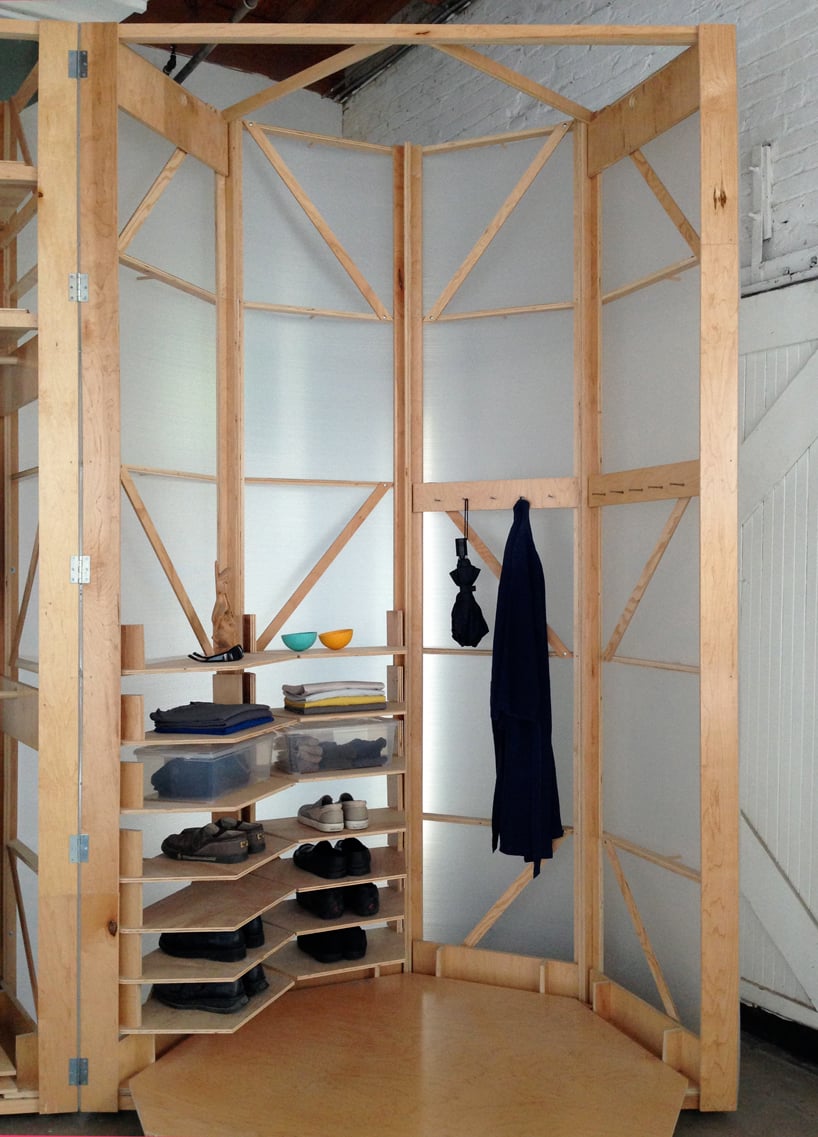
10. A Low-Profile wardrobe makeover DIY idea
 Keep the wardrobe short and doorless. Why not? It will make your small bedroom look more prominent than ever. Additionally, making the back side not completely covered with wood panels will add to the aesthetic impression in the end.
So, you only need two 3/4″ x 20″ x 6′ pine boards. Use these wood panels for the side of the wardrobe.
- Drill holes in these two panels on the top side as a place to attach copper pipes for your clothes hangers.
- Furthermore, three pieces of pine boards measuring 3/4″ x 20″ x 36″ will be needed as supports for the top, center, and bottom sides.
- Also, one piece of pine board measuring 3/4″ x 12″ x 6′ for the back, where you will attach the round mirror at the final stage.
- Screw all parts of the wood panels to form a wardrobe frame without a door.
- Install the center wood panel bit lower to create space for the clothes rod.
- Install the copper pipe by inserting both sides into the perforated part.
- After everything is in order, install the back panel of your closet and immediately glue the round mirror at eye level.
9. An Effortless Closet cabinet Project Idea
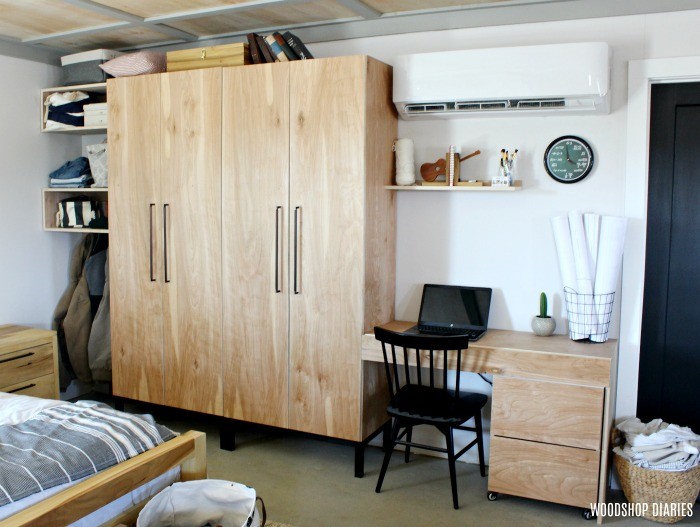 As the name suggests, you will find it effortless to meet your clothes and shoes in one area. This closet cabinet is like a unified whole. However, these are two standing closets with different contents of the same size.
One closet cabinet is equipped with a rod for hanging clothes. At the same time, others have adjustable shelves and shoe racks.
Thanks to PureBond Plywood and some boards. You’ll need about 4.5 sheets of 3/4″ plywood and two sheets of 1/4″ to make this type of wardrobe. In addition, there will also be three pieces 2x2x8 boards, two pieces 1x4x8 boards, two pieces 1x2x8 boards, and a one ½″ diameter dowel rod 6′ long.
- The first step is to make the base or legs for this closet cabinet. Use 2 x 2 wood cut to size as required, then assemble it into a 33 ½″ wide, 18″ deep, and 8″ tall base.
- Attach it with screws or nails, then paint it darkly.
- Next, make a wardrobe closet from the available pieces of plywood.
- These cabinets are 18″ deep to allow clothes hangers to fit inside. However, you can use another size if you wish it. Assemble each part with pocket hole screws.
- Then, once the wardrobe frames are finished, you can install shelves in one cabinet and clothes hanging rods in another. You can end up just giving the door for these cabinets.
However, for extra storage, you can make mounted shelves on the door of one of the cabinets to store your shoes.
8. Turn An IKEA Pax into a Fully Custom Closet
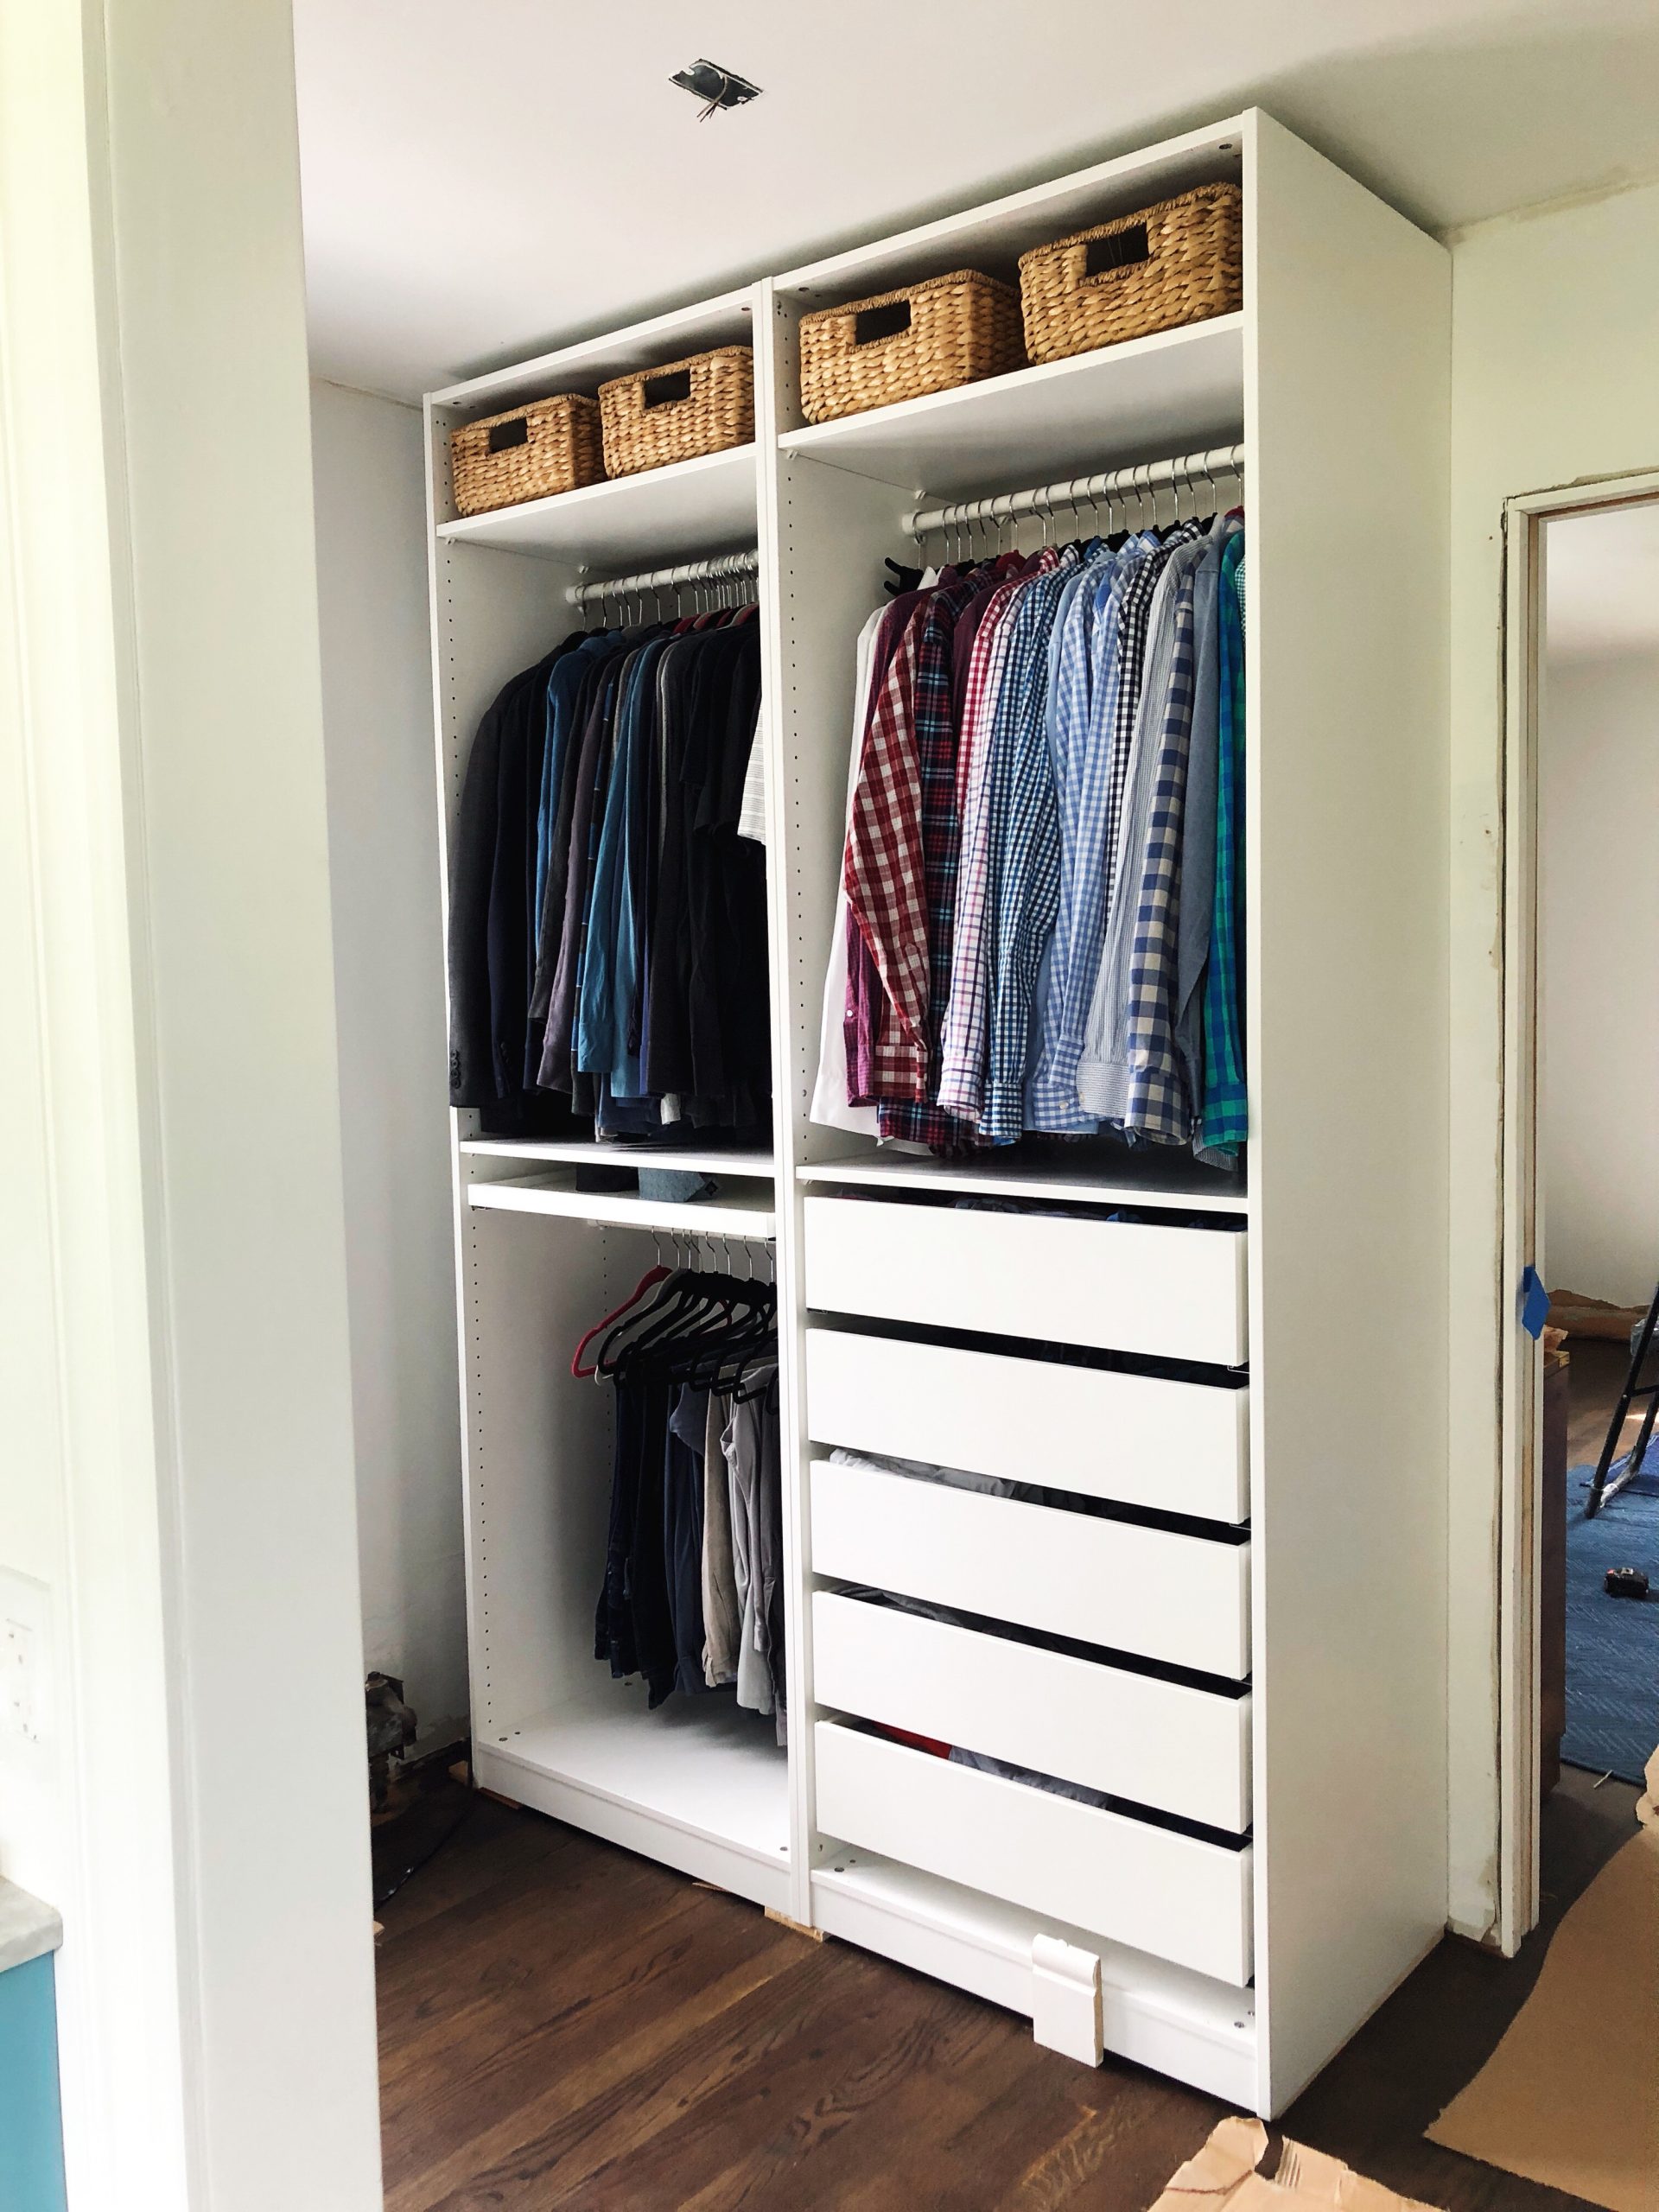
A fully custom closet may be pricey. But don’t worry. You can still have it with IKEA Pax hacks. The first step, make sure where you want the built-in closet to be placed. You can also make it a walk-in.
- Ensure the size also fits your needs without making the room crowded.
- Next, you will need two IKEA Pax here.
- Arrange them so they are level to ensure no space above or below the closet goes to waste.
- Install the puck lights for extra lighting in each of your closet units.
- To strengthen the built-in impression and provide extra ornamentation around the closet, install a baseboard at the bottom of the unit connected to the wall and let it run across the room.
- Install the wood trim along the closet edges and filler boards where the closet does not meet the wall. And remember to add the crown molding to hide the gap above the wardrobe up to the ceiling.
- Add the drawer front to make everything look more sociable.
- Then stick the paintable faux grasscloth wallpaper to the back of the wardrobe units.
- Primed, then painted all the cabinets to give a touch of personality.
- And finally, install the drawer pulls and rods to the closet unit.
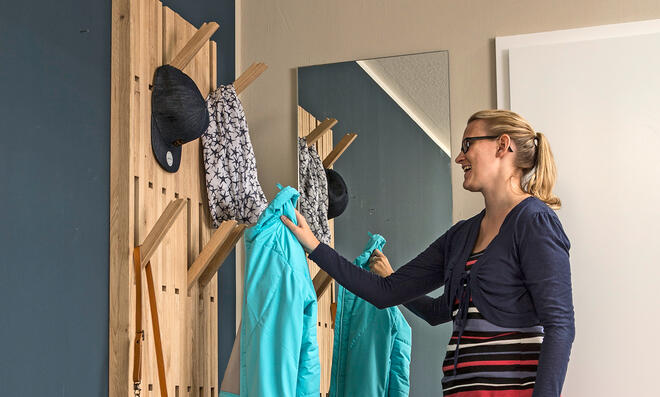
7. A DIY Montessori Toddler Wardrobe Project
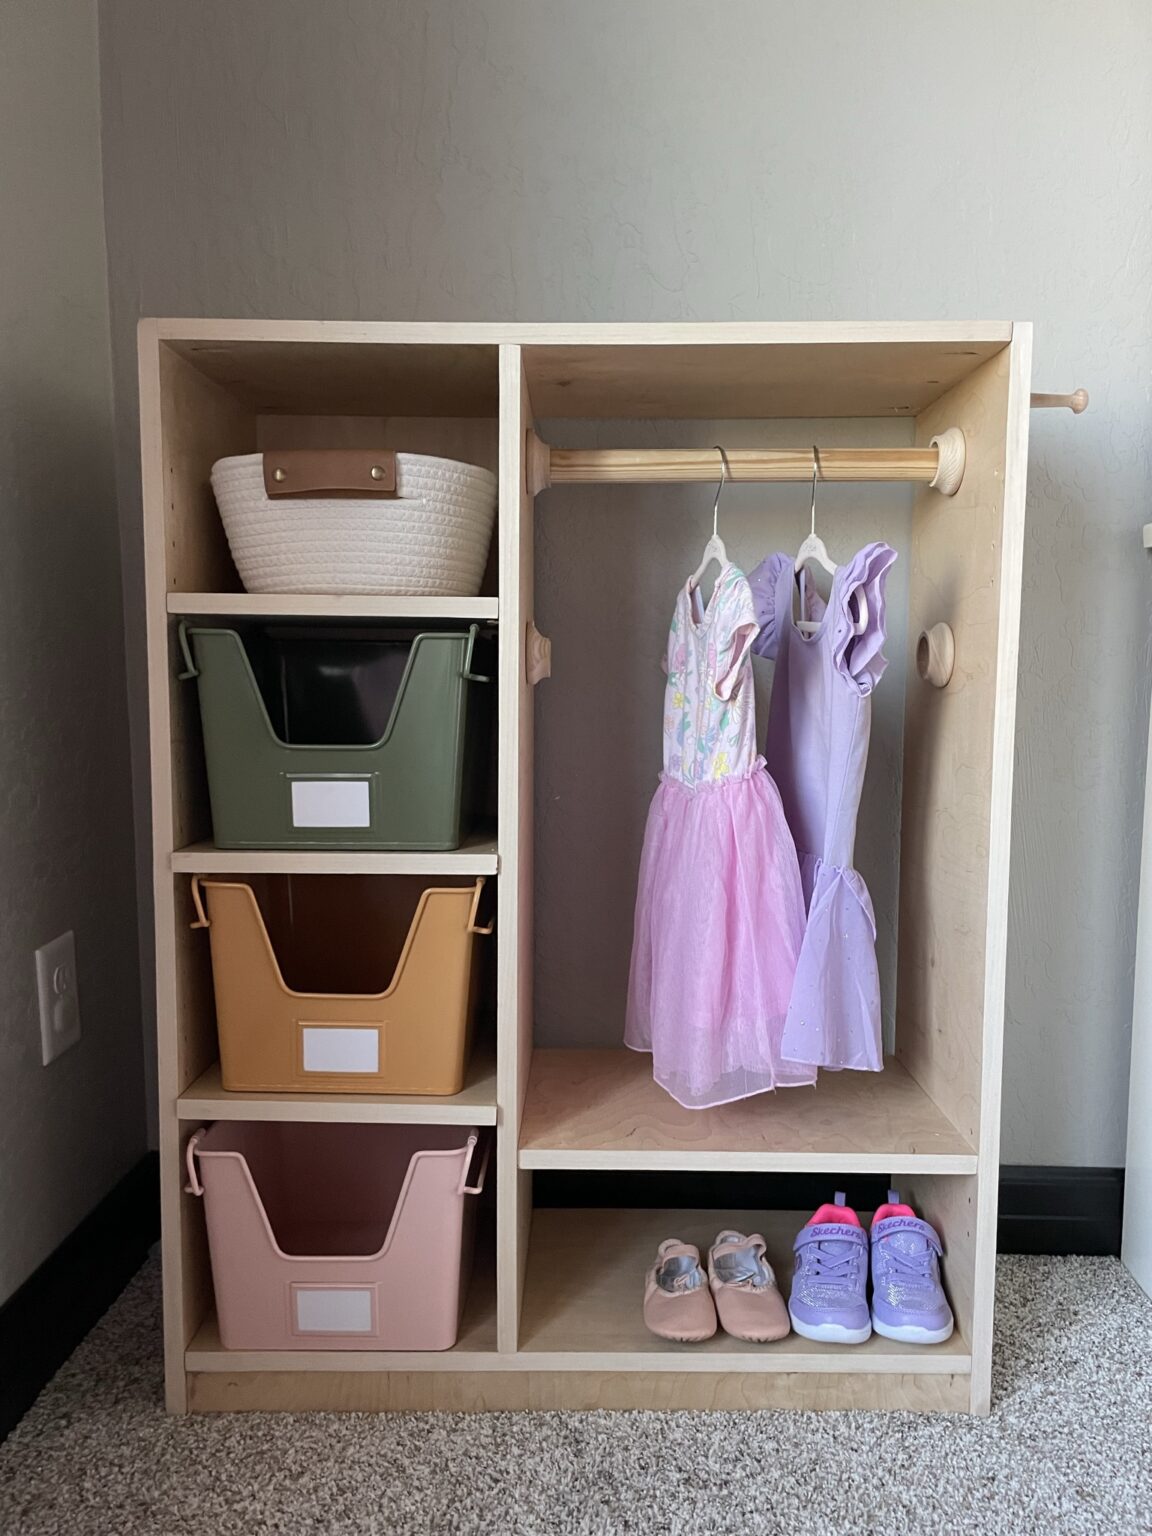
- Add pocket holes on specific pieces before assembling them.
- Cover the Plywood edges facing the front using edge banding to give a nice finish look.
- Assemble all the parts using screws. Make sure center supports and shelf boards have the appropriate spacing for better structure.
- Lastly, screw also the closet rod to the wardrobe unit.
You can also paint this wardrobe to give it a bit of fun. Otherwise, if you want to maintain the original light wood color, complete each shelf with colorful baskets or bins to avoid a monotonous impression.
6. An IKEA Rast hack Wardrobe Project Idea
 Your budget-friendly and multifunctional wardrobe is here only using these IKEA Rast Dressers. As additional units, you will need about ten pieces of 2 ft melamine boards, four pieces of 6 ft boards, and a 7 ft board. For the width, you can adjust it according to your needs. As soon as all the materials are ready, assemble all the panels to form two bookshelf-like units that will flank your IKEA Rast Dressers.
- Screw everything to make the two bookshelf units stand in place and level with each other.
- Add wood strips on the underside of the unit to hide the gap between the furniture and the floor.
- Next, place your first IKEA dresser properly between the two bookshelf units.
- Then, you’ll need to cut about 4 inches off the bottom of the second dresser, so they don’t have too much gap between each other.
- Secure the two dressers in place using the thin metal connectors.
- Place 7 ft trimmed boards across the top of both bookshelves.
- After that, paint all parts with a neutral or black color.
- Finally, change the drawer pulls into the metal ones, then add hardware.
5. How to make a Freestanding Wardrobe Made of 2x4s
 2 x 4′ lumber and birch plywood are perfect for creating a space-saving free-standing wardrobe. This unit will measure 30 1/2″ wide, 17 3/4″ deep, and 71 3/4″ tall.
- First, trim down and glue the 2×4 lumber into four corner posts to form the legs for the cabinet. You can also add tapers on both sides of the bottom of the legs.
- Cut plywood sheets into two 11″ x 64″ as side panels of the wardrobe.
- After that, assemble them using wood glue, pocket holes, and screws.
- Do the same method for the cabinet frame. And install other Plywood for the bottom panel.
- Next, install the trim molding.
- Attach the other parts from the cabinet’s back panels, shelf boards, and top side.
- After that, install the wardrobe doors using the pivot hinges.
- Build the drawers using the remaining plywood sheets.
- Afterward, set the drawer front for a more excellent look.
- Next, install it to the drawer slide on the wardrobe unit.
You can also stain or paint everything if you love it.
4. A Natural Jute Closet Project Idea
A jute closet will be perfect for Boho lovers. It’s simple. It would help if you had an old IKEA Vestby as a base cabinet structure.
Next, cover the visible wardrobe part with jute, and prepare as much as approximately 3.5 meters. You don’t need to remove the milky plastic wall of the Vestby at this point.
Note: Pull the jute tight to create a neat surface when applying it. Then, fold the edges inward so the jute ends won’t fray.
 Now it’s time to make the door frame from wood strips.
- Take the dimensions you need and measure each part of the door according to the cabinet’s dimensions.
- Assemble the wood strips using wood glue, then secure them with the stapler.
- Install the cabinet doors with three hinges each.
- Then add the holders too.
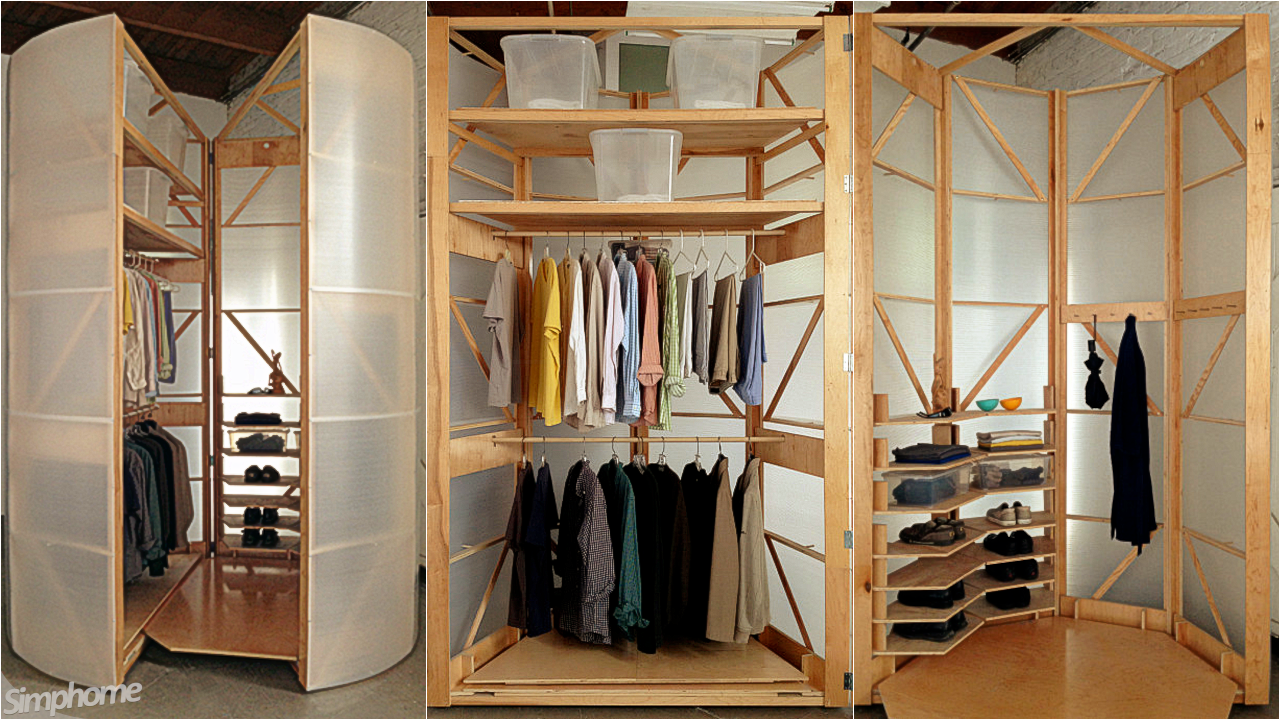
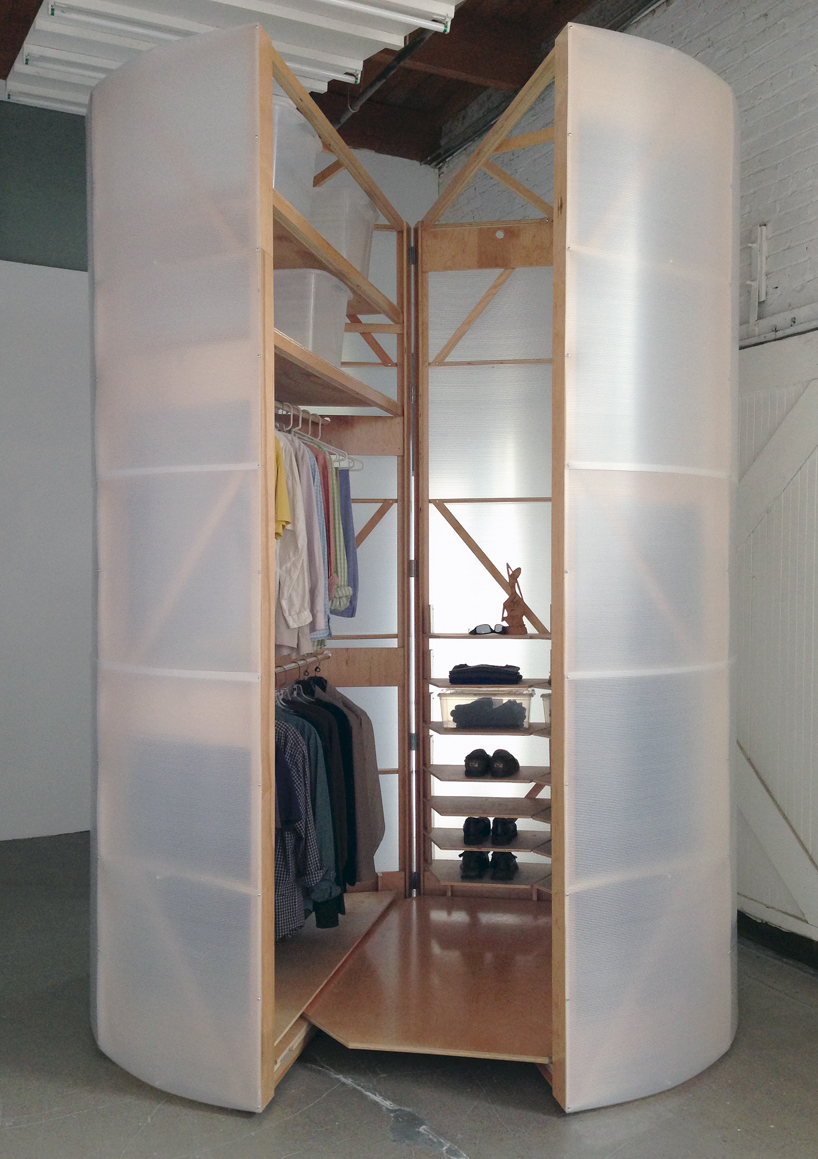
3. A Simple Open Closet System Wooden Project Idea
This rustic open closet system is friendly to duplicates. Everything comes with lumber of different sizes.
- To create it, you only need to put together some wood to form a wardrobe frame. To strengthen the base structure, you must mount it to the wall using screws.
- After that, build other cabinet units, such as shelves and bars, by attaching the wood to the inner railings.
- Screws and nails are not enough. It’s good to go with wood glue also for extra fastening. Install every unit on the wardrobe according to your preferences and needs, then give it a finished look with stains, or let them bare.
You can also add L-brackets at the wardrobe top if needed.
2. A Rolling Garment Rack Project Idea
This quick DIY is for a rolling garment rack, perfect for your small and rental property.
- Begin with a piece of 1x12x6 board, and you have now entered the first step to building it.
- Before assembling the board with other materials, remember to sand its edges and corners.
- Next, clean the pipes and spray-paint them black while you stain the wood.
- Dry all parts.
- After that, screw the flanges on the end of the two long pipes.
- Meanwhile, add the elbow to the other end using a flange.
- Build the horseshoe shape from the last three 5 feet of pipes.
- On the other hand, attach casters with screws on the board edges.
- Assemble the “horseshoe” unit with the board as the bottom center part using screws and make sure everything is secure.
If you want extra bottom shelves, you must have four other small pipes to create them.
1. How to Build a Freestanding Closet with Wheels
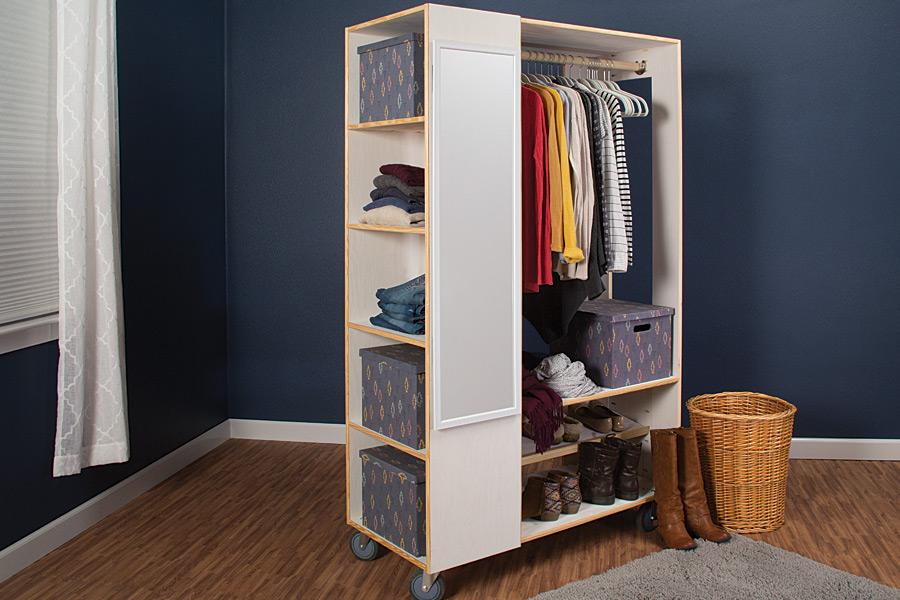
A portable free-standing wardrobe could be a trend because of its convenience. In this final DIY, you’ll find a tutorial for creating this unit. It all starts with plywood sheets; cut them to the size you want to form lower and upper outside frame fillers.
- Next, assemble them with the outer frame using screws.
- Afterward, sand them to create a smooth surface.
- Create a sanded corner frame, drill the pocket holes to its edge, and attach them to the outside perimeter using screws.
- Cut the panels for the top, bottom, front, and back sides, then install them to form a wardrobe case.
- Next, create the inside frame and fillers, then assemble all the parts.
- Install the back and front panels to the structure.
- After that, add the shelf boards in the wardrobe unit.
- The last step, give it paint and wheels for easy to move anywhere you want.
References:
12. Industrieelchique.com
11. Charlestoncrafted.com
10. Kust-interior.de
9. Woodshopdiaries.com
8. Erinkestenbaum.com
7. Makingitwithabby.com
6. Makeitboho.de
5. Woodshopdiaries.com
4. Shoeboxdwelling.com, Superorganismla.com
3. Selbst.de
2. Freshmommyblog.com
1. Learn.kregtool.com