5. Transform your pantry with this impressive DIY canned food storage rack!
1. Assess Your Needs:
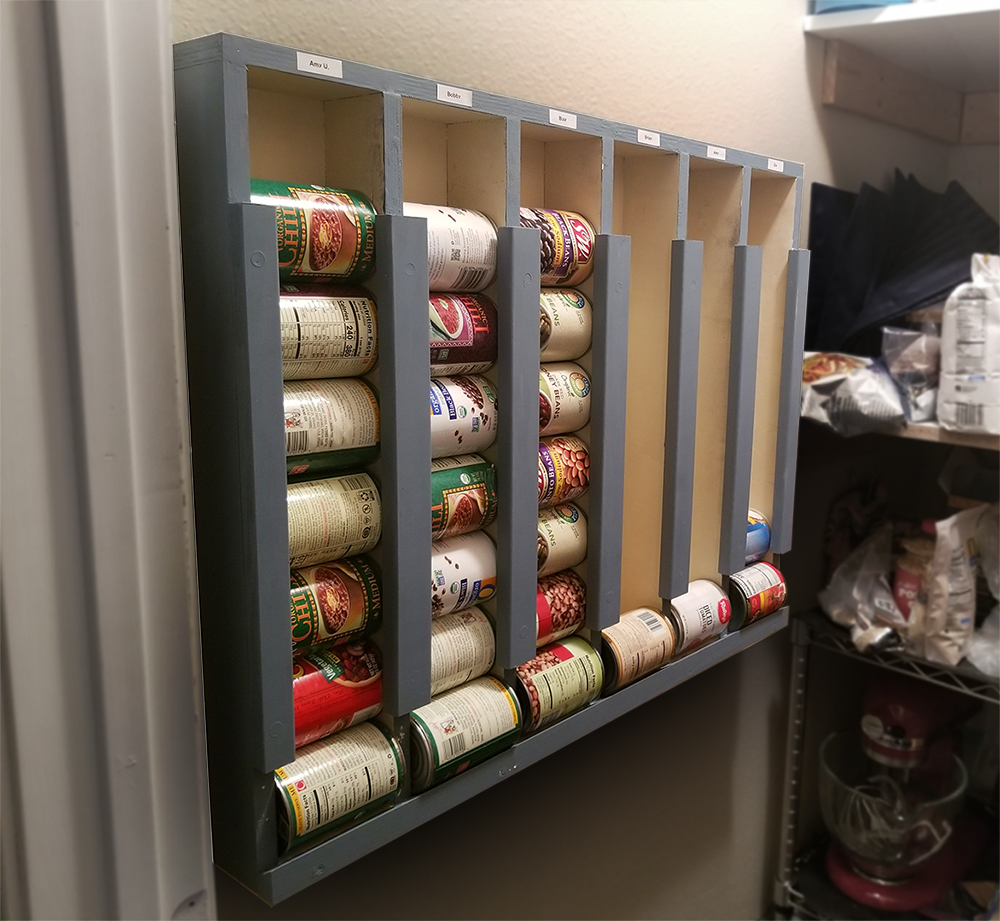
Count your cans and evaluate the available space in your pantry. Aim for a 32-9/16″ x 24-1/2″ back panel made of 1/4″ plywood, accommodating 42 cans in 6 columns. Ensure your pantry has about 30″ of horizontal space.
2. Gather the Materials:
You’ll need plywood (1/4″ and 3/4″), screws, 2×4 blocks, plaster of Paris, paint (primer and house paint), and 16″ long rails (molding). Get ready to create your masterpiece!
3. Create the Basic Frame:
Cut seven strips of 3/4″ plywood for vertical dividers and two strips for top and bottom frames. Assemble the outside frame by screwing the dividers and frames to the back panel. Double-check the fit by placing cans and spacers in each column.
4. Secure the Dividers:
With the spacers and cans clamped in place, drill tiny holes next to each divider to mark their position. Then, drill and screw the dividing walls through the back panel. Aim accurately, about 3/8″ to the left of each tiny hole.
5. Add the Front Lip:
Rip a rail on the table saw for the bottom front lip, giving it a 60° angle (30° on the table saw). This lip will keep the cans in place while allowing easy access.
6. Install the 2×4 Blocks:
Cut 2×4 blocks on the table saw at a 45° angle and glue them to the bottom of each column. These blocks will push the cans outward, making them easy to grab.
7. Finishing Touches:
Cover all screws with plaster of Paris and spray prime the inside. Use house paint to add a splash of color to your storage rack. Cut 16″ long rails from molding and screw them to the dividers to prevent cans from falling out from the sides.
8. Mounting the Rack:
Attach a support rail to the pantry studs using a level. Screw 4 washer-head cabinet screws through the back panel into the studs for added strength and stability.
9. Load It Up:
Load your new canned food storage rack with all your cans, and admire your beautifully organized pantry. Just remember not to drop cans from the top to avoid loud noises.
Detail: Imgur | Bobswoodstuff.com | Youtube Detail
4. Elevate your kitchen with the following two inspiring plywood cabinet ideas:
1. Birch Plywood Cabinets By Stonermakes:
Choose birch plywood for its unbeatable combo of durability and beauty. This wood doesn’t easily warp, promising long-lasting cabinets. Its light hue and delicate grain offer elegance. Plus, it’s moisture-resistant – perfect for steamy kitchens. Bonus: It’s budget-friendly without skimping on quality.
2. Ottolenghi’s Vivid Test Kitchen:
![]() Transform dull spaces like Studiomama did for chef Yotam Ottolenghi. Located in a former railway arch, pops of saffron yellow and raspberry red breathe life. Features? A yellow-gridded window frame, plywood bookcases with playful color trims, and berry-shaded stairs. Even the furniture gets a color boost, mirroring Ottolenghi’s vibrant recipes. Now, cooking is a joy in a space that pops!
Transform dull spaces like Studiomama did for chef Yotam Ottolenghi. Located in a former railway arch, pops of saffron yellow and raspberry red breathe life. Features? A yellow-gridded window frame, plywood bookcases with playful color trims, and berry-shaded stairs. Even the furniture gets a color boost, mirroring Ottolenghi’s vibrant recipes. Now, cooking is a joy in a space that pops!
Stonermakes.com
Dezeen.com
3. Incidental Prepper’s Vertical Canned Food Storage Idea (First In First Out)
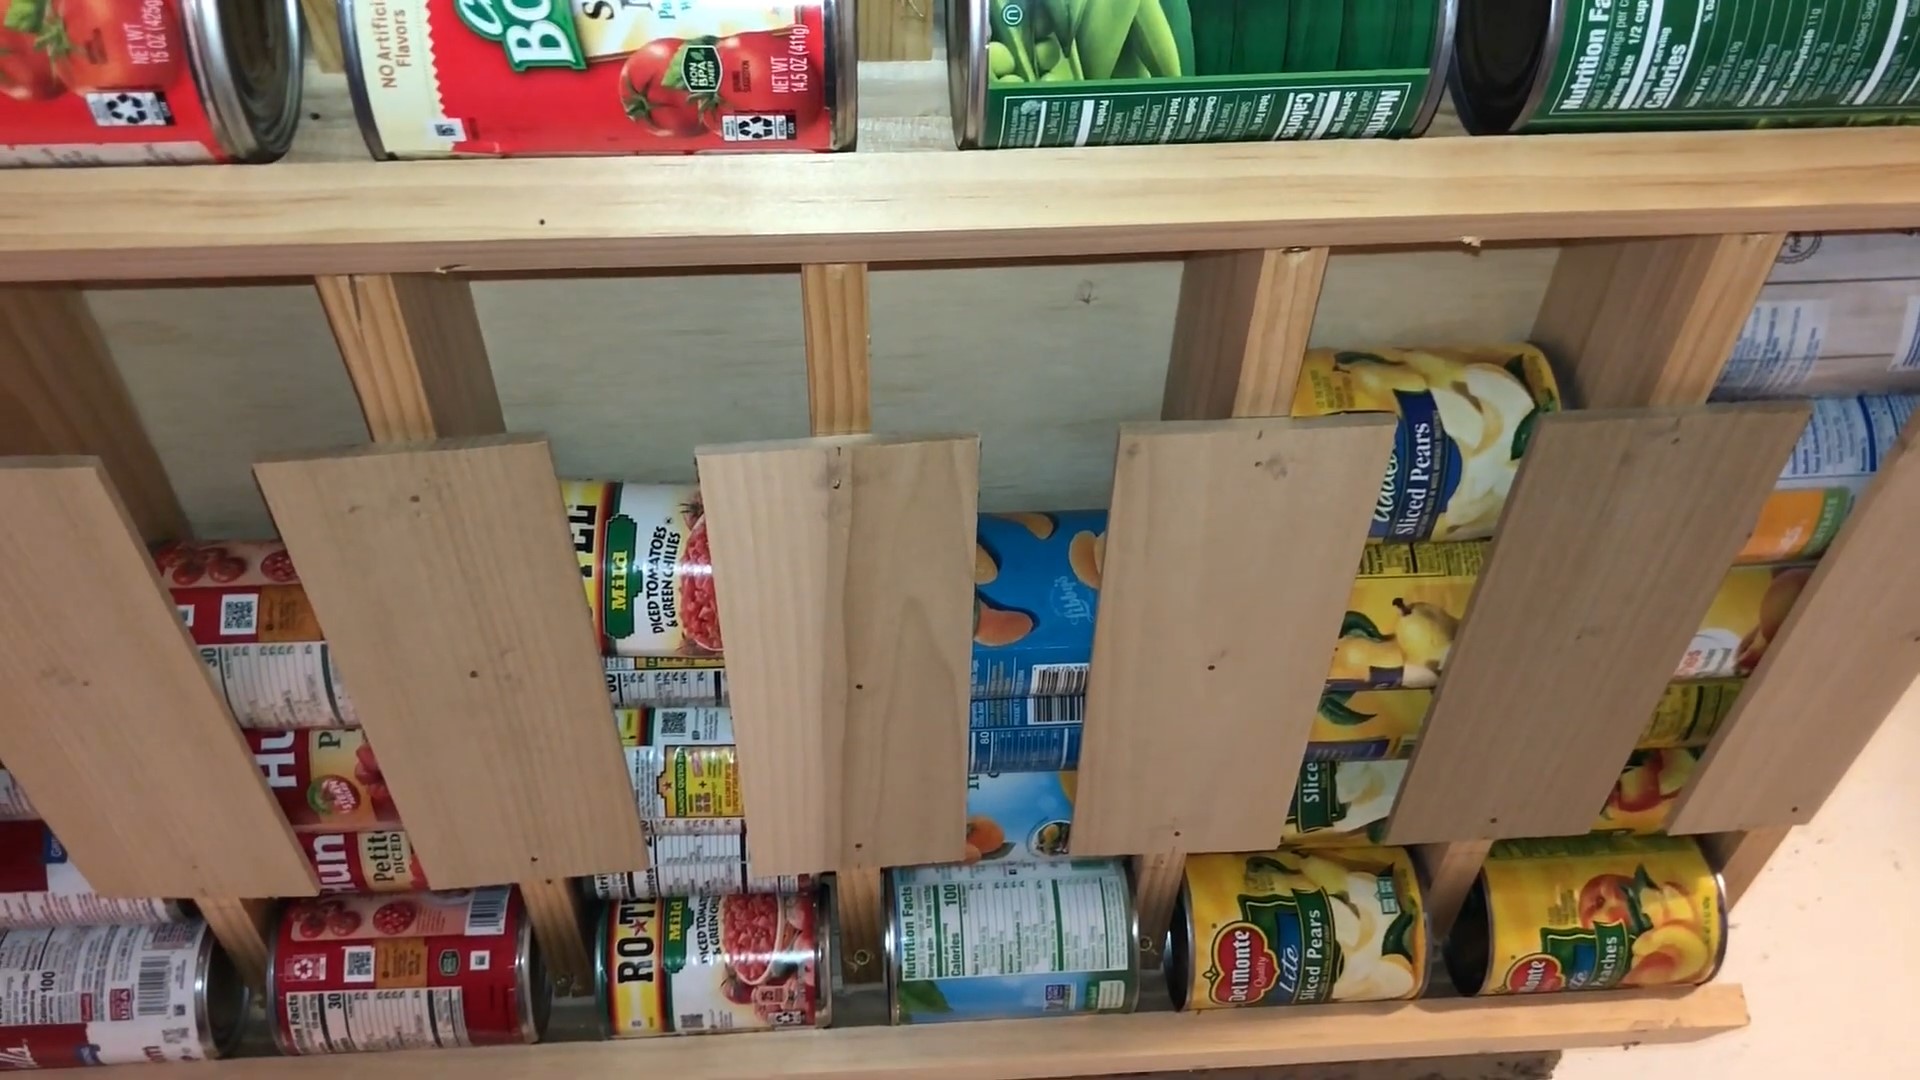 Today, we will learn how Incidental Prepper crafted her efficient vertical food storage system for canned goods. This space-saving solution is perfect for tight spaces like under basement stairs and ensures a first-in, first-out rotation for your food items.
Let’s dive into the details!
Step 1: Construction
Start by creating the basic structure using plywood. Cut a back panel to 32-9/16″ x 24-1/2″ to allow for 6 columns and 42 cans. Use 3/4″ plywood for the vertical dividers (11/16″ actual) and top and bottom frames. Secure the dividers to the back panel and each other with screws. To ease your access, add a bump-out at the bottom of each column to help push the cans forward for easier access. This clever feature makes pulling out cans a breeze!
Step 2: Organizing Cans
Organize your cans for easy inventory and shopping. Keep the oldest cans at the bottom and the newest at the top. When you shop, add new cans to the top, and when you take items from the pantry, grab them from the bottom. This way, you always know what you need to restock.
Step 3: Customize Columns
Feel free to customize your columns based on your preferences and needs. For instance, use multiple columns for frequently used items like corn. Keep a convention of using specific columns to maintain freshness and organization.
Step 4: Smaller Cans Area
If you have smaller cans, such as shrimp or water chestnuts, create a designated area for them. You can vary the column sizes to accommodate different types of food, maximizing your storage efficiency.
Step 5: Consider Weight
Limit your columns to about six cans high, especially for heavy items like canned goods. Too much weight at the bottom can make it difficult to access cans and might compromise the integrity of the cans.
Step 6: Assess Your Space
Look around your home for vertical areas that can be utilized for additional storage. Whether it’s under stairs, in a closet, or any other narrow space, this vertical food storage system can help you make the most of your available space.
2. Craft Your Next Ultimate DIY Can Rotator!
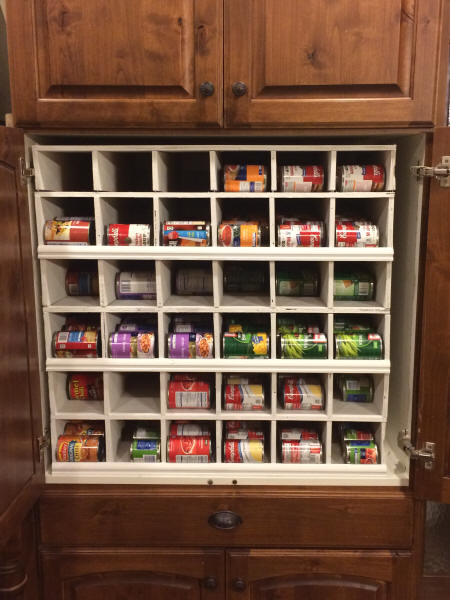 Transform your kitchen space by creating a bespoke can rotation system from 1/2″ plywood. This organizer is designed to hold a whopping 252 standard cans (14 cans x 3 rows x 6 columns), ensuring optimal can rotation.
Here’s your quick guide:
- Determine Dimensions: Measure available space, aiming for six columns with a 1″ gap between cans.
- Shelf Layout: Lay cans on a plywood piece, marking sufficient height and slope for smooth rotation.
- Cut Slots: Stack 4-5 plywood sheets. Drill 1/2″ holes at marked ends and saw slots.
- Shelving: Place vertical plywood pieces apart and cut shelves, fitting the depth of each slot.
- Assembly: Utilize 2×4 blocks for spacing. Nail shelves, flip, and nail the back. Add wood trim to the front, preventing cans from rolling out.
- Finishing Touch: Paint your organizer and let it dazzle in your kitchen. Voilà, a 2-3 hour project to revolutionize your storage!
Detail: Buildmyowncabin.com (1) | (2)
Lastly, No 1. Dive into a DIY Can Rotator System!
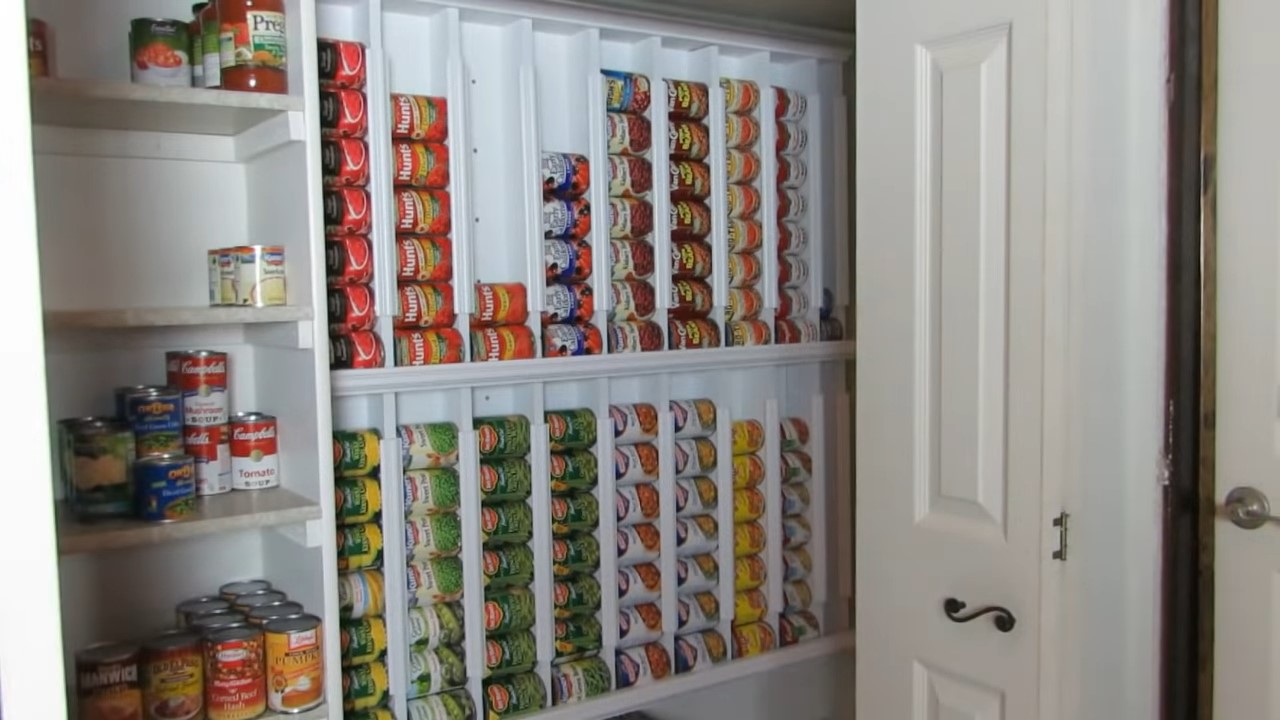
For construction:
- Use 1×4 and 1×2 wood for the can lip, ensuring Cans stay in place. Pre-drill, glue, then screw for support.
- Measure a 24″ drop and clamp; don’t forget the glue.
- Slim down your 1×4 slots to 3 inches for a tight can fit. Add an extra eighth of an inch for can width variability.
- Assemble the top tier using angled screws for robustness. Each row should hold seven cans.
- Place trim (15 7/8″ length for us) to guide cans. Use a nail gun for fastening.
- Add mini trim sections for can rollout, followed by hole-filling and paint.
Detail: Wikihow.com | Video Detail | Support Channel