Organizing clutter is not always a small job. However, the right choice of organizational options can be a life-saver. And this is where we come in! We have 10 wall storage and cabinet ideas that will help you make the most of your space, invest wisely and save a lot of time too! First thing first, Both wall storage and cabinets have the same purpose. More about that soon, and without any further delay, let’s get to it:
Oh, and As always, Simphome presents you with the list.
🔊10 Wall Storage and Cabinets Video:
List Entries:
- 10 Minimalist Living Room Furniture and Storage Improvements
- 10 Bedroom, Bathroom, and Kitchen Cabinet Facelifts for Small Space
- 10 TV Cabinet Ideas and Mounting System Best for a Small Living Room
- 10 Small Living Room Storage and Cabinet
- 10 DIY Before and After Cabinet Makeover Projects
- 12 Kitchen Corner Cabinet Organization ideas
- 12 DIY Projects for Better Wardrobe Organizations
- 12 Bathroom Cabinet Makeovers
- 12 DIY Kitchen Cabinet Makeover Ideas
- 12 Storage Cabinet Ideas for a Small Bedroom and Living Room
10. Simply Add Hinges
 With a particular feature, this wall storage idea is a type of storage that won’t let dust pile in on what is inside. Those hinges are practical, and they are easy to open by pulling up the cover.
It has a beautiful design compared to simple open wooden wall storage. The hinges accentuate the box and become a feature that turns it into more than just a square cabinet on the wall. The cover means it won’t let naughty animals such as rats get inside playing and messing with your collection.
Instructions:
- No 1. Firstly, divide the wall into three divisions using a pencil and ruler.
- No 2. Then, take a piece of wood and cut it into a few pieces that can fit into the divisions you have made earlier.
- No 3. Once you are done with that, take another piece of wood and cut it accordingly to make space for hinges in two walls out of the three walls.
- No 4. Use a drill machine to make holes where you will attach the hinges on each side of each wall.
- No 5. Attach the hinges in each division using screws.
- No 6. Attach the hinges in other walls using screws, too, and then hang up that box you wanted to make open storage with.
That’s all! You have successfully made a wall storage cabinet out of your space lot. Give it that touch of color if you want, and turn it into more than just a bland square cabinet on the wall.
9. Return to the Classic Concept
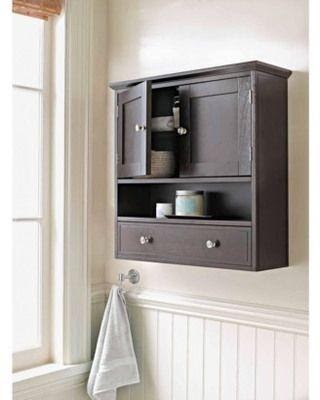 A classic touch spreads an aesthetic feeling in the air. It might not be wall storage that anybody would stare at for a long time and admire it, but it fits the way it is.
When placed in a bathroom, it should be safe from water that may splash when you take a shower. You should as well consider what type of wood you’re going to use. It would be better to use semi-gloss, satin, or gloss paint since they are easy to clean. Opt for 100 percent acrylic enamel formula for durability, especially in a high-moisture room.
Other information you need to pay attention to are:
- No 1. You must use acrylic enamel paint on a flat surface, preferably the bottom of the wall.
- No 2. No primer is needed for this wall storage cabinet since it has an anti-corrosion system baked into it.
- No 3. Use a pencil to draw out where you want the cutout to be, and then mark that using a ruler before cutting out pieces of wood in those places earlier.
- No 4. Use screws to attach the pieces so that they remain stable once they are all pressed together.
- No 5. Now comes the hard part! You have to attach them to the wall as well!
- No 6. Make sure it is in a position that is level with the ground or floor.
- No 7. Give it a coat of paint, and then forget about it since it will be there on your wall even when you get back home.
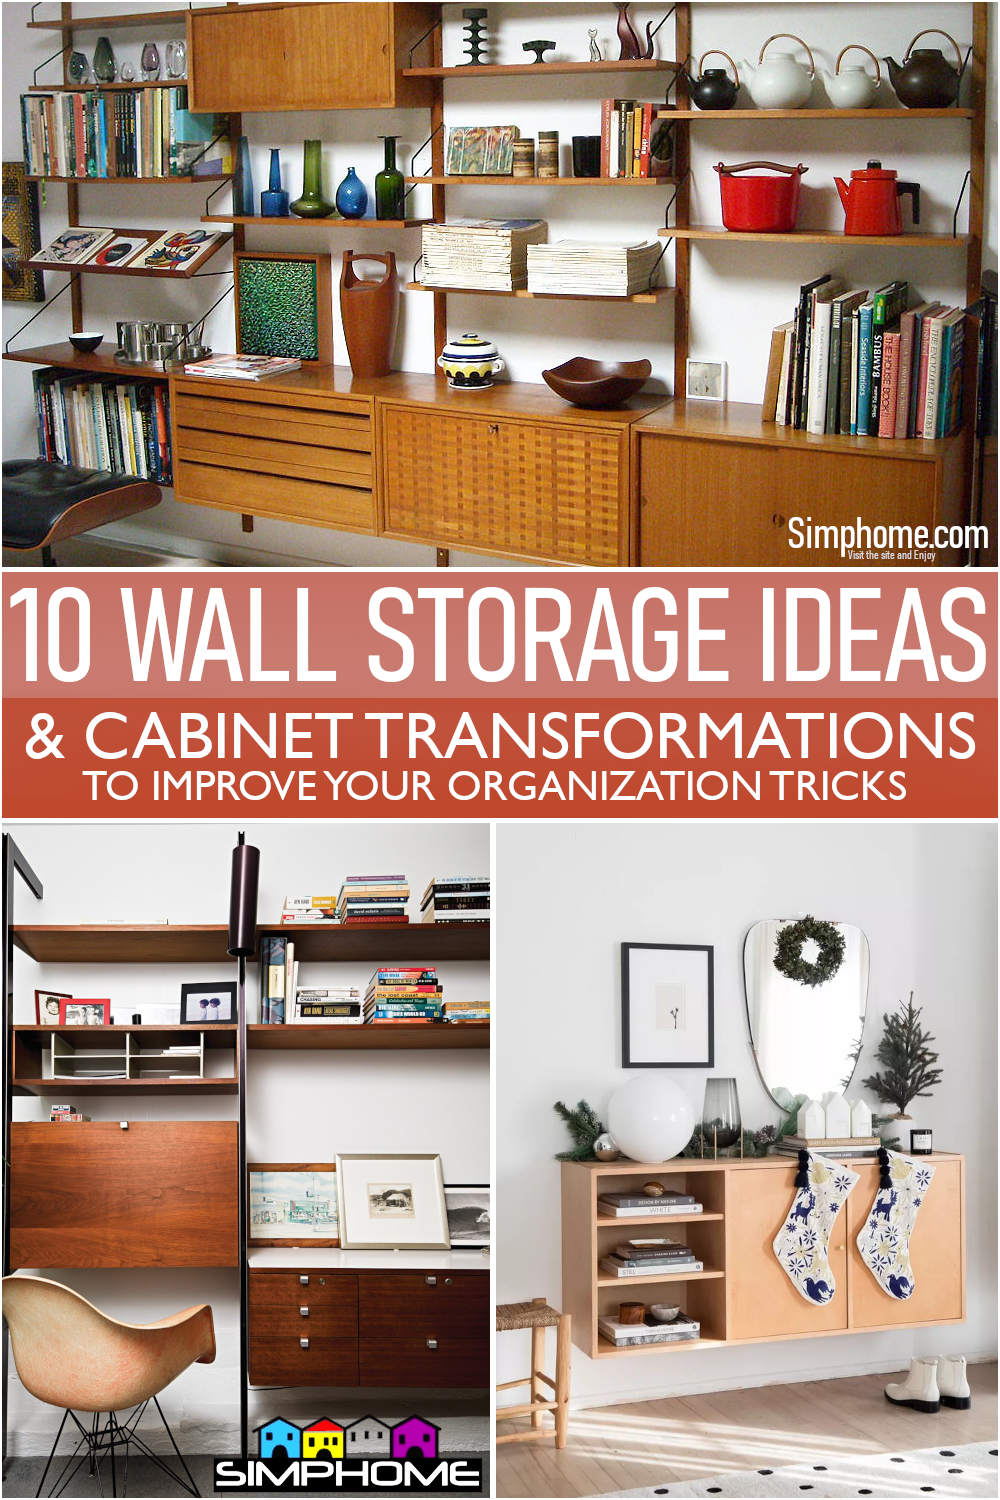
8. The Mid-Century Wall Storage Idea
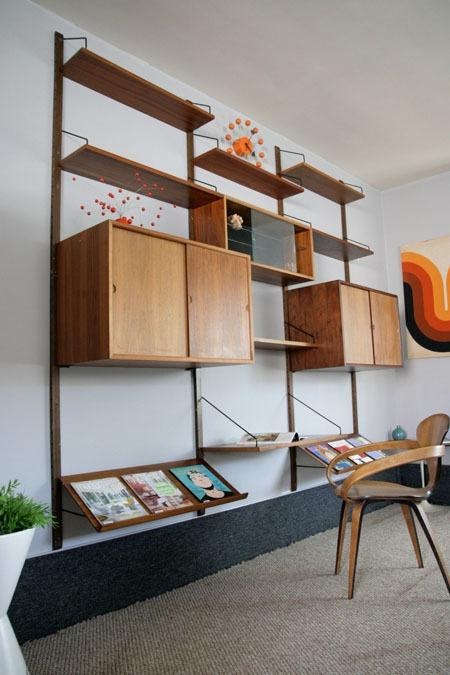 This mid-century wall-montaged idea comes with many shelves and boxes for tremendous storage.
Storing your beautiful collection of art or books wouldn’t be a problem here unless you have a pet that would likely jump up there just to see whether or not the gravity is working.
Open shelves are typically meant to store things that you tend to display, while the boxes keep random things that would be better to stay inside since they could scatter all over the place.
In general, to replicate the floating mid-century wall storage idea or similar to it, your instructions are:
- No 1. Cut through the drywall with a drywall saw.
- No 2. Cut 3/4-inch plywood to fit inside the cutout area. It should be twice as long and half as tall as the cutout area.
- No 3. Use biscuits and glue to assemble the three boxes, including adding backing material behind them (such as with the heavy-duty picture frames).
- No 4. Glue blocks or bricks to the bottom of the back of the boxes.
- No 5. Lay everything out on the floor, and paint it with semi-gloss spray paint as you see fit.
- No 6. Go ahead and hang those boxes up on your wall next to each other and then arrange them as per your preferences.
7. The DIY Wooden Wall Storage
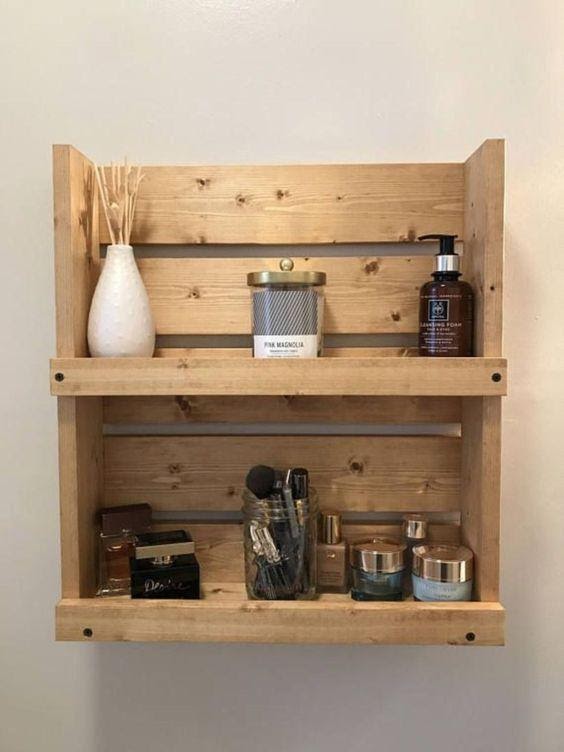 Sometimes you want something after you see it somewhere first. And then you realize you need after you know how valuable the thing is.
This wooden storage is in its natural form without any paint or color. Firstly, determine the size of the storage you would like to build. Secondly, cut the wood into the desired length or height.
Assemble the back strips along with the left and right parts and screw. Put the shelves and secure them with screws or nails. Lastly, fix the front strips, and you’re done.
Other concerns that you need to pay attention to are:
- No 1. Use a 2×4 to make the horizontal part that connects the front and back of each piece of wood.
- No 2. Use a 1×2, and it should support the weight of the wood you’re using.
- No 3. Positioning is critical since this would determine where you hang it on your wall. Ensure there is enough space between one piece of wood and another so there won’t be any distorting or bending when you install them on your wall.
- No 4. Consider using hardwood flooring to make this wall storage. This step would ensure that whatever you put inside it wouldn’t be damaged easily.
- No 5. It is not recommended to put screws through wood since it wouldn’t hold when you open and close the handles. Instead, you should use dowels.
6. The DIY Hanging Wall Storage Idea with Pipes
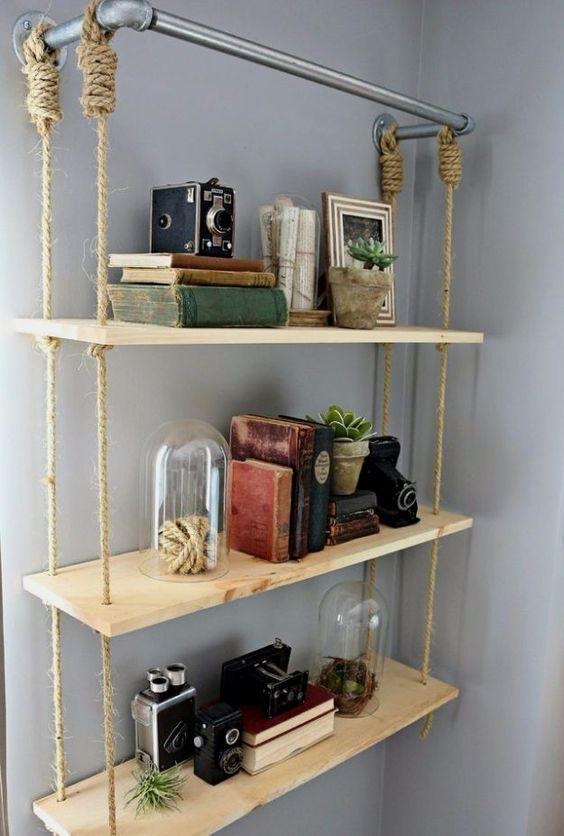
So, make sure you are always careful when placing any stuff on the shelves.
Cut the wood and give each of the cuts holes on the edges. Fix the pipe onto the wall.
Insert ropes through the holes and make a knot for every hole.
Hole the rope on the pipe. Display your favorite things on the shelves and make them look nicely organized.
The relevant information you need to know such as:
- No 1. Use only sturdy pipes to ensure that the shelves won’t bend or break easily (For that reason, check your item first after receiving it from the online store or before you purchase it).
- No 2. Don’t overload the shelves with stuff, or you might have problems getting your favorite stuff out at a later time.
- No 3. Use nails or screws to connect the wood and ensure maximum stability when hanging it on your wall.
- No 4. Cut holes through the wood to fix ropes on them and hang them back up on your wall after heavy use.
- No 5. When you’re not using this storage space, you can have it disassembled and stored somewhere inside your house.
5. The Sliding Kitchen Cabinet Idea
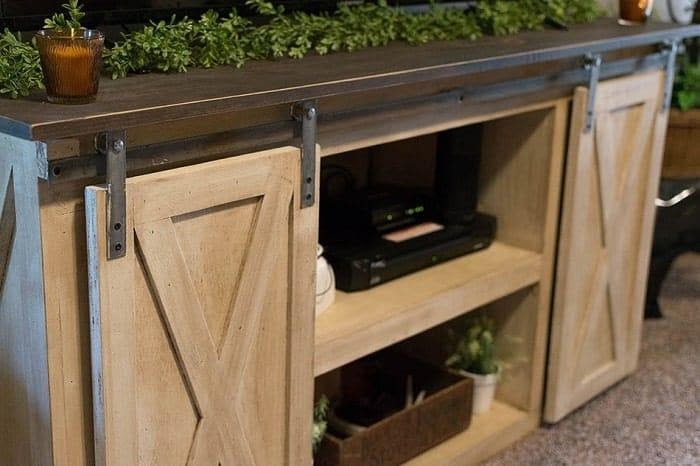 Cabinets are crucial in the kitchen. It’s because the kitchen would be one of the many places that stores lots of equipment and ingredients. When you have a tight space, it could be a problem when opening the cabinet doors.
Sliding doors come to the rescue. Not only does the cabinet have a style, but it also saves some space as you can slide the doors aside. You can still have a wide space when you sit in front of the cabinet, trying to pick any ingredients from the cabinet.
Pick weather-resistant wood so that it won’t bend as time passes by or the door won’t shut properly.
It is not impossible to hang the cabinet with sliders too.
And in general, your instructions are:
- No 1. Cut the pieces of wood using a miter saw.
- No 2. Use a brad nailer to secure the parts together.
- No 3. Cut the bottom of your cabinet, and place it on the floor to be straight.
- No 4. Use a chalk pencil to do the marking. Cut out the holes for drawers, and insert them with drawer slides. They tend to fit better than regular hinges.
- No 5. Assemble all cabinet parts, including adding backing material behind them (heavy-duty picture frames).
- No 6. Hang the cabinet on your wall with nails or screws.
4. The floating cabinet idea with foot space
 The idea of removing the legs and mounting the cabinet is to create an open and airy space. And it looks pretty nice here. When mounting it on the wall, you need to find the studs to hang the cabinet.
You may remove the doors first so that you can fix the cabinet well. Make sure it’s on an equal level, or else it will look slanted to the side. You may add some plants or greeneries to the cabinet to bring beauty here.
The relevant informations you need to know:
- No 1. Check the spacing of the door so that it would slide smoothly.
- No 2. Use glue (mastic) to fix the cabinet.
- No 3. Mounting nails are enough for this idea.
- No 4. Choose weather-resistant wood to make this floating cabinet so that the surface doesn’t get damaged easily
3. How To Hang A Pallet on a Wall Safely
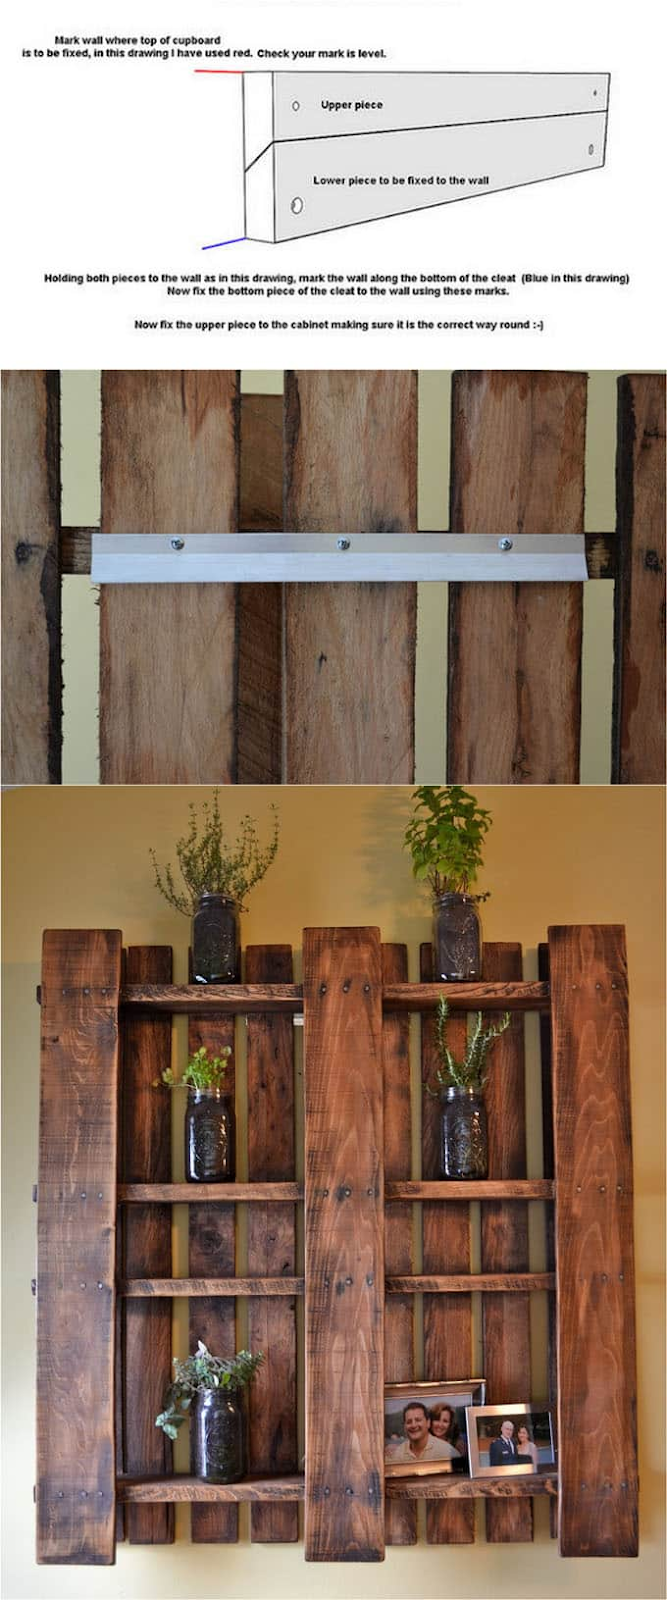 A Regular Wooden pallet is heavy. Big nails, even anchors, and a stud sometimes won’t do the job. You probably have the concern in your mind, too, but you probably haven’t heard about the french cleat.
Some brands will include instructions on the back of their packaging and a smartphone scan code. But in reality, you just need to put one side of the cleat on the wall, level it, and screw it into place.
Start the gear by screwing in the middle, and screw it slowly until it is parallel (Secure a small level that will attach to the cleat). Attach the opposite side of the cleat to the pallet. And so, within a second, you would have your very own secure way of making a wall pallet.
[amazon bestseller=”french cleat” items=”4″]
A 100-pound cleat should be double the weight of a pallet. Plus, all the gear is included; it has a solid level and doesn’t need any power tools. Also, the ability to move an item by inches will increase flexibly depending on what is necessary.
2. Recycled Your Kitchen Cabinet with Barn wood
 This cabinet is a recycled idea. The broken or unnecessary parts were torn down and left with the parts that were still worth using. It got a nice makeover that made it what it is now. The barn wood doors were the new feature that changed the cabinet.
It is possible to apply this principle for the same occurrence. If you have an old cabinet or see somebody throw theirs, you can ask if it’s okay to collect the cabinet. It would be a great opportunity as long as the cabinet is still worth recycling.
It may be perfect for cutting down on the budget. Besides, you just don’t want to waste a chance to modify something old to become new and valuable.
To maintain your new wooden cabinet, your instructions are:
- No 1. Use good quality paint.
- No 2. Use nails because you need to fasten the cabinet to a wall or ceiling.
- No 3. Cut the wood according to your size.
- No 4. Use sandpaper or wet or dry paper to smooth out the surface and avoid gouges and holes in your cabinet doors.
- No 5. Fix the hinges using nails and wood glue.
- No 6. You can use a hand drill or masonry bit to screw in the cabinet as long as you have a workbench that it would match with.
- No 7. Ensure that you do not use paint thinner on your furniture and expose it to sunlight to avoid damage from UV rays.
Lastly, Number 1. Add Racks on the Doors
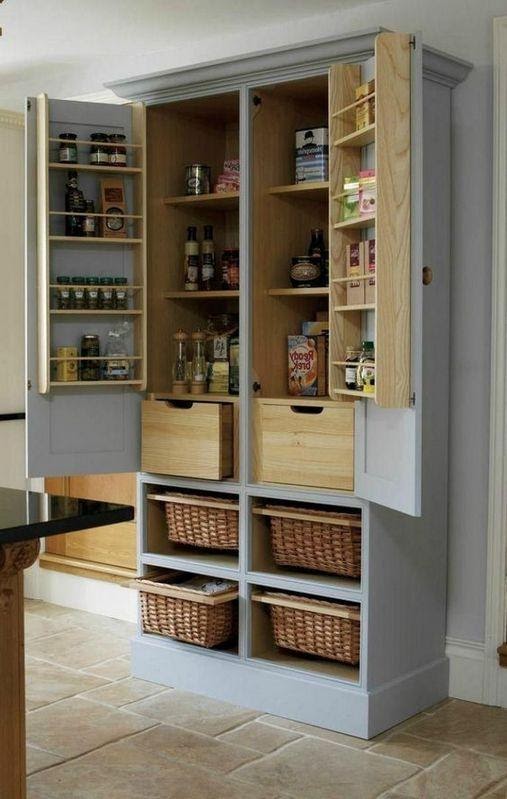 This pantry cabinet may look small, but it provides more than you would expect. There are six shelves, two drawers, and four rooms for baskets below, not to mention racks on the doors.
The racks are additional storage when you think you have more food to save than the size of the cabinet itself. But you should use durable hinges as they hold more weight than typical doors without racks.
If the hinges can hold them, the doors will be slightly down, which looks ugly, and you will have difficulty shutting the doors.
Other instruction or information you need to know:
- No 1. Mix paint to imitate the color of your desired shelves.
- No 2. Use nails to fix the shelves on the cabinet.
- No 3. Use cloth hangers for baskets.
- No 4. You may want to use a paint thinner or wood bleaching to make your cabinets look good and help maintain them for long periods. It enables you to dry faster, and the wooden furniture will not fade and become yellow as time passes by.
- No 5. Add hooks or a rod to the crown of the shelf for hanging clothes or towels.
- No 6. Use a rubber band to hold the towel rod in place so that the shelf doesn’t hang upside down or drop.
- No 7. Use a tap with a screwdriver to attach it to cabinets and furniture alike.
Conclusion:
So the 10 wall storage and cabinet ideas are on your way to finding what you need. They do look charming and also appealing. However, the convenience and beauty of the cabinet hinge on the construction methods. So you have to consider all these factors to come up with a good decision on what would work well for you.
Not only do they give storage options, but they also make your wall space look organized and tidy, as well. You just need to consider where you want it in your home or apartment.
So, What do you think of our 10 wall storage and cabinet ideas? We hope you find them helpful.
References:
10. Housebeautiful.com
9. Pinterest.com
8. Digsdigs.com
7. Pinterest.ru
6. Pinterest.com
5. Homenish.com
4. Mydomaine.com
3. Domesticdoozie.blogspot.com
2. Morningchores.com
1. Decorinspira.com