A Built-in Closet Project that can Camouflage
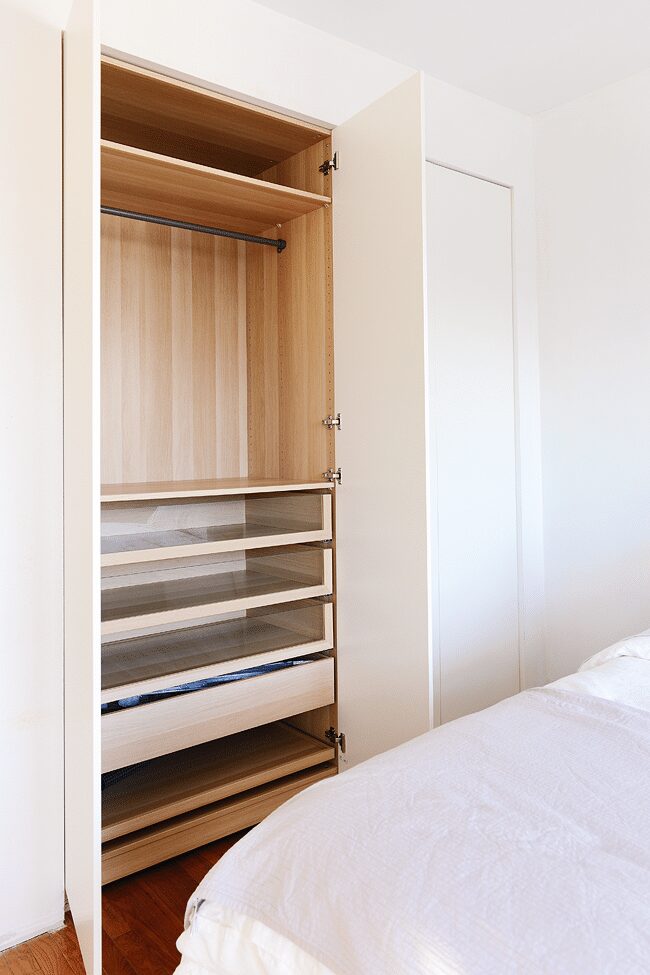
One that makes a room feel bigger is less furniture. So, creating a built-in closet is a result of the statement. If you want to DIY one for your own, here are the steps.
The first thing is to assemble the IKEA PAX box frame and attach the doors. Next, slide the cabinet you the boxed-out space in your bedroom. Secure it directly to the wall. Add trim to the bottom to conceal and shim.
After that, slide the second box. You might need some adjustments in this step based on the size of your space. Finally, attach all the drawers to the box.
How to Make the Most of a Small Closet
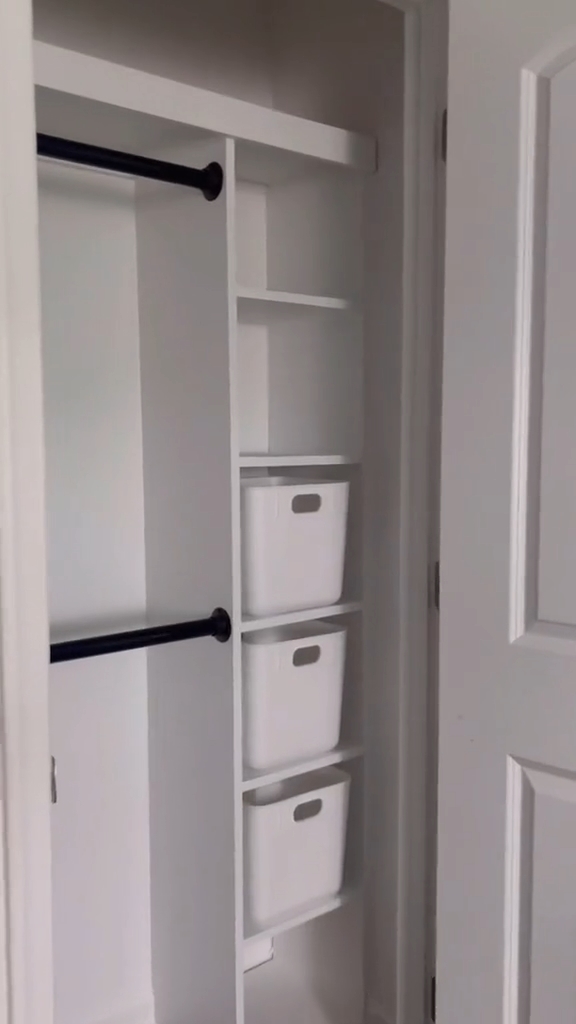
You do not need to worry if you have a small closet. Here we have the answer to maximize the space. Start with clearing out all your stuff from the closet. Then detach all the shelves and rods. When the closet is clean and empty, mark the wall using tape.
Then cut boards the size of your marks. Assemble the board to make vertical cubes from 4 x 8 plywood. Next, install the cabinet in the closet. Screw cleat to the wall.
Then attach the board to create a shelf. After that, paint the cabinet and shelf. When the paint dries, attach rods to the cabinet and side wall. Last, insert boxes into the cabinet to keep it tidy.
A Cubby Storage Idea for Your Shoes
Looking for a stylish and practical storage solution for your shoes? Look no further than this easy-to-make DIY cube! With just a few simple steps, you can have stylish and functional storage space for your footwear in no time.
First, measure the available space, so you know exactly how much room you have to work with. Then, cut two 1×12 boards to 52 inches. This will be the frame for your cube.
Next, it’s time to get creative. Draw a zigzag pattern on the boards to create a unique look for your shelves. Trace the line with a circular saw and cut out the shelves.
Once you’ve cut the shelves, it’s time to assemble the cube. Glue the shelves into place and secure them with nails. Then, using some plywood, make the front pieces – one less than the number of shelves – and nail it to the frame boards.
Finally, give your new cube a fresh coat of paint and prime it to protect it from wear and tear. Your shoes will thank you for the stylish and functional storage space, and you’ll have the satisfaction of creating it yourself.
Lastly, A Small Walk-In Closet Makeover

Revamping a cramped walk-in closet can feel daunting, but it doesn’t have to be! The key to success is getting organized and decluttering.
Start by emptying the closet and removing any items you no longer need. Once you have a clean slate, it’s time to give the space a fresh new look. Repaint the walls in a neutral color to create a bright and open environment.
Next, it’s time to add some storage. Install an IKEA Algot system to maximize the space and create a custom shelving solution. First, screw the frame to the wall and mark where you want the shelves to be attached. Then, build the shelves and baskets and secure them in place.
Finally, don’t forget to make use of every inch of space. Add pockets to store smaller items and maximize the space beside the shelving unit. When organizing your clothes, place the items you use less frequently on the top shelf. With these tips and a little bit of elbow grease, your walk-in closet will be a beautiful and functional space in no time!
References:
10. Karapaslaydesigns.com
9. Thriftdiving.com
8. Schereleimpapier.de
7. Youtube.com/@JayMuneeDIY
6. Familyhandyman.com
5. Ispydiy.com
4. Yellowbrickhome.com
3.Tiktok.com/@therenegadehome, Tiktok.com/@therenegadehome, Instagram.com/@therenegadehome
2. Realitydaydream.com
1. Youtube.com/@MissAnnieB