We need to get creative with our cooking methods because of our little kitchen. We also believe you have more leeway to take risks in a compact kitchen than in a spacious one with an island and an American-style refrigerator. As a result of the size constraint, the kitchen cabinet costs can be reduced, freeing up additional funds that you can put toward things like lighting and appliances.
Because most people get their morning started in the kitchen, it tends to be the busiest room in the house. It should come as no surprise that it has a good number of spices and condiments essential to your daily life. You will require a significant amount of storage space for those products. The space limitations of your kitchen prevent you from enjoying that luxury.
Try not to give up hope. We have compiled the following 12 Small house kitchen essential solutions to assist you in developing a clutter-free and pleasant environment for food preparation. As always, Simphome curates the countdown.
12 Small House Kitchen Essential Options
12. The DIY Rolling Kitchen Appliance and storage
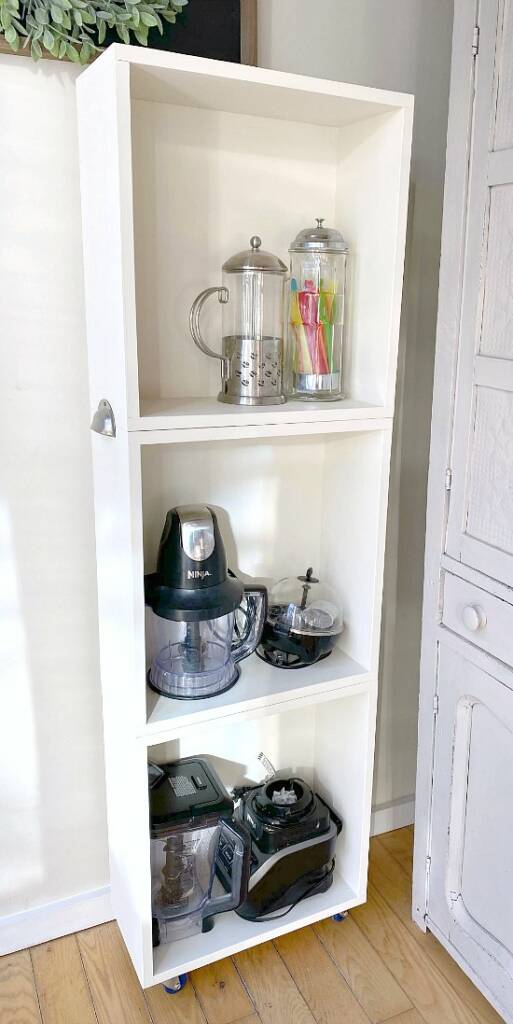 The process begins with fresh new, hand-built wooden boxes, with castors added to the base crate.
To be clear, the castors of the spinning variety must have wheels that roll in a straight line and out again. Then, stack three boxes atop one another, secured with wood glue and screws. Despite the difficulty of the space, this mobile shelf fits in the pantry perfectly.
It will be ideal if the pantry is tucked away near the back entrance, so it won’t be in the way. After that, paint the mobile racks to make them less noticeable. They are better to be white, so you can blend them to create a uniform color and set to work painting. Attach a little cup pull to the edge of the boxes to get you out of that nook.
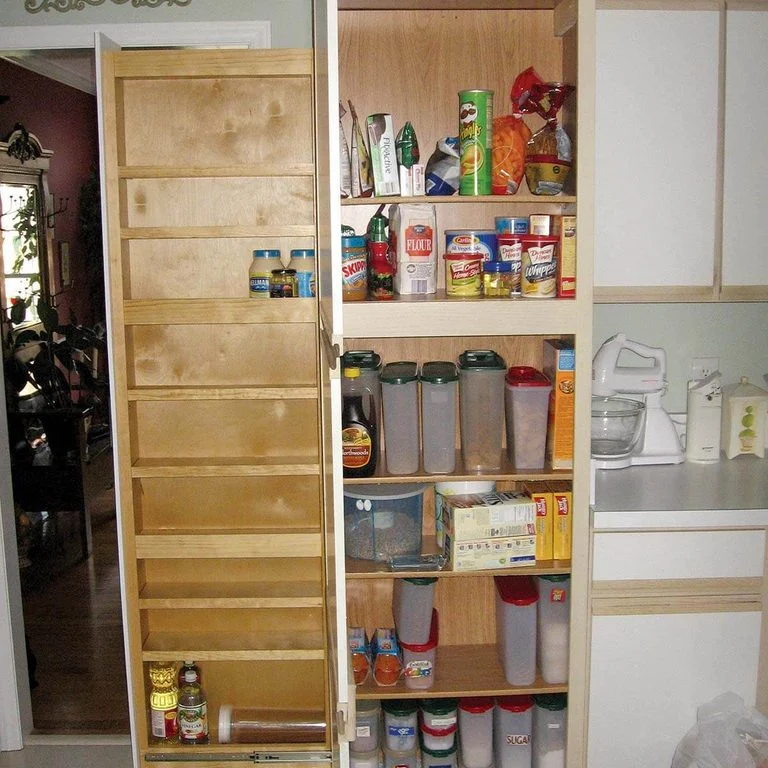
11. No-Pantry Tricks
 Not all people are blessed with a dedicated pantry. Thus, they tend to toss everything in the cabinets and drawers, creating a veritable catastrophe. You need to end it soon by making an ergonomic cabinet or cupboard to house your kitchen essentials.
This cupboard features drawer slides that enable you to pull the shelves out. This way, you can access items stored at the back easily. You will not throw canned foods away in the trashcan because they are expired already anymore.
Optimize the storage space by tapping into the door. You can hang some hooks or purchase magnetic spice jars to incorporate additional storage solutions.
10. A Kitchen rollout project idea
 Jason Gilliam (the author) moved the cabinet to the garage and performed delicate surgery there to come out with the idea. He shifted the rear panel forward, made a hole in the side, and installed a shelf that anyone could pull out. The shelf is mobile on a set of fixed casters, and Jason supported the new storage with full-extension drawer slides (two installed at the bottom and one constructed at the top).
9. A DIY Ziploc Bag Organizer
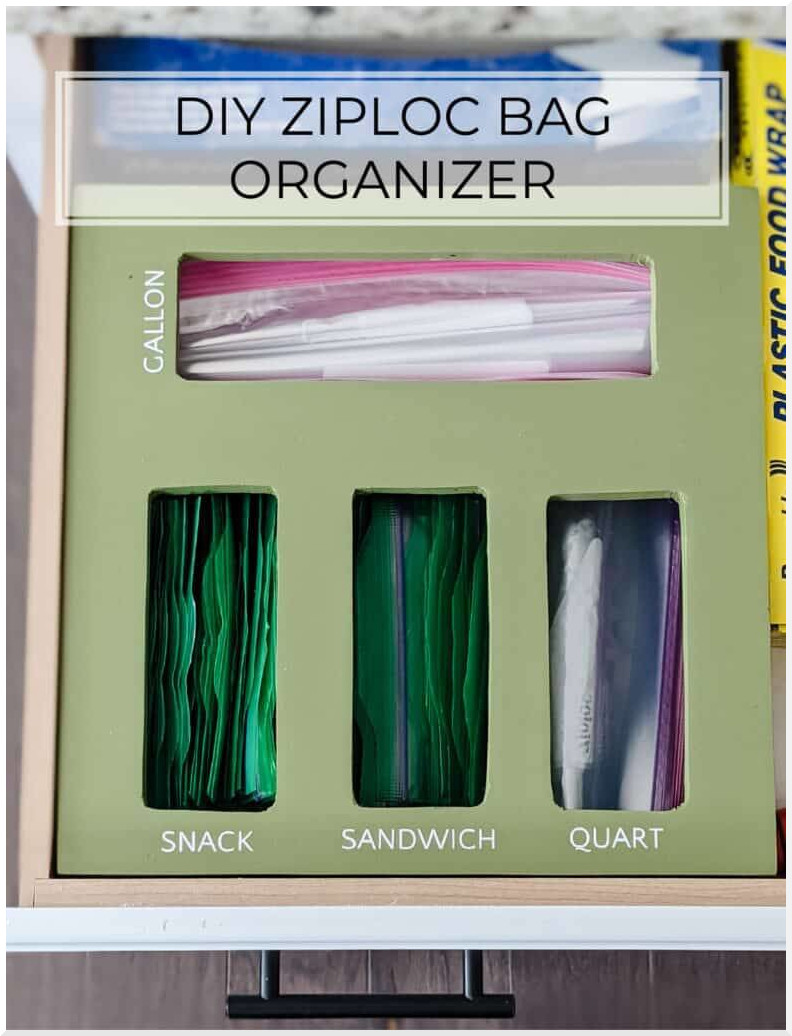 This DIY Ziploc organizer can hold a full Costco variety pack of Ziploc bags, including 52-gallon bags, 50-quart bags, 125 sandwich bags, and 120 snack bags.
MAKE YOUR CUTS:
The author constructed the Ziploc organizer from a 2’x4′ sheet of maple plywood. Cut your plywood to the sizes specified on the cut list above.
CUT ZIPLOC BAGS HOLES
Now that you’ve cut the major parts, you can cut the holes for the Ziploc bag compartments.
Begin by drawing out where you want to cut your top piece. Each section will be around 2.5″ wide.
USE GLUE AND NAILS TO ASSEMBLE
Now that you’ve completed step 2, it’s time to put it together!
One thing to keep in mind is that if your holes are a little rough, it’s best to sand the interior of the holes you cut before putting everything together.
Later, you’ll use wood glue and 1″ nails for assembly. A new component is stacked over the previous one, and nails are driven through both layers.
Finally, PRIMER, ADD LABELS, and SEALER WITH POLYCRYLIC for staining or painting.
8. The EXPEDIT ROLLING KITCHEN ISLAND Idea with multiple functionalities
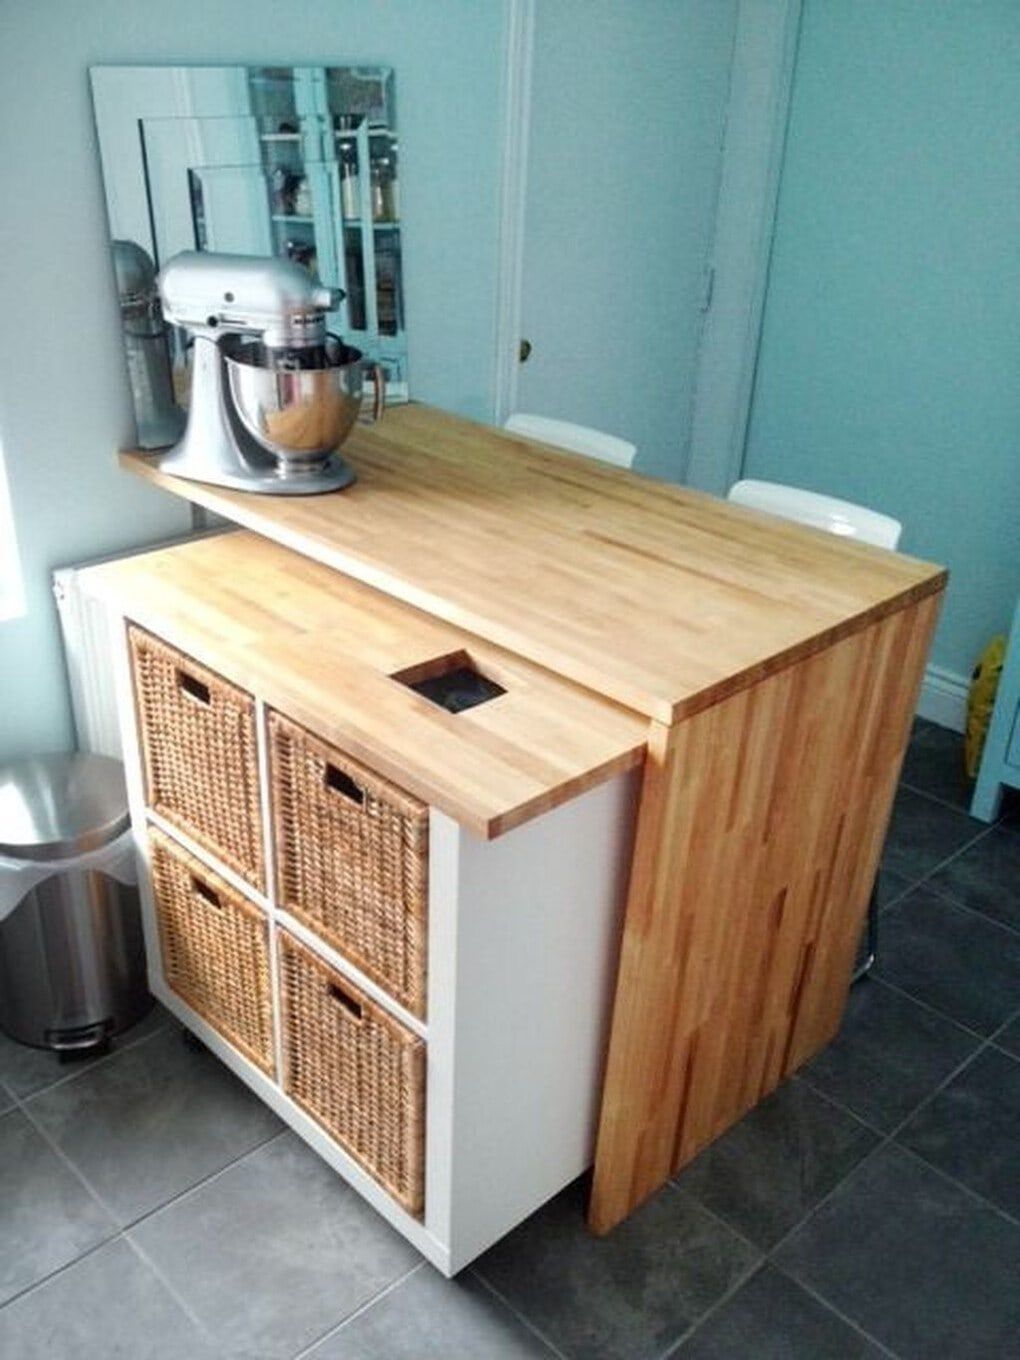
First, assemble the Expedit bookshelf, omitting the top panel and adding castors to the bottom. Given how much pushing, pulling and shoving this island undergoes, utilize high-quality rubber castors.
Second, cut the Lagan countertop to the correct size (overhanging the front and back of the shelf and leaving a 2.5′′ overhang on each side). Because Expedit panels are hollow fiberboard, use many tiny brackets. Lay the countertop over the shelf and trace the shelf panels on the bottom.
Then secure the countertop brackets. Reverse it and attach the side and center brackets.
Cut a 1/8″-thick backing panel. You need to nail Primed MDF to the shelf back. This little trick stops the baskets from being kicked by island chairs.
Fourth, cut the Lagan countertop into an L-shape and fasten it to the wall (find the studs!).
- Expedit storage cube (2×2) in white
- (2) Lengths of Ikea Numerar countertop
- Heavy duty L-brackets
- Light duty corner brackets
- 1″ Wood screws (for island construction)
- 2.5″ Screws (for wall mounting)
- (4) Heavy-duty castors
Construction
First, assemble the Expedit unit
One thing to remember when putting together the Expedit is to make sure you mount the castors far enough apart. The first holes I drilled were too closely spaced, and the unit was prone to tipping if moved too quickly. I ended up removing the castors and remounting them closer to the edges.
Second, measure the length of the countertop to overhang the Expedit. I wanted a small overhang at the back, just enough to cover the thin MDF backer panel (note: this doesn’t come with the Expedit, but no one wants their pretty baskets falling out the back!)
To secure the countertop:
- Lay it on top of the shelves.
- With a pencil, trace the line of the gables onto the underside of the countertop.
- Attach the corner brackets to the countertop, flip them over, and screw them to the gables.
Be aware the gables on the sides are basically hollow fiber boards and may not offer a great grip for the screws. However, the center gable and the weight of the countertop will keep it in place with no problem.
For the L-shaped island, the directions are uber simple. Cut two lengths of countertop with a skilled saw to the dimensions as shown on the below construction plans.
Next up – mounting to the wall. I found it was easier to secure the L-brackets to the wall first. It gave the counter something to rest on while I screwed the L-bracket to the underside. If you mount the bracket to the countertop and then to the wall, you’ll support the counter with your body while you screw into studs. Not ideal!
Finally, once you have the leg sitting at the best angle you want (remember, until now, it’s been secured to the top with only small corner brackets), you should add heavy-duty L-brackets to the inside corner. Originally I wasn’t going to do this, but I found the leg slid around under the counter, and I wanted more structural stability than that!
One last step for extra awesomeness: Above the upper right cabinet, I cut a small hole (6″x6″) with my jigsaw. Below that hole was a waste bin wedged into the basket. Perfect for cutting veggies and dumping the cuttings right into the bin. Can I get a Booyah for efficiency?
7. A DIY Custom Kitchen Storage Shelf
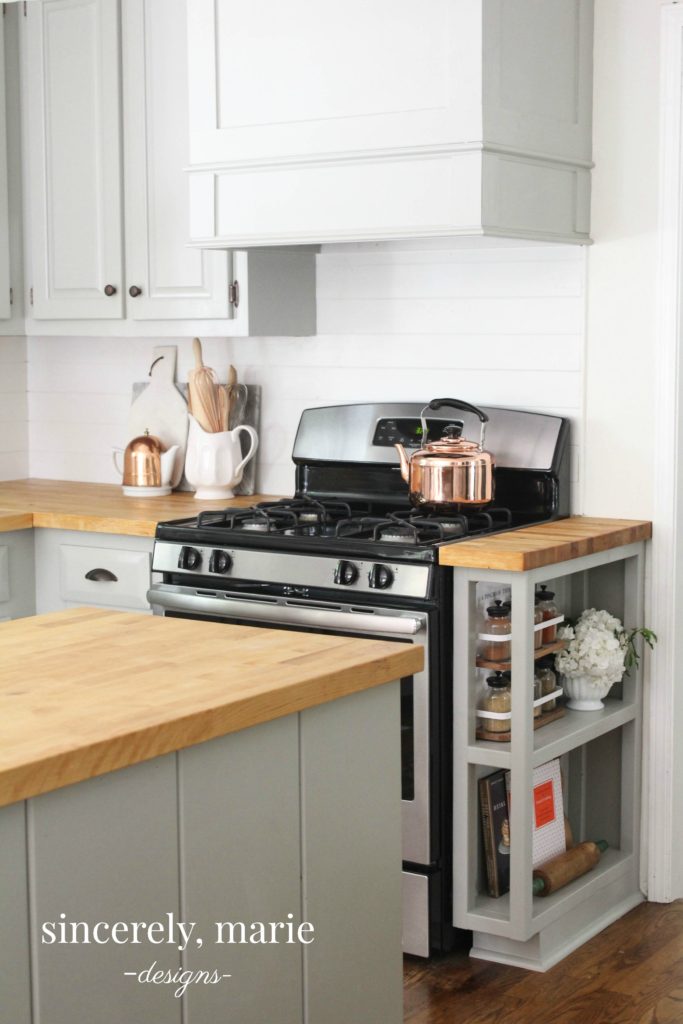 This concept is essentially a cookbook rack that also provides a convenient place to keep your spices. To replicate the design, you’ll need to use 2x2s to create a shelf frame that’s the same width and depth as our current cabinets and then use 1/2-inch plywood for the two shelves.
Then, construct a foundation using 2x4s and finish the back with a bead board. You may easily make do with scraps from the last time you put in countertops by cutting a piece of butcher block to size, gluing it to the top of the frame, and sealing the whole thing.
6. The slideout kitchen essential racks
 Those condiment drawers and rotating spice racks are flavorful, much like life. You may stow your belongings out of sight in these tall, narrow drawers when you don’t need them. If you cook with spices frequently but have difficulties keeping them organized, this is the perfect answer for your kitchen. Spices keep well, as do many other condiments, like olive oil.
These vertical drawers are ideal for budget-conscious homeowners needing a unique way to organize their kitchen’s contents. Unlike many conventional space-saving storage solutions, both rolled up and unrolled; they make a stylish statement.
5. A Pull-out Baking Sheet Drawer Idea
 When you’re finished with the parts, put pressure on the drawer sides while attaching them to ensure there’s no gap (this is when a clamp would be nice). Then, in the same manner, attach the drawer bottom to the drawer front. Then, while maintaining the wood level on the hard surface, rotate it to one of the side pieces and attach it. Before attaching the other side piece, rotate the wood to the other side piece (flat on the hard surface), then set the back piece in position to ensure it fits.
The reverse piece is then attached in the same manner. TIP: Long clamps will make assembling the drawer easier, but you can accomplish it without them.
4. The shelving support idea without a Bracket or Nail
 Even down to the shelves’ supports, Martha Stewart carefully thought about every detail in her Bedford, New York kitchen. Shelves may be easily slid in and out with the help of “bird’s beak” supports, a classic carpentry technique Martha particularly likes. There are no flaws in the form due to holes or hardware.
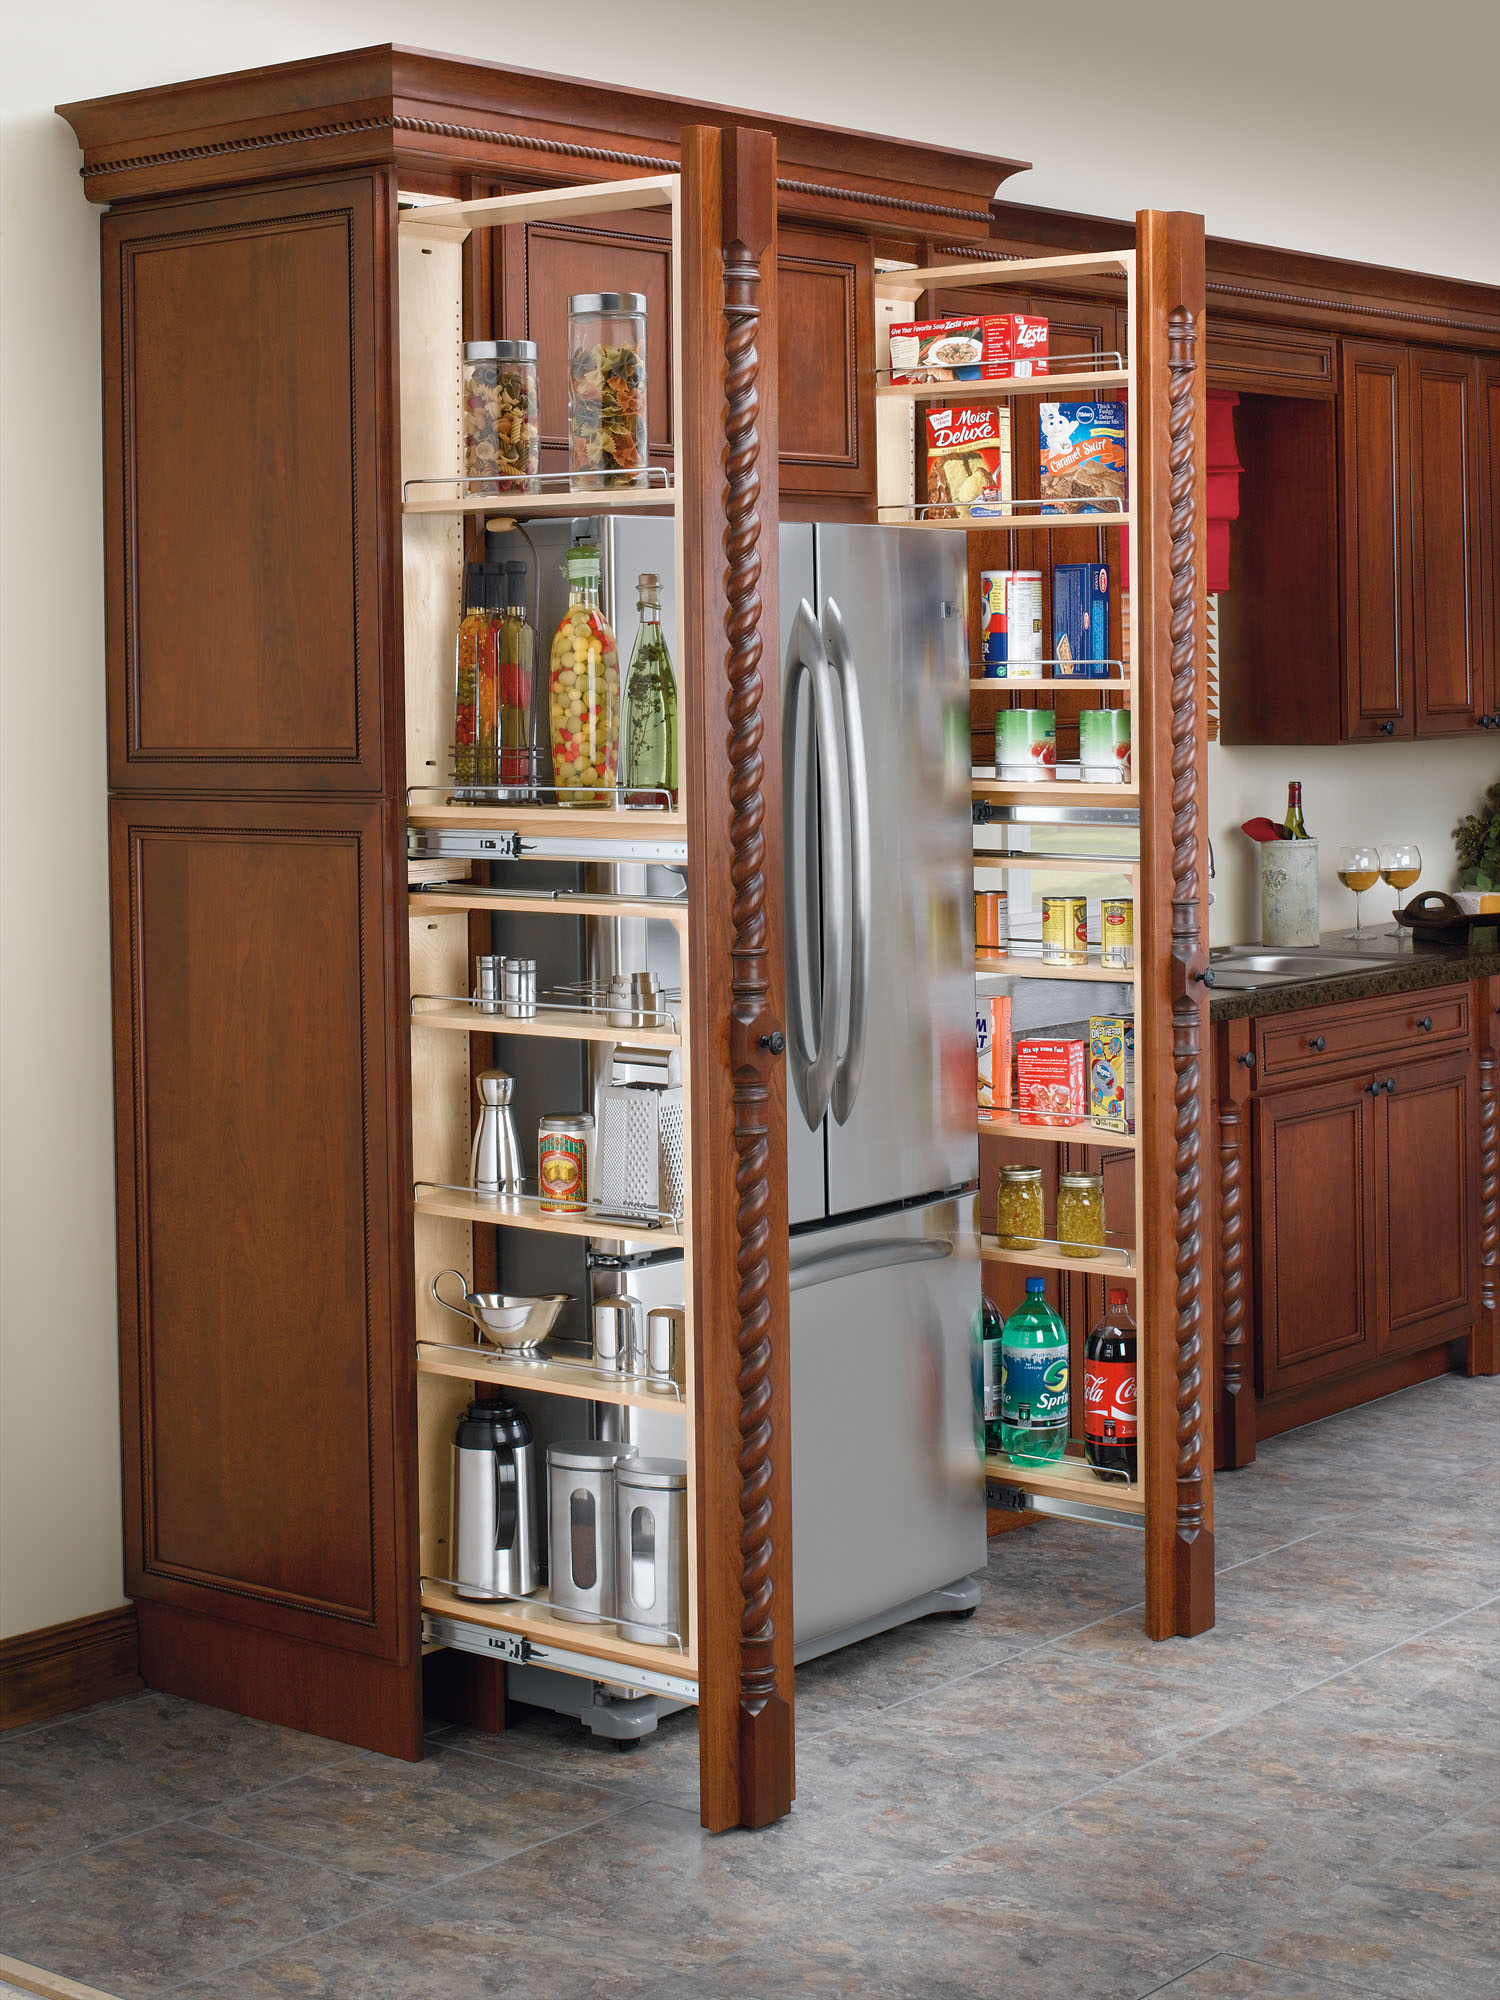
3. The Tall Unit split shelving idea
 The existing Sub Zero refrigerator and freezer inspired the overall kitchen design transformation. Moneyhill interiors upgraded the kitchen with a microwave in the wall cabinet, a steam oven, a warming drawer, and a Wolf single oven. Even though counter space is limited, a Miele five-zone induction hob fits in without a problem. With a stunning appearance and functionality, this kitchen represents the pinnacle of modern kitchen design. A Quooker fusion tap, a wine rack with integrated walnut lap trays, and marble countertops that wrap the peninsula are just a few of the ingenious details.
Remodel ideas for a compact U-shaped kitchen with a light wood floor, beaded-inset cabinetry, white cabinets, a white backsplash, a stone slab backsplash, stainless steel equipment, and a peninsula in Hertfordshire.
2. A Swing-out Storage Kitchen Cabinets
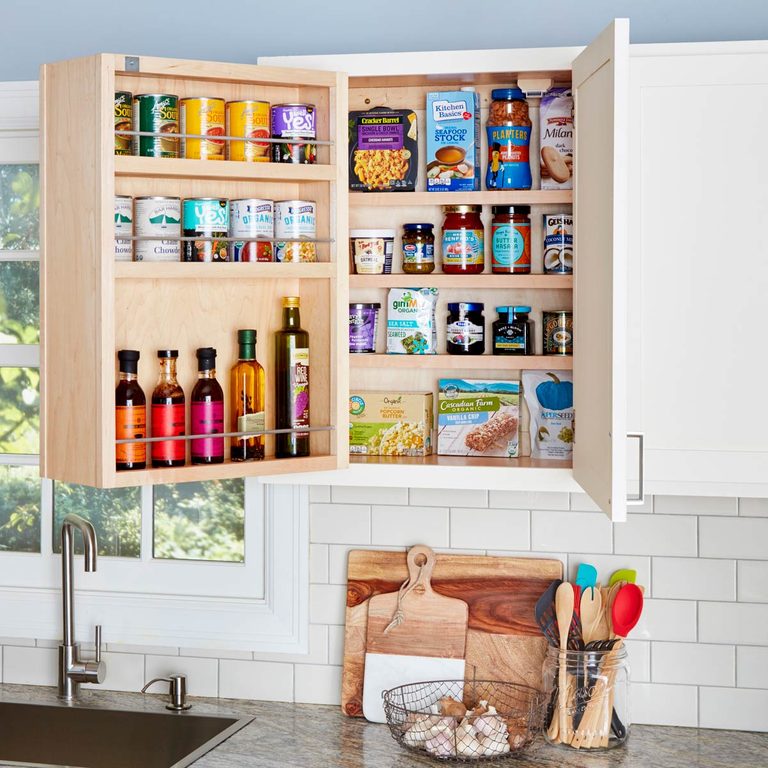 Hardware for sliding-door tool cabinets.
You can get everything you need to build this handy swing-out cabinet at a hardware store or lumber yard. You must precisely cut plywood for the pull-out shelves, and 1x3s must be shredded into 1-inch-wide strips for the shelf ends. The optimum instruments for making these cuts are a table saw, and a power miter saw.
Fasten everything together with 1-1/2-inch brad nails and an 18-gauge brad nailer. However, screws or finish nails can be driven by hand if a brad nailer is unavailable.
Shelving is arranged in three levels.
Place the spices you use the most frequently in easy reach. Put infrequently used things on the two inner shelves.
You should plan the size of the swing-out ahead of time.
Since there is such a wide range of wall cabinet sizes, we can’t provide you with a specific blueprint for constructing a swing-out that will fit in yours. You’ll need to modify the cabinet’s width and height to make it work, but since most wall cabinets have the same depth, you should be able to make the cabinet 8 inches deep like ours.
How to Instructions: Determine the Size of your cabinets and ensure you are clear to go.
Next, Construct a Box. Set up the partition, make rod holes, set up the rods and trim, complete the hinge’s continuous mount, install the pull-out, and lastly, set up movable shelves
1. A Tiered spice rack idea
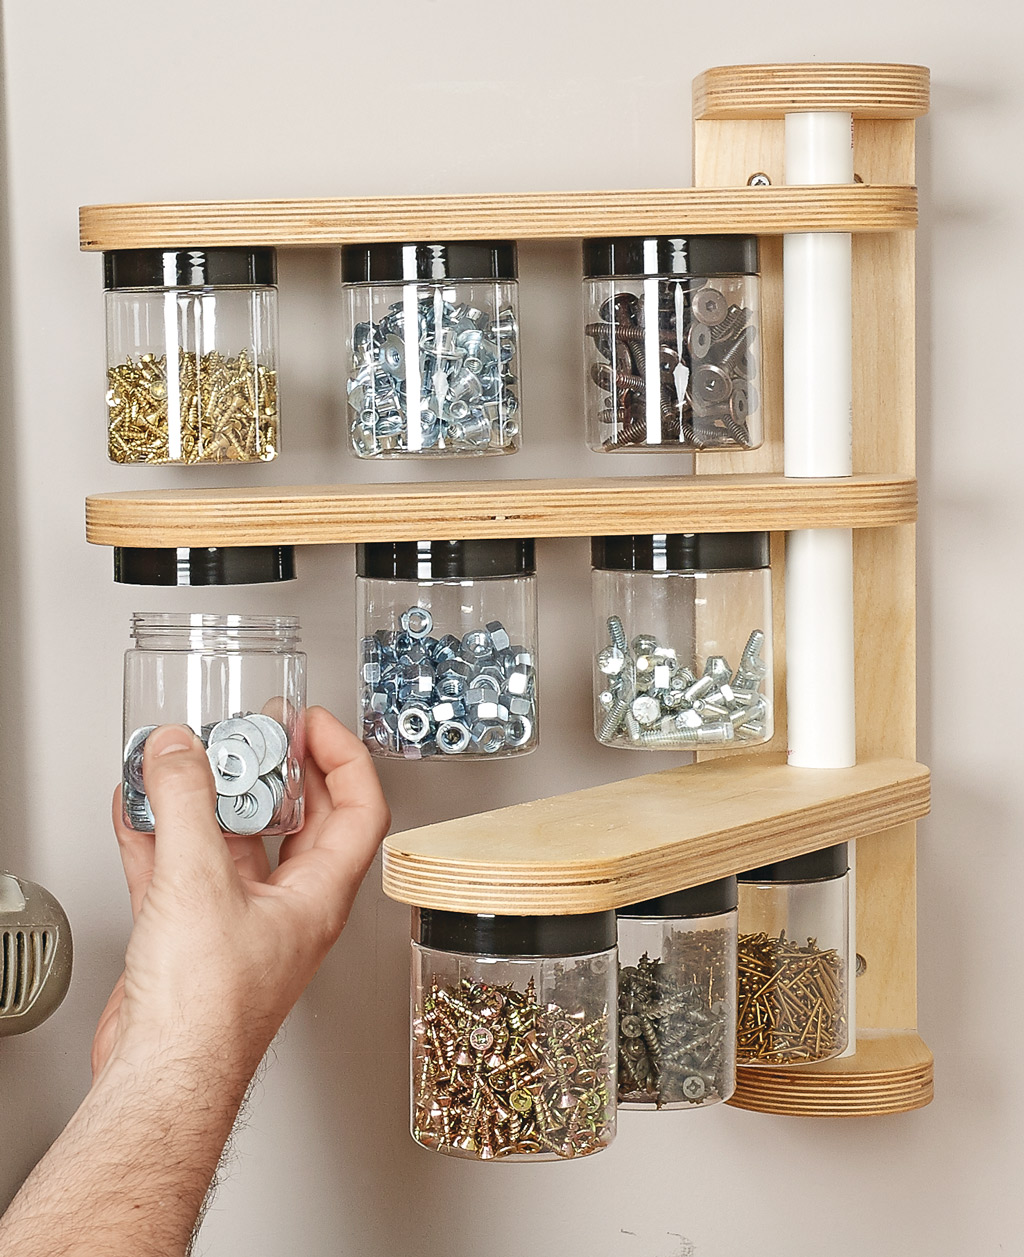 You’ll discover two suggestions for organizing your spice jars here like a pro.
There’s not a lot of information available on the first one. The image, however, makes it easy to see that the author used a plastic pipe to join the hands together with the main body. You can either drill holes in the steel bottles or use magnetic tape to attach the bottles.
The alternative concept for the spice container is less complex and more specific.
Simply slip the shelf and riser into your cabinet, clamp it to the shelf above it, and nail it in from the top of the shelf above it for the rest of the shelves.
References:
12. Homeroad.net
11. Marthastewart.com
10. Familyhandyman.com
9. Craftedbythehunts.com
8. Ikeahackers.net
7. Sincerelymariedesigns.com
6. Seasonalleaf.com
5. Twofeetfirst.net
4. Marthastewart.com
3. Houzz.com
2. Familyhandyman.com
1. Orchid.ganoksin.com