Despite the limited space, you can still make your small garden become a kid-friendly area while having a spot for entertaining yourself. Adding architectural features, recycling containers for flower pots, or creating vegetable beds is also possible. As well, add fencing to keep wildlife and protect your garden. Most use rabbit fences like these https://www.critterfence.com/rabbit-fence as rabbits are very problematic to any garden.
Are you wondering how to change the appearance of your small garden? If you feel that it is short on space, no need to worry. We have compiled ideas on making your small garden a functional and beautiful outdoor retreat.
Let’s cut to straight and check out our 10 small garden transformations and planter updates. As always, Simphome presents you with the list.
🔊10 Small Garden Transformations and Planter Video:
List Entries:
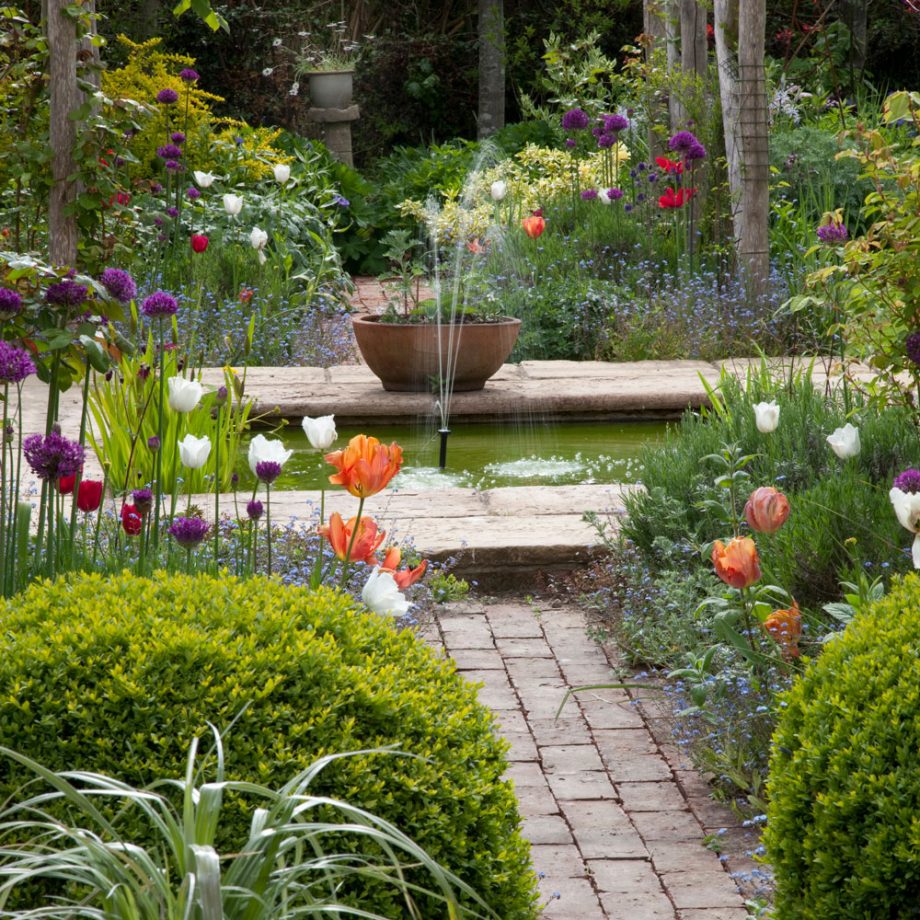
10. Add a Matching Water Feature
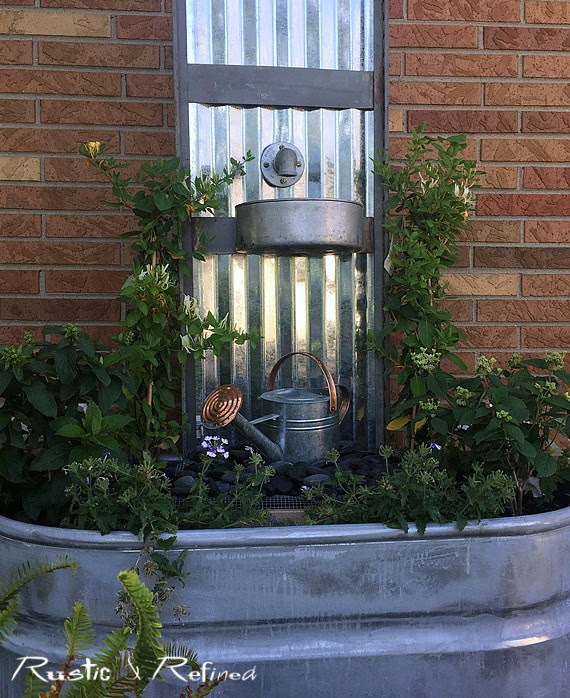 One important thing for a garden is water resources. So, why don’t you make this feature have more appeal? The most common water feature for a garden is a fountain. However, it can take valuable spots for plants to grow for smaller gardens.
When you contemplate adding one, you could build it into an existing wall or other structure. If you consider making it yourself, here are tips you could follow.
First, pick plumbing parts that fit your fountain and garden size. Second, you can use metal, wood, plastic tub, or brick for the sides. If you are on a budget, it is better to use whatever you have lying around. Third, choose plants that like water near the water.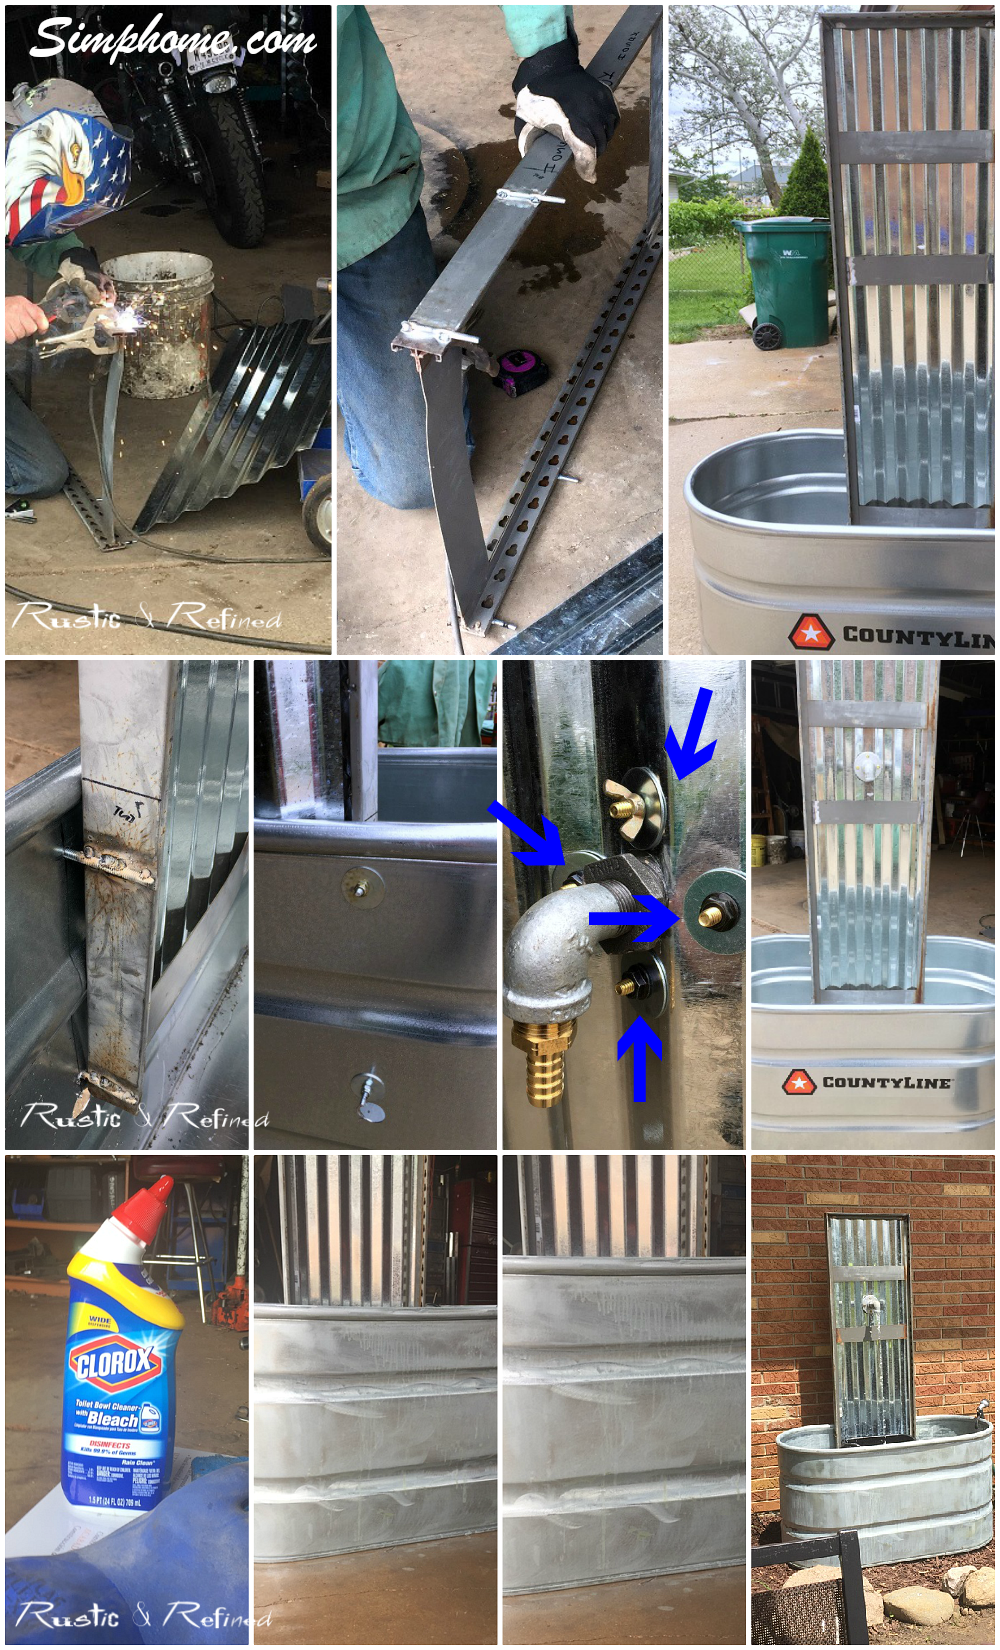
Further Improvement suggestions:
No 1: Build the sides of the water feature.
You will need a concrete “T” or a similar material to do this.
- Step 2: Build the frame for the pump.
Use an old vase, plastic buckets, or anything containing water and is sturdy enough to hold parts of the fountain.
Step 3: Add soil and plants.
Place a few inches of gravel on top of a layer of sand in the bottom of your container. Next, place soil over the gravel and anchor it with rocks to minimize erosion.
- No 2: Add plants that are suitable for the water.
Those plants such as Arrowhead, Spider plant, and water lilies are a good choice. - No 3: Fill it up with water and start enjoying it!
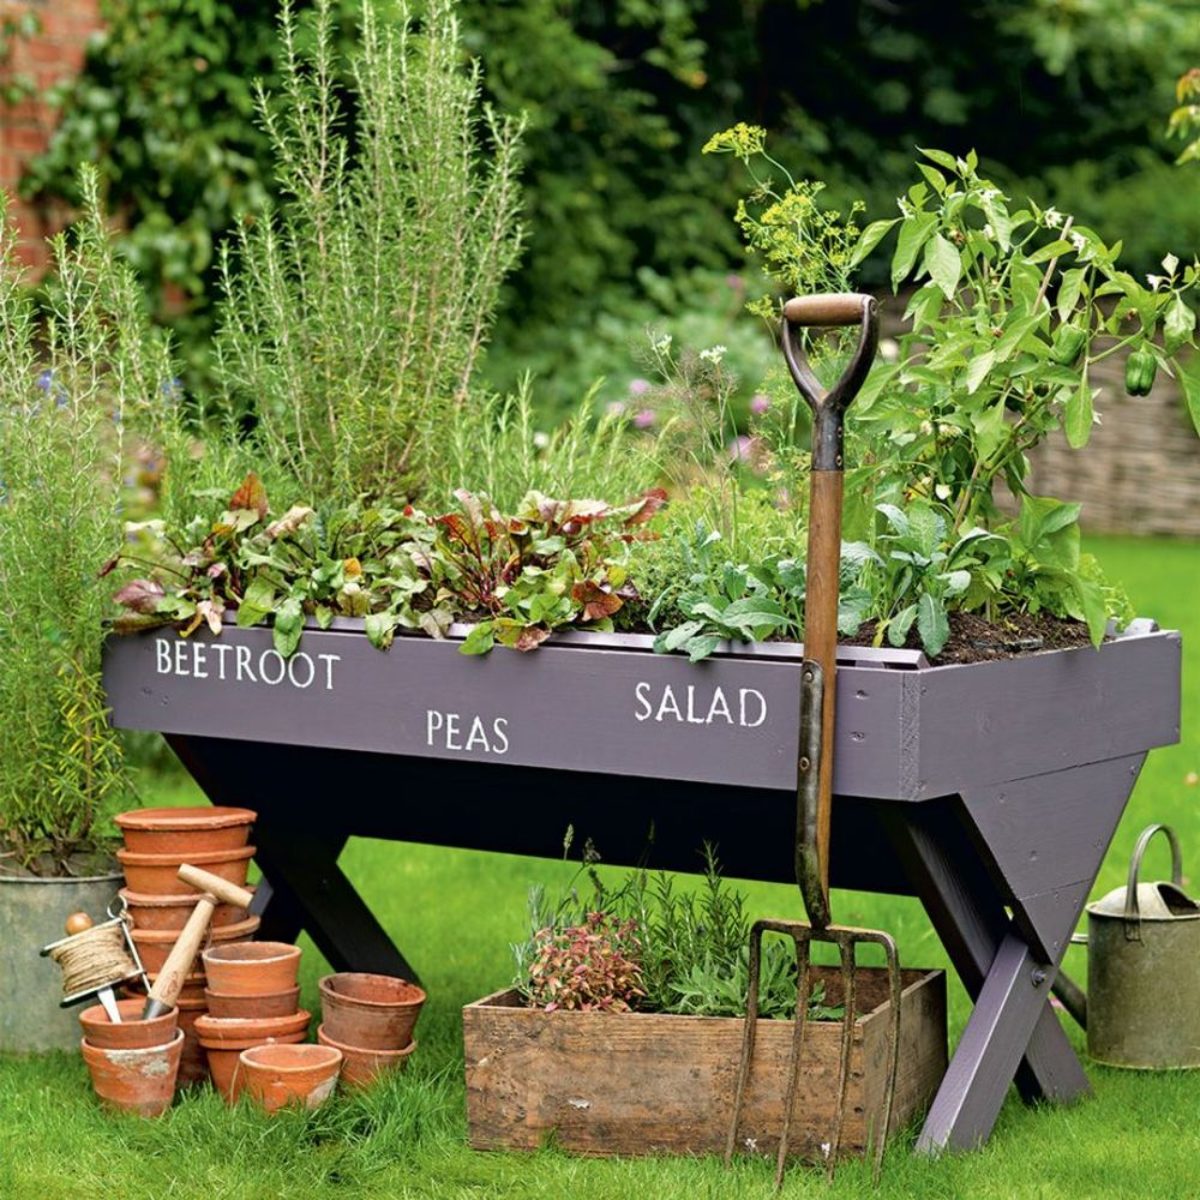
9. Max the use of low maintenance materials
 Smaller gardens are relatively low maintenance than larger ones. Yet, transforming them sometimes leaves you with an empty wallet.
To avoid that, you have to make a plan. See what you can keep and reuse rather than replace the entire thing. Sketch the layout and pick materials that last longer.
You can visit recycling centers to find containers for your plants. Then, try to grow flowers from seeds or cuttings. When you purchase them, remember that certain plants are expensive in a season but very cheap in others. Autumn is the best season to buy bulbs or bare-root plants. Just be patient when you grow them.
Further improvements:
- Plant perennials.
Perennials are low-maintenance forms of flowers that you can plant in late spring or summer. They look good almost all year. This idea will save you the trouble of pulling them out when they start to wither or go brown in fall. - Grow edible plants
Edible plants are a great way to complement your garden with food. At the same time, they will reduce the cost of buying groceries outside your home. - Plant herbs and vegetables instead of flowers.
Most of the flowers will bloom and die. Some will be left on the stalk or the ground after being cut. Also, some might be eaten by your pets, or you might not want to sow them in your garden.
To get around this, choose herbs and vegetables instead of flowers such as chives, parsley, basil, oregano, mints, etc. They are easy to grow and preserve over a longer period. - Think about hydroponics
Hydroponics is the use of artificial media to support plant growth. Depending on your gardening preference, you can do it indoors or outdoors. - Uncover a downed tree
Instead of removing a dead tree, consider simply uncovering it. This process is straightforward. Cut the branches and peel off the bark. Then, place a pot inside the trunk and fill it with potting soil. Plant your favorite herb or vegetable inside the container. - Use bricks to build steps.
You can use the leftover material from brick projects, especially building walkways or steps. You can also use wood, stone, or concrete instead of bricks for this purpose. - Go electric!
Electric lights give off light, but they do not require you to care for them frequently. And often, they are smaller than the standard light that comes with your house.
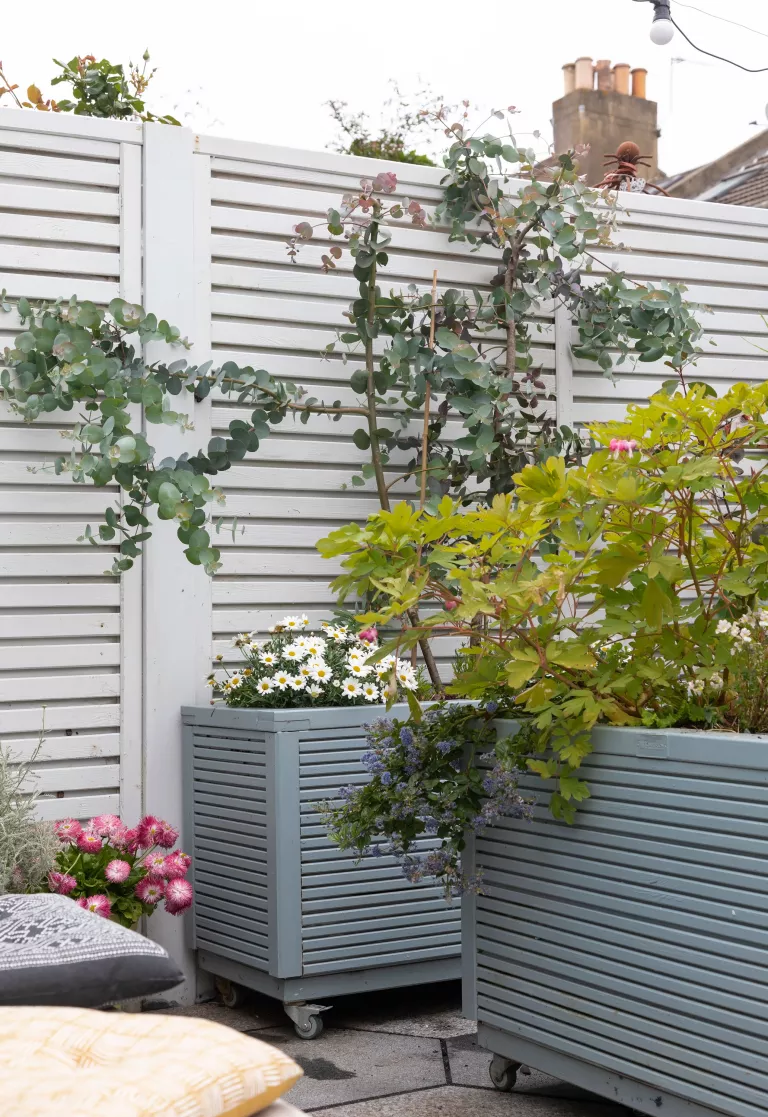
8. Touch it up with a gallery wall
 A vertical garden can solve any difficulties in a small space. Tiered pots or climbing vines are some options you can choose. Moreover, you can turn your outside wall, fence, or shed into a new and green gallery wall.
Start looking around the yard and make flower containers from those wooden frames or old loaf tins. Try to pick creepers like Trachelospermum (star jasmine) and tremendous trailers to adorn the wall.
You can also hang baskets of Pelargonium (geraniums) to get blooms into the view. Fill the containers with flowers until you hide them behind the lush foliage.
Simple instruction you should replicate the idea is:
- No 1. Find a wall
Hang your pots on the fence or wall. - No 2. Choose plants for this kind of project
Choose plants with hanging flowers, roots, or vines for this project. - No 3. Put plants in each pot
Some plants can be grown inside the pots, such as lavender and African violets. You can also talk to your local nursery to learn more about suitable plants for this kind of project. - No 4. Fill up the other pots
You can plant herbs or hanging plants to fill up the space between pots.
7. Or simply Repurpose unused containers
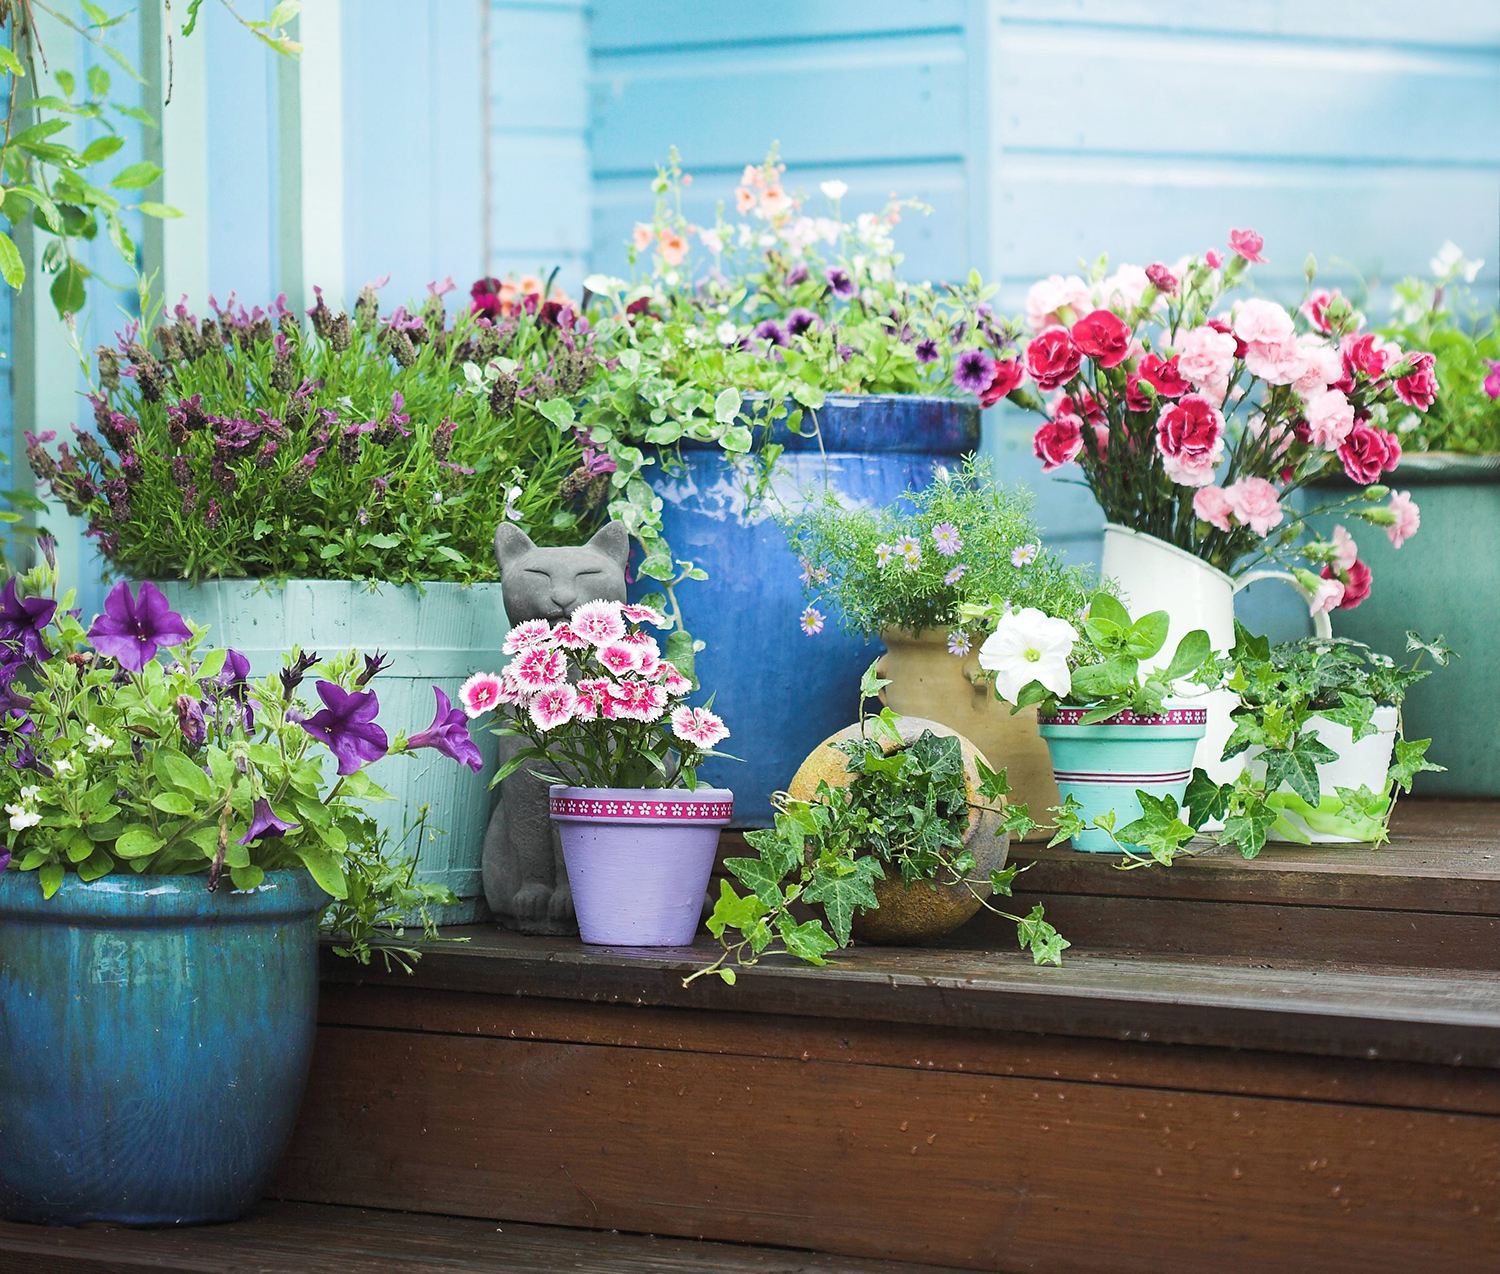
You don’t have to purchase various types and sizes of pots. You can just try to recycle what you already have. However, before recycling, remember that terracotta tends to dry out faster than plastic or ceramic.
Arrange the potted plants in layers. Select varieties that support each other in color and leaf form. Include tall showy plants, bushy medium-sized plants, and flowering vines. Don’t forget to water and fertilize them regularly.
Recycle unused containers to get a new planter is self-explanatory; however, in case you need some help, your instructions are:
- No 1. Remove the plants
Maybe some plants have died or are just not in bloom. - No 2. Sort out the old pots
You can check whether the pot is broken. If it is, you can get replacement containers at your local nursery. Or, you can get new pottery at a specialty store or garden center. However, keep it for your next project if the pot looks good. - No 3. Use new pots
Get a new container and keep the old set aside for recycling. - No 4. Compost the old pots
Now that you have a new planter, you can use it to compost the old pottery or simply throw them in a landfill.
You can also get green from your recycled container by growing mint in it. All you need to do is add manure to your compost pile and moisten it with water from time to time. - No 5. Top the planter with soil
Time to put your potted herbs into the new pot or old containers. The next step is to fill the container with soil, leaving enough room for the plant. Add 1/2 inch of organic material, 1 inch of compost, and a top dressing of rich garden soil before planting your herb.
6. Divide your garden into zones
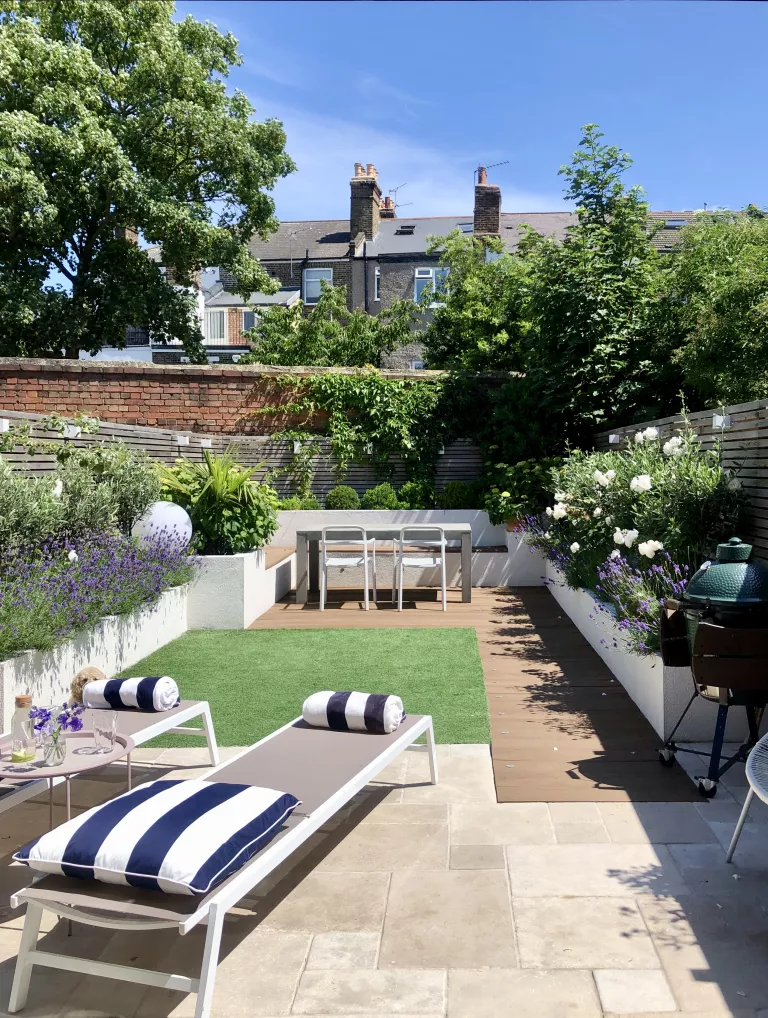 To maximize your garden, you can divide it into several sections. Indeed you like to work with your plants while still able to watch over your children nearby.
You could separate your gardening area from the playing zone with different flooring. The grassy area is for the children and the paving one for you. That way, an open space can be effectively divided into parts.
Create a separate room with a living wall if you want a little privacy. It can be a row of tall plants, a deck of tiered pots, or simply put screens that you can remove easily.
Before you start the project, pay attention to:
- See what you like
You can start your project by picking your favorite plants. See whether the plants are compatible with one another. - Create zones
Now you know which plants can go together. Arrange them based on their growth characteristics and needs while keeping the pot’s size in mind. You can put more than one plant in a container to make it easier for you to move them around in later months. Also, consider the colored foliage of each plant to create more contrast in your garden design. - Arrange it in a garden
Put the plants at the corner of the patio or in a certain way that you have been imagining. Depending on your garden design, you can also put them on a sloped wall.
You can spot an idea of combining vines and pots on Pinterest and try to follow the instructions above. - Maintain your garden design
After weeks or months, the plants in the containers will grow. Do not forget to move them around when they grow too much.
Lastly, consider some of these ideas:
20+ Garden Design Plans
10 Brilliant Space Saving Ideas for Small Gardens
10 Unique Small Garden Ideas
5. Wheeled Containers
 Portable containers enable you to arrange your garden with relative ease. You can just roll them aside when you need more room for socializing. There are two options to make them, add a caddy below or simply attach wheels below. Both ways are great and simple DIY projects.
First, you need to choose sturdy materials yet not too heavy for the wheel. If you prefer a caddy, measure the wood to fit the size of the pot.
This option allows you to keep your favorite pots. However, the pots are likely to be vulnerable and easy to stumble. The other option is best if you want more balance containers. Moreover, you can make your garden look united.
Other details you need to know are:
- Secure the pots to the caddy
Next, you have to attach the pots so that they are secure. You can use screws to hold them in place. However, you can also use garden wire or rope to tie them down. - Clean up the wheeled containers
When finished with your project, clean up the caddy or remove it from start to start if you have an option. You can simply wash it with water, especially after using it. - Use your caddy or wheeled containers.
If you want some extra space, you can simply remove some pots and place another on the next available spot. - Choose which design solution to use.
There are some designs out there that are perfect for small spaces. You can come up with some around your patio or even inside your yard. Make sure that you choose ones that will sit close to the ground to be easily accessible for you and others sitting on the patio; after all, it is about convenience. - Avoid placing the wheeled containers too close to the wall
You might want to put your wheeled containers in front of your wall. However, you should not do it too close because this is not about space but safety. The pots are likely to tip over if placed in front of the wall. Preferably, you should keep them in front of the patio table or some other object that will prevent them from tipping over.
4. Complete your garden with a bird feeder
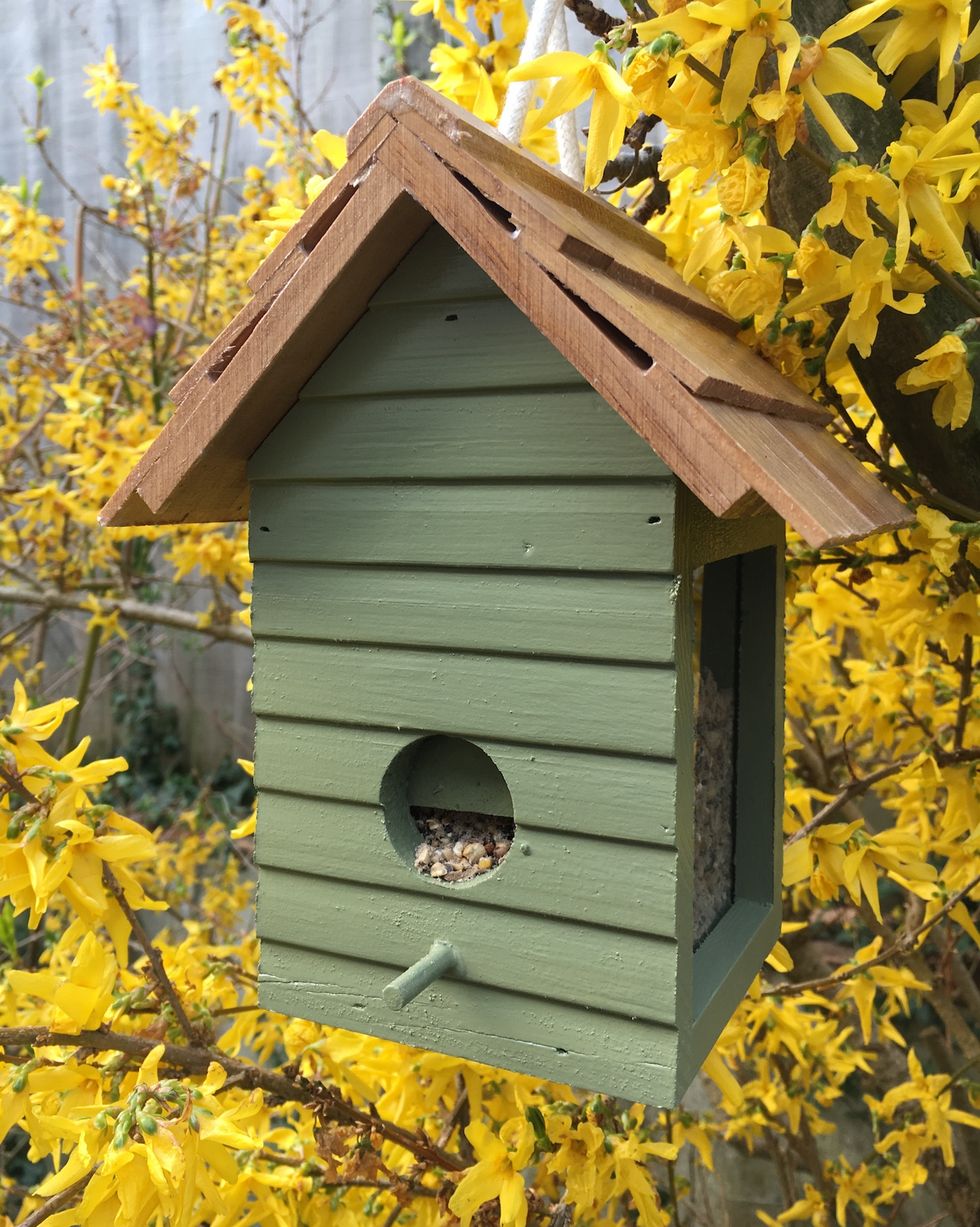 Listening to the birds chirping can boost the mood for the day. It can help lower stress and anxiety. Even though you have a small garden, you can still attract them by installing a bird feeder, birdbath, or birdhouse. The more they come, the merrier your outdoor space.
There are many birdhouses available to purchase. Yet, why not build it by yourself? If so, follow these steps.
First, you need to make a plan. Then, cut the board to length. After that, assemble the parts.
Next, you can paint the house. Finally, install it in your garden. There, put some food inside to attract them. You can enjoy their voice once they settle down.
Alternative ideas you can try are:
- Build a stackable birdhouse
Instead of buying one birdhouse, you can make your own. You can make them under two or more stacked to create a larger space. If you are handy, you can build it yourself in your backyard. - Build a hanging birdhouse
Hanging birdhouses are the best when you want to keep the birds in your garden for more extended periods. However, they can be tricky jobs to do yourself if it is your first time. - Incorporate birdhouses with planters
You might have seen some of them out there, but have you ever tried it? Adding birdhouses with planters is a great idea to keep the birds around until wintertime. You can use cocoa, fruits, or even seeds to attract them. - Create a birdbath
When it comes to attracting birds, a birdbath is an absolute must. You can build it from stone or metal if you have some extra material budget. Whatever your selection, just make sure that you can easily clean it up after drinking water. - Be an excellent host to the birds.
It is easy to put a feeder in your garden, but do not forget to be a good host by refilling them regularly. Also, keep the water clean every time they use it. - Nurture your garden
Little birds need your care too. You can put some feeders for them to ensure they are always safe and healthy.
3. Raise the flower beds
 The garden in the picture was once a parking lot transformed into a pretty urban garden. The designer simply added a screen to the gate and above the fence.
You can copy this idea if you have a new spot in your outdoor area. Clear the site and start building raised beds around. Plant flowers with various heights to add dimension to the garden.
Opt for shrubs if you want to add shape. Planting flowers such as Hyacinth, Magnolia, Gardenia, or Freesia, will give more fragrance. Add a bench so you can enjoy tea time while watching the flowers.
Step by step to build your first garden flower bed:
- First, decide where you want to create the flower bed.
- Lay down a base of wood. Make sure that the size of the base is around 20-24 inches wide as per your flower bed’s dimensions.
- Measure the height from the ground to three places around it.
- Take a step ladder and measure from one corner to another for a distance of 13 inches.
- Use the measure to get the distance from the ground to the ladder. Subtract it from 13 inches. This step will help you mark one corner of your flower bed. At this point, the distance between each corner is 4 feet and 1 inch (4 feet and 1 inch = 13″).
- Next, you need to calculate how wide you want your bed to be.
2. Neat Vegetable Trug On a Budget
 If you like edible rather than decorative plants, you could grow vegetables. However, some of you might not have enough space for the veggies to squeeze in.
Instead of having a full-scale patch, try to grow them in a trug. Then, you can take your kitchen scraps and plant them.
Onions and celery are easy to regrow as long as you leave a couple of inches of stem attached. Then, you can plant the seeds of chilies, peppers, and tomatoes directly into the compost.
The advantage of using trugs to create a veggie garden is that you can easily move them. You can put them on a windowsill, hang them on the railing, or arrange them outside where they can get enough sun.
To build your veg trug, your instructions are:
- Take measurements, sketch out the plan, and use leftover material if possible. Also, prepare your drill to make some holes.
- Find a proper place to keep your veg trug. In this case, you can do it under a garden railing or hanging planters.
- Measure the height of your planter by putting soil on top of it.
- Dig out the space for planting your seeds inside the potting mix, then add them into the soil on top of your planter until you fill it up.
You can also arrange the trug in a pot or window box. - Leave it for germinating the seeds inside the trug. Most seeds will grow within six to twelve weeks, depending on their variety.
Lastly, Number 1. Carve out a New walking path
 The last idea of small garden transformation is carving out a path in your garden. It will make your garden look luxurious.
You could build the way following the flower beds, so your layout will not alter much. Using gravel slabs is a great budget solution and easy to do. Opt for paving block, brick, or concrete if you want a tidier walkway.
By adding a path to your garden, you can easily tend your flowers without worrying about damaging the grass. Moreover, it is nice to enjoy walking about the flowers on a warm afternoon.
If your space does not allow you for a project like this, your choices are:
1. Add some garden furniture
a). Invest in the best garden furniture you can afford.
b). If you live near a park or a local lake, get yourself a picnic bench and try to find the best spot to enjoy it.
2. Create a small entry garden with flowers and plants
a). Add ivy and blackberry to the floor and fence of your patio or balcony. They will help to create privacy in your outdoor space and beautify it simultaneously.
b). Placing an old table along the fence will be a great addition to your garden. You can use it as a splash mat or as a place to put your coffee mug.
c). Make sure that every flower is in the shade so it will grow.
d). Add some hanging baskets, pots of flowers, and stools for extra space.
3. Build a raised garden
a). Build a metal frame for your fence, which is about four feet high.
b). Fill the frame with rocks and stones, then you will be able to create your mini mini-garden.
c). The best feature is that it will help you plant plants with a small footprint.
d). If you want an even more sophisticated look, follow the idea of creating a lamp stake or small corner garden.
4. Raise a patio
a). Place a wooden deck in the backyard with a few chairs and tables.
b). You can create a mini-garden on your patio or your deck.
c). It will help you add more greenery and light into your garden, thus bringing more nature into your house.
d). If you have a new window sill, place potted flowers on it to create a small garden for yourself.
5. Create a water feature in the middle of your garden
a). You can add a pond or a statue to make it more interesting.
b). If you do not like all the work required in making one, you can cheat your way by buying one from a DIY store and simply placing it in the center of the garden.
6. Build a wood deck
a). You can make a deck with wooden planks, bricks, or recycled pallets.
b). You can add a concrete table and chairs for outdoor dining for extra decoration.
c). The best part is that you can stain your deck to create a beautiful color pattern.
d). If it is a small deck, then you can easily clean up the garden before winter comes.
7. Add a garden gate
a). You can have a plain or ornate gate.
b). When you open the garden gate, you will be able to see your flowers, plants, and deck in one easy look.
c). If you like to name your deck and want it more classy, get yourself some iron sconces and place it around the patio.
d). It will add more charm to your garden and make it more inviting.
8. Create a small backyard
a). Cut your garden’s grass and tear down the fence.
b). Dig the ground until you create a dirt pool for planting some colorful flowers.
c). Fill up the dirt with some mulch to look more natural.
d). You can also add rocks for added protection, but optional.
e). If you have lawn chairs or tables, place them around the flower bed to give your garden some character.
9. Add a miniature vegetable garden
a). You can plant the vegetables in various containers.
b). Fill egg shells or egg cartons with dirt and plant cabbage, carrots, and lettuce seeds.
c). Place your containers on the windowsill and create a nice mini-garden.
d). It will be helpful for your cooking, and it is easier to maintain than a regular vegetable garden.
10. Create a small stepping stone garden
a). Find some old bricks on the sidewalk and carry them to your garden.
b). Place them on the grass so you can walk more easily.
c). Once you place all of your bricks, try to create patterns with them. You can put colorful stones in between to decorate your stepping stone garden.
d). If you like some extra privacy, try to put some plants around it so no one except you can see the stepping stones inside the house.
Conclusion:
You can lift your garden appearance while saving on landscaping costs. The list above contains budget-friendly ideas to transform a small garden and update planters. Recheck the list and find quick fixes to make your space look fantastic.
References:
10. Floralandhardy.co.uk, Rustic-refined.com
9. Floralandhardy.co.uk, Housebeautiful.com
8. Idealhome.co.uk, Daviddomoney.com
7. Daviddomoney.com
6. Realhomes.com
5. Realhomes.com
4. Housebeautiful.com
3. Houzz.co.uk
2. Idealhome.co.uk
1. Idealhome.co.uk