Living in cramped quarters calls for some innovative problem-solving. Smart storage solutions, creative space organization, and deciding what belongs in your house are all challenges you must face. Bedrooms, no matter how small, are a great blank slate for expressing one’s unique style through decor. Small bedroom ideas abound, so it won’t be hard to find something that works for you when you start looking for references. This time, we will discuss ten small bedrooms with inspiring DIY cabinet ideas to complete and win over your bedroom organization challenges. Enriching our bedroom improvement archive, Simphome presents you with the list.
10 Small Bedrooms with Inspiring DIY Cabinet Video:
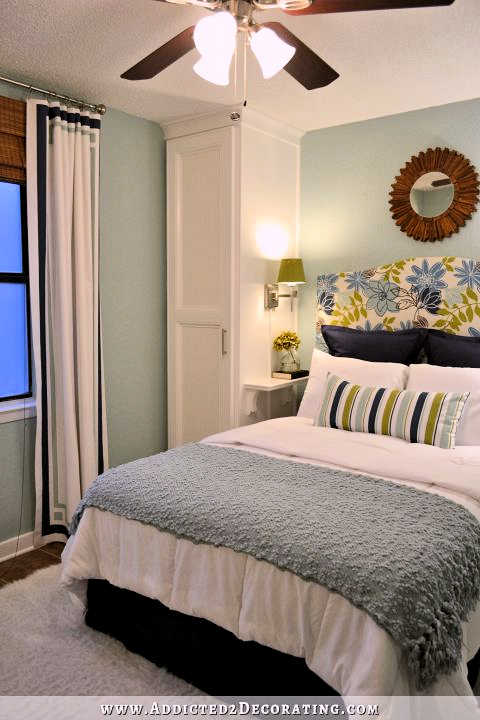
10. A Corner Slim Bed Side Cabinet Idea
 To construct the new closet, fasten a 1/2-inch MDF board to the wall. This is half of a whole sheet of MDF, so it is 24.5 inches wide. (You can have them cut it at Home Depot.)
You can install one shelf at the top and one hanging rod for longer garments in the closet on your right.
The outside of the left closet is the same as the one on the right. However, inside, there are two separate bars for hanging shorter garments. They add up to around 69 inches of overall hanging space. That’s a gain of over 10 inches compared to the room’s original wardrobe (which is now shelf and drawer storage). Ultimately, the price per unit was around $168.
9. A Bedroom Cabinet with a Bi-folded Door
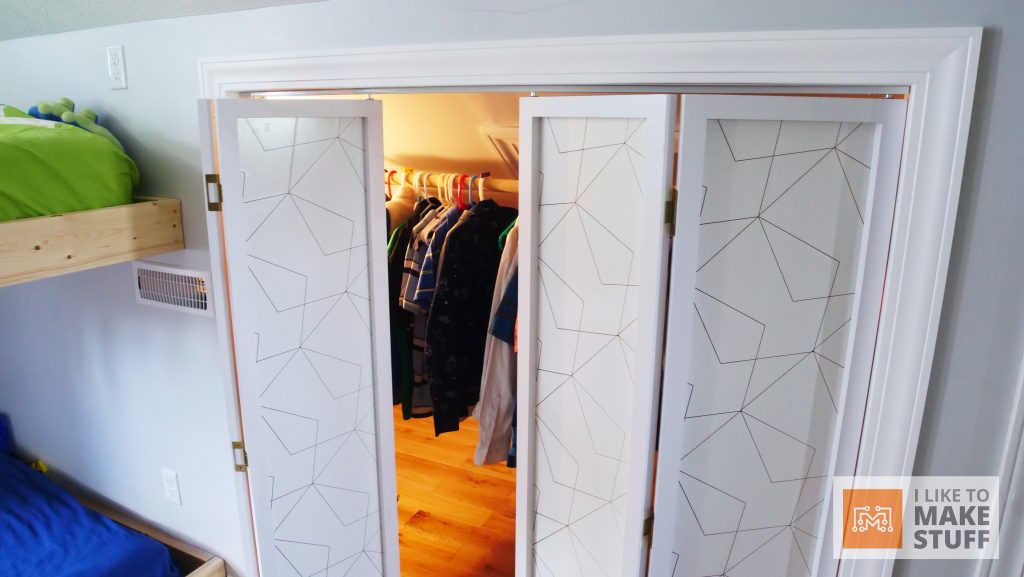 Tight space usually becomes a problem in a small bedroom. Therefore, if you own a big bulky cabinet that already takes up lots of space, turn the doors into bi-fold. Besides looking fabulous, this will save your space two times more than a flat cabinet door.
Acquiring a Bifold Door Hardware Kit is a requirement for the work that needs to be done. It is economical, customizable, and more affordable than conventional closet doors.
The instructions with the kit provide step-by-step guidance on how to construct your doors so that they are a suitable fit for the opening after adding the hardware.
The non-mortise hinges are quite simple to install, and using some self-centering drill bits assisted in achieving the desired fit on the first attempt. After that, you will need to measure your opening, cut your frames, and insert your ornamental pieces.
You probably want to paint before starting to assemble them. One thing, remember the track hardware so you can move them easily.
8. A compact bed idea with storage behind the Curtain
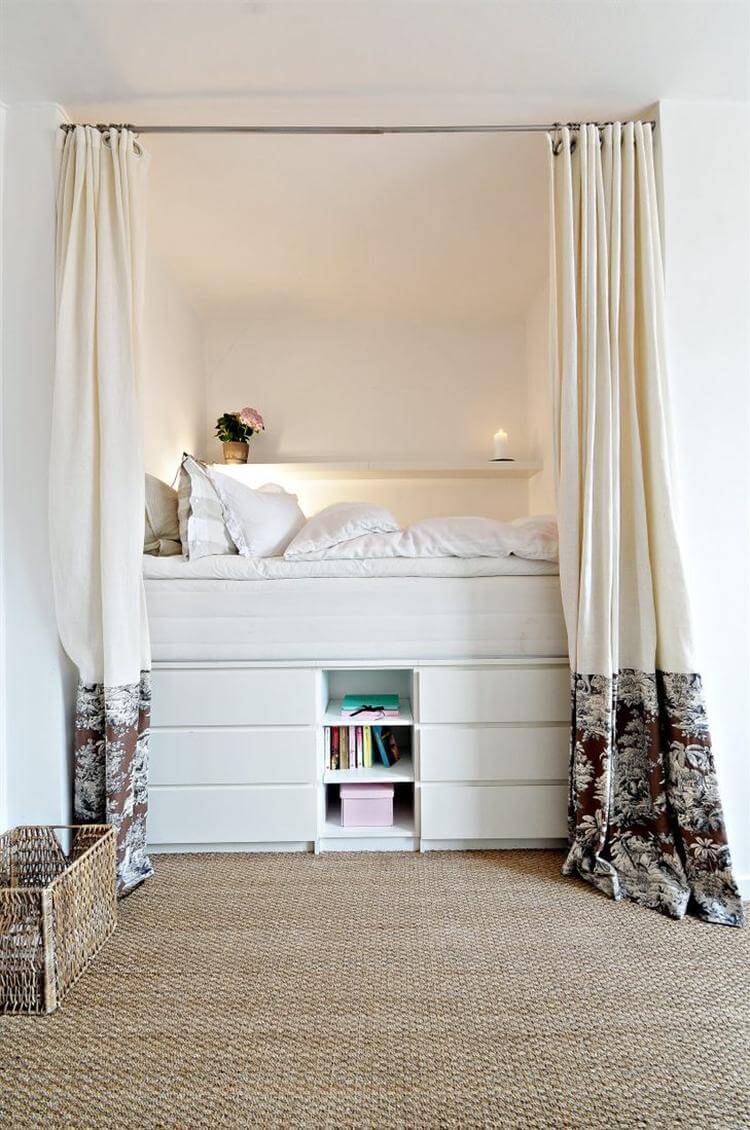 A compact bedroom benefits tremendously from having a cupboard placed underneath the bed. It offers excellent storage to organize your items and still leaves additional space for you to utilize if you add more furnishings. To give the illusion of space, choose a curtain the same color as the wall.
Using simple boards, you can construct a bed cabinet like this to match your space’s aesthetic. However, it would be best if you made it the same size as your bed or around 1 inch broader than your bed. Also, take into account the height. If you need to get up onto the bed, you can use the drawers as steps.
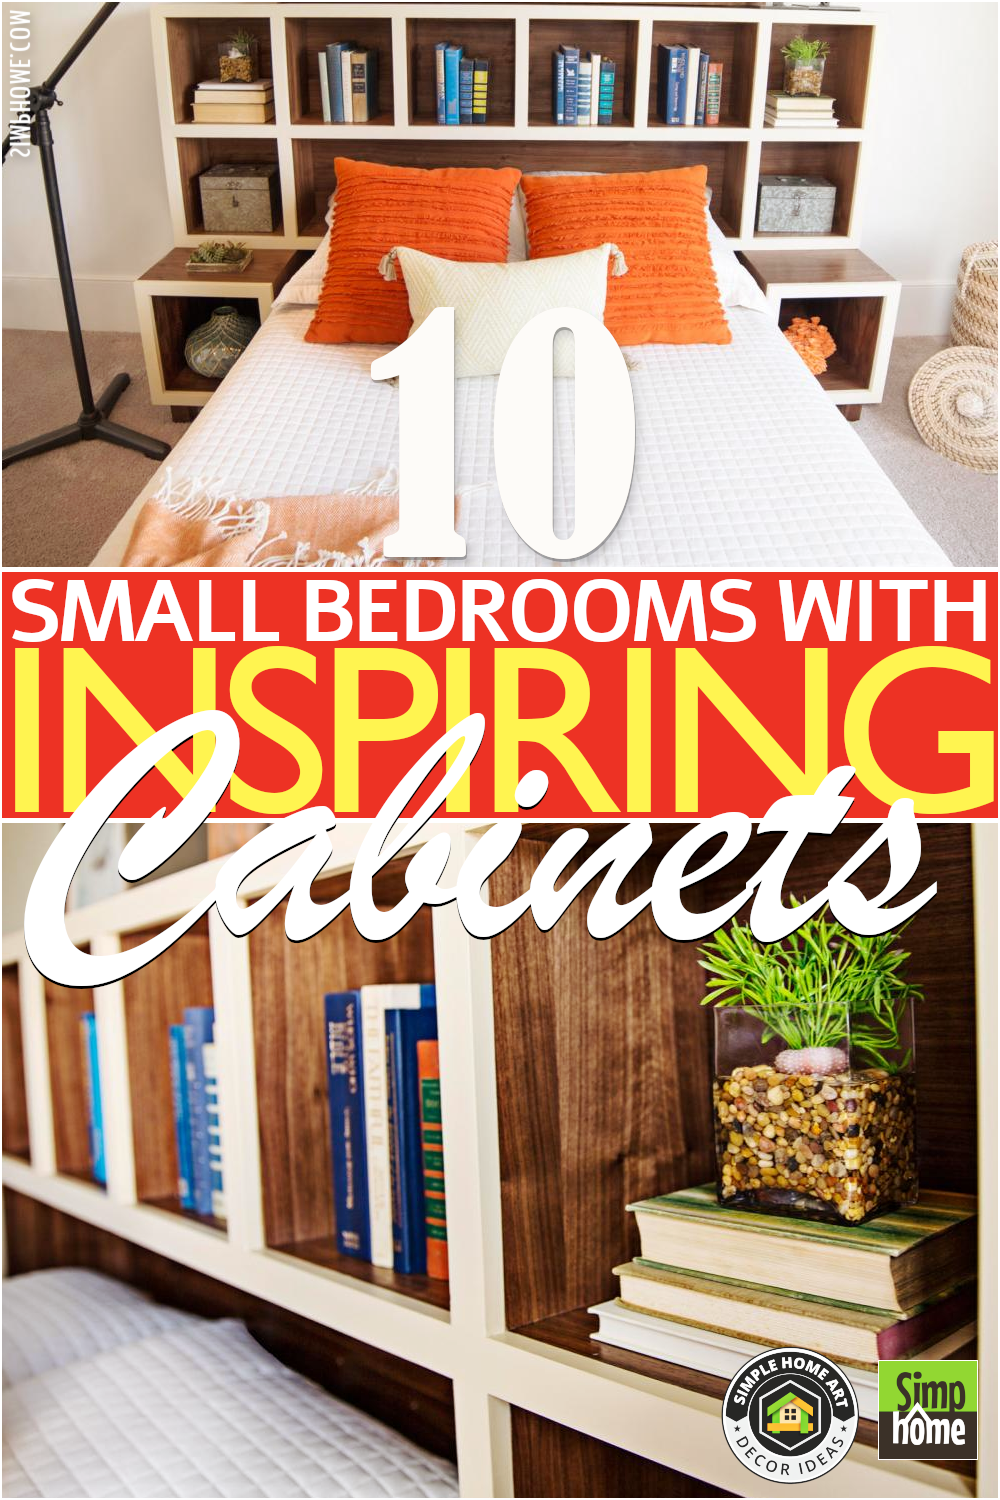
7. The Headboard Cabinet Idea
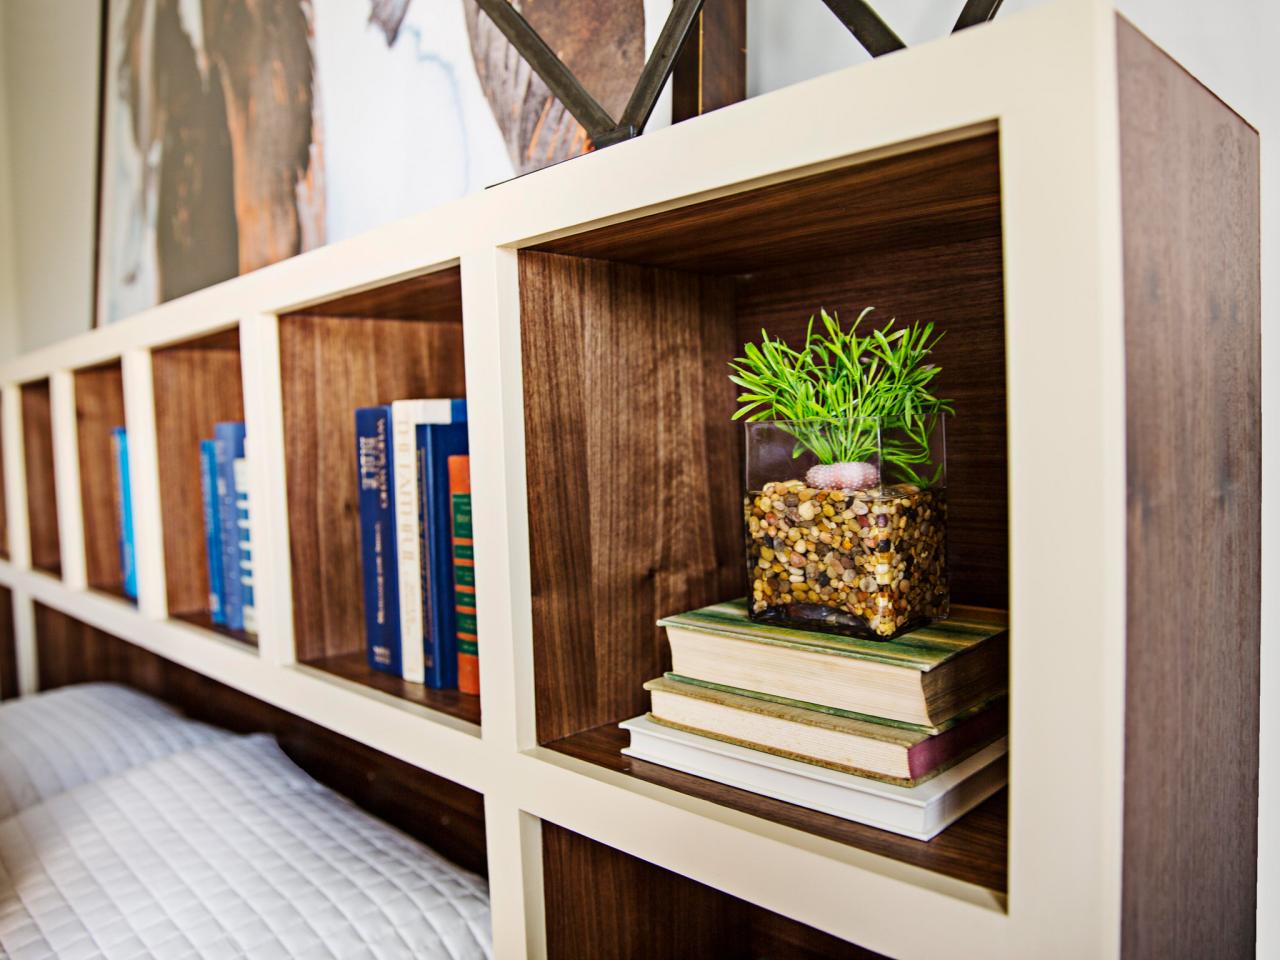 Besides under the bed, putting cabinets as a headboard is also visually attractive and space-saving. Without a door, you can display books, ornaments, and plants. But a cabinet with a door makes the room appear clean, tidy, and spacious.
As usual, assemble your top unit after gathering materials, measuring, and creating a cut list. Continue constructing the top unit frame once you have precut the plywood, poplar, and walnut pieces with a table saw. Get your storage unit set up. Please note that this assembly is simpler if completed in multiple steps rather than all at once.
Next, you’ll want to fasten your trim into place. Put together the table’s inner and outer frames, and then fasten the table’s skirt to the frames. Table legs should be marked, worked on, and attached before moving on to the headboard.
You can finish it there with no doors cabinet. If you want to add doors, consider using a sliding door or opening up the door.
6. A Semi-Built-In Storage idea
In short, assemble the complete cabinetry system before securely attaching it, and then test the fit of the assembled cabinets by leaning them against the wall.
Back to the image, the homeowner built a storage wall using the Sektion cabinet system from IKEA. To give it a more finished look, he added faux-wood doors from Semihandmade, a company that customizes IKEA cabinetry. Mounting the fold-down bed to the wall studs is accomplished using an aluminum mounting kit purchased from murphybeds.com.
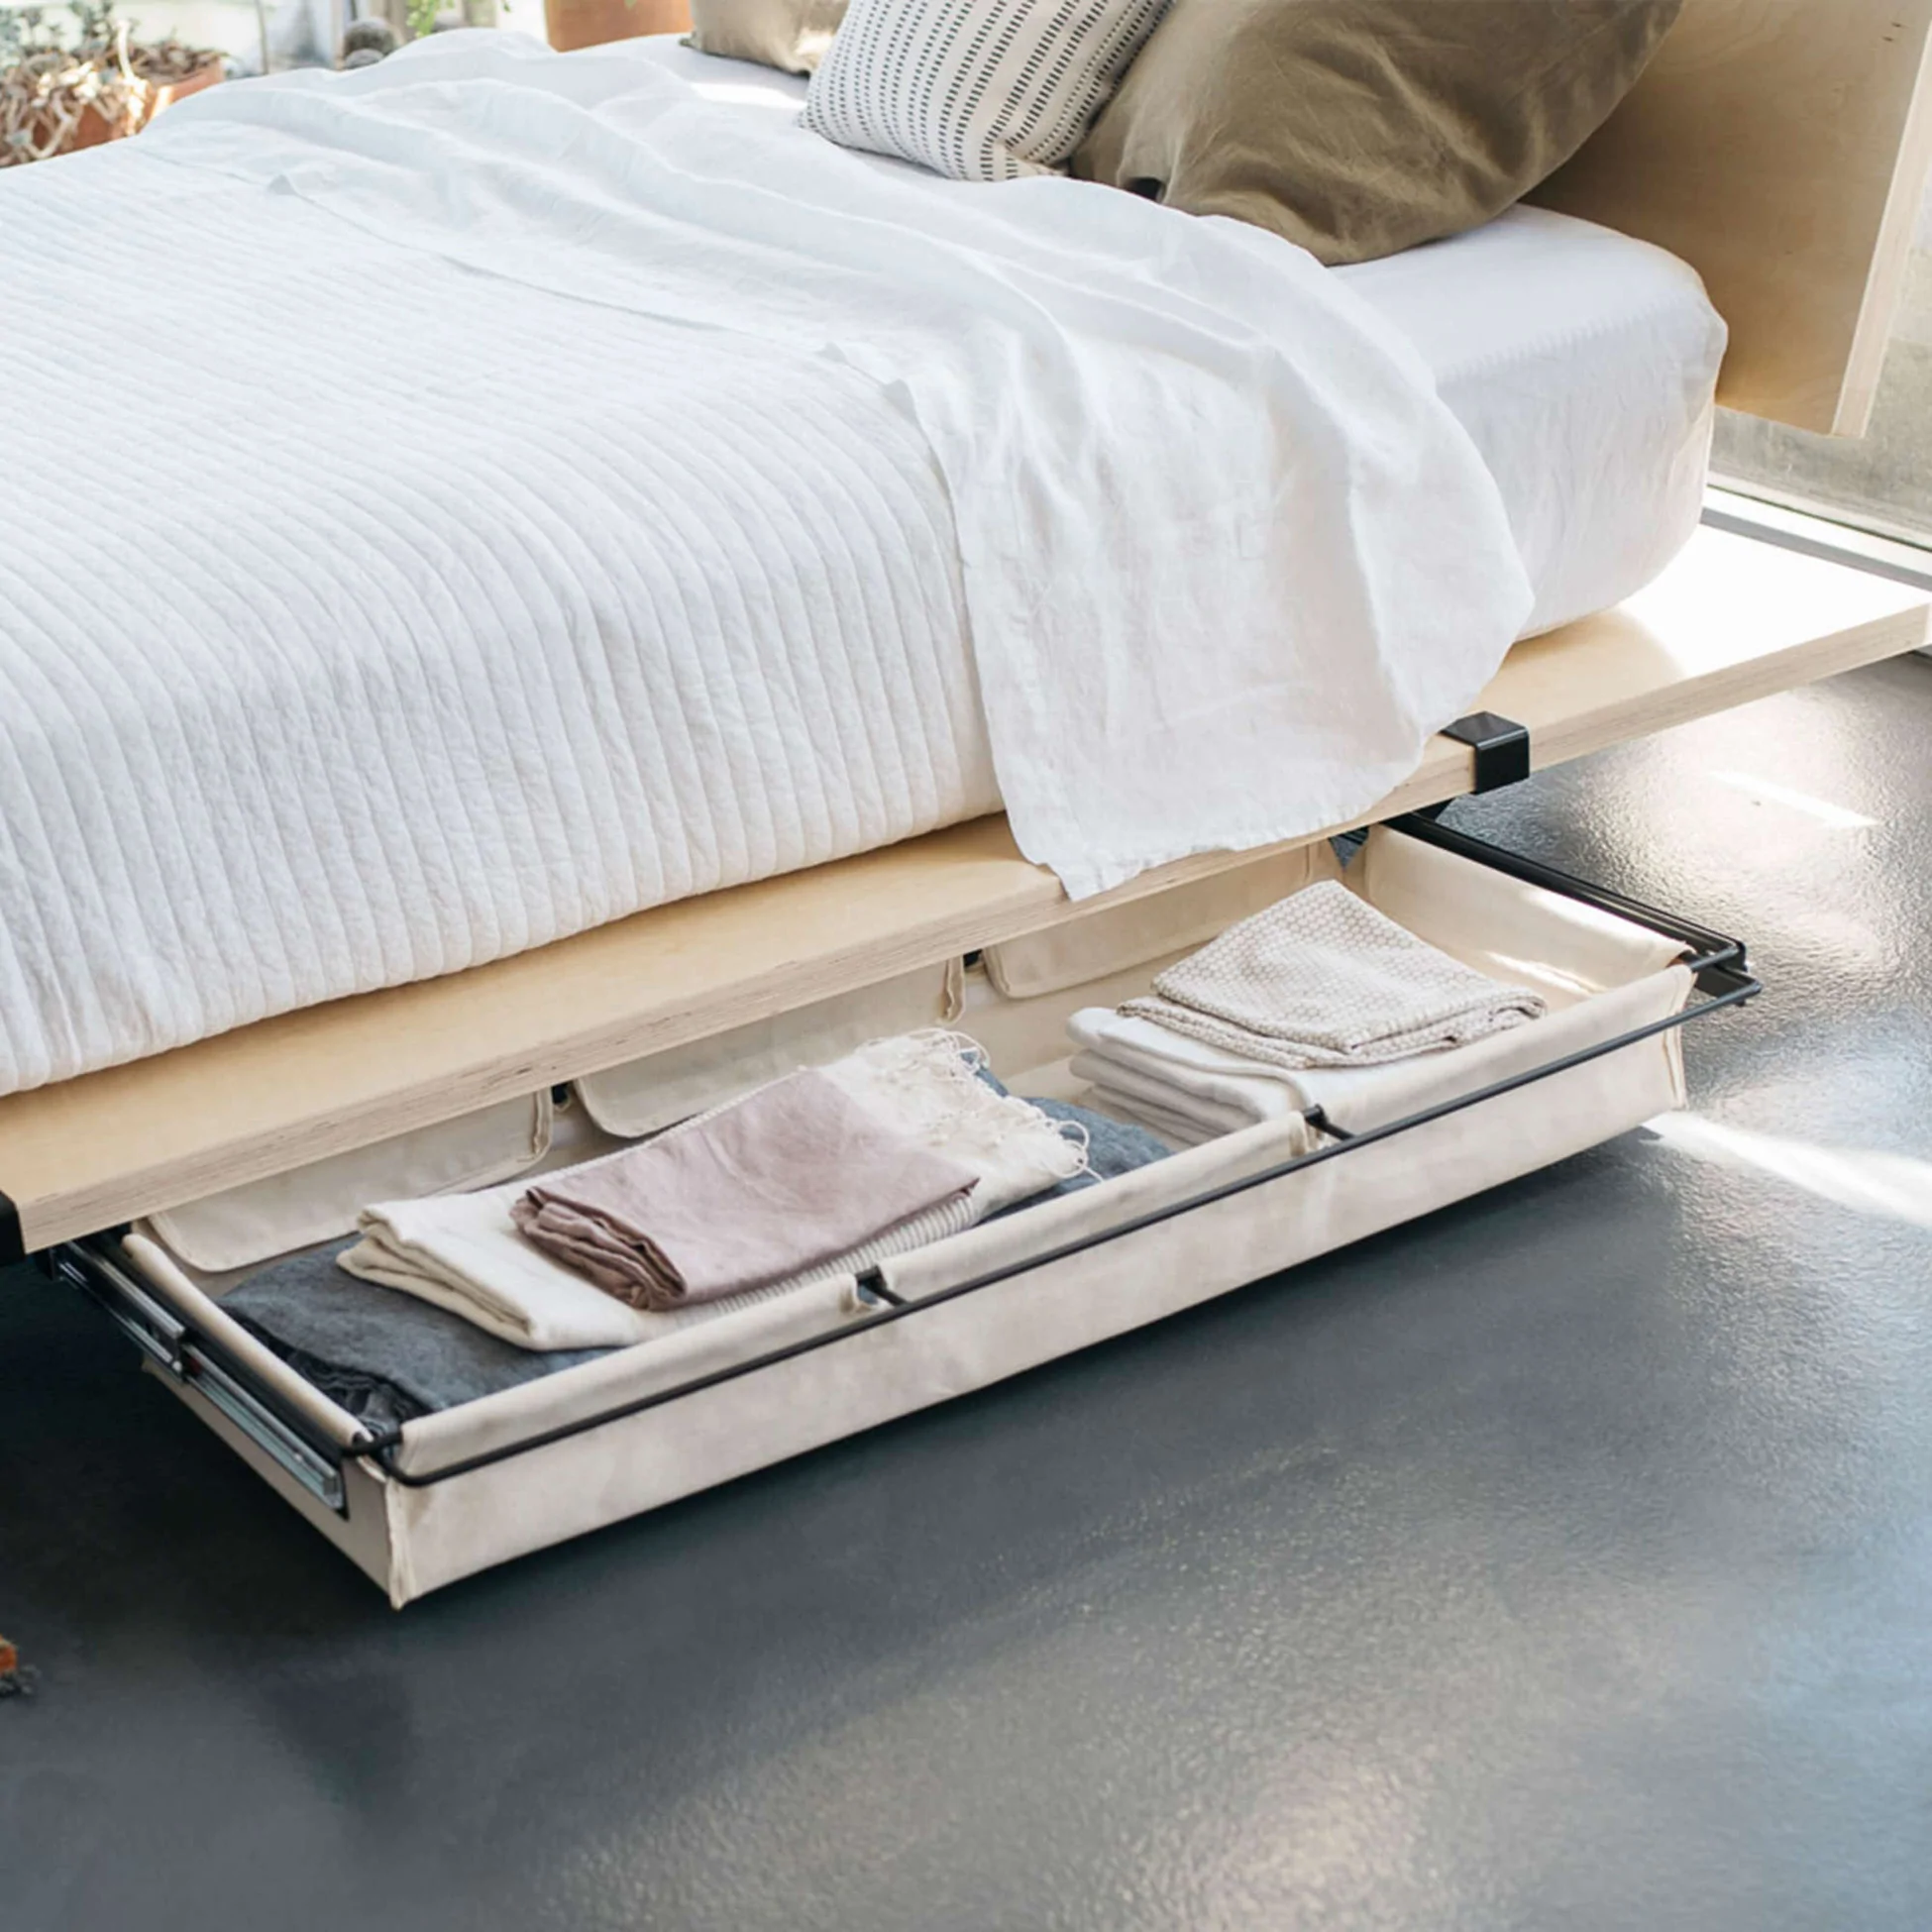
5. A built-in bed idea with an extra cabinet
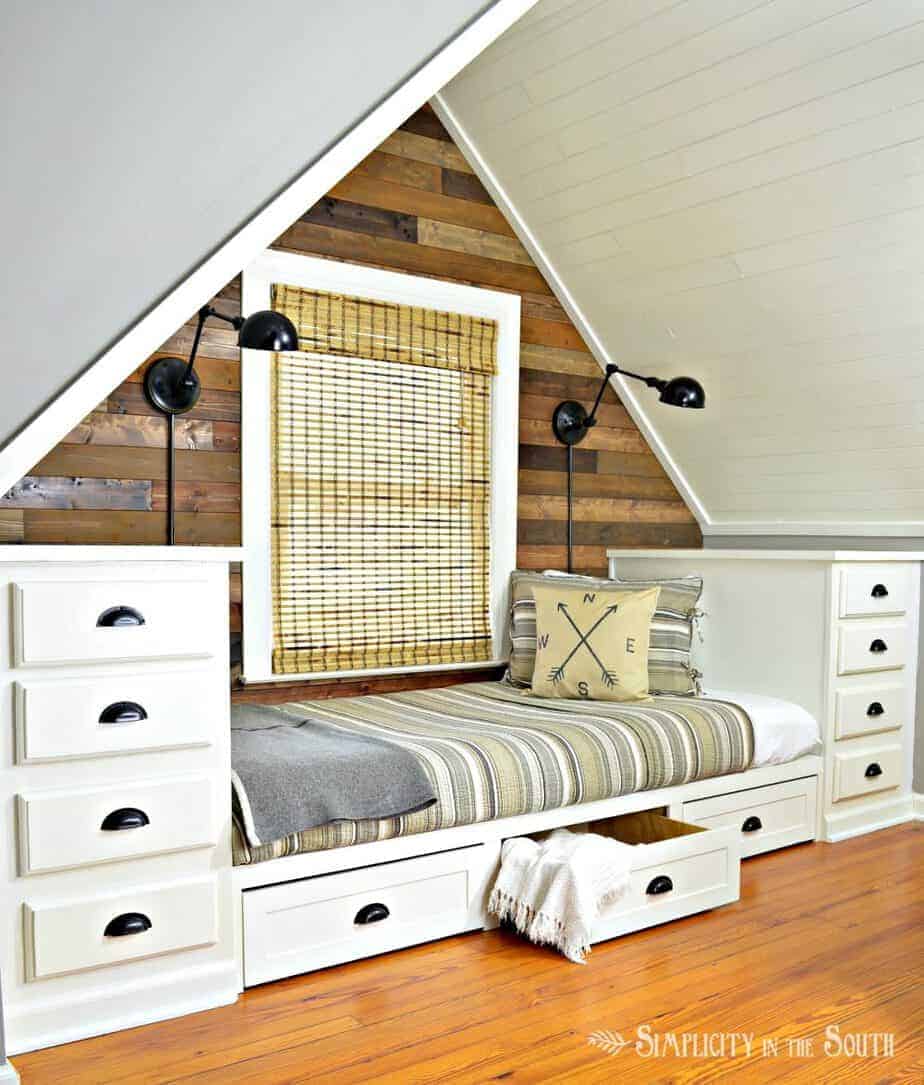 A rooftop bedroom is often hard to deal with since it usually comes in small and odd sizes. Bringing in the wrong size of furniture will mess up everything. Therefore, the best solution is a raised bed with tiny but handy cabinets like the headboard and footboard.
The supplies for the storage bed in a closet run about $480. Before deciding where to put your bed in the dormer, you must determine its dimensions. In the author’s situation, you can fit an extra-long twin mattress 80 inches in length and 38 inches in width into the nook, roughly 10 feet wide and 4 feet deep.
Use the dimensions of the two mattresses to calculate how much space will be left over for the two drawer units on either side.
Remember that older homes are usually not perfectly square. If you’re ordering new cabinets, always double-check your measurements. If your cabinet has a 3/4 in. reveal on its front, you can use the ripped-down 1 x 4s to finish the bed’s frame after installing the cabinets.
Ana White shares the tutorial on constructing an under-bed trundle drawer beneath a bench.
4. The DIY Floating Nightstands idea for the small bedroom
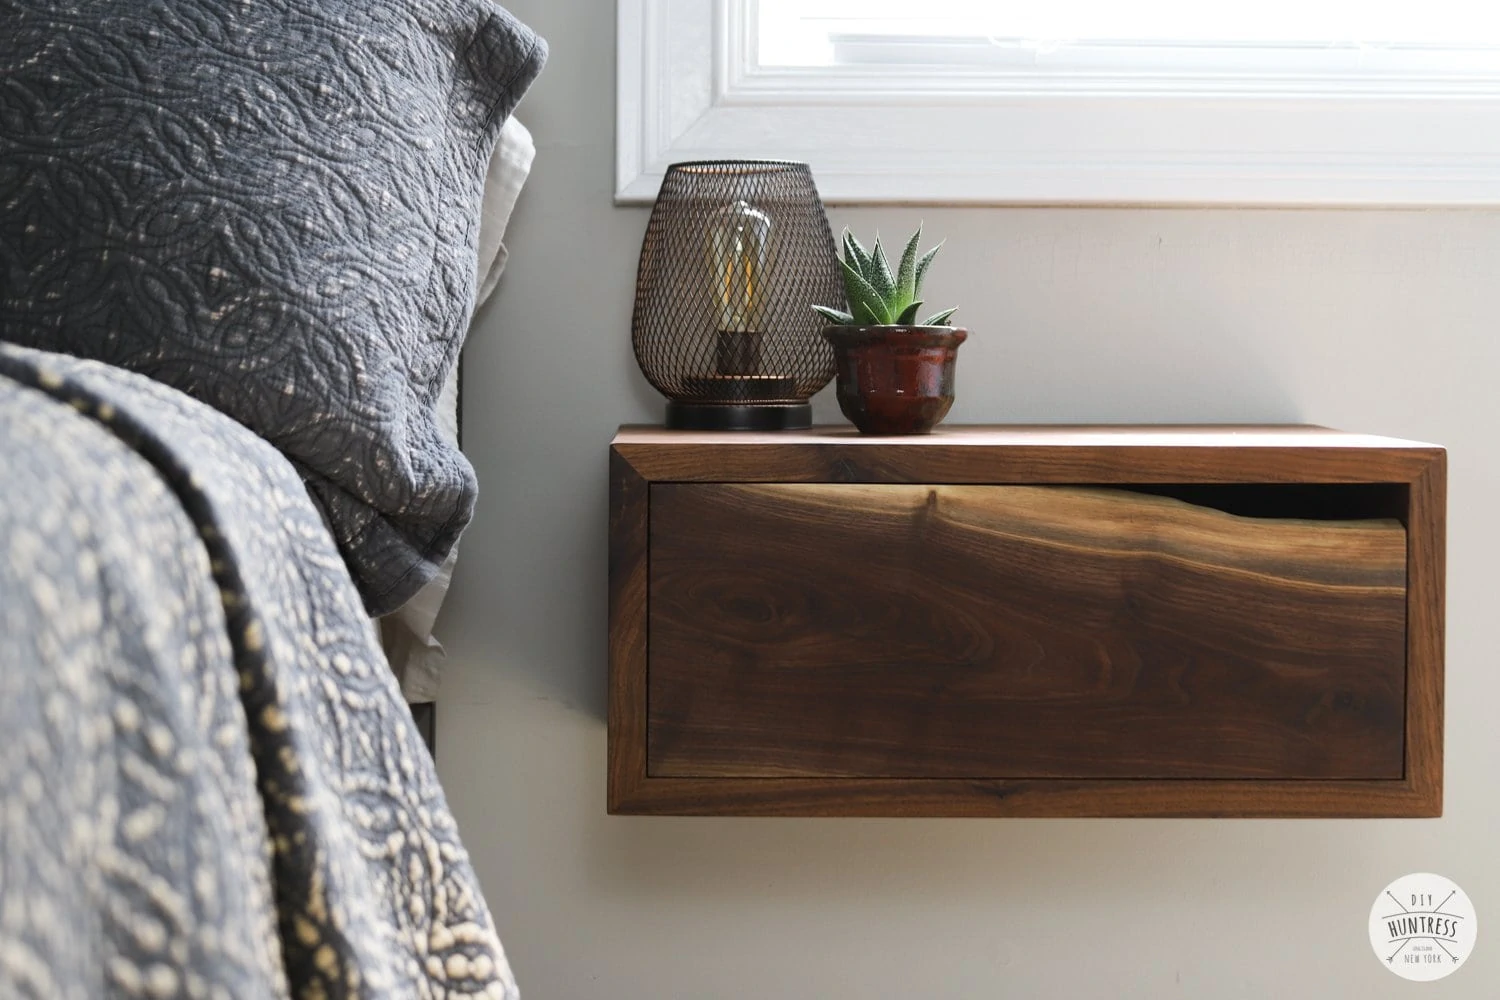 The first approach is to chunk up your content into more manageable chunks. Using a miter saw, cut the materials down to almost their final dimensions (keep them a little longer to trim later). At this time, you should focus on the components you’ll be using to build the nightstand. It’s best to put the rear panel and the drawer on the back burner. The next day, with the panels still clamped, you can run them through the planer again to get them to their final proportions; make sure to add mitered corners to any panel you will use in the construction of the nightstand box.
The rear panel is up next, so get to it! Using a miter saw, cut out the panel and then attach it to the nightstand’s back with pocket holes, screws, and wood glue. When installing the french cleat system, insert the panel into the nightstand, so it fits.
When you return the next day to hang the nightstands, they will have had enough time to dry. To achieve the safest result for the final step, you need to choose a french cleat system from Hangman Products, which can be easily attached to the underside of a dresser with a screwdriver.
3. The Adorable Fold-Down Table to Double your bedroom office area (with a chalkboard bonus)
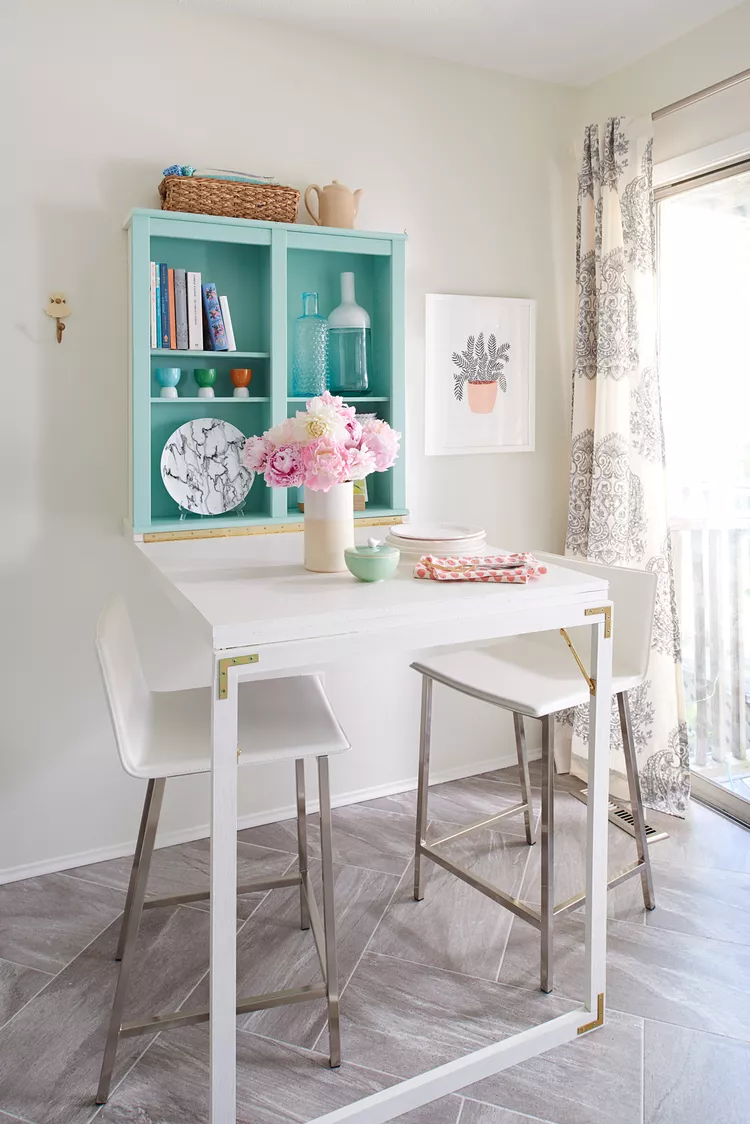 Coat wood with primer and paint. The top of this do-it-yourself folding table needs to be made from 3/4-inch plywood, while the structure, legs, and support boards should be from 1×2 boards (The sample used oak). Put boards together and make framing cuts. You should fasten a board to the front lower of the cabinet.
After that, cut the legs and crossbars and use flat braces to join the four parts at the front and back corners. Join the base to the top of the table using the piano hinge. Make sure the legs of your makeshift wall desk don’t slip out from under you by installing locking drop-leaf supports on either side. When folded, the leg structure serves as the framework for the chalkboard. Apply chalkboard paint to the area, if desired, and let dry.
Finally, install the necessary bracing and hang your new Workstation.
 Adding multiple cabinets to a small bedroom might make the area feel cramped. On the other hand, you can’t deny that a compact bedroom desperately needs more storage space. So, if you need more storage but don’t want the area to look cluttered, a hidden cabinet like the one shown above is a great option.
You can whip this up with just some wood boards and hinges in no time.
Simply build a cube and cut a hole in the top. Put in a steel bar to support the door when it’s open. And lastly, hide your new cube somewhere inconspicuous, such as beneath or beside the bed.
If the project is impossible to copy, you can “Floyd” your bedframe and enjoy new storage without touching your floorboard, which could cost you more than $500 and some legal trouble if your bedroom space is a rental. The Floyd solution will cost you around $380.
1. Adopt the Rustic DIY Chimney Cabinet to max your sloped bedroom space or near window space
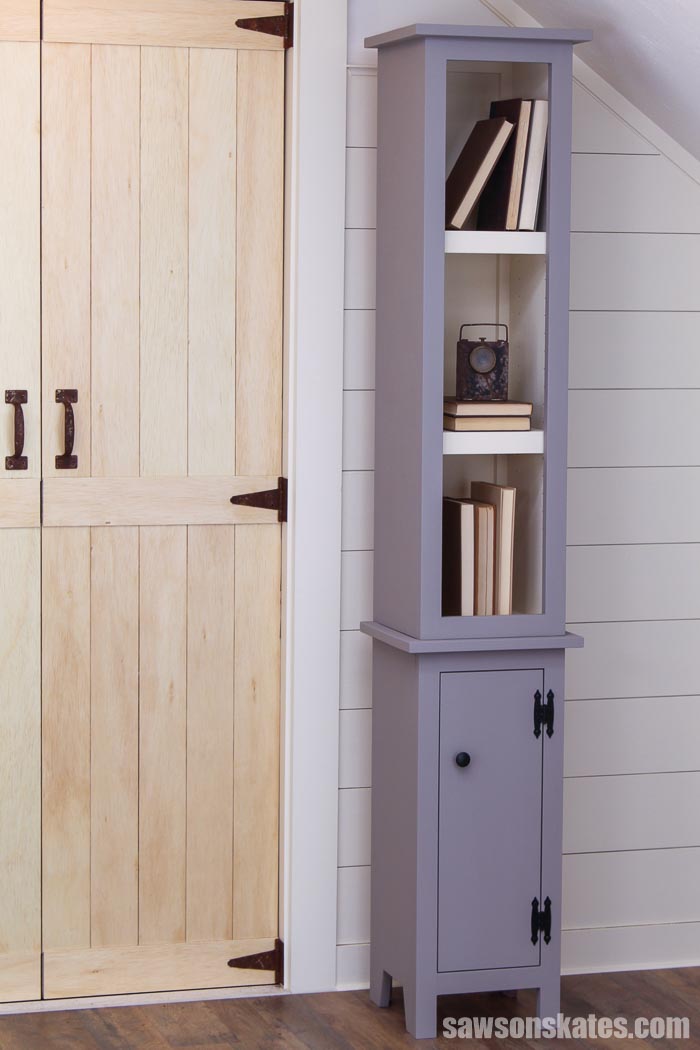 The DIY chimney cabinet is an excellent addition to any room with extra shelving. It would look great in the kitchen, tight bathroom, small dining room, and even a sloped bedroom or bedroom attic. This cupboard’s compact size and basic, rustic design make it a versatile addition to various settings. There’s a closed storage space with a door and two removable shelves at the base of the cabinet. It is an excellent hiding spot for rolled towels, periodicals, and other reading materials.
There are two movable shelves in an open bookcase in the upper part of the cabinet. A variety of items, like books, plants, and decorative accessories, would look wonderful.
You can use the Kreg Shelf Pin Jig to make holes in the carcass of the cabinet at regular intervals, allowing the shelf to be moved around as needed. After you drill the holes, you can set shelf pins to keep the shelves in place. Anyone can utilize the jig. Drill through the jig’s guides after clamping it to the board.
References:
10. Addicted2decorating.com, Addicted2decorating.com
9. Iliketomakestuff.com, Youtube.com, Thisoldhouse.com
8. Homeideashq.com, Banginteriorshelsinki.com
7. Hgtv.com
6. Bhg.com, Bhg.com
5. Simplicityinthesouth.com, Ana-white.com
4. Diyhuntress.com
3. Bhg.com
2. Homeideashq.com, Codyjamesphoto.com, Floydhome.com
1. Sawsonskates.com