Key points:
- You can get a sleeper sofa on your own, from a simple sleeper sofa to a big sleeper sofa with storage in it. So if you have a small place, this can be one of your best options.
- The price of some sleeper sofas is as cheap as $699. Some are more expensive and reach up to $10,000 or more! You can get them in different designs and colors too.
- Many sofa beds are comfortable for the guests who will sleep on them for a night or two. They provide excellent comfort without sacrificing style and design.
- To build a sleeper sofa on your own, you need to prepare some materials, such as a mattress and a box spring, that you can get from any home goods store.
- You can find many DIY ideas on the Internet to build your sleeper sofa. Some of the materials you need and the steps you need to follow are also included in this post.
- You don’t need to pay someone to do this job for you because you can find most of the things you need at your local home goods store like Home Depot or Lowe’s.
- There are also many more features available in sleeper sofas today than there were back when they were made of metal, like built-in storage and cup holders, among other things that make sleeping in a sleeper sofa even more comfortable.
Buying a sofa is an easy way to go when you need a large and comfortable piece of furniture in your small space.
But have you ever thought to create a sofa? Yes, this is a new idea that has gained massive traction as DIY makers came up with new plans that are easy and fun to make. So, let’s take a look at these 10 comfortable sleeper sofa DIY ideas for small spaces below to get a complete explanation. As always, Simphome presents you with the list.

🔊10 Comfortable Sleeper Sofa DIY Ideas for Small Spaces Video:
List Entries:
10. A DIY Sofa Bed idea with A Side Table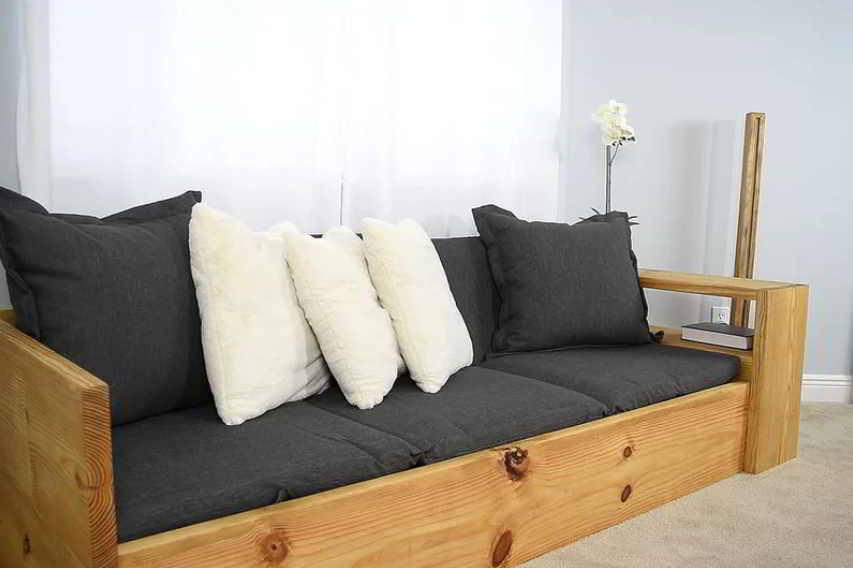
This sofa becomes a comfortable seat with a side table during the day. It transforms into a full-size bed with a built-in nightstand at night.
Making this sofa is not that hard.
- First, you need to laminate two pieces of wood using wood glue and dowels to shape the back of the sofa and the arms.
- Then, strengthen the back of the storage arm. You can use screws to get this if your sleeper sofa is against the wall.
- Next, secure the slats for the sliding feature of the sofa bed using glue and screws. Just make sure you provide enough space between them.
- Finally, give a finishing touch. It would be better to round the edges of the blades with a sander.

Relevant details:
- For the materials, use two pieces of medium-density fiberboard (MDF) or 2″ thick MDF boards.
- As long as the sliding door opens towards you, it can be a full-size bed. If it doesn’t, use a combination of half-size sheets and place some foam in the middle to make it into a full-size bed.
- To get large slats for the sofa bed, you need to make minor cuts in the wood about 1/2″ wide and 3/4″ long. Then cut them into 90-degree angles
- The mattress must be as thick as your sofa’s frame, and if your budget allows, you need to get the best quality foam you can.
9. The DIY Sleeper Sofa with Adjustable Backrest
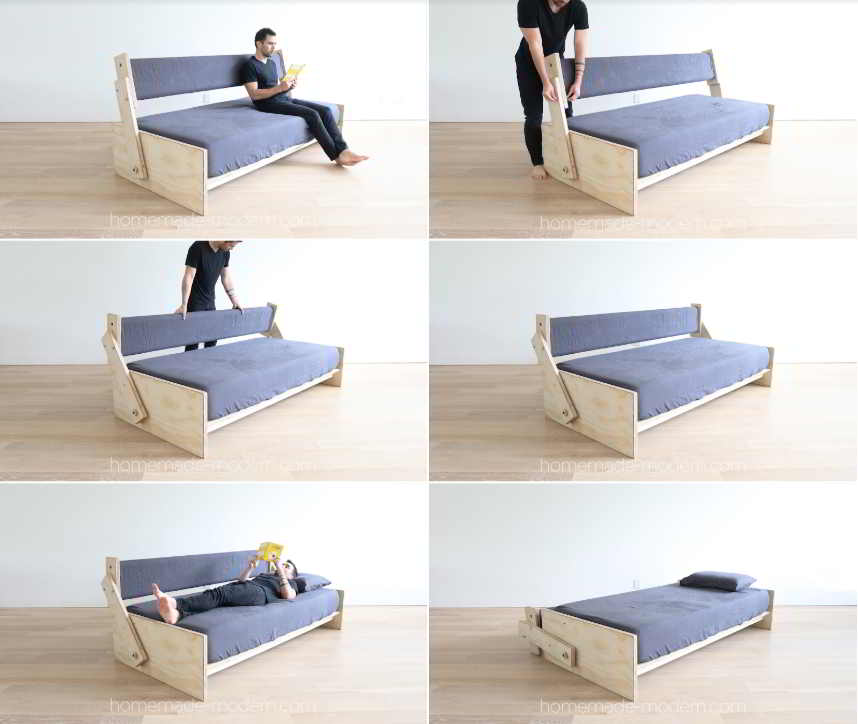 If you are looking for another effortless sleeper sofa, this one is for you.
You can start by cutting the plywood to the proper dimensions. Next, take a 6-inch huge strip for the folding arm and secure every two pieces with the help of a few spring clamps.
Sand the wood and round off the sharp corners. Then, secure the pieces using screws.
Cover the wood with some polyurethane, collect the pieces, and cover the drains with some pool noodles. Finally, add a mattress and create a matching cover for the bed and backrest.
To copy the current project, you need to know that the total cost of all the materials can be more than $200 if you allow yourself to make some mistakes. For that reason, care to visit the link source related to the idea. You’ll find two other bonus ideas you probably love to try more than the current idea.
8. A DIY Comfortable Sleeper Sofa Idea with Storages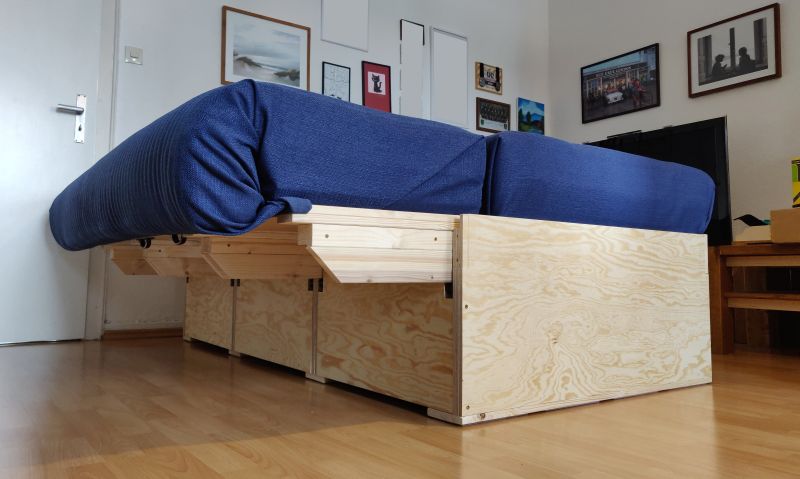
This simple design can be a space saver if you have a tiny house.
First, start by sawing the plywood to a suitable width and cutting the edges inward for a refined aesthetic and feel.
Next, assemble and install the lifting system and plugs. After that, flip the main part to install the lower part of the sofa more easily. Finally, return it to its original position and attach the looped nylon piece to create the handle.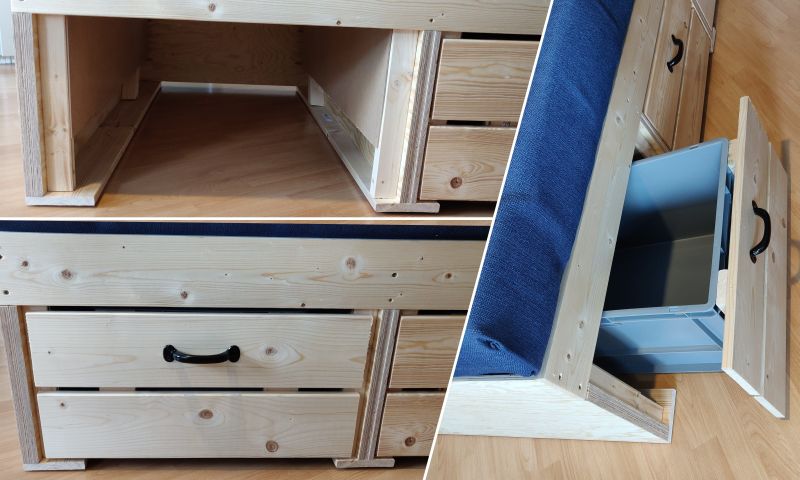
Last, position your custom-made sofa bed exactly where you want it and add a mattress and pillows.
7. The Humble DIY Couch Bed Idea
 This fascinating sofa bed is ideal for everyday use and comfortable for any time you have guests staying.
Its slightly-wide size provides a charming, comfortable feel and sturdy frame. One of the remarkable things about this multifunctional piece is that it can accommodate a twin-size or full-size mattress.
Another desired element is the backrest that can function as a pillow when you lie down. Collect some wood, then assemble as in the picture. The steps must be easy because the design is simple.
6. DIY Futon Sleeper Sofa
 This simple futon couch is perfect for you, especially for those with a small living room. What you have to do first is drill two pocket holes at the top of each of the four legs. Install the legs 150mm in from the bottom of the front and rear seat frames.
Cut the peg into 4. Insert it through the first hole drilled in the armrest. Now you can attach the top of the arm and the seat slats to the backside of the front and rear seat frames.
To complete the project, you can use the wood of your choice, but you can also remove the joints from the welding machine to make it less visible and to make your work easier.
What is the difference between a sleeper sofa and a sofa bed?
Answer:
A sleeper sofa is a bed that is hidden inside a couch. It has the appearance of a conventional sofa and folds out into a double bed, and can be used for sleeping. For this reason, sleeper sofas are typically relatively longer than other sofas to accommodate the size of an adult lying down.
A sofa bed is essentially a convertible sofa. It consists of two elements: one that looks like an upholstered couch or armchair, and another that looks like an ordinary single or double bed. When not in use, it may look like any regular furniture piece. When in use, it may look like just another type of sofa, depending on the design. The main difference between a sofa bed and a sleeper sofa is the ease of bed assembly. You can easily assemble sofa beds without the need for special tools. A sleeper sofa requires more time-consuming assembly, as it needs to be disassembled first and then reassembled.
Another commonly cited difference is that sleeper sofas tend to be more comfortable than their couch counterparts. Sleeper sofas are made with self-supporting frame designs, which support each side’s mattress and body weight. This design helps create a more level sleep surface.
There are many other differences between sleeper sofas and couches, but these are some of the most common ones.
5. The DIY Upholstered Couch Idea
 Believe it or not, you can get this beautiful sofa just by sticking it. You can take a new fabric and glue it on the old one.
Do the next step. You can paint the sofa legs the same color as the fabric for the final touch.
Upholstering an Old couch is differently challenging. For that reason, it’s advised to read the article thoroughly and follow the plan closely.
In general, your basic instructions are:
- Step 1: Make sure your couch. It must be of the same thickness as the fabric you’ll be using. The foam padding at the base and under the pillow should be good and still supportive.
- Step 2: Take out the old fabric. Next, take off all hardware, including the cushions and pillows, by unscrewing screws and pulling them out from beneath or behind each segment. To remove them from under cushion bottoms, you may have to unscrew a few bolts from wooden legs.
- Step 3: Measure the size of the new fabric you want to use, and then cut it into shape. You can also cut some extra if there is any excess.
Step 4: Once you have all the fabric pieces, glue them together with the glue gun. - Step 5: Next, create a pattern on your couch to ensure that all the corners are covered by glue and make sure everything fits correctly. It’s best to work in small segments when doing this and cover one piece at a time so that you won’t get frustrated or frustrated while doing it.
- Step 6: Cover your couch with old material and apply pressure using your pattern as a reference until it is dry.
- Step 7: Apply the first glue to the edges of the new fabric and then apply it to the inside of the couch. Then, glue along all sides and then once more along the edges. Then, take a fabric roller cloth, rub it on the sofa back, and put on a fresh one afterward to avoid wrinkling.
- Step 8: Once this is completely dry, you can put your couch back together. However, you might have to replace some hardware or screws depending on how old they are or if they’re broken too badly and need replacing. You can also add a small cover if using metal legs.
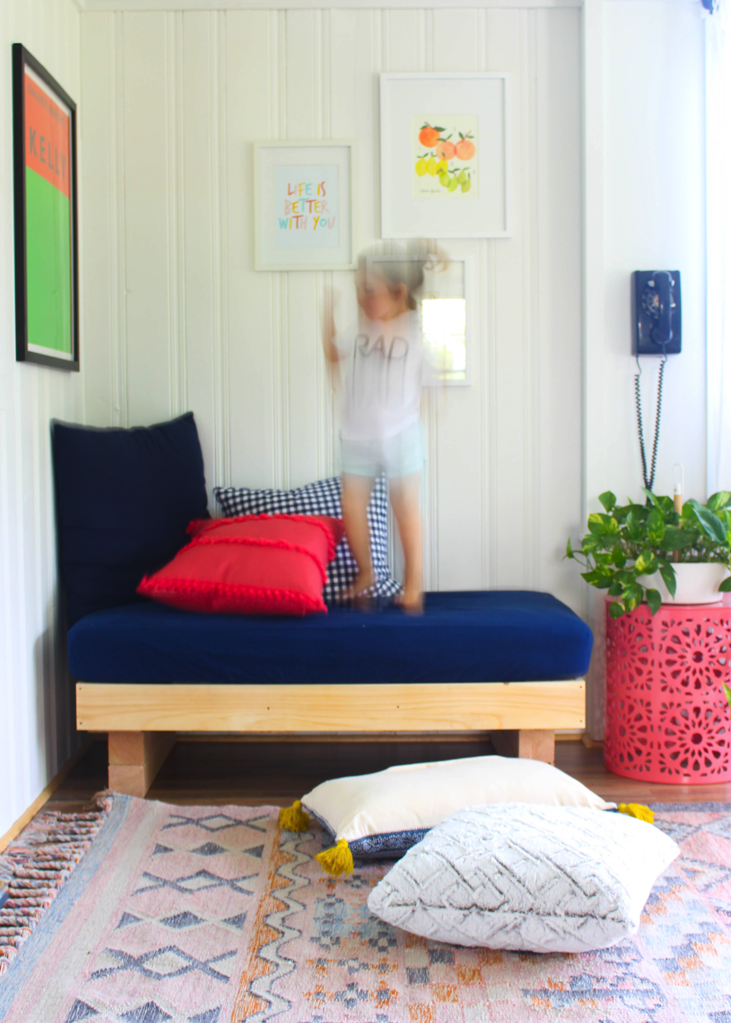
4. DIY Plywood Daybed
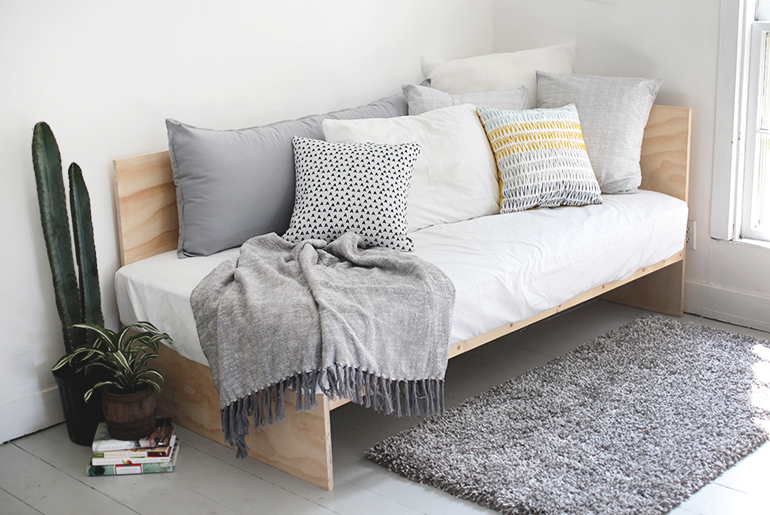 A daybed is necessary for a small house, apartments, living rooms, or a home office that combines work with a nap.
The beautiful design of this daybed mostly requires 3/4 inch plywood. It indicates you have fewer small pieces to put together.
The hardest part of this project is tearing the double-by-six boards into narrower ones. However, once you get them done, it’s just a matter of assembling large pieces of plywood. It is a simple, fast, and affordable sofa manufacturer.
Relevant instructions:
- Step 1: Start your plywood daybed project with 3/4-inch thick plywood.
- Step 2: Next, you can use a circular saw to saw edges for the studs.
- Step 3: After the sawing, sand the edges and attach them with thin wood screws and washers.
- Step 4: Apply primer white paint on plywood pieces to prevent future destruction.
- Step 5: Once you have painted it, you can assemble it. Start by gluing and screwing together the legs with plywood. Then, apply more glue to the front and back of the legs, attach them with screws, and add a strip of hardwood underneath the platform footboard to protect it from any water damage or leakage.
- Step 6: You can also decorate the table or bed with your choice. In addition, you can paint or finish the daybed by staining or varnishing it.
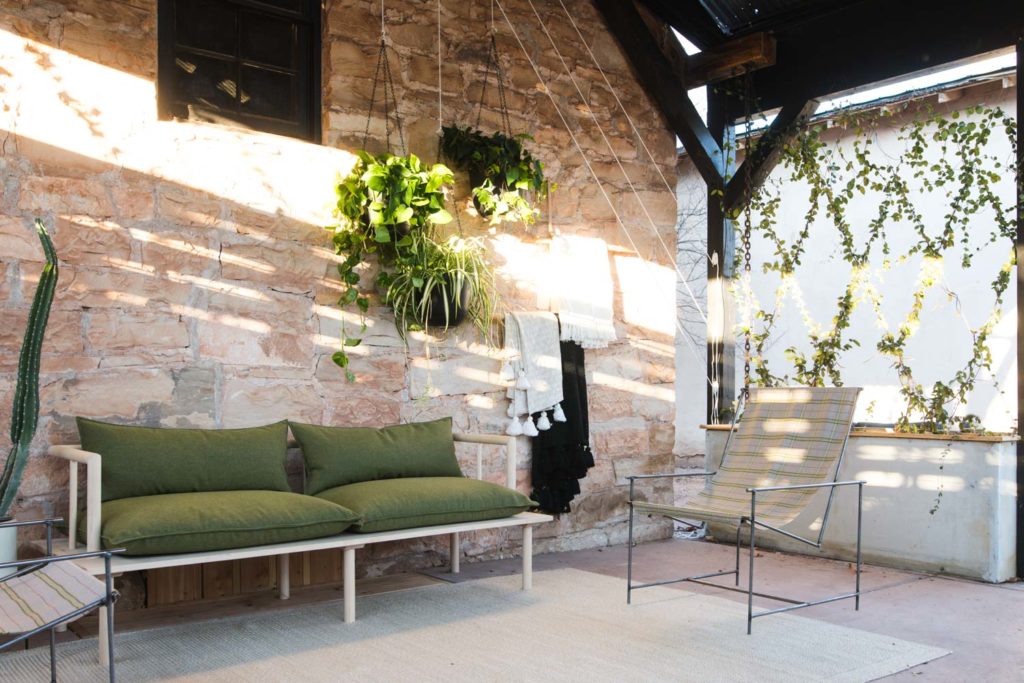
3. The DIY Platform Couch Project Idea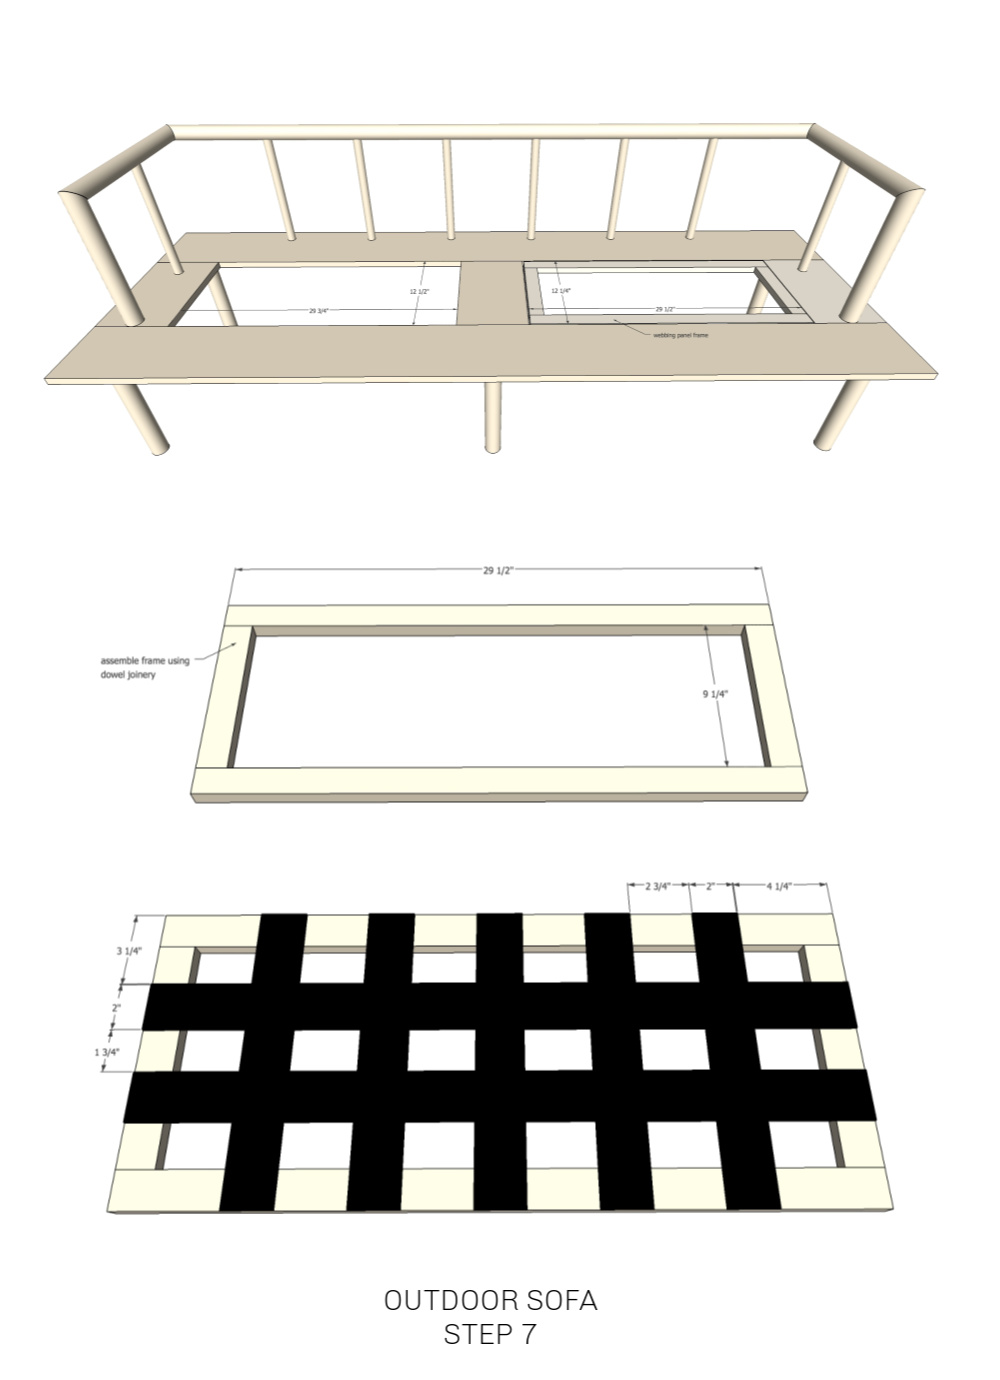
To make this couch, create the frame first by using wood glue and dowel joints, make the sofa frame.
- Then attach the support to the frame with wood glue and one 1/4″ screw, and attach the support pieces to the bottom of the frame.
- Attach the feet. You can attach them using hanger bolts. Next, add vertical dowels to the back support dowel. The easiest way to make sure your 1″ stakes line up perfectly is to use a chalk line.
- Now attach to the frame. Drill 1″ diameter holes 3/8″ deep for each vertical dowel.
Then secure it from the bottom using 2″ wood screws. - Add the webbing by wrapping it around the outside of the frame. Start by lining the cut edges on the frame with the length of the webbing in the middle.
- Last, attach the webbing to the sofa frame. Attach the webbing frame by screwing the holes drilled through the panel frame with 2″ wood screws.
2. The DIY Pallet Sofa
 It might look like an ordinary sleeper bench from the outside, but have you ever thought about making one on your own?
- First, prepare the equipment. You can start by placing the blocks under the top pallet components. Attach the beam with angle iron.
- Then put the legs. Make sure beams and superstructure support them.
- Next is painting! Then flip it over and continue the cleaning job. The bottom components need hacking! You can add some scrap wood on each side of the pallet.
- Finally, add a soft base and a variety of pillows to enhance the look.
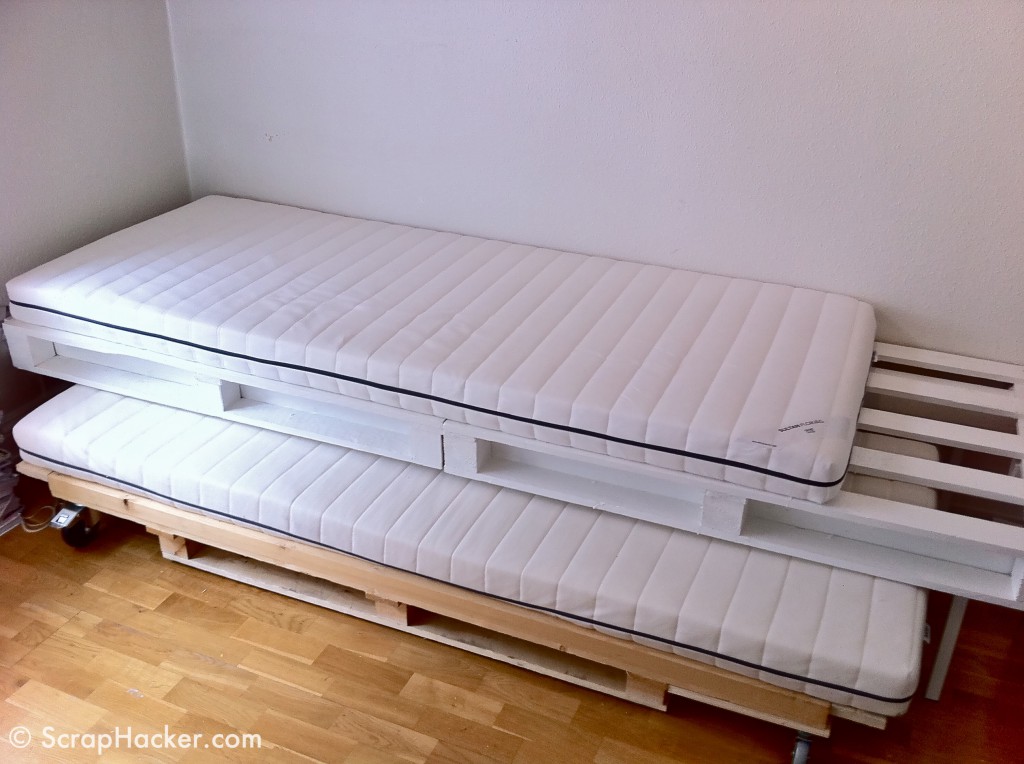
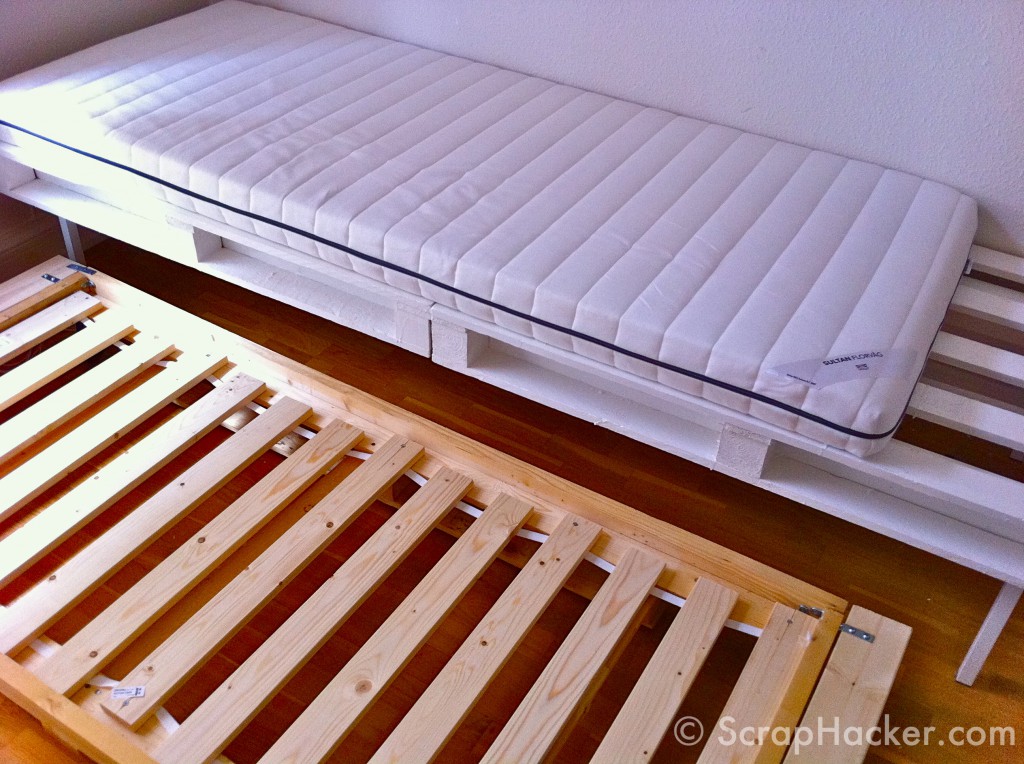
Lastly, number 1. DIY Crib Mattress Sofa
 This crib mattress sofa is very simple to assemble. You can make it into sections and then complete the final assembly once it is in position.
For the construction and assembly of the slats, you may choose to use the cleats attached to the supports. Then attach the slats directly to the cleats.
Using a crib mattress can make this sofa easy to clean. Just pull up the sheets and wash! There are no zippers or covers that are impossible to mess with, and you have a wide variety of colors and patterns in the crib section.
Relevant instructions:
- Step 1: Begin by taking off the old slats and replacing them with new ones.
- Step 2: Prepare the crib mattress with your choice of sheets, pillowcases, and pillowcases.
- Step 3: Next, you’ll need to attach the frame for the crib mattress. First, begin with laying out all of your parts on a table. Begin by connecting one support to the mainframe using wood and wood screws. Once this is complete, you will move on to step two to attach all of the other slat pieces using wood screws. After every piece has been attached to ensure that it is entirely secure, continue attaching brackets.
- Step 4: You need to attach all of the crib mattress frames to all of the support beams. To do this, you will use wood screws and wood glue.
- Step 5: After, measure and cut all of the pieces of the platform board. You will need to cut them into 30″ x 36″ pieces. You will need to place a rectangle in each corner and screw each piece onto it.
In conclusions:
- No 1. To build your sleeper sofa, you’ll need to have good tools and many materials, not to mention patience. But the results are worth it.
- No 2. You can use pallet woods for the primary material or buy plywood and lumber from a hardware store. The DIY Pallet Sofa is a good idea for an affordable sofa in your home.
- No 3. The most crucial step is to prepare the materials. You can measure and cut them or ask a friend to help.
- No 4. Use metal plates under the support beams to ensure they are strong enough to withstand heavy people and children.
- No 5. To treat the wood for long use, you need to protect it from moisture. You can use any natural product for this purpose. But the most common is using linseed oil.
- No 6. If you want to make a pallet couch, learn to do it immediately, at least once!
- No 7. Do not carry out the work in the rain or high-temperature weather.
- No 8. To turn your final project more unique and personalized, you need to choose the colors and patterns of your choice or watch different kinds of woodworkers build new arts from the material.
- No 9. Before starting the final assembly, you can use wood glue and wood screws to attach the slats.
- No 10. After placing all of the slats evenly, you can start to fill them with old sheets or blankets for better comfort and softness.
- No 11. To attach the slats directly onto the frame, apply tenacious glue on both sides using a bracing clamp or any other clamp to ensure enough pressure on the slats when they are not yet in place.
- No 12. After the assembly footboard, you can use decorative bowling pins and supports.
- No 13. To make the pallet sofa more comfortable and cozy, you can add a soft base.
- No 14. Because it is easy to clean, you can remove the sheets, pillows, and cleaners from mess and dirt every day.
- No 15. After washing a pallet sofa, you need to flip it over to clean both sides equally, using a vacuum cleaner or your hands with cleaning cloths.
In the end, If you enjoyed these 10 comfortable sleeper sofa DIY ideas for small spaces, stop by our other social channels to see what we have to offer next. Please share the result in the comments box if you made a new craft from the post below.
References:
10. Prettyfrugalliving.com
9. Prettyfrugalliving.com
8. Homecrux.com
7. Pinterest.com
6. Home-dzine.co.za
5. Hometalk.com
4. Themerrythought.com
3. Vintagerevivals.com
2. Scraphacker.com/Tutorial
1. Cloudydaygray.com