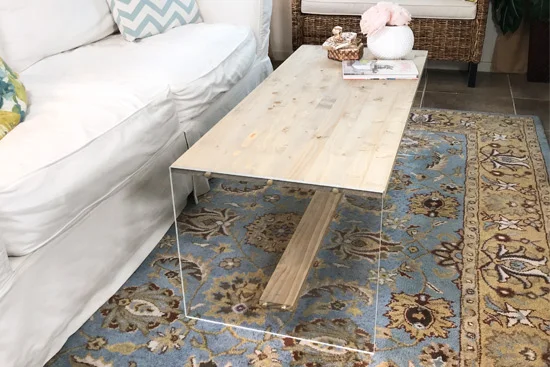
A DIY Acrylic Coffee Table Project Idea

Hey, my tiny living room makeover enthusiasts! Are you looking to make your small space feel lighter, airier, and more spacious? Then, get ready to float on cloud nine with this DIY Acrylic Coffee Table Idea!
Picture a coffee table that’s practically invisible, making your living room feel like it’s got more room to breathe.
How do you make this magic happen?
With acrylic panels, a wood top, and a sprinkle of DIY fairy dust!
Step one: get yourself some ½” thick acrylic to support the top, like a Marvel Silver Surfer.
To cut it, channel your inner lumberjack and use a wood blade with plenty of carbide-tipped teeth on a table or circular saw. Remember, slow and steady wins the race – or at least doesn’t crack the acrylic!
Step two: it’s time to drill, baby, drill!
Make holes through the acrylic using a regular ¼” wood bit, like a dentist for see-through furniture. Line up the acrylic and wood, then drill holes onto the wood’s edge with a 1/8-inch drill bit.
Step three: let’s connect those parts like a jigsaw puzzle made of acrylic and wood! Do the same for the bottom support, and your very own floating coffee table is now completed!
So, next time you’re feeling cramped in your small living room, remember to float above the clutter with this DIY Acrylic Coffee Table Idea! Your space (and your sanity) will thank you!