The living room is the center of activity. You usually hang out with your family here. When guests come over, you will be likely ask them to sit down on your couch so that you can have a conversation. It has proven that keeping the living room nice and clean is necessary.
Sometimes the clutter is inevitable.
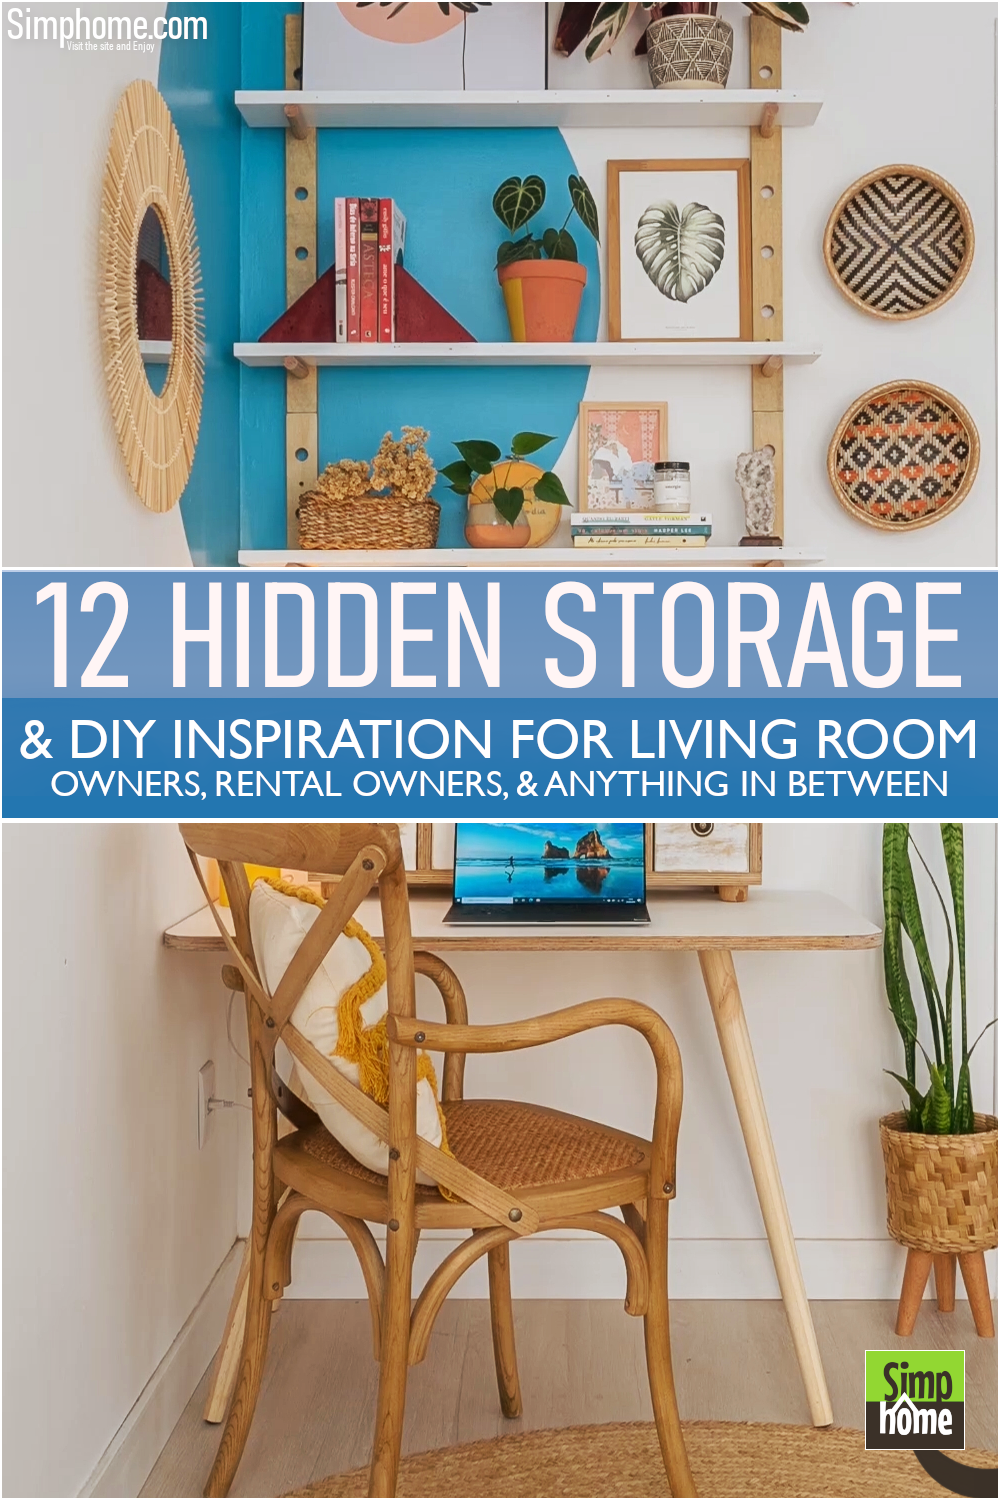
It always occurs anywhere, especially if you are dealing with limited space. To overcome this problem, stroll along with these 12 hidden storage DIY and improvements for the living room. Completing our similar ideas, this title is also brought to you by Simphome; let’s start the countdown.
List Entries:
12 DIY Storage Boxes for the Bedroom, Kitchen, and Living Room
12 Storage Cabinet Ideas for a Small Bedroom and Living Room
12 Living Room Shelving Ideas
12 Ideas to Declutter your Living Room and Make it More Organized
12 Clever Living Room Furniture Ideas and Arrangement
15 Ideas How to Upgrade and Improve Small Living Room Set Ups
20 Organization Projects and decoration for a Small Living Room
20 Living Room Furniture and Seating (Include DIY Cushions)
40 DIY Small Living Room Decor Ideas
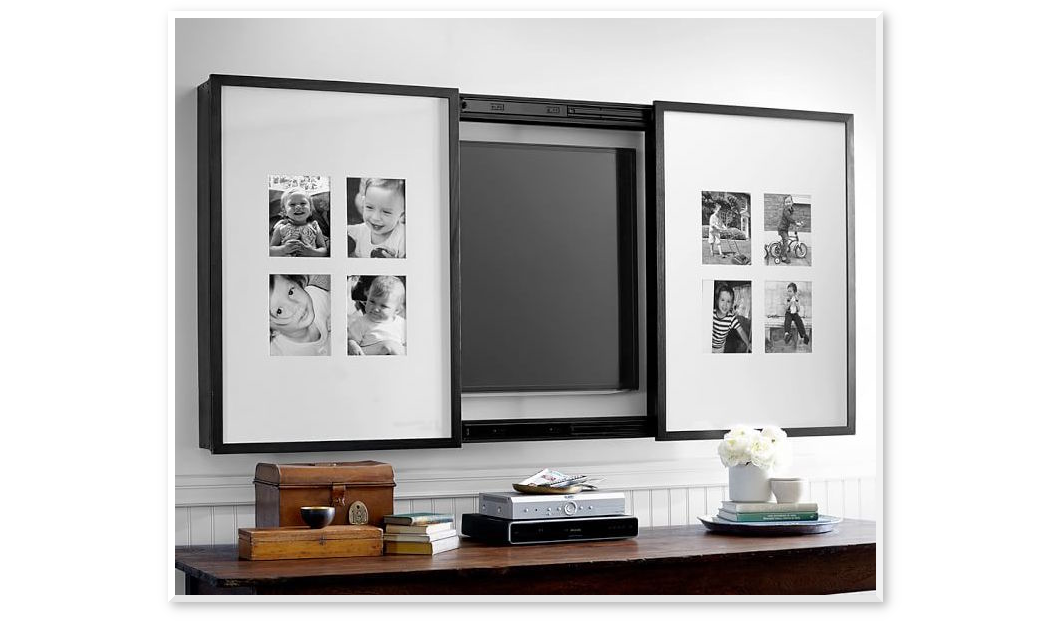
12. The Gallery Frame TV Cover
 Some people make the TV a focal point, which is not really good. It is like a smartphone that may disrupt conversations. Therefore, you should avoid it.
If you have to install the TV in your living room, consider making a cabinet to conceal it.
Even better, you can try to construct this cabinetry.
This cabinetry will epically conceal your TV. It features sliding doors that resemble barn doors.
However, try using photo frames instead of adding X patterns, which may accentuate the rustic look.
When you close the cabinet doors, people may think that it is just a photo gallery.
When you slide them sideways, they will be surprised by what they find.
Isn’t it ingenious hidden storage?
General Instructions:
- Measure the length, height, width of the TV set.
- Cut out an equally-sized piece of plywood to form a rectangle base for your cabinet.
- Measure the height of your TV, then cut out the bottom piece to create a space for it.
- The top panel is designed to accommodate the TV’s stand that slides into its groove for support and is then secured with screws through predrilled holes in its back panel.
- Measure the width of your TV’s stand, then cut out a piece of plywood to create a space for it too.
- After the four panels are cut out from plywood, you have to join them by fastening them with nails and glue.
- Next, you’ll need to attach the vertical support pieces that will support the cabinet doors and the horizontal divider that separates the doors from each other.
- Measure the width of the space between the TV’s stand. Cut out a piece of plywood to fill in that space.
- Hang the doors by installing hinges and corresponding hardware onto the cabinet’s panel.
- To hold up your TV, you’ll need to install either threaded inserts or L brackets on its back panel to allow it to be secured with screws through predrilled holes in its bottom panel.
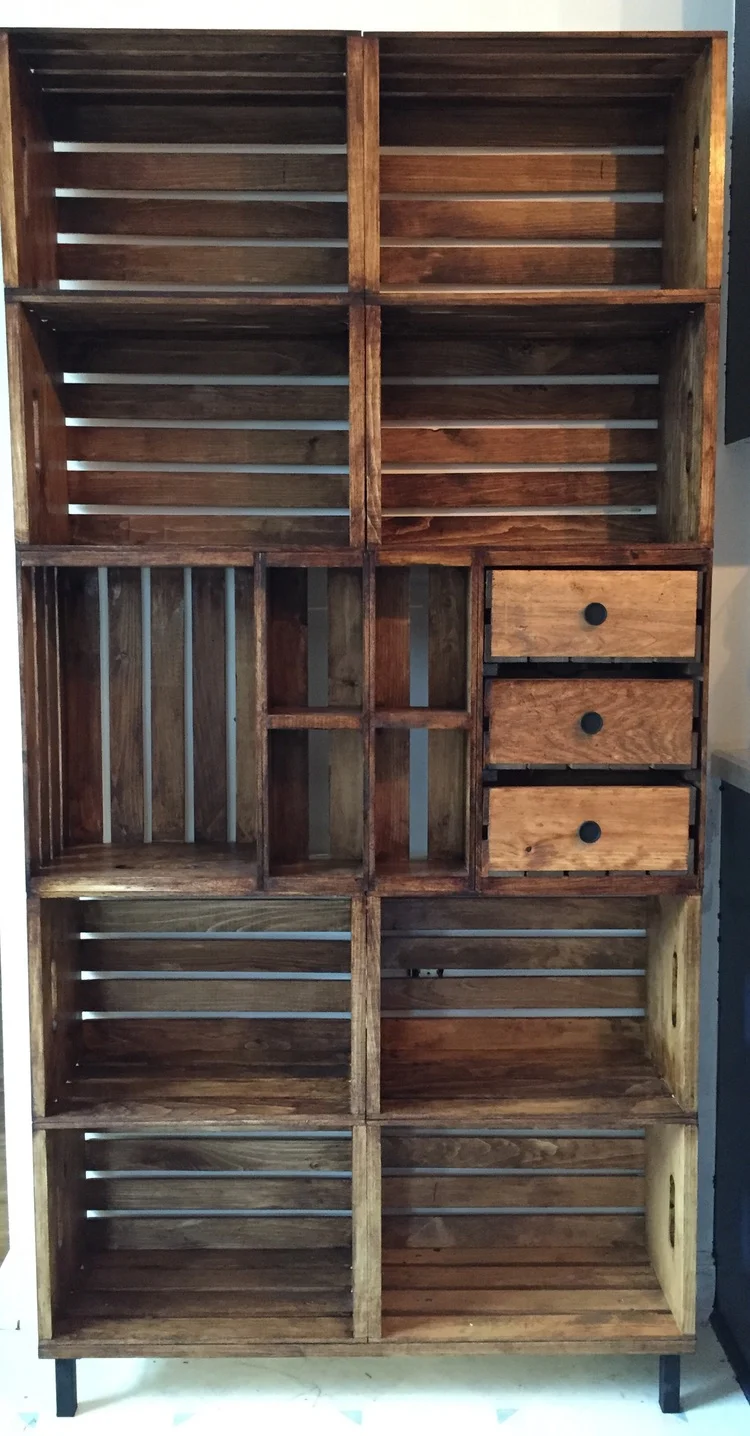 Wooden crates are practical and versatile. They are well known for being excellent storage solutions. You just need to screw them on the wall, and you will get some floating shelves. However, if you have some trouble with studs, this DIY bookshelf is worth trying.
First, go find some crates of different sizes because you will make some drawer units, too.
You will also need a board as a platform to which you can attach the 4″ legs.
To align the crates, you will use a lot of mending plates.
Before screwing the legs to the platform, color them and the mending plates with black chalkboard spray paint.
This way, they will look bolder and modern.
Then, begin attaching the legs to the platform board.
After that, assemble the crates according to the design you like.
Screw the plates to secure the boxes that you have just stacked.
Use angle braces to support the upper crates.
Finally, apply any finish you desire.
If you want to carve out a rustic look, stain the crates thoroughly.
To copy the project, you’ll also need to pay attention to:
- Examine the depth of your cabinet’s shelves and adjust the number of crates you buy so that they will match the depth.
- Be careful when scoring the crate with a utility knife to avoid cutting into its wood.
- When aligning them, be sure that their doors face inside.
- When you screw the legs to the platform, make sure they are tight for extra stability.
- When attaching the crates, be careful not to over-tighten the mending plates.
10. DIY – SMART Organizer (How to hide your secrets in plain sight)
If you have a small living room running out of floor space, try tapping into the area above the door to incorporate additional storage solutions. It is a perfect place to hide less-used items away or anything that you do not want everyone to see.
Come learn how to make an organizer that will help you use the space above your doors smarter!
First, you need to make the box by assembling two 30″ x 8″ and two 7.5″ x 8″ using wood glue and screws. After that, paint it navy blue.
You will also need to make the doorframe by assembling a 28.5″ x 7.3″ board.
Next, paint it the same color as the box.
After that, get Indian straw, cut it to size, and staple it over the doorframe.
Next, install cabinet catch rollers to the box and doorframe.
You also need to screw two knobs to the frame.
Then, attach the box to the wall over the door and put the frame in place.
 The area under the stair tends to be awkward. It is not spacious enough for a cozy reading nook. Therefore, many people just leave it that way. Still, you do not need to do that because it can come in handy.
You can conceal this space and use it as additional storage to improve the appearance of your living room.
First, you need to fill in the void with MDF. However, you have to build the frame using timber battens around the alcove. Do not forget to make one supporting strut in the middle.
Next, begin to attach the MDF starting from where the door would open.
You may also need to use leftover as a spacing measurement.
Once the MDF has covered the wall altogether, you can cut out the door.
Then, install hinges on it.
Improvement suggestions:
- Measure the width of the door and cut to make enough space for the hinges.
- After you have cut out a door, measure, and mark where you want to put it in place on the wall.
- After you have marked these locations, drill pilot holes for screws.
- Follow by screwing the hinges into place to strengthen it.
- Hang the door on the hinges and secure it by adding two screws through predrilled holes.
- After you have installed the hinges, add a latch to the doorframe.
- Add a 3/4″ MDF trim board to cover any remaining void space on all sides of the door frame.
- Lastly, paint the MDF and trim boards the same color you want for your living room.
8. Create Shallow Between the Stud Cabinetry to Mimic a Doorway
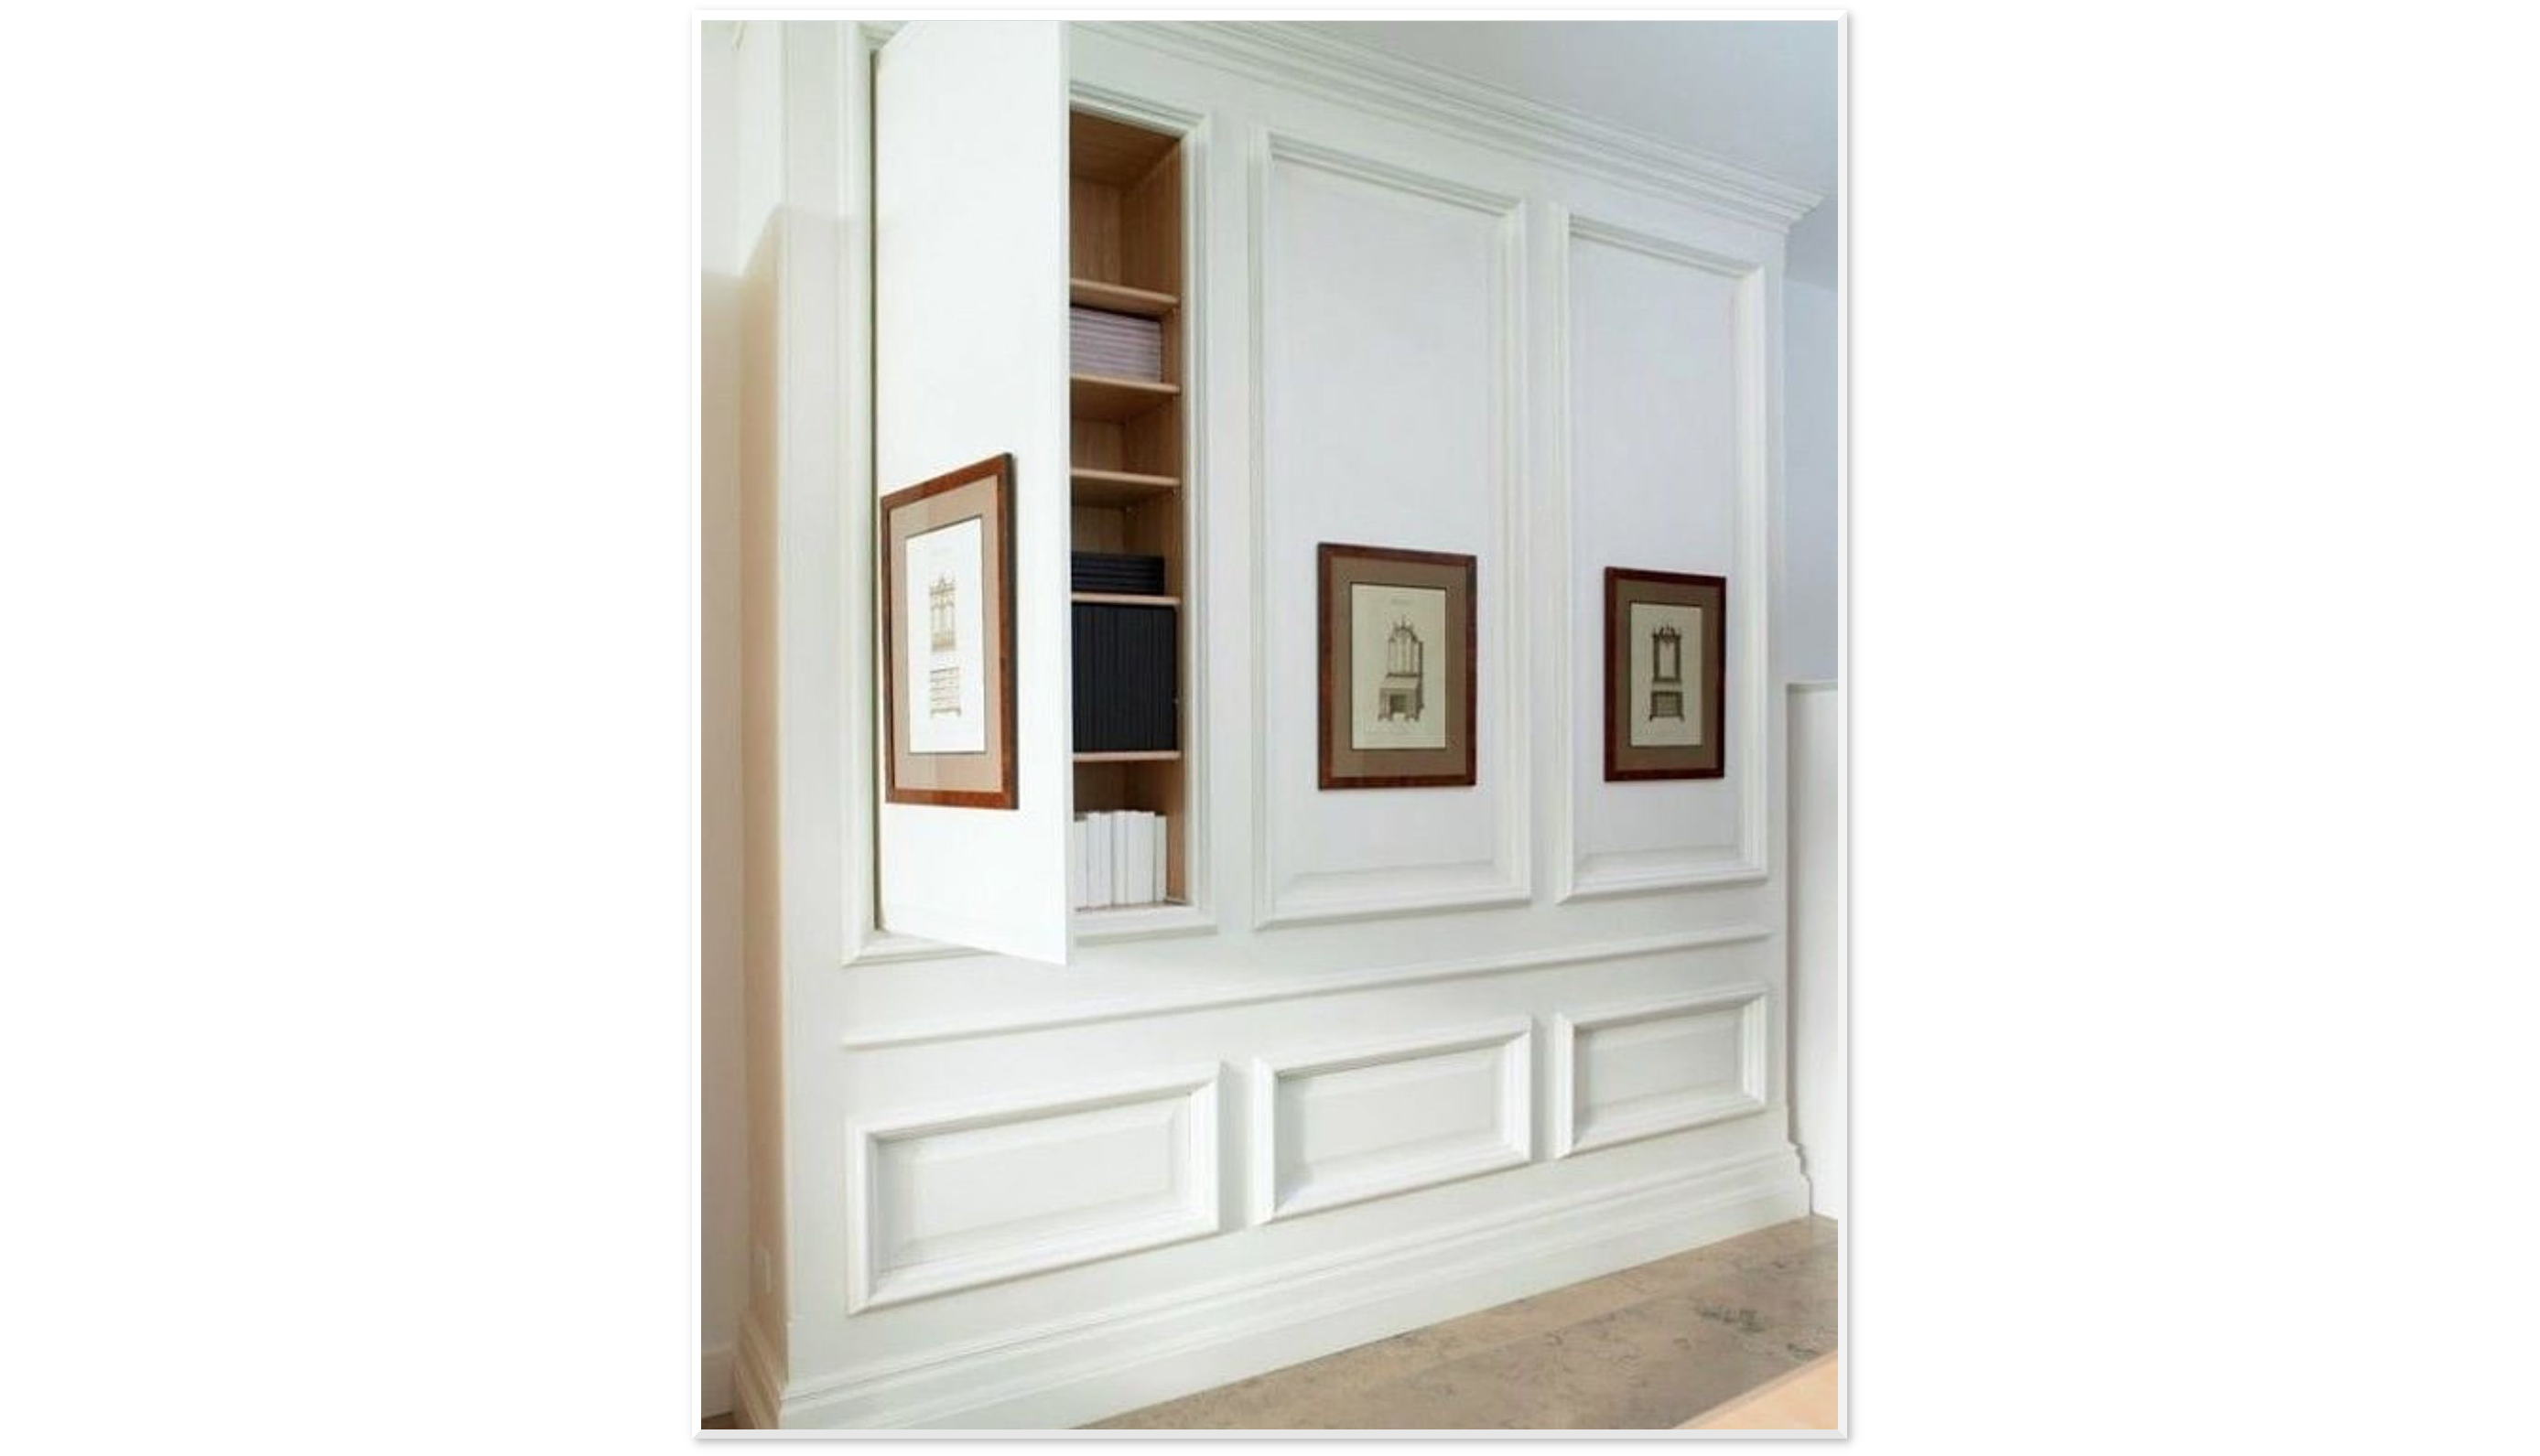 Adding flat wainscoting panels to the walls can make them look luxurious. However, it would be odd if you installed some shelves on the paneling. It would ruin its elegance. So, what should you do to eradicate clutter?
You may not be able to attach shelves on the paneling, but you can always have some storage space behind it. This wainscoting paneling, for example, conceals the hidden storage nicely. When closed, it disguises as a part of the luxurious interior. It turns out that it is a door of a built-in cabinet.
General instructions:
- When you measure the doorframe’s height, be sure that it is at least 6″ higher than all cabinets in your family room.
- Measure the height of the opening in front of your cabinets and subtract 6″. That is how tall the walls will be on both sides of this doorframe.
- After you have measured these heights, draw a line horizontally across the wall above the cabinet openings to create stripes on both sides of them.
- Next, cut through the lines using a jigsaw or cutting machine.
- Measure the width of the doorframe, then measure its height too.
- Draw a line across the width of it at the height of 6″. This area is where you will install your door frame to hide your hidden storage space behind it.
- Finally, screw the paneling to the walls with decorative headboard screws
7. Secret Compartment Jewelry Case
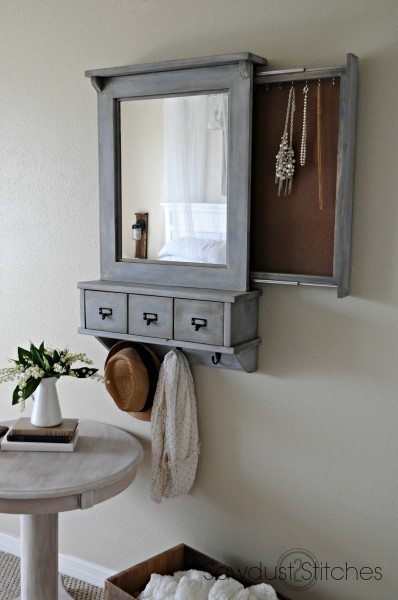
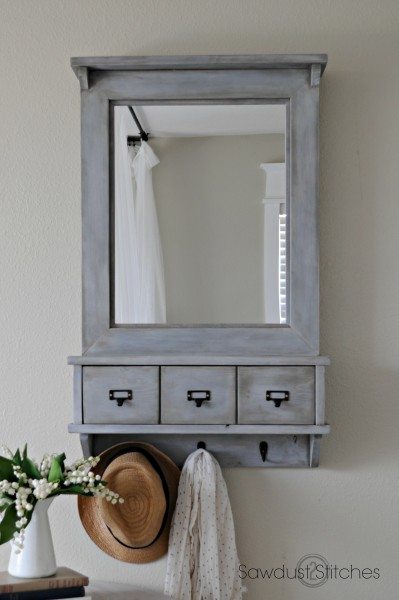 People usually have a mirror in the bedroom or bathroom. It does not mean you cannot have one in the living room, though. Hanging a mirror in the living room or hallway can help you double-check your look before leaving the house. It would be nicer if it also features additional storage space.
This mirror, for example, not only helps you check your look but also holds your accessories. It has three drawers that you can use to store small items. Behind the mirror are some hooks that will assist you in organizing your necklaces.
Instead of pulling the door out like many cabinets, you can slide it aside, which is unique. Therefore, you will need to install drawer glides at the back. You also have to leave a ¼” gap to install a magnetic touch latch.
6. The DIY – BATHROOM or LAUNDRY Clothes Basket
Who said that the bathroom and bedroom are the best places for a laundry basket? It turns out that it comes in handy when put in a living room.
This laundry basket looks chic with a blue finish and Indian straw in front. You can use it to toss a throw or stash away some books or toys. More importantly, it is easy to make.
First, you need to make the outer frame from 20″ x16″ boards.
After that, you need to make the inner box from 16″ x13.5″ boards.
Then, cut out the front part so that it looks like a photo frame.
Next, staple Indian straw to it.
You may also need to use mini corners installing from the inside to support the box.
Finally, install four casters underneath.
5. How to Hide a Printer
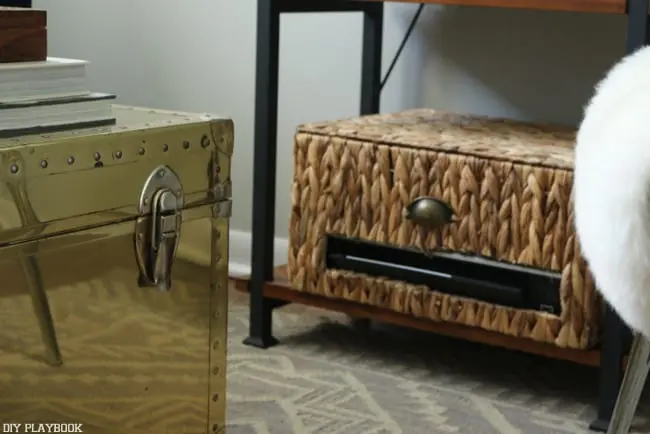 Some people have their own home office in the living room. It means everybody can see what is on your desk unless you can conceal it.
Talking about concealing things, this one is a brilliant and aesthetical idea to hide your printer and awe your guests at the same time. You just need to find a basket in which your printer can fit snugly. After that, cut out the back for the wire and the front for the output tray. That’s it! You can also add a knob to make it look more stylish.
General instructions:
- After you have measured the width and depth of your printer, you can start cutting it out from a basket.
- Start by making holes for the input tray and the power socket at the back.
- Next, cut out a bigger hole for the printer’s output tray using a jigsaw.
- Lastly, add a knob to make it look chicer
- To craft the basket, you can use any natural woven basket or a wicker basket you can find at a thrift store.
4. The DIY – EASY TABLE for your HOME OFFICE From Diycore Karla Amadori
Incorporating a home office in the living room is a great idea. It will not take up a lot of space. You can even use the area in the corner.
If you are serious about the idea of working from home, you need to make a chic desk.
It will ensure your comfort while impressing everyone who sees it.
You can begin with cutting a plywood board to size.
Consider cutting out the corners so that they will be rounded rather than pointed.
Next, install four peg legs to accentuate the mid-century modern style.
Top the table with four small drawers.
Improvement and Alternative instructions:
- Cut your plywood board to size, and then cut out the four corners.
- Install double face tape on both sides and then laminate it to create a finished edge.
- Attach the legs by installing the bottom holes and then lifting the legs until they are level with the table.
- Next, install double face tape on both sides and then laminate it to create a finished edge.
- Once you have installed the drawers, you can install a computer keyboard and monitor on top of them.
- Finally, attach nylon trims to make it prettier.
This desk will allow you to utilize the space in your living room as efficiently as possible, which is one of its primary purposes.
3. A clever Dog bedroom with extra space for your own mess
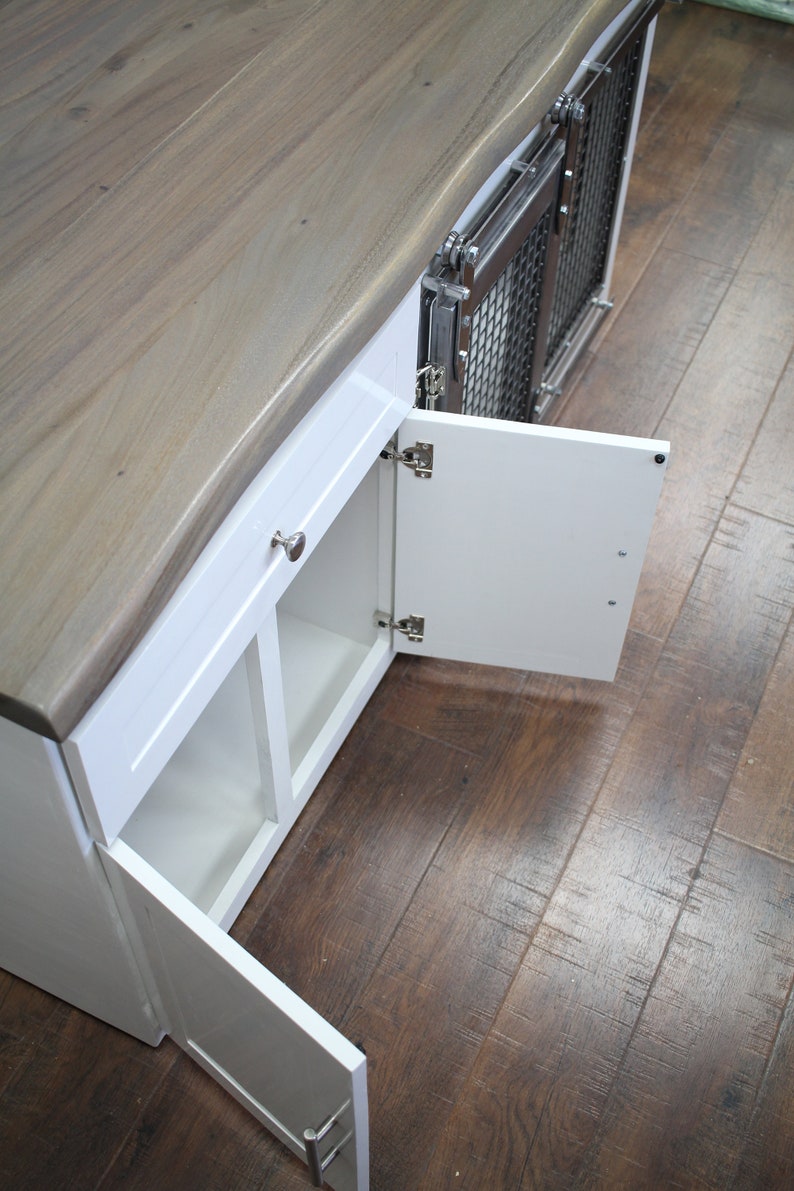 Do you think your pet might be scared if left outside? Why don’t you just let it sleep in your living room?. If you are worried that it will make some mess, you can build or purchase this DIY dog bedroom.
The extraordinary thing about this cage is that it provides a comfortable place for your pet to sleep and more storage space to hide the clutter away. It also even has a tabletop that you can use to set down books, accessories, and a lamp.
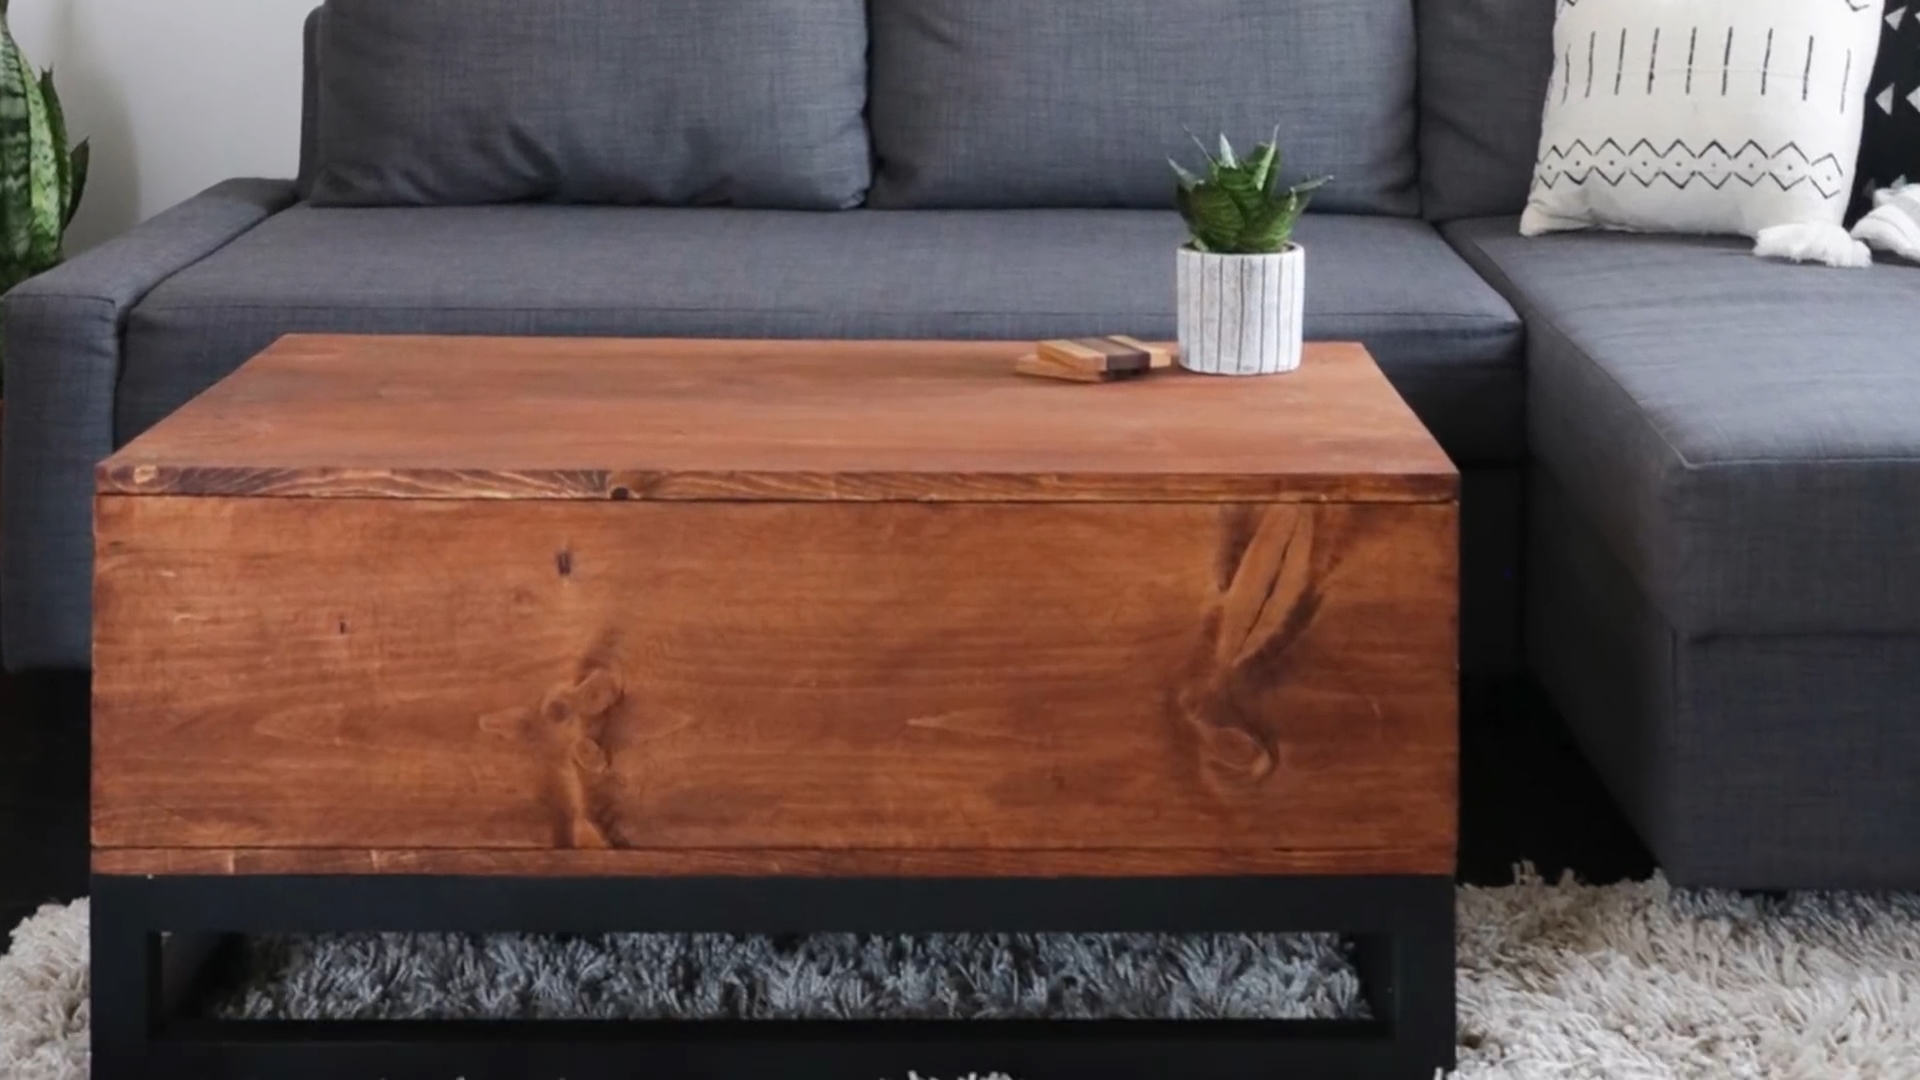 Having a coffee table in the living room is essential. You can use it to set down some snacks and beverages when watching a movie or having a conversation with your guests.
Some coffee tables even work harder. They provide ample storage space that you can use to stash away books, magazines, and stuff. You just need to cut and sand some boards, stain them, and assemble them all. Do not forget to install hinges so that you can access storage space.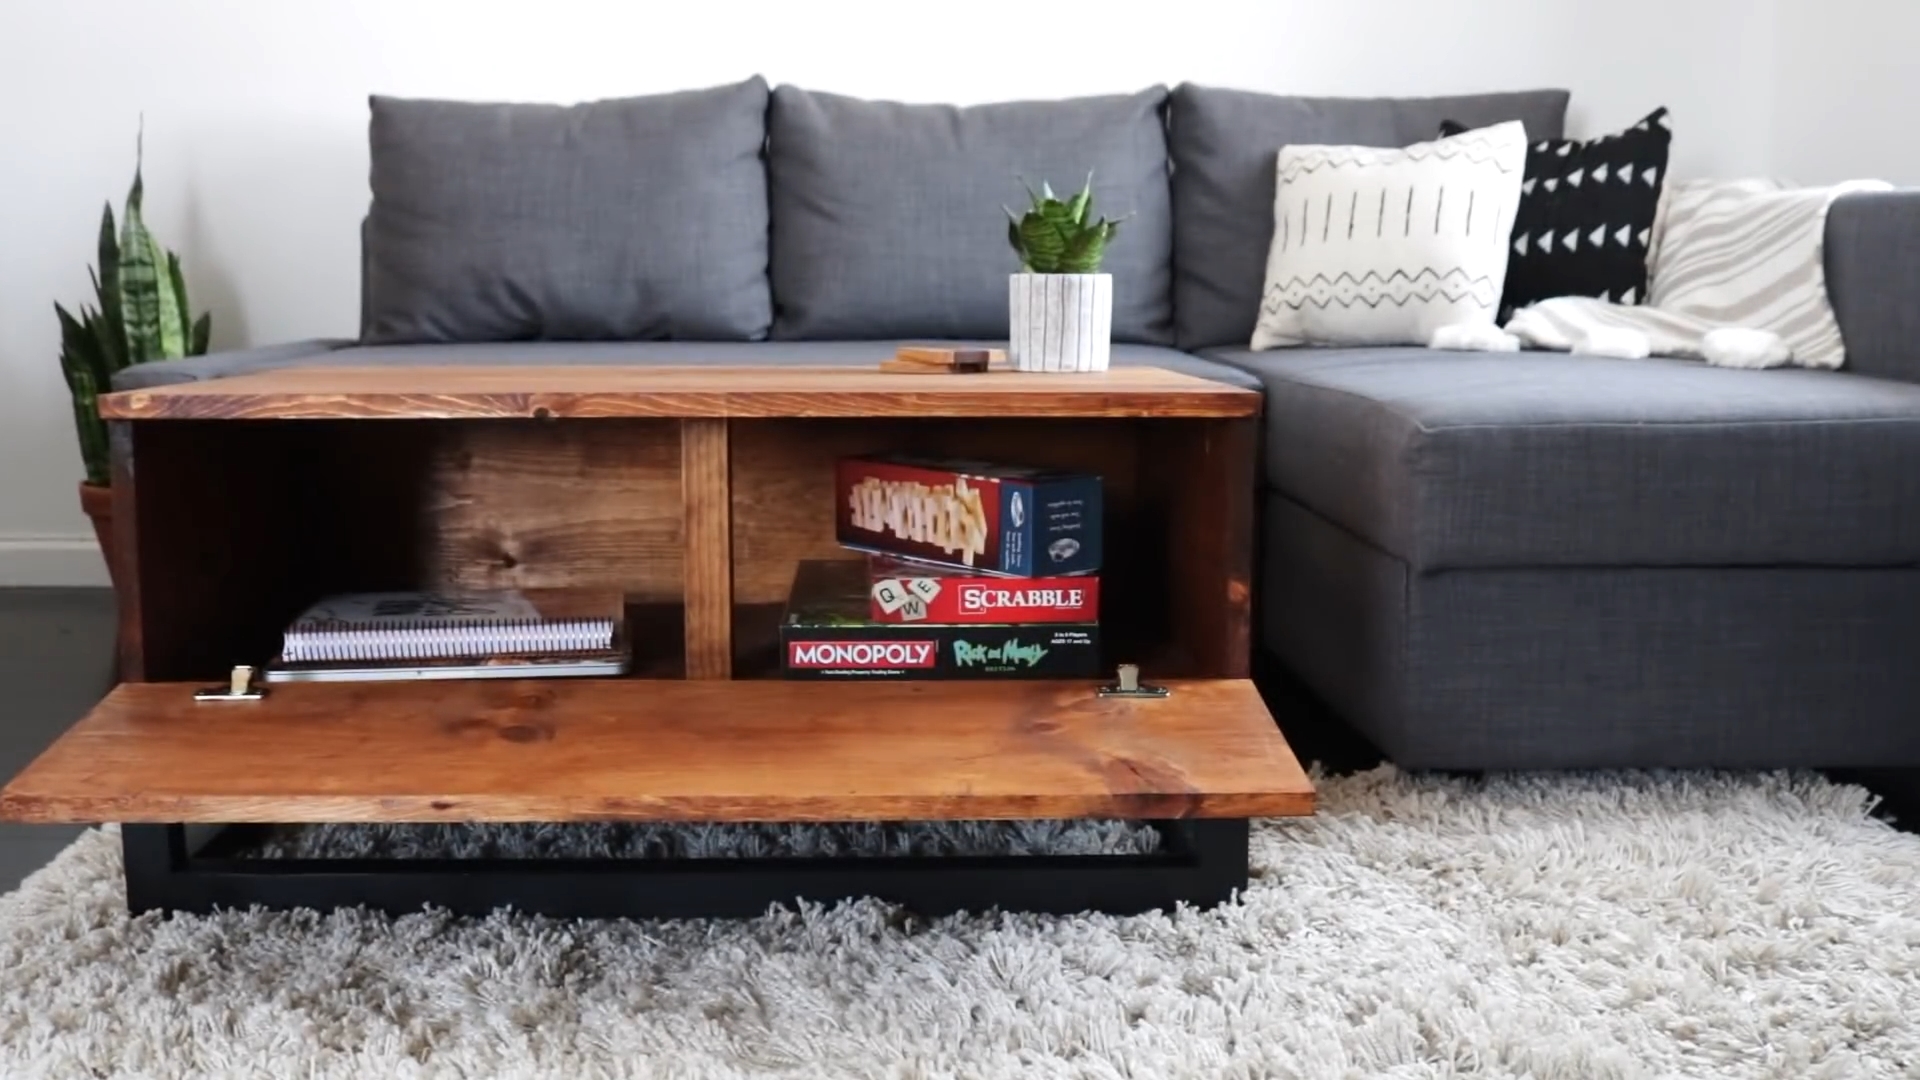
General instruction to replicate the project is:
- Cut all of your boards to size.
- Next, use a circular saw to cut out the corners of all boards.
- After that, sand the edges until they are smooth.
- Stain all of your pieces and then assemble them using glue while screwing them on the underside of each one with a screwdriver to keep it sturdy while it dries overnight. You can also add hinges here to make it functional if you want extra storage space for books or magazines on top of the table itself.
Lastly, Number 1. Grab a $7 Mirror from Walmart To get A cheap High-End Storage system
This one is another excellent idea to organize your living room and hallway. Basically, it is a cabinet with a full-length mirror as the door.
The mirror will not only help you cover what is inside but also double-check your look. You just need to make the shelves and attach some hooks to one of them. After that, assemble the mirror and shelves using hinges. Flank the cabinet with two sconces to make it look cuter.
Improvement suggestions:
- First, make a frame out of plywood and then frame your mirror using the same piece and the hardware. Attach both with screws and then attach hinges to detach them from the mirror.
- Next, attach legs to the bottom of the cabinet. Then, give it a coat of wall paint on both sides for aesthetic effect.
- Finally, install some hooks on the top of each shelf to make it look more practical and fashionable
Conclusion:
Living room organization should not have to be complicated. The ideas described in this article-video will help you to create a room that works for your personality. Also, you can experiment with different styles of storage systems to find the one that best matches your room’s design.
Organizing the living space is important to carve out comfort and impress everybody who sees it, including your guests. These 12 hidden storage inspirations DIY for the living room will help you out with that. So, which one is your favorite?
References:
12. Atticmag.com
11. Simphome.com
10. Youtube.com
9. Lukearthurwells.com
8. Laurelberninteriors.com
7. Sawdust2stitches.com
6. Youtube.com
5. Thediyplaybook.com
4. Youtube.com
3. Etsy.com
2. Youtube.com
1. Youtube.com