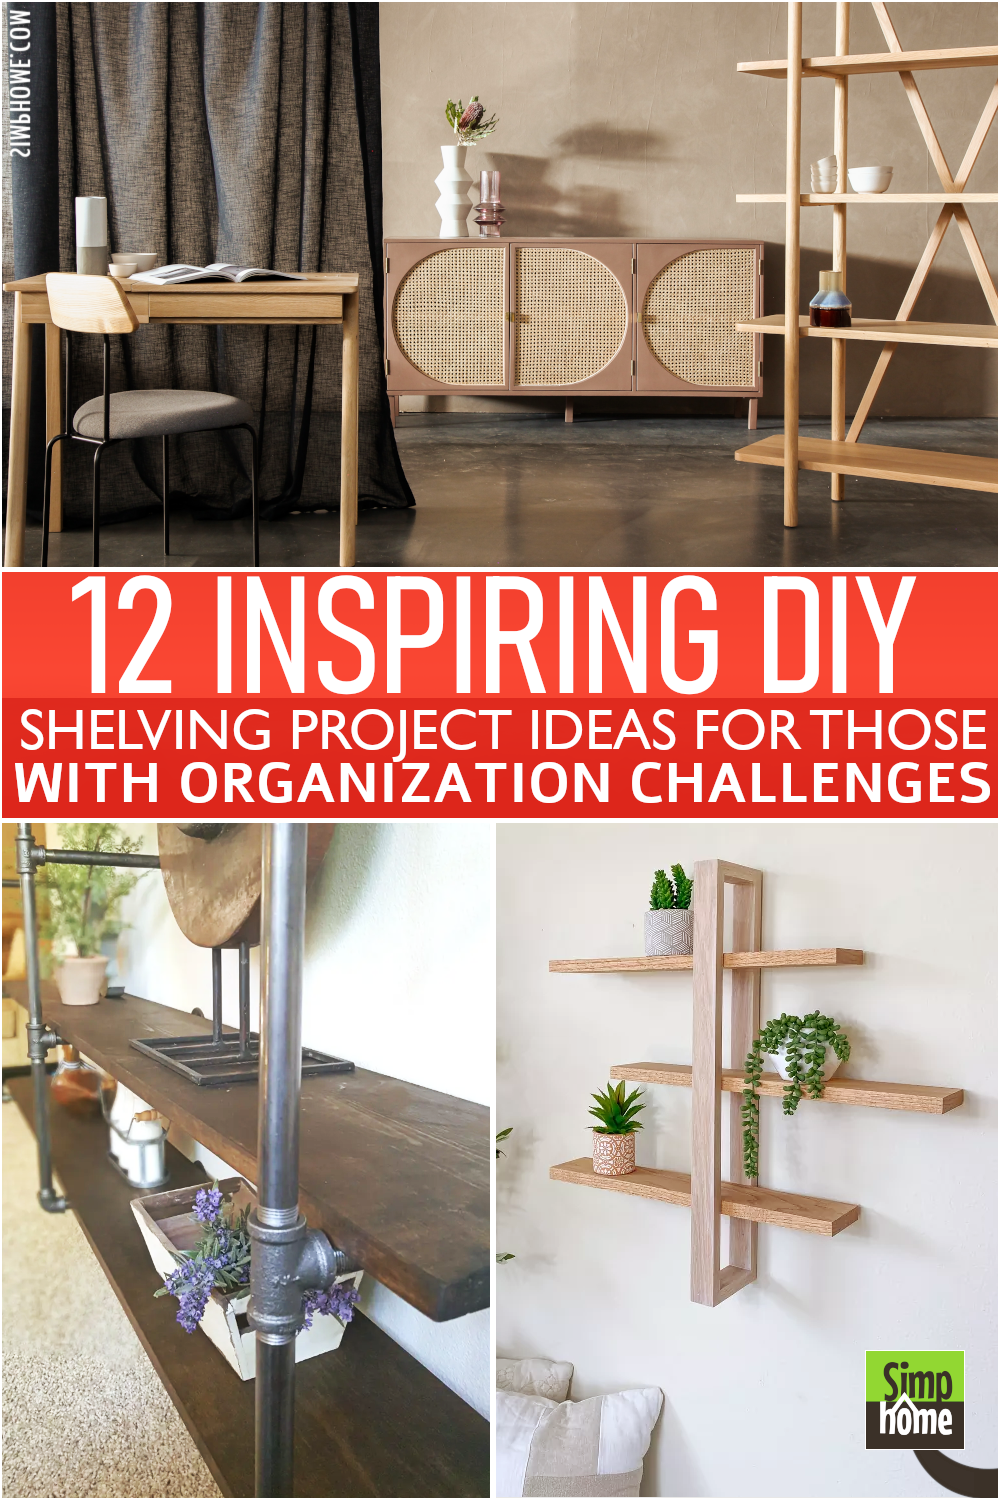
Shelves can come in shapes, sizes, and materials, with so many designs that it’s hard to know where to begin.
When it comes time to install shelving for your home (or maybe even office), there is no shortage of DIY projects you can take on. Check out 12 inspiring DIY shelving project ideas from this list and find one that’s perfect for your space.
Key Points:
- Your inspiring shelving project can be started with absolutely no cost—using scrap materials!
- Use the shelves for almost any space in your home, from your bathroom to your craft room.
- Pick from various materials, like lumber, plywood, and even steel.
- Get creative and make a unique design that perfectly fits your home’s decor.
- Always find your room measurement because this will help you determine the exact amount of materials needed.
- Basic tools to convert your idea to reality are a drill, saw, and sandpaper.
- One last piece of advice: Don’t overthink your project—simplify it.
Providing ample storage is crucial because it can help you get rid of clutter. As a result, you can get a nice and comfortable place to live. However, investing in cabinets, closets, and dressers may not be good, especially if you have limited space. Thus, you should opt for shelves.
Shelves are incredibly versatile. You can even use them in your kitchen, living room, bedroom, or any nook and cranny in your house. Besides, the designs are limitless.
Are you looking for functional shelves that may also look appealing? Check out these 12 inspiring DIY shelving project ideas. As always, Simphome presents you with the list.
🔊12 Inspiring DIY Shelving Project Video:
List Entries:
12. An Easy Closet Transformation project from @Keltonfinders
The closet is a perfect spot to hide everything away. You only need to toss everything inside it, and you are good to go.
Then when you open the closet, you will find a disaster area. To overcome this problem, you only need to invest in more storage, just like these handy shelves.
- You need to buy two boards with pre-drilled peg holes to make these shelves. You can get them from Home Depot.
- Then, cut some 1×12 boards down to size for the shelves.
- After that, apply any finish you want.
- Then, insert the pegs into the holes.
- Finally, put the shelves in place with the pegs as the support.
People usually use screws or L brackets to secure a floating shelf to the frame or wall. This time, you will not need them. You will create hidden brackets that allow you to put and remove the shelves if necessary without breaking a sweat.
- First, get ¾-inch aspen boards and sandwich ¾-inch plywood in between.
- Then, attach a ½-inch face board to the frame. This way, you can create an illusion of a solid wood shelf.
- Next, stain the shelves thoroughly.
- After that, install the ¾-inch aluminum angle inside the shelving unit to create the hidden brackets.
- Finally, slide the shelves to the brackets.
Relevant details:
- Find your room measurement, and then plan your project
- Build the wood frames as a base for your shelves
- Cut the wood and make sure they are ready to assemble
- Attach the pegboards to the wooden frames (make sure there is a space between both frames)
- Mount metal brackets on the wall and then attach them to the wooden frame with screws
- Make two small holes on each side of each shelf and insert screws in these holes to attach them,
- Use your measurement to cut the metal brackets to fit the shelf
- Attach the shelves to brackets with nails and screws. Be sure there is a space between the shelf and bracket
- Peel off all the paper from the inside the back of each shelf
- Put your favorite items on top of your shelves. Or test the strength of your new shelf first by placing the computer or a heavy box on the shelves.
- Mount the legs to the bottom of each wall mount shelf with screws
- Check if all adjustable shelf legs are tight and well-installed
- Apply wood finish to all wooden boards and then allow it to dry for 24 hours; you can put something on top of it later.
- You can use a pegboard hanger or buy some floating shelves from your local DIY shop
10. The DIY Garage Shelving idea You Can Build By Yourself
Part 1 by @Themartinnest
The garage is prone to clutter. You tend to store various tools here. As a result, they can conquer this area.
With these effortless DIY garage shelves, you can organize your tools in a jiffy.
- First, mount 2×4 onto the wall and through the studs. You can use an impact driver and self-tapping star screws because they are handy. After that, you need to attach another 2×4 over the first one. You will need a clamp to hold both boards if you do it by yourself.
- Next, attach the vertical supports. You will need one on each end. If your shelving unit is rather long, you may add another vertical support in the middle.
- Once the vertical and horizontal supports are up, unscrew the front portion. You will notice that you have a direct mirror image of what you place on your back wall.
- Now, it is time to cut the horizontal cleats. Make sure they are at the exact same length.
- Then, screw the cleats to the horizontal supports on the wall. You can begin from the bottom up to the top. Once the cleats are in place, attach the front support.
@Themartinnest Video Part 2
Once the frame is ready, you can attach 4×8 plywood sheets to create the shelves. Finally, you can organize things in your garage.
9. The DIY Floating Drawer Wall Shelves | UPCYCLE PROJECT
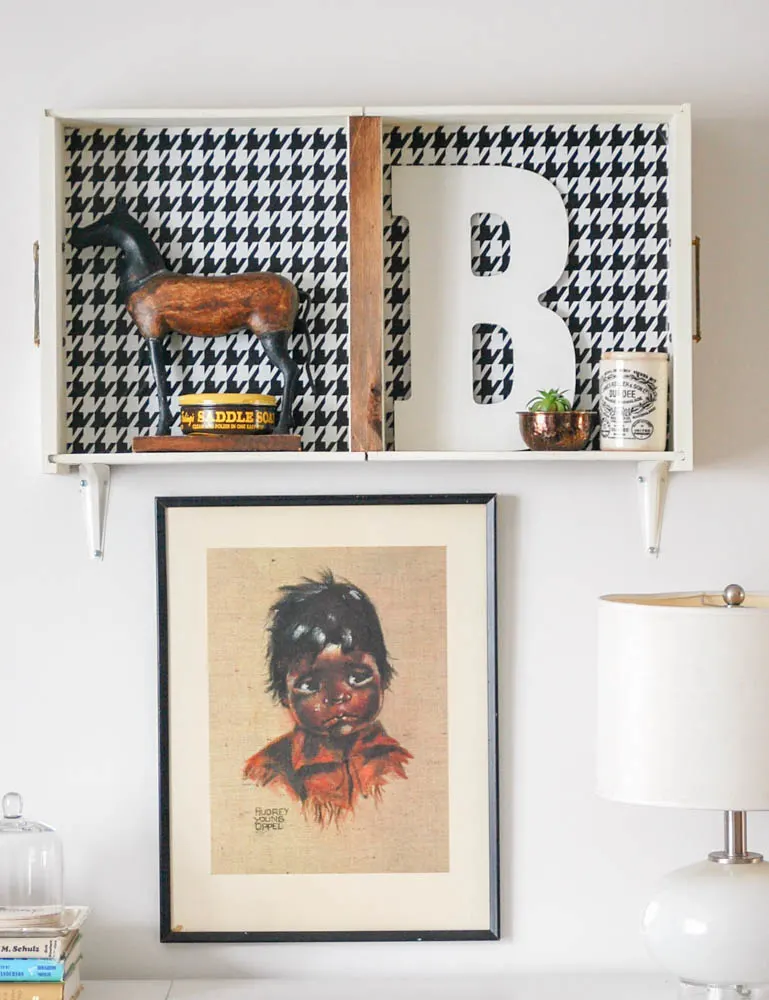 Creating chic shelves does not have to be arduous, especially if you are not into woodworking. Instead of making them from scratch, you can try upcycling old drawers.
- To create these shelves, you will need old drawers.
- Then, sand them down thoroughly if necessary so that you can apply any finish you want easily.
- Next, use decorative paper to line the inside. This way, they will look pretty.
- If your drawers are old and have uneven sides, you can join them using two wood shims in the middle.
- Finally, install brackets with mounting hardware to the wall and attach your shelves.
8. Make This Shelf From @Emyludesigns For $40
Your laundry room deserves a fancy floating shelf. You do not have to splurge out on an expensive one because you can make it yourself for only $40.
- First, use 2×3 to create the frame for the shelf. You will need three to make the horizontal support, face frame, and nine shorter pieces in between as supports.
- Next, assemble them using wood glue and wood screws.
- Once the frame is ready, attach it to the wall and through the stud.
- After that, dress up the frame with RevolutionPly, which you can get at Lowes.
- Attach the RevolutionPly to the top and bottom of the frame.
- Then, cut a small piece for the front part.
7. The Floating Entertainment Center from DIYCreators
If space is limited, a media console can be your best bet. It will help you organize your DVD player and play station, offering you more storage for books, DVD collections, magazines, etc.
- You only need to create a floating shelf with a partition in the middle.
- Then, you can install drawer slides inside the media console. This way, you can access the shelf easily.
- If you plan to put your play station inside the media console, consider routing the bottom of the cabinet to create an opening for the cooling fan system.
- You can also try routing out a section on the back of the media console to attach LED strips. It is optional, though. Still, if you do this, you will get a superb cabinet.
6. The DIY Cat Shelves Idea @Emilyrayna
If you are a cat parent, consider having these awesome shelves.
- You only need to get some wooden boards, cut them to size, sand them down, and stain and seal them.
- Once you are done, line and attach the carpet to each piece, you may need to cut the carpet to fit in with the shelves.
- You can glue down the carpet to attach it to the boards. However, you can also drive some nails into the carpet and panels to make it stay in place.
- Next, get some heavy-duty brackets and spray paint them gold.
- After that, install the shelves on the wall at certain angles you wish with the golden brackets as the supports.
5. Install any floating shelf you desire to build without those pesky butt joints
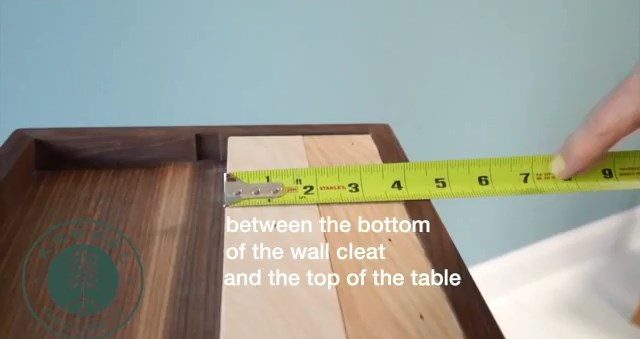 Install the french cleat and let your craft smoothly float in the air.
A French cleat is one of the ways to install your floating shelf smoothly. Besides, its sturdy support makes your cabinet or racks long-lasting and robust.
- First, create the cleat. Since it is a French cleat, it has to have a 30 or 45-degree slope.
- After that, find the location where you want to hang your cabinet.
- Place the bottom edge of the cleat 4.5 inches below the location because when you hang it, you will find 4.5 inches between the bottom of the wall cleat and the top of the cabinet.
- Once you place the cleat on the wall, check whether it is level. Then, mark around the edge.
- After that, use the included silver screws and a hammer to mark the wall through the pre-drilled holes.
- Next, install the drywall anchors into the drywall. If you have plaster walls, you may need to pre-drill holes for the metal anchors. You use a 3/8 bit to do that, and make sure you drill it through the lathe.
Since the anchors are in place, you can screw the cleat to the wall. - After that, find the stud edges to locate the center.
- Then, use the countersink bit to tap a guide hole.
- After that, screw in the included 2″-screw to attach the cleat to the stud.
- Now, it is time to hang the cabinet by sliding it onto the cleat, pull up in front when you push it down in the back, and lock it to the cleat if necessary.
Install Sliding Doors 2021-Krovel-Furniture @Simphome.com
4. Make A Modern DIY Wall Shelf
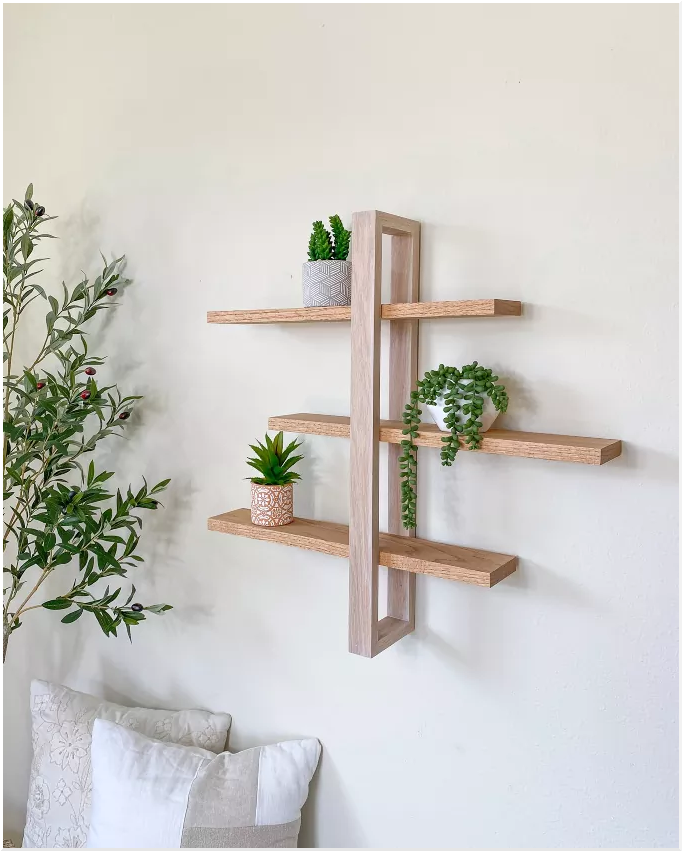 This shelf will solve your problem and spruce up the space. If you wonder where you can get it, you can build it yourself.
- First, cut 1×4 into three 20″ pieces, which will be the shelves.
- Then, grab 1×2 and cut it into two 5″ pieces and two 24 ½” pieces with a 45-degree angle on each end to create the frame.
- Then, sand each piece and stain them thoroughly.
- Next, assemble the frame and attach the shelves to it.
- Finally, install D-rings to the back of the frame to hang it.
3. Build a modern wall shelf via @Threalgerber
If you want modern adjustable shelves, you can try this idea. You need to create some notches inside the frame. Then, hang it to the wall and slide the boards through each notch.
As always, to replicate the idea, decide your measurement and then collect your materials and processing tools. Next, make the notches and assemble your work properly, as seen in the video.
Next, get different planks and set them to the notches you already built previously.
The make your new floating shelf securely attach to your wall; you need to install wall anchors. If you have drywall, you can use plastic anchors.
However, if you have plaster walls, you may need to drill through the lathe to get metal anchors to hold up the frame and your board. After that, reinforce the anchor by screwing it into the studs using a screwdriver.
Once that is done, hang your shelf frame on it. Later, slide all of your boards in each notch and get everything in place.
2. Step By Step on how to build a new Industrial Pipe Floating Shelf
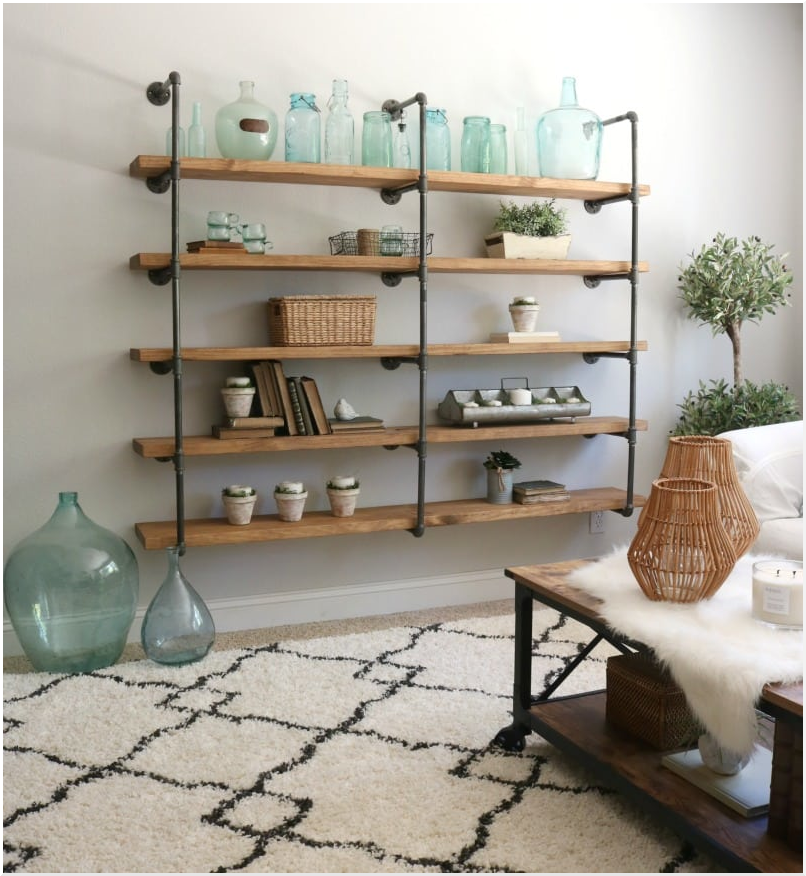 Are you into industrial style? Try these shelves.
You only need to install galvanized pipes to the wall to make these shelves. You can try spray-painting them beforehand to create a more rustic look.
Once the frame is ready, you can slide your boards onto each support. You can also use pipe clamps for peace of mind.
Lastly,
Number 1. The unique idea to convert old basketball into a floating shelf @Motivatedbymyplan
Do you have an old basketball? Do not throw it yet because you can make a cool shelf with it.
First, cut the ball into quarters. Then, trace the cutting to cardboard. After that, cut the cardboard and glue the pieces onto the ball to cover the opening. Finally, attach the shelf to the wall.
In conclusion:
Building your DIY shelving doesn’t have to be tough. As long as you have found one that inspires you, you can begin to build it. Try to follow the ideas above, and you won’t have any problems.
You can also build a new shelf from PVC pipes as long as you have the needed tools, like a saw and drill. Moreover, it requires less effort than building a cabinet because you can get to have some fun with the process.
Once you are done, you will be surprised how much your house looks different with floating shelves.
You will find it easier to keep things organized, too. Installing floating shelves can give you an amazing look and feel at home. You can display beautiful photos or souvenirs on them, too.
So, Those are 12 inspiring DIY shelving project ideas you can copy and experiment with today. We hope you liked them; if yes, share this article with your friends and family. We wish you all the best in building your new DIY floating shelves for your house. May you like these project ideas and follow them to build amazing shelving for yourself or someone you love.
References:
12. Tiktok.com/@keltonflinders
11. Tiktok.com/@bradwillbuildit
10. Tiktok.com/@themartinnest, Tiktok.com/@themartinnest
9. Diypassion.com
8. Tiktok.com/@emyludesigns
7. Pinterest.co.uk, Diycreators.com
6. Tiktok.com/@emilyrayna
5. Krovelmade.com, Youtube.com
4. Hometalk.com
3. Tiktok.com/@therealgerber
2. Thedesigntwins.com
1. Tiktok.com/@motivatedbymylan