In Generals:
- You only need two pieces of wood: one long board and one short board – standard 2x4s or 2x2s work well. Two screw hooks are at least 12 inches apart (depending on how far you want your shelf to hang).
- To hang the shelf, drill holes in the shortboard and the longboard. Hold them together. They should be centered.
- Screw the short board to the wall studs with screws that go into a matching recessed screw (if your ceiling is already finished). Use a level to ensure a straight line between the two screw points. Then hang your shelf on top of it. If you can’t, take it down and try again.
- Screw up one end of your longboard to hold it up – this makes your hanging shelf higher than on the other sides (the same idea goes for using two 2x4s as longboards, but you might want to bolt them together).
- (Optional) You can paint or stain your boards (or paint the uncovered board).
- (Optional) You can also add some lights and displayed objects to your shelf.
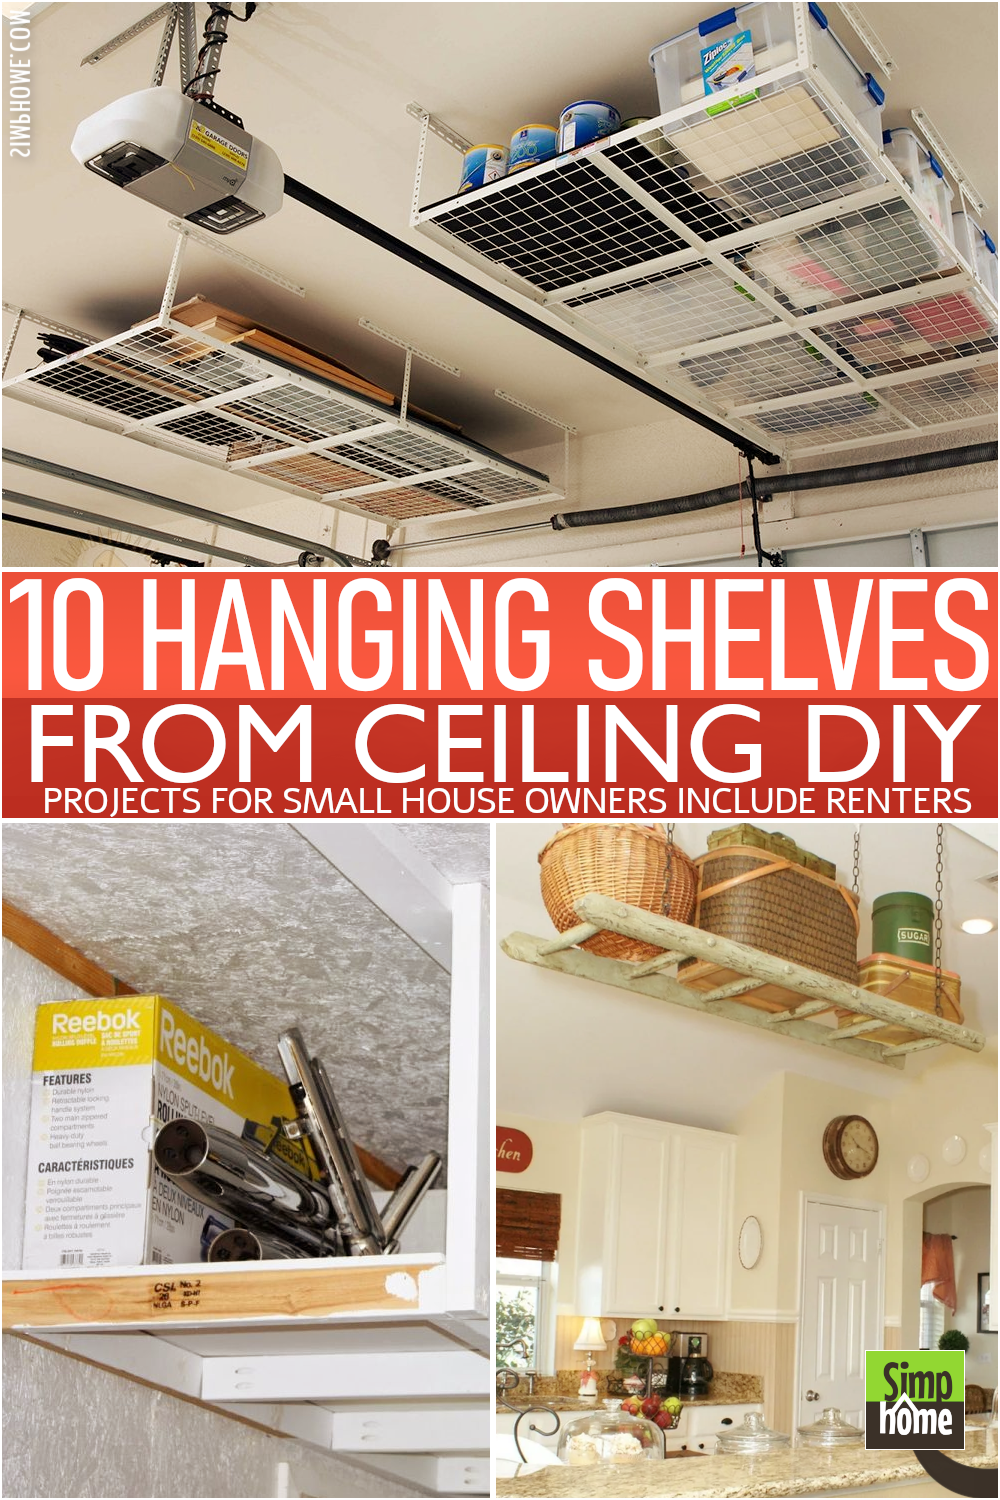
In short, Hanging shelves from the ceiling is a nice idea to help you make better use of your house, especially if you get a high-ceiling room with ample space. It’s not only easy to install but also less costly and efficient than adding a new wall to put more stuff hanging on the wall. Take your time and figure out what items you want to display on the shelf before hanging them on the ceiling. More on that soon
Are you struggling with the limited space you have? You may think the best solution would be to hang some wall shelves. Well, it may work like a charm, but don’t you want to try something new, like suspending them from the ceiling?
Hanging shelves from the ceiling will allow you to free up floor space. As a result, you have more room to move. But, how will you do it?
Do not worry! We have summed up 10 hanging shelves from ceiling ideas, including some tips and DIY guides to create one. As always, Simphome® presents you with the list. If you need more details, don’t hesitate to browse the reference area included in the post.
🔊10 Hanging Shelves from Ceiling Video:
List Entries:
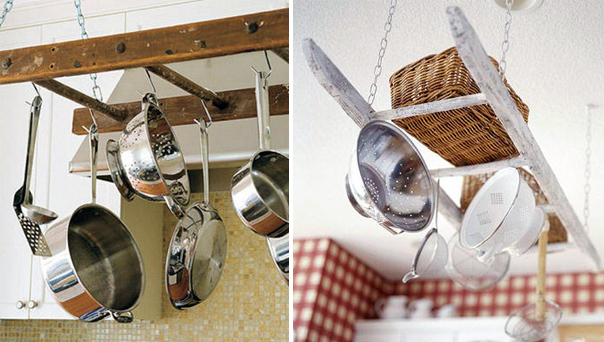
10. A Shelf for Equipment and Amenities in your Kitchen
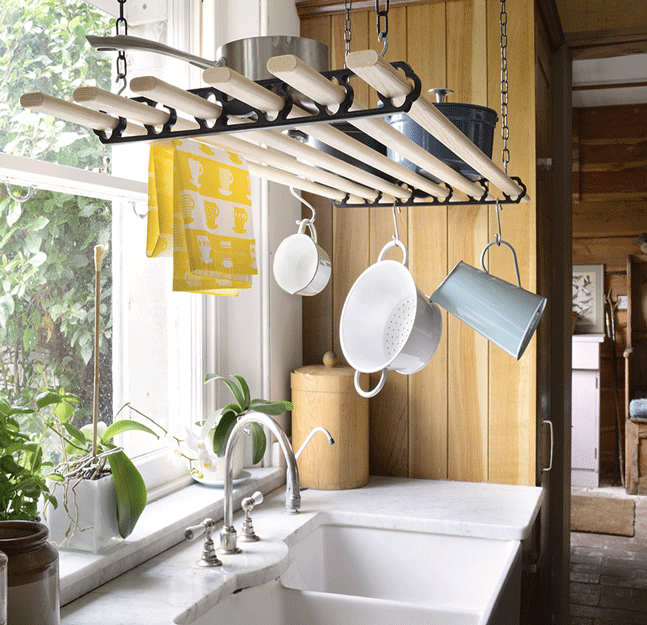 When there’s no space left in the kitchen, this would be the best idea you can think of. The ceiling is an open and expansive space that offers an abundance of advantages for creating shelves.
Using chains or ropes wouldn’t be so much different in terms of usage. And with several long sticks, you can arrange them and create a shelf above the sink. The advantage is that you can see what’s on the shelf, and it helps the equipment dry quickly without making the floor wet.
Basic instructions:
- Step 1: Measure your kitchen and the height of your ceiling
- Step 2: Select the material you need
- Step 3: Take long sticks and connect them with small pieces of wood.
If you want to hang heavier stuff, ensure the shelf is strong enough to support them. For example, pots and pans should be strong enough to carry up to 5kg.
As a result, your kitchen will look more spacious and neat, as you can keep all dishes and amenities in order without worrying about a lack of space.
9. As a new hanging shelf to upgrade your plain and lifeless windows
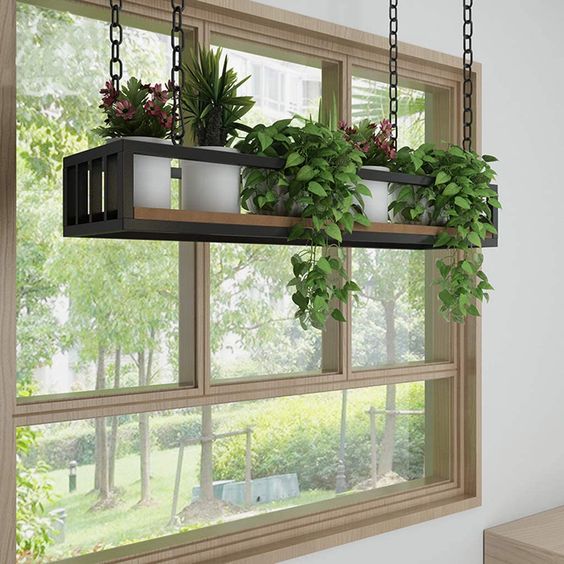 Growing plants is a must for those with a green thumb. Unfortunately, you do not have more space left for them. If you cannot grow them outdoors, you can always make them thrive indoors. You only need to suspend a DIY planter from the ceiling.
The steps would be to cut the iron to the decided length. And then, weld all the parts until it becomes a cube shelf. Hang it on the ceiling with chains. Next, give it a piece of wood for placing the plants.
Basic instructions:
- Step 1: Get measurements of your room and the window
- Step 2: To construct your hanging, you need to get the iron. The size depends on how big the plant you will put in the box.
- Step 3: Arrange the iron pieces to create a cube and take it to a welder or simply use your tools for welding.
- Step 4: Hang chains from your ceiling and attach the planter.
- Step 5: Take some wood for the planter to place on your shelf.
To ensure that your new hanging shelf is rigid, reliable, and won’t mess with your ceiling construction later or worse, you need to follow some particular procedure. You can learn this video from DIYhomestead or call someone with experience.
Before you seal the deal, ensure it is strong enough to hold the weight of a few pots and will be easy to maintain. About the plants and planters, you have all the freedom and time to make some adjustments you need
8. A trendy suspended kitchen shelving
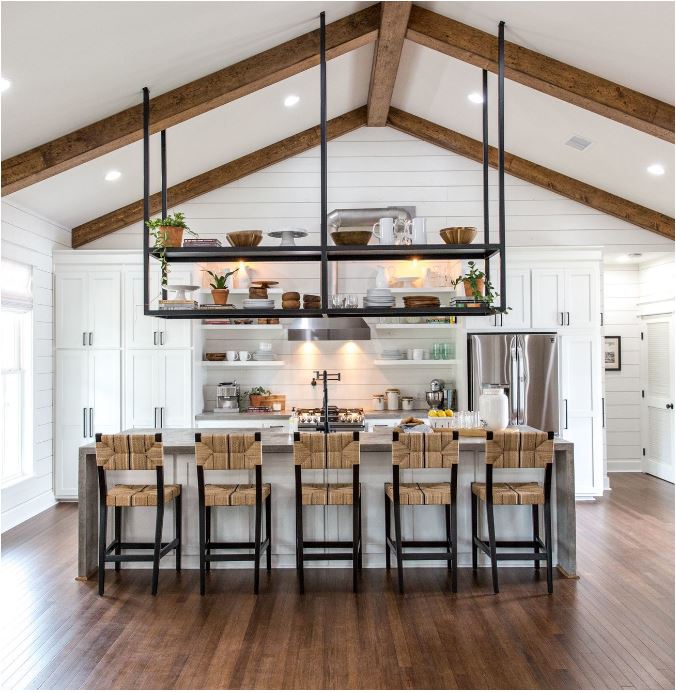 Despite the benefits you may get from hanging a shelf from the ceiling, you will also need to anticipate the drawbacks. For example, it might need a ladder or a chair to reach the top of the shelf.
It may sound too much trouble, but it keeps the kids away as they can’t touch it unless they climb the table. With the different heights and shapes of the ceiling, you should have a precise cut when making the shelf.
It wouldn’t be funny if the shelf were unleveled because of the mistake you make when cutting the material. It will be like a jigsaw puzzle for your kids. So, getting a professional to help you with cutting is best.
Basic instructions:
- Step 1: Measure the height of your ceiling and the length you need
- Step 2: Cut wood to the needed size, paint it and let it dry.
- Step 3: Take some iron rods or wire and weave through them into the distance you must cover.
- Step 4: Attach iron pieces to make a shelf leveler and use chains from your ceiling to hang it on.
- Step 5: Choose what you want to store on your shelf, such as pots and pans, coats, etc
7. An Affordable Rope Shelving Idea
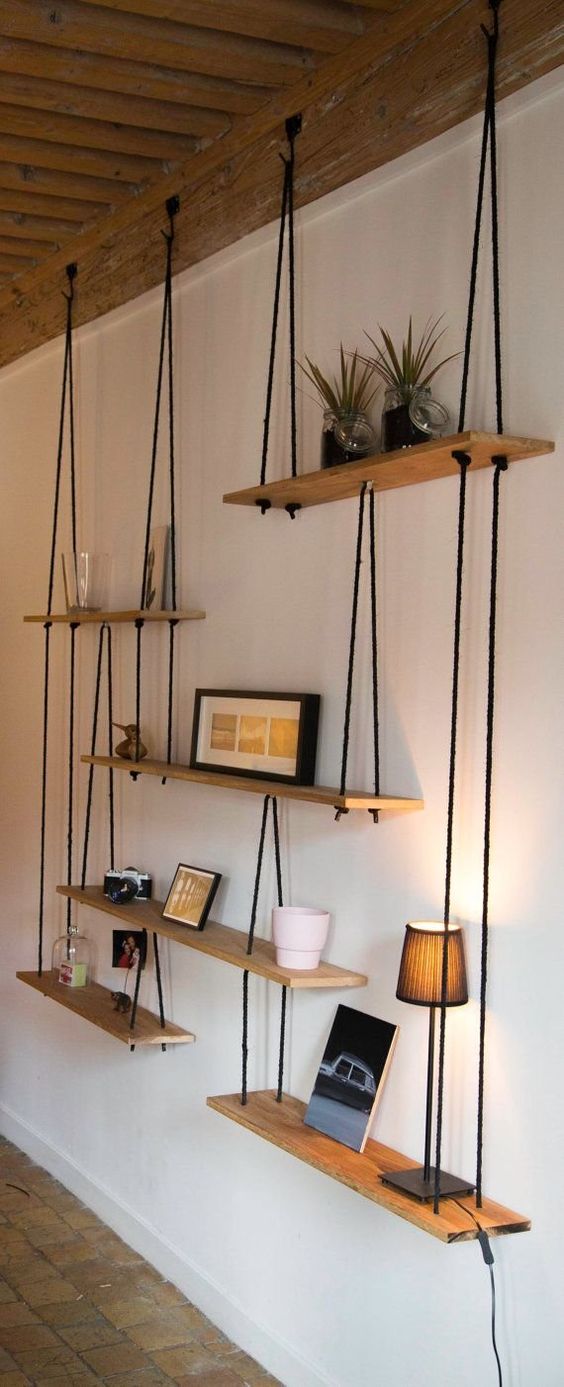 For a cheap DIY shelf, you can try this idea. It may look easy, but it’s actually going to need some effort.
The hard part would be making the knot if it’s not equal and can cause chaos because it will be imbalanced. The more shelves you’re going to make, the harder they will be.
So start with a smaller number. You can add more shelves when there’s no problem with the rope or the height. The weight of each item you display on them will also affect it. So, you need to be wise with that.
To choose the ideal rope, first, you can use a rope made of metal or another material that can hold a good weight. You can even use cable ties with metal parts in the ends. If you need more, it can be smart to use an iron wire. It’s easy to cut and measures 12 inches, which is quite large. However, you have to find an iron wire with a more narrow diameter than 16 inches. Another thing, without proper metal processing tools, the project would scare away most DIY fanatics.
Second, you can use Burlap Ribbon, Jute Hemp Rope, or Rope braided twisted Cord twine string. For the placement, it is free for you not to hang it close to your wall. In case you don’t have sufficient walls for the project, like a project on number 6th.
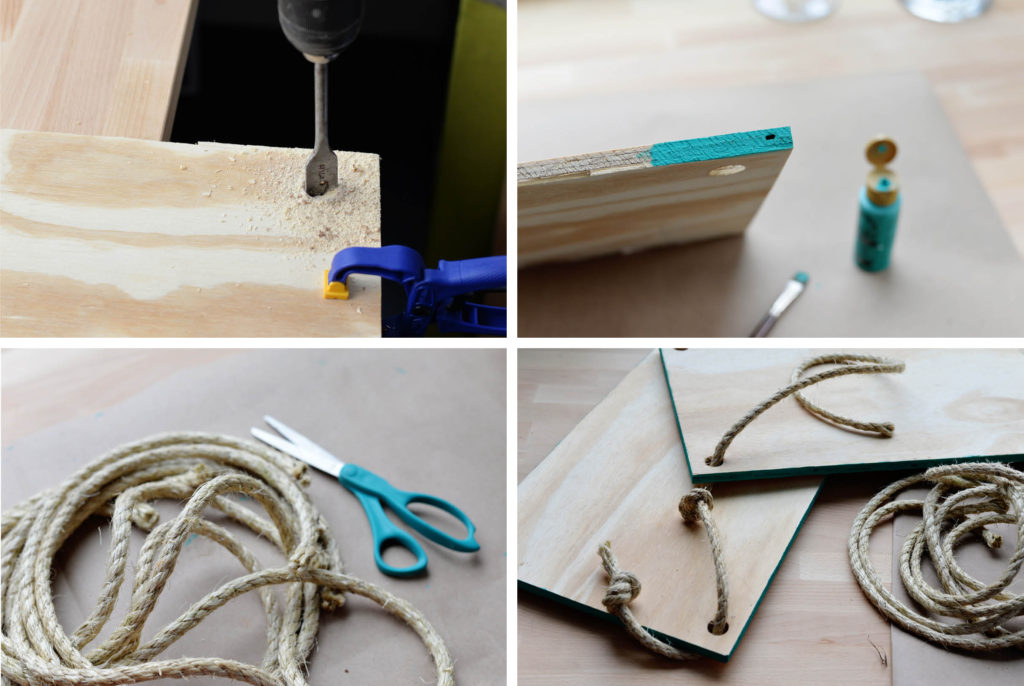
Basic installation instructions:
- Step 1: Find your location and proper measurements, and then cut the rope or cable tie to the appropriate measurement.
- Step 2: It’s best to start from the middle of your ceiling because it will be easier for you than reaching the top.
- Step 3: Tie one end of a knot and ensure it is equal and flat with your ceiling.
- Step 4: Take a strong tape and stick it on every side of your rope. Then, pass called through all the knots again so you have a secure frame that won’t fall off without hooks. Thoroughly “finessed” all parts by going inside each formed part of the frame with a snake or other tool that can grip tight without scratching anything.
6. A modern levitated kitchen hanging shelf
- Firstly you can purchase pieces of wood, or even better. You can use some leftovers if there are any.
- Secondly, cut them based on the purpose and the length of the shelf. Sand and spray paint them. Drill on each edge of the wood to create two holes.
- And then, attach iron sticks onto the ceiling, install the shelf, and secure it with bolts. Repeat the step. Make sure you get them leveled.
You should also be aware to find the right place to install it since it would leave ugly marks on the ceiling if you decide to fix it in another place.
5. A Clever Hanging Drawer idea for your Garage
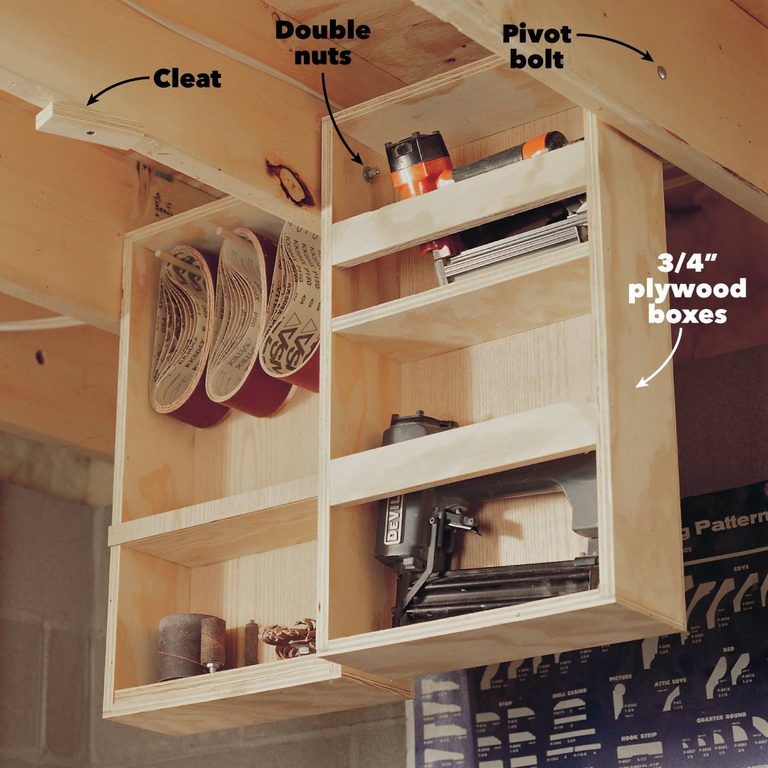 These drawers are just like any drawer you commonly find in many homes. It becomes interesting when they are hanging on the ceiling. If the ceiling has joists, you can take advantage by putting a drawer between them. Simply make a box that fits the in-between space and secure it with pivot bolts and double nuts.
Each box can have a different size and usage. Therefore, the shelf or divider should be arranged based on the items you would like to put there. You can even have wooden pegs inside the drawer to hang things.
4. A Classic DIY Garage Shelving idea
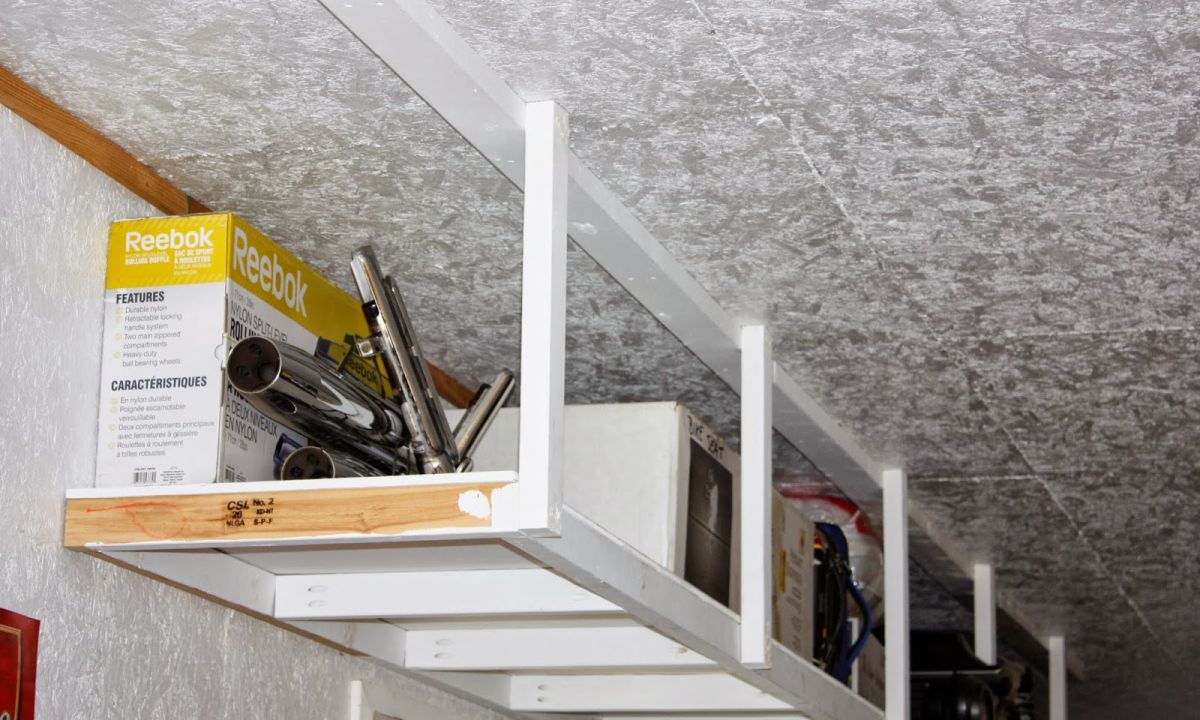 The garage usually has a good height for making a hanging shelf. And this one is an example you know you need it.
This DIY shelf or storage is straightforward, with no doors, drawers, or such. It wouldn’t take so much time to build it. If there are any leftovers, you don’t have to spend a penny to buy some wood.
- Measure and cut the wood. You’ll need several cuts for the short and three for the long ones.
- Assemble them into making a ladder.
- Then put a sheet of wood on it.
- Fix a long wood onto the ceiling.
- Install the ladder on the wall, secure it with the short pieces, and secure them on the ceiling.
3. A Humble DIY hanging ladder shelving idea
 The cupboard may be already full of many things, so you’re looking for an alternative. As a result, you build a hanging shelf.
When you see a picture of a hanging shelf but have a better idea, you’re free to change it. It can be the materials or styles you disagree with, and that’s only natural.
If there’s bamboo around your neighborhood, you could use it as a substitute for wood. Bamboo is versatile and durable enough, not to mention it’s cheap. Remember that when you have something on the ceiling, it will block the light. So, you should be aware that some parts of the room or kitchen will be in the shade.
Basic instruction for the project:
- Step 1: Find your measurement and collect your necessary supplies such as screws, nails, scissors, and a pencil (include the ladder you want to re-cycle to follow the project).
- Step 2: Measure the length of your ceiling.
- Step 3: Cut the Bamboo to your measurement.
- Step 4: Measure and mark the length of the screws.
- Step 5: Pre-drill holes with a drill at each end of all pieces to avoid splitting while you drive screws through them.
- Step 6: Screw all pieces together in an alternating pattern to create a balanced and sturdy ladder.
Relevant List: 10 DIY Ladder Project Ideas for Your Bedroom, Bathroom, and Kitchen
2. An advance hanging shelving idea for your Boxes for your garage or else
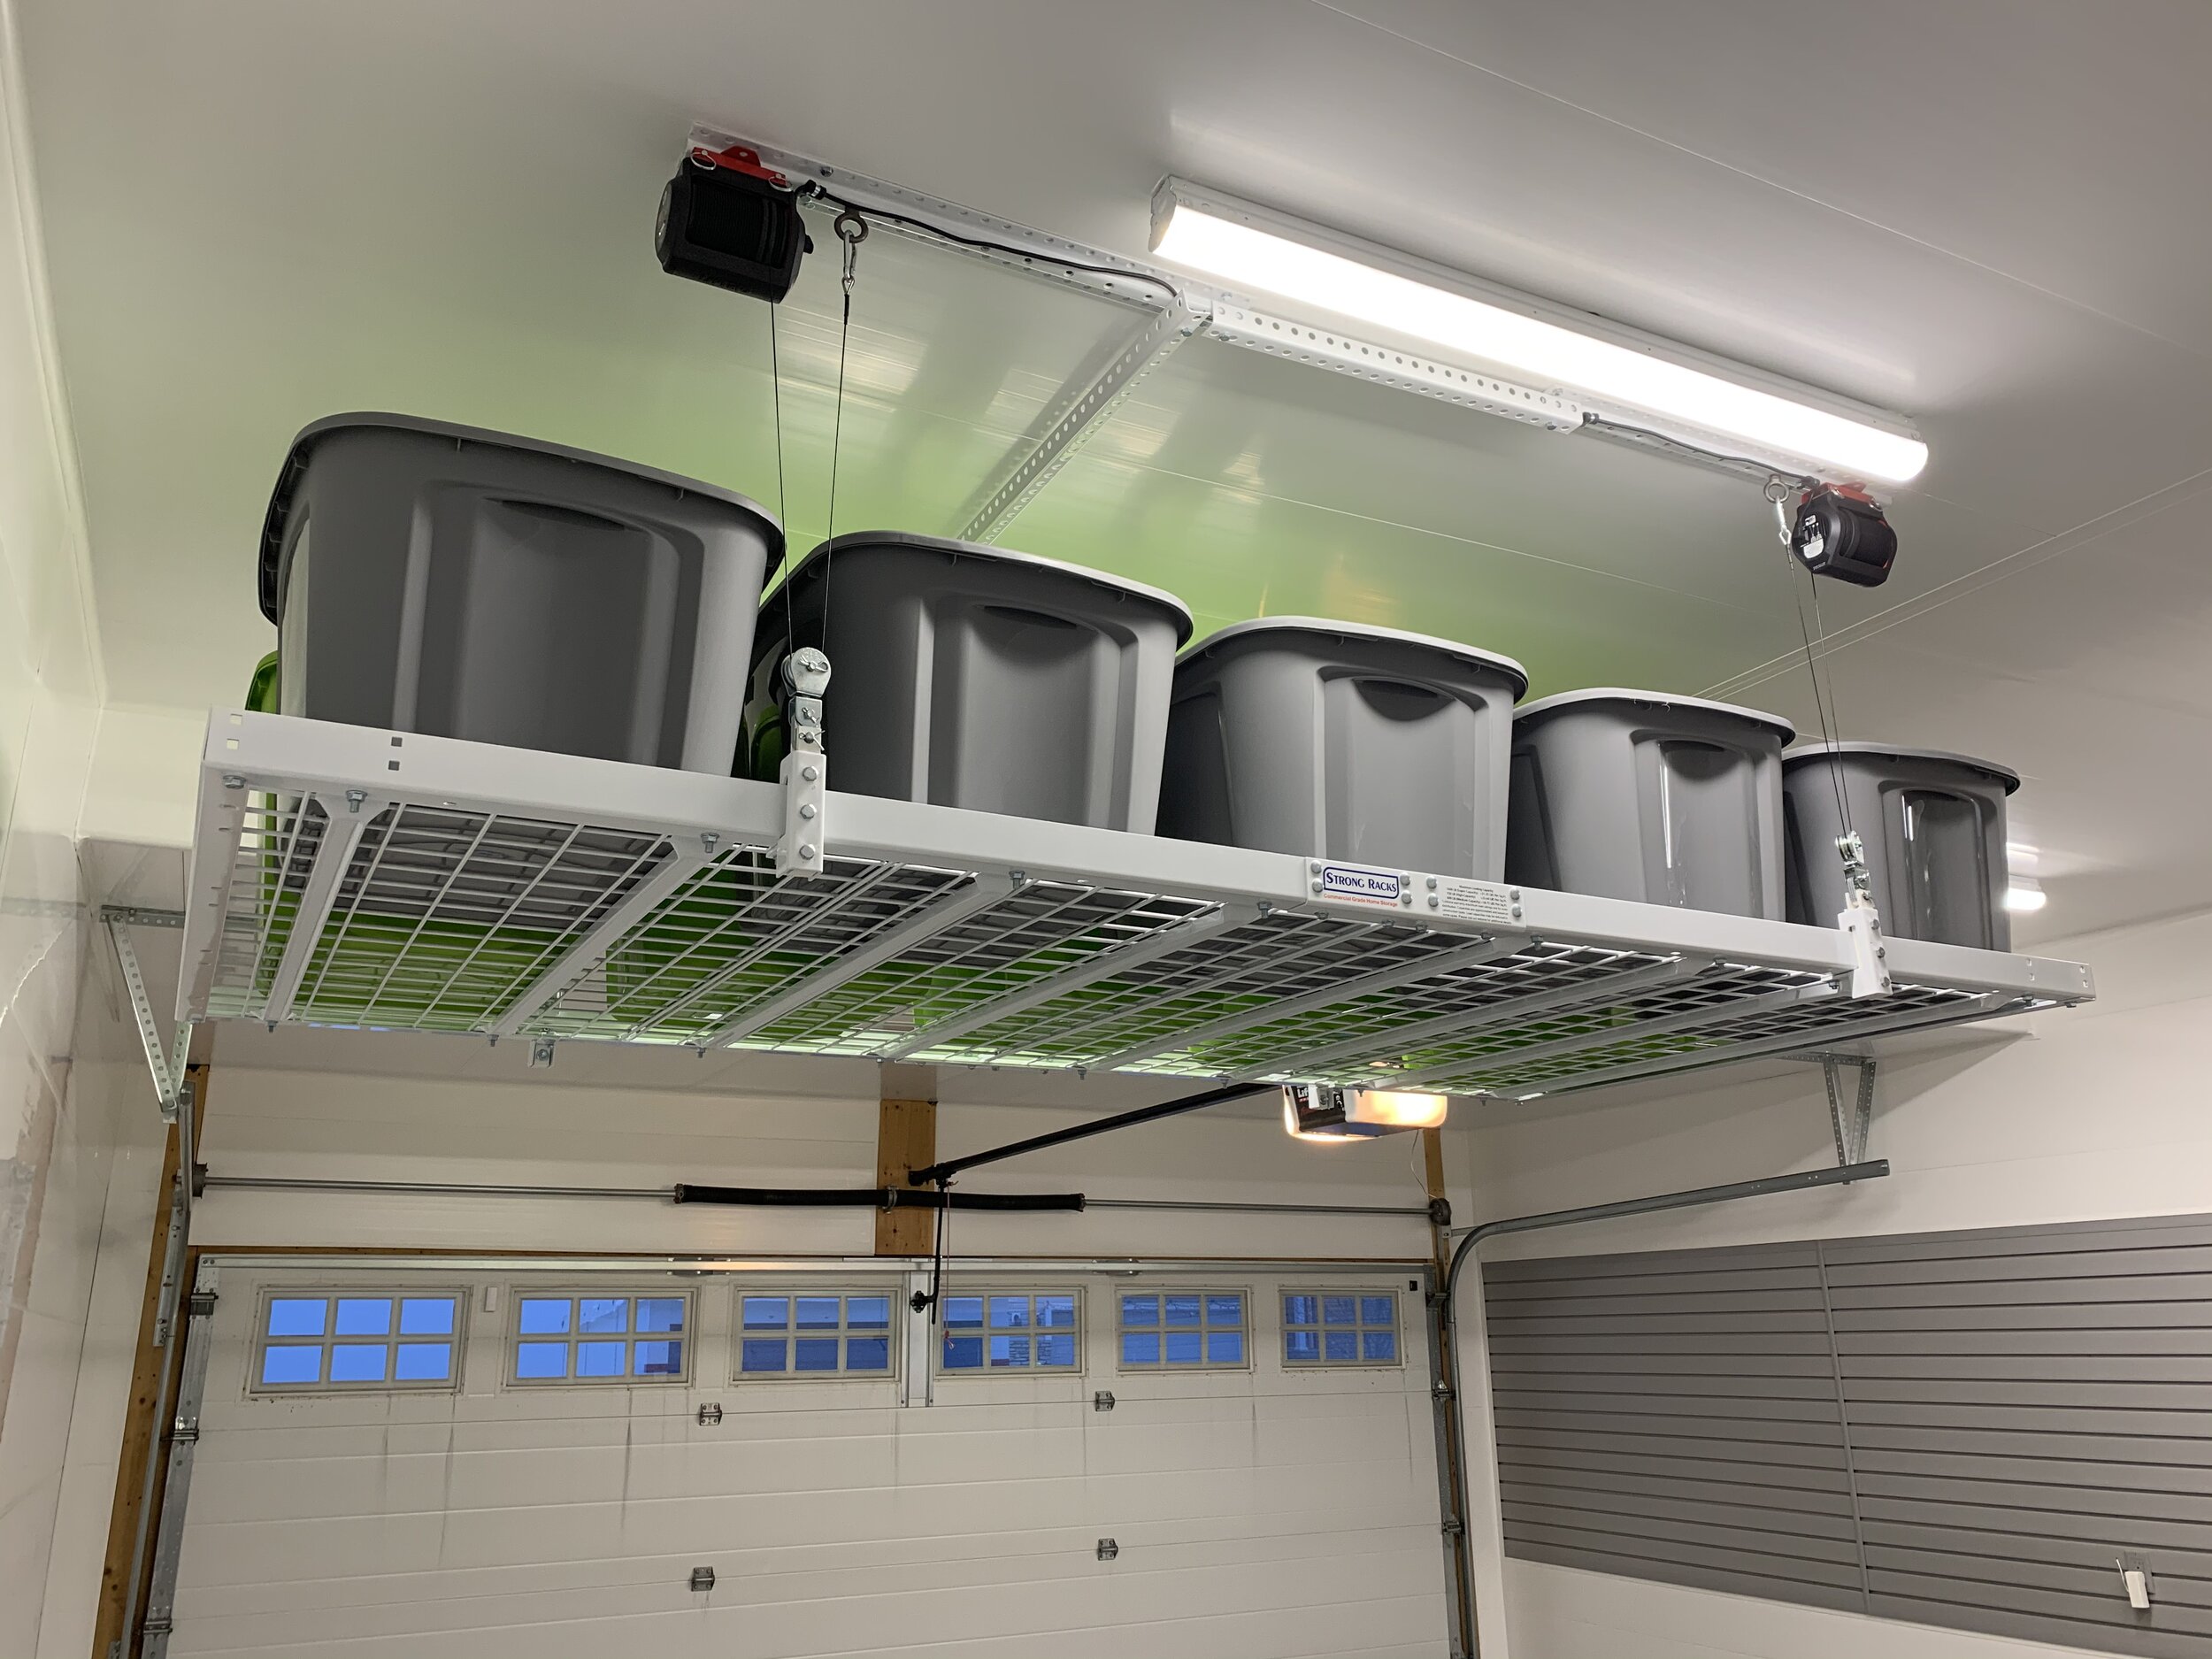 Boxes are essential when it comes to storage. Whether on the floor or up on the ceiling, they will always play a significant role in keeping everything tidy.
For instance, you had better place the boxes in the garage above your vehicles. They don’t take up space there. It also makes the garage look spacious as they are not in the way. The tricky part of installing a shelf on the ceiling would be to bore the hard surface of the ceiling itself. Make sure your tools can bear with it, or you should find a better way to do that.
About the construction, you’ll need to ensure that the shelf is not too far from your door. The distance should be about 5-6 feet for the shelves that are 4 feet wide or 8-10 feet for the shelves that are 8 feet wide. But all only the basic. To know the complete process from start to finish, prepare some time to browse the link in the references.
Relevant Ideas: 12 DIY Storage Boxes for the Bedroom, Kitchen, and Living Room include some videos
Lastly, Number 1. A simple shelving idea from pipes for your awkward space
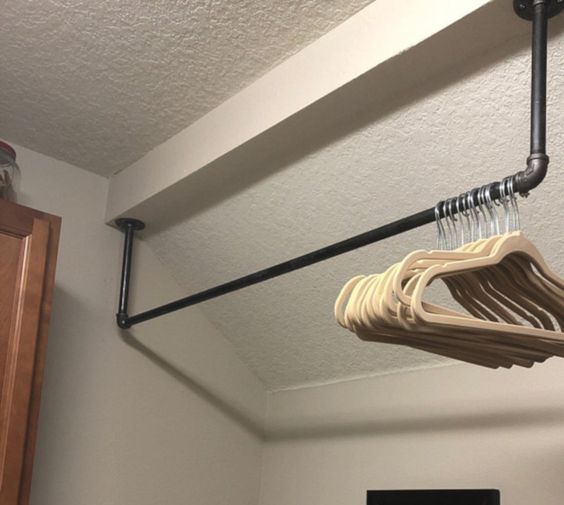 It’s just with a single pipe, and you would be able to hang your clothes there. Yes, that doesn’t sound like a made-up story. You would probably find it in a cramped space in many rents, so the renters must be smart enough to squeeze some space.
Get a long pipe for the shelf and two more cuts for sticking to the ceiling. Use elbow joints to create a U-shaped shelf, and connect them. Bore through the ceiling and secure the pipe with screws.
Follow the relevant link to find 10 DIY Pipe Shelving Ideas
Beyond your ceiling, here are other relevant ideas to utilize precious bedroom space for more storage solutions:
Idea no 1: A wood hanging shelf with a mirror in your bedroom
The project will require some basic materials such as some wooden planks and a hammer. Ensure you get the right size according to the depth of your ceiling. And then, you will need more materials like nails, screws, and mirrors. By the way, what better way to add beauty to your room than by hanging up a mirror.
To start, measure the length of your space and cut it manually on the plank of wood lying around. Then make sure you do it carefully to avoid damaging anything unless something better fits.
Lastly, drill through each end of one side of the wood for it to fit neatly into the constructions. Find the detail here
Idea no 2: A cozy hanging wall shelves for your bedroom with no bracket
To experiment with the idea, you will need the following items:
Supplies:
- Wooden boards and nails
- Basic measuring tools
- A screwdriver
- Wood glue to hold the pieces together.
General instructions:
- Step 1: Measure the space where you want your shelf, then cut the pieces of wood according to that size. Make sure each piece is slightly smaller than the one beside it so they fit nicely together.
- Step 2: After that, find a drill with a wide enough bit and put a hole on one side of the first piece of wood and then on both sides of the pieces after it. Do this with each piece so that they are all connected through holes.
- Step 3: Glue the wood together and hammer in the nails.
- Step 4: Attach the shelf to your wall once you have done that.
The detail is here
Idea no 3: A hanging storage cabinet for your kids’ toys
Kids’ toys are sometimes a nightmare to deal with. They are always lying around. The up-side-down or sideways toy makes a child think it is doing the right thing when it looks nothing like the image on the box. So, hanging a mini storage organizer such as a shoe box will be a good idea for your kids’ playroom.
And then, you can build this organizer with basic materials such as small pieces of wood, a glue gun, and other common items around your home.
Step 1: You will need at least two pieces of wood 10″ x 10″, one piece of wood 10″ x 9″, and one piece of wood 8 ½” x 5 ¼”. You can make any size that suits you, but these measurements are just examples. You can customize the sizes to your taste and need.
Once you have those ready with your glue gun, attach the small piece of wood 10″ X 5 ¼” to one end of the smaller piece of wood that has cross-sections at both ends.
The second larger piece should be attached to one of the ends having cross-sections, so it is not as wide as the smaller pieces.
Step 2: The three different-sized pieces will now be assembled as a frame. Do this by gluing two sides together. The top and bottom pieces do not need to be glued because they will cover up where you have glued on the other sides.
Step 3: Once the frame is glued up, it is time to cover it with your chosen cover. After that is done, it is time to put the shoe boxes in. You can hang them using wires or small hooks you might already have lying around your house.
Alternatively, you can follow this list on how to manage kid’s toys, 25 of them
So What do you think of our 10 hanging shelves from ceiling ideas? Which idea would you like to try?
References:
10. Pinterest.com
9. Amazon.co.uk
8. Centsationalstyle.com
7. Pinterest.com
6. Homedit.com
5. Hative.com
4. Bobvila.com
3. Diy-enthusiasts.com
2. Thespruce.com
1. Etsy.com