MOBILE HOME REMODEL BEFORE AND AFTER
Hey everyone, I have been a little MIA with the blog lately but with a good reason. I’ve been working on an old single wide mobile home remodel for my Dad.
Let me catch you up. My father had a stroke a little over a year ago and since then he has been slowly getting more confused with dementia. Well, recently we noticed a quick decline and realized that he really shouldn’t be living alone anymore. So, we decided to move my brother and his wife into my dad’s mobile home to help take care of him.
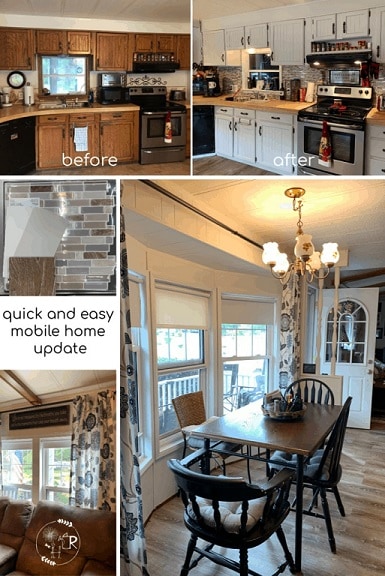
Mobile home remodel before and after
I own the mobile home that my Dad lives in. I didn’t do many updates when my parents moved in because it reminded them of our childhood home. Even though it was so dated, they loved it! So, it really needed some TLC.
I was just going to replace the flooring because I had to remove some tile and sub-floor a while ago because of my Dad’s incontinent dog. Ugh! Well, I never replaced the tile because I couldn’t match it, so I was waiting to replace the whole floor, which never happened. So, that had to get done.
When I finally picked out the new flooring I thought about how good the cabinets would look if I painted them.
Then, I decided that I might as well paint the wall paneling while I was at it.
And then I realized that the hall closet/pantry was just a terrible design and a complete waste of space and it needed to be redone too.
You get the idea. I just can’t stop myself. Therefore, I spent a very exhausting couple of weeks updating quite a bit of my Dad’s home.
Well, one good thing about that is I now have something to blog about. 😉
You can do big changes with a small budget
We needed to do this mobile home remodel quickly, so my brother and his wife could move in, and with a small budget, which I knew I could do. Even though my husband was getting really nervous about my growing to do list, I knew I could do it all inexpensively. The only expense I was worried about was the floor installation quote I got from Home Depot. Yikes! For the product and the installation it was around $10,000. Nope. That was not going to happen.
My sister-in-law’s father, who is a contractor offered to help, but things came up and the more I thought about it I knew I could do it myself. At least in my head I could. Not sure if my knees and back could do it, but I figured I’d give it a shot. So, my brother and I did the floor ourselves and ended up saving thousands of dollars! The flooring itself was around $2000. So we saved around $8000. WOW!
So, the lesson here is to look into what is involved in your home improvement project before you hire it out. This flooring was pretty easy to install, aches and pains aside. 🙂
Here is a rundown of the projects I did and how I did them. I haven’t added up all the expenses but I’m sure the whole project was under $3000. Wait to you see what a difference it made. Here are the details of the mobile home remodel before and after.

You might like this…
For more inexpensive mobile home remodeling ideas, visit my post “Inexpensive Mobile Home Remodeling Ideas“
Fixing the cabinets
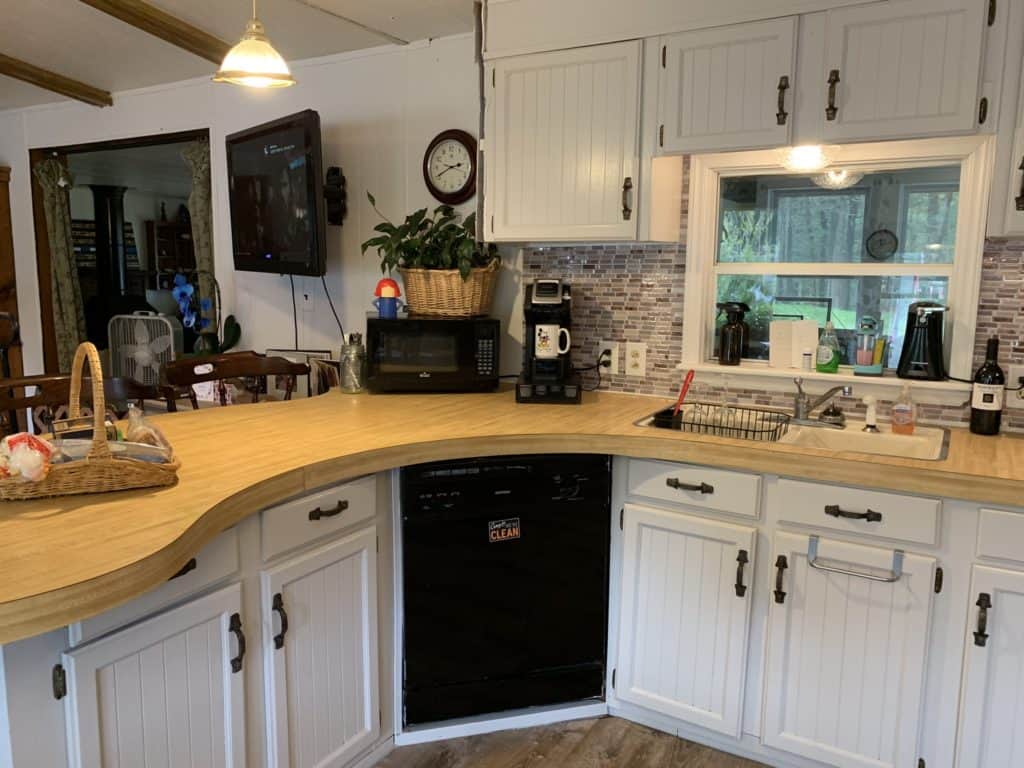
We started with the existing stained wood kitchen cabinets. My dad had a glass cabinet that sat in the corner of his kitchen counter top. This took up so much space on the counter and the only thing in the cabinet was cable boxes, wires, and other miscellaneous stuff. Nothing that you would want to see in a glass cabinet. So, I decided to take it out. This made so much more space on the counter. Now there is actually a place to put the microwave that doesn’t take up all the counter space.
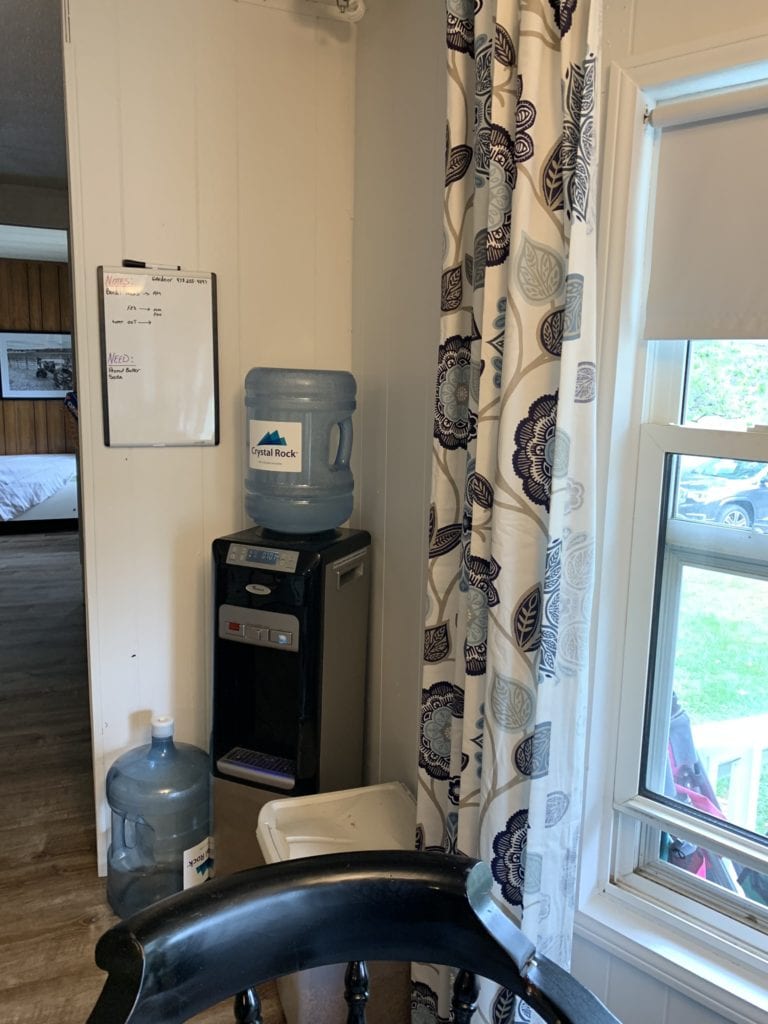
He also had a corner cabinet that sat on the floor in the back corner of the kitchen. This cabinet had random items in it like some snack foods, cookbooks, and plant food and vases. Again, not a good use of space. So, we took that out. This ended up making a nice corner for my brother’s water cooler.
Painting the cabinets and paneled walls
Paint is your number one best friend. Paint can literally transform a space from dull and drab to bright and cheery for very little money. I purchased 1 gallon of primer and 2 gallons of paint to update my Dad’s kitchen cabinets, and the walls in the kitchen, hall and living room.
You might like this…
My first camper renovation is another great example of how paint can transform a space. Read Camper Remodel – Before and After.
Disclosure: I am an amazon affiliate and may earn a small commission from any purchase you make thru these links at no additional cost to you. Rest assured that I will not recommend any product that I would not use myself.
The first step for this project was to wash the cabinets with tsp first. This is a strong cleaner that strips all oils and dirt from the cabinets to make sure that the paint will stick to the surface. I couldn’t believe how clean the cabinets looked after using this product.
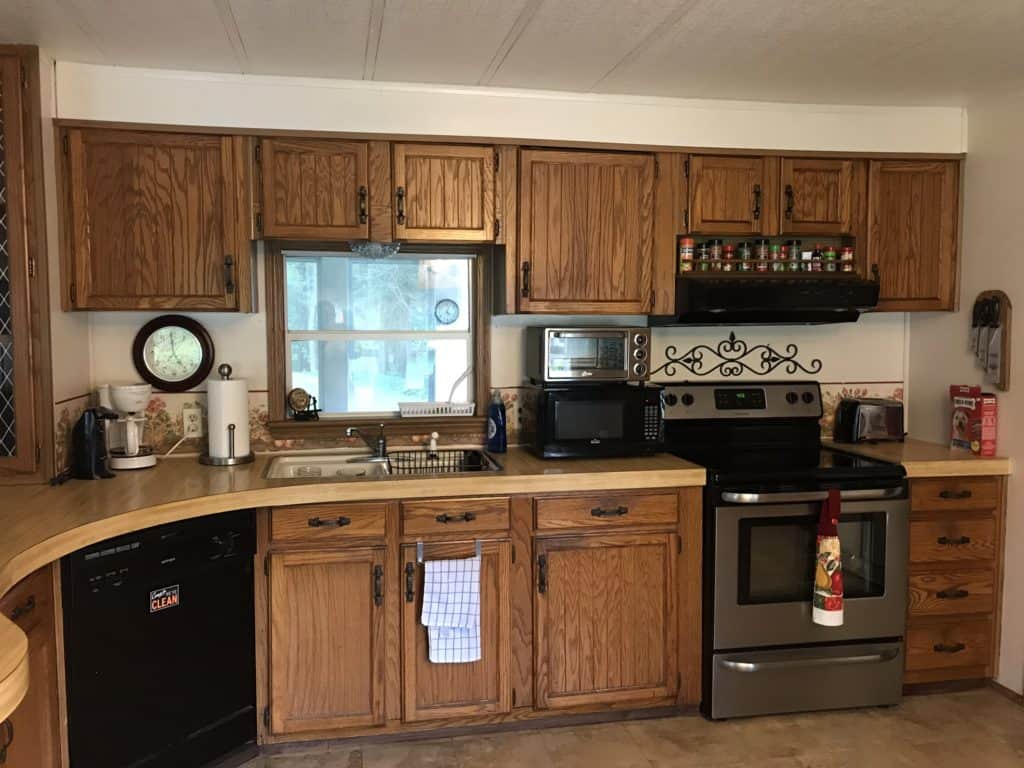
Then I purchased a good primer and painted all of the paneling and cabinets. I decided to use a very pale gray for the cabinets and a bright white for the walls. It was amazing how much brighter the whole space looked just from painting.

Add style with an inexpensive backsplash
While I was shopping for paint colors I looked at backsplash options. I really didn’t need to add a backsplash, but you know…I wanted to. 🙂 The peel-and-stick tile worked great with the paint colors and the flooring I chose.

Installing the back splash was so quick and easy. I did however learn something. When you start your back splash cut one side of the tile into a straight line and start from a corner. I started in a corner but I didn’t cut the tile first and had to go back after and “fill in” a bunch of tiles. This worked fine but I would have saved myself a lot of time if I had just started with a straight edge to begin with.

The flooring
I had to replace the floor. This was a necessity. The dog had done a number on the existing vinyl floor tiles and it just had to be replaced. Plus this mobile home had 4 different types of flooring from the back bedroom, bathroom, kitchen and living room. It really needed to be one consistent flooring.
I picked out a floating vinyl plank flooring from LifeProof that we were able to install right over the old floors. Of course we replaced any damaged flooring and had to level up a few spots but other than that it was a pretty easy installation.

This flooring completely transformed the whole space. Not only did it make the space more updated but it made the space feel bigger. It’s amazing what having one consistent floor can do for a space. No more with the 3 different vinyl floor tiles that ran through the space. Now it’s one consistent, beautiful floor.
You might like this…
Want some exterior updating ideas? Check out our post “How to update and modernize your split-level home’s exterior.“
Use what you have
The key to any budget friendly mobile home remodel is to use what you have first.
One way I did this was to use the existing hardware from the cabinets. However, they needed to be cleaned badly. I soaked them in the tsp solution for about an hour then rinsed them off. Well, the solution kind of oxidized the metal. But, I loved it! I was going for a farmhouse look anyway and the brass took on an aged blue/green tint that I loved. That was an oops that turned out good.


Get organized
Another way to make a huge difference in a space without spending a lot of money is to organize what you have. Just moving things around, purging, and organizing what’s left will make a huge difference.
The kitchen cabinets
Because we had to empty the cabinets for painting I cleaned and purged some items Dad didn’t use. This helped make room for some of my brother’s stuff. It’s amazing how much cleaner and more organized your space can look just doing this and it doesn’t cost a penny.
The hall pantry closet
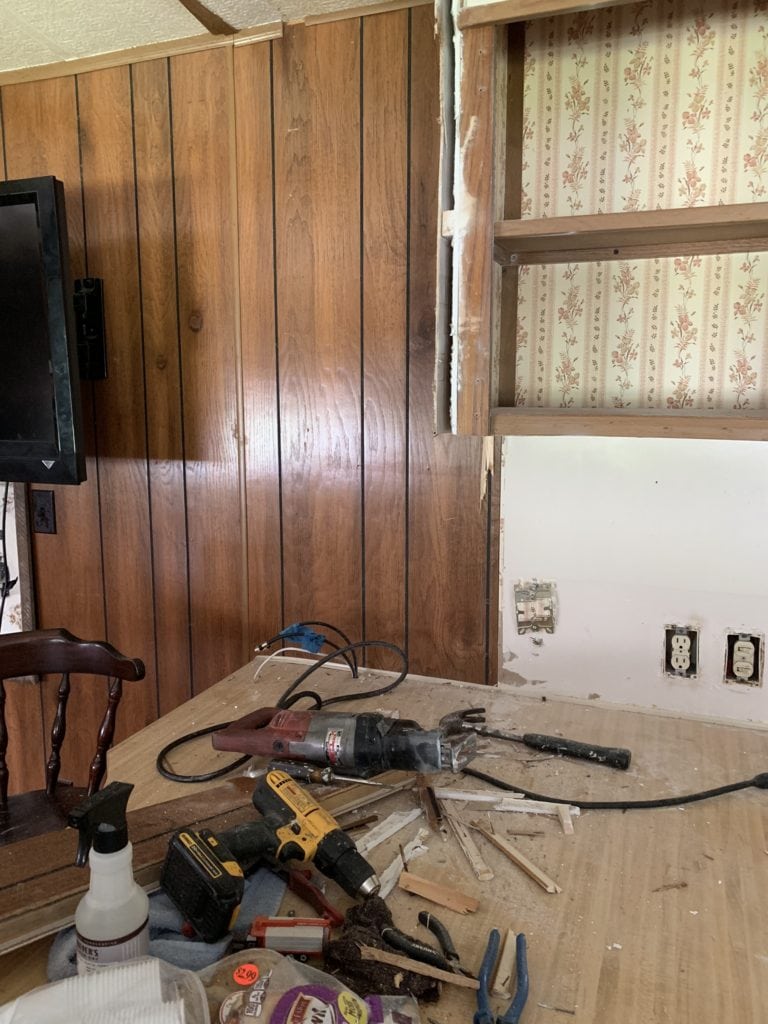
The hall closet/pantry drove me crazy. It had the cheapest sliding doors that never worked right. My dad tried to “fix” them by adding hinges and making them doors that opened out but that didn’t work out very well either.
The shelves were very deep and there was only 3 of them so they were useless for holding food items. Everything just got lost deep in the back. Totally a waste of space.
And for some strange reason there were two dividing walls that ended up in the middle of the door openings. ??? Not sure what that was all about. This made the whole middle section of the closet inaccessible. It just had to be gutted. Note: I realized that because the doors were originally sliding doors, it makes sense why the dividers were in the middle of the doors. But, it still wasn’t a good use of space.

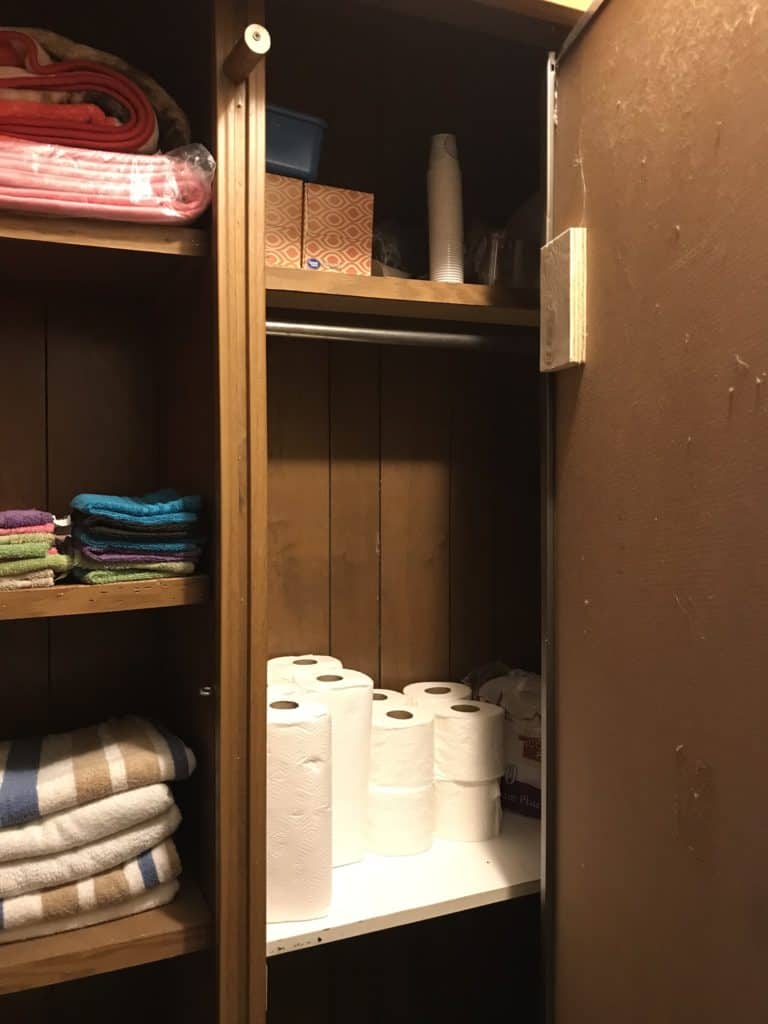
I took off the doors and the tracks. I removed the dividing walls inside the closet and ripped out all of the shelves.
Once the closet was all opened up I decided that I didn’t want to build in any shelving. I decided to purchase free standing units that could be configured to your needs. I purchased one large metal unit with 4 shelves that measured 46″w x 18″d x 72″h. This worked great for dried foods and canned items. I also purchased some containers to hold smaller items and to organize things a bit better.


For the other side of the closet I needed shelving for linens and bathroom supplies. My daughter-in-law had a smaller metal shelving unit that worked great for this. I was able to get all of my Dad’s personal stuff in there.

This left a small section in the middle which was perfect for hanging cleaning tools and to house the vacuum cleaner and ironing board.
Now I just need to get doors. I think I’m going to use two sets of bi-fold doors. This way you will be able to open up a whole section and still have room in the hall to move around.
Move things around
Now, we had to move all of my brother’s stuff into the house. This is always the funnest part to me. I love using what people already have to make their home look great.
Setting up Dad’s bedroom
The plan was to move my Dad into the back bedroom and give my brother and his wife the other one because it had a master bath that was open to the bedroom. This would make it easier for them to get ready for work in the morning with out having to walk to the other bathroom.
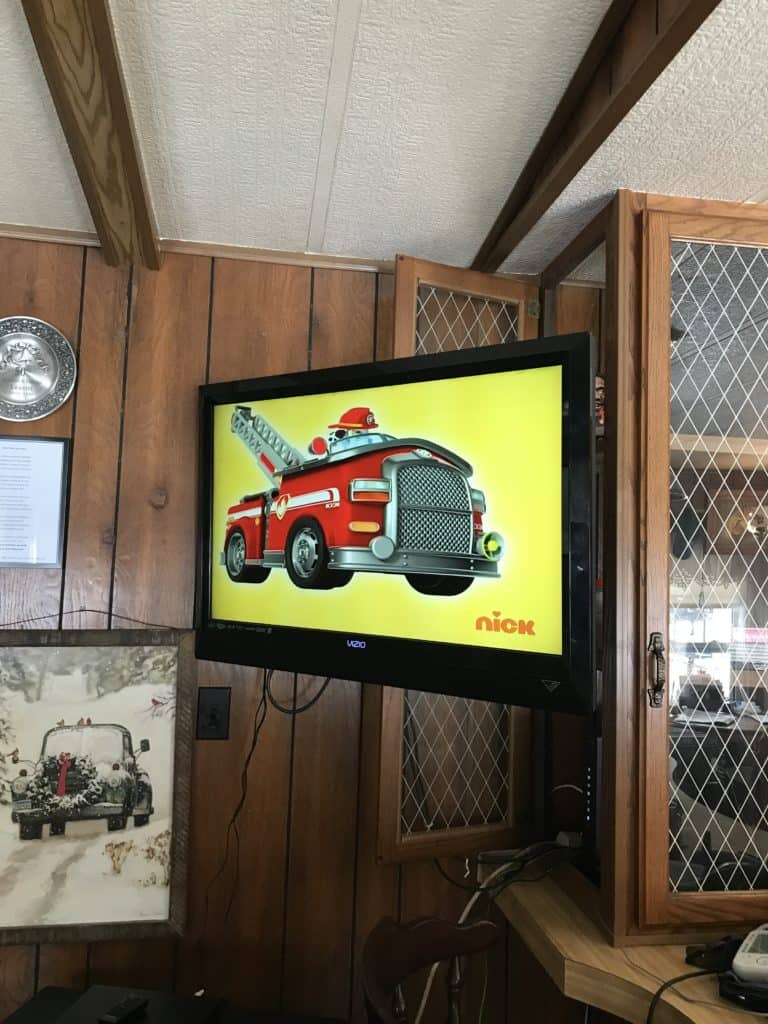
The rooms were about the same size anyway so we were able to set up my Dad’s new room exactly the same way he had it before. We added a recliner instead of the winged back chair he had in the other room and added a TV on top of his dresser so he would have a place to himself to relax in.


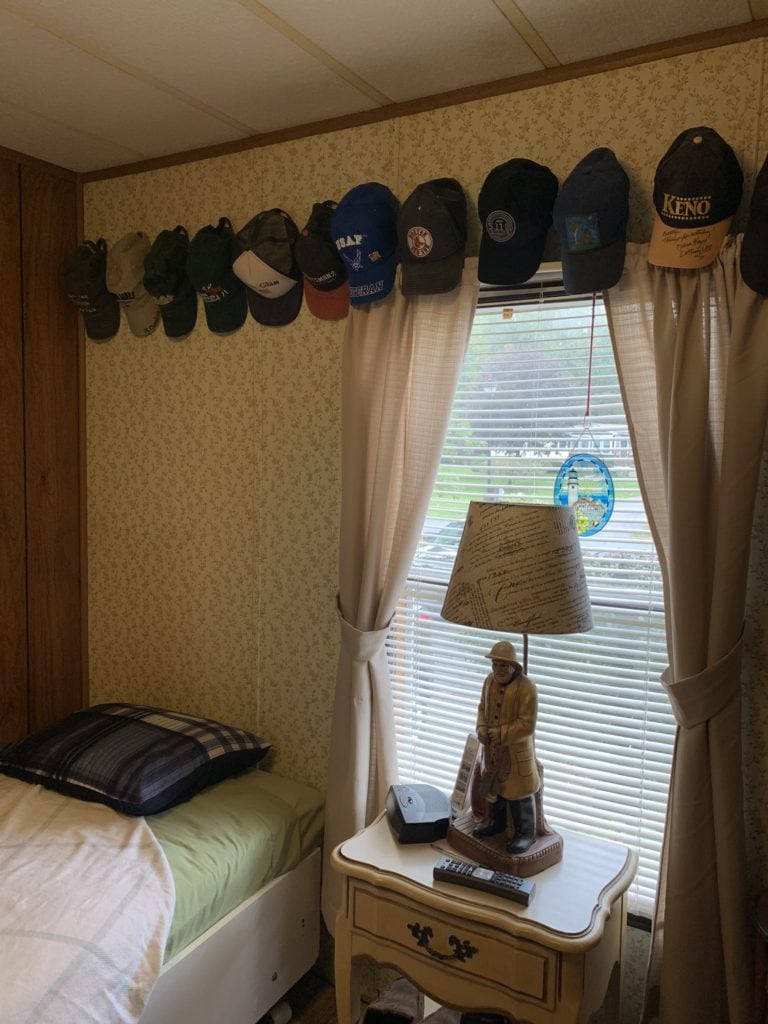
I know this room isn’t exactly a designer’s showcase but with my Dad having dementia, we are trying to keep some things familiar to him. Moving him to another room was a big move in itself so keeping his own furniture seems like a good idea for now. Maybe, bit by bit we can get him some new things. But, he did make that bed himself and is proud of it. 🙂 And one of the first things he said when we moved him is that he liked that floral wallpaper. huh. 😉 So for now it stays.
And I bet your wondering about the hats? Well, Dad is from the generation where you keep everything. And by “keep everything” I mean not only keep everything but display everything! So, wherever there was a blank space on the wall, he would fill it with, well, anything. He had his hats on a shelf the length of a whole wall, and hung them over the kitchen table across the window. So when we moved him I decided to collect all his hats and display them in his room. This way he not only gets to enjoy them, but they are easily accessible for him to grab one and go. At least they’re not all over the house anymore.
The living room and family room
Next was the living room. My brother owns 2 large scaled reclining sofas that we had to fit into a small room. We ended up putting them in an “L” configuration which gave it a “sectional” kind of look. Even though one sofa sits in front of part of the other one we were still able to get most of the seating to recline.
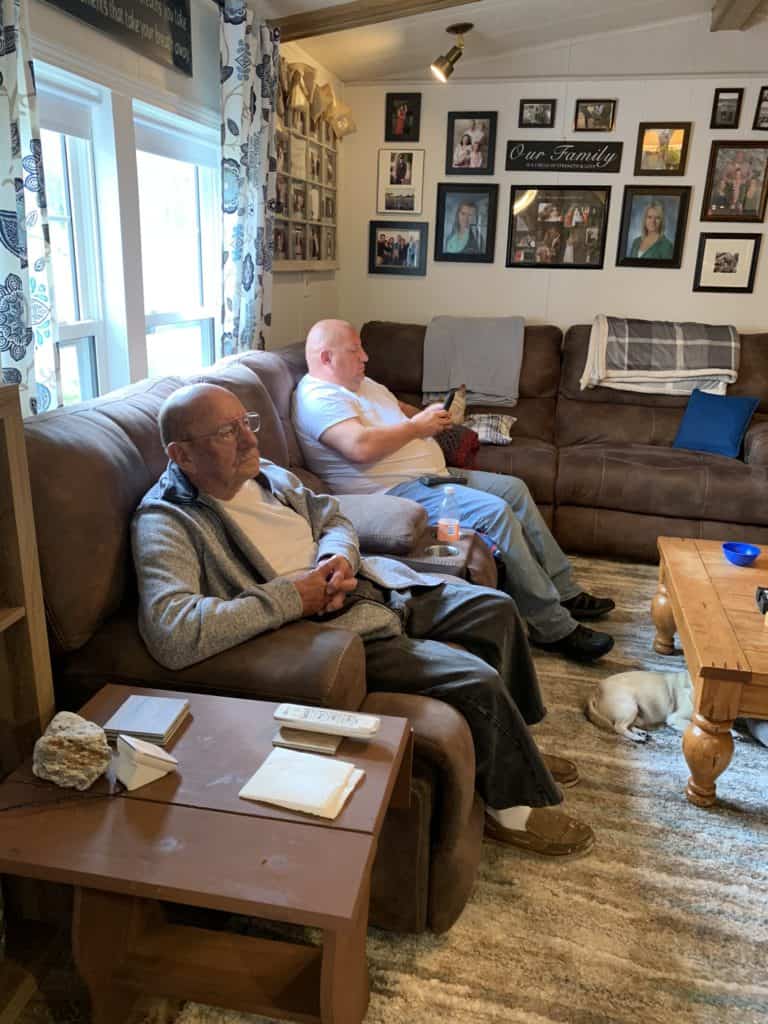
We needed to figure out what we were going to use under the TV for the cable boxes and movies, etc. that we took out of the kitchen corner cabinet. My daughter-in-law reminded us that my brother’s entertainment center was in the shed. It fit the space perfectly and looked great with the floor.


Accessorizing
We started with making a picture gallery of our family photos. Even though we had one in the same space before, I decided to consolidate the photos by removing outdated pictures. I began the arrangement with a wooden “family” saying and worked the pictures around it. I love the way it turned out. We still have a few pictures to replace but we can work on that later.


Next was to install a window frame photo project we made for my parents 50th wedding anniversary. Just like the photo arrangement this ended up where it was before.


A couple weeks of craziness, a little bit of money and the place looks completely updated and new. I love how light and bright the space looks after getting rid of all the brown wood walls and cabinets.
This project was far from a complete rehab or full decorating project but more like a “I have to get this place ready quick”. But despite that, I think the place looks completely different. Just goes to show you what you can do with a little elbow grease and a little $$.


Awh, looks great. We just got done a total full single wide gut, down to bare studs, including subfloors, across a 14×60 single.. Was all rotted, soft spots, and the placed smelled really swampy (wet insulation will do that), when we bought it. New everything, including roof, gator wrap on the belly, new a/c, siding, windows and doors.., rear porch roof replacement, etc, bathrooms, flooring, etc.. We did most of it ourselves.. and its been a 2 year process. Something like what we did runs around 100k… not including purchase price for the existing home.. Had to be a full gut, it was gross.. but tight, smells like nothing, etc.. Materials are getting more expensive, especially solid wood, and appliances are getting harder to get due to supply issues. You are correct in that these changes make a world of difference.. people can do some of it themselves, to save money.. but plumbling mistakes can be costly, (like a leak, cause you don’t know how to do it properly,), etc.. Mobile homes are a different breed all together, and I think they are really fun to work on..
Leslie, Thanks for your comment. You are right. A lot of people don’t realize that mobile homes have unique sizes in things like plumbing fixtures, stud sizes, and more, and that you sometimes cannot just go to a big box store and purchase replacements for these and have them fit. But, that being said, there are a lot of things you can do inexpensively to update the look of your mobile home. I’d love to see what you have done to your mobile home. Can you share some pictures?
Hi, I think you did a fantastic job! I’m all about saving money. I love how bright and new it looks. I too have been going through fixing up our dw in a senior park. Paint is the best tool to do a remodel with. I’ve painted my kitchen cabinets. Painted a fake ship lap on the kitchen wall. I painted a fake reclaimed wood wall in blues, greens, grays, browns in the livingroom. I painted the paneling in hallway with white a light blue stripes. Along with all the other accessories I’ve painted. Beach theme! Lol
Thank you Beth, I’d love to see what you did in your mobile home! 🙂
This is great! Were the cabinets particle board or wood? I would like to paint mine but they’re the kind of cabinets that are covered in almost a paper-like substance that is peeling at the edges. I’m not sure what to do, aside from getting new faces or trying to repair and paint.
Hi Brandi, Our cabinets were wood, a cheap wood, but no paper laminate. You can sand the paper down and prime and paint over it just as you would for any cabinet material. Just make sure you sand off all of the peeling paper edges and use a good primer.
Good luck with it. 🙂
I do not need nothing remodel just yet maybe on down a few years I might want to do something but not right now. Thank you very much. I hope this doesn’t ruin my chances in anything. Thank you again.
You didn’t ruin your chances of anything. Just come on back whenever your ready. 🙂
You did an outstanding job on your dad’s home.
Those are the exact tiles in my deceased mom’s modular
home. Can’t find that style and considering one piece
vinyl flooring when I get enough money saved.
Thank you for saying that. I really appreciate it. 🙂 They have some beautiful vinyl flooring designs today. I’m sure you can find something updated that will work with todays styles. Good luck with the rehab.
This looks amazing! You guys did an amazing job! A labor of love for your family. So sweet. Love to see the respect and reverence for your father that is obvious in your family!
OMG Amanda, thank you so much for your kind words. You are so sweet.
Love it. Well written content
https://makaansolutions.com/blue-world-city-islamabad/
Thank you Jason!
I’m actually moving into a manufactured home soon. I end up buying one of the basic models so I can design it the way I wanted to. I find this post sooo helpful. Thank you for sharing.
Monica
Congrats on your new place and thank you. I’m glad I could help.
Nice Blog very informative
https://wifigenius.uk/home-wifi-installation/
Thank you 🙂
It’s super cute! I’m glad you took the time to do what makes your home your happy place. I also love that your Dad is enjoying what is good to him. What an honor to tend to your father in his greatest hour of need. Blessings.
Thank you Dusty. The most important thing in design is doing what makes you happy! 🙂
Hi, just wondering on the laminated flooring, you said you paid about $2,000 to do the entire house. I saw this at Home Depot and it’s like $3.89, I think, square foot. Is that where you purchased it. I love it- looks a amazing. Your did a amazing job. Did u do this transformation in 2022?
Thank you
Thank you Christine. Yes, I purchased the flooring at Home Depot in 2022 and we love it. FYI, I’m in process of writing another mobile home update post and should have it posted within the next week or so. It’s about lots of inexpensive ways to update your mobile home. Keep an eye out for it. 🙂
Great job, and a very sweet act of love and honor for your father. We are in the midst of renovating our 1996 DW, and it’s taking forever!
You did an awesome job in such a short amount of time, keeping your dad’s dementia in mind. God bless you.
Thank you Christine 🙂
Love it
Thank you 🙂
I have a 1972 double wide mobile home it’s been in 2floods. I’ve been trying to fix an remodel the home. Help. I’m 58 an doing all work myself. I bought paneling from habit store used in living room put new tub an bathtub panel in behind tub try to replace flooring using roof wood panels for that an replace kitchen counter that nasty falling apart. Any pointers help
Hi Kimberly,
Good for you for tackling these repairs yourself. Unfortunately this is beyond my scope of knowledge. So that being said I found a webpage that talks about some mobile home repairs…
https://mobilehomepartsstore.com/latestnews/mobile-home-repairs-diy/
And this is a book all about mobile home repairs. Check them out and I hope they help. If not then you should consult with a contractor to see what repairs you can do yourself and what ones you should leave to a professional.
https://www.amazon.com/s?k=mobile+home+repair+book&crid=3JGWRHJ5BG9JF&sprefix=mobile+home+repair%2Caps%2C137&ref=nb_sb_ss_ts-doa-p_2_18
Either way good luck and let me know how it’s going!
My neighbor and I just finished painting my 72 mobil home. We used light sage green and dark green for focus walls. I added plants and modern curtains rods. It really looks great and appears larger and lighter. Still have work to do in the kitchen. Price so far is about 3000.00.
Cheryl, It sounds beautiful! I’d love to see pics. We painted my son and wife’s mobile home before they built new and it may a HUGE difference. Like you said so much lighter and bigger. Paint can do miracles!
Will you post pics? That sounds pretty
Hello I’m just seeing this post love the new look I want to do the same to my trailer as well to get a new look.My biggest problem will be the flooring thou hope to read more about your process
Thanks Latonya, I also did the master bathroom but can’t remember if I took pictures before. I’ll have to check my stash and make a new post. The flooring really isn’t difficult to do just hard in the back and knees. 😊
The previous owner put in beautiful wood floors then covered most of it with carpet…ugh…any suggestions on getting rid of the glue from the padding???
Hey Robin, I have never had to deal with this problem myself but I found this guy who did. 🙂 https://tilen.space/how-to-remove-old-carpet-padding-stuck-to-wood-floors/#:~:text=Most%20people%20like%20using%20a,t%20working%2C%20try%20denatured%20alcohol.
Thank you for the information!
Your Welcome 🙂
Ended up using good old Goo Gone Pro…little scrape with a straight edge blade and some elbow grease…beautiful!
Have some before and after pictures I’d love to share with you…
Thanks Robin, I’d love to see them. 😊
How do I get pictures to you? Love to show you before and after
Omg I can’t wait t see them! You can send them to me at info@ourrepurposedhome.com
It comes off when you sand it and stain the floor
How has the tile held up?
Hi Kristy, The tile is holding up extremely well both in the mobile home and in my downstairs family room. One issue I am having is a couple of spots where the floor wasn’t perfectly level in the family room. I knew when I installed it that that could be an issue and it is. When I walk on those spots I can feel the floor move under my feet. But so far it hasn’t caused an issue with the floor itself. Fingers crossed. And I do see one spot in the mobile home where I didn’t connect the tile completely and it seems to be separating a bit. But both of those issues was my fault. My suggestion is to make sure your floor is level and make sure your boards are completely locked together. You shouldn’t see a seam…it just about completely disappears. If it doesn’t disappear then try again.
Thank you for your helpful hints and insights!
Right now I am upgrading a mobile that is right next to mine! A family member will be moving in!
Love your ideas!
Your welcome! Glad I could help.
Did you remodel the bathrooms? We currently live in a mobile home and need to convert the tub/shower into a walk in shower.
I did update one bathroom but we didn’t change the tub. I don’t see why you couldn’t change it to a walk in.
Hi Lori. I live in a double wide and want to redo the floors like you did and make everything the same throughout. Two questions. Did you lift the cabinets or just butt up to them with the new flooring? And which direction did you lay the flooring. Across the middle seam or with it ? Thanks. Karyn
Karyn, we butted the flooring up to the cabinets and we ran the boards across the width of the trailer. I hope this helps.
We have a double wide and the walls are not made out of dry wall. I’m not sure what they are but they have strips to cover where sections meet. I hate them. How do you paint them? I’ve heard you have to use something special but can’t find out what. I hate painting and my fear is I’ll start and it will peel. I would die!
Hi Maryann, From what you describe it is paneling. And yes, it is difficult to paint it but not impossible. The trick is to use make sure the surface is clean and use a really good primer before you paint. I have used Kilz and Zinnzer brands and had good luck. They have many different kinds of primer so ask your paint dealer which would be best for the surface you are trying to cover.
I hope this helps.
Are you sure it is not dry wall with paneling paper like material of it? Some mobile homes in the mid to late 80’s had this type of wall. If your mobile home is older than mid 80’s, it is wood paneling. If it is wall paper paneling, you can remove the strips and use sheet rock mud to fill the cracks behind the strips. And paint a primer on the wallpaper and then paint. I just did my mobile home and the walls look like a regular house now.
Glendon, Very helpful!! Thank you
Your welcome 🤗
I once lived in a double wide, and had to same walls.. But I painted the kids rooms with regular paint. I didn’t have any problem.
Thanks for sharing Jenn. I’m glad it all worked out for you.
Maryann, likely what you have is VOG – vinyl over gypsum. You can do some research about it online (sorry I don’t have a link for you). If that’s what it is you’re right to be concerned about it peeling. Opinion varies but the best advice I’ve found so far says that you don’t have to prime VOG walls. You do need to use two coats of a good paint. Good luck. Please wish me luck as I’m about to renovate my 1971 double-wide. Good luck.
MisTBlu, thank you for sharing your experience. And good luck with your renovation!
If this looks like “wallpaper” not wood paneling, I have successfully removed the strips, then mudded the joints just like finishing drywall. (Look up how to info online). Then I primed and painted. Lots of elbow grease and patience, but really worth it. (If you have a corner that you walk around. I recommend buying a corner that is both paper and metal. I have had best success with this type.) Good Luck!
You can take out those straps and putty the walls. After sanding where the putty was you can get a good paint with primer in it. It turns out great.
Thanks for sharing your home’s transformation. I love the updates and how your choice of paint and organizing talent gave your home a fresh, bright and updated look. Congratulations on a job well done.
Thank you so much ❤️
Thank you so much for your blog! My husband and I own a manufactured home also and I found your blog while looking for remodeling ideas. I am trying to do some quick, inexpensive updates so that we can sell and your blog was the perfect ticket! I had to tell you not only does your Dad’s home look fantastic, but most importantly that it shows the love that you have for your Dad. I lost both of my parents within 6 months of one another and reading your blog really warmed my heart. Thank you so much!
Dawn, Im so sorry to hear about the loss of your parents. My Dad means the world to me and I would do anything for him especially because he was the type of person that did everything for everyone else his whole life. Now that he has had a stroke he can’t do much of anything so it’s my turn to help him when he needs it.
I’m glad I was able to give you some ideas for your mobile home. And congratulations on your move. 🙂 I hope you signed up to get my newsletters. If not go to my homepage and click on the sign up box.
Thanks for your kind words
I’ m in my 70’s and need to re do my cabinets in a 25 yr. old mobile home. They are pressboard and the contact paper is peeling. What can I use to clean it and so I get it? Your’ s look fabulous by the way.
Hi Bob, I didn’t have any damage on my cabinets so I can’t personally help you with that question. But, I did find this article for you that tells you how to repair and paint many different types of damage to mobile home cabinets. I hope this helps. Repairing Mobile Home Cabinets
Beautiful renovation!!
I couldn’t help but notice on your dad’s hat collection that he was in the Air Force. Could you please Thank him for his service from my family? 🇺🇸
Oh, thank you so much! I’m with him now and he is smiling! ❤️
❤
You did an amazing job live the backsplash where did you get it
Thank you! Pretty sure it was Home Depot. But if not Lowe’s. It’s just peel and stick plastic tile 🤪
Finally, a kitchen redo for regular folks that don’t have the money to hire a decorator and don’t have a huge budget. I love that your project brought joy and light to your dad and family, and that you did it with no pretentiousness whatsoever. How refreshing!! I’m a city gal with an old home and I’ve slowly been updating every wall, fixture, and piece of furniture on my own. Thank you for encouraging me with your blog. I wish you continued success!!
Anita, This is the sweetest thing anyone has ever said to me! Thank you so much for your kind words. Just so you know, I am a decorator, but I love working with people on a small budget. It forces me to be creative. I’m the same way with my own home…sometimes. LOL HomeGoods, TJ Maxx, and Hobby Lobby are my favorite places to shop. 😉
What do you use to clean the wooden cabinets..
Rochelle, I used TSP. It worked really well.
What is TSP?
Trisodium Phosphate is a cleanser, degreaser, and stain remover. It works wonders but it can be harmful if swallowed, and exposure to it (in granular or diluted form) can cause serious eye injury and skin irritation. Personal protection equipment (PPE), including long pants and sleeves, waterproof gloves, goggles, and a respirator, should be worn when preparing and using TSP. I have heard that Simple Green works well too if you’d rather try something less toxic.
So glad to see this come up on my phone. I was googling how to re-do kitchen cabinets in a mobile home so guess that’s how I received your story. My home is 25 yrs old and I put in new flooring 2 yrs.ago and decided I need to paint the brown cabinets. I didn’t want to replace all the hardware so will try cleaning with tsp and see what happens. Loved the before and after pics. Thank you.
Thanks Kathy, I would not recommend using the tsp for your hardware. I learned that the hard way even though I liked the result myself. You can use vinegar and water and let them soak. It should loosen all the gunk on the metal.
Hi Lori,
Awesome job!! How big and what year is the manufactured home? We are in the very beginning stages of planning for our reno. I love what you did to your kitchen cabinets. Are your cabinets all wood or are they press board? Ours are press board. Could they still be painted and look ok?
Thanks Dinna,
I don’t know the year and I think it’s 60’. It’s a 2 bed, 2 ba with an addition on the back.
The cabinets are pressed wood. Make sure you clean them well with a degreaser and use a good primer. So far they are holding up really well.
Good luck with your Reno 😊
We are starting a remodel and wanted to know how much it cpst you in total?
Courtney, I’m bad and didn’t keep my receipts so I don’t have the exact amount. But the whole thing was under $3000.
Glad you finally decided to do this series! I think it’s going to be useful for a lot of readers!
Thanks David, I can’t wait to do some more updates!
We are moving into a mobile home and I am looking for ideas. This is perfect! Thank you for sharing.
Your welcome 😊
We are moving into a mobile home and I am looking for ideas. This is perfect! Thank you for sharing.
You did a Great job We live in a moblie home too. It’s over 20 years old. I have a question for you my cabinets are not made of wood so are pealing or dipping balls everywhere water has touch them. What can use for that should I buy cabinets?
Please let know what to do
Hi Alma, I’m not sure what you meant that the water was doing to your cabinets. But if you buy new cabinets you may have to add more structure to the walls behind them. Typically mobile home walls are very thin and don’t have much for studs. So if you can fortify them a bit you should be able to use whatever kind of cabinets you want. That being said, please check with a contractor to be sure of how to do it correctly.
We just bought a cute single wide. Gutted the kitchen and are doing lowers only with open shelving. The drawers were so flimsy with the single track runner. New ones worked better for us. 6 total lowers. In lieu of repairing walls, we covered them with beadboard and painted it white. Clean fresh and open!
Cabinets arrive Dec 6th!
It sounds BEAUTIFUL 😍. PLEASE SEND PICS
Hi! This looks amazing! Did you use a paint sprayer or brush and roller?
Thanks Rebecca, I used a brush and roller only because I have never had luck with getting a paint sprayer to work right for me. If you have luck with a sprayer then it would make the job faster and with a smoother finish.
Your redo looks really good. Ive in in mobile home . i got tried of the brown paneling. So I pur wall paper ocer it to lighten it up. People told me I’d have fill the cracks in the paneling in. I didn’t and it turned out great.
Thanks Marti, Glad your wallpaper project turned out the way you wanted. It never hurts to try right?
I love all the changes especially the kitchen. The beams in the ceiling ,were they originally there?
Thank you Brenda. The beams were there when we bought it and I think they may have been original to the home. They are kind of cool.
We live in a mobile home too. I redid all my kitchen cabinets to an off white and used a grey glaze around insets. Sure made the brown wood look so much better. And like you we also put in new flooring which opened up the space.
Turned living room wall into ceiling to floor windows and added 2 skylights. It really transformed the place. I know what you went through but it’s so worth it after it’s done. Great job and enjoy it. Glad you have your dad with you!
Thank you Cheryl. I’d love to see your pics!!! Lori
Bob and I are saddened to hear of your dad’s worsening dememtia. I’m sure your talented decorating must have been good for his spirits. If there is anything we can do, let us know.
I’m sure he’d love a visit 🙂
Love how bright the kitchen looks! Nice transformation!
Me too Eleanor 😊
Looks amazing
Thank you Nancy