

Introduction: Outdoor Grill Cart (Reclaimed) - Cart Plans


Intro:
99% of of all my wood I used is thrown away pallet wood from my company. Perfectly good wood, just needs some TLC.
This was my very first reclaimed wood project in year 2017 (which I'm dubbing the year of Wood).
I came across Steve Ramsey's Woodworking for Mere Mortals video on Youtube (see link)
and since I was in need of a new grill and didn't want the expense of a full blown stand up grill (and I had an old one collecting dust and spiderwebs) decided to give his free plans (see Steve's PDF attachment) a try. If you haven't seen him or his stuff check him out worth the watch for inspiration and plan ideas.
Step 1: Step 1 - Cut and Sand All Pieces.
Following his plans and using the scrap wood I had available in my shed I cut down the pieces I need to make this card.
Attachments

Step 2: Step 2: Assemble Frame


Pretty straight forward if you follow Steve's plans or other plans. Be sure to drill pilot holes before screwing pieces together. Especially important with reclaimed wood.
Step 3: Step 3: Paint Frame


Now if you seen any of my other posts you know how much @*&(!@)^)&^!!!!! I hate painting.
This being my first project I got excited about banging it out but I did manage to slow down enough to paint sections as I went.
Step 4: Step 4: Paint Slats

Once I had the frame assembled and painted I moved on to the slats and gave them a good coat of paint.
Step 5: Step 5: Assemble Top and Base Shelfs.


If you actually end up using Steve's plans you'll notice his has a third shelf at the top / back of the cart. Because the Weber Grill he has doesn't have the side shelves. The Weber Grill I have does. (Its supposed to be a tailgating type of grill) So I adjusted his plans to omit the top shelf.
Step 6: Step 6: Add Wheels and Add Propane Tank Features


Per Steve's suggestion I reclaimed the Wheel's off my old grill stand. I did the same with the metal bracket that helps hold the top of tank from falling over. To accomplish this I added eyebolts to either side in the back and looped the hooks through. Then placing the tank in position aligned with the bracket I traced a circle around the base of the propane tank. I then took my hand trim router and routed out a groove for the tank to nestle into. This worked great so now when I move the cart the tank stays exactly where it should.
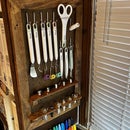
I also added brass tool hooks screwed into the side I would use the most.
Step 7: Step 7: Final Coat of Paint and Grill Up Some Good Eats.

My Wife are so glad we found these plans and grill. Steve's simple plans and video convinced me I could do this simple project. And the Weber Q2100 Grill is awesome for the two of us. Being portable we can take it to the park and use small propane canisters plus when we're not using it I can put it up in my shed (aka Time Machine) to keep it out of the elements.

Participated in the
Reclaimed Contest 2017

Participated in the
Furniture Contest 2017


