
How to Build a Fold-Out Closet Desk

Updated: Jun. 02, 2023
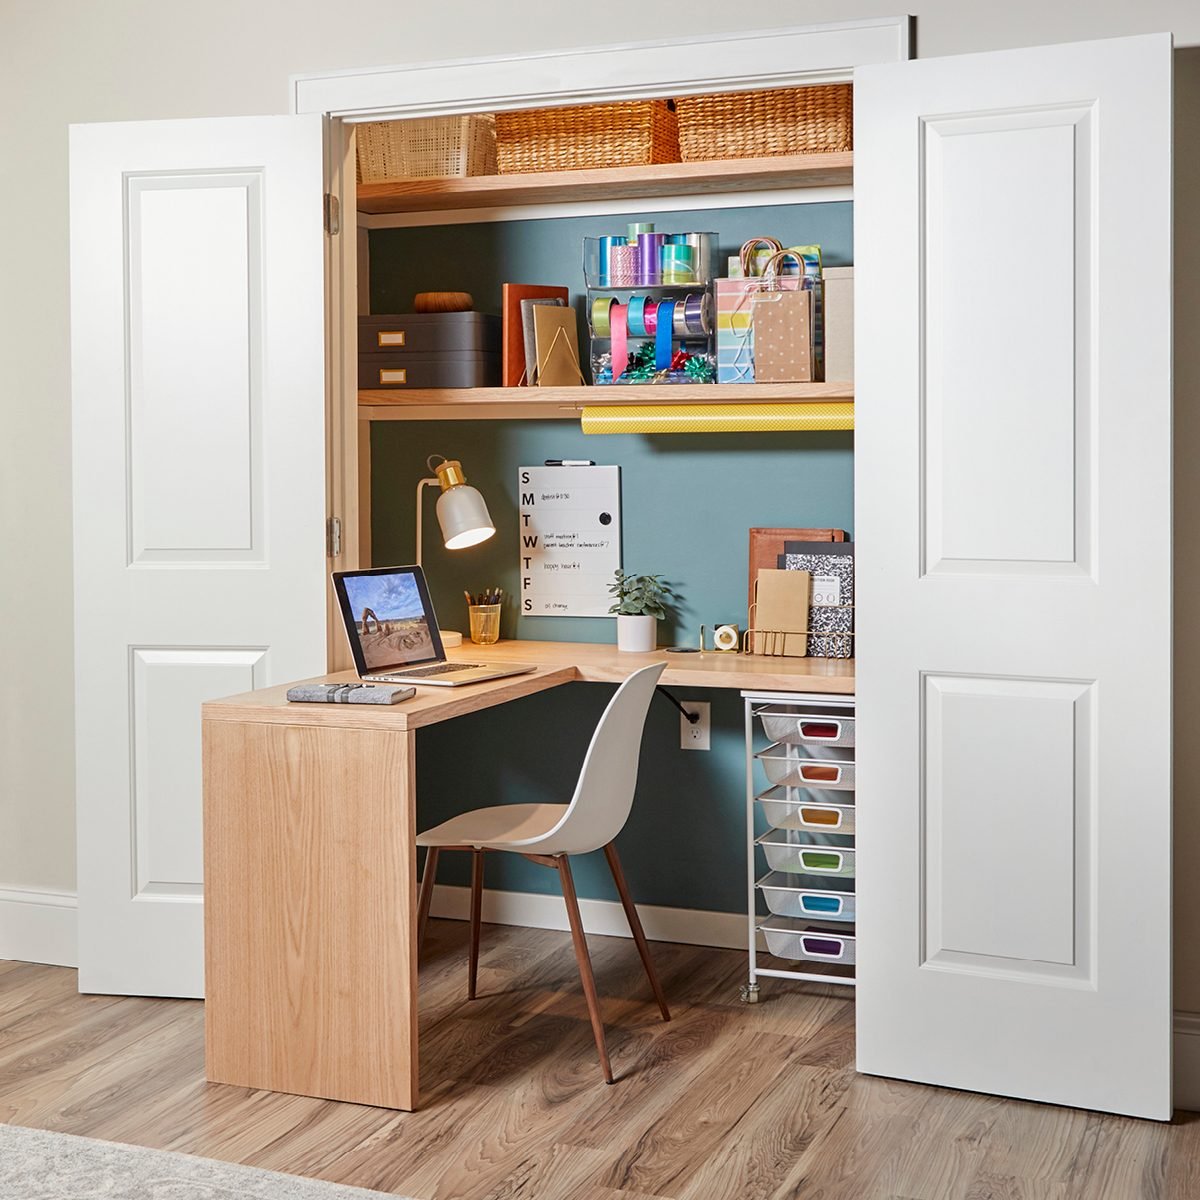
Need a zone to call your own? Look inside the closet!
Two days
Intermediate
$600-700
Introduction
This folding desk tucks away into a closet for an on-demand workspace.Tools Required
- 3 in. hole saw
- 4 ft. level
- Basic hand tools
- Circular saw
- Drill/driver
- Drywall saw
- Hacksaw
- Oscillating multi-tool
- Pull saw
- Stud finder
- Torpedo level
- Wire stripper/cutter
Materials Required
- 1 - 1x2x12' primed
- 1-in. 18-gauge brad nails
- 2 - 1x2x8' primed
- 2 - 2x6 pine
- 2 - Folding leg bracket hinges
- 2 in. 18 gauge brad nails
- 2-1/2 in. trim head screws
- 3 - 6'8" x 2" hollow core doors
- 3/4" x 3/4" x 30" piano hinge
- Construction adhesive
- Cord and outlet grommets
- Electrical supplies
- Power strip
- Wood glue
Working from home has become a reality for many, but not every home has a spare bedroom to turn into a home office. Even if you don’t work from home, you might long for a dedicated space for your craft or hobby, or a place for kids to do their homework.
Converting a closet allows you to gain space without taking over a room or remodeling. I’ll show you how to transform your closet into a multipurpose work space using hollow-core doors and basic tools. You can find doors at a reuse center, as I did, or buy them new at a home center.
Project step-by-step (10)
Make Filler Strips
After you cut the door slabs to fit your closet space, you need to make the filler pieces that fit inside to reinforce the hollow core.
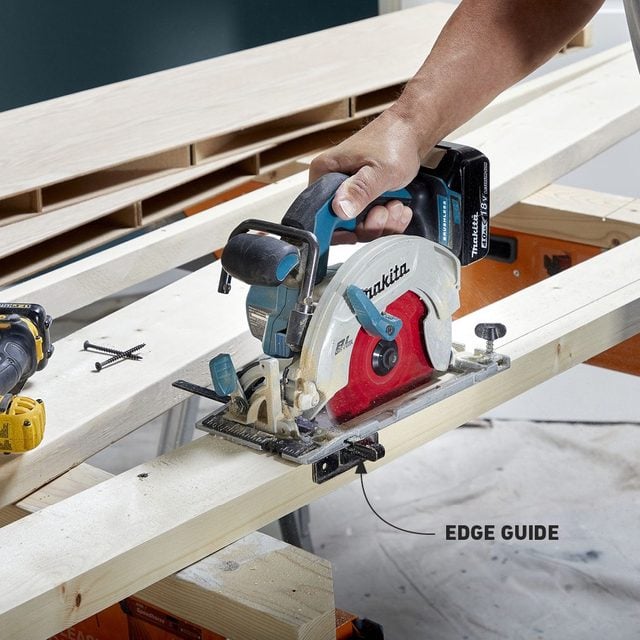
Measure the inner door cavity. Mine measured 1-1/8-in.; that’s typical, but it can vary. You can cut filler pieces to that size from a 2×6. I have wood-topped sawhorses, so I fastened down the 2×6 with 2-in. screws. Clamps would work just as well.
With the blade depth set to 1-5/8-in., make a short test cut to be sure the edge guide is set to the right width, and the zero stop on the saw’s bevel gauge is cutting at 90 degrees. Keeping the wider part of the saw’s baseplate on the 2×6, I was able to get two passes with a solid footing of my saw’s baseplate on the board, which ensured accurate cuts. Despite some waste, this is a safe technique if you don’t have a table saw.
Install Filler Strips
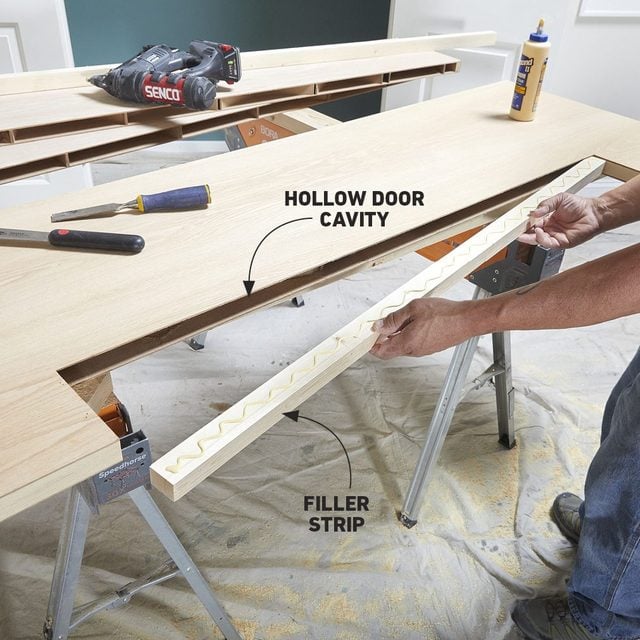
Most new hollow-core doors have a cardboard web inside to support the outer panels. With a sharp chisel and a pull saw, you can quickly cut and push that out of the way. If you’re repurposing older doors, you may encounter a thin wood filler that takes more time to clear.
Install your new solid filler pieces with glue and 1-in. nails. Be sure to add filler pieces on the fold-down top and leg to give solid purchase for the leg bracket screws. Then sand the filler pieces smooth and flush with the outer panels.
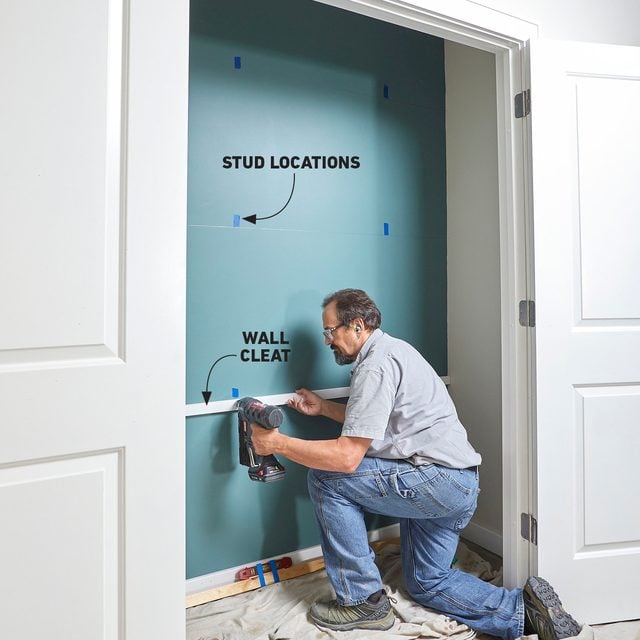
Install Wall Cleats
A comfortable desk height is about 30 inches. I wanted enough height between the desk and the first shelf for my computer monitor, and enough room above the upper shelf to fit the boxes I previously had in the closet.
With all this in mind, I marked the height for the desk and shelves inside the closet. With a torpedo level taped to a straight piece of 1×2, I made level lines on the back closet wall for the cleats. Locate the wall studs and mark them with painter’s tape. Nail the back wall cleats to the studs.
In case I ever need to remove the desk, I skipped the glue here. A few small holes are easier to repair than long swaths of paint and drywall. Then I used the torpedo level to install the side wall cleats. If you don’t find studs to which you can fasten the side cleats, use hollow-wall anchors.
Expect the Unexpected
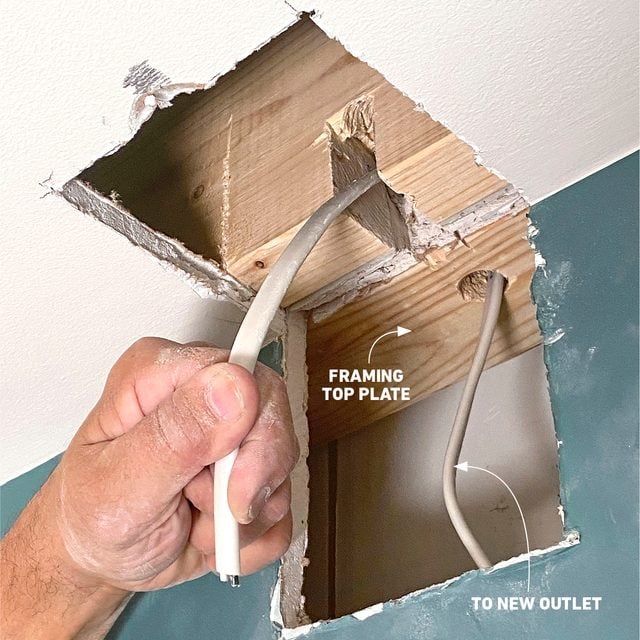
What you find inside a wall often isn’t “typical.” I encountered a 2×6 drywall backer nailed over drywall that ran over the top plate, probably from a previous remodel. This kept me from simply pushing the wire through the top plate into the ceiling cavity. To make this 90-degree turn, I cut a notch with a multi-tool in the 2×6 framing to pull the wire through.
Before I cut that notch, I double-checked to be sure this 2×6 framing wasn’t a structural piece, like the bottom chord of a truss or a floor joist. I then fished the wire up through the wall from the outlet cutout below the desktop, through the top plate and into the ceiling to make my connections in the closet light fixture box.
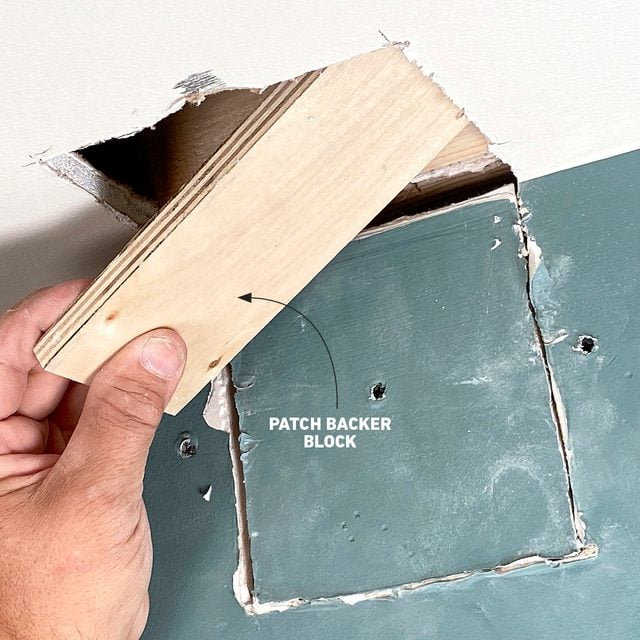
To complete this step, I installed the remodel box and outlet, patched the wall and ceiling, and installed a 6-in. flush-mount LED ceiling fixture to replace the old bulb socket in the closet.
Run the Wiring
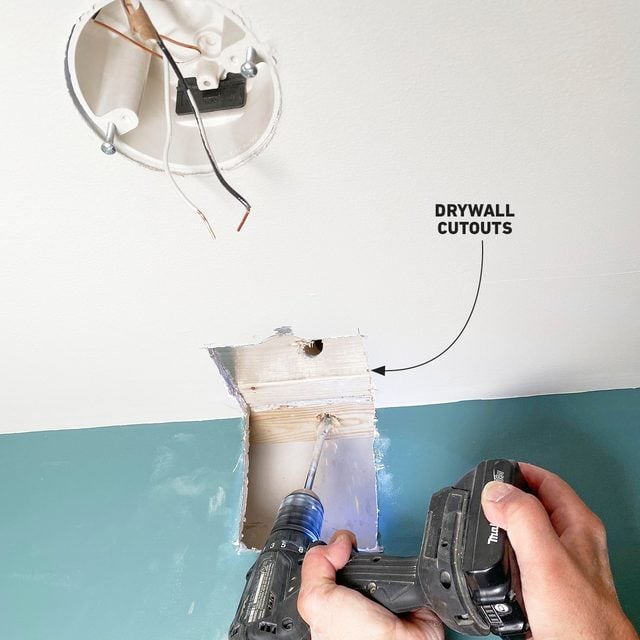
To add an outlet below the desktop, I pulled a wire from the closet ceiling fixture. The first step with any wiring project is to locate and turn off the breaker feeding the circuit you’re working on.
To get a wire up a wall and into a ceiling cavity, you’ll need to drill through some framing members. To access them, cut two 5-in. square holes, one in the ceiling and the other in the wall directly behind the light fixture box. Save the drywall squares for reuse. Then drill a hole through the top plate of the wall framing.
Finish and Paint
For the best results, paint or finish your desktop and shelves before installation. I used a water-based polyurethane finish for my desktop and shelves, and I coated the shelf cleats with latex enamel paint. Prime and repaint the wall and ceiling patches.
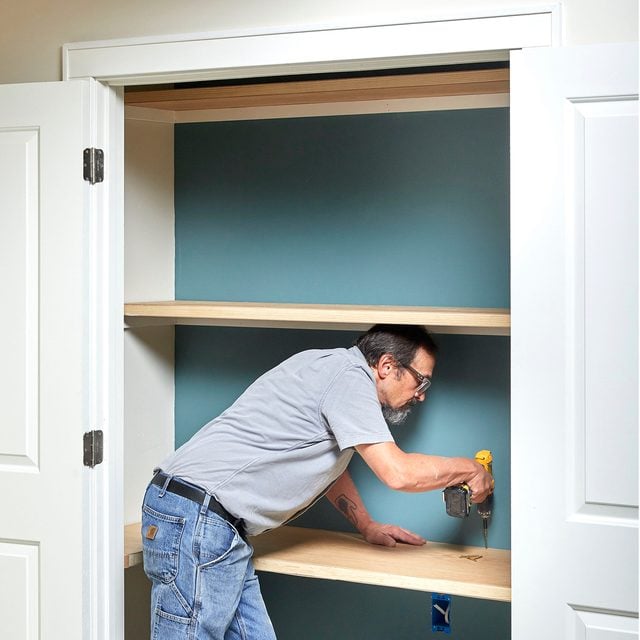
Install the Desktop and Shelves
You may need to install your desktop first if the upper shelves will prevent you from getting the desktop into place. Because I may want to restore this closet to its original configuration someday, I didn’t use adhesive. A couple of 2-1/2-in. trim screws at each alcove end and one in the center are all I needed to secure everything in place.
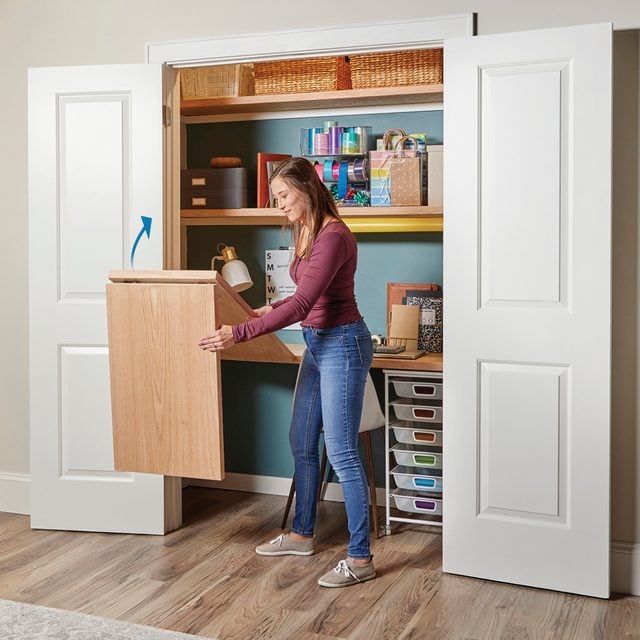
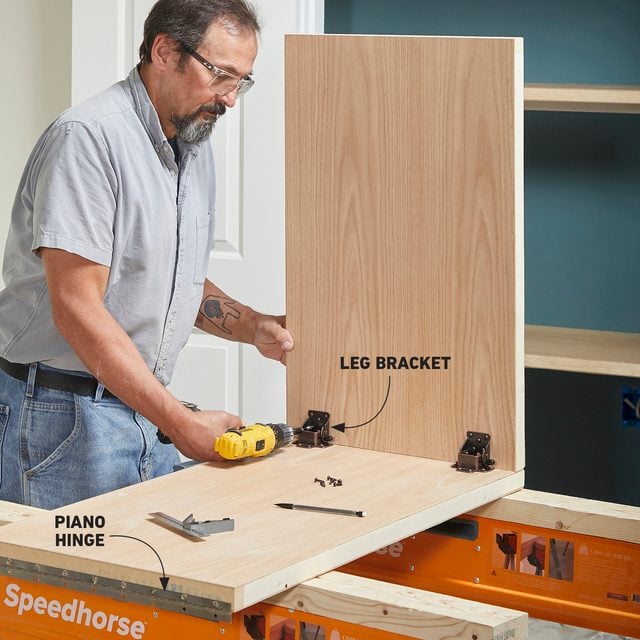
Assemble the Foldout
Cut the piano hinge to length and attach one of its leaves to the desktop. Using a combination square, mark the placement for the folding leg brackets on the back of the leg and underside of the folding desk. Predrill holes and install the brackets with the supplied screws.
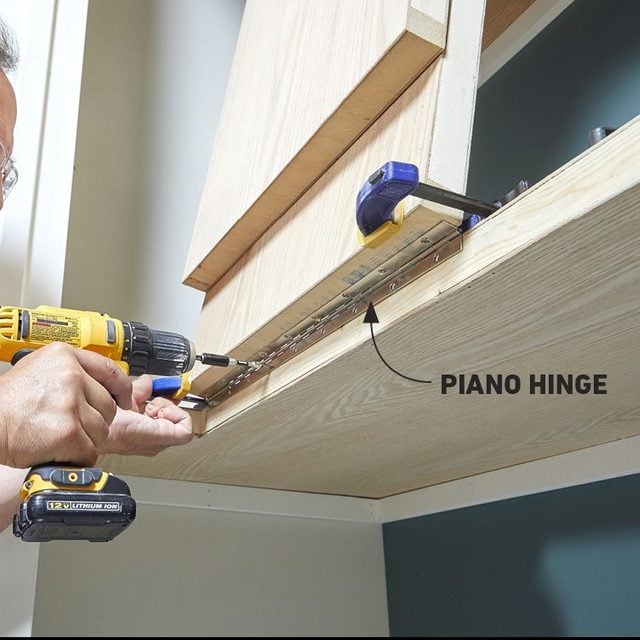
Attach the Foldout
Using clamps to hold the folding desktop in position, attach the other leaf of the piano hinge to the desktop.
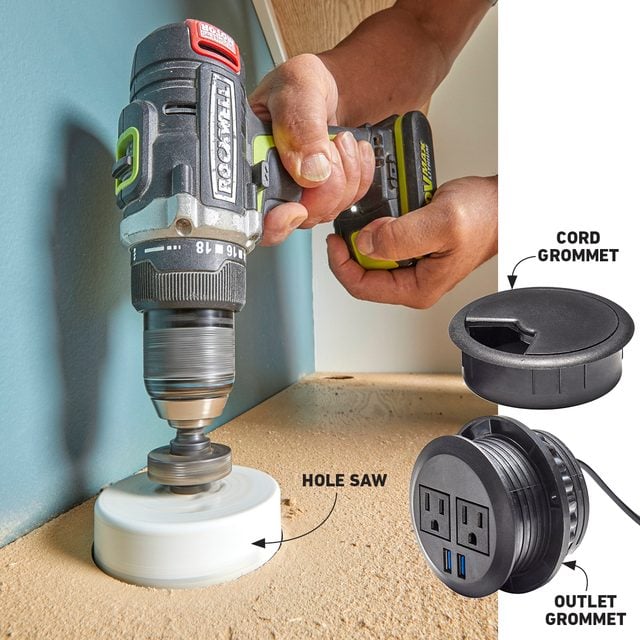
Add Cord and Power Frommets
Mark the placement for the desktop outlets — whatever is convenient for your desktop. I put a cord grommet in the center of the desk and one outlet grommet in each of the back corners. Use a 3-in. hole saw to cut the holes through the desktop.
I attached a surge protector power strip with additional USB ports underneath the desk. Then I secured all the cords under the desk using zip ties,
Originally Published: November 10, 2021