Learn how to make a flower bed in a way that saves you time, energy, and the headache of ripping up and getting rid of grass.
We purchased our second house from an elderly woman who hadn’t done much maintenance in the years leading up to the sale. But, it was in the exact neighborhood where we wanted to live, the lot had enough sun for a large vegetable garden, and the price was darn good!
As soon as we finished addressing some of the immediate house to-do’s – new roof, asbestos flooring and water damaged paneling removed from the basement, wood floors installed in the living room – we set to work on the yard.
When moved into our house you couldn’t see the front of it from the street – overgrown trees and shrubs obscured it from view. There also wasn’t much landscaping around the actual house, just a few lonely plants in a sea of grass.
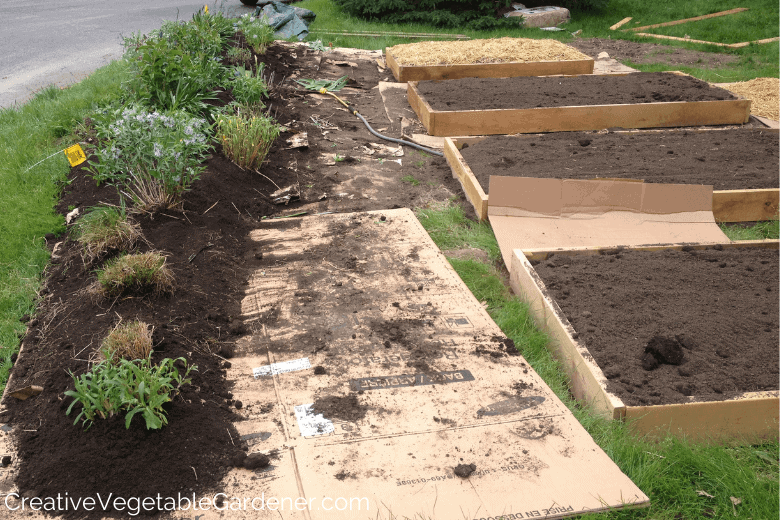
Since it was early June when we moved in, our first order of business was building the vegetable garden. I wrote a long post sharing all the details and plenty of photos of how we created easy raised garden beds.
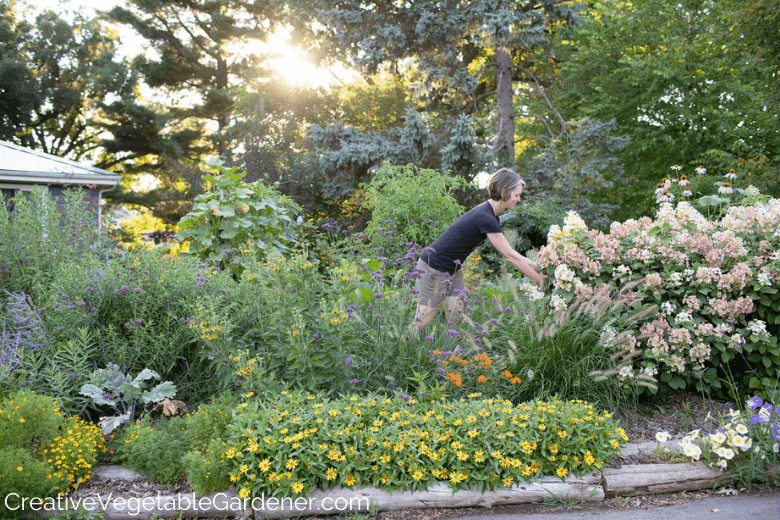
In front of the vegetable garden, between it and the street, we created a quick and dirty flower garden bed at the same time we were building rest. (More about that below.)
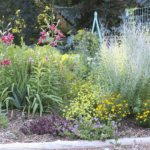
That was phase one of our garden plan. Phase two didn’t occur until fall since we were busy getting unpacked and settled. I definitely wanted a perennial garden along the south side of the house because it got plenty of sun and was in a highly visible area.
I knew from experience that it’s easier to prepare a planting area the season before you plan on buying trees, shrubs and flowers, so that’s exactly what I set out to do that fall.
The second area I wanted to plant was filled with grass, and because I’m not a big fan of stripping away grass with a machine or my own muscles and shovel, I opted for the easy way out.
In this article I’ll share how to make a flower bed with two easy, no-dig ways that will save you a lot of sweat and tears.

This post contains affiliate links.
How to Make a Flower Bed: Two Scenarios
Method #1: Mounded Flower Bed
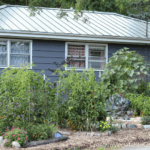
As I mentioned before, when we bought our house there were overgrown shrubs taking over the sunniest part of the lot and you couldn’t even see the house from the street. We cut most of them down and turned them into woodchips with my husband’s chipper (he’s an arborist).
Our installation area was mostly bare soil after the shrubs were removed, so we were able to install right onto a clean slate. After building and installing easy raised garden beds, we set about creating a perennial flower bed between the street and the vegetable garden for a visual buffer and a way to add some additional texture and color to our front yard.
Here’s how we did it:

Step 1: Design
Used a long measuring tape to lay out the shape and length of the flower bed. You could also use a hose or a rope.

Step 2: Smother
If you’re creating the bed right on top of the grass, put down a layer of cardboard to help smother the grass.

Step 3: Soil
You’ll need soil to build up the mounded bed. For our yard project we had gotten a large delivery of raised bed garden mix (half compost and half topsoil). Even though this mix was supposed to be nutrient rich for growing food, it was poor quality and ended up causing soil problems in the vegetable garden beds.
But, perennials don’t have as many nutrient needs as vegetables, so you can get away with a lower quality soil mix. Ordering half compost and half topsoil is a good option.
To move the soil a wheelbarrow is very handy. You can fill it with soil and dump it in piles within the area you mapped out with the measuring tape and on top of the cardboard. Use a hard rake to move the soil and shape the bed to your liking. We designed our flower bed to have a slight curve that mimicked our property line.
Step 4: Plant
Before we moved out of our previous house we dug up and divided some of our favorite perennials to bring with us. This was fun because it basically provided us with an instant garden!
If you want to fill your flower garden bed with colorful and unusual bulbs you can find some of my favorites here.
And in this article I share my top five summer blooming perennials.
If you’re creating this flower bed and aren’t plant anything right away, simply skip to the next step.

Step 5: Mulch
If you hate weeding and want to cut down on the amount of time you spend watering then I highly recommend you spread a thick layer of mulch over your mounded flower bed.
If you’re not planting until later you can layer on the mulch right away. If you’re going to plant right after building the bed you should plant first and then mulch.
That’s it! That’s a pretty easy way to build a flower bed.
Now let’s talk about the pros and cons of this method.
Pros:
Quick: These beds don’t require lumber, tools, or building skills. You can easily construct several in an afternoon work session.
Ready to Plant: Because you’re building up soil on top of the grass, you don’t have to wait for the grass to die before planting. You can create the bed and plant your perennials in the same afternoon.
Shape: You can create mounded beds in lots of different shapes and sizes and even add curves to make them more interesting.
Cons:
Expense of Materials: Because you’re building up you’ll need extra soil to create the mounded bed. You might have extra soil laying around from a project that you’d be thrilled to use up. If not, you’ll have to order soil from a local landscape supply company.

Method #2: Smother & Wait Flower Bed
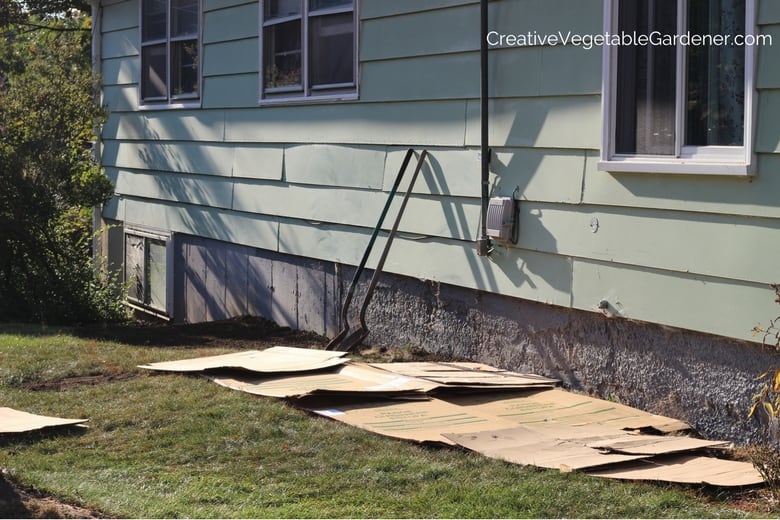
The side of our house, which is south facing, was devoid of landscaping when we moved in. It gets great sun and is highly visible to our neighbors and passersby, so I definitely wanted to created a space for planting. My plan was to create a planting bed that would run along the entire length of the house.
Instead of struggling to plant into or remove the grass I decided to prepare the area in the fall and wait to plant until the next spring. And by preparing I mean I simply killed the grass and got a head start on building up some organic matter.
Step 1: Design
Use spray paint or a hose to figure out the footprint of the planting area. The hose allows you to play with the curve of the bed.
Step 2: Lay out cardboard
Spread the cardboard out to cover the entire planting area. I scavenged large pieces of cardboard from the dumpster of a furniture store near my house.
You can simply flatten each box and use it as a double layer. There is disagreement in our house whether to remove the tape and stickers or not. (I vote no.) Make sure you are overlapping each piece of cardboard. No grass should be visible.
 .
.
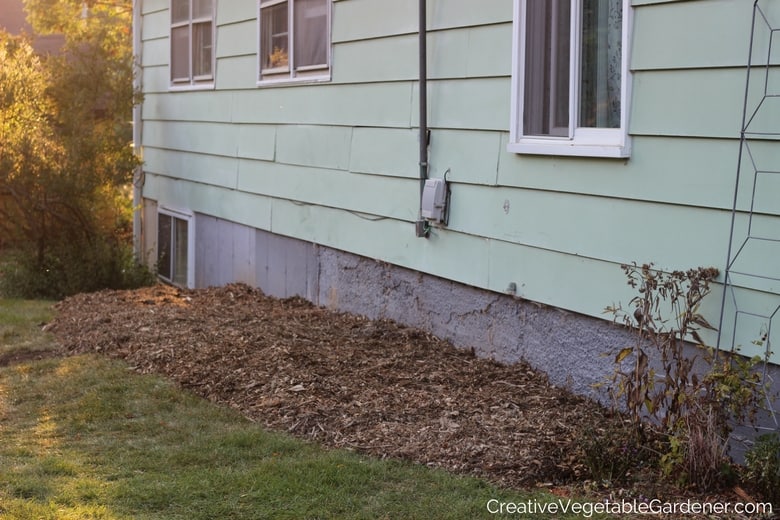
Step 3: Spread woodchips
Spread a thick layer of woodchips over the cardboard – 4-6 inches. Feather it over the front of the bed where the cardboard meets the grass. I like it thick here because it’s going to be a trouble area. Grass likes to move into the woodchips.
We always transport our woodchips from the driveway pile to the area where we’re working with a wheelbarrow. My favorite tool to fill the wheelbarrow is a large pitchfork.
Our woodchips always come delivered straight to our yard courtesy of my dear arborist husband, but many cities and tree care companies offer them for free.
Step 4: Leave the bed for winter (or the season)
The aim of this method is to smother the grass so it’s much easier to plant. This take times. If you’re tackling this task in the spring I suggest leaving it be for the season to let grass die underneath the cardboard. You might be able to start planting in the fall.
If you’re working on this in the summer or fall, you can leave the area until the following spring. When you’re ready to plant most of the cardboard should be pretty decomposed.
Step 5: Plant
After a few months or the next season you can simply push some of the woodchips aside and dig a hole with a shovel for whatever you’re planting. If you run into some cardboard just move it aside and tuck it under another area of woodchips.
Now let’s examine some of the pros and cons of method number two of how to make a flower bed.
Pros:
Quick: These beds don’t require lumber, tools, or building skills. You can easily construct several in an afternoon work session.
Shape: You can create woodchip beds in lots of different shapes and sizes and even add curves to make them more interesting.
Low Expense: You only need cardboard and woodchips for this method. Both can be sourced for free. Yay!
Cons:
Wait to Plant: The whole purpose of this technique is to make planting easy. That means you have to wait for the grass to die and the cardboard to break down a bit before planting. You’ll need to wait at least a few months between creating the bed and planting it.

A Few More Tips
This technique is best for areas where you’ll be planting trees, shrubs, perennial flowers or woody fruit.
Woodchips are for the vegetable garden aisles ONLY. If you want to use this method to establish vegetable garden beds you will need to remove the woodchips from the area where you’ll be planting in spring. When mixed into the soil, woodchips tie up nitrogen because they are made of so much carbon. This will steal much needed nitrogen from your vegetable plants and possibly stunt their growth.
Feel free to add compost, leaves or other organic matter either underneath or on top of the cardboard. I usually add compost to each hole I dig when planting the next spring.
Each season you’ll want to refresh the woodchips so they are nice and thick to keep down the weeds.
Check out this article with tips on flower garden design and how to avoid the number one mistake most flower gardeners make.
If you want to fill your flower garden bed with colorful and unusual bulbs you can find some of my favorites here.
And in this article I share my top five summer blooming perennials.
Hopefully you’ve learned how to make a flower bed in a way that saves you time, energy, and the headache of wrestling with ripping up and getting rid of grass. I’ve been there and done that in the past and definitely learned that there were easier ways to create a garden.
SHARE IT ON PINTEREST
.


Comments
I like mowing.
I have an area I’d like to clear that was a rain garden gone awry. It’s a dense stand of goldenrod now. How would you recommend doing this?
Hi Betsy – If it was my yard I’d whack it down and then cover it with a thick layer of cardboard and woodchips. Some of the goldenrod might end up returning, but then you can dig it out if needed. This seems easier than trying to clear it out by hand. Hope you are well!
I read in the British magazine “Permaculture” that you can plant anything especially veggies in nothing but woodchips with great success.
Hi Jenny- This has not been my experience. Even my annual flowers get a little grumpy in woodchips. I’d suggest doing an experiment in your yard and seeing what you think!
Love the idea of less lawn! I am trying to figure out where to source large cardboard now as I am ambitiously planning on doing my whole front lawn. One thing I wanted to suggest (and this depends your preferred aesthetic) is to plant with the end goal of no longer mulching. I’ve read some great pieces on it, like this one: http://landscapeofmeaning.blogspot.ca/2013/08/mulch-addiction.html Good luck with your project!
Thanks for stopping by to say hi! I read the article you linked to and she makes some great points. I’m married to an arborist, so we get lots of free woodchips, so we’ll likely always mulch. But I definitely agree with planting tightly in the veggie and flower garden. Keep us posted on your front lawn project!
It’s spring and we started a garden. I don’t want to wait until next fall to get rid of the grass nor do I want to dig it out like my husband has suggested. I do want to grow some vegetables. Can I go ahead and cover the grass with cardboard then dirt and have the same result? I’m guessing this year I would have to put things in containers while the cardboard decomposes. Thanks!
Hi Risa- Great question! I have put cardboard over the grass and then soil and planted a garden. The cardboard breaks down really quickly once it’s wet, so you can do it right away if you want. Just make sure you have a foot of two of soil so the plants have room to grow.
I wish I would have seen this article sooner. I had forgotten about this tip. I have an flower bed in the whole back of the yard. I think the weed barrier has broken down as tons of grass comes up all around the rocks. We are so tired of weeding it all the time. I ordered some ground cover to put there but need to get rid of all the grass first. One end I have given up and am going to let the grass come in. I’ll put up a barrier of some kind to stop it there, hoping that helps. Thought about using like vinegar to kill the weeds, but then nothing else would grow either. Kinda a lost cause. May try the cardboard next fall.
Oh, your flower gardening is really so sweet! LOVE IT.
Hey, could you talk about the barley??? I have been trying to understand how to do soil enrichment in the home garden for some time…and there you are doing it! Thanks Megan! Linda
I like your idea but I am concerned – won’t the cardboard soak and simply get destroyed? I am not sure if it will work out for a longer period? I’m very interested in your opinion. Honestly, I have the flower beds which require digging but I grow there everything. I have one which is only with herbs and looks stunning. I have lots of basil, especially this variety: https://gardenseedsmarket.com/sweet-basil-seeds-ocimum-basilicum-650-seeds.html which is growing there like crazy.
Yes, the cardboard will break down eventually, which is what you want because then it will be easier to plant into your bed. Covering with woodchips will help keep the weeds downs.