|
[#1]
I've got it saved as a pdf if you want it.
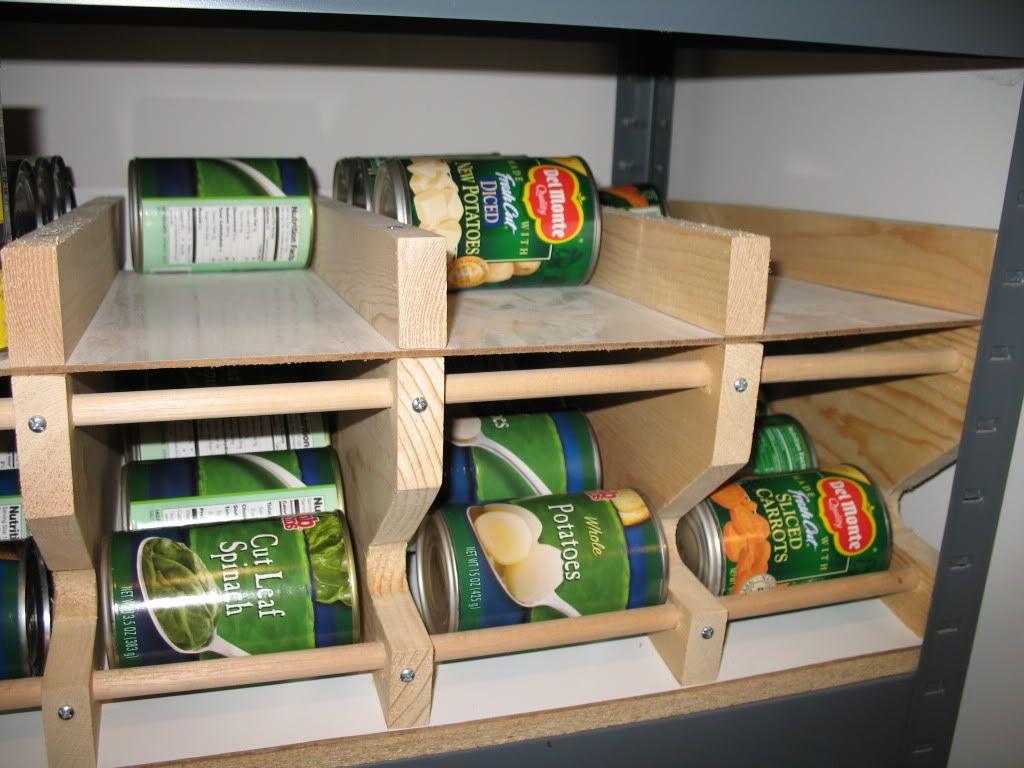
ETA- here's the text part with apologies to the author as I can't remember who posted this. I'm having some photobucket issues so I can't upload the pics at the moment. "The Pantry" it will store and rotate your canned goods. In an effort to organize our food storage I developed this pantry. It will rotate the food as you use it, FIFO. I thought you might find it interesting and if you decided to make something similar you could benefit from my building experience (and mistakes.) What I ended up with is a unit that will store over 300 lbs. of canned food while taking up only 456 sq inches of floor space (<4 sq.feet) at a cost of $134.72. This does not include the cabinet screws that I already had in inventory. My material pile, which includes 3 boards that I did not need. You will need 1 3/8” sheeting grade plywood, 1 sheet peg board and 9 1”x10”x8’ pine boards. I measured the distance from floor to ceiling and then cut off 2” to make it easier to set the unit in place. I used the resulting gap to store extra florescent lighting tubes. Cut your 4’ end boards the full width of your sheet. This is important as the sideboards and spacers will be supporting the weight of the food and you want them to be sitting on top of the bottom board. Cut the sideboards to fit inside the end boards and screw in place. Measure and cut a board into the two shelves. Fit them to separate the space into 3 equal parts and screw in place, both ends and back. Rip the remaining 5 boards lengthwise in 2 equal widths. Cut 6 pieces to length, place between shelves along each outside vertical board and screw in place. These are necessary to fasten the outside edges of the pegboard. Next using the cans that you will be storing, determine size of spaces for the dividing boards and screw them in place top, bottom and backs. If you do all small cans you may need to rip 1 more board for additional spacers. Cut the peg board to length and screw fast to the spacer boards. I cut mine 20” deep. The bottom space is 4” which will allow the larger cans to easily exit onto the shelf while still controlling the smaller cans. I left the upper hole, the one that you use to fill the space 5 ½.” This allows room to get your/my hand and forearm part way down the cavity so that it is not necessary to drop the cans the full length. Finally cut 1 ½” boards the length of the shelves and screw on the front of each shelf to keep the cans from rolling off the front. The finished project. Prior to screwing on the pegboard I removed the baseboard from the wall, determined where the studs were in the wall and screwed through the back of the pantry, through the drywall and into the studs to hold the unit in place. I use the pegboard to store bulky lighter items. It would probably hold up to heavier stuff but I figured with all the weight of the cans of food in back why take the chance. Observations: 1.) You can look through pegboard to determine inventory levels. 2.) My unit as constructed will hold 19 soup cans per row, 11 1lb. 10.5 oz cans per row or 14 1lb cans. 3.) At times some can sizes will jam when they make the turn from the column to the shelf. I place kicker boards at the backs where the column meets the shelf and this helped a bit. The jams are relatively easy to work out either way. 4.) I built this unit in our garage and not in it’s final destination, the storage room. Banker Billy helped me move the unit. We took the pantry up the garage steps that are shown in the background of the garage pictures. We busted 1 light switch, 2 nuts, and a vertebrae but could not make the corner. So back down the steps, out onto the porch, up the steps in the living room, through the kitchen and just barely made it into the storage room. Banker Billy was pretty red in the face and our dogs were covering up their ears by the time we finally got the thing in place. Billy did suggest, well I can’t say everything that he suggested at least not in polite company. He did make a comment that it would have been far easier if I had built the unit in 2 sections and then screwed them together when we had it in place. He was right, I could have made a horizontal cut at the top shelf, put a bottom board on the cut off piece and a top board on the bottom piece and then screwed the 2 together at the installation. |
|
|
|
[#2]
That's pretty nice! Could you post or IM me the PDF? Thanks. I've been looking for something like this.
|
|
|
|
[#3]
Could you email me the pdf too if it's not too much trouble.
|
|
|
|
[#4]
I would appreciate it also, if you don't mind.
Thanks in advance! |
|
|
|
[#5]
Please send me a copy too. Thanks
|
|
|
|
[#6]
same here.....Just picked up 30 # 10 cans of supplies from Providence Pantry....would like to have it on shelves instead of pallet.
|
|
|
|
[#7]
I'd love to get a copy of this as well if possible.
|
|
|
|
[#8]
|
|
|
|
[#9]
Thanks for that.
|
|
|
|
[#10]
Very cool
|
|
|
|
[#11]
Thanks for hosting those!
Again, I'm sorry to the folks who created them, it appears I didn't save their user names. |
|
|
|
[#12]
Hmmm, looking at the PDF, my though would be to let the dividers between the columns of cans "float", using screws or pins through the front of the pegboard for locating them. Taht way, if inventory type changes, you don't need to disassemble - just pull 2 screws and slide it over.
|
|
|
|
[#13]
I had just enough space for a store bought shelving unit.
I took plans from canracks.com and adjusted them so they fit perfectly on the shelves. 
They work pretty good overall. If you are at all handy with wood, you should be able to build the plans, or modify them to suit your needs. |
|
|
|
[#14]
Could you post some additional pics of how the cans drop down in the rear? That is a sweet setup. Nice job.
|
|
|
|
[#15]
Another option... I'm trying a vertical in-wall system. Spacing between regular 16" OC studs will just fit three channels that will fit the most common can size. I think I used 1/2" plywood for the dividers:

This is about as far as I've gotten with it so far... too many projects... Nice thing about this is that it's taking advantage of otherwise wasted space, if done with an interior wall that isn't insulated. |
|
|
|
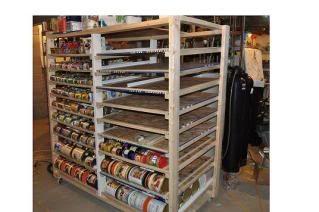
[#16]
One I put together. Should have made two smaller ones. It's on casters but is really heavy.
|
|
|
|
[#17]
Quoted:
Another option... I'm trying a vertical in-wall system. Spacing between regular 16" OC studs will just fit three channels that will fit the most common can size. I think I used 1/2" plywood for the dividers: http://i1010.photobucket.com/albums/af227/mid_mo/DSC_0010.jpg This is about as far as I've gotten with it so far... too many projects... Nice thing about this is that it's taking advantage of otherwise wasted space, if done with an interior wall that isn't insulated. I like that, looks like I have my Vacation project set, LOL J- |
|
|
|
[#18]
Quoted:
Could you post some additional pics of how the cans drop down in the rear? 

|
|
|
|
[#19]
Here's the one I posted several years ago. Storage Rack I saved the PDF file from a different web site, fellow claimed he built it. When I asked him what the dogs names were he wouldn't post any more. LOL.
If you need any advice send me a PM. ONG |
|
|
|
[#20]
cool....bump for newer members
|
|
|
|
[#21]
Quoted:
I had just enough space for a store bought shelving unit. I took plans from canracks.com and adjusted them so they fit perfectly on the shelves. http://i649.photobucket.com/albums/uu214/stopper87/IMG_1911_3.jpg http://i649.photobucket.com/albums/uu214/stopper87/IMG_1912_2.jpg They work pretty good overall. If you are at all handy with wood, you should be able to build the plans, or modify them to suit your needs. I'd like to build something like your can rotator. The commercial ones from shelf reliance are expensive! I found a video of a can rack. It seems like they are of similar design. Anyone know of a place to get plans other than canracks.com? |
|
|
|
[#22]
I'm looking for an idea to store cans plus have them somewhat portable to load in my truck if I have to scoot (bug out).
I was thinking of the smaller plastic totes to hold maybe 15 cans or so. And I could use them for freeze dried stuff and keep them somewhat dry. In a true situation, I'm going to have to head to the mountains or somewhere up north to avoid the locusts heading in from the west coast. If something happened to LA or San Diego, they would all head east to Phoenix and leave nothing untouched, I'm sure. There is simply no way to stay in the city.
|
|
|
|
[#23]
I was inspired. I built these in a couple hours and some 1/2" plywood
first I cut the dividers 9x13 I then cut the slot in them 1/2 x 9.5" I then chopped off a small sliver on the bottom 1/2 on one end, 1.5" on the other Here is a picture of what you end up with 
I used this as a template to make more, you need 7 per 32" of shelf for large size cans take the 9.5" x 32 and slide all the dividers on 
then all you have to do is add the back 
and then add the bottom and fornt bands to be finished 
end shot so you can see how the pieces fit 
some details on the plans. not to scale 
Cut list 1xback 9x32 1xbottom 13x32 1xshelf 9.5" x 32 7xdividers 9x13 front band top 2x32 front band bottom 1.5x32 What I like about this is with a simple divider you can make a shelving unit form a few inches, to few feet wide, cut just the pieces longer It also only uses one type of wood 1/2 plywood It uses the min number of pieces and cuts, the hardest part is the slot, but with a pattern its easy. They also stack, so you really dont need any shelving at all, just make 4-5 of these and stack em a closet or where ever. 
Thanks for the thread |
|
|
|
[#24]
Great idea!!!!
|
|
|
|
[#25]
tagged for my build
|
|
|
|
[#26]
I don't know the dog's names but I do know who made these


|
|
|
|
[#27]
Quoted:
I was inspired. I built these in a couple hours and some 1/2" plywood /// SNIP /// What I like about this is with a simple divider you can make a shelving unit form a few inches, to few feet wide, cut just the pieces longer It also only uses one type of wood 1/2 plywood It uses the min number of pieces and cuts, the hardest part is the slot, but with a pattern its easy. They also stack, so you really dont need any shelving at all, just make 4-5 of these and stack em a closet or where ever. Thanks for the thread Just what I was looking for! Thanks! How many cans will this rack hold? |
|
|
|
[#28]
60 of the larger vegetable cans
or 90 of the campbells soup cans(you have to double stack them like a double stack mag) you could scale them to any size you want, I buy the 8 pack veggi cans from the big box stores, so when i see 2 cans left I can open a new box and know that it will fit without having the 1-2 cans left over with no where to stack them |
|
|
|
[#29]
carpentry fail
|
|
|
|
[#30]
For smaller cans you can find FIFO (first in first out) can racks at some stores. The local Maceys used to have sales on these every now and then.
|
|
|
|
[#31]
I broke down and bought one of these from Shelf Reliance a couple of years ago. They made me an awesome deal on a floor model and they're local which saved me shipping.
I've already scoped out a place in the basement to build one of those upright #10 can rotators. I've got tons of that but it's all stacked in boxes on the shelves. |
|
|
|
[#32]
This awesome thread deserves a bump. I have some plywood laying around. Hmmm...
|
|
|
|
[#33]
tag
|
|
|
|
[#34]
Quoted:
some details on the plans. not to scale http://i42.photobucket.com/albums/e303/taylorwso/shelf001.jpg Cut list 1xback 9x32 1xbottom 13x32 1xshelf 9.5" x 32 7xdividers 9x13 front band top 2x32 front band bottom 1.5x32 Awesome afternoon project! can you take a side shot of a finish cut divider? I am unclear on the plans of the pitch of your middle cut (for the drop down). It looks like 1/3 total in the front to 1/2 total in the back. Also, does the little tit stay in the back for an angle? (it was not shaded in the "remove" and measured). Thanks again for your contribution |
|
|
|
[#35]
Maybe this will make it clear
The angles were minimal, just enough to make a can roll, so I could make it as flat as possible, |
|
|
|
[#36]
Thanks alot!
I guess its more a factor of making all of the dividers identical, than specific pitch. I can estimate the start/stop dimentions of your "angle cut" given the width of your face boards. (in the first template pics I was wondering if you had used a dado to chop the entire 1/2", but it looks like 2 cuts.) sweet shelf |
|
|
|
[#37]
Quoted: Thanks alot! I guess its more a factor of making all of the dividers identical, than specific pitch. I can estimate the start/stop dimentions of your "angle cut" given the width of your face boards. (in the first template pics I was wondering if you had used a dado to chop the entire 1/2", but it looks like 2 cuts.) sweet shelf I bet it he did use a dado. A 1/4" kerf on a blade is a pretty wide blade. |
|
|
|
[#38]
Quoted:
Thanks alot! I guess its more a factor of making all of the dividers identical, than specific pitch. I can estimate the start/stop dimentions of your "angle cut" given the width of your face boards. (in the first template pics I was wondering if you had used a dado to chop the entire 1/2", but it looks like 2 cuts.) sweet shelf Yeah it was 2 cuts, If I had my router table running it would have been cleaner you can make it whatever you want on the dimensions, just make sure a diameter of a can can get around the shelf when dropping |
|
|
|
[#39]
Just found this on YouTube. Interesting idea.
I would put coverings on the ends to hide its purpose. Storage Rack Idea |
|
|
|
[#40]
these are cool as shit...
|
|
|
|
[#41]
Anyone ever seen one that will take glass jars?
|
|
|
|
[#42]
Quoted:
Anyone ever seen one that will take glass jars? I'd think it would break a glass jar to make the turn. You'd need to make the rack fed from the back and pull from the front with no turn around like the can racks listed. |
|
|
|
[#43]
Anyone tried the cardboard ones? I have been meaning to order a few packs and try them....
http://www.thecanorganizer.com/ |
|
|
|
[#44]
Quoted:
Anyone tried the cardboard ones? I have been meaning to order a few packs and try them.... http://www.thecanorganizer.com/ They look to be priced competitively. If I ordered 5 packs which would be about $75 and they fell apart in a month, then I'd be upset at myself for not investing better. I watched the setup video and they look ok, but just do not let them get wet There is the plastic one that you can get for about $35 a unit, so $75 might get 3 units delivered. You could start off with 2 of the plastic ones then add more as you have a bit of money. clicky linky; dees ees dee plastik wun :} |
|
|
|
[#45]
Quoted: Anyone tried the cardboard ones? I have been meaning to order a few packs and try them.... http://www.thecanorganizer.com/ Those are VERY interesting. I've been looking for something that is very thin to maximize the space I have but not wanting to pay over $10 per slot with the plastic ones. At just over $3 per slot (if I ordered the 5 pack for the discount) that is a pretty good deal. There is no way I could make them for less than that. I do wonder how they hold up as well. Certainly if they got wet that would be bad but I can count on one finger the times I've ever spilled anything liquid in the pantry. My concern is how well they hold up to rotating. ETA: Correction, with shipping (which is pretty steep at $19.25) they run $4.10 per slot. |
|
|
|
[#46]
Quoted:
Anyone tried the cardboard ones? I have been meaning to order a few packs and try them.... http://www.thecanorganizer.com/ Some of the reviews stated that the postage costs were high. No way to tell how much they are going to charge for postage until you register with Google. I'm not big on giving a lot of info just to explore pricing. |
|
|
|
[#47]
Tag.
|
|
|
|
[#48]
Quoted:
I had just enough space for a store bought shelving unit. I took plans from canracks.com and adjusted them so they fit perfectly on the shelves. http://i649.photobucket.com/albums/uu214/stopper87/IMG_1911_3.jpg http://i649.photobucket.com/albums/uu214/stopper87/IMG_1912_2.jpg They work pretty good overall. If you are at all handy with wood, you should be able to build the plans, or modify them to suit your needs. How long did it take for them to send you the plans? ~Willz |
|
|
|
[#49]
anti-archive bump!
|
|
|
|
[#50]
These work well.
We got a bunch of their small ones to fit in our pantry which has shallow shelves. Once you figure out how to get it all folded and taped (use package tape) and they work well. Pretty cost efficient, and a great time saver. |
|
|
 Win a FREE Membership!
Sign up for the ARFCOM weekly newsletter and be entered to win a free ARFCOM membership. One new winner* is announced every week!
You will receive an email every Friday morning featuring the latest chatter from the hottest topics, breaking news surrounding legislation, as well as exclusive deals only available to ARFCOM email subscribers.

AR15.COM is the world's largest firearm community and is a gathering place for firearm enthusiasts of all types.
From hunters and military members, to competition shooters and general firearm enthusiasts, we welcome anyone who values and respects the way of the firearm.

Subscribe to our monthly Newsletter to receive firearm news, product discounts from your favorite Industry Partners, and more.
Copyright © 1996-2024 AR15.COM LLC. All Rights Reserved.
Any use of this content without express written consent is prohibited.
AR15.Com reserves the right to overwrite or replace any affiliate, commercial, or monetizable links, posted by users, with our own.


