
Bathroom Floating Shelves

Bathrooms are probably the most important room in the house aside from the kitchen. They are a multifunctional room where we bathe ourselves, and possibly a dog or two, practice good oral hygiene, or constantly encourage the kids to, and spend endless hours fixing our hair or putting on makeup to improve our appearance before we run out the door.
Given the bathroom’s multifunctionality, it’s critical that the room have proper storage. One of the easiest, most affordable way to add more storage to this room is to add shelving wherever you can. Floating shelves in the bathroom are a good solution because there are many places you can display them.
1- Tuck them into a corner
2- Mount them above your toilet
3- Or take the sheet rock off a wall and place shelves between the two by fours
There may even be an existing medicine cabinet or closet that you could transform into a very functional space. That is exactly what we did in our home.

This is what our bathroom looked like for many years and it served us well. After years of brown Formica counter tops, I decided it was time to do a refresh. We were fortunate to have a very large storage space to the left of the mirror that I knew I could do something with. So the process began.

By doubling the size of the space I was able to add one additional shelf for a total of three large shelves to house plants, extra towels, and all the other necessities needed in a very busy room of the house. Most of the sheet rock was in good condition and I didn't need to do anything to it. It was only the top of the space that I needed to square it off and mud, sand and repeat to get a nice clean finish.

Once I added a fresh coat of white paint (all of my materials are listed at the end of the blog) I knew I wanted to paint the back of the shelves black. Whenever you have a narrow enclosed space such as this, adding a dark backdrop will highlight the objects on the shelf and make it appear much bigger than it actually is.

In order to get a clean, straight edge, I used a Sharpie marker and drew a line as close to the edge as possible. When I painted the back black, it was so much easier to follow the line that was already there than trying to create that same line, freehand.
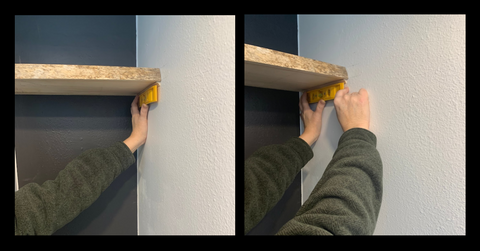
When the paint had dried, the next step was to attach the wood pieces (dowel bars) that would hold the shelves up, in place and level them. After figuring out how far apart I wanted them within the space, I added a layer of caulk to the back so they would stay in place while I used a nail gun to attach them to the wall.

Here are the before and after pictures of the placement of the dowel bars. In the picture to the left the dowels were attached to the wall with a small amount of caulk so I left them to dry for about a half an hour. After giving the caulk a chance to dry, I proceeded to paint them with the white paint of the walls and you can see how they will virtually disappear under the shelf once it is put into place.

Floating shelves are a 'must have' in any bathroom for these simple reasons:
1-They are functional
2- You can get creative and place them virtually anywhere in your space
3-They keep things organized
4-They are a fun and easy DIY project

Come play with us on Pinterest, Facebook and Instagram
Join our community and Follow, Like & Share