gabrielamatilde reblogged this from heyheyok
 imjusttrynnadome-blog liked this
  ks-artsandcrafts reblogged this from heyheyok
  noahsrichmom liked this
 livthinn liked this
wonderbynature reblogged this from heyheyok
lookingtothelight liked this
 blackboxdisco liked this
  nolifestandards liked this
 kvn-nvk liked this
marslarouge liked this
colossaldreamer liked this
ohsweetylifeispretty liked this
carebearlovestodraw liked this
iisa-blog-blog liked this
just4thehealthof-it-blog liked this
winterinter liked this
tristantales liked this
ilovemacaron liked this
 i-is-dragon reblogged this from heyheyok
 funeralsforbuildings liked this
unapolgeticbyhoe reblogged this from heyheyok
 travauxpratiques liked this
 alondralondrita liked this
221bakersst reblogged this from heyheyok
ohthosebeautifullies-blog reblogged this from heyheyok
ashenedsoul-blog liked this
row-for-eternity liked this
jadejameanlees liked this
loverose02-blog liked this
essele liked this
 grooveface reblogged this from heyheyok
 kpossibles liked this
gutobernardo liked this
somethingflo reblogged this from heyheyok
blownfromthesunintothesurf-blog liked this
vokeo liked this
heyheyok posted this
- Show more notes
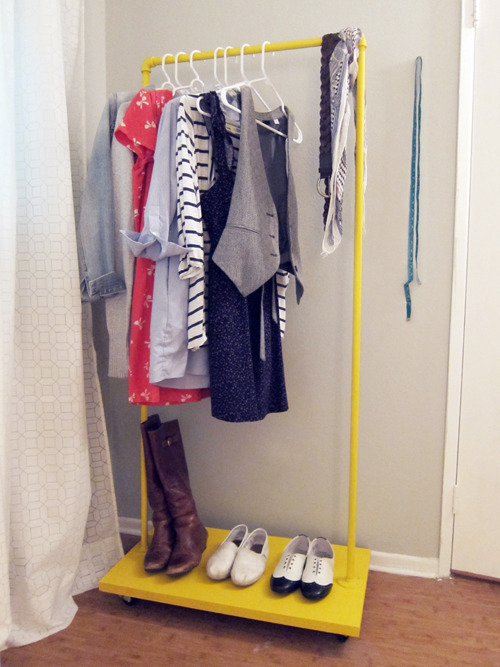
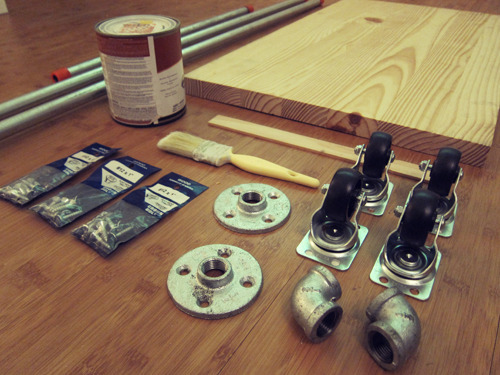
DIY : Rolling Rack
After wanting to try my hand at making a rolling rack for my room, I finally did it! I use it when I’m doing laundry, planning my outfits for the week or working on sewing projects. It’d also work great as a coat rack in an entryway. You could even place a basket on it to put shoes in. Below is my best attempt at explaining how I did it. Let me know if you end up making one! I’d love to see!
What You’ll Need:
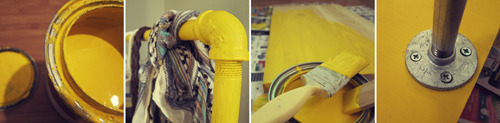
- Paint – I bought a quart and I probably only used half
- paint brush
- (1) cut of wood – mine is a little over 1" thick + 30" x 17.5" (Note: I determined my board size based on the pipe length of my smallest pipe.)
- (2) long pipes – I used ½" thick poles that are about 60" long
- (1) short pipe – I used a ½" thick pole that is about 25" long
- (2) ½" 90° elbow attachments to connect the pipes
- (2) ½" floor flanges
- (4) 2" rubber wheels with swivel plate casters
- (24) 1" screws
- screwdriver
Directions:
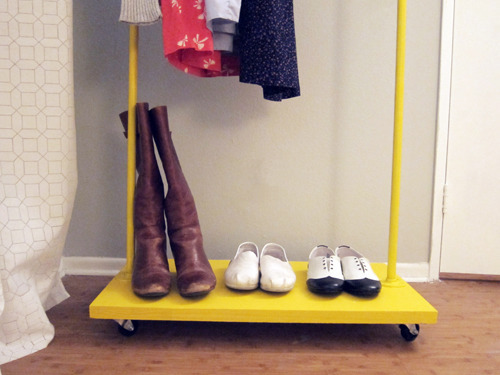
- Screw your four rubber wheels on to each corner of the board. Before I screwed them in, I made sure that the wheel wouldn’t stick out from the board at all if it rotated in any direction.
- Flip your board over and paint the top and sides of the board. Mine took a couple coats and I didn’t paint the bottom.
- Now we’re going to start connecting the three pipes to the board. (*Note: I had to clean the pipes with Goo Gone because they had a greasy residue from the hardware store on them)
- Once your board has dried, screw one of your floor flanges onto the top of the board close to the edge and centered to the width of the board.
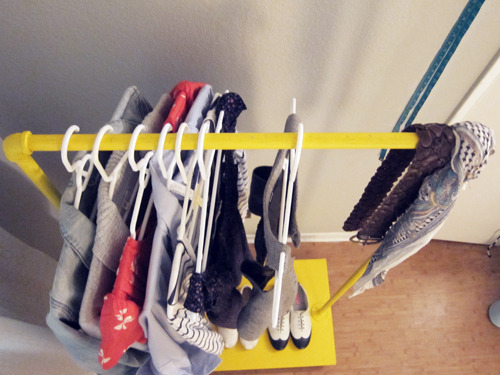
- Screw one of your long pipes into that floor flange. Then screw an elbow onto the top of that pipe. Make sure that the elbow ends up facing inward.
- Next, screw the smallest pipe into that elbow. Attach the second elbow to the other end. Then attach your second long pipe to that elbow.
- So you should have all your pipes connected to each other but only connected to the board on one side.
- Screw your second floor flange onto the end of your last pipe. From there you can place the flange on the board opposite the other and screw it to the board.
- Last step is to paint the pipe and all the pipe hardware. This took a couple coats of paint for me and I had to touch up a bunch of places as it dried.
- Let it all dry and you’re ready to start hanging!
TOTAL COST = around $50